Guia de início rápido: criar um assistente de voz personalizado
Neste início rápido, você usará o SDK de fala para criar um aplicativo de assistente de voz personalizado que se conecta a um bot que você já criou e configurou. Se você precisar criar um bot, consulte o tutorial relacionado para obter um guia mais abrangente.
Depois de satisfazer alguns pré-requisitos, conectar seu assistente de voz personalizado leva apenas algumas etapas:
- Crie um
BotFrameworkConfigobjeto a partir da sua chave de subscrição e região. - Crie um
DialogServiceConnectorobjeto usando oBotFrameworkConfigobjeto de cima. - Usando o
DialogServiceConnectorobjeto, inicie o processo de escuta de um único enunciado. - Inspecione o
ActivityReceivedEventArgsdevolvido.
Nota
O Speech SDK para C++, JavaScript, Objective-C, Python e Swift suporta assistentes de voz personalizados, mas ainda não incluímos um guia aqui.
Você pode visualizar ou baixar todos os exemplos de C# do SDK de fala no GitHub.
Pré-requisitos
Antes de começar, certifique-se de:
- Criar um recurso de Fala
- Configure seu ambiente de desenvolvimento e crie um projeto vazio
- Criar um bot conectado ao canal Direct Line Speech
- Certifique-se de que tem acesso a um microfone para captura de áudio
Nota
Consulte a lista de regiões suportadas para assistentes de voz e certifique-se de que seus recursos sejam implantados em uma dessas regiões.
Abra seu projeto no Visual Studio
A primeira etapa é certificar-se de que você tem seu projeto aberto no Visual Studio.
Comece com algum código clichê
Vamos adicionar algum código que funciona como um esqueleto para o nosso projeto.
No Gerenciador de Soluções, abra
MainPage.xamlo .Na exibição XAML do designer, substitua todo o conteúdo pelo seguinte trecho que define uma interface de usuário rudimentar:
<Page
    x:Class="helloworld.MainPage"
    xmlns="http://schemas.microsoft.com/winfx/2006/xaml/presentation"
    xmlns:x="http://schemas.microsoft.com/winfx/2006/xaml"
    xmlns:local="using:helloworld"
    xmlns:d="http://schemas.microsoft.com/expression/blend/2008"
    xmlns:mc="http://schemas.openxmlformats.org/markup-compatibility/2006"
    mc:Ignorable="d"
    Background="{ThemeResource ApplicationPageBackgroundThemeBrush}">

    <Grid>
        <StackPanel Orientation="Vertical" HorizontalAlignment="Center"
                    Margin="20,50,0,0" VerticalAlignment="Center" Width="800">
            <Button x:Name="EnableMicrophoneButton" Content="Enable Microphone"
                    Margin="0,0,10,0" Click="EnableMicrophone_ButtonClicked"
                    Height="35"/>
            <Button x:Name="ListenButton" Content="Talk to your bot"
                    Margin="0,10,10,0" Click="ListenButton_ButtonClicked"
                    Height="35"/>
            <StackPanel x:Name="StatusPanel" Orientation="Vertical"
                        RelativePanel.AlignBottomWithPanel="True"
                        RelativePanel.AlignRightWithPanel="True"
                        RelativePanel.AlignLeftWithPanel="True">
                <TextBlock x:Name="StatusLabel" Margin="0,10,10,0"
                           TextWrapping="Wrap" Text="Status:" FontSize="20"/>
                <Border x:Name="StatusBorder" Margin="0,0,0,0">
                    <ScrollViewer VerticalScrollMode="Auto"
                                  VerticalScrollBarVisibility="Auto" MaxHeight="200">
                        <!-- Use LiveSetting to enable screen readers to announce
                             the status update. -->
                        <TextBlock
                            x:Name="StatusBlock" FontWeight="Bold"
                            AutomationProperties.LiveSetting="Assertive"
                            MaxWidth="{Binding ElementName=Splitter, Path=ActualWidth}"
                            Margin="10,10,10,20" TextWrapping="Wrap"  />
                    </ScrollViewer>
                </Border>
            </StackPanel>
        </StackPanel>
        <MediaElement x:Name="mediaElement"/>
    </Grid>
</Page>
A visualização Design é atualizada para mostrar a interface do usuário do aplicativo.
- No Gerenciador de Soluções, abra o arquivo
MainPage.xaml.csde origem code-behind . (Está agrupado emMainPage.xaml.) Substitua o conteúdo deste arquivo pelo abaixo, que inclui:
usinginstruções para osSpeechnamespaces eSpeech.DialogUma implementação simples para garantir o acesso ao microfone, ligado a um manipulador de botões
Auxiliares básicos da interface do usuário para apresentar mensagens e erros no aplicativo
Um ponto de aterrissagem para o caminho do código de inicialização que será preenchido posteriormente
Um auxiliar para reproduzir texto em fala (sem suporte de streaming)
Um manipulador de botão vazio para começar a ouvir que será preenchido mais tarde
using Microsoft.CognitiveServices.Speech;
using Microsoft.CognitiveServices.Speech.Audio;
using Microsoft.CognitiveServices.Speech.Dialog;
using System;
using System.Diagnostics;
using System.IO;
using System.Text;
using Windows.Foundation;
using Windows.Storage.Streams;
using Windows.UI.Xaml;
using Windows.UI.Xaml.Controls;
using Windows.UI.Xaml.Media;

namespace helloworld
{
    public sealed partial class MainPage : Page
    {
        private DialogServiceConnector connector;

        private enum NotifyType
        {
            StatusMessage,
            ErrorMessage
        };

        public MainPage()
        {
            this.InitializeComponent();
        }

        private async void EnableMicrophone_ButtonClicked(
            object sender, RoutedEventArgs e)
        {
            bool isMicAvailable = true;
            try
            {
                var mediaCapture = new Windows.Media.Capture.MediaCapture();
                var settings =
                    new Windows.Media.Capture.MediaCaptureInitializationSettings();
                settings.StreamingCaptureMode =
                    Windows.Media.Capture.StreamingCaptureMode.Audio;
                await mediaCapture.InitializeAsync(settings);
            }
            catch (Exception)
            {
                isMicAvailable = false;
            }
            if (!isMicAvailable)
            {
                await Windows.System.Launcher.LaunchUriAsync(
                    new Uri("ms-settings:privacy-microphone"));
            }
            else
            {
                NotifyUser("Microphone was enabled", NotifyType.StatusMessage);
            }
        }

        private void NotifyUser(
            string strMessage, NotifyType type = NotifyType.StatusMessage)
        {
            // If called from the UI thread, then update immediately.
            // Otherwise, schedule a task on the UI thread to perform the update.
            if (Dispatcher.HasThreadAccess)
            {
                UpdateStatus(strMessage, type);
            }
            else
            {
                var task = Dispatcher.RunAsync(
                    Windows.UI.Core.CoreDispatcherPriority.Normal,
                    () => UpdateStatus(strMessage, type));
            }
        }

        private void UpdateStatus(string strMessage, NotifyType type)
        {
            switch (type)
            {
                case NotifyType.StatusMessage:
                    StatusBorder.Background = new SolidColorBrush(
                        Windows.UI.Colors.Green);
                    break;
                case NotifyType.ErrorMessage:
                    StatusBorder.Background = new SolidColorBrush(
                        Windows.UI.Colors.Red);
                    break;
            }
            StatusBlock.Text += string.IsNullOrEmpty(StatusBlock.Text)
                ? strMessage : "\n" + strMessage;

            if (!string.IsNullOrEmpty(StatusBlock.Text))
            {
                StatusBorder.Visibility = Visibility.Visible;
                StatusPanel.Visibility = Visibility.Visible;
            }
            else
            {
                StatusBorder.Visibility = Visibility.Collapsed;
                StatusPanel.Visibility = Visibility.Collapsed;
            }
            // Raise an event if necessary to enable a screen reader
            // to announce the status update.
            var peer = Windows.UI.Xaml.Automation.Peers.FrameworkElementAutomationPeer.FromElement(StatusBlock);
            if (peer != null)
            {
                peer.RaiseAutomationEvent(
                    Windows.UI.Xaml.Automation.Peers.AutomationEvents.LiveRegionChanged);
            }
        }

        // Waits for and accumulates all audio associated with a given
        // PullAudioOutputStream and then plays it to the MediaElement. Long spoken
        // audio will create extra latency and a streaming playback solution
        // (that plays audio while it continues to be received) should be used --
        // see the samples for examples of this.
        private void SynchronouslyPlayActivityAudio(
            PullAudioOutputStream activityAudio)
        {
            var playbackStreamWithHeader = new MemoryStream();
            playbackStreamWithHeader.Write(Encoding.ASCII.GetBytes("RIFF"), 0, 4); // ChunkID
            playbackStreamWithHeader.Write(BitConverter.GetBytes(UInt32.MaxValue), 0, 4); // ChunkSize: max
            playbackStreamWithHeader.Write(Encoding.ASCII.GetBytes("WAVE"), 0, 4); // Format
            playbackStreamWithHeader.Write(Encoding.ASCII.GetBytes("fmt "), 0, 4); // Subchunk1ID
            playbackStreamWithHeader.Write(BitConverter.GetBytes(16), 0, 4); // Subchunk1Size: PCM
            playbackStreamWithHeader.Write(BitConverter.GetBytes(1), 0, 2); // AudioFormat: PCM
            playbackStreamWithHeader.Write(BitConverter.GetBytes(1), 0, 2); // NumChannels: mono
            playbackStreamWithHeader.Write(BitConverter.GetBytes(16000), 0, 4); // SampleRate: 16kHz
            playbackStreamWithHeader.Write(BitConverter.GetBytes(32000), 0, 4); // ByteRate
            playbackStreamWithHeader.Write(BitConverter.GetBytes(2), 0, 2); // BlockAlign
            playbackStreamWithHeader.Write(BitConverter.GetBytes(16), 0, 2); // BitsPerSample: 16-bit
            playbackStreamWithHeader.Write(Encoding.ASCII.GetBytes("data"), 0, 4); // Subchunk2ID
            playbackStreamWithHeader.Write(BitConverter.GetBytes(UInt32.MaxValue), 0, 4); // Subchunk2Size

            byte[] pullBuffer = new byte[2056];

            uint lastRead = 0;
            do
            {
                lastRead = activityAudio.Read(pullBuffer);
                playbackStreamWithHeader.Write(pullBuffer, 0, (int)lastRead);
            }
            while (lastRead == pullBuffer.Length);

            var task = Dispatcher.RunAsync(
                Windows.UI.Core.CoreDispatcherPriority.Normal, () =>
            {
                mediaElement.SetSource(
                    playbackStreamWithHeader.AsRandomAccessStream(), "audio/wav");
                mediaElement.Play();
            });
        }

        private void InitializeDialogServiceConnector()
        {
            // New code will go here
        }

        private async void ListenButton_ButtonClicked(
            object sender, RoutedEventArgs e)
        {
            // New code will go here
        }
    }
}
Adicione o seguinte trecho de código ao corpo do
InitializeDialogServiceConnectormétodo de . Este código cria o com as informações daDialogServiceConnectorsua subscrição.// Create a BotFrameworkConfig by providing a Speech service subscription key // the botConfig.Language property is optional (default en-US) const string speechSubscriptionKey = "YourSpeechSubscriptionKey"; // Your subscription key const string region = "YourServiceRegion"; // Your subscription service region. var botConfig = BotFrameworkConfig.FromSubscription(speechSubscriptionKey, region); botConfig.Language = "en-US"; connector = new DialogServiceConnector(botConfig);Nota
Consulte a lista de regiões suportadas para assistentes de voz e certifique-se de que seus recursos sejam implantados em uma dessas regiões.
Nota
Para obter informações sobre como configurar seu bot, consulte a documentação do Bot Framework para o canal Direct Line Speech.
Substitua as cadeias de
YourSpeechSubscriptionKeycaracteres eYourServiceRegionpor seus próprios valores para sua assinatura de fala e região.Anexe o seguinte trecho de código ao final do corpo do método de
InitializeDialogServiceConnector. Esse código configura manipuladores para eventos usados paraDialogServiceConnectorcomunicar suas atividades de bot, resultados de reconhecimento de fala e outras informações.// ActivityReceived is the main way your bot will communicate with the client // and uses bot framework activities connector.ActivityReceived += (sender, activityReceivedEventArgs) => { NotifyUser( $"Activity received, hasAudio={activityReceivedEventArgs.HasAudio} activity={activityReceivedEventArgs.Activity}"); if (activityReceivedEventArgs.HasAudio) { SynchronouslyPlayActivityAudio(activityReceivedEventArgs.Audio); } }; // Canceled will be signaled when a turn is aborted or experiences an error condition connector.Canceled += (sender, canceledEventArgs) => { NotifyUser($"Canceled, reason={canceledEventArgs.Reason}"); if (canceledEventArgs.Reason == CancellationReason.Error) { NotifyUser( $"Error: code={canceledEventArgs.ErrorCode}, details={canceledEventArgs.ErrorDetails}"); } }; // Recognizing (not 'Recognized') will provide the intermediate recognized text // while an audio stream is being processed connector.Recognizing += (sender, recognitionEventArgs) => { NotifyUser($"Recognizing! in-progress text={recognitionEventArgs.Result.Text}"); }; // Recognized (not 'Recognizing') will provide the final recognized text // once audio capture is completed connector.Recognized += (sender, recognitionEventArgs) => { NotifyUser($"Final speech to text result: '{recognitionEventArgs.Result.Text}'"); }; // SessionStarted will notify when audio begins flowing to the service for a turn connector.SessionStarted += (sender, sessionEventArgs) => { NotifyUser($"Now Listening! Session started, id={sessionEventArgs.SessionId}"); }; // SessionStopped will notify when a turn is complete and // it's safe to begin listening again connector.SessionStopped += (sender, sessionEventArgs) => { NotifyUser($"Listening complete. Session ended, id={sessionEventArgs.SessionId}"); };Adicione o seguinte trecho de código ao corpo do
ListenButton_ButtonClickedmétodo naMainPageclasse. Esse código é configuradoDialogServiceConnectorpara ouvir, uma vez que você já estabeleceu a configuração e registrou os manipuladores de eventos.if (connector == null) { InitializeDialogServiceConnector(); // Optional step to speed up first interaction: if not called, // connection happens automatically on first use var connectTask = connector.ConnectAsync(); } try { // Start sending audio to your speech-enabled bot var listenTask = connector.ListenOnceAsync(); // You can also send activities to your bot as JSON strings -- // Microsoft.Bot.Schema can simplify this string speakActivity = @"{""type"":""message"",""text"":""Greeting Message"", ""speak"":""Hello there!""}"; await connector.SendActivityAsync(speakActivity); } catch (Exception ex) { NotifyUser($"Exception: {ex.ToString()}", NotifyType.ErrorMessage); }
Crie e execute seu aplicativo
Agora você está pronto para criar seu aplicativo e testar seu assistente de voz personalizado usando o serviço de fala.
Na barra de menus, escolha Build>Build Solution para criar o aplicativo. Agora o código deverá ser compilado sem erros.
Escolha Depurar>Iniciar Depuração (ou pressione F5) para iniciar o aplicativo. A janela helloworld é exibida.
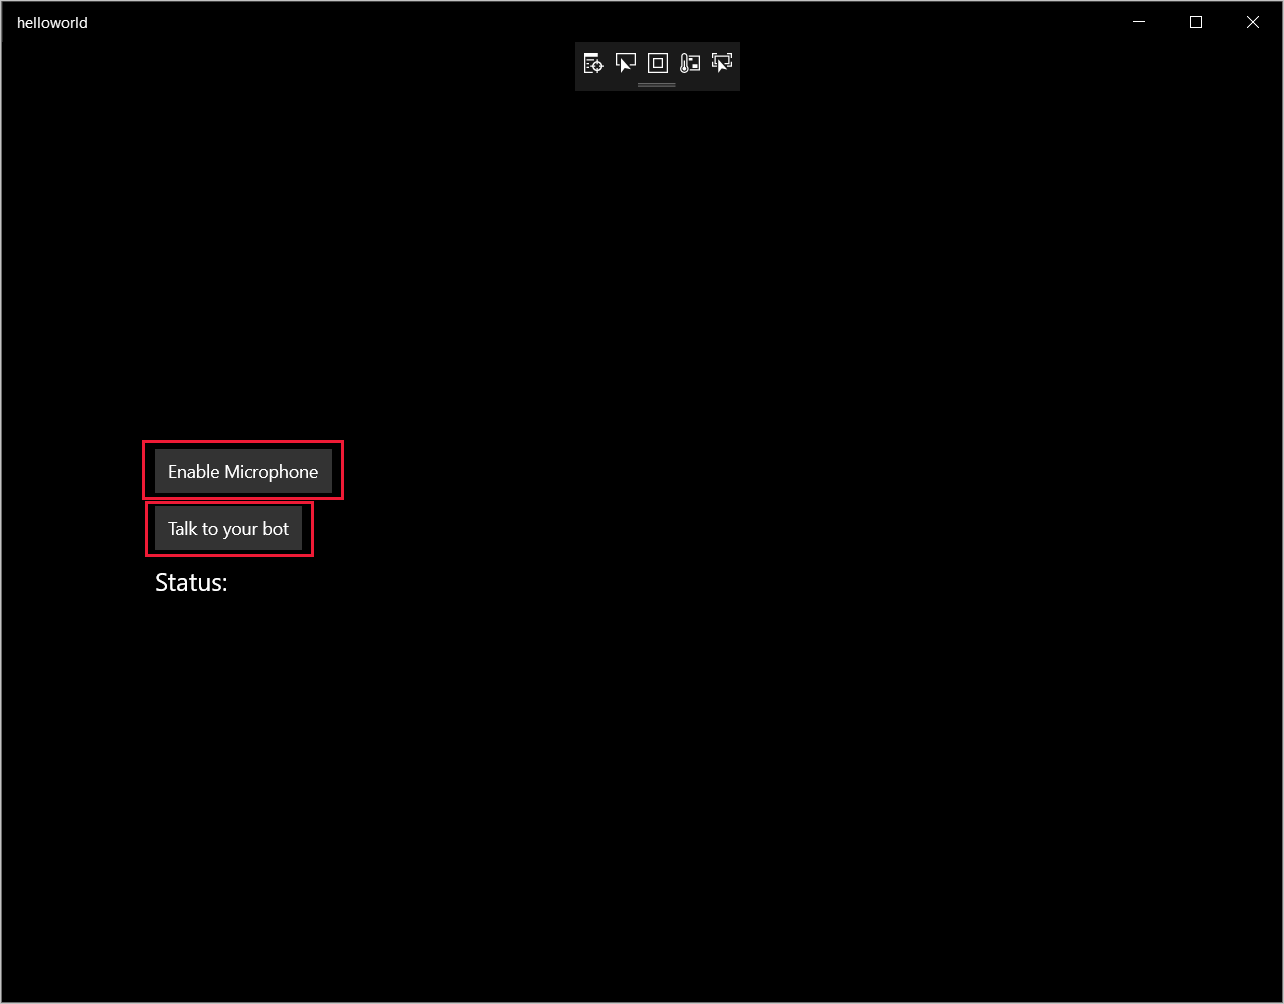
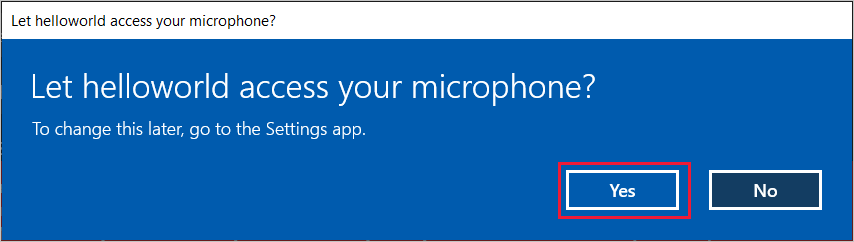
Selecione Ativar microfone e, quando a solicitação de permissão de acesso aparecer, selecione Sim.
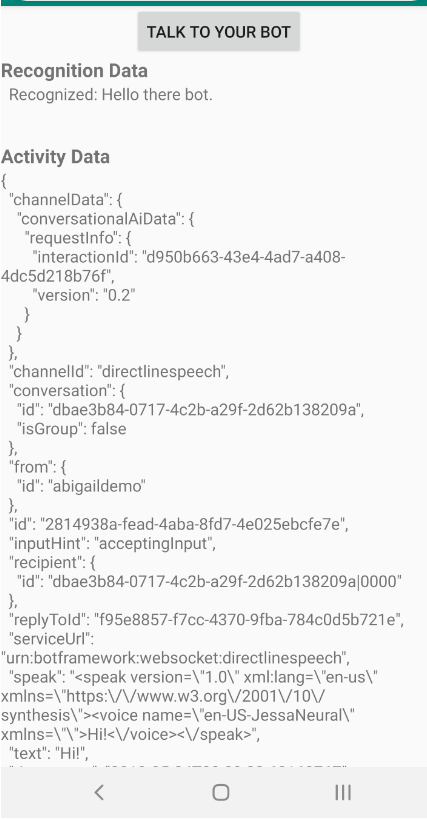
Selecione Fale com seu bot e fale uma frase ou frase em inglês no microfone do seu dispositivo. Sua fala é transmitida para o canal Direct Line Speech e transcrita para texto, que aparece na janela.
Próximos passos
Você pode visualizar ou baixar todos os exemplos Java do Speech SDK no GitHub.
Escolha o seu ambiente de destino
Pré-requisitos
Antes de começar, certifique-se de:
- Criar um recurso de Fala
- Configure seu ambiente de desenvolvimento e crie um projeto vazio
- Criar um bot conectado ao canal Direct Line Speech
- Certifique-se de que tem acesso a um microfone para captura de áudio
Nota
Consulte a lista de regiões suportadas para assistentes de voz e certifique-se de que seus recursos sejam implantados em uma dessas regiões.
Criar e configurar o projeto
Crie um projeto Eclipse e instale o SDK de fala.
Além disso, para habilitar o registro, atualize o arquivo pom.xml para incluir a seguinte dependência:
 <dependency>
     <groupId>org.slf4j</groupId>
     <artifactId>slf4j-simple</artifactId>
     <version>1.7.5</version>
 </dependency>
Adicionar código de exemplo
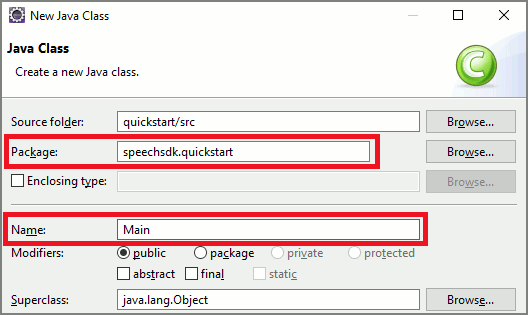
Para adicionar uma nova classe vazia ao seu projeto Java, selecione Ficheiro>Novo>Classe.
Na janela Nova classe Java, digite speechsdk.quickstart no campo Pacote e Main no campo Nome.
Abra a classe recém-criada
Maine substitua oMain.javaconteúdo do arquivo pelo seguinte código inicial:package speechsdk.quickstart; import com.microsoft.cognitiveservices.speech.audio.AudioConfig; import com.microsoft.cognitiveservices.speech.audio.PullAudioOutputStream; import com.microsoft.cognitiveservices.speech.dialog.BotFrameworkConfig; import com.microsoft.cognitiveservices.speech.dialog.DialogServiceConnector; import org.slf4j.Logger; import org.slf4j.LoggerFactory; import javax.sound.sampled.AudioFormat; import javax.sound.sampled.AudioSystem; import javax.sound.sampled.DataLine; import javax.sound.sampled.SourceDataLine; import java.io.InputStream; public class Main { final Logger log = LoggerFactory.getLogger(Main.class); public static void main(String[] args) { // New code will go here } private void playAudioStream(PullAudioOutputStream audio) { ActivityAudioStream stream = new ActivityAudioStream(audio); final ActivityAudioStream.ActivityAudioFormat audioFormat = stream.getActivityAudioFormat(); final AudioFormat format = new AudioFormat( AudioFormat.Encoding.PCM_SIGNED, audioFormat.getSamplesPerSecond(), audioFormat.getBitsPerSample(), audioFormat.getChannels(), audioFormat.getFrameSize(), audioFormat.getSamplesPerSecond(), false); try { int bufferSize = format.getFrameSize(); final byte[] data = new byte[bufferSize]; SourceDataLine.Info info = new DataLine.Info(SourceDataLine.class, format); SourceDataLine line = (SourceDataLine) AudioSystem.getLine(info); line.open(format); if (line != null) { line.start(); int nBytesRead = 0; while (nBytesRead != -1) { nBytesRead = stream.read(data); if (nBytesRead != -1) { line.write(data, 0, nBytesRead); } } line.drain(); line.stop(); line.close(); } stream.close(); } catch (Exception e) { e.printStackTrace(); } } }No método, você primeiro configura e
mainDialogServiceConfigusa para criar umaDialogServiceConnectorinstância. Esta instância se conecta ao canal Direct Line Speech para interagir com seu bot. UmaAudioConfiginstância também é usada para especificar a origem da entrada de áudio. Neste exemplo, o microfone padrão é usado comAudioConfig.fromDefaultMicrophoneInput().- Substitua a cadeia de caracteres
YourSubscriptionKeypela chave de recurso de Fala, que você pode obter no portal do Azure. - Substitua a cadeia de caracteres
YourServiceRegionpela região associada ao recurso de fala.
Nota
Consulte a lista de regiões suportadas para assistentes de voz e certifique-se de que seus recursos sejam implantados em uma dessas regiões.
final String subscriptionKey = "YourSubscriptionKey"; // Your subscription key final String region = "YourServiceRegion"; // Your speech subscription service region final BotFrameworkConfig botConfig = BotFrameworkConfig.fromSubscription(subscriptionKey, region); // Configure audio input from a microphone. final AudioConfig audioConfig = AudioConfig.fromDefaultMicrophoneInput(); // Create a DialogServiceConnector instance. final DialogServiceConnector connector = new DialogServiceConnector(botConfig, audioConfig);- Substitua a cadeia de caracteres
O conector
DialogServiceConnectordepende de vários eventos para comunicar suas atividades de bot, resultados de reconhecimento de fala e outras informações. Adicione esses ouvintes de eventos em seguida.// Recognizing will provide the intermediate recognized text while an audio stream is being processed. connector.recognizing.addEventListener((o, speechRecognitionResultEventArgs) -> { log.info("Recognizing speech event text: {}", speechRecognitionResultEventArgs.getResult().getText()); }); // Recognized will provide the final recognized text once audio capture is completed. connector.recognized.addEventListener((o, speechRecognitionResultEventArgs) -> { log.info("Recognized speech event reason text: {}", speechRecognitionResultEventArgs.getResult().getText()); }); // SessionStarted will notify when audio begins flowing to the service for a turn. connector.sessionStarted.addEventListener((o, sessionEventArgs) -> { log.info("Session Started event id: {} ", sessionEventArgs.getSessionId()); }); // SessionStopped will notify when a turn is complete and it's safe to begin listening again. connector.sessionStopped.addEventListener((o, sessionEventArgs) -> { log.info("Session stopped event id: {}", sessionEventArgs.getSessionId()); }); // Canceled will be signaled when a turn is aborted or experiences an error condition. connector.canceled.addEventListener((o, canceledEventArgs) -> { log.info("Canceled event details: {}", canceledEventArgs.getErrorDetails()); connector.disconnectAsync(); }); // ActivityReceived is the main way your bot will communicate with the client and uses Bot Framework activities. connector.activityReceived.addEventListener((o, activityEventArgs) -> { final String act = activityEventArgs.getActivity().serialize(); log.info("Received activity {} audio", activityEventArgs.hasAudio() ? "with" : "without"); if (activityEventArgs.hasAudio()) { playAudioStream(activityEventArgs.getAudio()); } });Conecte-se
DialogServiceConnectorao Direct Line Speech invocando oconnectAsync()método. Para testar seu bot, você pode invocar o método para enviar entradalistenOnceAsyncde áudio do microfone. Além disso, você também pode usar osendActivityAsyncmétodo para enviar uma atividade personalizada como uma cadeia de caracteres serializada. Essas atividades personalizadas podem fornecer dados adicionais que seu bot usa na conversa.connector.connectAsync(); // Start listening. System.out.println("Say something ..."); connector.listenOnceAsync(); // connector.sendActivityAsync(...)Salve as
Mainalterações no arquivo.Para suportar a reprodução de resposta, adicione uma classe adicional que transforme o objeto PullAudioOutputStream retornado da API getAudio() em um Java InputStream para facilitar o manuseio. Esta
ActivityAudioStreamé uma classe especializada que lida com a resposta de áudio do canal Direct Line Speech. Ele fornece acessadores para buscar informações de formato de áudio que são necessárias para lidar com a reprodução. Para isso, selecione Arquivo>Nova>Classe.Na janela New Java Class, digite speechsdk.quickstart no campo Package e ActivityAudioStream no campo Name.
Abra a classe recém-criada
ActivityAudioStreame substitua-a pelo seguinte código:package com.speechsdk.quickstart; import com.microsoft.cognitiveservices.speech.audio.PullAudioOutputStream; import java.io.IOException; import java.io.InputStream; public final class ActivityAudioStream extends InputStream { /** * The number of samples played per second (16 kHz). */ public static final long SAMPLE_RATE = 16000; /** * The number of bits in each sample of a sound that has this format (16 bits). */ public static final int BITS_PER_SECOND = 16; /** * The number of audio channels in this format (1 for mono). */ public static final int CHANNELS = 1; /** * The number of bytes in each frame of a sound that has this format (2). */ public static final int FRAME_SIZE = 2; /** * Reads up to a specified maximum number of bytes of data from the audio * stream, putting them into the given byte array. * * @param b the buffer into which the data is read * @param off the offset, from the beginning of array <code>b</code>, at which * the data will be written * @param len the maximum number of bytes to read * @return the total number of bytes read into the buffer, or -1 if there * is no more data because the end of the stream has been reached */ @Override public int read(byte[] b, int off, int len) { byte[] tempBuffer = new byte[len]; int n = (int) this.pullStreamImpl.read(tempBuffer); for (int i = 0; i < n; i++) { if (off + i > b.length) { throw new ArrayIndexOutOfBoundsException(b.length); } b[off + i] = tempBuffer[i]; } if (n == 0) { return -1; } return n; } /** * Reads the next byte of data from the activity audio stream if available. * * @return the next byte of data, or -1 if the end of the stream is reached * @see #read(byte[], int, int) * @see #read(byte[]) * @see #available * <p> */ @Override public int read() { byte[] data = new byte[1]; int temp = read(data); if (temp <= 0) { // we have a weird situation if read(byte[]) returns 0! return -1; } return data[0] & 0xFF; } /** * Reads up to a specified maximum number of bytes of data from the activity audio stream, * putting them into the given byte array. * * @param b the buffer into which the data is read * @return the total number of bytes read into the buffer, or -1 if there * is no more data because the end of the stream has been reached */ @Override public int read(byte[] b) { int n = (int) pullStreamImpl.read(b); if (n == 0) { return -1; } return n; } /** * Skips over and discards a specified number of bytes from this * audio input stream. * * @param n the requested number of bytes to be skipped * @return the actual number of bytes skipped * @throws IOException if an input or output error occurs * @see #read * @see #available */ @Override public long skip(long n) { if (n <= 0) { return 0; } if (n <= Integer.MAX_VALUE) { byte[] tempBuffer = new byte[(int) n]; return read(tempBuffer); } long count = 0; for (long i = n; i > 0; i -= Integer.MAX_VALUE) { int size = (int) Math.min(Integer.MAX_VALUE, i); byte[] tempBuffer = new byte[size]; count += read(tempBuffer); } return count; } /** * Closes this audio input stream and releases any system resources associated * with the stream. */ @Override public void close() { this.pullStreamImpl.close(); } /** * Fetch the audio format for the ActivityAudioStream. The ActivityAudioFormat defines the sample rate, bits per sample, and the # channels. * * @return instance of the ActivityAudioFormat associated with the stream */ public ActivityAudioStream.ActivityAudioFormat getActivityAudioFormat() { return activityAudioFormat; } /** * Returns the maximum number of bytes that can be read (or skipped over) from this * audio input stream without blocking. * * @return the number of bytes that can be read from this audio input stream without blocking. * As this implementation does not buffer, this will be defaulted to 0 */ @Override public int available() { return 0; } public ActivityAudioStream(final PullAudioOutputStream stream) { pullStreamImpl = stream; this.activityAudioFormat = new ActivityAudioStream.ActivityAudioFormat(SAMPLE_RATE, BITS_PER_SECOND, CHANNELS, FRAME_SIZE, AudioEncoding.PCM_SIGNED); } private PullAudioOutputStream pullStreamImpl; private ActivityAudioFormat activityAudioFormat; /** * ActivityAudioFormat is an internal format which contains metadata regarding the type of arrangement of * audio bits in this activity audio stream. */ static class ActivityAudioFormat { private long samplesPerSecond; private int bitsPerSample; private int channels; private int frameSize; private AudioEncoding encoding; public ActivityAudioFormat(long samplesPerSecond, int bitsPerSample, int channels, int frameSize, AudioEncoding encoding) { this.samplesPerSecond = samplesPerSecond; this.bitsPerSample = bitsPerSample; this.channels = channels; this.encoding = encoding; this.frameSize = frameSize; } /** * Fetch the number of samples played per second for the associated audio stream format. * * @return the number of samples played per second */ public long getSamplesPerSecond() { return samplesPerSecond; } /** * Fetch the number of bits in each sample of a sound that has this audio stream format. * * @return the number of bits per sample */ public int getBitsPerSample() { return bitsPerSample; } /** * Fetch the number of audio channels used by this audio stream format. * * @return the number of channels */ public int getChannels() { return channels; } /** * Fetch the default number of bytes in a frame required by this audio stream format. * * @return the number of bytes */ public int getFrameSize() { return frameSize; } /** * Fetch the audio encoding type associated with this audio stream format. * * @return the encoding associated */ public AudioEncoding getEncoding() { return encoding; } } /** * Enum defining the types of audio encoding supported by this stream. */ public enum AudioEncoding { PCM_SIGNED("PCM_SIGNED"); String value; AudioEncoding(String value) { this.value = value; } } }Salve as
ActivityAudioStreamalterações no arquivo.
Compilar e executar a aplicação
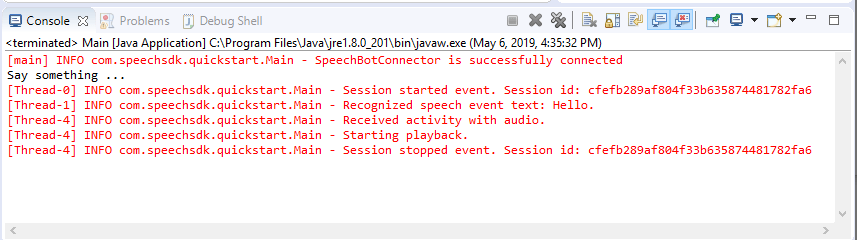
Selecione F11 ou selecione Executar>depuração.
O console exibe a mensagem "Diga algo". Neste ponto, fale uma frase em inglês que seu bot possa entender. A sua fala é transmitida para o seu bot através do canal Direct Line Speech, onde é reconhecida e processada pelo seu bot. A resposta é retornada como uma atividade. Se o bot retornar a fala como resposta, o áudio será reproduzido usando a AudioPlayer classe.
Próximos passos

Você pode visualizar ou baixar todos os exemplos do Speech SDK Go no GitHub.
Pré-requisitos
Antes de começar:
- Criar um recurso de Fala
- Configure seu ambiente de desenvolvimento e crie um projeto vazio
- Criar um bot conectado ao canal Direct Line Speech
- Certifique-se de que tem acesso a um microfone para captura de áudio
Nota
Consulte a lista de regiões suportadas para assistentes de voz e certifique-se de que seus recursos sejam implantados em uma dessas regiões.
Configure seu ambiente
Atualize o arquivo go.mod com a versão mais recente do SDK adicionando esta linha
require (
    github.com/Microsoft/cognitive-services-speech-sdk-go v1.15.0
)
Comece com algum código clichê
Substitua o conteúdo do seu ficheiro de origem (por exemplo quickstart.go) pelo seguinte, que inclui:
- Definição de pacote "principal"
- importando os módulos necessários do Speech SDK
- variáveis para armazenar as informações do bot que serão substituídas posteriormente neste início rápido
- uma implementação simples usando o microfone para entrada de áudio
- manipuladores de eventos para vários eventos que ocorrem durante uma interação de fala
package main

import (
    "fmt"
    "time"

    "github.com/Microsoft/cognitive-services-speech-sdk-go/audio"
    "github.com/Microsoft/cognitive-services-speech-sdk-go/dialog"
    "github.com/Microsoft/cognitive-services-speech-sdk-go/speech"
)

func main() {
    subscription :=  "YOUR_SUBSCRIPTION_KEY"
    region := "YOUR_BOT_REGION"

    audioConfig, err := audio.NewAudioConfigFromDefaultMicrophoneInput()
    if err != nil {
        fmt.Println("Got an error: ", err)
        return
    }
    defer audioConfig.Close()
    config, err := dialog.NewBotFrameworkConfigFromSubscription(subscription, region)
    if err != nil {
        fmt.Println("Got an error: ", err)
        return
    }
    defer config.Close()
    connector, err := dialog.NewDialogServiceConnectorFromConfig(config, audioConfig)
    if err != nil {
        fmt.Println("Got an error: ", err)
        return
    }
    defer connector.Close()
    activityReceivedHandler := func(event dialog.ActivityReceivedEventArgs) {
        defer event.Close()
        fmt.Println("Received an activity.")
    }
    connector.ActivityReceived(activityReceivedHandler)
    recognizedHandle := func(event speech.SpeechRecognitionEventArgs) {
        defer event.Close()
        fmt.Println("Recognized ", event.Result.Text)
    }
    connector.Recognized(recognizedHandle)
    recognizingHandler := func(event speech.SpeechRecognitionEventArgs) {
        defer event.Close()
        fmt.Println("Recognizing ", event.Result.Text)
    }
    connector.Recognizing(recognizingHandler)
    connector.ListenOnceAsync()
    <-time.After(10 * time.Second)
}
Substitua os YOUR_SUBSCRIPTION_KEY valores e por YOUR_BOT_REGION valores reais do recurso Fala.
Navegue até o portal do Azure e abra seu recurso de Fala
Em Chaves e Ponto de Extremidade à esquerda, há duas chaves de assinatura disponíveis
- Use qualquer um deles como substituição de
YOUR_SUBSCRIPTION_KEYvalor
- Use qualquer um deles como substituição de
Em Visão geral à esquerda, anote a região e mapeie-a para o identificador de região
- Use o identificador de região como a substituição de
YOUR_BOT_REGIONvalor, por exemplo:"westus"para West US
Nota
Consulte a lista de regiões suportadas para assistentes de voz e certifique-se de que seus recursos sejam implantados em uma dessas regiões.
Nota
Para obter informações sobre como configurar seu bot, consulte a documentação do Bot Framework para o canal Direct Line Speech.
- Use o identificador de região como a substituição de
Explicação do código
A chave e a região de assinatura de fala são necessárias para criar um objeto de configuração de fala. O objeto de configuração é necessário para instanciar um objeto de reconhecimento de fala.
A instância do reconhecedor expõe várias maneiras de reconhecer a fala. Neste exemplo, a fala é continuamente reconhecida. Essa funcionalidade permite que o serviço de Fala saiba que você está enviando muitas frases para reconhecimento e, quando o programa for encerrado, pare de reconhecer a fala. À medida que os resultados são produzidos, o código irá gravá-los no console.
Compilar e executar
Agora você está configurado para criar seu projeto e testar seu assistente de voz personalizado usando o serviço de fala.
- Construa o seu projeto, por exemplo , "vá construir"
- Execute o módulo e fale uma frase ou frase no microfone do seu dispositivo. Sua fala é transmitida para o canal Direct Line Speech e transcrita para texto, que aparece como saída.
Nota
O SDK de Fala assumirá como padrão o reconhecimento usando en-us para o idioma, consulte Como reconhecer fala para obter informações sobre como escolher o idioma de origem.
Próximos passos
Suporte adicional a idiomas e plataformas
Se clicou neste separador, provavelmente não viu um início rápido na sua linguagem de programação favorita. Não se preocupe, temos materiais adicionais de início rápido e exemplos de código disponíveis no GitHub. Use a tabela para encontrar o exemplo certo para sua combinação de linguagem de programação e plataforma/sistema operacional.
| Idioma | Amostras de código |
|---|---|
| C# | .NET Framework, .NET Core, UWP, Unity |
| C++ | Windows, Linux, macOS |
| Java | Android, JRE |
| JavaScript | Navegador, Node.js |
| Objective-C | iOS, macOS |
| Python | Windows, Linux, macOS |
| Swift | iOS, macOS |