Ingest Emissions Impact dashboard data into Sustainability Manager
Microsoft Sustainability Manager integrates with the Emissions Impact dashboard through its connector framework. Organizations can use the Emissions Impact Dashboard for Azure connector to obtain the emissions data generated from their Microsoft Azure services into Microsoft Sustainability Manager. This data provides a unified view of the emissions from their operations and IT infrastructure.
Prerequisites
Azure emissions are directly related to Azure costs. As a result, the service principal used to read Azure emissions and the user who's creating the connection in Microsoft Sustainability Manager must have permission to read billing account data.
Before you can connect to the Emissions Impact Dashboard, you should complete the following steps:
Set up a service principal.
Create a new service principal in the same tenant as Microsoft Sustainability Manager.
Assign the Billing Account Reader role to the new service principal (or EnrollmentReader, if you're using an Enterprise Agreement account).
Ensure that the user who's creating the connection in Microsoft Sustainability Manager also has the Billing Account Reader role (or EnrollmentReader, if you're using an Enterprise Agreement account).
For more information, see Assign roles to Azure Enterprise Agreement service principal names.
Exercise: Ingest data from Emissions Impact Dashboard for Azure into Sustainability Manager
In this exercise, you ingest data from the Emissions Impact Dashboard for Azure into Sustainability Manager.
Task: Create a connection for Emissions Impact Dashboard for Azure connector
Your task is to create a connection for the Emissions Impact Dashboard for Azure connector by following these steps:
Sign in to the Sustainability Manager application.
Select Data > Imports from the left navigation pane.
Select New.
Select DATA PROVIDER CONNECTORS.

Select Emissions Impact Dashboard for Azure from the connectors list. Select Next.

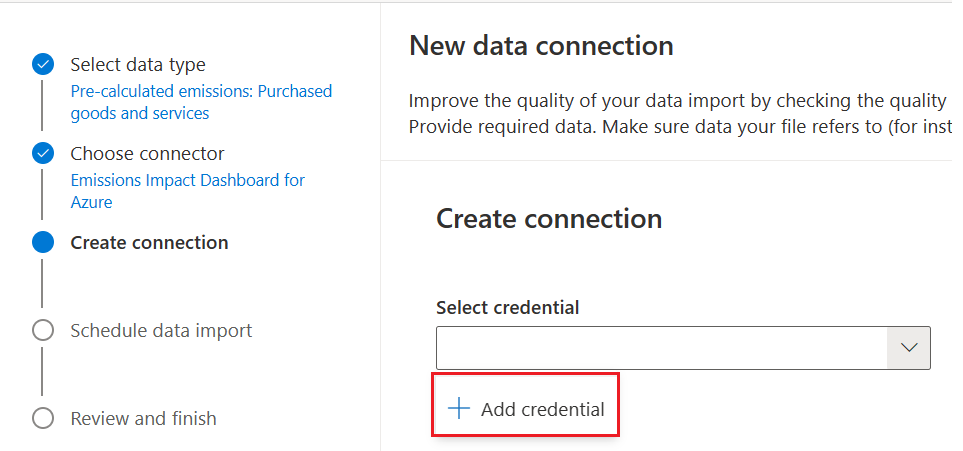
In the Create connection screen, select the Select credential dropdown and then select + Add credential. Select Next.
In the Add credentials dialog, provide the details for the fields and then select Add.

Field Information Credentials nickname User-friendly nickname Client ID Client ID of the service principal Client secret Client secret of the service principal Billing ID Billing ID of the billing account, which you can find in the Azure portal under Cost Management & Billing Organizational unit Select the organizational unit that Azure emissions should be associated with Wait until the connection creation is completed. Then, you can add more credentials, or you can move on to the next step by selecting Next.
Schedule the data refresh. The refresh can be automatic at a defined frequency or on a defined schedule.
Enter a name and then select Connect.
Select Done.


