Configure authentication in a sample WPF desktop app by using Azure AD B2C
This article uses a sample Windows Presentation Foundation (WPF) desktop application to illustrate how to add Azure Active Directory B2C (Azure AD B2C) authentication to your desktop apps.
Overview
OpenID Connect (OIDC) is an authentication protocol built on OAuth 2.0. You can use OIDC to securely sign users in to an application. This desktop app sample uses the Microsoft Authentication Library (MSAL) with OIDC authorization code Proof Key for Code Exchange (PKCE) flow. The MSAL is a Microsoft-provided library that simplifies adding authentication and authorization support to desktop apps.
The sign-in flow involves following steps:
- Users open the app and select sign-in.
- The app opens the desktop device's system browser and starts an authentication request to Azure AD B2C.
- Users sign up or sign in, reset the password, or sign in with a social account.
- After users sign in successfully, Azure AD B2C returns an authorization code to the app.
- The app takes the following actions:
- It exchanges the authorization code to an ID token, access token, and refresh token.
- It reads the ID token claims.
- It stores the tokens in an in-memory cache for later use.
App registration overview
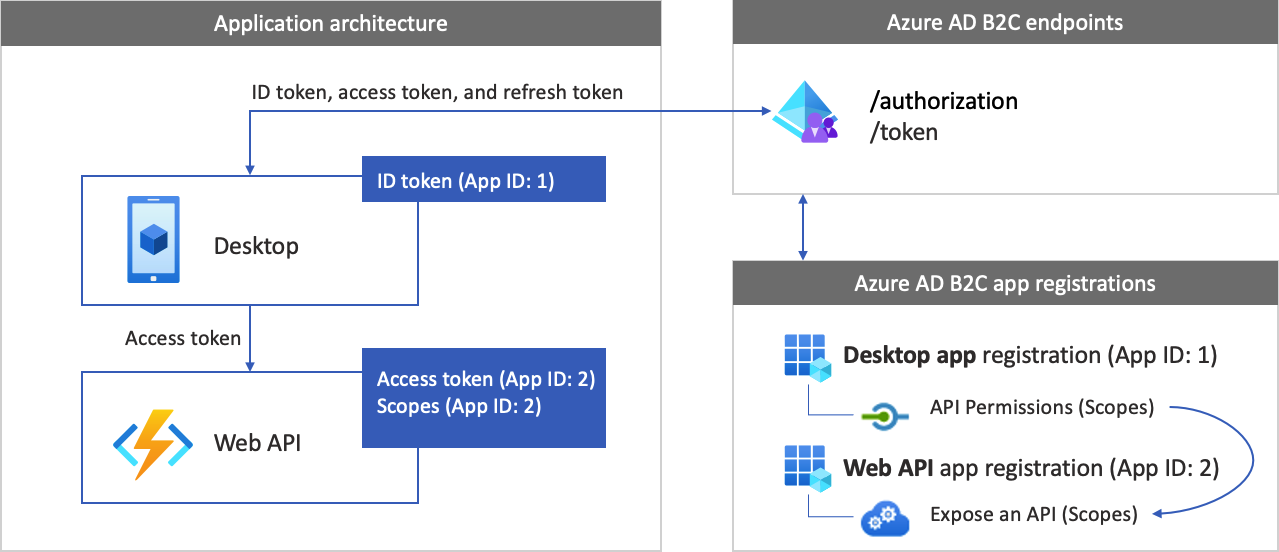
To enable your app to sign in with Azure AD B2C and call a web API, register two applications in the Azure AD B2C directory.
The desktop application registration enables your app to sign in with Azure AD B2C. During app registration, specify the Redirect URI. The redirect URI is the endpoint to which users are redirected by Azure AD B2C after they've authenticated with Azure AD B2C. The app registration process generates an application ID, also known as the client ID, which uniquely identifies your desktop app (for example, App ID: 1).
The web API registration enables your app to call a protected web API. The registration exposes the web API permissions (scopes). The app registration process generates an application ID, which uniquely identifies your web API (for example, App ID: 2). Grant your desktop app (App ID: 1) permissions to the web API scopes (App ID: 2).
The application registration and architecture are illustrated in the following diagrams:
Call to a web API
After the authentication is completed, users interact with the app, which invokes a protected web API. The web API uses bearer token authentication. The bearer token is the access token that the app obtained from Azure AD B2C. The app passes the token in the authorization header of the HTTPS request.
Authorization: Bearer <access token>
If the access token's scope doesn't match the web API's scopes, the authentication library obtains a new access token with the correct scopes.
The sign-out flow
The sign-out flow involves the following steps:
- From the app, users sign out.
- The app clears its session objects, and the authentication library clears its token cache.
- The app takes users to the Azure AD B2C sign-out endpoint to terminate the Azure AD B2C session.
- Users are redirected back to the app.
Prerequisites
A computer that's running Visual Studio 2019 with .NET desktop development.
Step 1: Configure your user flow
When users try to sign in to your app, the app starts an authentication request to the authorization endpoint via a user flow. The user flow defines and controls the user experience. After users complete the user flow, Azure AD B2C generates a token and then redirects users back to your application.
If you haven't done so already, create a user flow or a custom policy. Repeat the steps to create three separate user flows as follows:
- A combined Sign in and sign up user flow, such as
susi. This user flow also supports the Forgot your password experience. - A Profile editing user flow, such as
edit_profile. - A Password reset user flow, such as
reset_password.
Azure AD B2C prepends B2C_1_ to the user flow name. For example, susi becomes B2C_1_susi.
Step 2: Register your applications
Create the desktop app and the web API application registration, and specify the scopes of your web API.
Step 2.1: Register the web API app
To create the web API app registration (App ID: 2), follow these steps:
Sign in to the Azure portal.
Make sure you're using the directory that contains your Azure AD B2C tenant. Select the Directories + subscriptions icon in the portal toolbar.
On the Portal settings | Directories + subscriptions page, find your Azure AD B2C directory in the Directory name list, and then select Switch.
In the Azure portal, search for and select Azure AD B2C.
Select App registrations, and then select New registration.
For Name, enter a name for the application (for example, my-api1). Leave the default values for Redirect URI and Supported account types.
Select Register.
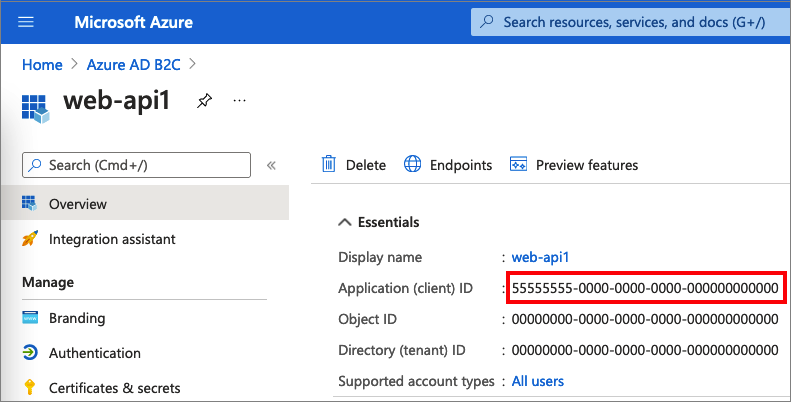
After the app registration is completed, select Overview.
Record the Application (client) ID value for later use when you configure the web application.
Step 2.2: Configure web API app scopes
Select the my-api1 application that you created (App ID: 2) to open its Overview page.
Under Manage, select Expose an API.
Next to Application ID URI, select the Set link. Replace the default value (GUID) with a unique name (for example, tasks-api), and then select Save.
When your web application requests an access token for the web API, it should add this URI as the prefix for each scope that you define for the API.
Under Scopes defined by this API, select Add a scope.
To create a scope that defines read access to the API:
- For Scope name, enter tasks.read.
- For Admin consent display name, enter Read access to tasks API.
- For Admin consent description, enter Allows read access to the tasks API.
Select Add scope.
Select Add a scope, and then add a scope that defines write access to the API:
- For Scope name, enter tasks.write.
- For Admin consent display name, enter Write access to tasks API.
- For Admin consent description, enter Allows write access to the tasks API.
Select Add scope.
Step 2.3: Register the desktop app
To create the desktop app registration, do the following:
- Sign in to the Azure portal.
- Select App registrations, and then select New registration.
- Under Name, enter a name for the application (for example, desktop-app1).
- Under Supported account types, select Accounts in any identity provider or organizational directory (for authenticating users with user flows).
- Under Redirect URI, select Public client/native (desktop & desktop) and then, in the URL box, enter
https://your-tenant-name.b2clogin.com/oauth2/nativeclient. Replaceyour-tenant-namewith your tenant name. For more options, see Configure redirect URI. - Select Register.
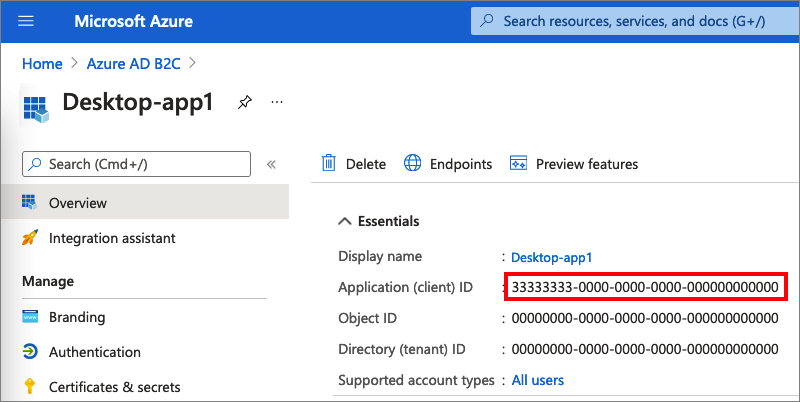
- After the app registration is completed, select Overview.
- Record the Application (client) ID for later use, when you configure the desktop application.
Step 2.4: Grant the desktop app permissions for the web API
To grant your app (App ID: 1) permissions, follow these steps:
Select App registrations, and then select the app that you created (App ID: 1).
Under Manage, select API permissions.
Under Configured permissions, select Add a permission.
Select the My APIs tab.
Select the API (App ID: 2) to which the web application should be granted access. For example, enter my-api1.
Under Permission, expand tasks, and then select the scopes that you defined earlier (for example, tasks.read and tasks.write).
Select Add permissions.
Select Grant admin consent for <your tenant name>.
Select Yes.
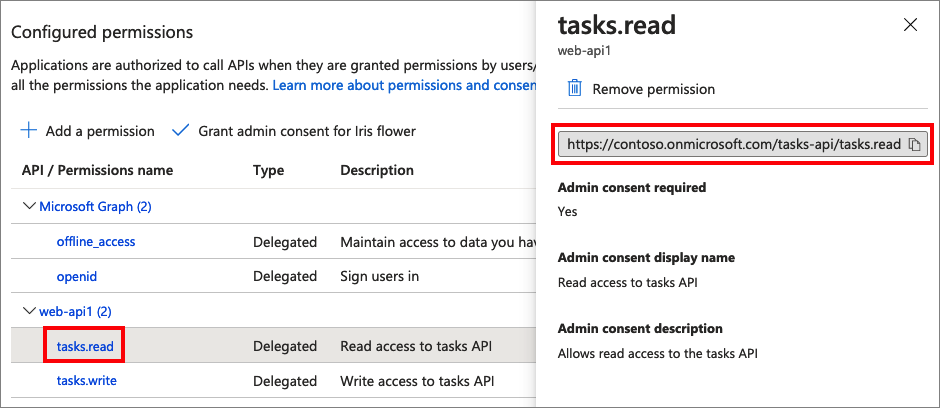
Select Refresh, and then verify that Granted for ... appears under Status for both scopes.
From the Configured permissions list, select your scope, and then copy the scope full name.
Step 3: Configure the sample web API
This sample acquires an access token with the relevant scopes that the desktop app can use for a web API. To call a web API from code, do the following:
- Use an existing web API, or create a new one. For more information, see Enable authentication in your own web API using Azure AD B2C.
- After you configure the web API, copy the URI of the web API endpoint. You will use the web API endpoint in the next steps.
Tip
If you don't have a web API, you can still run this sample. In this case, the app returns the access token but won't be able to call the web API.
Step 4: Get the WPF desktop app sample
Download the .zip file, or clone the sample web application from the GitHub repo.
git clone https://github.com/Azure-Samples/active-directory-b2c-dotnet-desktop.gitOpen the active-directory-b2c-wpf solution (the active-directory-b2c-wpf.sln file) in Visual Studio.
Step 5: Configure the sample desktop app
In the active-directory-b2c-wpf project, open the App.xaml.cs file. The App.xaml.cs class members contain information about your Azure AD B2C identity provider. The desktop app uses this information to establish a trust relationship with Azure AD B2C, sign users in and out, acquire tokens, and validate them.
Update the following class members:
| Key | Value |
|---|---|
TenantName |
The first part of your Azure AD B2C tenant name (for example, contoso.b2clogin.com). |
ClientId |
The desktop application ID from step 2.3. |
PolicySignUpSignIn |
The sign-up or sign-in user flow or custom policy that you created in step 1. |
PolicyEditProfile |
The edit profile user flow or custom policy that you created in step 1. |
ApiEndpoint |
(Optional) The web API endpoint that you created in step 3 (for example, https://contoso.azurewebsites.net/hello). |
ApiScopes |
The web API scopes that you created in step 2.4. |
Your final App.xaml.cs file should look like the following C# code:
public partial class App : Application
{

private static readonly string TenantName = "contoso";
private static readonly string Tenant = $"{TenantName}.onmicrosoft.com";
private static readonly string AzureAdB2CHostname = $"{TenantName}.b2clogin.com";
private static readonly string ClientId = "<web-api-app-application-id>";
private static readonly string RedirectUri = $"https://{TenantName}.b2clogin.com/oauth2/nativeclient";

public static string PolicySignUpSignIn = "b2c_1_susi";
public static string PolicyEditProfile = "b2c_1_edit_profile";
public static string PolicyResetPassword = "b2c_1_reset";

public static string[] ApiScopes = { $"https://{Tenant}//api/tasks.read" };
public static string ApiEndpoint = "https://contoso.azurewebsites.net/hello";
Step 6: Run and test the desktop app
Select F5 to build and run the sample.
Select Sign In, and then sign up or sign in with your Azure AD B2C local or social account.
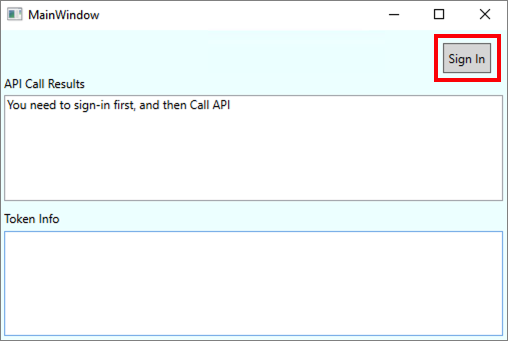
After a successful sign-up or sign-in, the token details are displayed on the lower pane of the WPF app.
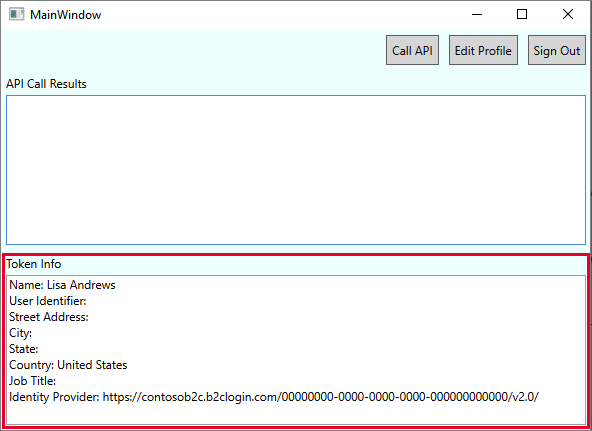
Select Call API to call your web API.
Next steps
Learn how to Configure authentication options in a WPF desktop app by using Azure AD B2C.