Back up Azure VMware Solution VMs with Azure Backup Server
This article shows you how to back up VMware virtual machines (VMs) running on Azure VMware Solution with Azure Backup Server. First, thoroughly go through Set up Microsoft Azure Backup Server for Azure VMware Solution.
Then, walk through all of the necessary procedures to:
- Set up a secure channel so that Azure Backup Server can communicate with VMware vCenter Server over HTTPS.
- Add the account credentials to Azure Backup Server.
- Add the vCenter Server to Azure Backup Server.
- Set up a protection group that contains the VMware vSphere VMs you want to back up, specify backup settings, and schedule the backup.
Create a secure connection to the vCenter Server
By default, Azure Backup Server communicates with VMware vCenter Server over HTTPS. To set up the HTTPS connection, download the VMware certificate authority (CA) certificate and import it on the Azure Backup Server.
Set up the certificate
In the browser, on the Azure Backup Server machine, enter the vSphere Client URL.
Note
If the VMware vSphere Client Getting Started page doesn't appear, verify the connection and browser proxy settings and try again.
On the VMware vSphere Client Getting Started page, select Download trusted root CA certificates.
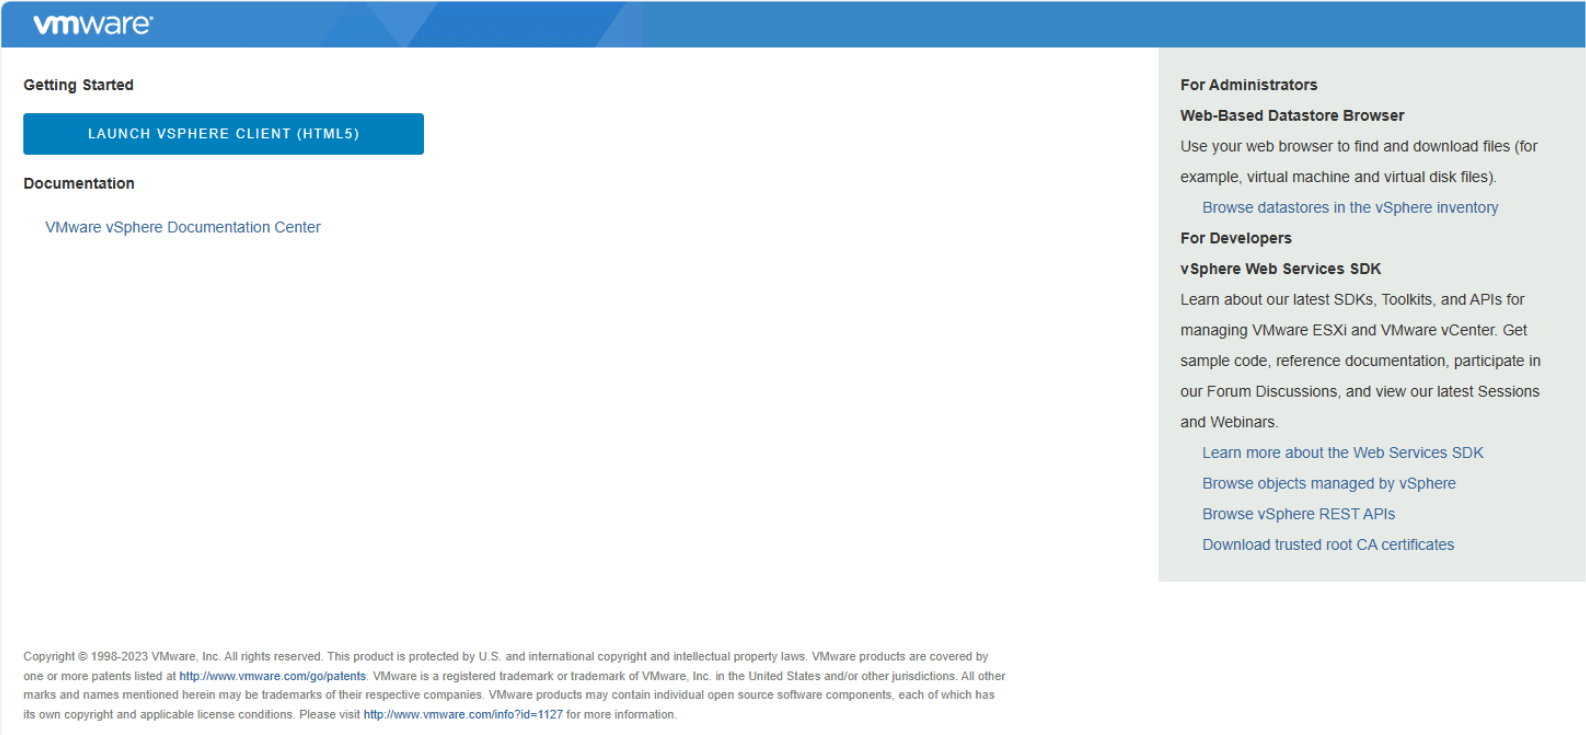
Save the download.zip file to the Azure Backup Server machine, and then extract its contents to the certs folder, which contains the:
- Root certificate file with an extension that begins with a numbered sequence like 0.0 and 0.1.
- CRL file with an extension that begins with a sequence like, .r0 or .r1.
In the certs folder, right-click the root certificate file and select Rename to change the extension to .crt.
The file icon changes to one that represents a root certificate.
Right-click the root certificate, and select Install Certificate.
In the Certificate Import Wizard, select Local Machine as the destination for the certificate, and select Next.
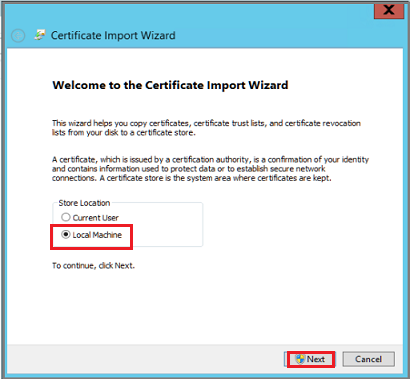
Note
If asked, confirm that you want to allow changes to the computer.
Select Place all certificates in the following store, and select Browse to choose the certificate store.
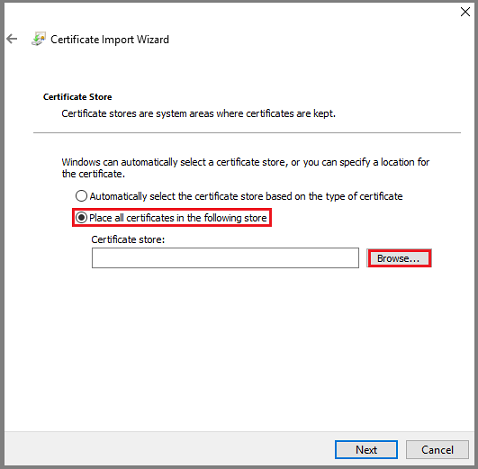
Select Trusted Root Certification Authorities as the destination folder, and select OK.
Review the settings, and select Finish to start importing the certificate.
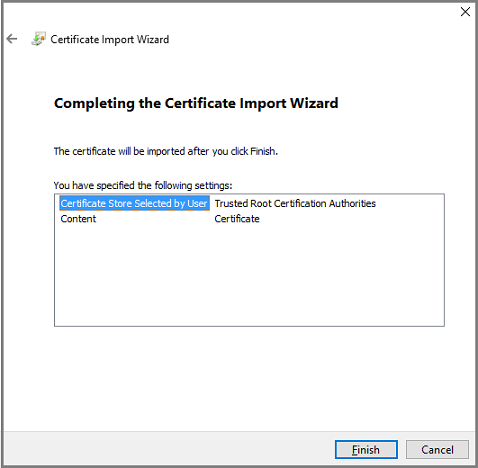
After the certificate import is confirmed, sign in to the vCenter Server to confirm that your connection is secure.
Enable TLS 1.2 on Azure Backup Server
VMware vSphere 6.7 onwards has TLS enabled as the communication protocol.
Copy the following registry settings, and paste them into Notepad. Then save the file as TLS.REG without the .txt extension.
Windows Registry Editor Version 5.00

[HKEY_LOCAL_MACHINE\SOFTWARE\WOW6432Node\Microsoft\.NETFramework\v2.0.50727]

   "SystemDefaultTlsVersions"=dword:00000001

   "SchUseStrongCrypto"=dword:00000001

[HKEY_LOCAL_MACHINE\SOFTWARE\WOW6432Node\Microsoft\.NETFramework\v4.0.30319]

   "SystemDefaultTlsVersions"=dword:00000001

   "SchUseStrongCrypto"=dword:00000001

[HKEY_LOCAL_MACHINE\SOFTWARE\Microsoft\.NETFramework\v2.0.50727]

   "SystemDefaultTlsVersions"=dword:00000001

   "SchUseStrongCrypto"=dword:00000001

[HKEY_LOCAL_MACHINE\SOFTWARE\Microsoft\.NETFramework\v4.0.30319]

   "SystemDefaultTlsVersions"=dword:00000001

   "SchUseStrongCrypto"=dword:00000001
Right-click the TLS.REG file, and select Merge or Open to add the settings to the registry.
Add the account on Azure Backup Server
Open Azure Backup Server, and in the Azure Backup Server console, select Management > Production Servers > Manage VMware.
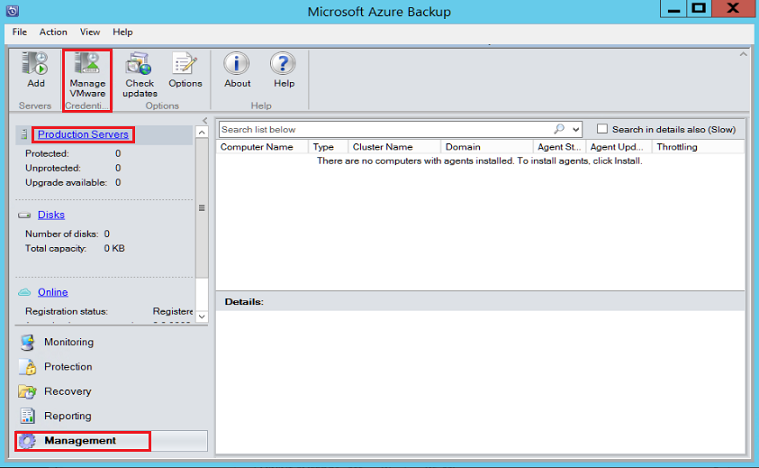
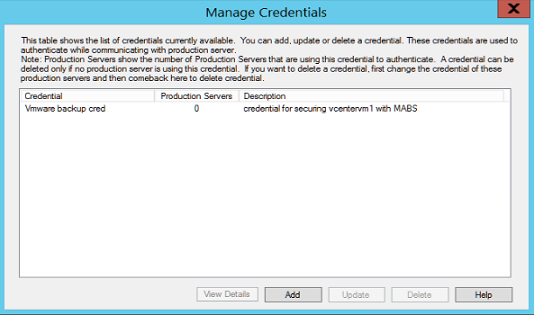
In the Manage Credentials dialog box, select Add.
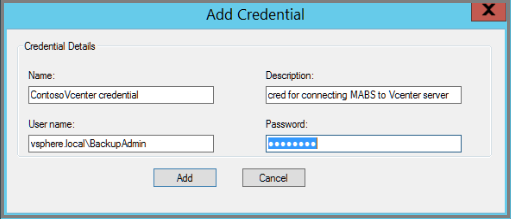
In the Add Credential dialog box, enter a name and a description for the new credential. Specify the user name and password you defined on the VMware server.
Note
If the VMware vSphere virtual machine and Azure Backup Server aren't in the same domain, specify the domain in the User name box.
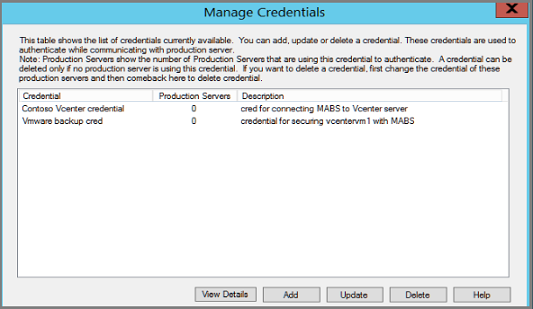
Select Add to add the new credential.
Add the vCenter Server to Azure Backup Server
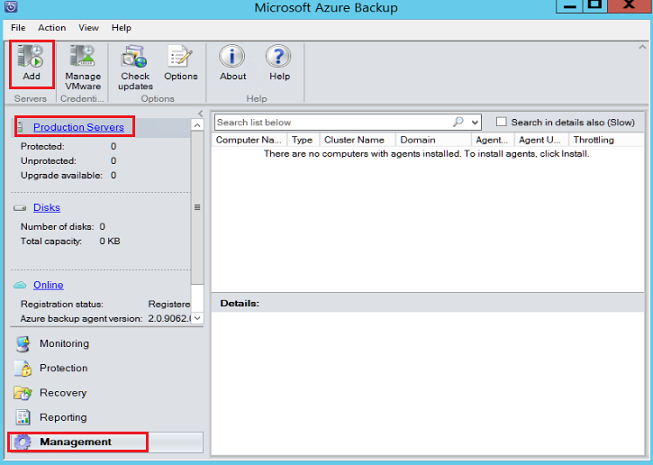
In the Azure Backup Server console, select Management > Production Servers > Add.
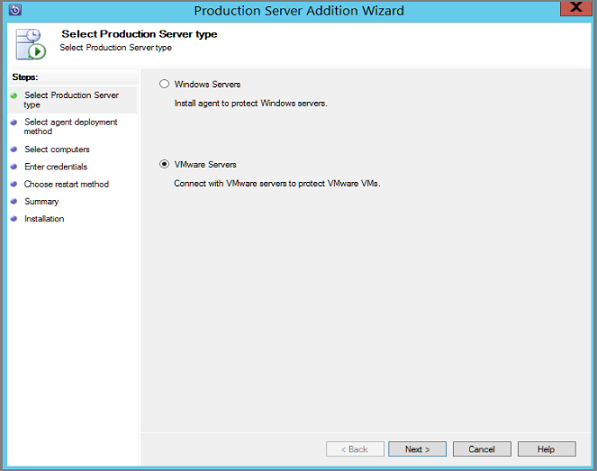
Select VMware Servers, and select Next.
Specify the IP address of the vCenter Server.
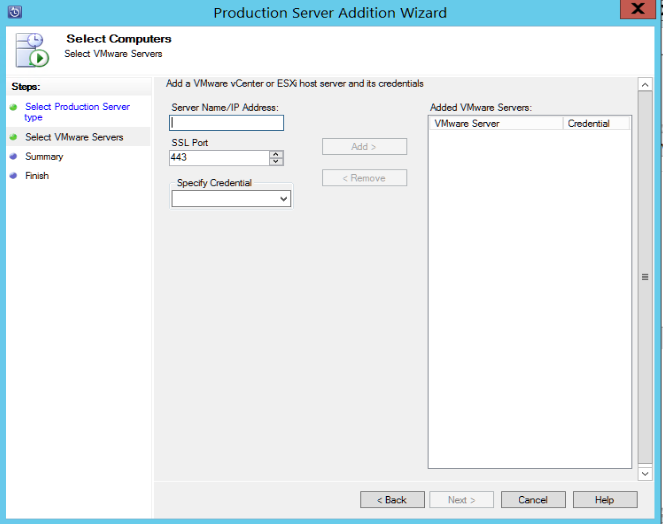
In the SSL Port box, enter the port used to communicate with the vCenter Server.
Tip
Port 443 is the default port, but you can change it if your vCenter Server listens on a different port.
In the Specify Credential box, select the credential that you created in the previous section.
Select Add to add the vCenter Server to the servers list, and select Next.
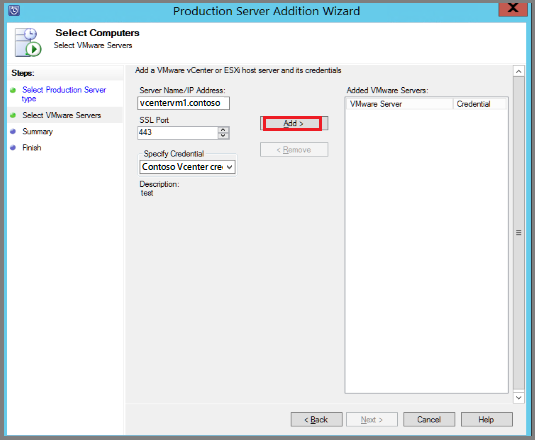
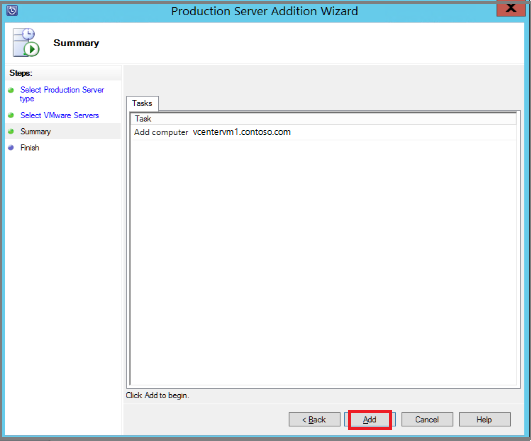
On the Summary page, select Add to add the vCenter Server to Azure Backup Server.
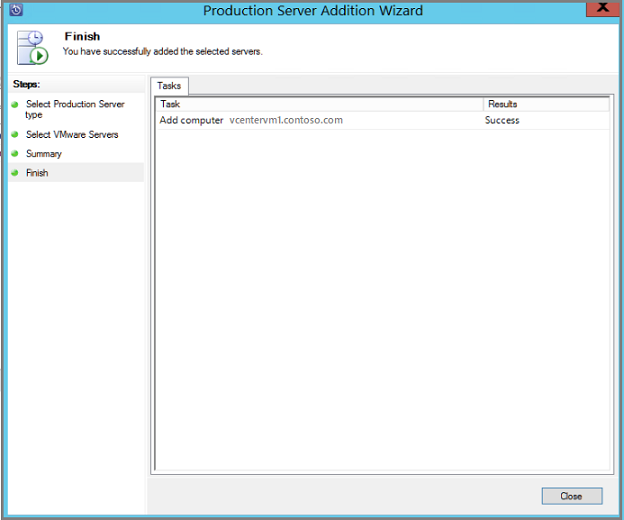
The new vCenter Server gets added immediately. vCenter Server doesn't need an agent.
On the Finish page, review the settings, and then select Close.
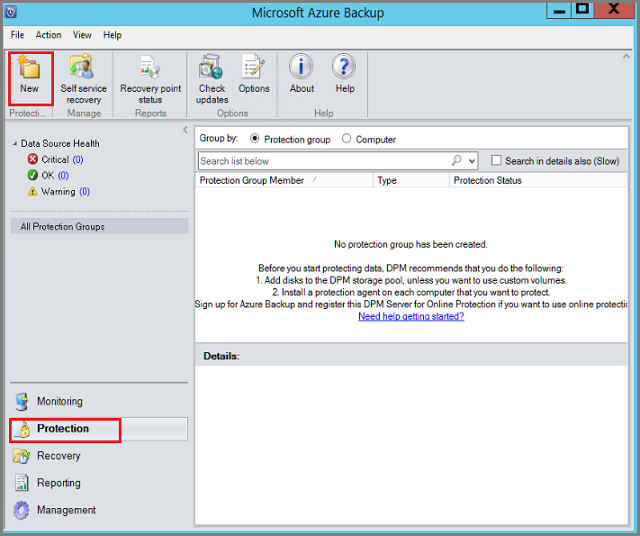
You see the vCenter Server listed under Production Server with:
Type as VMware Server
Agent Status as OK
If you see Agent Status as Unknown, select Refresh.
Configure a protection group
Protection groups gather multiple VMs and apply the same data retention and backup settings to all VMs in the group.
In the Azure Backup Server console, select Protection > New.
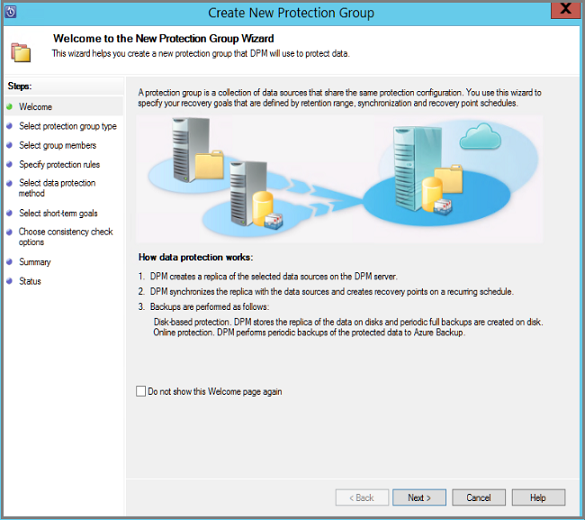
On the Create New Protection Group wizard welcome page, select Next.
On the Select Protection Group Type page, select Servers, and then select Next. The Select Group Members page appears.
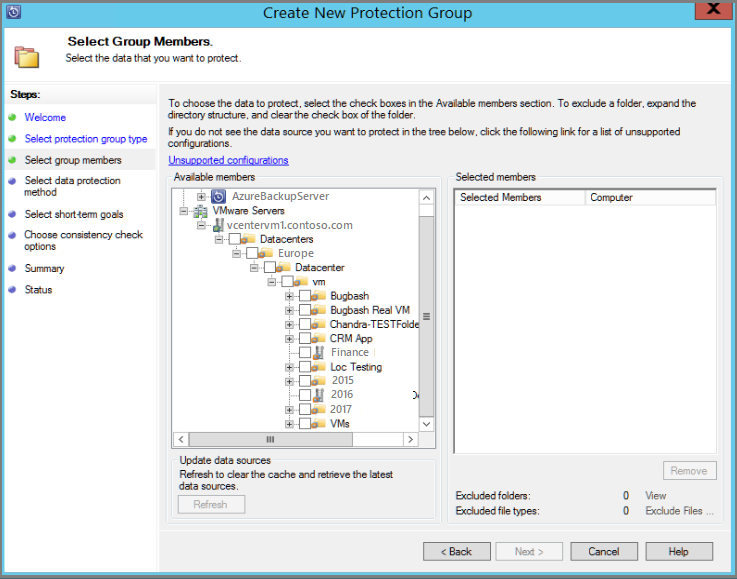
On the Select Group Members page, select the VMs (or VM folders) that you want to back up, and then select Next.
Note
When you select a folder or VMs, folders inside that folder are also selected for backup. You can uncheck folders or VMs you don't want to back up. If a VM or folder is already being backed up, you can't select it, which ensures duplicate recovery points aren't created for a VM.
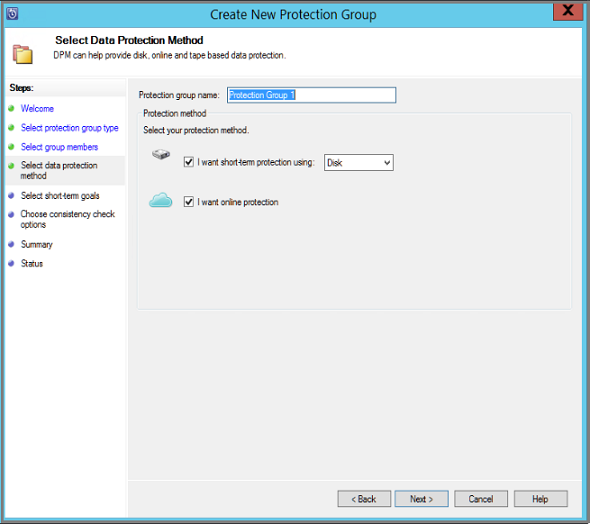
On the Select Data Protection Method page, enter a name for the protection group and protection settings.
Set the short-term protection to Disk, enable online protection, and then select Next.
Specify how long you want to keep data backed up to disk.
- Retention range: The number of days that disk recovery points are kept.
- Express Full Backup: How often disk recovery points are taken. To change the times or dates when short-term backups occur, select Modify.

On the Review Disk Storage Allocation page, review the disk space provided for the VM backups.
- The recommended disk allocations are based on the retention range you specified, the workload type, and the protected data size. Make any changes that are required, then select Next.
- Data size: Size of the data in the protection group.
- Disk space: Recommended amount of disk space for the protection group. If you want to modify this setting, select space lightly larger than the amount you estimate each data source grows.
- Storage pool details: Shows the status of the storage pool, which includes total and remaining disk size.

Note
In some scenarios, the data size reported is higher than the actual VM size. We're aware of the issue and currently investigating it.
On the Choose Replica Creation Method page, indicate how you want to take the initial backup, and select Next.
- The default is Automatically over the network and Now. If you use the default, specify an off-peak time. If you choose Later, specify a day and time.
- For large amounts of data or less-than-optimal network conditions, consider replicating the data offline by using removable media.

For Consistency check options, select how and when to automate the consistency checks and select Next.
- You can run consistency checks when replica data becomes inconsistent, or on a set schedule.
- If you don't want to configure automatic consistency checks, you can run a manual check by right-clicking the protection group Perform Consistency Check.
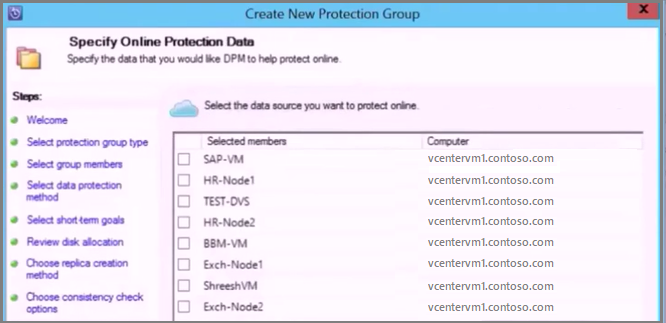
On the Specify Online Protection Data page, select the VMs or VM folders that you want to back up, and then select Next.
Tip
You can select the members individually or choose Select All to choose all members.
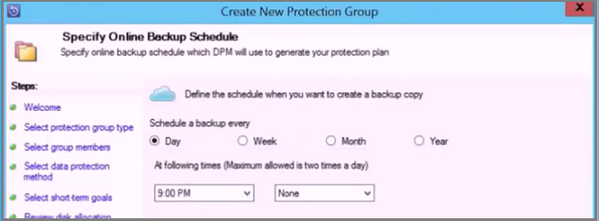
On the Specify Online Backup Schedule page, indicate how often you want to back up data from local storage to Azure.
- Cloud recovery points for the data to get generated according to the schedule.
- After the recovery point gets generated, it gets transferred to the Recovery Services vault in Azure.
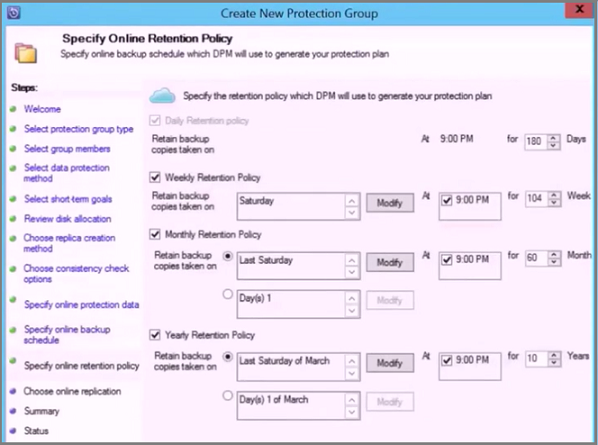
On the Specify Online Retention Policy page, indicate how long you want to keep the recovery points created from the backups to Azure.
- There's no time limit for how long you can keep data in Azure.
- The only limit is that you can't have more than 9,999 recovery points per protected instance. In this example, the protected instance is the VMware vCenter Server.
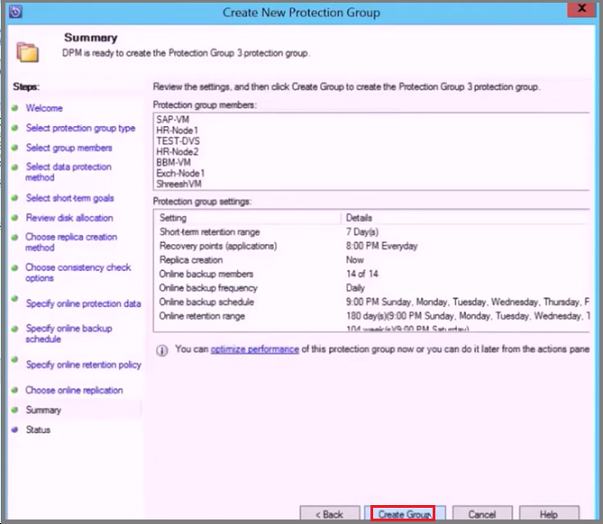
On the Summary page, review the settings and then select Create Group.
Monitor with the Azure Backup Server console
After you configure the protection group to back up Azure VMware Solution VMs, you can monitor the backup job status and alert by using the Azure Backup Server console. Here's what you can monitor.
- In the Monitoring task area:
- Under Alerts, you can monitor errors, warnings, and general information. You can view active and inactive alerts and set up email notifications.
- Under Jobs, you can view jobs started by Azure Backup Server for a specific protected data source or protection group. You can follow job progress or check resources consumed by jobs.
- In the Protection task area, you can check the status of volumes and shares in the protection group. You can also check configuration settings such as recovery settings, disk allocation, and the backup schedule.
- In the Management task area, you can view the Disks, Online, and Agents tabs to check the status of disks in the storage pool, registration to Azure, and deployed DPM agent status.

Restore VMware vSphere virtual machines
In the Azure Backup Server Administrator Console, there are two ways to find recoverable data. You can search or browse. When you recover data, you might or might not want to restore data or a VM to the same location. For this reason, Azure Backup Server supports three recovery options for VMware VM backups:
- Original location recovery (OLR): Use OLR to restore a protected VM to its original location. You can restore a VM to its original location only if no disks were added or deleted since the backup occurred. If disks were added or deleted, you must use alternate location recovery.
- Alternate location recovery (ALR): Use when the original VM is missing, or you don't want to disturb the original VM. Provide the location of an ESXi host, resource pool, folder, and the storage datastore and path. To help differentiate the restored VM from the original VM, Azure Backup Server appends "-Recovered" to the name of the VM.
- Individual file location recovery (ILR): If the protected VM is a Windows Server VM, individual files or folders inside the VM can be recovered by using the ILR capability of Azure Backup Server. To recover individual files, see the procedure later in this article. Restoring an individual file from a VM is available only for Windows VM and disk recovery points.
Restore a recovery point
In the Azure Backup Server Administrator Console, select the Recovery view.
Use the Browse pane and browse or filter to find the VM you want to recover. After you select a VM or folder, the **Recovery points for pane display the available recovery points.

In the Recovery points for pane, select a date when a recovery point was taken. For example, calendar dates in bold have available recovery points. Alternately, you can right-click the VM, select Show all recovery points, and then select the recovery point from the list.
Note
For short-term protection, select a disk-based recovery point for faster recovery. After short-term recovery points expire, you see only Online recovery points to recover.
Before recovering from an online recovery point, ensure the staging location contains enough free space to house the full uncompressed size of the VM you want to recover. The staging location can be viewed or changed by running the Configure Subscription Settings Wizard.

Select Recover to open the Recovery Wizard.

Select Next to go to the Specify Recovery Options screen. Select Next again to go to the Select Recovery Type screen.
Note
VMware vSphere workloads don't support enabling network bandwidth throttling.
On the Select Recovery Type page, either recover to the original instance or a new location.
- If you choose Recover to original instance, you don't need to make any more choices in the wizard. The data for the original instance is used.
- If you choose Recover as virtual machine on any host, then on the Specify Destination screen, provide the information for ESXi Host, Resource Pool, Folder, and Path.

On the Summary page, review your settings and select Recover to start the recovery process.
The Recovery status screen shows the progression of the recovery operation.
Restore an individual file from a VM
You can restore individual files from a protected VM recovery point. This feature is only available for Windows Server VMs. Restoring individual files is similar to restoring the entire VM, except you browse in the VMDK and find the files you want before you start the recovery process.
Note
Restoring an individual file from a VM is available only for Windows VM and disk recovery points.
In the Azure Backup Server Administrator Console, select the Recovery view.
In the Browse pane, browse or filter to find the VM you want to recover. After you select a VM or folder, the **Recovery points for pane display the available recovery points.

In the Recovery points for pane, use the calendar to select the wanted recovery points' date. Depending on how the backup policy was configured, dates can have more than one recovery point.
After you select the day when the recovery point was taken, make sure you choose the correct Recovery time.
Note
If the selected date has multiple recovery points, choose your recovery point by selecting it in the Recovery time drop-down menu.
After you choose the recovery point, the list of recoverable items appears in the Path pane.
To find the files you want to recover, in the Path pane, double-click the item in the Recoverable Item column to open it. Then select the file or folders you want to recover. To select multiple items, select the Ctrl key while you select each item. Use the Path pane to search the list of files or folders that appear in the Recoverable Item column.
Note
The option, Search list below doesn't search into subfolders. To search through subfolders, double-click the folder. Use the Up button to move from a child folder into the parent folder. You can select multiple items (files and folders), but they must be in the same parent folder. You can't recover items from multiple folders in the same recovery job.

After selecting the items for recovery, in the Administrator Console tool ribbon, select Recover to open the Recovery Wizard. In the Recovery Wizard, the Review Recovery Selection screen shows the selected items to be recovered.
On the Specify Recovery Options screen, do one of the following steps:
- Select Modify to enable network bandwidth throttling. In the Throttle dialog box, select Enable network bandwidth usage throttling to turn it on. Once enabled, configure the Settings and Work Schedule.
- Select Next to leave network throttling disabled.
On the Select Recovery Type screen, select Next. You can only recover your files or folders to a network folder.
On the Specify Destination screen, select Browse to find a network location for your files or folders. Azure Backup Server creates a folder where all recovered items are copied. The folder name has the prefix MABS_day-month-year. When you select a location for the recovered files or folder, the details for that location are provided.

On the Specify Recovery Options screen, choose which security setting to apply. You can opt to modify the network bandwidth usage throttling, but throttling is disabled by default. Also, SAN Recovery and Notification aren't enabled.
On the Summary screen, review your settings and select Recover to start the recovery process. The Recovery status screen shows the progression of the recovery operation.
Next steps
Now that you know how to back up your Azure VMware Solution VMs with Azure Backup Server, expand your knowledge and learn more about: