Set up Azure Backup Server for Azure VMware Solution
Azure Backup Server contributes to your business continuity and disaster recovery (BCDR) strategy. With Azure VMware Solution, you can only configure a virtual machine (VM)-level backup using Azure Backup Server.
Azure Backup Server can store backup data to:
- Disk: For short-term storage, Azure Backup Server backs up data to disk pools.
- Azure cloud: For both short-term and long-term storage off-premises, Azure Backup Server data stored in disk pools can be backed up to the Microsoft Azure cloud by using Azure Backup.
Use Azure Backup Server to restore data to the source or an alternate location. That way, if the original data is unavailable because of planned or unexpected issues, you can restore data to an alternate location.
This article helps you prepare your Azure VMware Solution environment to back up VMs by using Azure Backup Server. We walk you through the steps to:
- Determine the recommended VM disk type and size to use.
- Create a Recovery Services vault that stores the recovery points.
- Set the storage replication for a Recovery Services vault.
- Add storage to Azure Backup Server.
Supported VMware vSphere features
- Agentless backup: Azure Backup Server doesn't require an agent to be installed on the vCenter Server or ESXi server to back up the VM. Instead, provide the IP address or fully qualified domain name (FQDN) and the sign-in credentials used to authenticate the VMware vCenter Server with Azure Backup Server.
- Cloud-integrated backup: Azure Backup Server protects workloads to disk and the cloud. The backup and recovery workflow of Azure Backup Server helps you manage long-term retention and offsite backup.
- Detect and protect VMs managed by vCenter Server: Azure Backup Server detects and protects VMs deployed on a vCenter Server or ESXi hosts. Azure Backup Server also detects VMs managed by vCenter Server so that you can protect large deployments.
- Folder-level auto protection: vCenter Server lets you organize your VMs into Virtual Machine folders. Azure Backup Server detects these folders. You can use it to protect VMs at the folder level, including all subfolders. During the protection of folders, Azure Backup Server protects the VMs in that folder and protects VMs added later. Azure Backup Server detects new VMs daily, protecting them automatically. As you organize your VMs in recursive folders, Azure Backup Server automatically detects and protects the new VMs deployed in the recursive folders.
- Azure Backup Server continues to protect vMotioned VMs within the cluster: As VMs are vMotioned for dynamic resource load balancing within the cluster, Azure Backup Server automatically detects and continues VM protection.
- Recover necessary files faster: Azure Backup Server can recover files or folders from a Windows VM without recovering the entire VM.
- Application Consistent Backups: If the VMware Tools aren't installed, a crash consistent backup gets executed. When the VMware Tools are installed with Microsoft Windows virtual machines, all applications that support VSS freeze and thaw operations support application consistent backups. When the VMware Tools are installed with Linux virtual machines, application consistent snapshots are supported by calling the pre and post scripts.
Limitations
- If you're using Azure Backup Server V3, then you must install Update Rollup 2. New installations from the Azure portal now use Azure Backup Server V4 that supports vSphere, version 6.5 to 8.0.
- You can't back up user snapshots before the first Azure Backup Server backup. After Azure Backup Server finishes the first backup, then you can back up user snapshots.
- Update Rollup 2 for Azure Backup Server v3 must be installed.
- Azure Backup Server can't protect VMware vSphere VMs with pass-through disks and physical raw device mappings (pRDMs).
- Azure Backup Server can't detect or protect VMware vSphere vApps.
To set up Azure Backup Server for Azure VMware Solution, you must finish the following steps:
- Set up the prerequisites and environment.
- Create a Recovery Services vault.
- Download and install Azure Backup Server.
- Add storage to Azure Backup Server.
Deployment architecture
Azure Backup Server is deployed as an Azure infrastructure as a service (IaaS) VM to protect Azure VMware Solution VMs.
Prerequisites for the Azure Backup Server environment
Consider the recommendations in this section when you install Azure Backup Server in your Azure environment.
Azure Virtual Network
Ensure that you configure networking for your VMware private cloud in Azure.
Determine the size of the VM
Use the MABS Capacity Planner to determine the correct VM size. Based on your inputs, the capacity planner gives you the required memory size and CPU core count. Use this information to choose the appropriate Azure VM size. The capacity planner also provides total disk size required for the VM along with the required disk IOPS. We recommend using a standard SSD disk for the VM. By pooling more than one SSD, you can achieve the required IOPS.
Follow the instructions in the Create your first Windows VM in the Azure portal tutorial. You created the VM in the virtual network that you created in the previous step. Start with a gallery image of Windows Server 2019 Datacenter to run the Azure Backup Server.
Note
Azure Backup Server is designed to run on a dedicated, single-purpose server. You can't install Azure Backup Server on a computer that:
- Runs as a domain controller.
- Has the Application Server role installed.
- Is a System Center Operations Manager management server?
- Runs Exchange Server.
- Is a node of a cluster?
Disks and storage
Azure Backup Server requires disks for installation.
| Requirement | Recommended size |
|---|---|
| Azure Backup Server installation | Installation location: 3 GB Database files drive: 900 MB System drive: 1 GB for SQL Server installation You need space for Azure Backup Server to copy the file catalog to a temporary installation location when you archive. |
| Disk for storage pool (Uses basic volumes, can't be on a dynamic disk) |
Two to three times the protected data size. For detailed storage calculation, see DPM Capacity Planner. |
To learn how to attach a new managed data disk to an existing Azure VM, see Attach a managed data disk to a Windows VM by using the Azure portal.
Note
A single Azure Backup Server has a soft limit of 120 TB for the storage pool.
Store backup data on local disk and in Azure
Storing backup data in Azure reduces backup infrastructure on the Azure Backup Server VM. For operational recovery (backup), Azure Backup Server stores backup data on Azure disks attached to the VM. After the disks and storage space are attached to the VM, Azure Backup Server manages the storage for you. The amount of storage depends on the number and size of disks attached to each Azure VM. Each size of the Azure VM has a maximum number of disks that can be attached. For example, A2 is four disks, A3 is eight disks, and A4 is 16 disks. Again, the size and number of disks determine the total backup storage pool capacity.
Important
You should not retain operational recovery data on Azure Backup Server-attached disks for more than five days. If data is more than five days old, store it in a Recovery Services vault.
To store backup data in Azure, create or use a Recovery Services vault. When you prepare to back up the Azure Backup Server workload, you configure the Recovery Services vault. Once configured, each time an online backup job runs, a recovery point gets created in the vault. Each Recovery Services vault holds up to 9,999 recovery points. Depending on the number of recovery points created and how long kept, you can keep backup data for many years. For example, you could create monthly recovery points and keep them for five years.
Important
Whether you send backup data to Azure or keep it locally, you must register Azure Backup Server with a Recovery Services vault.
Scale deployment
If you want to scale your deployment, you have the following options:
- Scale up: Increase the size of the Azure Backup Server VM from A series to DS3 series, and increase the local storage.
- Offload data: Send older data to Azure and keep only the newest data on the storage attached to the Azure Backup Server machine.
- Scale out: Add more Azure Backup Server machines to protect the workloads.
.NET Framework
The VM must have .NET Framework 4.5 or higher installed.
Join a domain
The Azure Backup Server VM must be joined to a domain. A domain user with administrator privileges on the VM must install Azure Backup Server.
Azure Backup Server deployed in an Azure VM can back up workloads on the VMs in Azure VMware Solution. The workloads should be in the same domain to enable the backup operation.
Create a Recovery Services vault
A Recovery Services vault is a storage entity that stores the recovery points created over time. It also contains backup policies that are associated with protected items.
Sign in to the Azure portal, and on the left menu, select All services.
In the All services dialog box, enter Recovery Services and select Recovery Services vaults from the list.
The list of Recovery Services vaults in the subscription appears.
On the Recovery Services vaults dashboard, select Add.
The Recovery Services vault dialog box opens.
Enter values, then select Create.
- Name: Enter a friendly name to identify the vault. The name must be unique to the Azure subscription. Specify a name that has at least two but not more than 50 characters. The name must start with a letter and consist only of letters, numbers, and hyphens.
- Subscription: Choose the subscription to use. If you're a member of only one subscription, you see that name. If you're not sure which subscription to use, use the default (suggested) subscription. There are multiple choices only if your work or school account is associated with more than one Azure subscription.
- Resource group: Use an existing resource group or create a new one. To see the list of available resource groups in your subscription, select Use existing, then select a resource from the drop-down list. To create a new resource group, select Create new and enter the name.
- Location: Select the geographic region for the vault. To create a vault to protect Azure VMware Solution virtual machines, the vault must be in the same region as the Azure VMware Solution private cloud.
It can take a while to create the Recovery Services vault. Monitor the status notifications in the Notifications area in the upper-right corner of the portal. After creating your vault, it's visible in the list of Recovery Services vaults. If you don't see your vault, select Refresh.
Set storage replication
The storage replication option lets you choose between geo-redundant storage (the default) and locally redundant storage. Geo-redundant storage copies the data in your storage account to a secondary region, making your data durable. Locally redundant storage is a cheaper option that isn't as durable. To learn more about geo-redundant and locally redundant storage options, see Azure Storage redundancy.
Important
Changing the setting of Storage replication type Locally-redundant/Geo-redundant for a Recovery Services vault must be done before you configure backups in the vault. After you configure backups, the option to modify it is disabled, and you can't change the storage replication type.
From Recovery Services vaults, select the new vault.
Under Settings, select Properties. Under Backup Configuration, select Update.
Select the storage replication type, and select Save.
Download and install the software package
Follow the steps in this section to download, extract, and install the software package.
Download the software package
Sign in to the Azure portal.
If you already have a Recovery Services vault open, continue to the next step.
Tip
If you don't have a Recovery Services vault open, and you're in the Azure portal, in the list of resources enter Recovery Services > Recovery Services vaults.
From the list of Recovery Services vaults, select a vault.
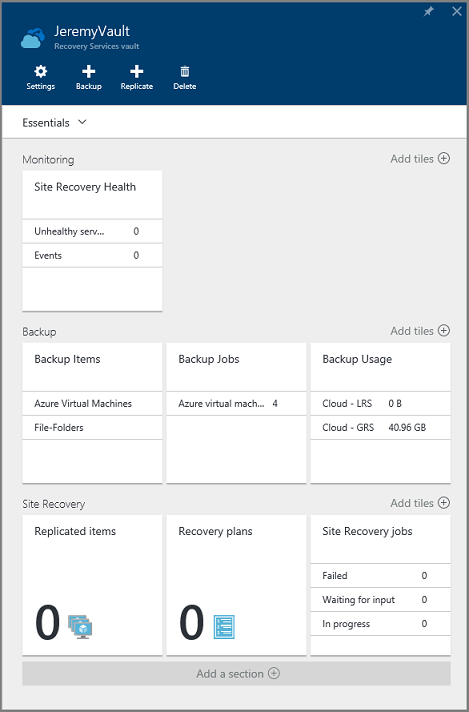
The selected vault dashboard opens.

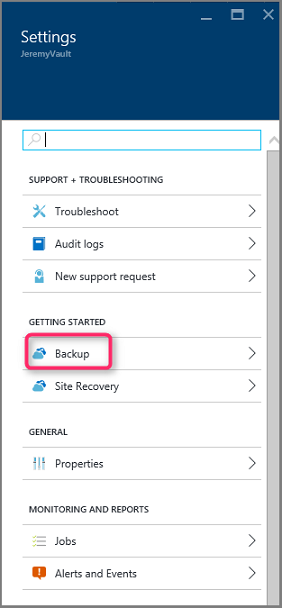
The Settings option opens by default. If closed, select Settings to open it.
Select Backup to open the Getting Started wizard.

In the window that opens:
From the Where is your workload running? menu, select On-Premises.

From the What do you want to back up? menu, select the workloads you want to protect by using Azure Backup Server.
Select Prepare Infrastructure to download and install Azure Backup Server and the vault credentials.

In the Prepare infrastructure window that opens:
Select the Download link to install Azure Backup Server.
Select Already downloaded or using the latest Azure Backup Server installation, then Download to download the vault credentials. You use these credentials when you register the Azure Backup Server to the Recovery Services vault. The links take you to the Download Center, where you download the software package.

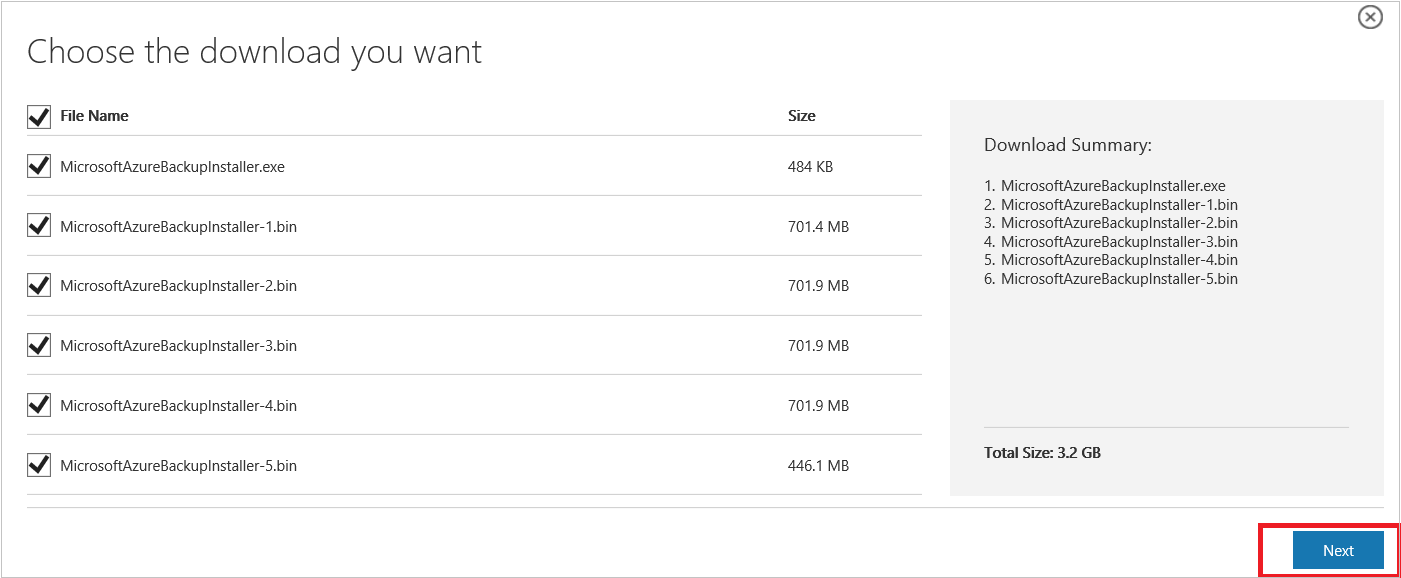
On the download page, select all the files and select Next.
Note
You must download all the files to the same folder. Because the download size of the files together is greater than 3 GB, it might take up to 60 minutes for the download to complete.

Extract the software package
If you downloaded the software package to a different server, copy the files to the VM you created to deploy Azure Backup Server.
Warning
At least 4 GB of free space is required to extract the setup files.
After you downloaded all the files, double-click MicrosoftAzureBackupInstaller.exe to open the Microsoft Azure Backup setup wizard, then select Next.
Select the location to extract the files to and select Next.
Select Extract to begin the extraction process.

Once extracted, select the option to Execute setup.exe, then select Finish.
Tip
- You can also locate the setup.exe file from the folder where you extracted the software package.
- To use your own SQL Server instance, ensure that you're using the supported SQL Server versions - SQL Server 2022 and 2019.
Install the software package
On the setup window under Install, select Microsoft Azure Backup to open the setup wizard and accept any licensing terms from the list that appears.
On the Welcome screen, select Next to continue to the Prerequisite Checks page.
To determine if the hardware and software meet the prerequisites for Azure Backup Server, select Check Again. If met successfully, select Next.
The Azure Backup Server installation package comes bundled with the appropriate SQL Server binaries that are needed. When you start a new Azure Backup Server installation, select the Install new Instance of SQL Server with this Setup option. Then select Check and Install.

Note
If you want to use your own SQL Server instance, the supported SQL Server versions are SQL Server 2014 SP1 or higher, 2016, and 2017. All SQL Server versions should be Standard or Enterprise 64-bit. The instance used by Azure Backup Server must be local only; it can't be remote. If you use an existing SQL Server instance for Azure Backup Server, the setup only supports the use of named instances of SQL Server.
If a failure occurs with a recommendation to restart the machine, do so, and select Check Again. For any SQL Server configuration issues, reconfigure SQL Server according to the SQL Server guidelines. Then retry to install or upgrade Azure Backup Server using the existing instance of SQL Server.
Manual configuration
When you use your own SQL Server instance, make sure you add builtin\Administrators to the sysadmin role to the main database sysadmin role.
Configure reporting services with SQL Server 2019 or 2022
If you use your instance of SQL Server, you must configure SQL Server Reporting Services (SSRS) manually. After configuring SSRS, make sure to set the IsInitialized property of SSRS to True. When set to True, Azure Backup Server assumes that SSRS is already configured and skips the SSRS configuration.
To check the SSRS configuration status, run:
$configset =Get-WmiObject –namespace
"root\Microsoft\SqlServer\ReportServer\RS_SSRS\v14\Admin" -class
MSReportServer_ConfigurationSetting -ComputerName localhost

$configset.IsInitialized
Use the following values for SSRS configuration:
- Service Account: Use built-in account should be Network Service.
- Web Service URL: Virtual Directory should be ReportServer_<SQLInstanceName>.
- Database: DatabaseName should be ReportServer$<SQLInstanceName>.
- Web Portal URL: Virtual Directory should be Reports_<SQLInstanceName>.
Learn more about SSRS configuration.
Note
Microsoft Online Services Terms (OST) governs the licensing for SQL Server used as the database for Azure Backup Server. According to OST, only use SQL Server bundled with Azure Backup Server as the database for Azure Backup Server.
After the installation is successful, select Next.
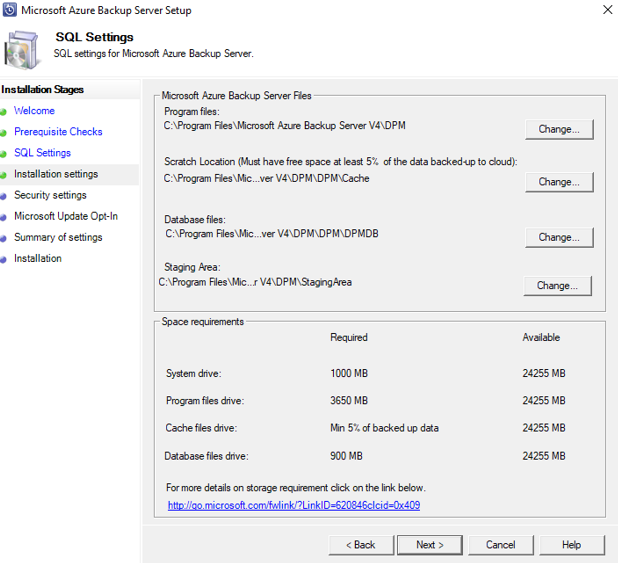
Provide a location for installing Microsoft Azure Backup Server files, and select Next.
Note
The scratch location is required for backup to Azure. Ensure the scratch location is at least 5% of the data planned for backing up to the cloud. For disk protection, separate disks need configuring after the installation finishes. For more information about storage pools, see Configure storage pools and disk storage.

Provide a strong password for restricted local user accounts, and select Next.
Select whether you want to use Microsoft Update to check for updates, and select Next.
Note
We recommend having Windows Update redirect to Microsoft Update, which offers security and important updates for Windows and other products like Azure Backup Server.
Review the Summary of Settings, and select Install.
The installation happens in phases.
- The first phase installs the Microsoft Azure Recovery Services Agent.
- The second phase checks for internet connectivity. If available, you can continue with the installation. If not available, you must provide proxy details to connect to the internet.
- The final phase checks the prerequisite software. If not installed, any missing software gets installed along with the Microsoft Azure Recovery Services Agent.
Select Browse to locate your vault credentials to register the machine to the Recovery Services vault, then select Next.
Select a passphrase to encrypt or decrypt the data sent between Azure and your premises.
Tip
You can automatically generate a passphrase or provide your minimum 16-character passphrase.
Enter the location to save the passphrase, then select Next to register the server.
Important
Save the passphrase to a safe location other than the local server. We strongly recommend using the Azure Key Vault to store the passphrase.
After the Microsoft Azure Recovery Services Agent setup finishes, the installation step moves on to the installation and configuration of SQL Server and the Azure Backup Server components.
After the installation step finishes, select Close.
Install Update Rollup 2 for Microsoft Azure Backup Server (MABS) version 3
Installing the Update Rollup 2 for Microsoft Azure Backup Server (MABS) version 3 is mandatory for protecting the workloads. You can find the bug fixes and installation instructions in the knowledge base article.
Add storage to Azure Backup Server
Azure Backup Server v3 supports Modern Backup Storage that offers:
- Storage savings of 50%.
- Backups that are three times faster.
- More efficient storage.
- Workload-aware storage.
Volumes in Azure Backup Server
Add the data disks with the Azure Backup Server VM's required storage capacity if not already added.
Azure Backup Server only accepts storage volumes. When you add a volume, Azure Backup Server formats the volume to Resilient File System (ReFS), which Modern Backup Storage requires.
Add volumes to Azure Backup Server disk storage
In the Management pane, rescan the storage, then select Add.
Select from the available volumes to add to the storage pool.
After you add the available volumes, give them a friendly name to help you manage them.
Select OK to format these volumes to ReFS so that Azure Backup Server can use Modern Backup Storage benefits.
Upgrade to Azure Backup Server V4 from Azure Backup Server V3
If you're already using Azure Backup Server V3 to back up AVS VMs, you can upgrade to Azure Backup Server V4 to get access to the latest features and bug fixes.
Next steps
Now that you learned how to set up Azure Backup Server for Azure VMware Solution, use the following resources to learn more.
