opomba,
Dostop do te strani zahteva pooblastilo. Poskusite se vpisati alispremeniti imenike.
Dostop do te strani zahteva pooblastilo. Poskusite lahko spremeniti imenike.
Build an intelligent HR assistant using LangChain.js and Azure services. This agent helps employees at the fictitious NorthWind company find answers to human resources questions by searching through company documentation.
You'll use Azure AI Search to find relevant documents and Azure OpenAI to generate accurate answers. The LangChain.js framework handles the complexity of agent orchestration, letting you focus on your specific business requirements.
What you'll learn:
- Deploy Azure resources using Azure Developer CLI
- Build a LangChain.js agent that integrates with Azure services
- Implement retrieval-augmented generation (RAG) for document search
- Test and debug your agent locally and in Azure
By the end of this tutorial, you have a working REST API that answers HR questions using your company's documentation.
Architecture overview
NorthWind relies on two data sources:
- HR documentation accessible to all employees
- Confidential HR database containing sensitive employee data.
This tutorial focuses on building a LangChain.js agent that determines whether an employee's question can be answered using the public HR documents. If so, the LangChain.js agent provides the answer directly.
Prerequisites
To use this sample in Codespace or local development container, including building and running the LangChain.js agent, you need the following:
- An active Azure account. Create an account for free if you don't have one.
If you run the sample code locally without a development container, you also need:
- Node.js LTS installed on your system.
- TypeScript for writing and compiling TypeScript code.
- Azure Developer CLI (azd) installed and configured.
- LangChain.js library for building the agent.
- Optional: LangSmith for monitoring AI usage. You need the project name, key, and endpoint.
- Optional: LangGraph Studio for debugging LangGraph chains and LangChain.js agents.
Azure resources
The following Azure resources are required. They are created for you in this article using the Azure Developer CLI and Bicep templates using Azure Verified Modules(AVM). The resources are created with both passwordless and key access for learning purposes. This tutorial uses your local developer account for passwordless authentication:
- Azure AI Search resource for vector search.
- Azure OpenAI resource with the following models:
- An embeddings model like
text-embedding-3-small. - A large language model (LLM) like
'gpt-4.1-mini.
- An embeddings model like
Agent architecture
The LangChain.js framework provides a decision flow for building intelligent agents as a LangGraph. In this tutorial, you create a LangChain.js agent that integrates with Azure AI Search and Azure OpenAI to answer HR-related questions. The agent's architecture is designed to:
- Determine if a question is relevant to general HR documentation available to all employees.
- Retrieve relevant documents from Azure AI Search based on the user query.
- Use Azure OpenAI to generate an answer based on the retrieved documents and LLM model.
Key Components:
Graph structure: The LangChain.js agent is represented as a graph, where:
- Nodes perform specific tasks, such as decision-making or retrieving data.
- Edges define the flow between nodes, determining the sequence of operations.
Azure AI Search integration:
- Uses an embeddings model to create vectors.
- Inserts HR documents (*.md, *.pdf) into vector store. The documents include:
- Company information
- Employee handbook
- Benefits handbook
- Employee role library
- Retrieves relevant documents based on the user prompt.
- Azure OpenAI integration:
- Uses a large language model to:
- Determines if a question is answerable from impersonal HR documents.
- Generates answer with prompt using context from documents and user question.
- Uses a large language model to:
The following table has examples of user questions which are and aren't relevant and answerable from general Human resources documents:
| Question | Relevant | Explanation |
|---|---|---|
Does the NorthWind Health Plus plan cover eye exams? |
Yes | The HR documents, such as the employee handbook, should provide an answer. |
How much of my perks + benefits have I spent? |
No | This question requires access to confidential employee data, which is outside the scope of this agent. |
By using the LangChain.js framework, you avoid much of the agentic boilerplate code typically required for agents and Azure service integration, allowing you to focus on your business needs.
Clone the sample code repository
In a new directory, clone the sample code repository and change to the new directory:
git clone https://github.com/Azure-Samples/azure-typescript-langchainjs.git
cd azure-typescript-langchainjs
This sample provides the code you need to create secure Azure resources, build the LangChain.js agent with Azure AI Search and Azure OpenAI, and use the agent from a Node.js Fastify API server.
Authenticate to the Azure CLI and Azure Developer CLI
Sign in to Azure with the Azure Developer CLI, create the Azure resources, and deploy the source code. Because the deployment process uses both Azure CLI and Azure Developer CLI, sign into Azure CLI, then configure the Azure Developer CLI to use your authentication from Azure CLI:
az login
azd config set auth.useAzCliAuth true
Create resources and deploy code with Azure Developer CLI
Begin the deployment process by running the azd up command:
azd up
During the azd up command, answer the questions:
- New environment name: enter a unique environment name such as
langchain-agent. This environment name is used as part of the Azure resource group. - Select an Azure Subscription: select the subscription where the resources are created.
- Select a region: such as
eastus2.
The deployment takes approximately 10-15 minutes. The Azure Developer CLI orchestrates the process using phases and hooks defined in the azure.yaml file:
Provision phase (equivalent to azd provision):
- Creates Azure resources defined in
infra/main.bicep:- Azure Container App
- OpenAI
- AI Search
- Container Registry
- Managed identity
- Post-provision hook: Checks if the Azure AI Search index
northwindalready exists- If the index doesn't exist: runs
npm installandnpm run load_datato upload HR documents using LangChain.js PDF loader and embedding client - If the index exists: skips data loading to avoid duplicates (you can manually reload by deleting the index or running
npm run load_data) Deploy phase (equivalent toazd deploy):
- If the index doesn't exist: runs
- Pre-deploy hook: Builds the Docker image for the Fastify API server and pushes it to Azure Container Registry
- Deploys the containerized API server to Azure Container Apps
When deployment completes, environment variables and resource information are saved to the .env file in the repository root. You can view the resources in the Azure portal.
The resources are created with both passwordless and key access for learning purposes. This introductory tutorial uses your local developer account for passwordless authentication. For production applications, use only passwordless authentication with managed identities. Learn more about passwordless authentication.
Use the sample code locally
Now that the Azure resources are created, you can run the LangChain.js agent locally.
Install dependencies
Install the Node.js packages for this project.
npm installThis command installs the dependencies defined in the two
package.jsonfiles in thepackages-v1directory, including:./packages-v1/server-api:- Fastify for the web server
./packages-v1/langgraph-agent:- LangChain.js for building the agent
- Azure SDK client library
@azure/search-documentsfor integrating with Azure AI Search resource. The reference documentation is here.
Build the two packages: the API server and the AI agent.
npm run buildThis command creates a link between the two packages so the API server can call the AI agent.
Run the API server locally
The Azure Developer CLI created the required Azure resources and configured the environment variables in the root .env file. This configuration included a post provision hook to upload the data into the vector store. Now, you can run the Fastify API server that hosts the LangChain.js agent. Start the Fastify API server.
npm run dev
The server starts and listens on port 3000. You can test the server by navigating to [http://localhost:3000] in your web browser. You should see a welcome message indicating that the server is running.
Use the API to ask questions
You can use a tool like REST Client or curl to send a POST request to the /ask endpoint with a JSON body containing your question.
Rest client queries are available in the packages-v1/server-api/http directory.
Example using curl:
curl -X POST http://localhost:3000/answer -H "Content-Type: application/json" -d "{\"question\": \"Does the NorthWind Health Plus plan cover eye exams?\"}"
You should receive a JSON response with the answer from the LangChain.js agent.
{
  "answer": "Yes, the NorthWind Health Plus plan covers eye exams. According to the Employee Handbook, employees enrolled in the Health Plus plan are eligible for annual eye exams as part of their vision benefits."
}
Several example questions are available in the packages-v1/server-api/http directory. Open the files in Visual Studio Code with REST Client to test them quickly.
Understand the application code
This section explains how the LangChain.js agent integrates with Azure services. The repository's application is organized as an npm workspace with two main packages:
Project Root
│
├── packages-v1/
│   │
│   ├── langgraph-agent/                    # Core LangGraph agent implementation
│   │   ├── src/
│   │   │   ├── azure/                      # Azure service integrations
│   │   │   │   ├── azure-credential.ts     # Centralized auth with DefaultAzureCredential
│   │   │   │   ├── embeddings.ts           # Azure OpenAI embeddings + PDF loading + rate limiting
│   │   │   │   ├── llm.ts                  # Azure OpenAI chat completion (key-based & passwordless)
│   │   │   │   └── vector_store.ts         # Azure AI Search vector store + indexing + similarity search
│   │   │   │
│   │   │   ├── langchain/                  # LangChain agent logic
│   │   │   │   ├── node_get_answer.ts      # RAG: retrieves docs + generates answers
│   │   │   │   ├── node_requires_hr_documents.ts  # Determines if HR docs needed
│   │   │   │   ├── nodes.ts                # LangGraph node definitions + state management
│   │   │   │   └── prompt.ts               # System prompts + conversation templates
│   │   │   │
│   │   │   └── scripts/                    # Utility scripts
│   │   │       └── load_vector_store.ts    # Uploads PDFs to Azure AI Search
│   │   │
│   │   └── data/                           # Source documents (PDFs) for vector store
│   │
│   └── server-api/                         # Fastify REST API server
│       └── src/
│           └── server.ts                   # HTTP server with /answer endpoint
│
├── infra/                                  # Infrastructure as Code
│   └── main.bicep                          # Azure resources: Container Apps, OpenAI, AI Search, ACR, managed identity
│
├── azure.yaml                              # Azure Developer CLI config + deployment hooks
├── Dockerfile                              # Multi-stage Docker build for containerized deployment
└── package.json                            # Workspace configuration + build scripts
Key architectural decisions:
- Monorepo structure: npm workspaces allow shared dependencies and linked packages
- Separation of concerns: Agent logic (
langgraph-agent) is independent from API server (server-api) - Centralized authentication: Files in
./langgraph-agent/src/azurehandle both key-based and passwordless auth and Azure service integration
Authentication to Azure Services
The application supports both key-based and passwordless authentication methods, controlled by the SET_PASSWORDLESS environment variable. The DefaultAzureCredential API from the Azure Identity library is used for passwordless authentication, allowing the application to run seamlessly in local development and Azure environments. You can see this authentication in the following code snippet:
import { DefaultAzureCredential } from "@azure/identity";

export const CREDENTIAL = new DefaultAzureCredential();

export const SCOPE_OPENAI = "https://cognitiveservices.azure.com/.default";

export async function azureADTokenProvider_OpenAI() {
  const tokenResponse = await CREDENTIAL.getToken(SCOPE_OPENAI);
  return tokenResponse.token;
}
When using third-party libraries like LangChain.js or the OpenAI library to access Azure OpenAI, you need a token provider function instead of passing a credential object directly. The getBearerTokenProvider function from the Azure Identity library solves this problem by creating a token provider that automatically fetches and refreshes OAuth 2.0 bearer tokens for a specific Azure resource scope (for example, "https://cognitiveservices.azure.com/.default"). You configure the scope once during setup, and the token provider handles all token management automatically. This approach works with any Azure Identity library credential, including managed identity and Azure CLI credentials. While Azure SDK libraries accept DefaultAzureCredential directly, third-party libraries like LangChain.js require this token provider pattern to bridge the authentication gap.
Azure AI Search integration
The Azure AI Search resource stores document embeddings and enables semantic search for relevant content. The application uses LangChain's AzureAISearchVectorStore to manage the vector store without you having to define the index schema.
The vector store is created with configuration for both admin (write) and query (read) operations so that document loading and querying can use different configurations. This is important whether you are using keys or passwordless authentication with managed identities.
The Azure Developer CLI deployment includes a post-deployment hook that uploads the documents to the vector store with LangChain.js PDF loader and embedding client. This post-deployment hook is the last step of the azd up command after the Azure AI Search resource is created. The document loading script uses batching and retry logic to handle service rate limits.
postdeploy:
  posix:
    sh: bash
    run: |
      echo "Checking if vector store data needs to be loaded..."

      # Check if already loaded
      INDEX_CREATED=$(azd env get-values | grep INDEX_CREATED | cut -d'=' -f2 || echo "false")

      if [ "$INDEX_CREATED" = "true" ]; then
        echo "Index already created. Skipping data load."
        echo "Current document count: $(azd env get-values | grep INDEX_DOCUMENT_COUNT | cut -d'=' -f2)"
      else
        echo "Loading vector store data..."
        npm install
        npm run build
        npm run load_data

        # Get document count from the index
        SEARCH_SERVICE=$(azd env get-values | grep AZURE_AISEARCH_ENDPOINT | cut -d'/' -f3 | cut -d'.' -f1)
        DOC_COUNT=$(az search index show --service-name $SEARCH_SERVICE --name northwind --query "documentCount" -o tsv 2>/dev/null || echo "0")

        # Mark as loaded
        azd env set INDEX_CREATED true
        azd env set INDEX_DOCUMENT_COUNT $DOC_COUNT

        echo "Data loading complete! Indexed $DOC_COUNT documents."
      fi
Use the root .env file is created by the Azure Developer CLI, you can authenticate to the Azure AI Search resource and create the AzureAISearchVectorStore client:
const endpoint = process.env.AZURE_AISEARCH_ENDPOINT;
const indexName = process.env.AZURE_AISEARCH_INDEX_NAME;

const adminKey = process.env.AZURE_AISEARCH_ADMIN_KEY;
const queryKey = process.env.AZURE_AISEARCH_QUERY_KEY;

export const QUERY_DOC_COUNT = 3;
const MAX_INSERT_RETRIES = 3;

const shared_admin = {
  endpoint,
  indexName,
};

export const VECTOR_STORE_ADMIN_KEY: AzureAISearchConfig = {
  ...shared_admin,
  key: adminKey,
};

export const VECTOR_STORE_ADMIN_PASSWORDLESS: AzureAISearchConfig = {
  ...shared_admin,
  credentials: CREDENTIAL,
};

export const VECTOR_STORE_ADMIN_CONFIG: AzureAISearchConfig =
  process.env.SET_PASSWORDLESS == "true"
    ? VECTOR_STORE_ADMIN_PASSWORDLESS
    : VECTOR_STORE_ADMIN_KEY;

const shared_query = {
  endpoint,
  indexName,
  search: {
    type: AzureAISearchQueryType.Similarity,
  },
};

// Key-based config
export const VECTOR_STORE_QUERY_KEY: AzureAISearchConfig = {
  key: queryKey,
  ...shared_query,
};

export const VECTOR_STORE_QUERY_PASSWORDLESS: AzureAISearchConfig = {
  credentials: CREDENTIAL,
  ...shared_query,
};

export const VECTOR_STORE_QUERY_CONFIG =
  process.env.SET_PASSWORDLESS == "true"
    ? VECTOR_STORE_QUERY_PASSWORDLESS
    : VECTOR_STORE_QUERY_KEY;
When you query, the vector store converts the user's query into an embedding, searches for documents with similar vector representations, and returns the most relevant chunks.
export function getReadOnlyVectorStore(): AzureAISearchVectorStore {
  const embeddings = getEmbeddingClient();
  return new AzureAISearchVectorStore(embeddings, VECTOR_STORE_QUERY_CONFIG);
}

export async function getDocsFromVectorStore(
  query: string,
): Promise<Document[]> {
  const store = getReadOnlyVectorStore();

  // @ts-ignore
  //return store.similaritySearchWithScore(query, QUERY_DOC_COUNT);
  return store.similaritySearch(query, QUERY_DOC_COUNT);
}
Because the vector store is built on top of LangChain.js, it abstracts away the complexity of directly interacting with the vector store. Once you learn the LangChain.js vector store interface, you can easily switch to other vector store implementations in the future.
Azure OpenAI integration
The application uses Azure OpenAI for both embeddings and large language model (LLM) capabilities. The AzureOpenAIEmbeddings class from LangChain.js is used to generate embeddings for documents and queries. Once you create the embeddings client, LangChain.js uses it to create the embeddings.
Azure OpenAI integration for embeddings
Use the root .env file created by the Azure Developer CLI to authenticate to the Azure OpenAI resource and create the AzureOpenAIEmbeddings client:
const shared = {
  azureOpenAIApiInstanceName: instance,
  azureOpenAIApiEmbeddingsDeploymentName: model,
  azureOpenAIApiVersion: apiVersion,
  azureOpenAIBasePath,
  dimensions: 1536, // for text-embedding-3-small
  batchSize: EMBEDDING_BATCH_SIZE,
  maxRetries: 7,
  timeout: 60000,
};

export const EMBEDDINGS_KEY_CONFIG = {
  azureOpenAIApiKey: key,
  ...shared,
};

export const EMBEDDINGS_CONFIG_PASSWORDLESS = {
  azureADTokenProvider: azureADTokenProvider_OpenAI,
  ...shared,
};

export const EMBEDDINGS_CONFIG =
  process.env.SET_PASSWORDLESS == "true"
    ? EMBEDDINGS_CONFIG_PASSWORDLESS
    : EMBEDDINGS_KEY_CONFIG;
export function getEmbeddingClient(): AzureOpenAIEmbeddings {
  return new AzureOpenAIEmbeddings({ ...EMBEDDINGS_CONFIG });
}
Azure OpenAI integration for LLM
Use the root .env file created by the Azure Developer CLI to authenticate to the Azure OpenAI resource and create the AzureChatOpenAI client:
const shared = {
  azureOpenAIApiInstanceName: instance,
  azureOpenAIApiDeploymentName: model,
  azureOpenAIApiVersion: apiVersion,
  azureOpenAIBasePath,
  maxTokens: maxTokens ? parseInt(maxTokens, 10) : 100,
  maxRetries: 7,
  timeout: 60000,
  temperature: 0,
};

export const LLM_KEY_CONFIG = {
  azureOpenAIApiKey: key,
  ...shared,
};

export const LLM_CONFIG_PASSWORDLESS = {
  azureADTokenProvider: azureADTokenProvider_OpenAI,
  ...shared,
};

export const LLM_CONFIG =
  process.env.SET_PASSWORDLESS == "true"
    ? LLM_CONFIG_PASSWORDLESS
    : LLM_KEY_CONFIG;
The application uses the AzureChatOpenAI class from LangChain.js @langchain/openai to interact with Azure OpenAI models.
export const callChatCompletionModel = async (
  state: typeof StateAnnotation.State,
  _config: RunnableConfig,
): Promise<typeof StateAnnotation.Update> => {
  const llm = new AzureChatOpenAI({
    ...LLM_CONFIG,
  });

  const completion = await llm.invoke(state.messages);
  completion;

  return {
    messages: [
      ...state.messages,
      {
        role: "assistant",
        content: completion.content,
      },
    ],
  };
};
LangGraph agent workflow
The agent uses LangGraph to define a decision workflow that determines whether a question can be answered using HR documents.
Graph structure:
import { StateGraph } from "@langchain/langgraph";
import {
  START,
  ANSWER_NODE,
  DECISION_NODE,
  route as endRoute,
  StateAnnotation,
} from "./langchain/nodes.js";
import { getAnswer } from "./langchain/node_get_answer.js";
import {
  requiresHrResources,
  routeRequiresHrResources,
} from "./langchain/node_requires_hr_documents.js";

const builder = new StateGraph(StateAnnotation)
  .addNode(DECISION_NODE, requiresHrResources)
  .addNode(ANSWER_NODE, getAnswer)
  .addEdge(START, DECISION_NODE)
  .addConditionalEdges(DECISION_NODE, routeRequiresHrResources)
  .addConditionalEdges(ANSWER_NODE, endRoute);

export const hr_documents_answer_graph = builder.compile();
hr_documents_answer_graph.name = "Azure AI Search + Azure OpenAI";
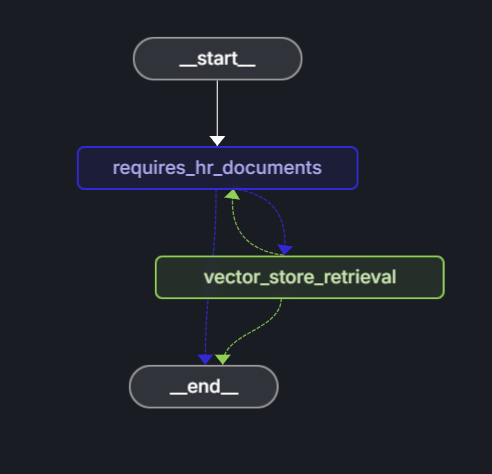
The workflow consists of the following steps:
- Start: User submits a question.
- requires_hr_documents node: LLM determines if the question is answerable from general HR documents.
- Conditional routing:
- If yes, then proceeds to
get_answernode. - If no, then returns message that question requires personal HR data.
- If yes, then proceeds to
- get_answer node: Retrieves documents and generates answer.
- End: Returns answer to user.
This relevance check is important because not all HR questions can be answered from general documents. Personal questions like "How much PTO do I have?" require access to employee databases that contain individual employee data. By checking relevance first, the agent avoids hallucinating answers for questions that need personal information it doesn't have access to.
Decide if the question requires HR documents
The requires_hr_documents node uses an LLM to determine if the user's question can be answered using general HR documents. It uses a prompt template that instructs the model to respond with YES or NO based on the question's relevance. It returns the answer in a structured message, which can be passed along the workflow. The next node uses this response to route the workflow to either the END or the ANSWER_NODE.
// @ts-nocheck
import { getLlmChatClient } from "../azure/llm.js";
import { StateAnnotation } from "../langchain/state.js";
import { RunnableConfig } from "@langchain/core/runnables";
import { BaseMessage } from "@langchain/core/messages";
import { ANSWER_NODE, END } from "./nodes.js";

const PDF_DOCS_REQUIRED = "Answer requires HR PDF docs.";

export async function requiresHrResources(
  state: typeof StateAnnotation.State,
  _config: RunnableConfig,
): Promise<typeof StateAnnotation.Update> {
  const lastUserMessage: BaseMessage = [...state.messages].reverse()[0];

  let pdfDocsRequired = false;

  if (lastUserMessage && typeof lastUserMessage.content === "string") {
    const question = `Does the following question require general company policy information that could be found in HR documents like employee handbooks, benefits overviews, or company-wide policies, then answer yes. Answer no if this requires personal employee-specific information that would require access to an individual's private data, employment records, or personalized benefits details: '${lastUserMessage.content}'. Answer with only "yes" or "no".`;

    const llm = getLlmChatClient();
    const response = await llm.invoke(question);
    const answer = response.content.toLocaleLowerCase().trim();
    console.log(`LLM question (is HR PDF documents required): ${question}`);
    console.log(`LLM answer (is HR PDF documents required): ${answer}`);
    pdfDocsRequired = answer === "yes";
  }

  // If HR documents (aka vector store) are required, append an assistant message to signal this.
  if (!pdfDocsRequired) {
    const updatedState = {
      messages: [
        ...state.messages,
        {
          role: "assistant",
          content:
            "Not a question for our HR PDF resources. This requires data specific to the asker.",
        },
      ],
    };

    return updatedState;
  } else {
    const updatedState = {
      messages: [
        ...state.messages,
        {
          role: "assistant",
          content: `${PDF_DOCS_REQUIRED} You asked: ${lastUserMessage.content}. Let me check.`,
        },
      ],
    };

    return updatedState;
  }
}

export const routeRequiresHrResources = (
  state: typeof StateAnnotation.State,
): typeof END | typeof ANSWER_NODE => {
  const lastMessage: BaseMessage = [...state.messages].reverse()[0];

  if (lastMessage && !lastMessage.content.includes(PDF_DOCS_REQUIRED)) {
    console.log("go to end");
    return END;
  }
  console.log("go to llm");
  return ANSWER_NODE;
};
Get the required HR documents
Once it is determined that the question requires HR documents, the workflow uses getAnswer to retrieve the relevant documents from the vector store, add them to the context of the prompt and pass the entire prompt to the LLM.
import { ChatPromptTemplate } from "@langchain/core/prompts";
import { getLlmChatClient } from "../azure/llm.js";
import { StateAnnotation } from "./nodes.js";
import { AIMessage } from "@langchain/core/messages";
import { getReadOnlyVectorStore } from "../azure/vector_store.js";

const EMPTY_STATE = { messages: [] };

export async function getAnswer(
  state: typeof StateAnnotation.State = EMPTY_STATE,
): Promise<typeof StateAnnotation.Update> {
  const vectorStore = getReadOnlyVectorStore();
  const llm = getLlmChatClient();

  // Extract the last user message's content from the state as input
  const lastMessage = state.messages[state.messages.length - 1];

  const userInput =
    lastMessage && typeof lastMessage.content === "string"
      ? lastMessage.content
      : "";

  const docs = await vectorStore.similaritySearch(userInput, 3);

  if (docs.length === 0) {
    const noDocMessage = new AIMessage(
      "I'm sorry, I couldn't find any relevant information to answer your question.",
    );
    return {
      messages: [...state.messages, noDocMessage],
    };
  }

  const formattedDocs = docs.map((doc) => doc.pageContent).join("\n\n");

  const prompt = ChatPromptTemplate.fromTemplate(`
    Use the following context to answer the question:

    {context}

    Question: {question}
    `);

  const ragChain = prompt.pipe(llm);

  const result = await ragChain.invoke({
    context: formattedDocs,
    question: userInput,
  });

  const assistantMessage = new AIMessage(result.text);

  return {
    messages: [...state.messages, assistantMessage],
  };
}
If no relevant documents are found, the agent returns a message indicating that it couldn't find an answer in the HR documents.
Troubleshooting
For any issues with the procedure, create an issue on the sample code repository
Clean up resources
You can delete the resource group, which holds the Azure AI Search resource and the Azure OpenAI resource or use the Azure Developer CLI to immediately delete all resources created by this tutorial.
azd down --purge