opomba,
Dostop do te strani zahteva pooblastilo. Poskusite se vpisati alispremeniti imenike.
Dostop do te strani zahteva pooblastilo. Poskusite lahko spremeniti imenike.
The recommended approach to authenticate an Azure-hosted app to other Azure resources is to use a managed identity. This approach is supported for most Azure services, including apps hosted on Azure App Service, Azure Container Apps, and Azure Virtual Machines. Discover more about different authentication techniques and approaches on the authentication overview page. In the following sections, you learn about:
- Essential managed identity concepts
- How to create a user-assigned managed identity for your app
- How to assign roles to the user-assigned managed identity
- How to authenticate by using the user-assigned managed identity from your app code
Essential managed identity concepts
A managed identity enables your app to securely connect to other Azure resources without the use of secret keys or other application secrets. Internally, Azure tracks the identity and which resources it's allowed to connect to. Azure uses this information to automatically obtain Microsoft Entra tokens for the app to allow it to connect to other Azure resources.
There are two types of managed identities to consider when configuring your hosted app:
- System-assigned managed identities are enabled directly on an Azure resource and are tied to its life cycle. When the resource is deleted, Azure automatically deletes the identity for you. System-assigned identities provide a minimalistic approach to using managed identities.
- User-assigned managed identities are created as standalone Azure resources and offer greater flexibility and capabilities. They're ideal for solutions involving multiple Azure resources that need to share the same identity and permissions. For example, if multiple virtual machines need to access the same set of Azure resources, a user-assigned managed identity provides reusability and optimized management.
Tip
Learn more about selecting and managing system-assigned and user-assigned managed identities in the Managed identity best practice recommendations article.
The following sections describe the steps to enable and use a user-assigned managed identity for an Azure-hosted app. If you need to use a system-assigned managed identity, see the system-assigned managed identities article for more information.
Create a user-assigned managed identity
User-assigned managed identities are created as standalone resources in your Azure subscription using the Azure portal or the Azure CLI. Azure CLI commands can be run in the Azure Cloud Shell or on a workstation with the Azure CLI installed.
In the Azure portal, enter Managed identities in the main search bar and select the matching result under the Services section.
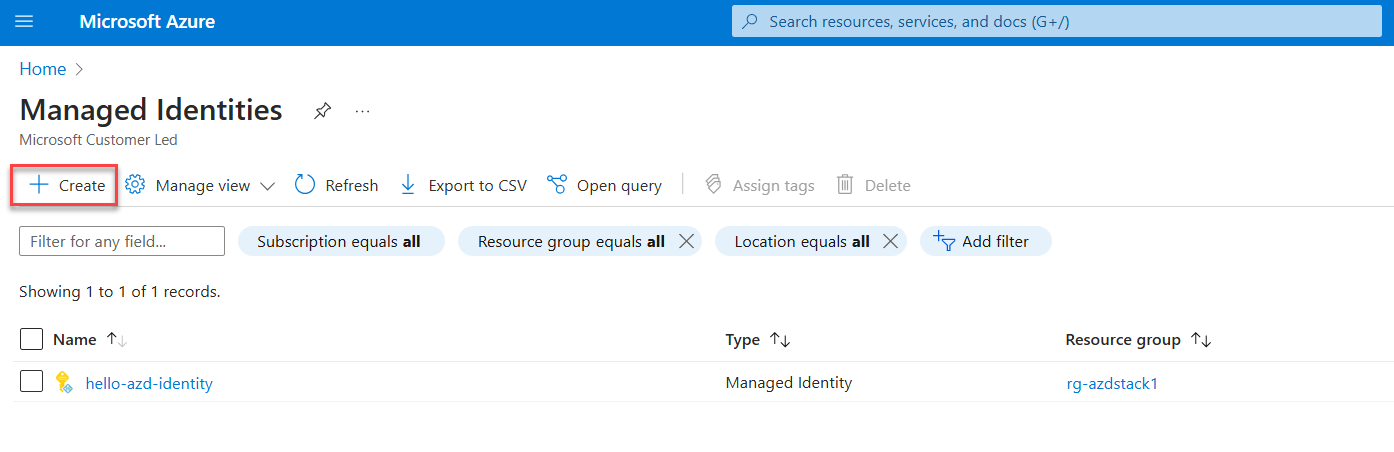
On the Managed Identities page, select + Create.
On the Create User Assigned Managed Identity page, select a subscription, resource group, and region for the user-assigned managed identity, and then provide a name.
Select Review + create to review and validate your inputs.
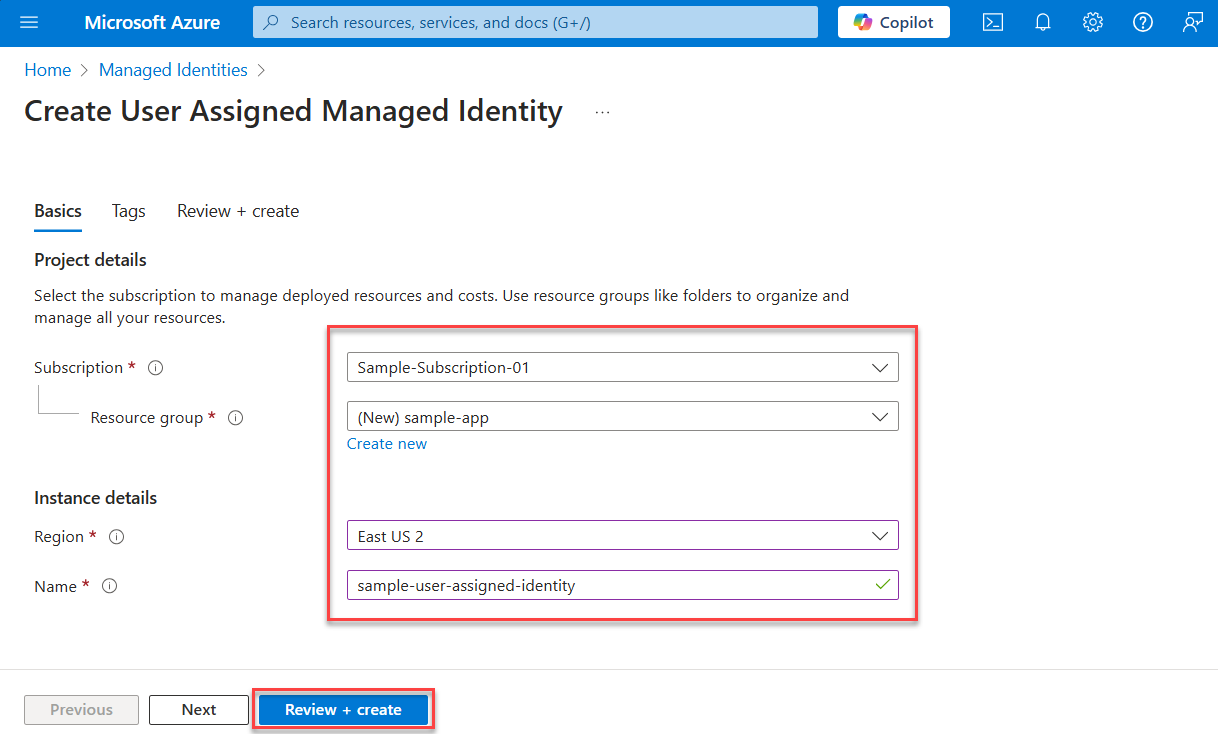
Select Create to create the user-assigned managed identity.
After the identity is created, select Go to resource.
On the new identity's Overview page, copy the Client ID value to use for later when you configure the application code.
Assign the managed identity to your app
A user-assigned managed identity can be associated with one or more Azure resources. All of the resources that use that identity gain the permissions applied through the identity's roles.
In the Azure portal, navigate to the resource that hosts your app code, such as an Azure App Service or Azure Container Apps instance.
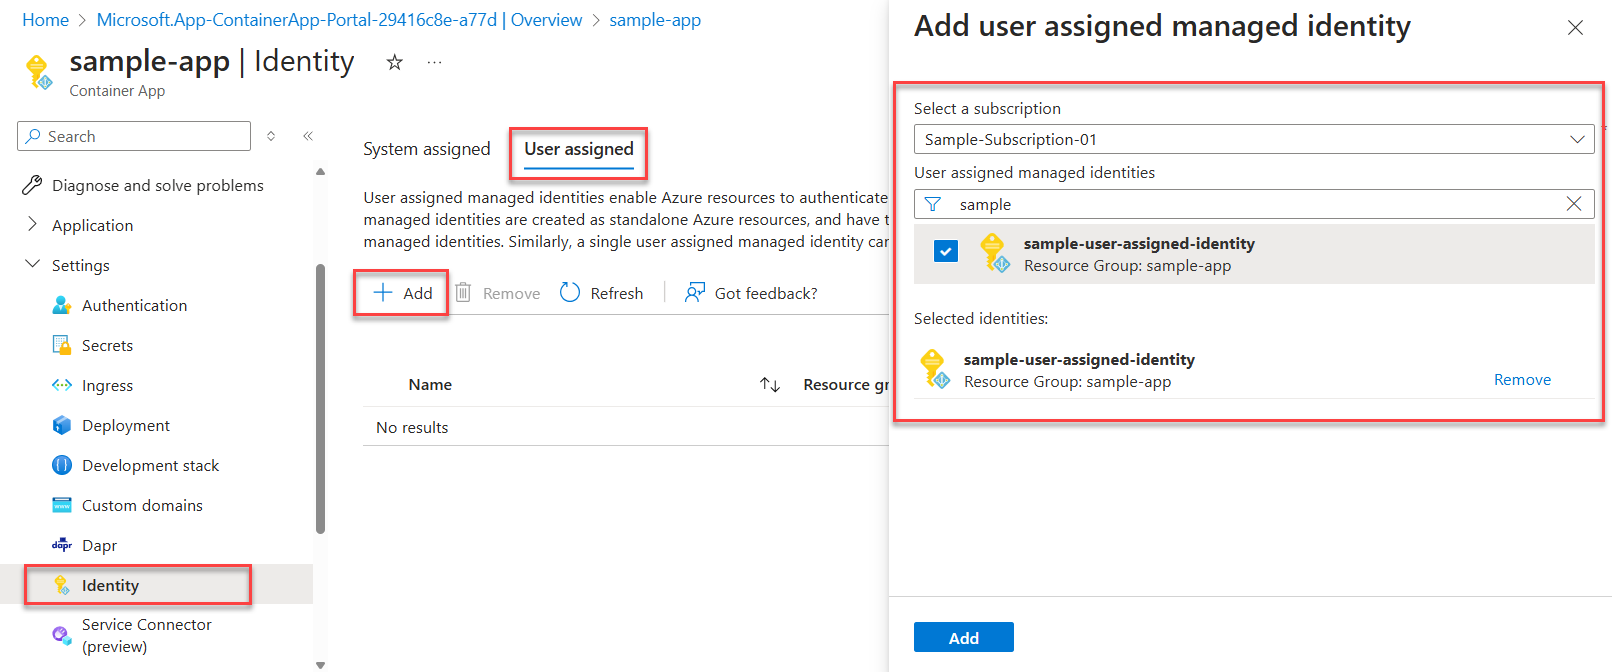
From the resource's Overview page, expand Settings and select Identity from the navigation.
On the Identity page, switch to the User assigned tab.
Select + Add to open the Add user assigned managed identity panel.
On the Add user assigned managed identity panel, use the Subscription dropdown to filter the search results for your identities. Use the User assigned managed identities search box to locate the user-assigned managed identity you enabled for the Azure resource hosting your app.
Select the identity and choose Add at the bottom of the panel to continue.
Assign roles to the managed identity
Next, determine which roles your app needs and assign those roles to the managed identity. You can assign roles to a managed identity at the following scopes:
- Resource: The assigned roles only apply to that specific resource.
- Resource group: The assigned roles apply to all resources contained in the resource group.
- Subscription: The assigned roles apply to all resources contained in the subscription.
The following example shows how to assign roles at the resource group scope, since many apps manage all their related Azure resources using a single resource group.
Navigate to the Overview page of the resource group that contains the app with the user-assigned managed identity.
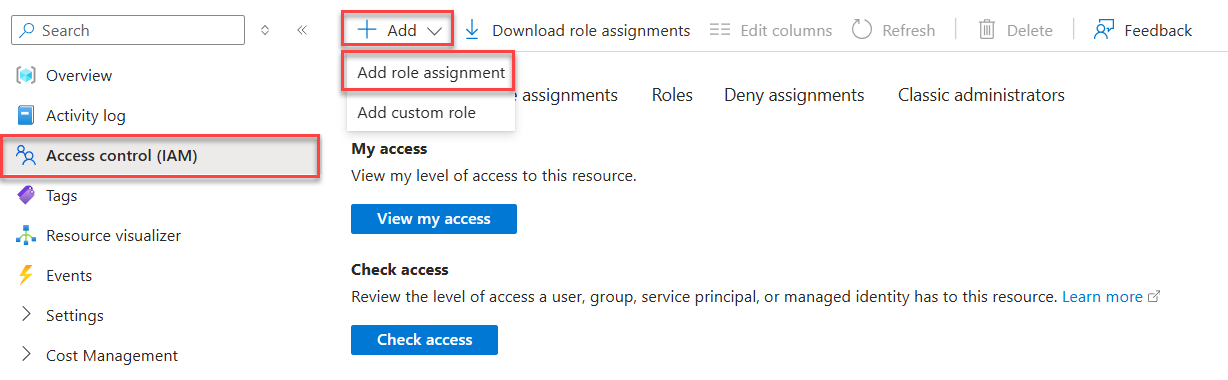
Select Access control (IAM) on the left navigation.
On the Access control (IAM) page, select + Add on the top menu and then choose Add role assignment to navigate to the Add role assignment page.
The Add role assignment page presents a tabbed, multi-step workflow to assign roles to identities. On the initial Role tab, use the search box at the top to locate the role you want to assign to the identity.
Select the role from the results and then choose Next to move to the Members tab.
For the Assign access to option, select Managed identity.
For the Members option, choose + Select members to open the Select managed identities panel.
On the Select managed identities panel, use the Subscription and Managed identity dropdowns to filter the search results for your identities. Use the Select search box to locate the user-assigned managed identity you enabled for the Azure resource hosting your app.
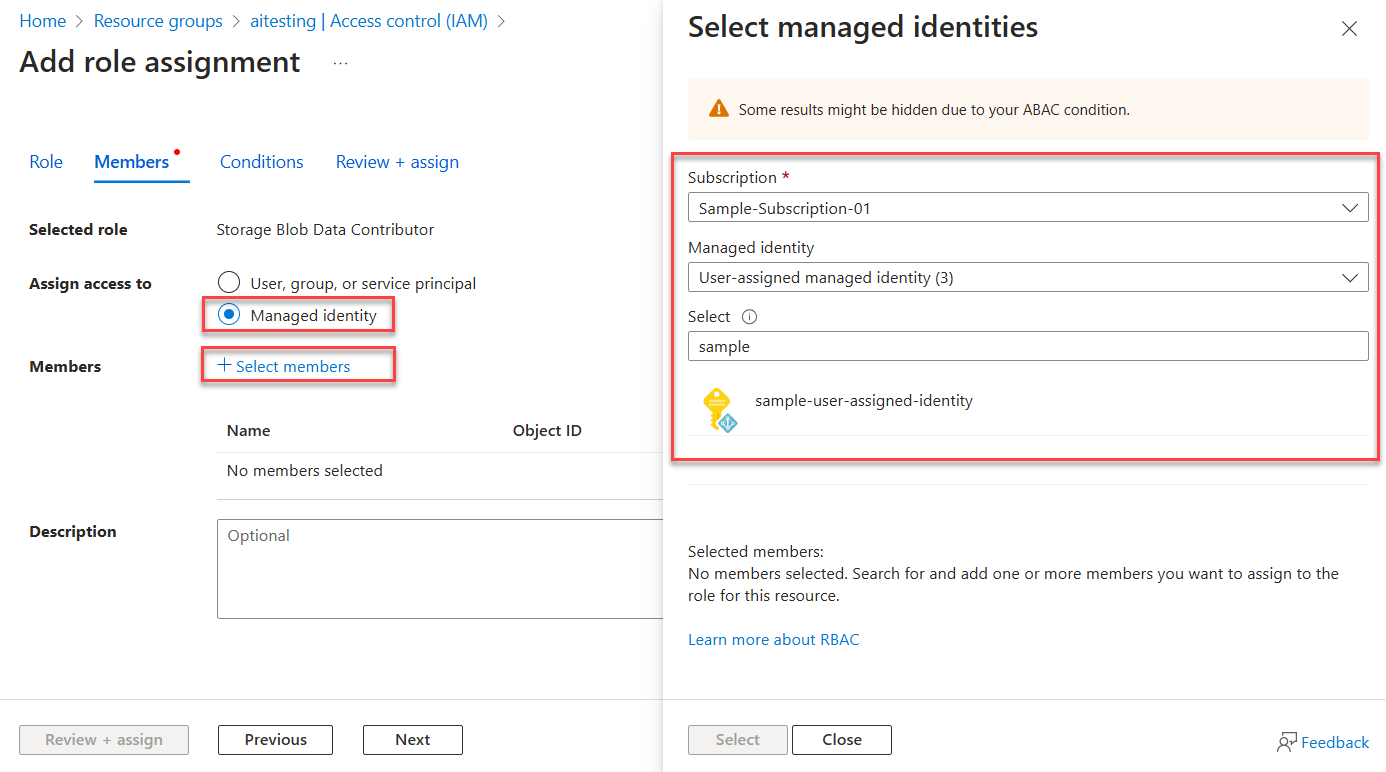
Select the identity and choose Select at the bottom of the panel to continue.
Select Review + assign at the bottom of the page.
On the final Review + assign tab, select Review + assign to complete the workflow.
Authenticate to Azure services from your app
The azure_identity crate provides
various credentials — implementations of TokenCredential that support
different scenarios and Microsoft Entra authentication flows. Since managed
identity isn't available when you run locally, the following guidance explains
which credential to use in each scenario:
- Local dev environment: During local development only, use
DeveloperToolsCredentialfor a simplified chain of developer tool credentials.DeveloperToolsCredentialtries to authenticate by using developer tools such as the Azure CLI, and stops when one succeeds. To learn more, see Authenticate to Azure services during local development. - Azure-hosted apps: When your app is running in Azure, use
ManagedIdentityCredential.
Implement the code
Add the azure_identity crate.
In a terminal, go to the application project directory and run:
cargo add azure_identity
Specialized clients from the various Azure SDK crates access Azure services. For any Rust code that instantiates an Azure SDK client in your app, you need to:
- Import the
azure_identitycrate. - Create an instance of
ManagedIdentityCredentialwith the identity of your user-assigned managed identity. - Pass the
ManagedIdentityCredentialinstance to the Azure SDK client constructor.
The ManagedIdentityCredentialOptions struct accepts a UserAssignedId enum to specify which user-assigned identity to authenticate. You can identify the managed identity by using its client ID, object (principal) ID, or Azure resource ID.
The most common approach is to use the client ID of the user-assigned managed identity:
use azure_identity::{ManagedIdentityCredential, ManagedIdentityCredentialOptions, UserAssignedId};
use azure_security_keyvault_secrets::SecretClient;

#[tokio::main]
async fn main() -> Result<(), Box<dyn std::error::Error>> {
    // Create a user-assigned managed identity credential
    let options = ManagedIdentityCredentialOptions {
        user_assigned_id: Some(UserAssignedId::ClientId(String::from("abcd1234-..."))),
        ..Default::default()
    };
    let credential = ManagedIdentityCredential::new(Some(options))?;

    // Create a client for the specified Key Vault
    let client = SecretClient::new(
        "https://<your-key-vault-name>.vault.azure.net/",
        credential.clone(),
        None,
    )?;

    // Use the client to interact with Azure Key Vault
    // let secret = client.get("secret-name", None).await?;

    Ok(())
}
Important
In production, use
ManagedIdentityCredential
to authenticate with the managed identity assigned to your app.
During local development, you can use DeveloperToolsCredential to authenticate by using your developer tools. For more information, see the local development authentication article.