Integrating Key Vault with Integrated Certificate Authorities
Azure Key Vault allows you to easily provision, manage, and deploy digital certificates for your network and to enable secure communications for applications. A digital certificate is an electronic credential that establishes proof of identity in an electronic transaction.
Azure Key Vault has a trusted partnership with the following Certificate Authorities:
Azure Key Vault users can generate DigiCert/GlobalSign certificates directly from their key vaults. Key Vault's partnership ensures end-to-end certificate lifecycle management for certificates issued by DigiCert.
For more general information about certificates, see Azure Key Vault certificates.
If you don't have an Azure subscription, create a free account before you start.
Prerequisites
To complete the procedures in this article, you need to have:
- A key vault. You can use an existing key vault or create one by completing the steps in one of these quickstarts:
- An activated DigiCert CertCentral account. Sign up for your CertCentral account.
- Administrator-level permissions in your accounts.
Before you begin
DigiCert
Make sure you have the following information from your DigiCert CertCentral account:
- CertCentral account ID
- Organization ID
- API key
- Account ID
- Account Password
GlobalSign
Make sure you have the following information from your Global Sign account:
- Account ID
- Account Password
- First Name of Administrator
- Last Name of Administrator
- E-mail of Administrator
- Phone Number of Administrator
Add the certificate authority in Key Vault
After you gather the preceding information from your DigiCert CertCentral account, you can add DigiCert to the certificate authority list in the key vault.
Azure portal (DigiCert)
To add DigiCert certificate authority, go to the key vault you want to add it to.
On the Key Vault property page, select Certificates.
Select the Certificate Authorities tab:

Select Add:

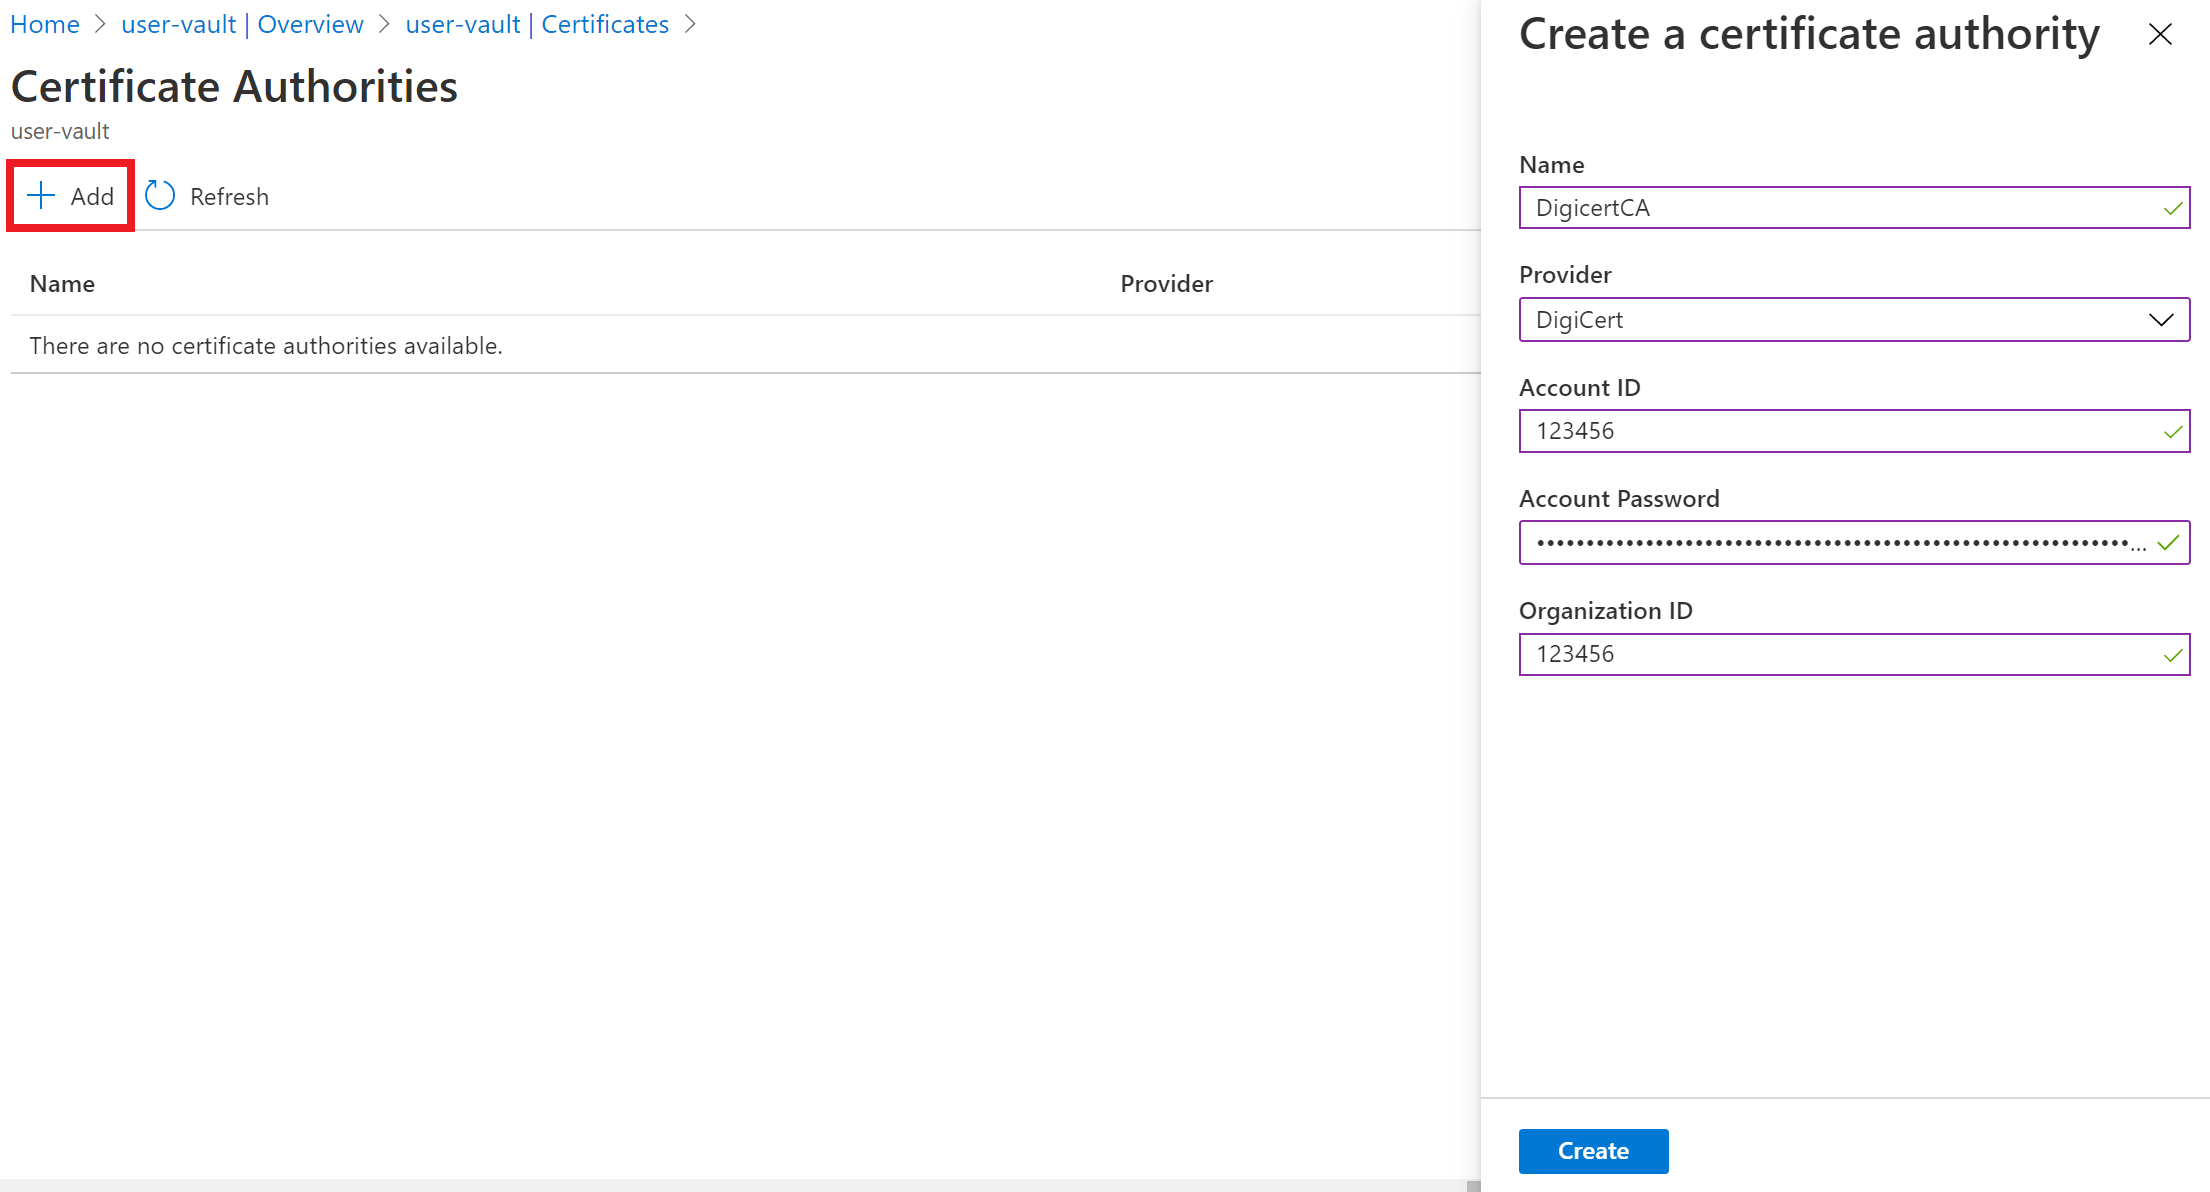
Under Create a certificate authority, enter these values:
- Name: An identifiable issuer name. For example, DigiCertCA.
- Provider: DigiCert.
- Account ID: Your DigiCert CertCentral account ID.
- Account Password: The API key you generated in your DigiCert CertCentral account.
- Organization ID: The organization ID from your DigiCert CertCentral account.
Select Create.
DigicertCA is now in the certificate authority list.
Azure portal (GlobalSign)
To add GlobalSign certificate authority, go to the key vault you want to add it to.
On the Key Vault property page, select Certificates.
Select the Certificate Authorities tab:

Select Add:

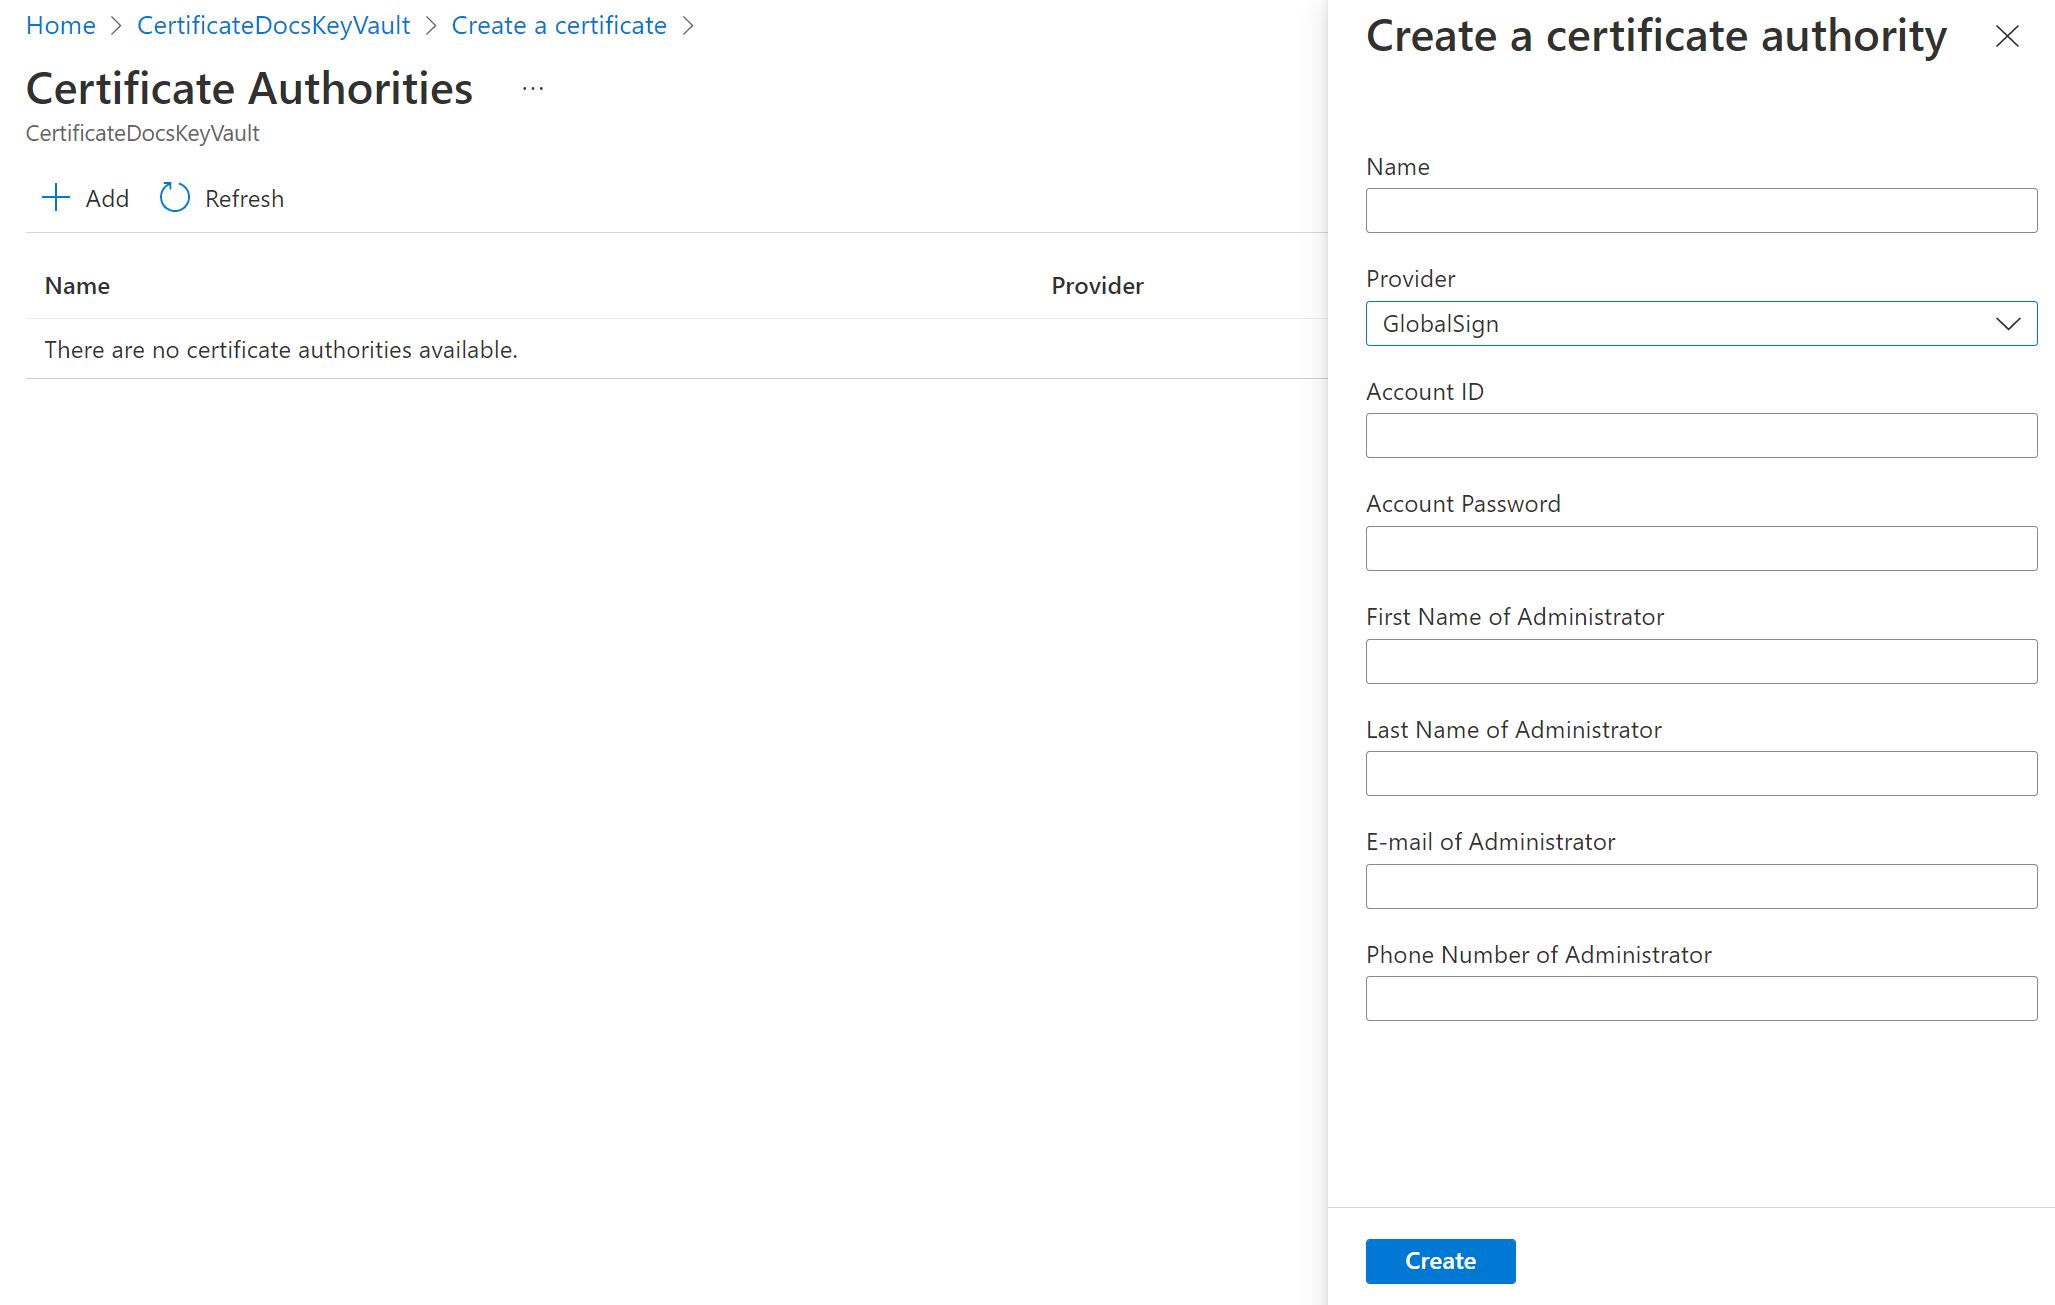
Under Create a certificate authority, enter these values:
- Name: An identifiable issuer name. For example, GlobalSignCA.
- Provider: GlobalSign.
- Account ID: Your GlobalSign account ID.
- Account Password: Your GlobalSign account password.
- First Name of Administrator: The first name of administrator of the Global Sign account.
- Last Name of Administrator: The last name of administrator of the Global Sign account.
- E-mail of Administrator: The email of administrator of the Global Sign account.
- Phone number of Administrator: The phone number of administrator of the Global Sign account.
Select Create.
GlobalSignCA is now in the certificate authority list.
Azure PowerShell
You can use Azure PowerShell to create and manage Azure resources by using commands or scripts. Azure hosts Azure Cloud Shell, an interactive shell environment that you can use through the Azure portal in a browser.
- If you choose to use Azure PowerShell locally:
- Install the latest version of the Az PowerShell module.
- Connect to your Azure account using the Connect-AzAccount cmdlet.
- If you choose to use Azure Cloud Shell:
- See Overview of Azure Cloud Shell for more information.
Create an Azure resource group by using New-AzResourceGroup. A resource group is a logical container into which Azure resources are deployed and managed.
New-AzResourceGroup -Name ContosoResourceGroup -Location EastUSCreate a key vault that has a unique name. Here,
Contoso-Vaultnameis the name for the key vault.- Vault name:
Contoso-Vaultname - Resource group name:
ContosoResourceGroup - Location:
EastUS
New-AzKeyVault -Name 'Contoso-Vaultname' -ResourceGroupName 'ContosoResourceGroup' -Location 'EastUS'- Vault name:
Define variables for the following values from your DigiCert CertCentral account:
- Account ID
- Organization ID
- API Key
$accountId = "myDigiCertCertCentralAccountID"
$org = New-AzKeyVaultCertificateOrganizationDetail -Id OrganizationIDfromDigiCertAccount
$secureApiKey = ConvertTo-SecureString DigiCertCertCentralAPIKey -AsPlainText –Force
Set the issuer. Doing so will add Digicert as a certificate authority in the key vault. Learn more about the parameters.
Set-AzKeyVaultCertificateIssuer -VaultName "Contoso-Vaultname" -Name "TestIssuer01" -IssuerProvider DigiCert -AccountId $accountId -ApiKey $secureApiKey -OrganizationDetails $org -PassThruSet the policy for the certificate and issuing certificate from DigiCert directly in Key Vault:
$Policy = New-AzKeyVaultCertificatePolicy -SecretContentType "application/x-pkcs12" -SubjectName "CN=contoso.com" -IssuerName "TestIssuer01" -ValidityInMonths 12 -RenewAtNumberOfDaysBeforeExpiry 60
Add-AzKeyVaultCertificate -VaultName "Contoso-Vaultname" -Name "ExampleCertificate" -CertificatePolicy $Policy
The certificate is now issued by DigiCert certificate authority in the specified key vault.
Troubleshoot
If the certificate issued is in disabled status in the Azure portal, view the certificate operation to review the DigiCert error message for the certificate:

Error message: "Please perform a merge to complete this certificate request."
Merge the CSR signed by the certificate authority to complete the request. For information about merging a CSR, see Create and merge a CSR.
For more information, see Certificate operations in the Key Vault REST API reference. For information on establishing permissions, see Vaults - Create or update and Vaults - Update access policy.