Tutorial: Create workflows that process emails using Azure Logic Apps, Azure Functions, and Azure Storage
Applies to: Azure Logic Apps (Consumption)
This tutorial shows how to build an example workflow that integrates Azure Functions and Azure Storage by using Azure Logic Apps. This example specifically creates a Consumption logic app workflow that handles incoming emails and any attachments, analyzes the email content using Azure Functions, saves the content to Azure storage, and sends email for reviewing the content.
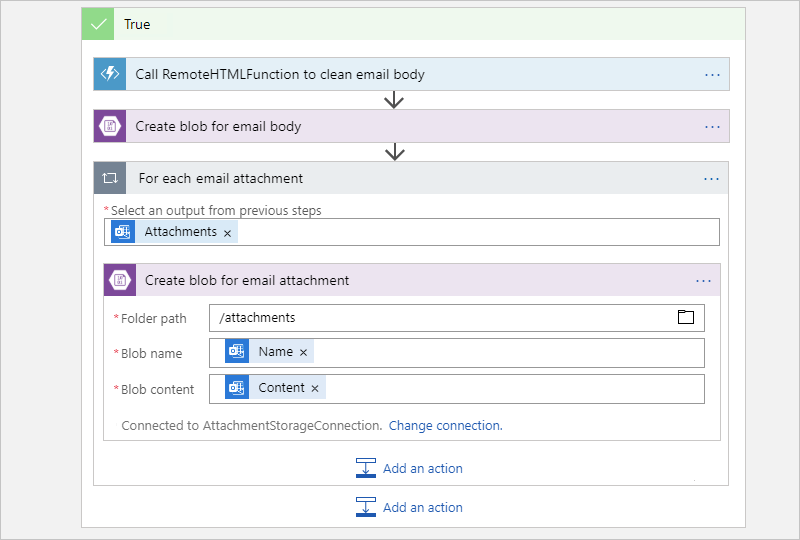
When you finish, your workflow looks like the following high level example:
Tip
To learn more, you can ask Azure Copilot these questions:
- What's Azure Logic Apps?
- What's Azure Functions?
- What's Azure Storage?
- What's a Consumption logic app workflow?
To find Azure Copilot, on the Azure portal toolbar, select Copilot.
You can create a similar workflow with a Standard logic app resource where some connector operations, such as Azure Blob Storage, are also available as built-in, service provider-based operations. However, the user experience and tutorial steps vary slightly from the Consumption version.
Prerequisites
An Azure account and subscription. If you don't have a subscription, sign up for a free Azure account.
An email account from an email provider supported by Azure Logic Apps, such as Office 365 Outlook, Outlook.com, or Gmail. For other supported email providers, see Connectors for Azure Logic Apps.
This example uses Office 365 Outlook with a work or school account. If you use a different email account, the general steps stay the same, but the user experience might slightly differ. If you use Outlook.com, use your personal Microsoft account instead to sign in.
Note
If you want to use the Gmail connector, only G-Suite business accounts can use this connector without restriction in logic app workflows. If you have a Gmail consumer account, you can use this connector with only specific Google-approved services, or you can create a Google client app to use for authentication with your Gmail connector. For more information, see Data security and privacy policies for Google connectors in Azure Logic Apps.
Download and install the free Microsoft Azure Storage Explorer. This tool helps you check that your storage container is correctly set up.
If your workflow needs to communicate through a firewall that limits traffic to specific IP addresses, that firewall needs to allow access for both the inbound and outbound IP addresses used by Azure Logic Apps in the Azure region where your logic app resource exists. If your workflow also uses managed connectors, such as the Office 365 Outlook connector or SQL connector, or uses custom connectors, the firewall also needs to allow access for all the managed connector outbound IP addresses in your logic app's Azure region.
Set up storage to save attachments
The following steps set up Azure storage so that you can store incoming emails and attachments as blobs.
In the Azure portal, sign in with your Azure account credentials.
Follow these steps to create a storage account unless you already have one.
On the Basics tab, provide the following information:
Property Required Value Description Subscription Yes <Azure-subscription-name> Your Azure subscription name.
This example uses Pay-As-You-Go.Resource group Yes <Azure-resource-group> The name for the Azure resource group used to organize and manage related resources.
Note: A resource group exists inside a specific region. Although the items in this tutorial might not be available in all regions, try to use the same region when possible.
This example uses LA-Tutorial-RG.Storage account name Yes <Azure-storage-account-name> Your unique storage account name, which must have 3-24 characters and can contain only lowercase letters and numbers.
This example uses attachmentstorageacct.Region Yes <Azure-region> The Azure data region for your storage account.
This example uses West US.Primary service No <Azure-storage-service> The primary storage type to use in your storage account. See Review options for storing data in Azure. Performance Yes - Standard
- PremiumThis setting specifies the data types supported and media for storing data. See Storage account overview.
This example uses Standard.Redundancy Yes - Locally-redundant storage
- Geo-redundant storage (GRS)This setting enables storing multiple copies of your data as protection from planned and unplanned events. For more information, see Azure Storage redundancy.
This example uses Geo-redundant storage (GRS).To create your storage account, you can also use Azure PowerShell or Azure CLI.
When you're ready, select Review + create. After Azure validates the information about your storage account resource, select Create.
After Azure deploys your storage account, select Go to resource. Or, find and select your storage account by using the Azure search box.
Get the storage account's access key by following these steps:
On the storage account menu, under Security + networking, select Access keys.
Copy the storage account name and key1. Save these values somewhere safe to use later.
To get your storage account's access key, you can also use Azure PowerShell or Azure CLI.
Create a blob storage container for your email attachments.
On the storage account menu, under Data storage, select Containers.
On the Containers page toolbar, select Container.
On the New container pane, provide the following information:
Property Value Description Name attachments The container name. Anonymous access level Container (anonymous read access for containers and blobs) Select Create.
After you finish, the containers list now shows the new storage container.
To create a storage container, you can also use Azure PowerShell or Azure CLI.
Next, connect Storage Explorer to your storage account.
Set up Storage Explorer
The following steps connect Storage Explorer to your storage account so to you can confirm that your workflow correctly saves attachments as blobs in your storage container.
Launch Microsoft Azure Storage Explorer. Sign in with your Azure account.
Note
If no prompt appears, on the Storage Explorer activity bar, select Account Management (profile icon).
In the Select Azure Environment window, select your Azure environment, and then select Next.
This example continues by selecting global, multitenant Azure.
In the browser window that appears, sign in with your Azure account.
Return to Storage Explorer and the Account Management window. Confirm that the correct Microsoft Entra tenant and subscription are selected.
On the Storage Explorer activity bar, select Open Connect Dialog.
In the Select Resource window, select Storage account or service.
In the Select Connection Method window, select Account name and key > Next.
In the Connect to Azure Storage window, provide the following information:
Property Value Display name A friendly name for your connection Account name Your storage account name Account key The access key that you previously saved For Storage domain, confirm that Azure (core.windows.net) is selected, and select Next.
On the Summary window, confirm your connection information, and select Connect.
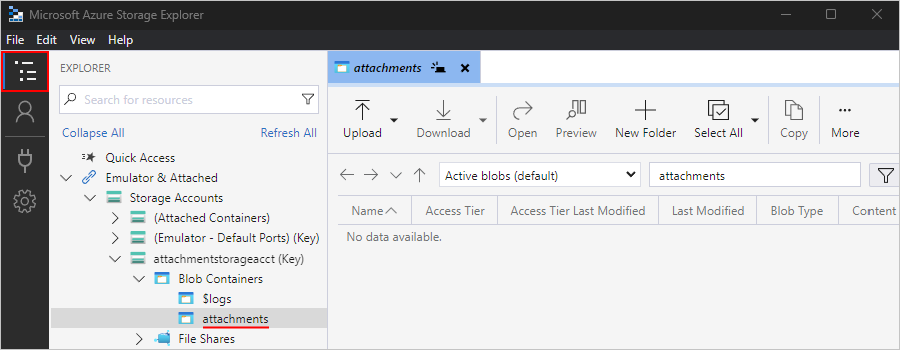
Storage Explorer creates the connection. Your storage account appears in the Explorer window under Emulator & Attached > Storage Accounts.
To find your blob storage container, under Storage Accounts, expand your storage account, which is attachmentstorageacct for this example. Under Blob Containers where you find the attachments container, for example:
Next, create an Azure function app and a function that removes HTML from content.
Create a function app
The following steps create an Azure function that your workflow calls to remove HTML from incoming email.
Before you can create a function, create a function app by selecting the Consumption plan and following these steps:
On the Basics tab, provide the following information:
Property Required Value Description Subscription Yes <Azure-subscription-name> The same Azure subscription that you previously used for your storage account. Resource Group Yes <Azure-resource-group-name> The same Azure resource group that you previously used for your storage account.
For this example, select LA-Tutorial-RG.Function App name Yes <function-app-name> Your function app name, which must be unique across Azure regions and can contain only letters (case insensitive), numbers (0-9), and hyphens (-).
This example already uses CleanTextFunctionApp, so provide a different name, such as MyCleanTextFunctionApp-<your-name>Runtime stack Yes <programming-language> The runtime for your preferred function programming language. For C# and F# functions, select .NET.
This example uses .NET.
In-portal editing is only available for the following languages:
- JavaScript
- PowerShell
- TypeScript
- C# script
You must locally develop any C# class library, Java, and Python functions.Version Yes <version-number> Select the version for your installed runtime. Region Yes <Azure-region> The same region that you previously used.
This example uses West US.Operating System Yes <your-operating-system> An operating system is preselected for you based on your runtime stack selection, but you can select the operating system that supports your favorite function programming language. In-portal editing is only supported on Windows.
This example selects Windows.Select Next: Storage. On the Storage tab, provide the following information:
Property Required Value Description Storage account Yes <Azure-storage-account-name> Create a storage account for your function app to use. Storage account names must be between 3 and 24 characters in length and can contain only lowercase letters and numbers.
This example uses cleantextfunctionstorageacct.
Note: This storage account contains your function apps and differs from your previously created storage account for email attachments. You can also use an existing account, which must meet the storage account requirements.When you finish, select Review + create. After Azure validates the provided information, select Create.
After Azure deploys the function app resource, select Go to resource.
Create function to remove HTML
The following steps create an Azure function in C# that removes HTML from each incoming email by using the sample code snippet. This function makes the email content cleaner and easier to process. You can call this function from your workflow.
In the Azure portal, open your function app, if not already open.
To run your function later in the Azure portal, set up your function app to explicitly accept requests from the portal. On the function app menu, under API, select CORS. Under Allowed Origins, enter
https://portal.azure.com, and select Save.On the function app menu, select Overview. On the Functions tab, select Create.
Note
If you don't see the Create button, select an option to create your function locally.
Follow these generic steps to create your function in C# using the HTTP trigger template, and provide the following information for your function:
Parameter Value Function name RemoveHTMLFunction Authorization level Function On the Code + Test tab, enter the following C# sample code, which removes HTML and returns the results to the caller.
#r "Newtonsoft.Json" using System.Net; using Microsoft.AspNetCore.Mvc; using Microsoft.Extensions.Primitives; using Newtonsoft.Json; using System.Text.RegularExpressions; public static async Task<IActionResult> Run(HttpRequest req, ILogger log) { log.LogInformation("HttpWebhook triggered"); // Parse query parameter string emailBodyContent = await new StreamReader(req.Body).ReadToEndAsync(); // Replace HTML with other characters string updatedBody = Regex.Replace(emailBodyContent, "<.*?>", string.Empty); updatedBody = updatedBody.Replace("\\r\\n", " "); updatedBody = updatedBody.Replace(@" ", " "); // Return cleaned text return (ActionResult)new OkObjectResult(new {updatedBody}); }When you finish, on the Code + Test toolbar, select Save, and then select Test/Run.
On the Test/Run pane, on the Input tab, in the Body box, enter following sample input, and select Run:
{"name": "<p><p>Testing my function</br></p></p>"}Your function's output looks like the following result:
{"updatedBody": "{\"name\": \"Testing my function\"}"}
After you confirm that your function works, create your logic app resource and workflow. Although this tutorial shows how to create a function that removes HTML from emails, Azure Logic Apps also provides an HTML to Text connector.
Create a Consumption logic app resource
In the Azure portal search box, enter logic app, and select Logic apps.
On the Logic apps page toolbar, select Add.
The Create Logic App page appears and shows the following options:
Plan Description Consumption Creates a logic app resource that supports only one workflow that runs in multitenant Azure Logic Apps and uses the Consumption model for billing. Standard Creates a logic app resource that supports multiple workflows. You have the following options:
- Workflow Service Plan: Workflows run in single-tenant Azure Logic Apps and use the Standard model for billing.
- App Service Environment V3: Workflows run in single-tenant Azure Logic Apps and use an App Service Environment plan for billing.
- Hybrid (Preview): Workflows run on premises and in multiple clouds using Kubernetes Event-driven Autoscaling (KEDA). For more information, see Create Standard workflows for hybrid deployment.On the Create Logic App page, select Consumption (Multi-tenant).
On the Basics tab, provide the following information about your logic app resource:
Parameter Required Value Description Subscription Yes <Azure-subscription-name> The same Azure subscription that you previously used. Resource Group Yes LA-Tutorial-RG The same Azure resource group that you previously used. Logic App name Yes <logic-app-name> Your logic app resource name, which must be unique across regions and can contain only letters, numbers, hyphens (-), underscores (_), parentheses (()), and periods (.).
This example creates a logic app resource named LA-ProcessAttachment. A Consumption logic app and workflow always have the same name.Region Yes West US The same region that you previously used. Enable log analytics Yes No Change this option only when you want to enable diagnostic logging. For this tutorial, keep the default selection.
Note: This option is available only with Consumption logic apps.Note
Availability zones are automatically enabled for new and existing Consumption logic app workflows in Azure regions that support availability zones. For more information, see Reliability in Azure Functions and Protect logic apps from region failures with zone redundancy and availability zones.
When you're ready, select Review + create. After Azure validates the information about your logic app resource, select Create.
After Azure deploys your logic app resource, select Go to resource. Or, find and select your logic app resource by using the Azure search box.
Add a trigger to monitor incoming email
The following steps add a trigger that waits for incoming emails that have attachments.
On the logic app menu, under Development Tools, select Logic app designer.
On the workflow designer, follow these general steps to add the Office 365 Outlook trigger named When a new email arrives.
The Office 365 Outlook connector requires that you sign in with a Microsoft work or school account. If you're using a personal Microsoft account, use the Outlook.com connector.
Sign in to your email account, which creates a connection between your workflow and your email account.
In the trigger information box, from the Advanced parameters list, add the following parameters, if they don't appear, and provide the following information:
Parameter Value Description Importance Any Specifies the importance level of the email that you want. Only with Attachments Yes Get only emails with attachments.
Note: The trigger doesn't remove any emails from your account, checking only new messages and processing only emails that match the subject filter.Include Attachments Yes Get the attachments as input for your workflow, rather than just check for attachments. Folder Inbox The email folder to check. Subject Filter Business Analyst 2 #423501 Specifies the text to find in the email subject. When you finish, the trigger looks similar to the following example:

Save your workflow. On the designer toolbar, select Save.
Your workflow is now live but doesn't do anything other check your emails. Next, add a condition that specifies criteria to continue subsequent actions in the workflow.
Add a condition to check for attachments
The following steps add a condition that selects only emails that have attachments.
On the workflow designer, follow these general steps to add the Control action named Condition.
In the Condition action information pane, rename the action with If email has attachments and key subject phrase.
Build a condition that checks for emails that have attachments.
On the Parameters tab, in the first row under the AND list, select inside the left box, and then select the dynamic content list (lightning icon). From this list, in the trigger section, select the Has Attachment output.
Tip
If you don't see the Has Attachment output, select See More.
In the middle box, keep the operator named is equal to.
In the right box, enter true, which is the value to compare with the Has Attachment output value from the trigger. If both values are equal, the email has at least one attachment, the condition passes, and the workflow continues.
In your underlying workflow definition, which you can view by selecting Code view on the designer toolbar, the condition looks similar to the following example:
"Condition": {
   "actions": { <actions-to-run-when-condition-passes> },
   "expression": {
      "and": [ {
         "equals": [
            "@triggerBody()?['HasAttachment']",
              "true"
         ]
      } ]
   },
   "runAfter": {},
   "type": "If"
}
Save your workflow.
Test your condition
On the designer toolbar, select Run > Run.
This step manually starts and runs your workflow, but nothing happens until you send a test email to your inbox.
Send yourself an email that meets the following criteria:
Your email's subject has the text that you specified in the trigger's Subject Filter: Business Analyst 2 #423501
Your email has one attachment. For now, just create one empty text file and attach that file to your email.
When the email arrives, your workflow checks for attachments and the specified subject text. If the condition passes, the trigger fires and causes Azure Logic Apps to instantiate and run a workflow instance.
To check that the trigger fired and the workflow successfully ran, on the logic app menu, select Overview.
To view successfully run workflows, select Runs history.
To view successfully fired triggers, select Trigger history.
If the trigger didn't fire, or the workflow didn't run despite a successful trigger, see Troubleshoot your logic app workflow.
Next, define the actions to take for the True branch. To save the email along with any attachments, remove any HTML from the email body, then create blobs in the storage container for the email and attachments.
Note
Your workflow can leave the False branch empty and not take any actions when an email doesn't have attachments. As a bonus exercise after you finish this tutorial, you can add any appropriate action that you want to take for the False branch.
Call the RemoveHTMLFunction
The following steps add your previously created Azure function, which accepts the email body content from the email trigger as input.
On the logic app menu, under Development Tools, select Logic app designer. In the True branch, select Add an action.
Follow these general steps to add the Azure Functions action named Choose an Azure function.
Select your previously created function app, which is CleanTextFunctionApp in this example.
Select your function, which is named RemoveHTMLFunction in this example, and then select Add Action.
In the Azure Functions action information pane, rename the action with Call RemoveHTMLFunction.
Now specify the input for your function to process.
For Request Body, enter the following text with a trailing space:
{ "emailBody":While you work on this input in the next steps, an error about invalid JSON appears until your input is correctly formatted as JSON. When you previously tested this function, the input specified for this function used JavaScript Object Notation (JSON). So, the request body must also use the same format.
Select inside the Request Body box, and then select the dynamic content list (lightning icon) so that you can select outputs from previous actions.
From the dynamic content list, under When a new email arrives, select the Body output. After this value resolves in the Request Body box, remember to add the closing curly brace (}).
When you finish, the Azure function looks like the following example:
Save your workflow.
Next, add an action that creates a blob to store the email body.
Add an action to create a blob for email body
The following steps create a blob that stores the email body in your storage container.
On the designer, in the condition's True block, under your Azure function, select Add an action.
Follow these general steps to add the Azure Blob Storage action named Create blob.
Provide the connection information for your storage account, for example:
Parameter Required Value Description Connection Name Yes <connection-name> A descriptive name for the connection.
This example uses AttachmentStorageConnection.Authentication Type Yes <authentication-type> The authentication type to use for the connection.
This example uses Access Key.Azure Storage Account Name Or Blob Endpoint Yes <storage-account-name> The name for your previously created storage account.
This example uses attachmentstorageacct.Azure Storage Account Access Key Yes <storage-account-access-key> The access key for your previously created storage account. When you finish, select Create New.
In the Create blob action information pane, rename the action with Create blob for email body.
Provide the following action information:
Tip
If you can't find a specified output in the dynamic content list, select See more next to the operation name.
Parameter Required Value Description Storage Account Name Or Blob Endpoint Yes Use connection settings(<storage-account-name-or-blob-endpoint>) Select the option that includes your storage account name.
This example useshttps://attachmentstorageacct.blob.core.windows.net.Folder Path Yes <path-and-container-name> The path and name for the container that you previously created.
For this example, select the folder icon, and then select attachments.Blob Name Yes <sender-name> For this example, use the sender name as the blob name.
1. Select inside the Blob Name box, and then select the dynamic content list option (lightning icon).
2. From the When a new email arrives section, select From.Blob Content Yes <cleaned-email-body> For this example, use the HTML-free email body as the blob content.
1. Select inside the Blob Content box, and then select the dynamic content list option (lightning icon).
2. From the Call RemoveHTMLFunction section, select Body.The following screenshot shows the outputs to select for the Create blob for email body action:
When you finish, the action looks like the following example:
Save your workflow.
Test attachment handling
On the designer toolbar, select Run > Run.
This step manually starts and runs your workflow, but nothing happens until you send a test email to your inbox.
Send yourself an email that meets the following criteria:
Your email's subject has the text that you specified in the trigger's Subject Filter parameter: Business Analyst 2 #423501
Your email has one or more attachments. For now, just create one empty text file, and attach that file to your email.
Your email has some test content in the body, for example: Testing my logic app workflow
If your workflow didn't trigger or run despite a successful trigger, see Troubleshoot your logic app workflow.
Check that your workflow saved the email to the correct storage container.
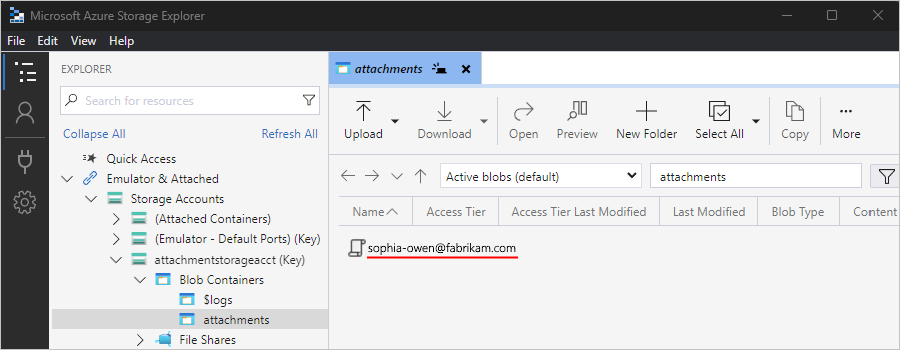
In Storage Explorer, expand Emulator & Attached > Storage Accounts > attachmentstorageacct (Key) > Blob Containers > attachments.
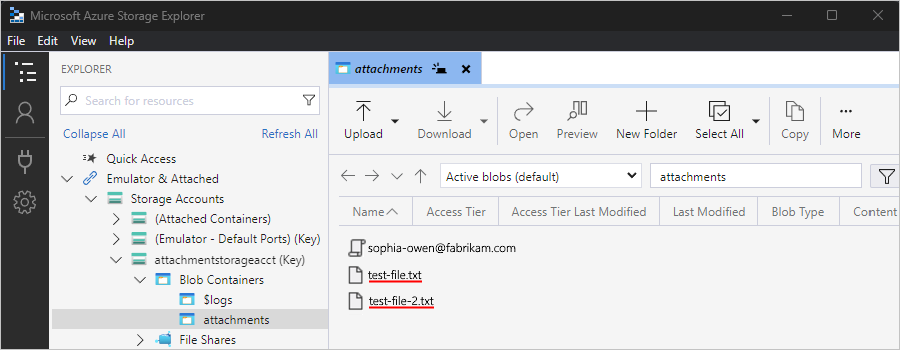
Check the attachments container for the email.
At this point, only the email appears in the container because the workflow hasn't processed the attachments yet.
When you finish, delete the email in Storage Explorer.
Optionally, to test the False branch, which does nothing at this time, you can send an email that doesn't meet the criteria.
Next, add a For each loop to process each email attachment.
Add a loop to process attachments
The following steps add a loop to process each attachment in the email.
Return to the workflow designer. Under the Create blob for email body action, select Add an action.
Follow these general steps to add the Control action named For each.
In the For each action information pane, rename the action with For each email attachment.
Now select the content for the loop to process.
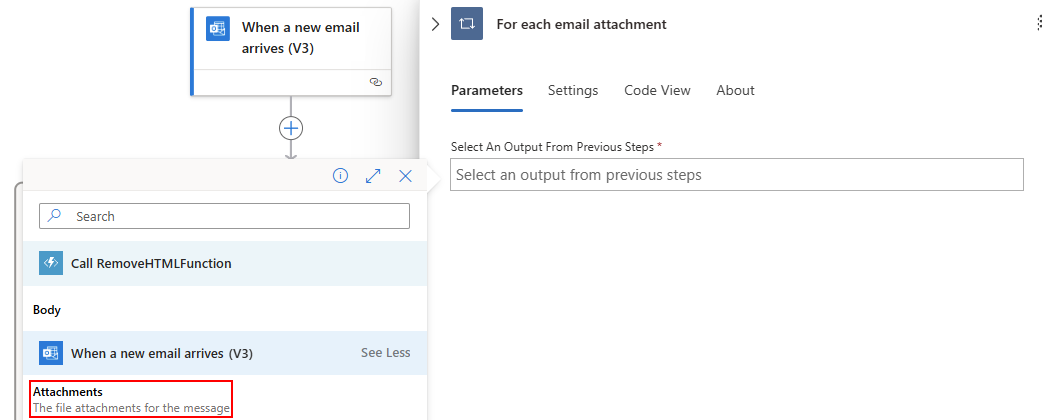
In the For each email attachment loop, select inside the Select An Output From Previous Steps box, and then select the dynamic content list option (lightning icon).
From the When a new email arrives section, select Attachments.
The Attachments output includes an array with all the attachments from an email. The For each loop repeats actions on each array item.
Tip
If you don't see Attachments, select See More.
Save your workflow.
Next, add an action that saves each attachment as a blob in your attachments storage container.
Add an action to create a blob per attachment
The following steps add an action to create a blob for each attachment.
In the designer, in the For each email attachment loop, select Add an action.
Follow these general steps to add the Azure Blob Storage action named Create blob.
In the Create blob action information pane, rename the action with Create blob for email attachment.
Provide the following action information:
Tip
If you can't find a specified output in the dynamic content list, select See more next to the operation name.
Parameter Required Value Description Storage Account Name Or Blob Endpoint Yes Use connection settings(<storage-account-name-or-blob-endpoint>) Select the option that includes your storage account name.
This example useshttps://attachmentstorageacct.blob.core.windows.net.Folder Path Yes <path-and-container-name> The path and name for the container that you previously created.
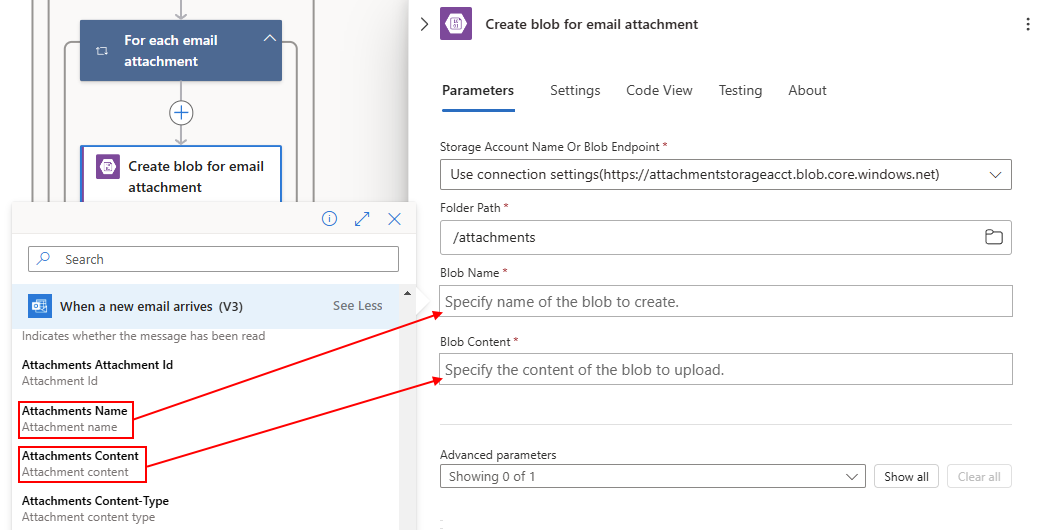
For this example, select the folder icon, and then select attachments.Blob Name Yes <attachment-name> For this example, use the attachment name as the blob name.
1. Select inside the Blob Name box, and then select the dynamic content list option (lightning icon).
2. From the When a new email arrives section, select Name.Blob Content Yes <email-content> For this example, use the email content as the blob content.
1. Select inside the Blob Content box, and then select the dynamic content list option (lightning icon).
2. From the When a new email arrives section, select Content.Note
If you select an output that has an array, such as the Content output, which is an array that includes attachments, the designer automatically adds a For each loop around the action that references that output. That way, your workflow can perform that action on each array item. To remove loop, move the action that references the output to outside the loop, and delete the loop.
The following screenshot shows the outputs to select for the Create blob for email attachment action:
When you finish, the action looks like the following example:
Save your workflow.
Retest attachment handling
On the designer toolbar, select Run > Run.
This step manually starts and runs your workflow, but nothing happens until you send a test email to your inbox.
Send yourself an email that meets the following criteria:
Your email's subject has the text that you specified in the trigger's Subject Filter parameter: Business Analyst 2 #423501
Your email has two or more attachments. For now, just create two empty text files and attach those files to your email.
If your workflow didn't trigger or run despite a successful trigger, see Troubleshoot your logic app workflow.
Check that your workflow saved the email and attachments to the correct storage container.
Next, add an action in your workflow that sends email to review the attachments.
Add an action to send email
The following steps add an action so that your workflow sends email to review the attachments.
Return to the workflow designer. In the True branch, under the For each email attachment loop, select Add an action.
Follow these general steps to add the Office 365 Outlook action named Send an email.
This example continues with the Office 365 Outlook connector, which works only with an Azure work or school account. For personal Microsoft accounts, select the Outlook.com connector.
If you're asked for credentials, sign in to your email account so that Azure Logic Apps creates a connection to your email account.
In the Send an email action information pane, rename the action with Send email for review.
Provide the following action information and select the outputs to include in the email:
Tip
If you can't find a specified output in the dynamic content list, select See more next to the operation name.
Parameter Required Value Description To Yes <recipient-email-address> For testing purposes, use your own email address. Subject Yes <email-subject> The email subject to include.
This example uses ASAP - Review applicant for position:, and the Subject output from the trigger.
1. In the Subject box, enter the example text with a trailing space.
2. Select inside the Subject box, and then select the dynamic content list option (lightning icon).
3. In the list, under When a new email arrives, select Subject.Body Yes <email-body> The email body to include.
The example uses Please review new applicant:, the trigger output named From, the Path output from the Create blob for email body action, and the Body output from your Call RemoveHTMLFunction action.
1. In the Body box, enter the example text, Please review new applicant:.
2. On a new line, enter the example text, Applicant name:, and add the From output from the trigger.
3. On a new line, enter the example text, Application file location:, and add the Path output from the Create blob for email body action.
4. On a new line, enter the example text, Application email content:, and add the Body output from the Call RemoveHTMLFunction action.Note
If you select an output that has an array, such as the Content output, which is an array that includes attachments, the designer automatically adds a For each loop around the action that references that output. That way, your workflow can perform that action on each array item. To remove loop, move the action that references the output to outside the loop, and delete the loop.
The following screenshot shows the finished Send an email action:
Save your workflow.
Your finished workflow now looks like the following example:
Test your workflow
Send yourself an email that meets this criteria:
Your email's subject has the text that you specified in the trigger's Subject Filter parameter: Business Analyst 2 #423501
Your email has one or more attachments. You can reuse an empty text file from your previous test. For a more realistic scenario, attach a resume file.
The email body has this text, which you can copy and paste:
Name: Jamal Hartnett

Street address: 12345 Anywhere Road

City: Any Town

State or Country: Any State

Postal code: 00000

Email address: jamhartnett@outlook.com

Phone number: 000-000-0000

Position: Business Analyst 2 #423501

Technical skills: Dynamics CRM, MySQL, Microsoft SQL Server, JavaScript, Perl, Power BI, Tableau, Microsoft Office: Excel, Visio, Word, PowerPoint, SharePoint, and Outlook

Professional skills: Data, process, workflow, statistics, risk analysis, modeling; technical writing, expert communicator and presenter, logical and analytical thinker, team builder, mediator, negotiator, self-starter, self-managing

Certifications: Six Sigma Green Belt, Lean Project Management

Language skills: English, Mandarin, Spanish

Education: Master of Business Administration
Run your workflow. If successful, your workflow sends you an email that looks like the following example:
If you don't get any emails, check your email's junk folder. Otherwise, if you're unsure that your workflow ran correctly, see Troubleshoot your logic app workflow.
Congratulations, you created and ran a workflow that automates tasks across different Azure services and calls some custom code!
Clean up resources
Your workflow continues running until you disable or delete the logic app resource. When you no longer need this sample, delete the resource group that contains your logic app and related resources.
In the Azure portal search box, enter resource groups, and select Resource groups.
From the Resource groups list, select the resource group for this tutorial.
On the resource group menu, select Overview.
On the Overview page toolbar, select Delete resource group.
When the confirmation pane appears, enter the resource group name, and select Delete.
Next steps
In this tutorial, you created a logic app workflow that processes and stores email attachments by integrating Azure services, such as Azure Storage and Azure Functions. Now, learn more about other connectors that you can use to build logic app workflows.


