Not
Åtkomst till den här sidan kräver auktorisering. Du kan prova att logga in eller ändra kataloger.
Åtkomst till den här sidan kräver auktorisering. Du kan prova att ändra kataloger.
Use the Office dialog API to open dialog boxes in your Office Add-in. This article provides guidance for using the dialog API in your Office Add-in. Consider opening a dialog box from a task pane, content add-in, or add-in command to do the following:
- Sign in a user with a resource such as Google, Facebook, or Microsoft identity. For more information, see Authenticate with the Office dialog API.
- Provide more screen space, or even a full screen, for some tasks in your add-in.
- Host a video that would be too small if confined to a task pane.
- Show an error, progress, or input screen.
Tip
We recommend that you don't use a dialog box to interact with a document. Use a task pane instead. For guidance, see Task panes in Office Add-ins.
Because overlapping UI elements are discouraged, avoid opening a dialog box from a task pane unless your scenario requires it. When you consider how to use the surface area of a task pane, note that task panes can be tabbed. For an example of a tabbed task pane, see the Excel Add-in JavaScript SalesTracker sample.
To learn more about best practices for implementing a dialog, see Best practices and rules for the Office dialog API.
The following image shows an example of a dialog box.
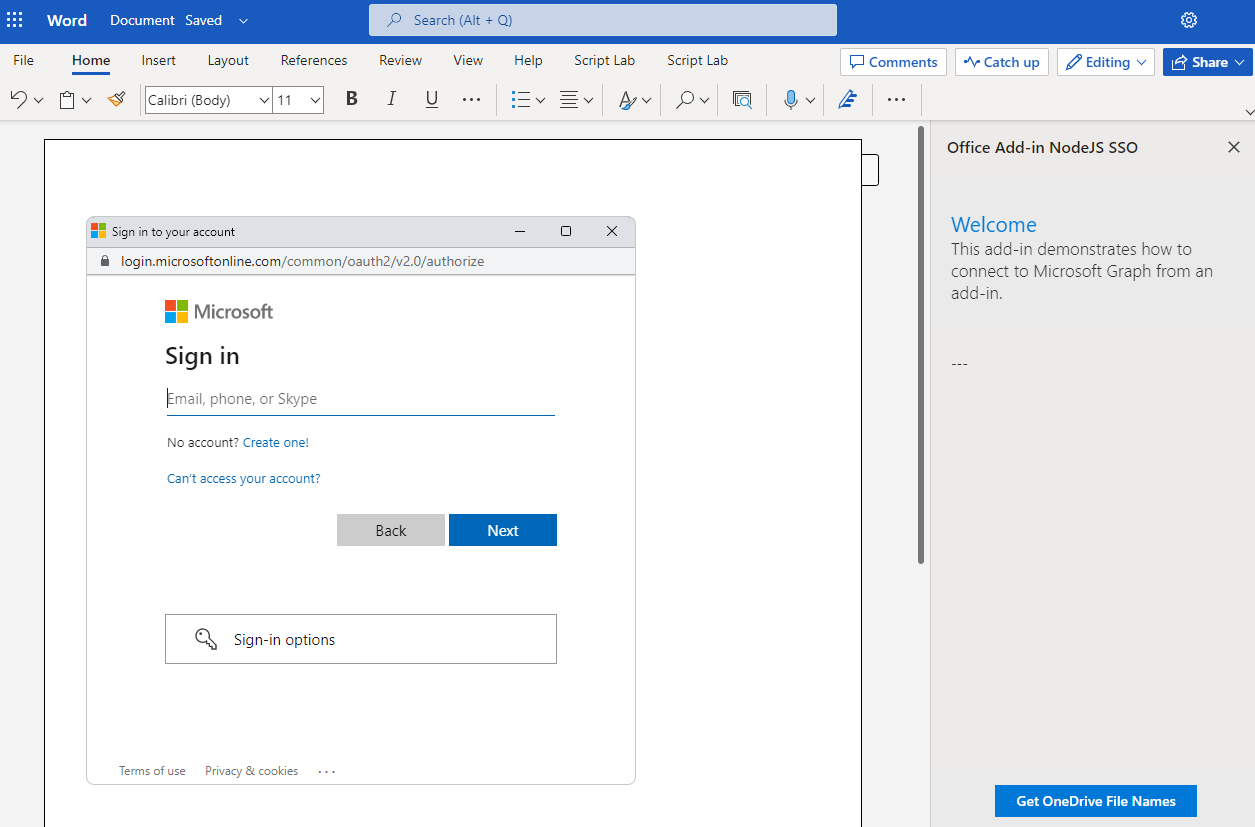
The dialog box always opens in the center of the screen. The user can move and resize it. The window is nonmodal--a user can continue to interact with both the document in the Office application and with the page in the task pane, if there is one.
Note
If you're developing an add-in that runs in Office on the web or new Outlook on Windows and it requires access to a user's device capabilities, see the device permission API to learn how to prompt the user for permissions. Device capabilities include a user's camera, geolocation, and microphone.
Open a dialog box from a host page
The Office JavaScript APIs include a Dialog object and two functions in the Office.context.ui namespace.
To open a dialog box, your code, typically a page in a task pane, calls the displayDialogAsync method and passes to it the URL of the resource that you want to open. The page on which this method is called is known as the "host page". For example, if you call this method in script on index.html in a task pane, then index.html is the host page of the dialog box that the method opens.
The resource that is opened in the dialog box is usually a page, but it can be a controller method in an MVC application, a route, a web service method, or any other resource. In this article, "page" or "website" refers to the resource in the dialog box. The following code is a simple example.
Office.context.ui.displayDialogAsync("https://www.contoso.com/myDialog.html");
- The URL uses the HTTPS protocol. This is mandatory for all pages loaded in a dialog box, not just the first page loaded.
- The dialog box's domain is the same as the domain of the host page, which can be the page in a task pane or the function file of an add-in command. It is required that the page, controller method, or other resource that is passed to the
displayDialogAsyncmethod must be in the same domain as the host page.
Important
The host page and the resource that opens in the dialog box must have the same full domain. If you attempt to pass displayDialogAsync a subdomain of the add-in's domain, it won't work. The full domain, including any subdomain, must match.
After the first page (or other resource) is loaded, a user can use links or other UI to navigate to any website (or other resource) that uses HTTPS. You can also design the first page to immediately redirect to another site.
By default, the dialog box will occupy 80% of the height and width of the device screen, but you can set different percentages by passing a configuration object to the method, as shown in the following example.
Office.context.ui.displayDialogAsync("https://www.contoso.com/myDialog.html", { height: 30, width: 20 });
For a sample add-in that does this, see Excel Tutorial - Completed. For more samples that use displayDialogAsync, see Code samples.
Set both values to 100% to get what is effectively a full screen experience. The effective maximum is 99.5%, and the window is still moveable and resizable.
You can open only one dialog box from a host window. An attempt to open another dialog box generates an error. For example, if a user opens a dialog box from a task pane, they can't open a second dialog box from a different page in the task pane. However, when a dialog box is opened from an add-in command, the command opens a new (but unseen) HTML file each time it is selected. This creates a new (unseen) host window, so each such window can launch its own dialog box. For more information, see Errors from displayDialogAsync.
Note
In Outlook on the web and new Outlook on Windows, don't set the window.name property when configuring a dialog in your add-in. The window.name property is used by these Outlook clients to maintain functionality across page redirects.
Take advantage of a performance option in Office on the web
The displayInIframe property is an additional property in the configuration object that you can pass to displayDialogAsync. When this property is set to true, and the add-in is running in a document opened in Office on the web, the dialog box will open as a floating iframe rather than an independent window, which makes it open faster. The following is an example.
Office.context.ui.displayDialogAsync("https://www.contoso.com/myDialog.html", { height: 30, width: 20, displayInIframe: true });
The default value is false, which is the same as omitting the property entirely. If the add-in isn't running in Office on the web, the displayInIframe is ignored.
Note
You should not use displayInIframe: true if the dialog box will at any point redirect to a page that can't be opened in an iframe. For example, the sign in pages of many popular web services, such as Google and Microsoft account, can't be opened in an iframe.
Send information from the dialog box to the host page
Code in the dialog box uses the messageParent function to send a string message to the host page. The string can be a word, sentence, XML blob, stringified JSON, or anything else that can be serialized to a string or cast to a string. To use the messageParent method, the dialog box must first initialize the Office JavaScript API.
Note
For clarity, in this section we call the message target the host page, but strictly speaking the messages are going to the Runtime in the task pane (or the runtime that is hosting a function file). The distinction is only significant in the case of cross-domain messaging. For more information, see Cross-domain messaging to the host runtime.
The following example shows how to initialize Office JS and send a message to the host page.
Office.onReady(() => {
   // Add any initialization code for your dialog here.
});

// Called when dialog signs in the user.
function userSignedIn() {
    Office.context.ui.messageParent(true.toString());
}
The next example shows how to return a JSON string containing profile information.
function userProfileSignedIn(profile) {
    const profileMessage = {
        "name": profile.name,
        "email": profile.email,
    };
    Office.context.ui.messageParent(JSON.stringify(profileMessage));
}
The messageParent function is one of only two Office JS APIs that can be called in the dialog box. The other JS API that can be called in the dialog box is Office.context.requirements.isSetSupported. For information about it, see Specify Office applications and API requirements. However, in the dialog box, this API isn't supported in volume-licensed perpetual Outlook 2016 (that is, the MSI version).
The host page must be configured to receive the message. You do this by adding a callback parameter to the original call of displayDialogAsync. The callback assigns a handler to the DialogMessageReceived event. The following is an example.
let dialog; // Declare dialog as global for use in later functions.
Office.context.ui.displayDialogAsync("https://www.contoso.com/myDialog.html", { height: 30, width: 20 },
    (asyncResult) => {
        dialog = asyncResult.value;
        dialog.addEventHandler(Office.EventType.DialogMessageReceived, processMessage);
    }
);
Office passes an AsyncResult object to the callback. It represents the result of the attempt to open the dialog box. It does not represent the outcome of any events in the dialog box. For more on this distinction, see Handle errors and events.
- The
valueproperty of theasyncResultis set to a Dialog object, which exists in the host page, not in the dialog box's execution context. - The
processMessageis the function that handles the event. You can give it any name you want. - The
dialogvariable is declared at a wider scope than the callback because it is also referenced inprocessMessage.
The following is a simple example of a handler for the DialogMessageReceived event.
function processMessage(arg) {
    const messageFromDialog = JSON.parse(arg.message);
    showUserName(messageFromDialog.name);
}
Office passes the arg object to the handler. Its message property is the string sent by the call of messageParent in the dialog box. In this example, it is a stringified representation of a user's profile from a service, such as Microsoft account or Google, so it's deserialized back to an object with JSON.parse. The showUserName implementation isn't shown. It might display a personalized welcome message on the task pane.
When the user interaction with the dialog box is completed, your message handler should close the dialog box, as shown in this example.
function processMessage(arg) {
    dialog.close();
    // Add code to process the message here.
}
The dialog object must be the same one that is returned by the call of displayDialogAsync. You need to declare the dialog object as a global variable. Or you can scope the dialog object to the displayDialogAsync call with an anonymous callback function as shown in the following example. In the example, processMessage doesn't need to close the dialog since the close method is called in the anonymous callback function.
Office.context.ui.displayDialogAsync("https://www.contoso.com/myDialog.html", { height: 30, width: 20 },
    (asyncResult) => {
        const dialog = asyncResult.value;
        dialog.addEventHandler(Office.EventType.DialogMessageReceived, (arg) => {
            dialog.close();
            processMessage(arg);
        });
      }
    );
If the add-in needs to open a different page of the task pane after receiving the message, you can use the window.location.replace method (or window.location.href) as the last line of the handler. The following is an example.
function processMessage(arg) {
    // Add code to process the message here.
    window.location.replace("/newPage.html");
    // Alternatively, use the following:
    // window.location.href = "/newPage.html";
}
For an example of an add-in that does this, see the Insert Excel charts using Microsoft Graph in a PowerPoint add-in sample.
Conditional messaging
Because you can send multiple messageParent calls from the dialog box, but you have only one handler in the host page for the DialogMessageReceived event, the handler must use conditional logic to distinguish different messages. For example, if the dialog box prompts a user to sign in to an identity provider such as Microsoft account or Google, it sends the user's profile as a message. If authentication fails, the dialog box sends error information to the host page, as in the following example.
if (loginSuccess) {
    const userProfile = getProfile();
    const messageObject = { messageType: "signinSuccess", profile: userProfile };
    const jsonMessage = JSON.stringify(messageObject);
    Office.context.ui.messageParent(jsonMessage);
} else {
    const errorDetails = getError();
    const messageObject = { messageType: "signinFailure", error: errorDetails };
    const jsonMessage = JSON.stringify(messageObject);
    Office.context.ui.messageParent(jsonMessage);
}
About the previous example, note:
- The
loginSuccessvariable would be initialized by reading the HTTP response from the identity provider. - The implementation of the
getProfileandgetErrorfunctions isn't shown. They each get data from a query parameter or from the body of the HTTP response. - Anonymous objects of different types are sent depending on whether the sign in was successful. Both have a
messageTypeproperty, but one has aprofileproperty and the other has anerrorproperty.
The handler code in the host page uses the value of the messageType property to branch as shown in the following example. Note that the showUserName function is the same as in the previous example and showNotification function displays the error in the host page's UI.
function processMessage(arg) {
    const messageFromDialog = JSON.parse(arg.message);
    if (messageFromDialog.messageType === "signinSuccess") {
        dialog.close();
        showUserName(messageFromDialog.profile.name);
        window.location.replace("/newPage.html");
    } else {
        dialog.close();
        showNotification("Unable to authenticate user: " + messageFromDialog.error);
    }
}
The showNotification implementation isn't shown. It might display status in a notification bar on the task pane.
Cross-domain messaging to the host runtime
After the dialog opens, either the dialog or the parent runtime may navigate away from the add-in's domain. If either of these things happens, then a call of messageParent will fail unless your code specifies the domain of the parent runtime. You do this by adding a DialogMessageOptions parameter to the call of messageParent. This object has a targetOrigin property that specifies the domain to which the message should be sent. If the parameter isn't used, Office assumes that the target is the same domain that the dialog is currently hosting.
Note
Using messageParent to send a cross-domain message requires the Dialog Origin 1.1 requirement set. The DialogMessageOptions parameter is ignored on older versions of Office that don't support the requirement set, so the behavior of the method is unaffected if you pass it.
The following is an example of using messageParent to send a cross-domain message.
Office.context.ui.messageParent("Some message", { targetOrigin: "https://resource.contoso.com" });
If the message doesn't include sensitive data, you can set the targetOrigin to "*" which allows it to be sent to any domain. The following is an example.
Office.context.ui.messageParent("Some message", { targetOrigin: "*" });
Tip
The
DialogMessageOptionsparameter was added to themessageParentmethod as a required parameter in mid-2021. Older add-ins that send a cross-domain message with the method no longer work until they are updated to use the new parameter. Until the add-in is updated, in Office on Windows only, users and system administrators can enable those add-ins to continue working by specifying the trusted domains with a registry setting: HKEY_CURRENT_USER\SOFTWARE\Microsoft\Office\16.0\WEF\AllowedDialogCommunicationDomains. To do this, create a file with a.regextension, save it to the Windows computer, and then double-click it to run it. The following is an example of the contents of such a file.Windows Registry Editor Version 5.00 [HKEY_CURRENT_USER\SOFTWARE\Microsoft\Office\16.0\WEF\AllowedDialogCommunicationDomains] "My trusted domain"="https://www.contoso.com" "Another trusted domain"="https://fabrikam.com"In Office on the web and new Outlook on Windows, if the domain of your dialog is different from that of your add-in and it enforces the Cross-Origin-Opener-Policy: same-origin response header, your add-in will be blocked from accessing messages from the dialog and your users will be shown error 12006. To prevent this, you must set the header to
Cross-Origin-Opener-Policy: unsafe-noneor configure your add-in and dialog to be in the same domain.
Pass information to the dialog box
Your add-in can send messages from the host page to a dialog box using Dialog.messageChild.
Use messageChild() from the host page
When you call the Office dialog API to open a dialog box, a Dialog object is returned. It should be assigned to a variable that has global scope so that you can reference it from other functions. The following is an example.
let dialog; // Declare as global variable.
Office.context.ui.displayDialogAsync("https://www.contoso.com/myDialog.html",
(asyncResult) => {
dialog = asyncResult.value;
dialog.addEventHandler(Office.EventType.DialogMessageReceived, processMessage);
}
);
function processMessage(arg) {
dialog.close();
// Add code to process the message here.
}
This Dialog object has a messageChild method that sends any string, including stringified data, to the dialog box. This raises a DialogParentMessageReceived event in the dialog box. Your code should handle this event, as shown in the next section.
Consider a scenario in which the UI of the dialog is related to the currently active Excel worksheet and that worksheet's position relative to the other worksheets. In the following example, worksheetPropertiesChanged sends the properties of the active worksheet to the dialog box. The data is stringified so that it can be passed to messageChild.
await Excel.run(async (context) => {
const worksheet = context.workbook.worksheets.getActiveWorksheet();
worksheet.load();
await context.sync();
worksheetPropertiesChanged(worksheet);
});
...
function worksheetPropertiesChanged(currentWorksheet) {
const messageToDialog = JSON.stringify(currentWorksheet);
dialog.messageChild(messageToDialog);
}
Handle DialogParentMessageReceived in the dialog box
In the dialog box's JavaScript, register a handler for the DialogParentMessageReceived event with the UI.addHandlerAsync method. This is typically done in the Office.onReady or Office.initialize function, as shown in the following. (A more robust example is included later in this article.)
Office.onReady(() => {
Office.context.ui.addHandlerAsync(Office.EventType.DialogParentMessageReceived,onMessageFromParent);
});
Then, define the onMessageFromParent handler. The following code continues the example from the preceding section. Note that Office passes an argument to the handler and that the message property of the argument object contains the string from the host page. In this example, the message is reconverted to an object and jQuery is used to set the top heading of the dialog to match the new worksheet name.
function onMessageFromParent(arg) {
const messageFromParent = JSON.parse(arg.message);
document.querySelector('h1').textContent = messageFromParent.name;
}
It's best practice to verify that your handler is properly registered. You can do this by passing a callback to the addHandlerAsync method. This runs when the attempt to register the handler completes. Use the handler to log or show an error if the handler wasn't successfully registered. The following is an example. Note that reportError is a function, not defined here, that logs or displays the error.
Office.onReady(() => {
Office.context.ui.addHandlerAsync(
Office.EventType.DialogParentMessageReceived,
onMessageFromParent,
onRegisterMessageComplete
);
});
function onRegisterMessageComplete(asyncResult) {
if (asyncResult.status !== Office.AsyncResultStatus.Succeeded) {
reportError(asyncResult.error.message);
}
}
Conditional messaging from parent page to dialog box
Because you can make multiple messageChild calls from the host page, but you have only one handler in the dialog box for the DialogParentMessageReceived event, the handler must use conditional logic to distinguish different messages. You can do this in a way that is precisely parallel to how you would structure conditional messaging when the dialog box is sending a message to the host page as described in Conditional messaging.
Note
In some situations, the messageChild API, which is a part of the DialogApi 1.2 requirement set, may not be supported. For example, messageChild isn't supported in volume-licensed perpetual Outlook 2016 and volume-licensed perpetual Outlook 2019. Some alternative ways for parent-to-dialog-box messaging are described in Alternative ways of passing messages to a dialog box from its host page.
Important
The DialogApi 1.2 requirement set can't be specified in the add-in manifest. You'll have to check for support for DialogApi 1.2 at runtime using the isSetSupported method as described in Check for API availability at runtime. Support for manifest requirements is under development.
Cross-domain messaging to the dialog runtime
After the dialog opens, either the dialog or the parent runtime may navigate away from the add-in's domain. If either of these things happens, then calls to messageChild will fail unless your code specifies the domain of the dialog runtime. You do this by adding a DialogMessageOptions parameter to the call of messageChild. This object has a targetOrigin property that specifies the domain to which the message should be sent. If the parameter isn't used, Office assumes that the target is the same domain that the parent runtime is currently hosting.
Note
Using messageChild to send a cross-domain message requires the Dialog Origin 1.1 requirement set. The DialogMessageOptions parameter is ignored on older versions of Office that don't support the requirement set, so the behavior of the method is unaffected if you pass it.
The following is an example of using messageChild to send a cross-domain message.
dialog.messageChild(messageToDialog, { targetOrigin: "https://resource.contoso.com" });
If the message doesn't include sensitive data, you can set the targetOrigin to "*" which allows it to be sent to any domain. The following is an example.
dialog.messageChild(messageToDialog, { targetOrigin: "*" });
The add-in's manifest specifies trusted domains. In the unified manifest for Microsoft 365, this is specified in the "validDomains" property. In the add-in only manifest, this is specified in the <AppDomains> element.
Note
The unified manifest for Microsoft 365 can be used in production Outlook add-ins. It's available only as a preview for Excel, PowerPoint, and Word add-ins.
But the runtime that's hosting the dialog can't access the manifest and thereby determine whether the domain from which the message comes is trusted, you must use the DialogParentMessageReceived handler to determine this. The object that's passed to the handler contains the domain that's currently hosted in the parent as its origin property. The following is an example of how to use the property.
function onMessageFromParent(arg) {
if (arg.origin === "https://addin.fabrikam.com") {
// Process the message.
} else {
// Signal the parent page to close the dialog.
const messageObject = { messageType: "untrustedDomain" };
Office.context.ui.messageParent(messageObject);
}
}
For example, your code could use the Office.onReady or Office.initialize function to store an array of trusted domains in a global variable. The arg.origin property could then be checked against that list in the handler.
Tip
The DialogMessageOptions parameter was added to the messageChild method as a required parameter in mid-2021. Older add-ins that send a cross-domain message with the method no longer work until they are updated to use the new parameter. Until the add-in is updated, in Office on Windows only, users and system administrators can enable those add-ins to continue working by specifying the trusted domains with a registry setting: HKEY_CURRENT_USER\SOFTWARE\Microsoft\Office\16.0\WEF\AllowedDialogCommunicationDomains. To do this, create a file with a .reg extension, save it to the Windows computer, and then double-click it to run it. The following is an example of the contents of such a file.
Windows Registry Editor Version 5.00

[HKEY_CURRENT_USER\SOFTWARE\Microsoft\Office\16.0\WEF\AllowedDialogCommunicationDomains]
"My trusted domain"="https://www.contoso.com"
"Another trusted domain"="https://fabrikam.com"
Close the dialog box
You can implement a button in the dialog box that will close it. To do this, the click event handler for the button should use messageParent to tell the host page that the button has been clicked. The following is an example.
function closeButtonClick() {
    const messageObject = { messageType: "dialogClosed" };
    const jsonMessage = JSON.stringify(messageObject);
    Office.context.ui.messageParent(jsonMessage);
}
The host page handler for DialogMessageReceived would call dialog.close, as in this example. (See previous examples that show how the dialog object is initialized.)
function processMessage(arg) {
    const messageFromDialog = JSON.parse(arg.message);
    if (messageFromDialog.messageType === "dialogClosed") {
       dialog.close();
    }
}
Even when you don't have your own close-dialog UI, an end user can close the dialog box by choosing the X in the upper-right corner. This action triggers the DialogEventReceived event. If your host pane needs to know when this happens, it should declare a handler for this event. See the section Errors and events in the dialog box for details.
Code samples
All of the following samples use displayDialogAsync. Some have NodeJS-based servers and others have ASP.NET/IIS-based servers, but the logic of using the method is the same regardless of how the server-side of the add-in is implemented.
- Excel Tutorial - Completed
- Excel Shared Runtime Scenario
- Office Add-in Microsoft Graph ASPNET
- Office Add-in Microsoft Graph React
- Office Add-in NodeJS SSO
- Office Add-in ASPNET SSO
- Office Add-in SAAS Monetization Sample
- Outlook Add-in Microsoft Graph ASPNET
- Outlook Add-in SSO
- Outlook Add-in Token Viewer
- Outlook Add-in Actionable Message
- Outlook Add-in Sharing to OneDrive
- PowerPoint Add-in Microsoft Graph ASPNET InsertChart
See also
Samarbeta med oss på GitHub
Källan för det här innehållet finns på GitHub, där du också kan skapa och granska problem och pull-begäranden. Mer information finns i vår deltagarguide.
Office Add-ins