หมายเหตุ
การเข้าถึงหน้านี้ต้องได้รับการอนุญาต คุณสามารถลอง ลงชื่อเข้าใช้หรือเปลี่ยนไดเรกทอรีได้
การเข้าถึงหน้านี้ต้องได้รับการอนุญาต คุณสามารถลองเปลี่ยนไดเรกทอรีได้
Azure Backup offers a stream-based, specialized solution to back up SQL Server running in Azure Virtual Machines (VMs). This solution aligns with Azure Backup's benefits of zero-infrastructure backup, long-term retention, and central management. It additionally provides the following advantages specifically for SQL Server:
- Workload aware backups that support all backup types - full, differential, and log
- 15 minute RPO (recovery point objective) with frequent log backups
- Point-in-time recovery up to a second
- Individual-database-levels backup and restore
Note
Azure Backup now provides snapshot-based backup for SQL Server instances in Azure VMs, which is currently in preview. Snapshot-based backups allow you to protect large databases with improved performance and achieve faster restores from the instant recovery tier. To know the latest product enhancements and feature updates in Azure, see Microsoft Azure Updates.
To view the backup and restore scenarios that we support today, see the support matrix. For common questions, see the frequently asked questions.
Snapshot backup for SQL Instances in Azure VM (preview)
Azure Backup provides a snapshot‑based SQL backup solution that improves performance for large databases. You can use disk snapshots for fast restores and frequent log backups to minimize data loss, helping you achieve lower Recovery Time Objective (RTO) and improved Recovery Point Objective (RPO).
Note
Snapshot Backup for SQL Server instances is available in preview. Snapshot‑based backups allow you to protect large databases with improved performance and achieve faster restores from the instant recovery tier.
Snapshot backups provide the following benefits while backing up large databases:
Instance level snapshot: Creates snapshot backups at the SQL instance level and select multiple databases in a single operation. Restore the entire instance or individual databases as needed.
Minimal impact on the source server: Azure Backup briefly quiesces the database to capture an application-consistent snapshot. While the database is quiesced only for a few seconds, snapshot creation and availability in operational tier complete within minutes. Unlike streaming backups, the source machine’s resources aren't consumed for a long duration.
Cost-effective: Optimizes storage cost with incremental snapshots.
Improved RTO: Uses faster restores from Instant/operational tier.
Low RPO: Combines log backups with snapshots to achieve a lower RPO and enable point-in-time restores.
Learn about the supported scenarios and limitations for SQL backup using snapshots in the support matrix. To back up SQL Server instance snapshot in Azure VM using the Azure portal, see this article.
Backup process for SQL Server database
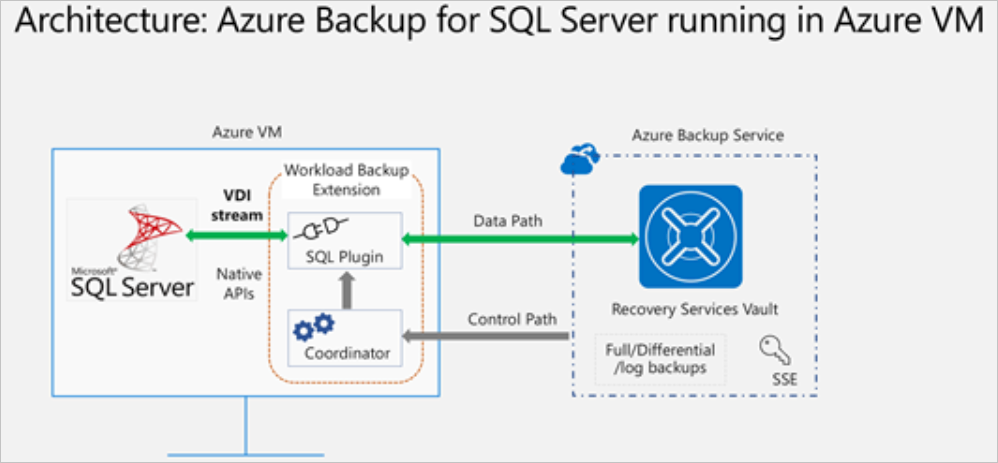
This solution uses the SQL native APIs to take backups of your SQL databases.
Once you specify the SQL Server VM that you want to protect and query for the databases in it, Azure Backup service installs a workload backup extension on the VM by the name
AzureBackupWindowsWorkloadextension.This extension consists of a coordinator and a SQL plugin. While the coordinator is responsible for triggering workflows for various operations like configure backup, backup, and restore, the plugin is responsible for actual data flow.
To be able to discover databases on this VM, Azure Backup creates the account
NT SERVICE\AzureWLBackupPluginSvc. This account is used for backup and restore and requires SQL sysadmin permissions. TheNT SERVICE\AzureWLBackupPluginSvcaccount is a Virtual Service Account, and so doesn't require any password management. Azure Backup uses theNT AUTHORITY\SYSTEMaccount for database discovery/inquiry, so this account needs to be a public login on SQL. If you didn't create the SQL Server VM from Azure Marketplace, you might receive an error UserErrorSQLNoSysadminMembership. If the error message appears, follow these instructions.Once you trigger configure protection on the selected databases, the backup service sets up the coordinator with the backup schedules and other policy details, which the extension caches locally on the VM.
At the scheduled time, the coordinator communicates with the plugin and it starts streaming the backup data from the SQL server using VDI(Virtual Device Interface).
The plugin sends the data directly to the Recovery Services vault, thus eliminating the need for a staging location. The Azure Backup service encrypts and stores the data in storage accounts.
When the data transfer is complete, coordinator confirms the commit with the backup service.
Backup process for SQL Server instance snapshots
Azure Backup uses managed-disk incremental snapshots to protect SQL databases in Azure VMs. The backup policy controls snapshot creation, retention, and logs backup behavior to enable fast restores and point-in-time recovery.
The backup and restore flow outlines a logical, end-to-end sequence of operations performed by Azure Backup that include the following operations:
Creates managed-disk incremental snapshots based on the user-defined backup policy. Currently, the Azure Backup service supports one snapshot every 6 hours or higher. You can configure Log backups for every 15 minutes or higher.
Takes snapshot backups at the SQL instance level. You can select up to 12 databases per snapshot operation.
Captures an application-consistent snapshot across all selected databases by snapping the underlying disks for the combined set of databases.
Retains snapshots in the Azure subscription within a specified resource group for a user-defined duration (up to 7 days). Azure Backup then moves the data to the Recovery Services vault as vaulted backup for long-term retention based on the configured policy.
Streams log backups at the database level to the vault. During restore, the service restores the snapshot to an alternate VM and applies log backups to achieve point-in-time recovery.
Learn how to back up SQL Server instance snapshot in Azure VM using Azure portal (preview).
Prerequisites for SQL Server backup
Before you start the SQL Server backup, review the following prerequisites:
- Make sure you have a SQL Server instance running in Azure. You can quickly create a SQL Server instance in the marketplace.
- Review the feature considerations and scenario support.
- Review common questions about this scenario.
Set VM permissions
When you run discovery on a SQL Server, Azure Backup performs the following actions:
- Adds the AzureBackupWindowsWorkload extension.
- Creates an NT SERVICE\AzureWLBackupPluginSvc account to discover databases on the virtual machine. This account is used for a backup and restore and requires SQL sysadmin permissions.
- Discovers databases that are running on a VM, Azure Backup uses the NT AUTHORITY\SYSTEM account. This account must be a public sign-in on SQL.
If you didn't create the SQL Server VM in Azure Marketplace or if you're on SQL 2008 or 2008 R2, you might receive a UserErrorSQLNoSysadminMembership error.
For giving permissions to SQL 2008 and 2008 R2 running on Windows 2008 R2, see this section.
For all other versions, assign the permissions using the following steps:
Use an account with SQL Server sysadmin permissions to sign in to SQL Server Management Studio (SSMS). Unless you need special permissions, Windows authentication should work.
On the SQL Server, open the Security/Logins folder.
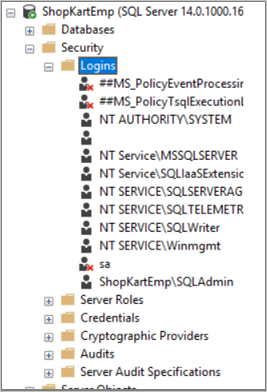
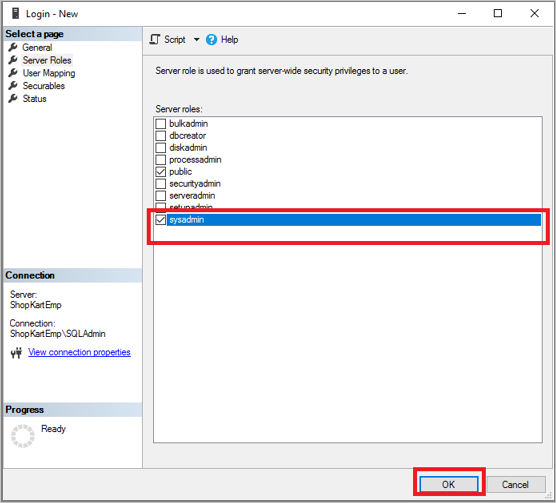
Right-click the Logins folder and select New Login. In Login - New, select Search.
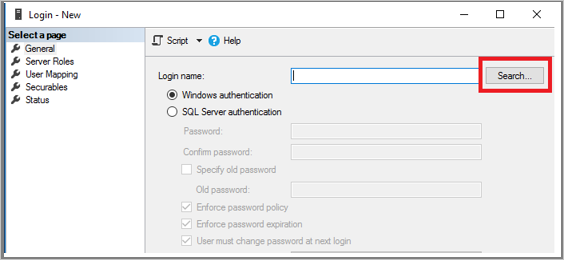
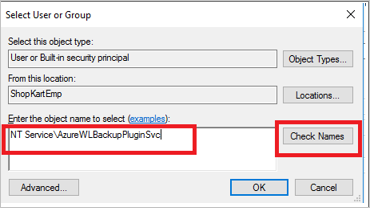
The Windows virtual service account NT SERVICE\AzureWLBackupPluginSvc was created during the virtual machine registration and SQL discovery phase. Enter the account name as shown in Enter the object name to select. Select Check Names to resolve the name. Select OK.
On Server Roles, make sure the sysadmin role is selected. Select OK. The required permissions should now exist.
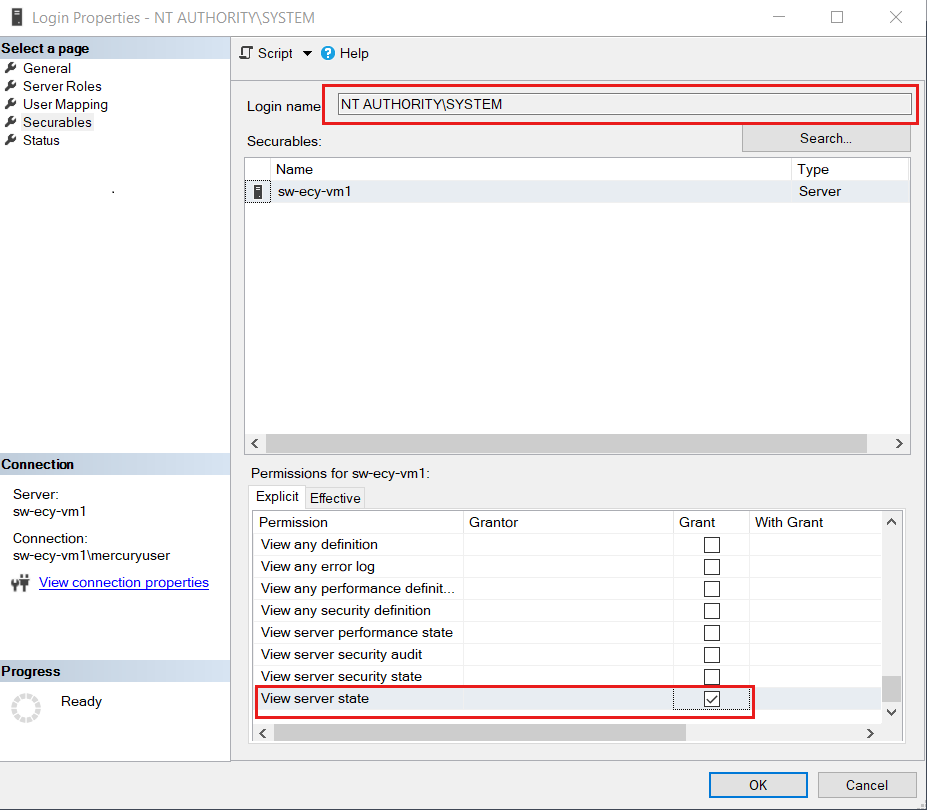
If the SQL Server instance is part of an Always-On Availability Group (AG), ensure that the NT AUTHORITY\SYSTEM account has the VIEW SERVER STATE permission enabled.
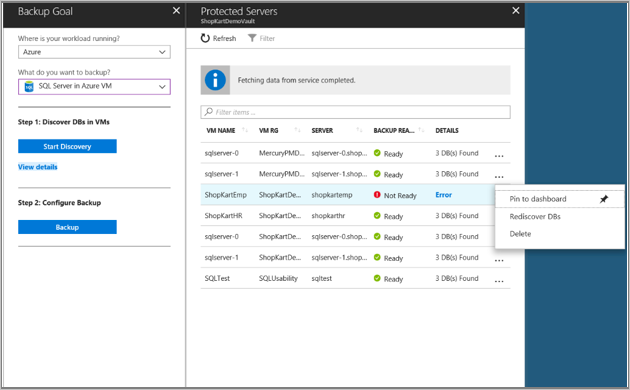
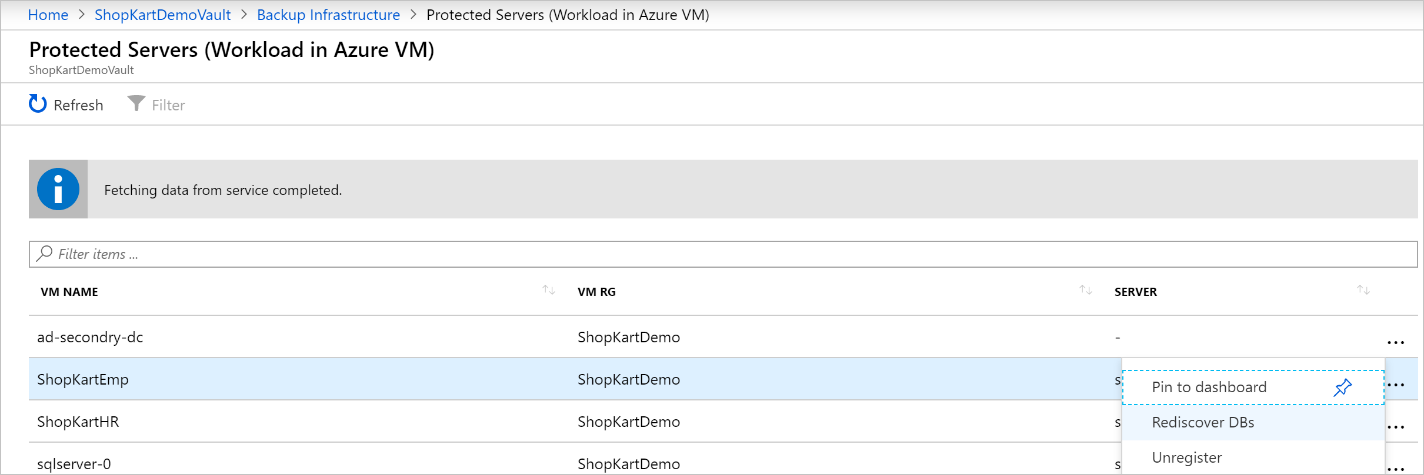
Now associate the database with the Recovery Services vault. In the Azure portal, in the Protected Servers list, right-click the server that's in an error state > Rediscover DBs.
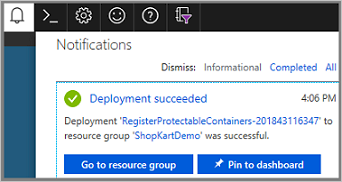
Check progress in the Notifications area. When the selected databases are found, a success message appears.
Note
If your SQL Server has multiple instances of SQL Server installed, then you must add sysadmin permission for NT Service\AzureWLBackupPluginSvc account to all SQL instances.
Assign SQL sysadmin permissions for SQL 2008 and SQL 2008 R2
To add NT AUTHORITY\SYSTEM and NT Service\AzureWLBackupPluginSvc logins to the SQL Server Instance, follow these steps:
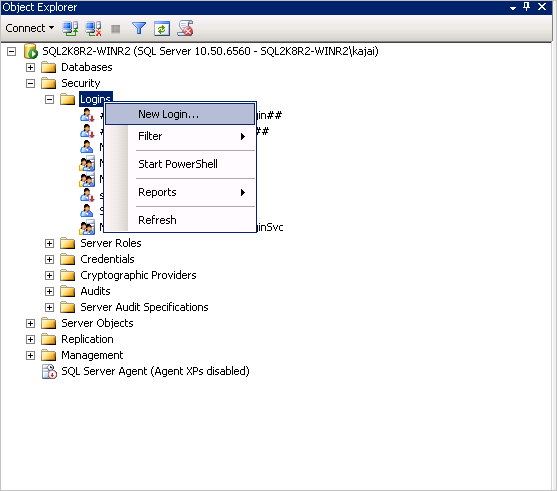
Go to the SQL Server Instance in the Object explorer.
Go to Security > Logins.
Right-click the Logins and select New Login
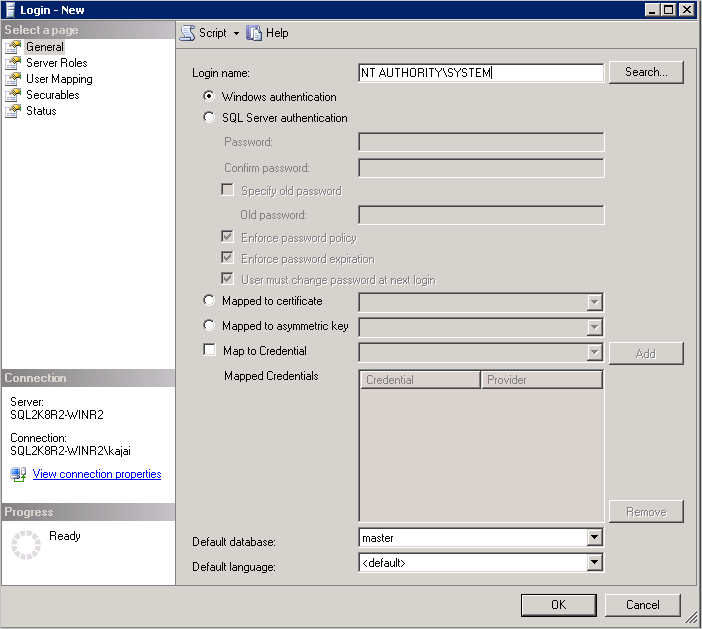
Go to the General tab and enter NT AUTHORITY\SYSTEM as the Login Name.
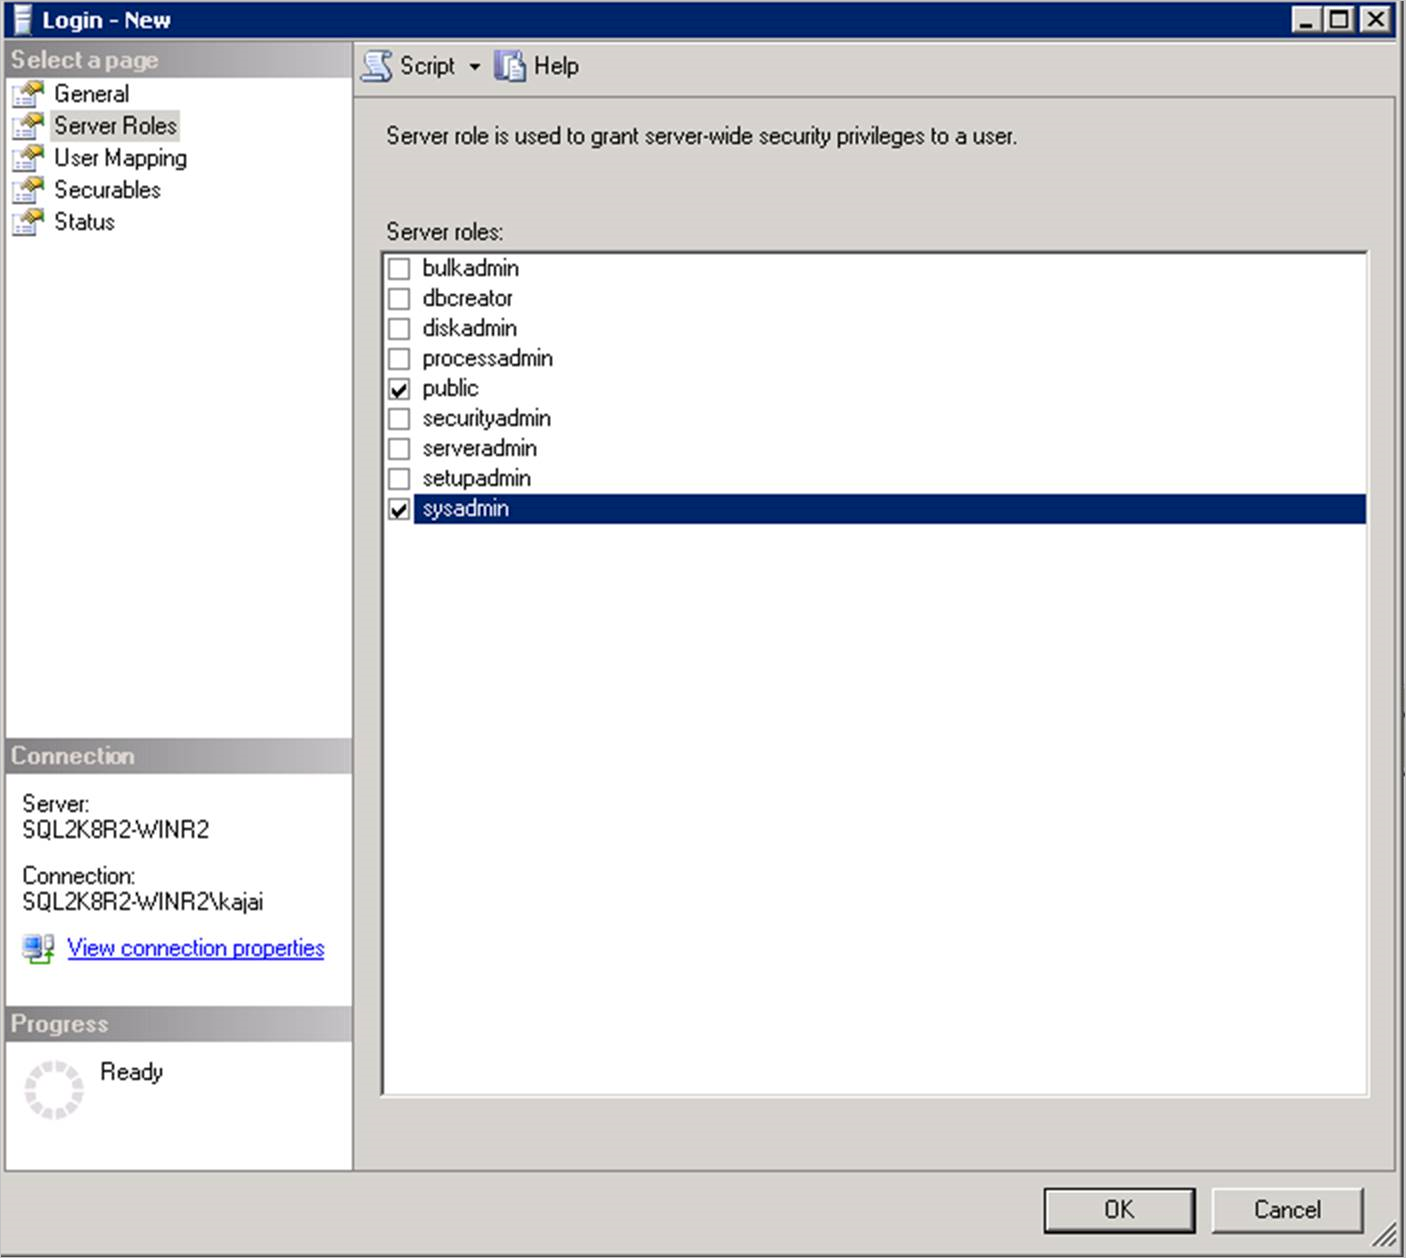
Go to the Server Roles tab and choose public and sysadmin roles.
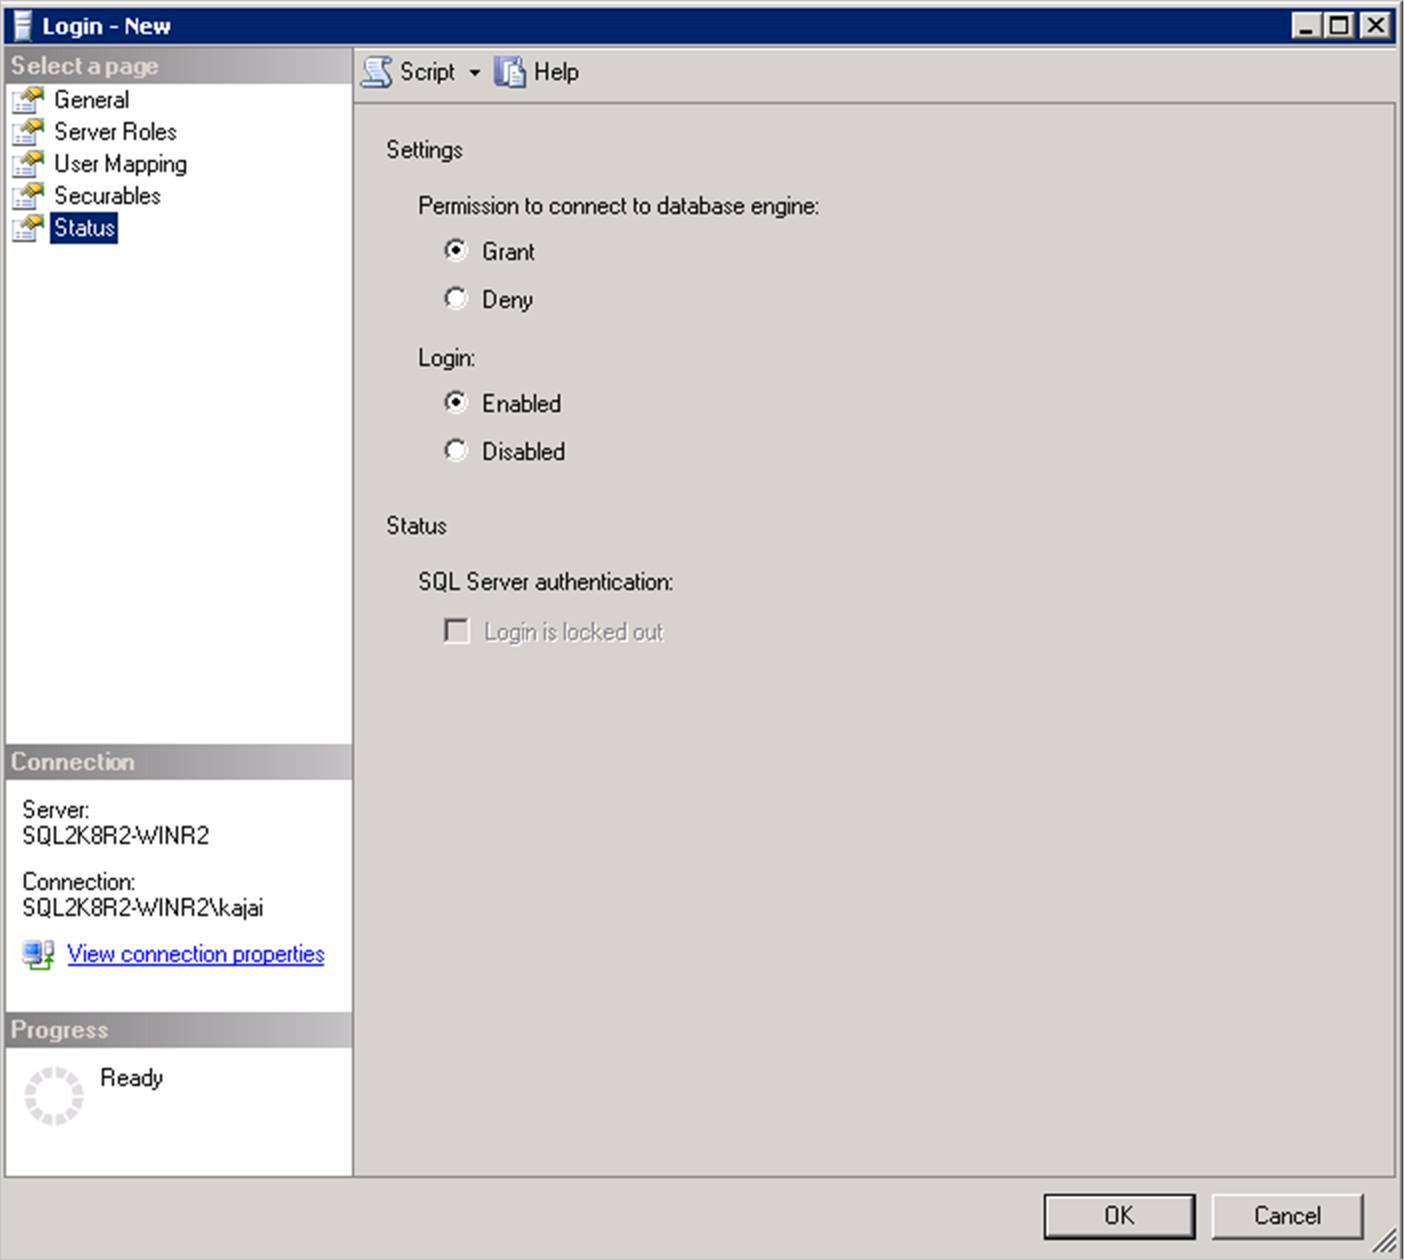
Go to Status, select Grant for the Permission to connect to database engine, and then select Enabled for Login.
Select OK.
To add the NT Service\AzureWLBackupPluginSvc login to the SQL Server instance, repeat steps 1-7.
If the login already exists, make sure it has the sysadmin server role and under Status it has the Grant option for the Permission to connect to database engine and Login as Enabled.
After granting permission, Rediscover DBs in the Azure portal by going to the Recovery Services vault > Manage > Backup Infrastructure > Workload in Azure VM.
Alternatively, you can automate the permission assignment by running the following cmdlets in admin mode.
Note
The instance name is set to MSSQLSERVER by default. Change the instance name argument in script if needed.
param(
    [Parameter(Mandatory=$false)]
    [string] $InstanceName = "MSSQLSERVER"
)
if ($InstanceName -eq "MSSQLSERVER")
{
    $fullInstance = $env:COMPUTERNAME   # In case it's the default SQL Server Instance
}
else
{
    $fullInstance = $env:COMPUTERNAME + "\" + $InstanceName   # In case of named instance
}
try
{
    sqlcmd.exe -S $fullInstance -Q "sp_addsrvrolemember 'NT Service\AzureWLBackupPluginSvc', 'sysadmin'" # Adds login with sysadmin permission if already not available
}
catch
{
    Write-Host "An error occurred:"
    Write-Host $_.Exception|format-list -force
}
try
{
    sqlcmd.exe -S $fullInstance -Q "sp_addsrvrolemember 'NT AUTHORITY\SYSTEM', 'sysadmin'" # Adds login with sysadmin permission if already not available
}
catch
{
    Write-Host "An error occurred:"
    Write-Host $_.Exception|format-list -force
}
Pricing for snapshot backup of SQL Server instances in Azure VMs
Backup of SQL in Azure VM snapshot incurs the following charges:
Snapshot backups stored in a Recovery Services vault are priced based on Azure Backup pricing.
In addition to the Protected Instance fee and vault storage cost, Azure Backup incurs extra charges for snapshot storage in the operational tier.
Managed disk snapshots incur charges based on Managed Disk snapshot pricing for the duration they're retained in your subscription.
Next steps
- Configure simultaneous backups.
- Back up SQL Server databases running on an Azure VM.
- Back up SQL Server instance snapshot in Azure VM using Azure portal (preview).
- Restore backed up SQL Server databases.
- Manage and monitor SQL Server database and instance snapshot (preview) backups.