กิจกรรม
17 มี.ค. 21 - 21 มี.ค. 10
แอปอัจฉริยะ เข้าร่วมชุด meetup เพื่อสร้างโซลูชัน AI ที่ปรับขนาดได้ตามกรณีการใช้งานจริงกับนักพัฒนาและผู้เชี่ยวชาญร่วมกัน
ลงทะเบียนตอนนี้เบราว์เซอร์นี้ไม่ได้รับการสนับสนุนอีกต่อไป
อัปเกรดเป็น Microsoft Edge เพื่อใช้ประโยชน์จากคุณลักษณะล่าสุด เช่น การอัปเดตความปลอดภัยและการสนับสนุนด้านเทคนิค
In this quickstart, you can use your own data with Azure OpenAI models. Using Azure OpenAI's models on your data can provide you with a powerful conversational AI platform that enables faster and more accurate communication.
The following resources:
เคล็ดลับ
You can use the Azure Developer CLI to programmatically create the resources needed for Azure OpenAI On Your Data
Navigate to Azure AI Foundry portal and sign-in with credentials that have access to your Azure OpenAI resource.
You can either create an Azure AI Foundry project by clicking Create project, or continue directly by clicking the button on the Focused on Azure OpenAI Service tile.

Select Chat under Playgrounds in the left navigation menu, and select your model deployment.
In the Chat playground, Select Add your data and then Add a data source

In the pane that appears, select Upload files (preview) under Select data source. Azure OpenAI needs both a storage resource and a search resource to access and index your data.
เคล็ดลับ
For Azure OpenAI to access your storage account, you will need to turn on Cross-origin resource sharing (CORS). If CORS isn't already turned on for the Azure Blob Storage resource, select Turn on CORS.
Select your Azure AI Search resource, and select the acknowledgment that connecting it will incur usage on your account. Then select Next.

On the Upload files pane, select Browse for a file and select the files you downloaded from the prerequisites section, or your own data. Then select Upload files. Then select Next.
On the Data management pane, you can choose whether to enable semantic search or vector search for your index.
ข้อสำคัญ
Review the details you entered, and select Save and close. You can now chat with the model and it will use information from your data to construct the response.
Start exploring Azure OpenAI capabilities with a no-code approach through the chat playground. It's simply a text box where you can submit a prompt to generate a completion. From this page, you can quickly iterate and experiment with the capabilities.

The playground gives you options to tailor your chat experience. On the top menu, you can select Deploy to determine which model generates a response using the search results from your index. You choose the number of past messages to include as conversation history for future generated responses. Conversation history gives context to generate related responses but also consumes token usage. The input token progress indicator keeps track of the token count of the question you submit.
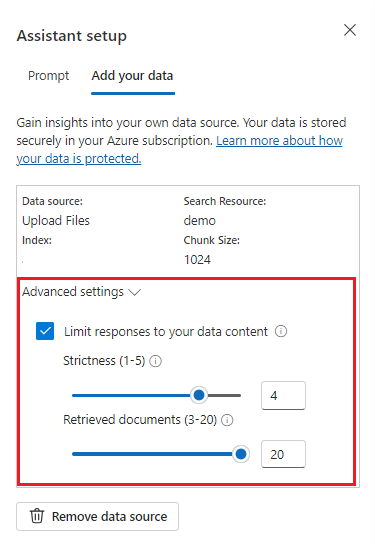
The Advanced settings on the left are runtime parameters, which give you control over retrieval and search relevant information from your data. A good use case is when you want to make sure responses are generated only based on your data or you find the model cannot generate a response based on existed information on your data.
Strictness determines the system's aggressiveness in filtering search documents based on their similarity scores. Setting strictness to 5 indicates that the system will aggressively filter out documents, applying a very high similarity threshold. Semantic search can be helpful in this scenario because the ranking models do a better job of inferring the intent of the query. Lower levels of strictness produce more verbose answers, but might also include information that isn't in your index. This is set to 3 by default.
Retrieved documents is an integer that can be set to 3, 5, 10, or 20, and controls the number of document chunks provided to the large language model for formulating the final response. By default, this is set to 5.
When Limit responses to your data is enabled, the model attempts to only rely on your documents for responses. This is set to true by default.
Send your first query. The chat models perform best in question and answer exercises. For example, "What are my available health plans?" or "What is the health plus option?".
Queries that require data analysis would probably fail, such as "Which health plan is most popular?". Queries that require information about all of your data will also likely fail, such as "How many documents have I uploaded?". Remember that the search engine looks for chunks having exact or similar terms, phrases, or construction to the query. And while the model might understand the question, if search results are chunks from the data set, it's not the right information to answer that kind of question.
Chats are constrained by the number of documents (chunks) returned in the response (limited to 3-20 in Azure AI Foundry portal playground). As you can imagine, posing a question about "all of the titles" requires a full scan of the entire vector store.
Once you're satisfied with the experience, you can deploy a web app directly from the portal by selecting the Deploy to button.

This gives you the option to either deploy to a standalone web application, or a copilot in Copilot Studio (preview) if you're using your own data on the model.
As an example, if you choose to deploy a web app:
The first time you deploy a web app, you should select Create a new web app. Choose a name for the app, which will
become part of the app URL. For example, https://<appname>.azurewebsites.net.
Select your subscription, resource group, location, and pricing plan for the published app. To update an existing app, select Publish to an existing web app and choose the name of your previous app from the dropdown menu.
If you choose to deploy a web app, see the important considerations for using it.
The following resources:
เคล็ดลับ
You can use the Azure Developer CLI to programmatically create the resources needed for Azure OpenAI On Your Data
Navigate to Azure AI Foundry portal and sign-in with credentials that have access to your Azure OpenAI resource.
You can either create an Azure AI Foundry project by clicking Create project, or continue directly by clicking the button on the Focused on Azure OpenAI Service tile.
Select Chat under Playgrounds in the left navigation menu, and select your model deployment.
In the Chat playground, Select Add your data and then Add a data source
In the pane that appears, select Upload files (preview) under Select data source. Azure OpenAI needs both a storage resource and a search resource to access and index your data.
เคล็ดลับ
For Azure OpenAI to access your storage account, you will need to turn on Cross-origin resource sharing (CORS). If CORS isn't already turned on for the Azure Blob Storage resource, select Turn on CORS.
Select your Azure AI Search resource, and select the acknowledgment that connecting it will incur usage on your account. Then select Next.
On the Upload files pane, select Browse for a file and select the files you downloaded from the prerequisites section, or your own data. Then select Upload files. Then select Next.
On the Data management pane, you can choose whether to enable semantic search or vector search for your index.
ข้อสำคัญ
Review the details you entered, and select Save and close. You can now chat with the model and it will use information from your data to construct the response.
You need to retrieve the following information to authenticate your application with your Azure OpenAI resource. This quickstart assumes you've uploaded your data to an Azure blob storage account and have an Azure AI Search index created. See Add your data using Azure AI Foundry portal.
| Variable name | Value |
|---|---|
AZURE_OPENAI_ENDPOINT |
This value can be found in the Keys & Endpoint section when examining your Azure OpenAI resource from the Azure portal. An example endpoint is: https://my-resoruce.openai.azure.com. |
AZURE_OPENAI_DEPLOYMENT_NAME |
This value corresponds to the custom name you chose for your deployment when you deployed a model. This value can be found under Resource Management > Deployments in the Azure portal. |
AZURE_AI_SEARCH_ENDPOINT |
This value can be found in the Overview section when examining your Azure AI Search resource from the Azure portal. |
AZURE_AI_SEARCH_INDEX |
This value corresponds to the name of the index you created to store your data. You can find it in the Overview section when examining your Azure AI Search resource from the Azure portal. |
Learn more about keyless authentication and setting environment variables.
In a console window (such as cmd, PowerShell, or Bash), use the dotnet new command to create a new console app with the name azure-openai-quickstart. This command creates a simple "Hello World" project with a single C# source file: Program.cs.
dotnet new console -n azure-openai-quickstart
Change your directory to the newly created app folder. You can build the application with:
dotnet build
The build output should contain no warnings or errors.
...
Build succeeded.
 0 Warning(s)
 0 Error(s)
...
Install the OpenAI .NET client library with:
dotnet add package Azure.AI.OpenAI --prerelease
From the project directory, open the Program.cs file and replace its contents with the following code:
using System;
using Azure.AI.OpenAI;
using System.ClientModel;
using Azure.AI.OpenAI.Chat;
using OpenAI.Chat;
using static System.Environment;

string azureOpenAIEndpoint = GetEnvironmentVariable("AZURE_OPENAI_ENDPOINT");
string azureOpenAIKey = GetEnvironmentVariable("AZURE_OPENAI_API_KEY");
string deploymentName = GetEnvironmentVariable("AZURE_OPENAI_DEPLOYMENT_NAME");
string searchEndpoint = GetEnvironmentVariable("AZURE_AI_SEARCH_ENDPOINT");
string searchKey = GetEnvironmentVariable("AZURE_AI_SEARCH_API_KEY");
string searchIndex = GetEnvironmentVariable("AZURE_AI_SEARCH_INDEX");

AzureOpenAIClient azureClient = new(
			new Uri(azureOpenAIEndpoint),
			new ApiKeyCredential(azureOpenAIKey));
ChatClient chatClient = azureClient.GetChatClient(deploymentName);

// Extension methods to use data sources with options are subject to SDK surface changes. Suppress the
// warning to acknowledge and this and use the subject-to-change AddDataSource method.
#pragma warning disable AOAI001

ChatCompletionOptions options = new();
options.AddDataSource(new AzureSearchChatDataSource()
{
	Endpoint = new Uri(searchEndpoint),
	IndexName = searchIndex,
	Authentication = DataSourceAuthentication.FromApiKey(searchKey),
});

ChatCompletion completion = chatClient.CompleteChat(
	[
		new UserChatMessage("What health plans are available?"),
			],
	options);

ChatMessageContext onYourDataContext = completion.GetMessageContext();

if (onYourDataContext?.Intent is not null)
{
	Console.WriteLine($"Intent: {onYourDataContext.Intent}");
}
foreach (ChatCitation citation in onYourDataContext?.Citations ?? [])
{
	Console.WriteLine($"Citation: {citation.Content}");
}
ข้อสำคัญ
For production, use a secure way of storing and accessing your credentials like Azure Key Vault. For more information about credential security, see the Azure AI services security article.
dotnet run program.cs
Contoso Electronics offers two health plans: Northwind Health Plus and Northwind Standard [doc1]. Northwind Health Plus is a comprehensive plan that provides coverage for medical, vision, and dental services, prescription drug coverage, mental health and substance abuse coverage, and coverage for preventive care services. It also offers coverage for emergency services, both in-network and out-of-network. On the other hand, Northwind Standard is a basic plan that provides coverage for medical, vision, and dental services, prescription drug coverage, and coverage for preventive care services. However, it does not offer coverage for emergency services, mental health and substance abuse coverage, or out-of-network services [doc1].

Intent: ["What are the available health plans?", "List of health plans available", "Health insurance options", "Types of health plans offered"]

Citation:
Contoso Electronics plan and benefit packages

Thank you for your interest in the Contoso electronics plan and benefit packages. Use this document to

learn more about the various options available to you...// Omitted for brevity
This will wait until the model has generated its entire response before printing the results.
Source code| Source code | Sample
The following resources:
เคล็ดลับ
You can use the Azure Developer CLI to programmatically create the resources needed for Azure OpenAI On Your Data
Navigate to Azure AI Foundry portal and sign-in with credentials that have access to your Azure OpenAI resource.
You can either create an Azure AI Foundry project by clicking Create project, or continue directly by clicking the button on the Focused on Azure OpenAI Service tile.
Select Chat under Playgrounds in the left navigation menu, and select your model deployment.
In the Chat playground, Select Add your data and then Add a data source
In the pane that appears, select Upload files (preview) under Select data source. Azure OpenAI needs both a storage resource and a search resource to access and index your data.
เคล็ดลับ
For Azure OpenAI to access your storage account, you will need to turn on Cross-origin resource sharing (CORS). If CORS isn't already turned on for the Azure Blob Storage resource, select Turn on CORS.
Select your Azure AI Search resource, and select the acknowledgment that connecting it will incur usage on your account. Then select Next.
On the Upload files pane, select Browse for a file and select the files you downloaded from the prerequisites section, or your own data. Then select Upload files. Then select Next.
On the Data management pane, you can choose whether to enable semantic search or vector search for your index.
ข้อสำคัญ
Review the details you entered, and select Save and close. You can now chat with the model and it will use information from your data to construct the response.
To successfully make a call against Azure OpenAI, you need the following variables. This quickstart assumes you've uploaded your data to an Azure blob storage account and have an Azure AI Search index created. For more information, see Add your data using Azure AI Foundry.
| Variable name | Value |
|---|---|
AZURE_OPENAI_ENDPOINT |
You can find this value in the Keys & Endpoint section when examining your Azure OpenAI resource from the Azure portal. Alternatively, you can find the value in Azure AI Foundry > Chat playground > Code view. An example endpoint is: https://my-resource.openai.azure.com. |
AZURE_OPENAI_API_KEY |
You can find this value in Resource management > Keys & Endpoint section when examining your Azure OpenAI resource from the Azure portal. You can use either KEY1 or KEY2. Always having two keys allows you to securely rotate and regenerate keys without causing a service disruption. |
AZURE_OPEN_AI_DEPLOYMENT_ID |
This value corresponds to the custom name you chose for your deployment when you deployed a model. You can find this value under Resource Management > Deployments in the Azure portal or alternatively under Management > Deployments in Azure AI Foundry portal. |
AZURE_AI_SEARCH_ENDPOINT |
You can find this value in the Overview section when examining your Azure AI Search resource from the Azure portal. |
AZURE_AI_SEARCH_API_KEY |
You can find this value in the Settings > Keys section when examining your Azure AI Search resource from the Azure portal. You can use either the primary admin key or secondary admin key. Always having two keys allows you to securely rotate and regenerate keys without causing a service disruption. |
AZURE_AI_SEARCH_INDEX |
This value corresponds to the name of the index you created to store your data. You can find it in the Overview section when examining your Azure AI Search resource from the Azure portal. |
Create and assign persistent environment variables for your key and endpoint.
ข้อสำคัญ
Use API keys with caution. Don't include the API key directly in your code, and never post it publicly. If you use an API key, store it securely in Azure Key Vault. For more information about using API keys securely in your apps, see API keys with Azure Key Vault.
For more information about AI services security, see Authenticate requests to Azure AI services.
หมายเหตุ
Spring AI defaults the model name to gpt-35-turbo. It's only necessary to provide the SPRING_AI_AZURE_OPENAI_MODEL value if you've deployed a model with a different name.
export SPRING_AI_AZURE_OPENAI_ENDPOINT=REPLACE_WITH_YOUR_AOAI_ENDPOINT_VALUE_HERE
export SPRING_AI_AZURE_OPENAI_API_KEY=REPLACE_WITH_YOUR_AOAI_KEY_VALUE_HERE
export SPRING_AI_AZURE_COGNITIVE_SEARCH_ENDPOINT=REPLACE_WITH_YOUR_AZURE_SEARCH_RESOURCE_VALUE_HERE
export SPRING_AI_AZURE_COGNITIVE_SEARCH_API_KEY=REPLACE_WITH_YOUR_AZURE_SEARCH_RESOURCE_KEY_VALUE_HERE
export SPRING_AI_AZURE_COGNITIVE_SEARCH_INDEX=REPLACE_WITH_YOUR_INDEX_NAME_HERE
export SPRING_AI_AZURE_OPENAI_MODEL=REPLACE_WITH_YOUR_MODEL_NAME_HERE
Spring AI doesn't currently support the AzureCognitiveSearchChatExtensionConfiguration options that allow an Azure AI query to encapsulate the Retrieval Augmented Generation (RAG) method and hide the details from the user. As an alternative, you can still invoke the RAG method directly in your application to query data in your Azure AI Search index and use retrieved documents to augment your query.
Spring AI supports a VectorStore abstraction, and you can wrap Azure AI Search can be wrapped in a Spring AI VectorStore implementation for querying your custom data. The following project implements a custom VectorStore backed by Azure AI Search and directly executes RAG operations.
In a Bash window, create a new directory for your app, and navigate to it.
mkdir ai-custom-data-demo && cd ai-custom-data-demo
Run the spring init command from your working directory. This command creates a standard directory structure for your Spring project including the main Java class source file and the pom.xml file used for managing Maven based projects.
spring init -a ai-custom-data-demo -n AICustomData --force --build maven -x
The generated files and folders resemble the following structure:
ai-custom-data-demo/
|-- pom.xml
|-- mvn
|-- mvn.cmd
|-- HELP.md
|-- src/
    |-- main/
    |   |-- resources/
    |   |   |-- application.properties
    |   |-- java/
    |       |-- com/
    |           |-- example/
    |               |-- aicustomdatademo/
    |                   |-- AiCustomDataApplication.java
    |-- test/
        |-- java/
            |-- com/
                |-- example/
                    |-- aicustomdatademo/
                        |-- AiCustomDataApplicationTests.java
Edit the pom.xml file.
From the root of the project directory, open the pom.xml file in your preferred editor or IDE and overwrite the file with following content:
<?xml version="1.0" encoding="UTF-8"?>
<project xmlns="http://maven.apache.org/POM/4.0.0" xmlns:xsi="http://www.w3.org/2001/XMLSchema-instance"
    xsi:schemaLocation="http://maven.apache.org/POM/4.0.0 https://maven.apache.org/xsd/maven-4.0.0.xsd">
    <modelVersion>4.0.0</modelVersion>
    <parent>
        <groupId>org.springframework.boot</groupId>
        <artifactId>spring-boot-starter-parent</artifactId>
        <version>3.2.0</version>
        <relativePath/> <!-- lookup parent from repository -->
    </parent>
    <groupId>com.example</groupId>
    <artifactId>ai-custom-data-demo</artifactId>
    <version>0.0.1-SNAPSHOT</version>
    <name>AICustomData</name>
    <description>Demo project for Spring Boot</description>
    <properties>
        <java.version>17</java.version>
    </properties>
    <dependencies>
        <dependency>
            <groupId>org.springframework.boot</groupId>
            <artifactId>spring-boot-starter</artifactId>
        </dependency>
        <dependency>
            <groupId>org.springframework.experimental.ai</groupId>
            <artifactId>spring-ai-azure-openai-spring-boot-starter</artifactId>
            <version>0.7.0-SNAPSHOT</version>
        </dependency>
        <dependency>
            <groupId>com.azure</groupId>
            <artifactId>azure-search-documents</artifactId>
            <version>11.6.0-beta.10</version>
            <exclusions>
                <!-- exclude this to avoid changing the default serializer and the null-value behavior -->
                <exclusion>
                    <groupId>com.azure</groupId>
                    <artifactId>azure-core-serializer-json-jackson</artifactId>
                </exclusion>
            </exclusions>
        </dependency>
        <dependency>
            <groupId>org.projectlombok</groupId>
            <artifactId>lombok</artifactId>
            <optional>true</optional>
        </dependency>
        <dependency>
            <groupId>org.springframework.boot</groupId>
            <artifactId>spring-boot-starter-test</artifactId>
            <scope>test</scope>
        </dependency>
    </dependencies>

    <build>
        <plugins>
            <plugin>
                <groupId>org.springframework.boot</groupId>
                <artifactId>spring-boot-maven-plugin</artifactId>
            </plugin>
        </plugins>
    </build>
    <repositories>
        <repository>
            <id>spring-snapshots</id>
            <name>Spring Snapshots</name>
            <url>https://repo.spring.io/snapshot</url>
            <releases>
                <enabled>false</enabled>
            </releases>
        </repository>
    </repositories>
</project>
From the src/main/java/com/example/aicustomdatademo folder, open AiCustomDataApplication.java in your preferred editor or IDE and paste in the following code:
package com.example.aicustomdatademo;

import java.util.Collections;
import java.util.List;
import java.util.Map;
import java.util.Optional;
import java.util.stream.Collectors;

import org.springframework.ai.client.AiClient;
import org.springframework.ai.document.Document;
import org.springframework.ai.embedding.EmbeddingClient;
import org.springframework.ai.prompt.Prompt;
import org.springframework.ai.prompt.SystemPromptTemplate;
import org.springframework.ai.prompt.messages.MessageType;
import org.springframework.ai.prompt.messages.UserMessage;
import org.springframework.ai.vectorstore.VectorStore;
import org.springframework.beans.factory.annotation.Autowired;
import org.springframework.beans.factory.annotation.Value;
import org.springframework.boot.CommandLineRunner;
import org.springframework.boot.SpringApplication;
import org.springframework.boot.autoconfigure.SpringBootApplication;
import org.springframework.context.annotation.Bean;

import com.azure.core.credential.AzureKeyCredential;
import com.azure.core.util.Context;
import com.azure.search.documents.SearchClient;
import com.azure.search.documents.SearchClientBuilder;
import com.azure.search.documents.models.IndexingResult;
import com.azure.search.documents.models.SearchOptions;
import com.azure.search.documents.models.RawVectorQuery;

import lombok.AllArgsConstructor;
import lombok.NoArgsConstructor;
import lombok.Builder;
import lombok.Data;
import lombok.extern.jackson.Jacksonized;

@SpringBootApplication
public class AiCustomDataApplication implements CommandLineRunner
{
    private static final String ROLE_INFO_KEY = "role";

    private static final String template = """
            You are a helpful assistant. Use the information from the DOCUMENTS section to augment answers.

            DOCUMENTS:
            {documents}
            """;

    @Value("${spring.ai.azure.cognitive-search.endpoint}")
    private String acsEndpoint;

    @Value("${spring.ai.azure.cognitive-search.api-key}")
    private String acsApiKey;

    @Value("${spring.ai.azure.cognitive-search.index}")
    private String acsIndexName;

    @Autowired
    private AiClient aiClient;

    @Autowired
    private EmbeddingClient embeddingClient;

    public static void main(String[] args) {
        SpringApplication.run(AiCustomDataApplication.class, args);
    }

    @Override
    public void run(String... args) throws Exception
    {
        System.out.println(String.format("Sending custom data prompt to AI service. One moment please...\r\n"));

        final var store = vectorStore(embeddingClient);

        final String question = "What are my available health plans?";

        final var candidateDocs = store.similaritySearch(question);

        final var userMessage = new UserMessage(question);

        final String docPrompts =
                candidateDocs.stream().map(entry -> entry.getContent()).collect(Collectors.joining("\n"));

        final SystemPromptTemplate promptTemplate = new SystemPromptTemplate(template);
        final var systemMessage = promptTemplate.createMessage(Map.of("documents", docPrompts));

        final var prompt = new Prompt(List.of(systemMessage, userMessage));

        final var resps = aiClient.generate(prompt);

        System.out.println(String.format("Prompt created %d generated response(s).", resps.getGenerations().size()));

        resps.getGenerations().stream()
          .forEach(gen -> {
              final var role = gen.getInfo().getOrDefault(ROLE_INFO_KEY, MessageType.ASSISTANT.getValue());

              System.out.println(String.format("Generated respose from \"%s\": %s", role, gen.getText()));
          });

    }

    @Bean
    public VectorStore vectorStore(EmbeddingClient embeddingClient)
    {
        final SearchClient searchClient = new SearchClientBuilder()
                .endpoint(acsEndpoint)
                .credential(new AzureKeyCredential(acsApiKey))
                .indexName(acsIndexName)
                .buildClient();
        return new AzureCognitiveSearchVectorStore(searchClient, embeddingClient);
    }

    public static class AzureCognitiveSearchVectorStore implements VectorStore
    {
        private static final int DEFAULT_TOP_K = 4;

        private static final Double DEFAULT_SIMILARITY_THRESHOLD = 0.0;

        private SearchClient searchClient;

        private final EmbeddingClient embeddingClient;

        public AzureCognitiveSearchVectorStore(SearchClient searchClient, EmbeddingClient embeddingClient)
        {
            this.searchClient = searchClient;
            this.embeddingClient = embeddingClient;
        }

        @Override
        public void add(List<Document> documents)
        {
            final var docs = documents.stream().map(document -> {

                final var embeddings = embeddingClient.embed(document);

                return new DocEntry(document.getId(), "", document.getContent(), embeddings);

            }).toList();

            searchClient.uploadDocuments(docs);
        }

        @Override
        public Optional<Boolean> delete(List<String> idList)
        {
            final List<DocEntry> docIds = idList.stream().map(id -> DocEntry.builder().id(id).build())
                .toList();

            var results = searchClient.deleteDocuments(docIds);

            boolean resSuccess = true;

            for (IndexingResult result : results.getResults())
                if (!result.isSucceeded()) {
                    resSuccess = false;
                    break;
                }

            return Optional.of(resSuccess);
        }

        @Override
        public List<Document> similaritySearch(String query)
        {
            return similaritySearch(query, DEFAULT_TOP_K);
        }

        @Override
        public List<Document> similaritySearch(String query, int k)
        {
            return similaritySearch(query, k, DEFAULT_SIMILARITY_THRESHOLD);
        }

        @Override
        public List<Document> similaritySearch(String query, int k, double threshold)
        {
            final var searchQueryVector = new RawVectorQuery()
                    .setVector(toFloatList(embeddingClient.embed(query)))
                    .setKNearestNeighborsCount(k)
                    .setFields("contentVector");

            final var searchResults = searchClient.search(null,
                    new SearchOptions().setVectorQueries(searchQueryVector), Context.NONE);

            return searchResults.stream()
                    .filter(r -> r.getScore() >= threshold)
                    .map(r -> {

                        final DocEntry entry = r.getDocument(DocEntry.class);

                        final Document doc = new Document(entry.getId(), entry.getContent(), Collections.emptyMap());
                        doc.setEmbedding(entry.getContentVector());

                        return doc;
                    })
                    .collect(Collectors.toList());
        }

        private List<Float> toFloatList(List<Double> doubleList)
        {
            return doubleList.stream().map(Double::floatValue).toList();
        }

    }

    @Data
    @Builder
    @Jacksonized
    @AllArgsConstructor
    @NoArgsConstructor
    static class DocEntry
    {
        private String id;

        private String hash;

        private String content;

        private List<Double> contentVector;
    }

}
ข้อสำคัญ
For production, use a secure way of storing and accessing your credentials like Azure Key Vault. For more information about credential security, see the Azure AI services security article.
Navigate back to the project root folder, and run the app by using the following command:
./mvnw spring-boot:run
  .   ____          _            __ _ _
 /\\ / ___'_ __ _ _(_)_ __  __ _ \ \ \ \
( ( )\___ | '_ | '_| | '_ \/ _` | \ \ \ \
 \\/  ___)| |_)| | | | | || (_| |  ) ) ) )
  '  |____| .__|_| |_|_| |_\__, | / / / /
 =========|_|==============|___/=/_/_/_/
 :: Spring Boot ::                (v3.1.5)

2023-11-07T14:40:45.250-06:00  INFO 18557 --- [           main] c.e.a.AiCustomDataApplication            : No active profile set, falling back to 1 default profile: "default"
2023-11-07T14:40:46.035-06:00  INFO 18557 --- [           main] c.e.a.AiCustomDataApplication            : Started AiCustomDataApplication in 1.095 seconds (process running for 1.397)
Sending custom data prompt to AI service. One moment please...

Prompt created 1 generated response(s).
Generated response from "assistant": The available health plans in the Contoso Electronics plan and benefit packages are the Northwind Health Plus and Northwind Standard plans.
Reference documentation | Source code | Package (npm) | Samples
An Azure subscription - Create one for free.
Azure CLI used for passwordless authentication in a local development environment, create the necessary context by signing in with the Azure CLI.
An Azure OpenAI resource deployed in a supported region and with a supported model.
Be sure that you're assigned at least the Cognitive Services Contributor role for the Azure OpenAI resource.
Download the example data from GitHub if you don't have your own data.
For the recommended keyless authentication with Microsoft Entra ID, you need to:
Cognitive Services User role to your user account. You can assign roles in the Azure portal under Access control (IAM) > Add role assignment.เคล็ดลับ
You can use the Azure Developer CLI to programmatically create the resources needed for Azure OpenAI On Your Data
Navigate to Azure AI Foundry portal and sign-in with credentials that have access to your Azure OpenAI resource.
You can either create an Azure AI Foundry project by clicking Create project, or continue directly by clicking the button on the Focused on Azure OpenAI Service tile.
Select Chat under Playgrounds in the left navigation menu, and select your model deployment.
In the Chat playground, Select Add your data and then Add a data source
In the pane that appears, select Upload files (preview) under Select data source. Azure OpenAI needs both a storage resource and a search resource to access and index your data.
เคล็ดลับ
For Azure OpenAI to access your storage account, you will need to turn on Cross-origin resource sharing (CORS). If CORS isn't already turned on for the Azure Blob Storage resource, select Turn on CORS.
Select your Azure AI Search resource, and select the acknowledgment that connecting it will incur usage on your account. Then select Next.
On the Upload files pane, select Browse for a file and select the files you downloaded from the prerequisites section, or your own data. Then select Upload files. Then select Next.
On the Data management pane, you can choose whether to enable semantic search or vector search for your index.
ข้อสำคัญ
Review the details you entered, and select Save and close. You can now chat with the model and it will use information from your data to construct the response.
You need to retrieve the following information to authenticate your application with your Azure OpenAI resource. This quickstart assumes you've uploaded your data to an Azure blob storage account and have an Azure AI Search index created. See Add your data using Azure AI Foundry portal.
| Variable name | Value |
|---|---|
AZURE_OPENAI_ENDPOINT |
This value can be found in the Keys & Endpoint section when examining your Azure OpenAI resource from the Azure portal. An example endpoint is: https://my-resoruce.openai.azure.com. |
AZURE_OPENAI_DEPLOYMENT_NAME |
This value corresponds to the custom name you chose for your deployment when you deployed a model. This value can be found under Resource Management > Deployments in the Azure portal. |
AZURE_AI_SEARCH_ENDPOINT |
This value can be found in the Overview section when examining your Azure AI Search resource from the Azure portal. |
AZURE_AI_SEARCH_INDEX |
This value corresponds to the name of the index you created to store your data. You can find it in the Overview section when examining your Azure AI Search resource from the Azure portal. |
Learn more about keyless authentication and setting environment variables.
Create a new folder use-data-quickstart to contain the application and open Visual Studio Code in that folder with the following command:
mkdir use-data-quickstart && cd use-data-quickstart
Create the package.json with the following command:
npm init -y
Install the OpenAI client library for JavaScript with:
npm install openai
For the recommended passwordless authentication:
npm install @azure/identity
Create the index.js file with the following code:
const { DefaultAzureCredential, getBearerTokenProvider } = require("@azure/identity");
const { AzureOpenAI } = require("openai");

// Set the Azure and AI Search values from environment variables
const endpoint = process.env.AZURE_OPENAI_ENDPOINT || "Your endpoint";
const searchEndpoint = process.enV.AZURE_AI_SEARCH_ENDPOINT || "Your search endpoint";
const searchIndex = process.env.AZURE_AI_SEARCH_INDEX || "Your search index";

// keyless authentication
const credential = new DefaultAzureCredential();
const scope = "https://cognitiveservices.azure.com/.default";
const azureADTokenProvider = getBearerTokenProvider(credential, scope);

// Required Azure OpenAI deployment name and API version
const deploymentName = process.env.AZURE_OPENAI_DEPLOYMENT_NAME || "gpt-4";
const apiVersion = process.env.OPENAI_API_VERSION || "2024-10-21";

function getClient() {
  return new AzureOpenAI({
    endpoint,
    azureADTokenProvider,
    deployment: deploymentName,
    apiVersion,
  });
}

async function main() {
  const client = getClient();

  const messages = [
    { role: "user", content: "What are my available health plans?" },
  ];

  console.log(`Message: ${messages.map((m) => m.content).join("\n")}`);

  const events = await client.chat.completions.create({
    stream: true,
    messages: [
      {
        role: "user",
        content:
          "What's the most common feedback we received from our customers about the product?",
      },
    ],
    max_tokens: 128,
    model: "",
    data_sources: [
      {
        type: "azure_search",
        parameters: {
          endpoint: searchEndpoint,
          index_name: searchIndex,
          authentication: {
            type: "api_key",
            key: searchKey,
          },
        },
      },
    ],
  });

  let response = "";
  for await (const event of events) {
    for (const choice of event.choices) {
      const newText = choice.delta?.content;
      if (newText) {
        response += newText;
        // To see streaming results as they arrive, uncomment line below
        // console.log(newText);
      }
    }
  }
  console.log(response);
}

main().catch((err) => {
  console.error("The sample encountered an error:", err);
});
Sign in to Azure with the following command:
az login
Run the JavaScript file.
node index.js
Message: What are my available health plans?
The available health plans in the Contoso Electronics plan and benefit packages are the Northwind Health Plus and Northwind Standard plans.
Reference documentation | Source code | Package (npm) | Samples
An Azure subscription - Create one for free.
Azure CLI used for passwordless authentication in a local development environment, create the necessary context by signing in with the Azure CLI.
An Azure OpenAI resource deployed in a supported region and with a supported model.
Be sure that you're assigned at least the Cognitive Services Contributor role for the Azure OpenAI resource.
Download the example data from GitHub if you don't have your own data.
For the recommended keyless authentication with Microsoft Entra ID, you need to:
Cognitive Services User role to your user account. You can assign roles in the Azure portal under Access control (IAM) > Add role assignment.เคล็ดลับ
You can use the Azure Developer CLI to programmatically create the resources needed for Azure OpenAI On Your Data
Navigate to Azure AI Foundry portal and sign-in with credentials that have access to your Azure OpenAI resource.
You can either create an Azure AI Foundry project by clicking Create project, or continue directly by clicking the button on the Focused on Azure OpenAI Service tile.
Select Chat under Playgrounds in the left navigation menu, and select your model deployment.
In the Chat playground, Select Add your data and then Add a data source
In the pane that appears, select Upload files (preview) under Select data source. Azure OpenAI needs both a storage resource and a search resource to access and index your data.
เคล็ดลับ
For Azure OpenAI to access your storage account, you will need to turn on Cross-origin resource sharing (CORS). If CORS isn't already turned on for the Azure Blob Storage resource, select Turn on CORS.
Select your Azure AI Search resource, and select the acknowledgment that connecting it will incur usage on your account. Then select Next.
On the Upload files pane, select Browse for a file and select the files you downloaded from the prerequisites section, or your own data. Then select Upload files. Then select Next.
On the Data management pane, you can choose whether to enable semantic search or vector search for your index.
ข้อสำคัญ
Review the details you entered, and select Save and close. You can now chat with the model and it will use information from your data to construct the response.
You need to retrieve the following information to authenticate your application with your Azure OpenAI resource. This quickstart assumes you've uploaded your data to an Azure blob storage account and have an Azure AI Search index created. See Add your data using Azure AI Foundry portal.
| Variable name | Value |
|---|---|
AZURE_OPENAI_ENDPOINT |
This value can be found in the Keys & Endpoint section when examining your Azure OpenAI resource from the Azure portal. An example endpoint is: https://my-resoruce.openai.azure.com. |
AZURE_OPENAI_DEPLOYMENT_NAME |
This value corresponds to the custom name you chose for your deployment when you deployed a model. This value can be found under Resource Management > Deployments in the Azure portal. |
AZURE_AI_SEARCH_ENDPOINT |
This value can be found in the Overview section when examining your Azure AI Search resource from the Azure portal. |
AZURE_AI_SEARCH_INDEX |
This value corresponds to the name of the index you created to store your data. You can find it in the Overview section when examining your Azure AI Search resource from the Azure portal. |
Learn more about keyless authentication and setting environment variables.
Create a new folder use-data-quickstart to contain the application and open Visual Studio Code in that folder with the following command:
mkdir use-data-quickstart && cd use-data-quickstart
Create the package.json with the following command:
npm init -y
Update the package.json to ECMAScript with the following command:
npm pkg set type=module
Install the OpenAI client library for JavaScript with:
npm install openai
For the recommended passwordless authentication:
npm install @azure/identity
Create the index.ts file with the following code:
import { AzureOpenAI } from "openai";
import { DefaultAzureCredential, getBearerTokenProvider } from "@azure/identity";
import "@azure/openai/types";

// Set the Azure and AI Search values from environment variables
const endpoint = process.env.AZURE_OPENAI_ENDPOINT || "Your endpoint";
const searchEndpoint = process.env.AZURE_AI_SEARCH_ENDPOINT || "Your search endpoint";
const searchIndex = process.env.AZURE_AI_SEARCH_INDEX || "Your search index";

// keyless authentication
const credential = new DefaultAzureCredential();
const scope = "https://cognitiveservices.azure.com/.default";
const azureADTokenProvider = getBearerTokenProvider(credential, scope);

// Required Azure OpenAI deployment name and API version
const deploymentName = process.env.AZURE_OPENAI_DEPLOYMENT_NAME || "gpt-4";
const apiVersion = process.env.OPENAI_API_VERSION || "2024-07-01-preview";

function getClient(): AzureOpenAI {
  return new AzureOpenAI({
    endpoint,
    azureADTokenProvider,
    deployment: deploymentName,
    apiVersion,
  });
}

async function main() {
  const client = getClient();

  const messages = [
    { role: "user", content: "What are my available health plans?" },
  ];

  console.log(`Message: ${messages.map((m) => m.content).join("\n")}`);

  const events = await client.chat.completions.create({
    stream: true,
    messages: [
      {
        role: "user",
        content:
          "What's the most common feedback we received from our customers about the product?",
      },
    ],
    max_tokens: 128,
    model: "",
    data_sources: [
      {
        type: "azure_search",
        parameters: {
          endpoint: searchEndpoint,
          index_name: searchIndex,
          authentication: {
            type: "api_key",
            key: searchKey,
          },
        },
      },
    ],
  });

  let response = "";
  for await (const event of events) {
    for (const choice of event.choices) {
      const newText = choice.delta?.content;
      if (newText) {
        response += newText;
        // To see streaming results as they arrive, uncomment line below
        // console.log(newText);
      }
    }
  }
  console.log(response);
}

main().catch((err) => {
  console.error("The sample encountered an error:", err);
});
Create the tsconfig.json file to transpile the TypeScript code and copy the following code for ECMAScript.
{
    "compilerOptions": {
      "module": "NodeNext",
      "target": "ES2022", // Supports top-level await
      "moduleResolution": "NodeNext",
      "skipLibCheck": true, // Avoid type errors from node_modules
      "strict": true // Enable strict type-checking options
    },
    "include": ["*.ts"]
}
Transpile from TypeScript to JavaScript.
tsc
Sign in to Azure with the following command:
az login
Run the code with the following command:
node index.js
ข้อสำคัญ
For production, use a secure way of storing and accessing your credentials like Azure Key Vault. For more information about credential security, see the Azure AI services security article.
Message: What are my available health plans?
The available health plans in the Contoso Electronics plan and benefit packages are the Northwind Health Plus and Northwind Standard plans.
The following resources:
Reference | Source code | Package (pypi) | Samples
These links reference the OpenAI API for Python. There's no Azure-specific OpenAI Python SDK. Learn how to switch between the OpenAI services and Azure OpenAI services.
เคล็ดลับ
You can use the Azure Developer CLI to programmatically create the resources needed for Azure OpenAI On Your Data
Navigate to Azure AI Foundry portal and sign-in with credentials that have access to your Azure OpenAI resource.
You can either create an Azure AI Foundry project by clicking Create project, or continue directly by clicking the button on the Focused on Azure OpenAI Service tile.
Select Chat under Playgrounds in the left navigation menu, and select your model deployment.
In the Chat playground, Select Add your data and then Add a data source
In the pane that appears, select Upload files (preview) under Select data source. Azure OpenAI needs both a storage resource and a search resource to access and index your data.
เคล็ดลับ
For Azure OpenAI to access your storage account, you will need to turn on Cross-origin resource sharing (CORS). If CORS isn't already turned on for the Azure Blob Storage resource, select Turn on CORS.
Select your Azure AI Search resource, and select the acknowledgment that connecting it will incur usage on your account. Then select Next.
On the Upload files pane, select Browse for a file and select the files you downloaded from the prerequisites section, or your own data. Then select Upload files. Then select Next.
On the Data management pane, you can choose whether to enable semantic search or vector search for your index.
ข้อสำคัญ
Review the details you entered, and select Save and close. You can now chat with the model and it will use information from your data to construct the response.
You need to retrieve the following information to authenticate your application with your Azure OpenAI resource. This quickstart assumes you've uploaded your data to an Azure blob storage account and have an Azure AI Search index created. See Add your data using Azure AI Foundry portal.
| Variable name | Value |
|---|---|
AZURE_OPENAI_ENDPOINT |
This value can be found in the Keys & Endpoint section when examining your Azure OpenAI resource from the Azure portal. An example endpoint is: https://my-resoruce.openai.azure.com. |
AZURE_OPENAI_DEPLOYMENT_NAME |
This value corresponds to the custom name you chose for your deployment when you deployed a model. This value can be found under Resource Management > Deployments in the Azure portal. |
AZURE_AI_SEARCH_ENDPOINT |
This value can be found in the Overview section when examining your Azure AI Search resource from the Azure portal. |
AZURE_AI_SEARCH_INDEX |
This value corresponds to the name of the index you created to store your data. You can find it in the Overview section when examining your Azure AI Search resource from the Azure portal. |
Learn more about keyless authentication and setting environment variables.
mkdir openai-python
cd openai-python
pip install openai
pip install python-dotenv
import os
import openai
import dotenv

dotenv.load_dotenv()

endpoint = os.environ.get("AZURE_OPENAI_ENDPOINT")
api_key = os.environ.get("AZURE_OPENAI_API_KEY")
deployment = os.environ.get("AZURE_OPENAI_DEPLOYMENT_NAME")

client = openai.AzureOpenAI(
    azure_endpoint=endpoint,
    api_key=api_key,
    api_version="2024-10-21",
)

completion = client.chat.completions.create(
    model=deployment,
    messages=[
        {
            "role": "user",
            "content": "What are my available health plans?",
        },
    ],
    extra_body={
        "data_sources":[
            {
                "type": "azure_search",
                "parameters": {
                    "endpoint": os.environ["AZURE_AI_SEARCH_ENDPOINT"],
                    "index_name": os.environ["AZURE_AI_SEARCH_INDEX"],
                    "authentication": {
                        "type": "api_key",
                        "key": os.environ["AZURE_AI_SEARCH_API_KEY"],
                    }
                }
            }
        ],
    }
)

print(f"{completion.choices[0].message.role}: {completion.choices[0].message.content}")
ข้อสำคัญ
For production, use a secure way of storing and accessing your credentials like Azure Key Vault. For more information about credential security, see the Azure AI services security article.
python main.py
The application prints the response in a JSON format suitable for use in many scenarios. It includes both answers to your query and citations from your uploaded files.
The following resources:
เคล็ดลับ
You can use the Azure Developer CLI to programmatically create the resources needed for Azure OpenAI On Your Data
Navigate to Azure AI Foundry portal and sign-in with credentials that have access to your Azure OpenAI resource.
You can either create an Azure AI Foundry project by clicking Create project, or continue directly by clicking the button on the Focused on Azure OpenAI Service tile.
Select Chat under Playgrounds in the left navigation menu, and select your model deployment.
In the Chat playground, Select Add your data and then Add a data source
In the pane that appears, select Upload files (preview) under Select data source. Azure OpenAI needs both a storage resource and a search resource to access and index your data.
เคล็ดลับ
For Azure OpenAI to access your storage account, you will need to turn on Cross-origin resource sharing (CORS). If CORS isn't already turned on for the Azure Blob Storage resource, select Turn on CORS.
Select your Azure AI Search resource, and select the acknowledgment that connecting it will incur usage on your account. Then select Next.
On the Upload files pane, select Browse for a file and select the files you downloaded from the prerequisites section, or your own data. Then select Upload files. Then select Next.
On the Data management pane, you can choose whether to enable semantic search or vector search for your index.
ข้อสำคัญ
Review the details you entered, and select Save and close. You can now chat with the model and it will use information from your data to construct the response.
You need to retrieve the following information to authenticate your application with your Azure OpenAI resource. This quickstart assumes you've uploaded your data to an Azure blob storage account and have an Azure AI Search index created. See Add your data using Azure AI Foundry portal.
| Variable name | Value |
|---|---|
AZURE_OPENAI_ENDPOINT |
This value can be found in the Keys & Endpoint section when examining your Azure OpenAI resource from the Azure portal. An example endpoint is: https://my-resoruce.openai.azure.com. |
AZURE_OPENAI_DEPLOYMENT_NAME |
This value corresponds to the custom name you chose for your deployment when you deployed a model. This value can be found under Resource Management > Deployments in the Azure portal. |
AZURE_AI_SEARCH_ENDPOINT |
This value can be found in the Overview section when examining your Azure AI Search resource from the Azure portal. |
AZURE_AI_SEARCH_INDEX |
This value corresponds to the name of the index you created to store your data. You can find it in the Overview section when examining your Azure AI Search resource from the Azure portal. |
Learn more about keyless authentication and setting environment variables.
The Azure OpenAI chat models are optimized to work with inputs formatted as a conversation. The messages variable passes an array of dictionaries with different roles in the conversation delineated by system, user, tool, and assistant. The dataSources variable connects to your Azure Cognitive Search index, and enables Azure OpenAI models to respond using your data.
To trigger a response from the model, you should end with a user message indicating that it's the assistant's turn to respond.
เคล็ดลับ
There are several parameters you can use to change the model's response, such as temperature or top_p. See the reference documentation for more information.
# Azure OpenAI metadata variables
   $openai = @{
       api_key     = $Env:AZURE_OPENAI_API_KEY
       api_base    = $Env:AZURE_OPENAI_ENDPOINT # your endpoint should look like the following https://YOUR_RESOURCE_NAME.openai.azure.com/
       api_version = '2023-07-01-preview' # this may change in the future
       name        = 'YOUR-DEPLOYMENT-NAME-HERE' #This will correspond to the custom name you chose for your deployment when you deployed a model.
   }

   $acs = @{
       search_endpoint     = 'YOUR ACS ENDPOINT' # your endpoint should look like the following https://YOUR_RESOURCE_NAME.search.windows.net/
       search_key    = 'YOUR-ACS-KEY-HERE' # or use the Get-Secret cmdlet to retrieve the value
       search_index = 'YOUR-INDEX-NAME-HERE' # the name of your ACS index
   }

   # Completion text
   $body = @{
    dataSources = @(
        @{
            type = 'AzureCognitiveSearch'
            parameters = @{
                    endpoint = $acs.search_endpoint
                    key = $acs.search_key
                    indexName = $acs.search_index
                }
        }
    )
    messages = @(
            @{
                role = 'user'
                content = 'What are my available health plans?'
            }
    )
   } | convertto-json -depth 5

   # Header for authentication
   $headers = [ordered]@{
       'api-key' = $openai.api_key
   }

   # Send a completion call to generate an answer
   $url = "$($openai.api_base)/openai/deployments/$($openai.name)/extensions/chat/completions?api-version=$($openai.api_version)"

   $response = Invoke-RestMethod -Uri $url -Headers $headers -Body $body -Method Post -ContentType 'application/json'
   return $response.choices.messages[1].content
The available health plans in the Contoso Electronics plan and benefit packages are the Northwind Health Plus and Northwind Standard plans.
ข้อสำคัญ
For production, use a secure way of storing and accessing your credentials like The PowerShell Secret Management with Azure Key Vault. For more information about credential security, see the Azure AI services security article.
To start chatting with the Azure OpenAI model that uses your data, you can deploy a web app using Azure AI Foundry portal or example code we provide on GitHub. This app deploys using Azure app service, and provides a user interface for sending queries. This app can be used with Azure OpenAI models that use your data, or models that don't use your data. See the readme file in the repo for instructions on requirements, setup, and deployment. You can optionally customize the frontend and backend logic of the web app by making changes to the source code.
The following resources:
Reference | Source code | Package (Go) | Samples
เคล็ดลับ
You can use the Azure Developer CLI to programmatically create the resources needed for Azure OpenAI On Your Data
Navigate to Azure AI Foundry portal and sign-in with credentials that have access to your Azure OpenAI resource.
You can either create an Azure AI Foundry project by clicking Create project, or continue directly by clicking the button on the Focused on Azure OpenAI Service tile.
Select Chat under Playgrounds in the left navigation menu, and select your model deployment.
In the Chat playground, Select Add your data and then Add a data source
In the pane that appears, select Upload files (preview) under Select data source. Azure OpenAI needs both a storage resource and a search resource to access and index your data.
เคล็ดลับ
For Azure OpenAI to access your storage account, you will need to turn on Cross-origin resource sharing (CORS). If CORS isn't already turned on for the Azure Blob Storage resource, select Turn on CORS.
Select your Azure AI Search resource, and select the acknowledgment that connecting it will incur usage on your account. Then select Next.
On the Upload files pane, select Browse for a file and select the files you downloaded from the prerequisites section, or your own data. Then select Upload files. Then select Next.
On the Data management pane, you can choose whether to enable semantic search or vector search for your index.
ข้อสำคัญ
Review the details you entered, and select Save and close. You can now chat with the model and it will use information from your data to construct the response.
You need to retrieve the following information to authenticate your application with your Azure OpenAI resource. This quickstart assumes you've uploaded your data to an Azure blob storage account and have an Azure AI Search index created. See Add your data using Azure AI Foundry portal.
| Variable name | Value |
|---|---|
AZURE_OPENAI_ENDPOINT |
This value can be found in the Keys & Endpoint section when examining your Azure OpenAI resource from the Azure portal. An example endpoint is: https://my-resoruce.openai.azure.com. |
AZURE_OPENAI_DEPLOYMENT_NAME |
This value corresponds to the custom name you chose for your deployment when you deployed a model. This value can be found under Resource Management > Deployments in the Azure portal. |
AZURE_AI_SEARCH_ENDPOINT |
This value can be found in the Overview section when examining your Azure AI Search resource from the Azure portal. |
AZURE_AI_SEARCH_INDEX |
This value corresponds to the name of the index you created to store your data. You can find it in the Overview section when examining your Azure AI Search resource from the Azure portal. |
Learn more about keyless authentication and setting environment variables.
Create a new folder named openai-go for your project and a new Go code file named sample.go. Change into that directory:
mkdir openai-go
cd openai-go
From the project directory, open the sample.go file and add the following code:
package main

import (
 "context"
 "fmt"
 "log"
 "os"

 "github.com/Azure/azure-sdk-for-go/sdk/ai/azopenai"
 "github.com/Azure/azure-sdk-for-go/sdk/azcore"
 "github.com/Azure/azure-sdk-for-go/sdk/azcore/to"
)

func main() {
 azureOpenAIKey := os.Getenv("AZURE_OPENAI_API_KEY")
 modelDeploymentID := os.Getenv("AZURE_OPENAI_DEPLOYMENT_NAME")

 // Ex: "https://<your-azure-openai-host>.openai.azure.com"
 azureOpenAIEndpoint := os.Getenv("AZURE_OPENAI_ENDPOINT")

 // Azure AI Search configuration
 searchIndex := os.Getenv("AZURE_AI_SEARCH_INDEX")
 searchEndpoint := os.Getenv("AZURE_AI_SEARCH_ENDPOINT")
 searchAPIKey := os.Getenv("AZURE_AI_SEARCH_API_KEY")

 if azureOpenAIKey == "" || modelDeploymentID == "" || azureOpenAIEndpoint == "" || searchIndex == "" || searchEndpoint == "" || searchAPIKey == "" {
 	fmt.Fprintf(os.Stderr, "Skipping example, environment variables missing\n")
 	return
 }

 keyCredential := azcore.NewKeyCredential(azureOpenAIKey)

 // In Azure OpenAI you must deploy a model before you can use it in your client. For more information
 // see here: https://learn.microsoft.com/azure/cognitive-services/openai/how-to/create-resource
 client, err := azopenai.NewClientWithKeyCredential(azureOpenAIEndpoint, keyCredential, nil)

 if err != nil {
 	//  TODO: Update the following line with your application specific error handling logic
 	log.Fatalf("ERROR: %s", err)
 }

 resp, err := client.GetChatCompletions(context.TODO(), azopenai.ChatCompletionsOptions{
 	Messages: []azopenai.ChatRequestMessageClassification{
 		&azopenai.ChatRequestUserMessage{Content: azopenai.NewChatRequestUserMessageContent("What are my available health plans?")},
 	},
 	MaxTokens: to.Ptr[int32](512),
 	AzureExtensionsOptions: []azopenai.AzureChatExtensionConfigurationClassification{
 		&azopenai.AzureSearchChatExtensionConfiguration{
 			// This allows Azure OpenAI to use an Azure AI Search index.
 			//
 			// > Because the model has access to, and can reference specific sources to support its responses, answers are not only based on its pretrained knowledge
 			// > but also on the latest information available in the designated data source. This grounding data also helps the model avoid generating responses
 			// > based on outdated or incorrect information.
 			//
 			// Quote from here: https://learn.microsoft.com/en-us/azure/ai-services/openai/concepts/use-your-data
 			Parameters: &azopenai.AzureSearchChatExtensionParameters{
 				Endpoint:  &searchEndpoint,
 				IndexName: &searchIndex,
 				Authentication: &azopenai.OnYourDataAPIKeyAuthenticationOptions{
 					Key: &searchAPIKey,
 				},
 			},
 		},
 	},
 	DeploymentName: &modelDeploymentID,
 }, nil)

 if err != nil {
 	//  TODO: Update the following line with your application specific error handling logic
 	log.Fatalf("ERROR: %s", err)
 }

 fmt.Fprintf(os.Stderr, "Extensions Context Role: %s\nExtensions Context (length): %d\n",
 	*resp.Choices[0].Message.Role,
 	len(*resp.Choices[0].Message.Content))

 fmt.Fprintf(os.Stderr, "ChatRole: %s\nChat content: %s\n",
 	*resp.Choices[0].Message.Role,
 	*resp.Choices[0].Message.Content,
 )
}
ข้อสำคัญ
For production, use a secure way of storing and accessing your credentials like Azure Key Vault. For more information about credential security, see the Azure AI services security article.
Now open a command prompt and run the following:
go mod init sample.go
Next run:
go mod tidy
go run sample.go
The application prints the response including both answers to your query and citations from your uploaded files.
The following resources:
เคล็ดลับ
You can use the Azure Developer CLI to programmatically create the resources needed for Azure OpenAI On Your Data
Navigate to Azure AI Foundry portal and sign-in with credentials that have access to your Azure OpenAI resource.
You can either create an Azure AI Foundry project by clicking Create project, or continue directly by clicking the button on the Focused on Azure OpenAI Service tile.
Select Chat under Playgrounds in the left navigation menu, and select your model deployment.
In the Chat playground, Select Add your data and then Add a data source
In the pane that appears, select Upload files (preview) under Select data source. Azure OpenAI needs both a storage resource and a search resource to access and index your data.
เคล็ดลับ
For Azure OpenAI to access your storage account, you will need to turn on Cross-origin resource sharing (CORS). If CORS isn't already turned on for the Azure Blob Storage resource, select Turn on CORS.
Select your Azure AI Search resource, and select the acknowledgment that connecting it will incur usage on your account. Then select Next.
On the Upload files pane, select Browse for a file and select the files you downloaded from the prerequisites section, or your own data. Then select Upload files. Then select Next.
On the Data management pane, you can choose whether to enable semantic search or vector search for your index.
ข้อสำคัญ
Review the details you entered, and select Save and close. You can now chat with the model and it will use information from your data to construct the response.
You need to retrieve the following information to authenticate your application with your Azure OpenAI resource. This quickstart assumes you've uploaded your data to an Azure blob storage account and have an Azure AI Search index created. See Add your data using Azure AI Foundry portal.
| Variable name | Value |
|---|---|
AZURE_OPENAI_ENDPOINT |
This value can be found in the Keys & Endpoint section when examining your Azure OpenAI resource from the Azure portal. An example endpoint is: https://my-resoruce.openai.azure.com. |
AZURE_OPENAI_DEPLOYMENT_NAME |
This value corresponds to the custom name you chose for your deployment when you deployed a model. This value can be found under Resource Management > Deployments in the Azure portal. |
AZURE_AI_SEARCH_ENDPOINT |
This value can be found in the Overview section when examining your Azure AI Search resource from the Azure portal. |
AZURE_AI_SEARCH_INDEX |
This value corresponds to the name of the index you created to store your data. You can find it in the Overview section when examining your Azure AI Search resource from the Azure portal. |
Learn more about keyless authentication and setting environment variables.
The Azure OpenAI chat models are optimized to work with inputs formatted as a conversation. The messages variable passes an array of dictionaries with different roles in the conversation delineated by system, user, tool, and assistant. The dataSources variable connects to your Azure AI Search index, and enables Azure OpenAI models to respond using your data.
To trigger a response from the model, you should end with a user message indicating that it's the assistant's turn to respond.
เคล็ดลับ
There are several parameters you can use to change the model's response, such as temperature or top_p. See the reference documentation for more information.
curl -i -X POST $AZURE_OPENAI_ENDPOINT/openai/deployments/$AZURE_OPENAI_DEPLOYMENT_NAME/chat/completions?api-version=2024-10-21 \
-H "Content-Type: application/json" \
-H "api-key: $AZURE_OPENAI_API_KEY" \
-d \
'
{
    "data_sources": [
        {
            "type": "azure_search",
            "parameters": {
                "endpoint": "'$AZURE_AI_SEARCH_ENDPOINT'",
                "index_name": "'$AZURE_AI_SEARCH_INDEX'",
                "authentication": {
                    "type": "api_key",
                    "key": "'$AZURE_AI_SEARCH_API_KEY'"
                }
            }
        }
    ],
    "messages": [
        {
            "role": "user",
            "content": "What are my available health plans?"
        }
    ]
}
'
{
    "id": "12345678-1a2b-3c4e5f-a123-12345678abcd",
    "model": "gpt-4",
    "created": 1709835345,
    "object": "extensions.chat.completion",
    "choices": [
        {
            "index": 0,
            "finish_reason": "stop",
            "message": {
                "role": "assistant",
                "content": "The available health plans in the Contoso Electronics plan and benefit packages are the Northwind Health Plus and Northwind Standard plans. [doc1].",
                "end_turn": true,
                "context": {
                    "citations": [
                        {
                            "content": "...",
                            "title": "...",
                            "url": "https://mysearch.blob.core.windows.net/xyz/001.txt",
                            "filepath": "001.txt",
                            "chunk_id": "0"
                        }
                    ],
                    "intent": "[\"Available health plans\"]"
                }
            }
        }
    ],
    "usage": {
        "prompt_tokens": 3779,
        "completion_tokens": 105,
        "total_tokens": 3884
    },
    "system_fingerprint": "fp_65792305e4"
}
To start chatting with the Azure OpenAI model that uses your data, you can deploy a web app using Azure AI Foundry portal or example code we provide on GitHub. This app deploys using Azure app service, and provides a user interface for sending queries. This app can be used with Azure OpenAI models that use your data, or models that don't use your data. See the readme file in the repo for instructions on requirements, setup, and deployment. You can optionally customize the frontend and backend logic of the web app by making changes to the source code.
If you want to clean up and remove an Azure OpenAI or Azure AI Search resource, you can delete the resource or resource group. Deleting the resource group also deletes any other resources associated with it.
กิจกรรม
17 มี.ค. 21 - 21 มี.ค. 10
แอปอัจฉริยะ เข้าร่วมชุด meetup เพื่อสร้างโซลูชัน AI ที่ปรับขนาดได้ตามกรณีการใช้งานจริงกับนักพัฒนาและผู้เชี่ยวชาญร่วมกัน
ลงทะเบียนตอนนี้การฝึกอบรม
โมดูล
Deploy a Spring Boot app to Azure Container Apps - Training
In this module, you learn how to deploy a Spring Boot app to Azure Container Apps. You deploy a Spring Boot application to Azure Container Apps and maintain it using the built-in Java stack.
ใบรับรอง
Microsoft Certified: Azure AI Engineer Associate - Certifications
Design and implement an Azure AI solution using Azure AI services, Azure AI Search, and Azure Open AI.