แก้ไข

แชร์ผ่าน


Manage an Azure Cosmos DB account by using the Azure portal

APPLIES TO: NoSQL MongoDB Cassandra Gremlin Table

This article describes how to manage various tasks on an Azure Cosmos DB account by using the Azure portal. Azure Cosmos DB can also be managed with other Azure management clients including Azure PowerShell, Azure CLI, Azure Resource Manager templates, Bicep, and Terraform.

Tip

The management API for Azure Cosmos DB or control plane is not designed for high request volumes like the rest of the service. To learn more see Control Plane Service Limits

Prerequisites

None

Create an account

Follow the steps:

  1. From the Azure portal menu or the Home page, select Create a resource.

  2. Search for Azure Cosmos DB. Select Create > Azure Cosmos DB.

  3. On the Create an Azure Cosmos DB account page, select the Create option within the Azure Cosmos DB for NoSQL section.

    Azure Cosmos DB provides several APIs:

    • NoSQL, for document data
    • PostgreSQL
    • MongoDB, for document data
    • Apache Cassandra
    • Table
    • Apache Gremlin, for graph data

    To learn more about the API for NoSQL, see Welcome to Azure Cosmos DB.

  4. In the Create Azure Cosmos DB Account page, enter the basic settings for the new Azure Cosmos DB account.

    Setting Value Description
    Subscription Subscription name Select the Azure subscription that you want to use for this Azure Cosmos DB account.
    Resource Group Resource group name Select a resource group, or select Create new, then enter a unique name for the new resource group.
    Account Name A unique name Enter a name to identify your Azure Cosmos DB account. Because documents.azure.com is appended to the name that you provide to create your URI, use a unique name. The name can contain only lowercase letters, numbers, and the hyphen (-) character. It must be 3-44 characters.
    Location The region closest to your users Select a geographic location to host your Azure Cosmos DB account. Use the location that is closest to your users to give them the fastest access to the data.
    Capacity mode Provisioned throughput or Serverless Select Provisioned throughput to create an account in provisioned throughput mode. Select Serverless to create an account in serverless mode.
    Apply Azure Cosmos DB free tier discount Apply or Do not apply With Azure Cosmos DB free tier, you get the first 1000 RU/s and 25 GB of storage for free in an account. Learn more about free tier.
    Limit total account throughput Selected or not Limit the total amount of throughput that can be provisioned on this account. This limit prevents unexpected charges related to provisioned throughput. You can update or remove this limit after your account is created.

    You can have up to one free tier Azure Cosmos DB account per Azure subscription and must opt in when creating the account. If you don't see the option to apply the free tier discount, another account in the subscription has already been enabled with free tier.

    Screenshot shows the Create Azure Cosmos DB Account page.

    Note

    The following options are not available if you select Serverless as the Capacity mode:

    • Apply Free Tier Discount
    • Limit total account throughput
  5. In the Global Distribution tab, configure the following details. You can leave the default values for this quickstart:

    Setting Value Description
    Geo-Redundancy Disable Enable or disable global distribution on your account by pairing your region with a pair region. You can add more regions to your account later.
    Multi-region Writes Disable Multi-region writes capability allows you to take advantage of the provisioned throughput for your databases and containers across the globe.
    Availability Zones Disable Availability Zones help you further improve availability and resiliency of your application.

    Note

    The following options are not available if you select Serverless as the Capacity mode in the previous Basics page:

    • Geo-redundancy
    • Multi-region Writes
  6. Optionally, you can configure more details in the following tabs:

    • Networking. Configure access from a virtual network.
    • Backup Policy. Configure either periodic or continuous backup policy.
    • Encryption. Use either service-managed key or a customer-managed key.
    • Tags. Tags are name/value pairs that enable you to categorize resources and view consolidated billing by applying the same tag to multiple resources and resource groups.
  7. Select Review + create.

  8. Review the account settings, and then select Create. It takes a few minutes to create the account. Wait for the portal page to display Your deployment is complete.

    Screenshot shows that your deployment is complete.

  9. Select Go to resource to go to the Azure Cosmos DB account page.

    Screenshot shows the Azure Cosmos DB account page.

Add/remove regions from your database account

Tip

When a new region is added, all data must be fully replicated and committed into the new region before the region is marked as available. The amount of time this operation takes depends upon how much data is stored within the account. If an asynchronous throughput scaling operation is in progress, the throughput scale-up operation is paused and resumes automatically when the add/remove region operation is complete.

  1. Sign in to Azure portal.

  2. Go to your Azure Cosmos DB account and select Replicate data globally in the resource menu.

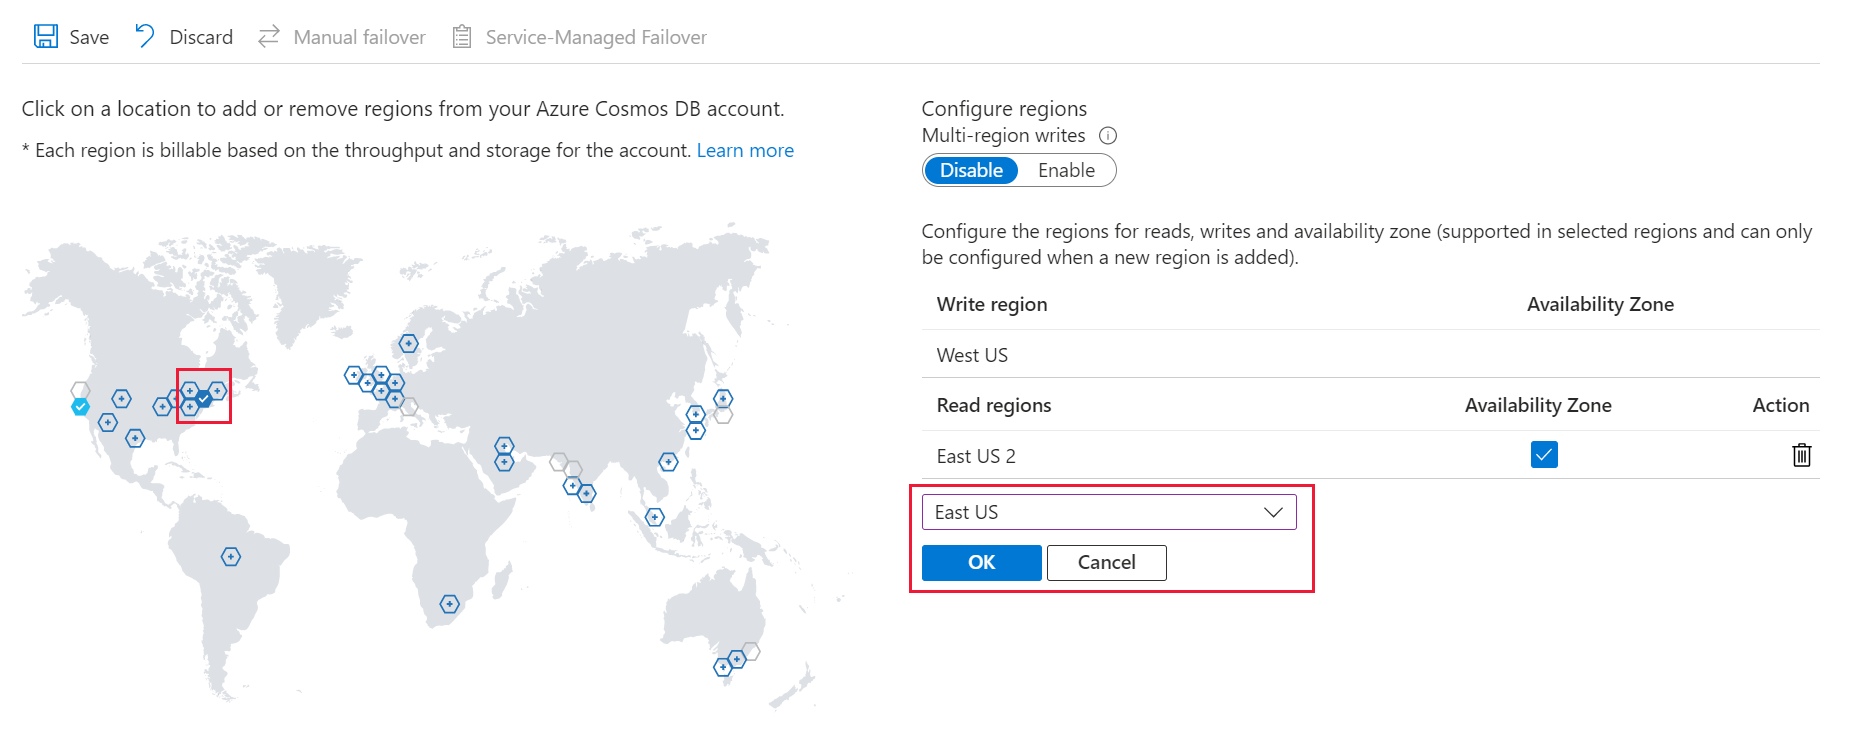
  3. To add regions, select the hexagons on the map with the + label that corresponds to your desired region(s). Alternatively, to add a region, select the + Add region option and choose a region from the drop-down menu.

  4. To remove regions, clear one or more regions from the map by selecting the blue hexagons with check marks. You can also select the "wastebasket" (🗑) icon next to the region on the right side.

  5. To save your changes, select OK.

    Screenshot of the Replicate data globally menu, highlighting a region.

    In a single-region write mode, you can't remove the write region. You must fail over to a different region before you can delete the current write region.

    In a multi-region write mode, you can add or remove any region, if you have at least one region.

    Configure multiple write-regions

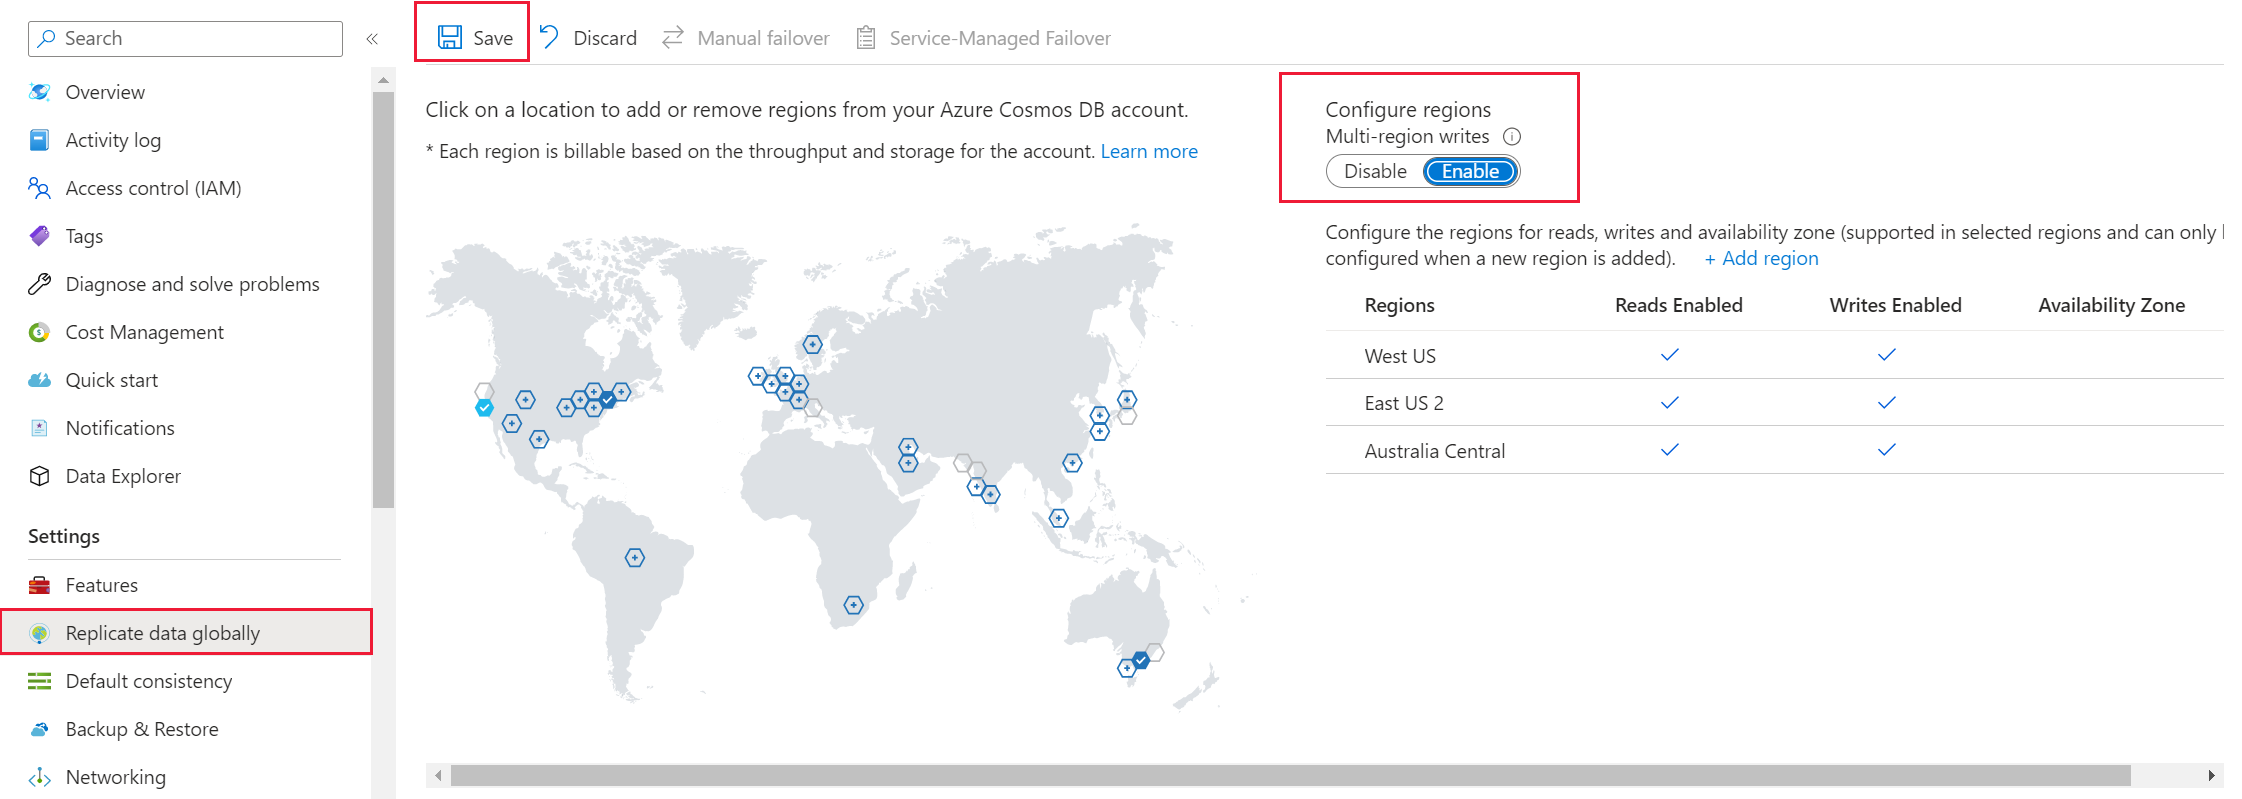
    Open the Replicate data globally tab and select Enable to enable multi-region writes. After you enable multi-region writes, all the read regions that you currently have on the account will become read and write regions.

    Screenshot of the Replicate data globally menu, highlighting Configure regions and Save.

Enable service-managed failover for your Azure Cosmos DB account

The Service-Managed failover option allows Azure Cosmos DB to fail over to the region with the highest failover priority with no user action should a region become unavailable. When service-managed failover is enabled, region priority can be modified. Your account must have two or more regions to enable service-managed failover.

  1. From your Azure Cosmos DB account, open the Replicate data globally pane.

  2. At the top of the pane, select Service-Managed Failover.

    Screenshot that shows the replicate data globally menu.

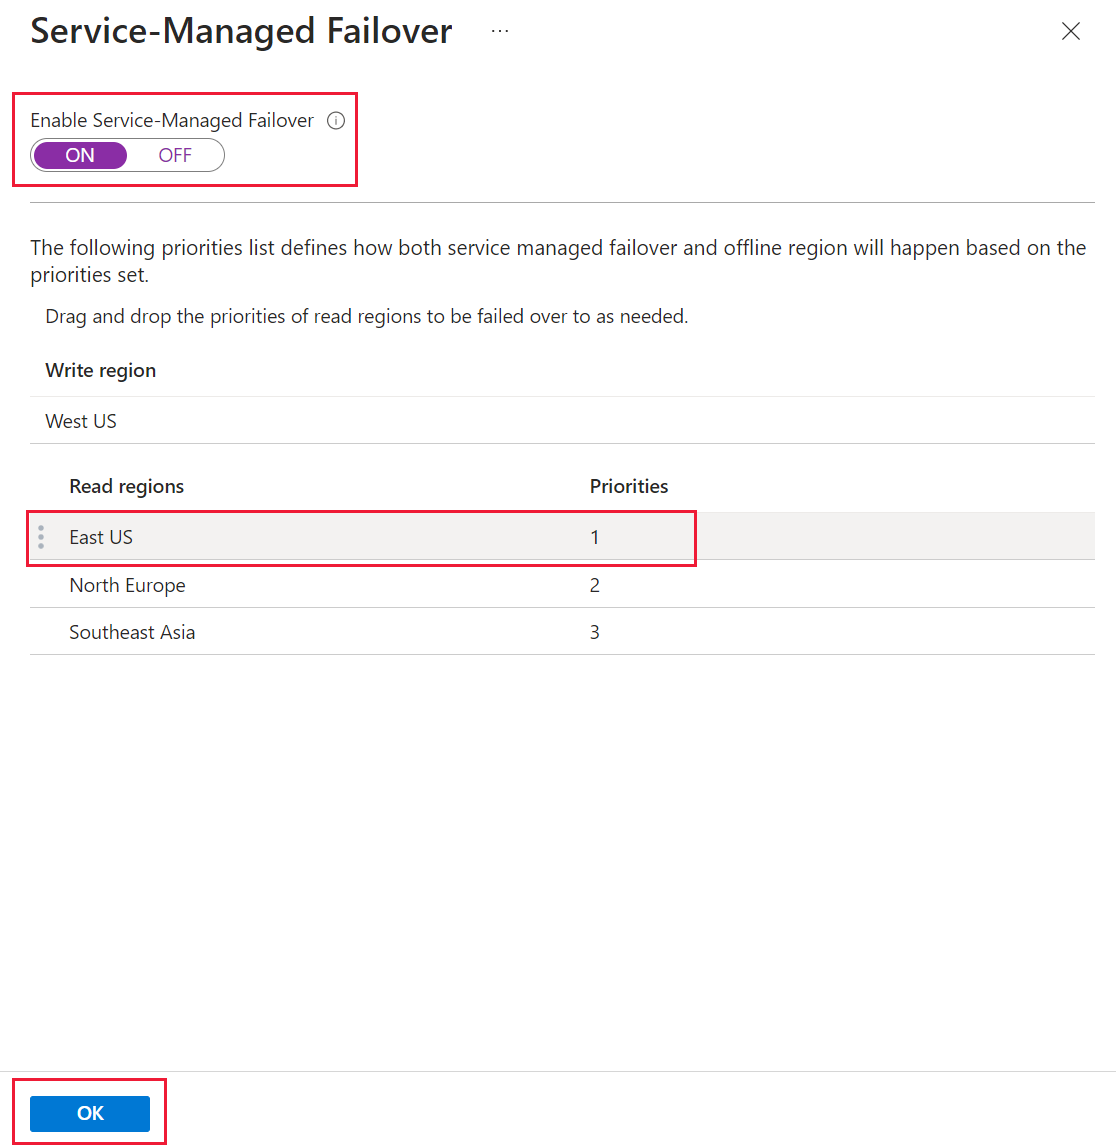
  3. On the Service-Managed Failover pane, make sure that Enable Service-Managed Failover is set to ON.

  4. Select Save.

    Screenshot of the Service-Managed failover portal menu.

Set failover priorities for your Azure Cosmos DB account

After an Azure Cosmos DB account is configured for service-managed failover, the failover priority for regions can be changed.

Important

You can't modify the write region (failover priority of zero) when the account is configured for service-managed failover. To change the write region, you must disable service-managed failover and do a manual failover.

  1. From your Azure Cosmos DB account, open the Replicate data globally pane.

  2. At the top of the pane, select Service-Managed Failover.

    Screenshot showing the Replicate data globally menu.

  3. On the Service-Managed Failover pane, make sure that Enable Service-Managed Failover is set to ON.

  4. To modify the failover priority, drag the read regions via the three dots on the left side of the row that appear when you hover over them.

  5. Select Save.

    Screenshot of the Service-Managed failover portal menu.

Perform manual failover on an Azure Cosmos DB account

Important

The Azure Cosmos DB account must be configured for manual failover for this operation to succeed.

Note

If you perform a manual failover operation while an asynchronous throughput scaling operation is in progress, the throughput scale-up operation will be paused. It resumes automatically when the failover operation is complete. For more information, see Best practices for scaling provisioned throughput (RU/s)

Warning

In the event of a write region outage, where the Azure Cosmos DB account promotes a secondary region to be the new primary write region via service-managed failover, the original write region will not be promoted back as the write region automatically once it's recovered. It is your responsibility to switch back to the recovered region as the write region using PowerShell, the Azure CLI, or the Azure portal (once safe to do so, as described above).

  1. Go to your Azure Cosmos DB account and open the Replicate data globally menu.

  2. At the top of the menu, select Manual Failover.

    Screenshot of the Replicate data globally menu.

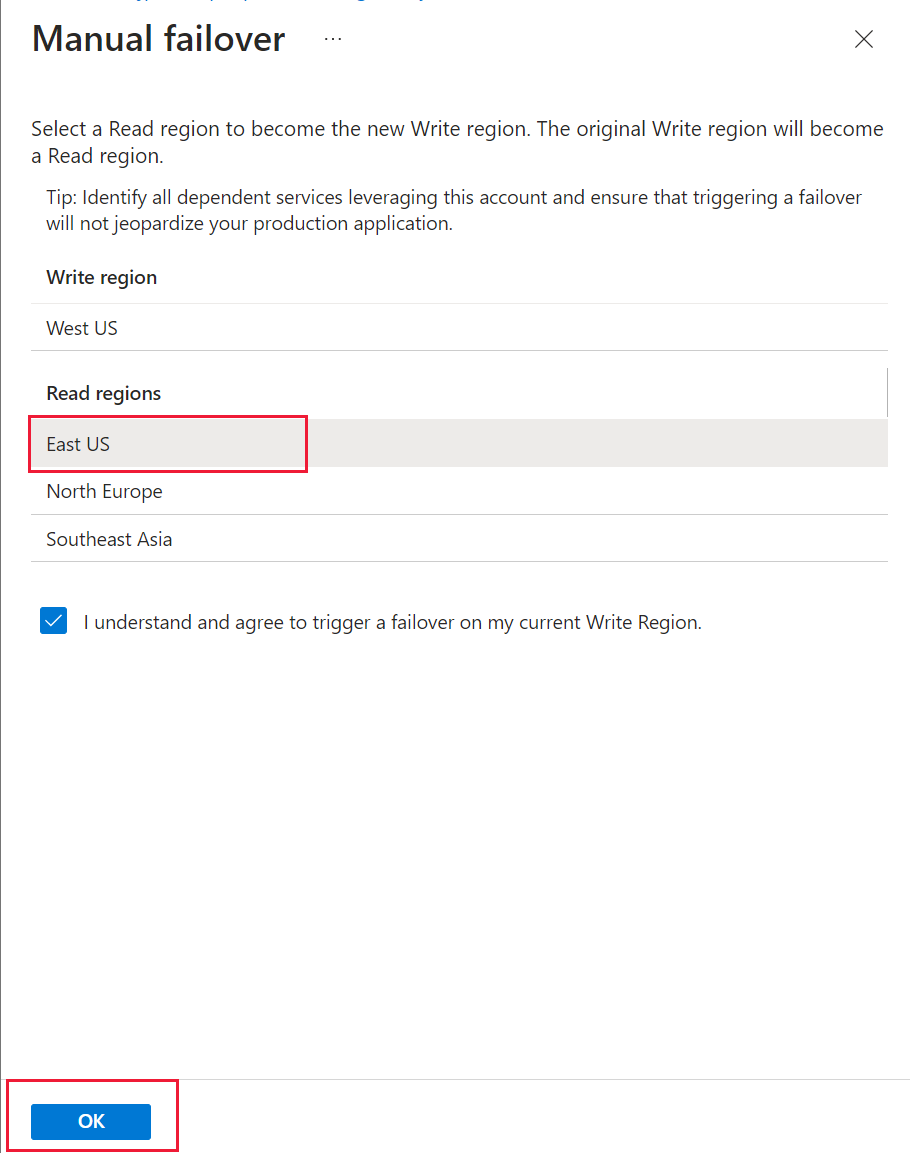
  3. On the Manual Failover menu, select your new write region. Select the check box to indicate that you understand this option changes your write region.

  4. To trigger the failover, select OK.

    Screenshot of the manual failover portal menu.