Set up and configure Microsoft Defender for Endpoint Plan 1
Applies to:
This article describes how to set up and configure Defender for Endpoint Plan 1. Whether you have assistance or are doing it yourself, you can use this article as a guide throughout your deployment.
The setup and configuration process
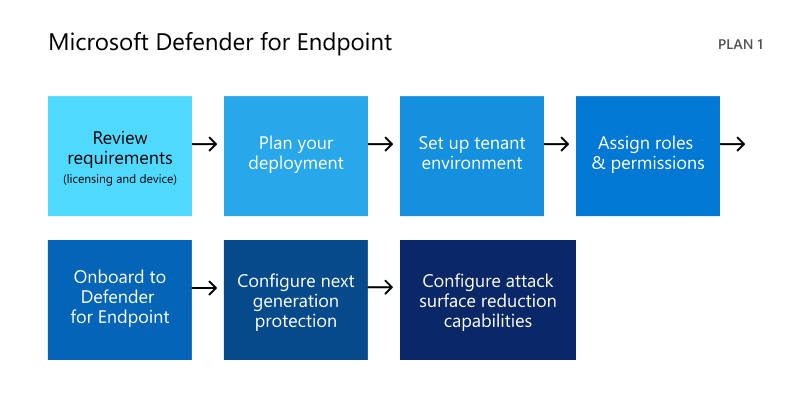
The general setup and configuration process for Defender for Endpoint Plan 1 is as follows:
| Number | Step | Description |
|---|---|---|
| 1 | Review the requirements | Lists licensing, browser, operating system, and datacenter requirements |
| 2 | Plan your deployment | Lists several deployment methods to consider and includes links to more resources to help you decide which method to use |
| 3 | Set up your tenant environment | Lists tasks for setting up your tenant environment |
| 4 | Assign roles and permissions | Lists roles and permissions to consider for your security team TIP: As soon as roles and permissions are assigned, your security team can get started using the Microsoft Defender portal. To learn more, see Getting started. |
| 5 | Onboard to Defender for Endpoint | Lists several methods by operating system to onboard to Defender for Endpoint Plan 1 and includes links to more detailed information for each method |
| 6 | Configure next-generation protection | Describes how to configure your next-generation protection settings in Microsoft Intune |
| 7 | Configure your attack surface reduction capabilities | Lists the types of attack surface reduction capabilities you can configure and includes procedures with links to more resources |
Review the requirements
The following table lists the basic requirements for Defender for Endpoint Plan 1:
| Requirement | Description |
|---|---|
| Licensing requirements | Defender for Endpoint Plan 1 (standalone, or as part of Microsoft 365 E3, A3, or G3) |
| Browser requirements | Microsoft Edge Internet Explorer version 11 Google Chrome |
| Operating systems (client) | Windows 11 Windows 10, version 1709, or later macOS iOS Android OS |
| Operating systems (server) | Windows Server 2022 Windows Server 2019 Windows Server version 1803 and later Windows Server 2016 and 2012 R2 are supported when using the modern unified solution Linux Server |
| Datacenter | One of the following datacenter locations: - European Union - United Kingdom - United States |
Note
The standalone version of Defender for Endpoint Plan 1 doesn't include server licenses. To onboard servers, you'll require an additional license, such as:
- Microsoft Defender for Servers Plan 1 or Plan 2 (as part of the Defender for Cloud) offering.
- Microsoft Defender for Endpoint for Servers
- Microsoft Defender for Business servers (for small and medium-sized businesses)
To learn more. see Defender for Endpoint onboarding Windows Server
Plan your deployment
When you plan your deployment, you can choose from several different architectures and deployment methods. Every organization is unique, so you have several options to consider, as listed in the following table:
| Method | Description |
|---|---|
| Intune | Use Intune to manage endpoints in a cloud native environment |
| Intune and Configuration Manager | Use Intune and Configuration Manager to manage endpoints and workloads that span an on-premises and cloud environment |
| Configuration Manager | Use Configuration Manager to protect on-premises endpoints with the cloud-based power of Defender for Endpoint |
| Local script downloaded from the Microsoft Defender portal | Use local scripts on endpoints to run a pilot or onboard just a few devices |
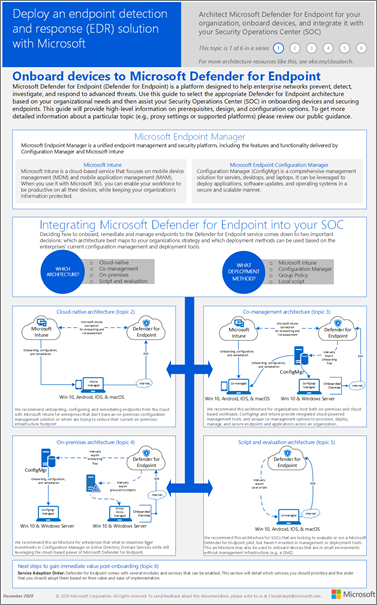
To learn more about your deployment options, see Plan your Defender for Endpoint deployment. And, download the following poster:
Tip
For more detailed information about planning your deployment, see Plan your Microsoft Defender for Endpoint deployment.
Set up your tenant environment
Setting up your tenant environment includes tasks, such as:
- Verifying your licenses
- Configuring your tenant
- Configuring your proxy settings (only if necessary)
- Making sure sensors are working correctly and reporting data to Defender for Endpoint
These tasks are included in the setup phase for Defender for Endpoint. See Set up Defender for Endpoint.
Assign roles and permissions
In order to access the Microsoft Defender portal, configure settings for Defender for Endpoint, or perform tasks, such as taking response actions on detected threats, appropriate permissions must be assigned. Defender for Endpoint uses built-in roles within Microsoft Entra ID.
Microsoft recommends assigning users only the level of permission they need to perform their tasks. You can assign permissions by using basic permissions management, or by using role-based access control (RBAC).
- With basic permissions management, Global Administrators and Security Administrators have full access, whereas Security Readers have read-only access.
- With RBAC, you can set more granular permissions through more roles. For example, you can have Security Readers, Security Operators, Security Administrators, Endpoint Administrators, and more.
The following table describes key roles to consider for Defender for Endpoint in your organization:
| Role | Description |
|---|---|
| Global Administrators As a best practice, limit the number of Global Administrators. |
Global Administrators can perform all kinds of tasks. The person who signed up your company for Microsoft 365 or for Microsoft Defender for Endpoint Plan 1 is a Global Administrator by default. Global Administrators are able to access/change settings across all Microsoft 365 portals, such as: - The Microsoft 365 admin center (https://admin.microsoft.com) - Microsoft Defender portal (https://security.microsoft.com) - Intune admin center (https://intune.microsoft.com) |
| Security Administrators | Security Administrators can perform Security Operator tasks plus the following tasks: - Monitor security-related policies - Manage security threats and alerts - View reports |
| Security Operator | Security Operators can perform Security Reader tasks plus the following tasks: - View information about detected threats - Investigate and respond to detected threats |
| Security Reader | Security Readers can perform the following tasks: - View security-related policies across Microsoft 365 services - View security threats and alerts - View reports |
Important
Microsoft recommends that you use roles with the fewest permissions. This helps improve security for your organization. Global Administrator is a highly privileged role that should be limited to emergency scenarios when you can't use an existing role.
To learn more about roles in Microsoft Entra ID, see Assign administrator and non-administrator roles to users with Microsoft Entra ID. And, more information about roles for Defender for Endpoint, see Role-based access control.
Onboard to Defender for Endpoint
When you're ready to onboard your organization's endpoints, you can choose from several methods, as listed in the following table:
Then, proceed to configure your next-generation protection and attack surface reduction capabilities.
Configure next-generation protection
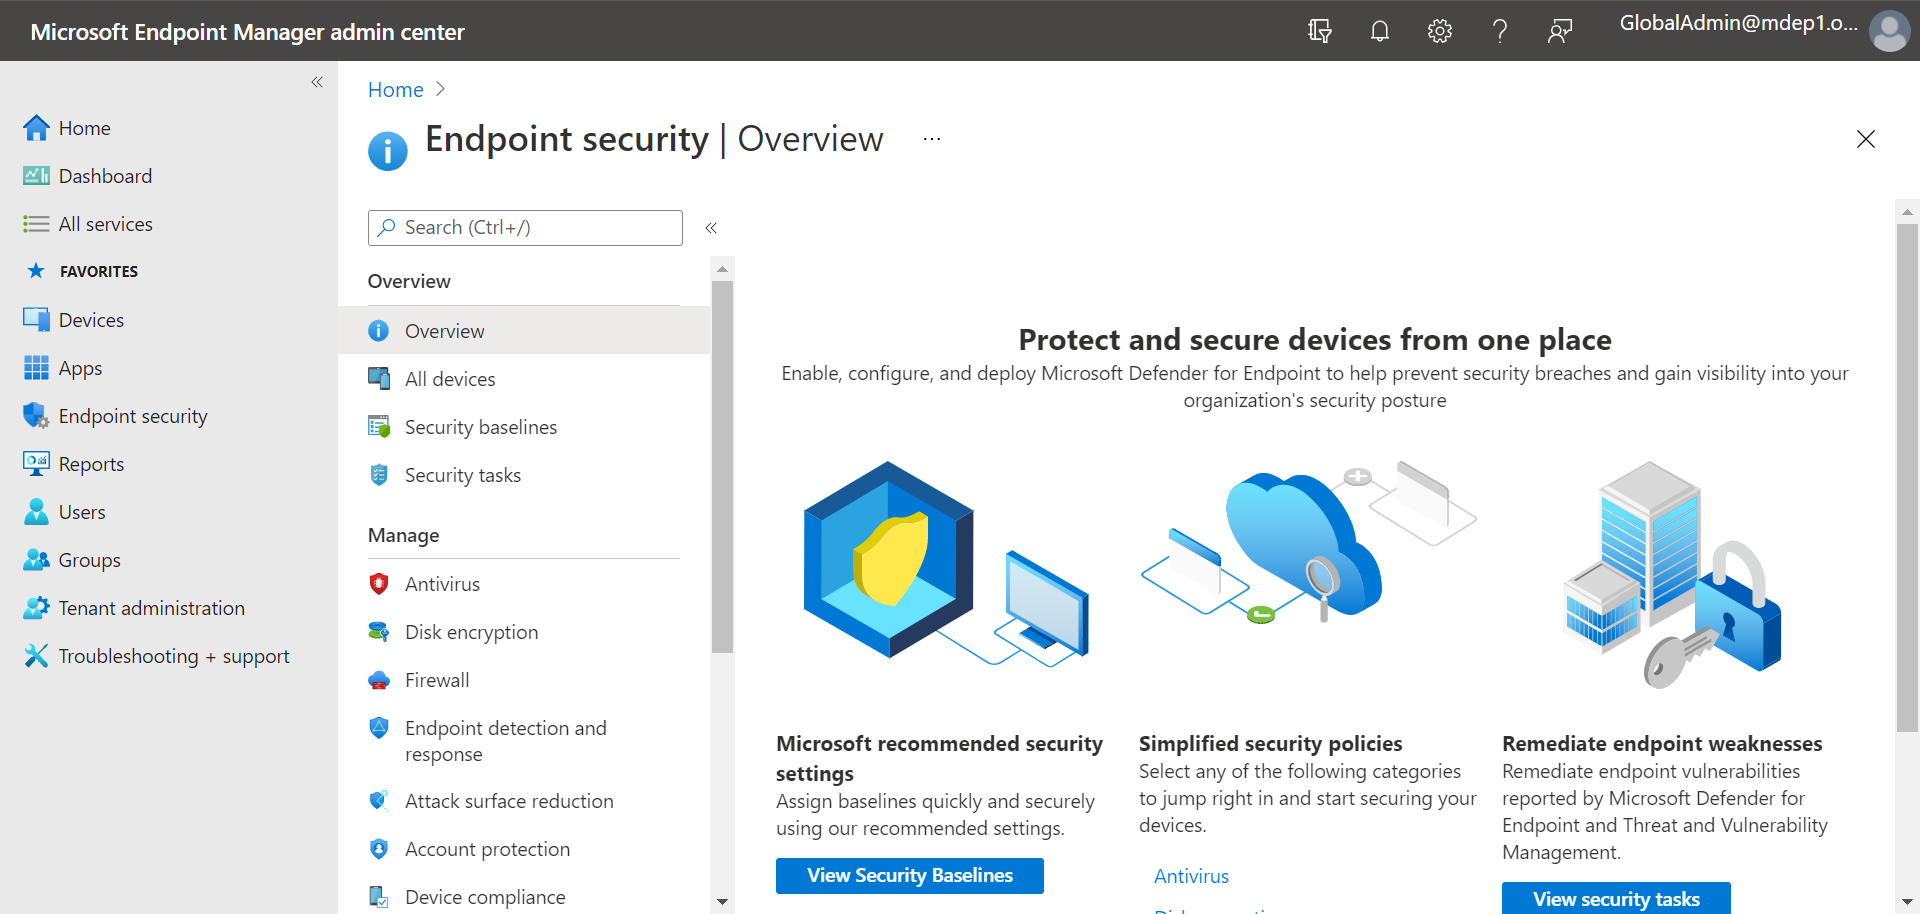
We recommend using Intune to manage your organization's devices and security settings, as shown in the following image:
To configure your next-generation protection in Intune, follow these steps:
Go to the Intune admin center (https://intune.microsoft.com) and sign in.
Select Endpoint security > Antivirus, and then select an existing policy. (If you don't have an existing policy, create a new policy.)
Set or change your antivirus configuration settings. Need help? Refer to the following resources:
When you're finished specifying your settings, choose Review + save.
Configure your attack surface reduction capabilities
Attack surface reduction is all about reducing the places and ways your organization is open to attack. Defender for Endpoint Plan 1 includes several features and capabilities to help you reduce your attack surfaces across your endpoints. These features and capabilities are listed in the following table:
| Feature/capability | Description |
|---|---|
| Attack surface reduction rules | Configure attack surface reduction rules to constrain software-based risky behaviors and help keep your organization safe. Attack surface reduction rules target certain software behaviors, such as - Launching executable files and scripts that attempt to download or run files - Running obfuscated or otherwise suspicious scripts - Performing behaviors that apps don't usually initiate during normal day-to-day work Such software behaviors are sometimes seen in legitimate applications. However, these behaviors are often considered risky because they're commonly abused by attackers through malware. |
| Ransomware mitigation | Set up ransomware mitigation by configuring controlled folder access, which helps protect your organization's valuable data from malicious apps and threats, such as ransomware. |
| Device control | Configure device control settings for your organization to allow or block removable devices (such as USB drives). |
| Network protection | Set up network protection to prevent people in your organization from using applications that access dangerous domains or malicious content on the Internet. |
| Web protection | Set up web threat protection to protect your organization's devices from phishing sites, exploit sites, and other untrusted or low-reputation sites. Set up web content filtering to track and regulate access to websites based on their content categories (such as Leisure, High bandwidth, Adult content, or Legal liability). |
| Network firewall | Configure your network firewall with rules that determine which network traffic is permitted to come into or go out from your organization's devices. |
| Application control | Configure application control rules if you want to allow only trusted applications and processes to run on your Windows devices. |
Attack surface reduction rules
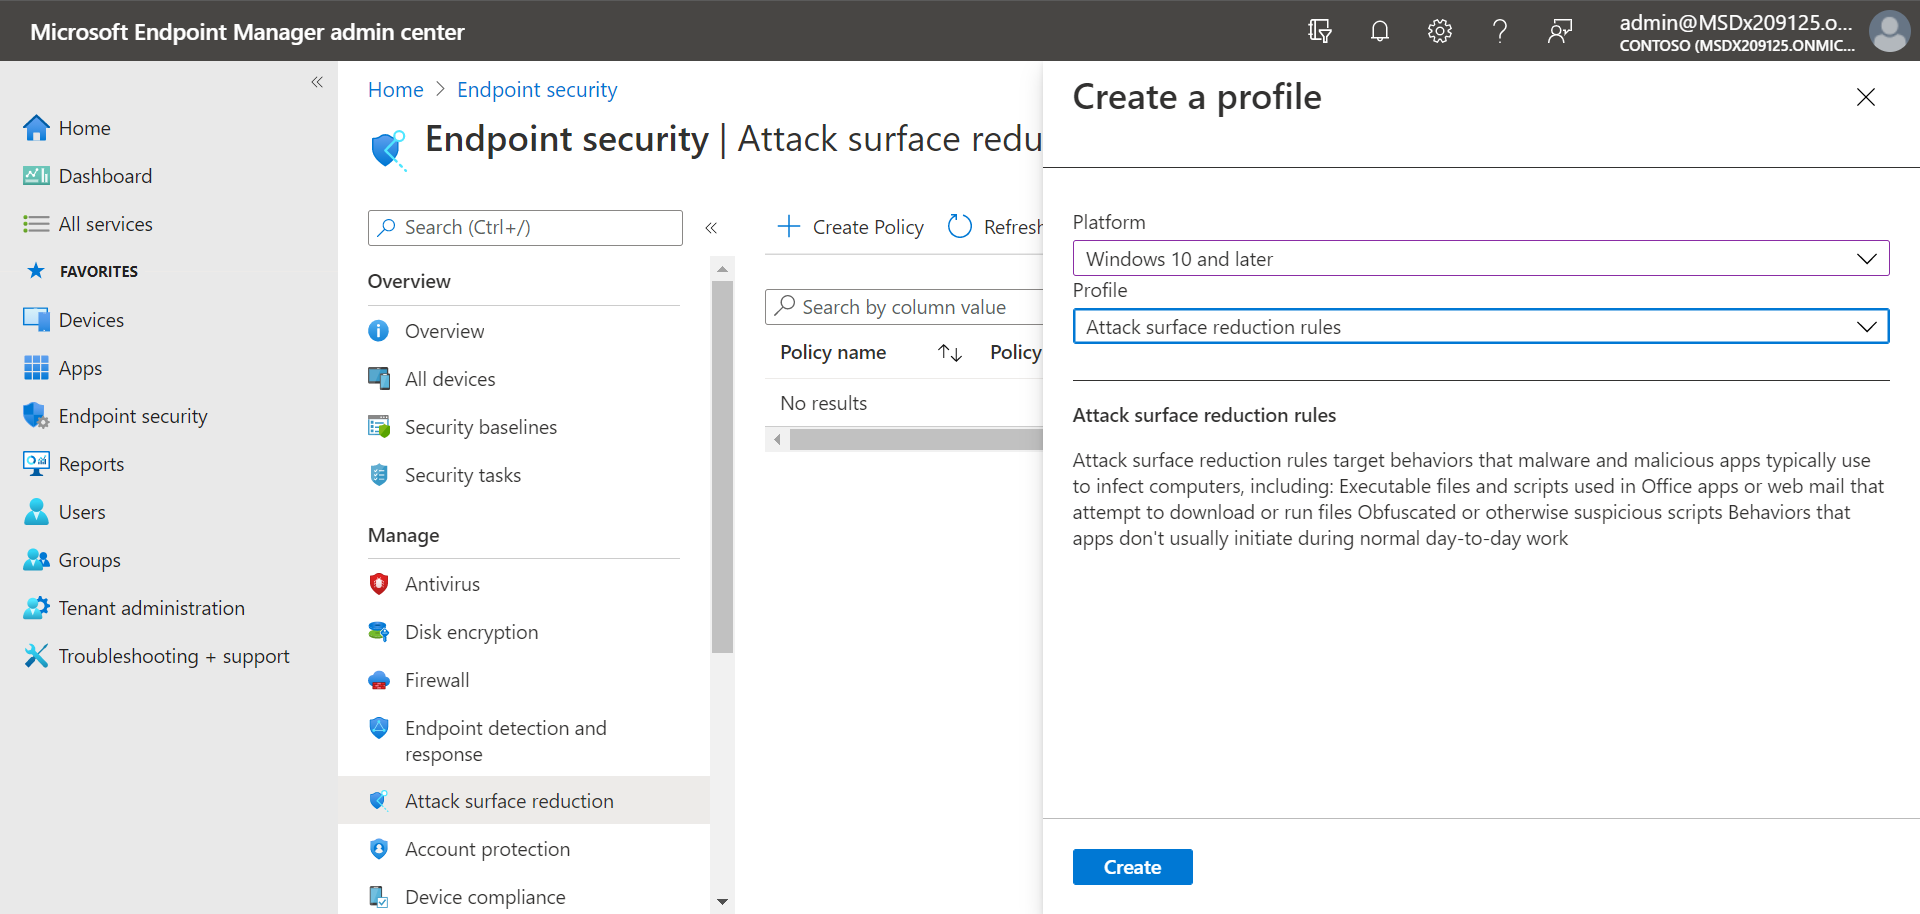
Attack surface reduction rules are available on devices running Windows. We recommend using Intune, as shown in the following image:
Go to the Intune admin center and sign in.
Choose Endpoint security > Attack surface reduction > + Create policy.
For Platform, select Windows 10, Windows 11, and Windows Server.
For Profile, select Attack surface reduction rules, and then choose Create.
On the Basics tab, specify a name and description for the policy, and then choose Next.
On the Configuration settings tab, expand under Defender, configure your attack surface reduction rules, and then choose Next. For more information about attack surface reduction rules, see Attack surface reduction rules deployment overview.
At a minimum, we recommend enabling the following three standard protection rules:
On the Scope tags tab, if your organization is using scope tags, choose + Select scope tags, and then select the tags you want to use. Then, choose Next.
To learn more about scope tags, see Use role-based access control (RBAC) and scope tags for distributed IT.
On the Assignments tab, specify the users and groups to whom your policy should be applied, and then choose Next. (To learn more about assignments, see Assign user and device profiles in Microsoft Intune.)
On the Review + create tab, review the settings, and then choose Create.
Tip
To learn more about attack surface reduction rules, see the following resources:
Ransomware mitigation
You get ransomware mitigation through controlled folder access, which allows only trusted apps to access protected folders on your endpoints.
We recommend using Intune to configure controlled folder access.
Go to the Intune admin center and sign in.
Go to Endpoint Security > Attack Surface Reduction, and then choose + Create Policy.
For Platform, select Windows 10, Windows 11, and Windows Server, and for Profile, select Attack surface reduction rules. Then choose Create.
On the Basics tab, name the policy and add a description. Select Next.
On the Configuration settings tab, under Defender section, scroll down to the bottom. In the Enable Controlled Folder Access drop-down, select Enabled, and then choose Next.
You can optionally specify these other settings:
- Next to Controlled Folder Access Protected Folders, toggle the switch to Configured, and then add folders that need to be protected.
- Next to Controlled Folder Access Allowed Applications, toggle the switch to Configured, and then add apps that should have access to protected folders.
On the Scope tags tab, if your organization is using scope tags, choose + Select scope tags, and then select the tags you want to use. Then, choose Next. To learn more about scope tags, see Use role-based access control (RBAC) and scope tags for distributed IT.
On the Assignments tab, select Add all users and + Add all devices, and then choose Next. (You can alternately specify specific groups of users or devices.)
On the Review + create tab, review the settings for your policy, and then choose Create. The policy is applied to any endpoints that were onboarded to Defender for Endpoint shortly.
Device control
You can configure Defender for Endpoint to block or allow removable devices and files on removable devices. We recommend using Intune to configure your device control settings.
Go to the Intune admin center and sign in.
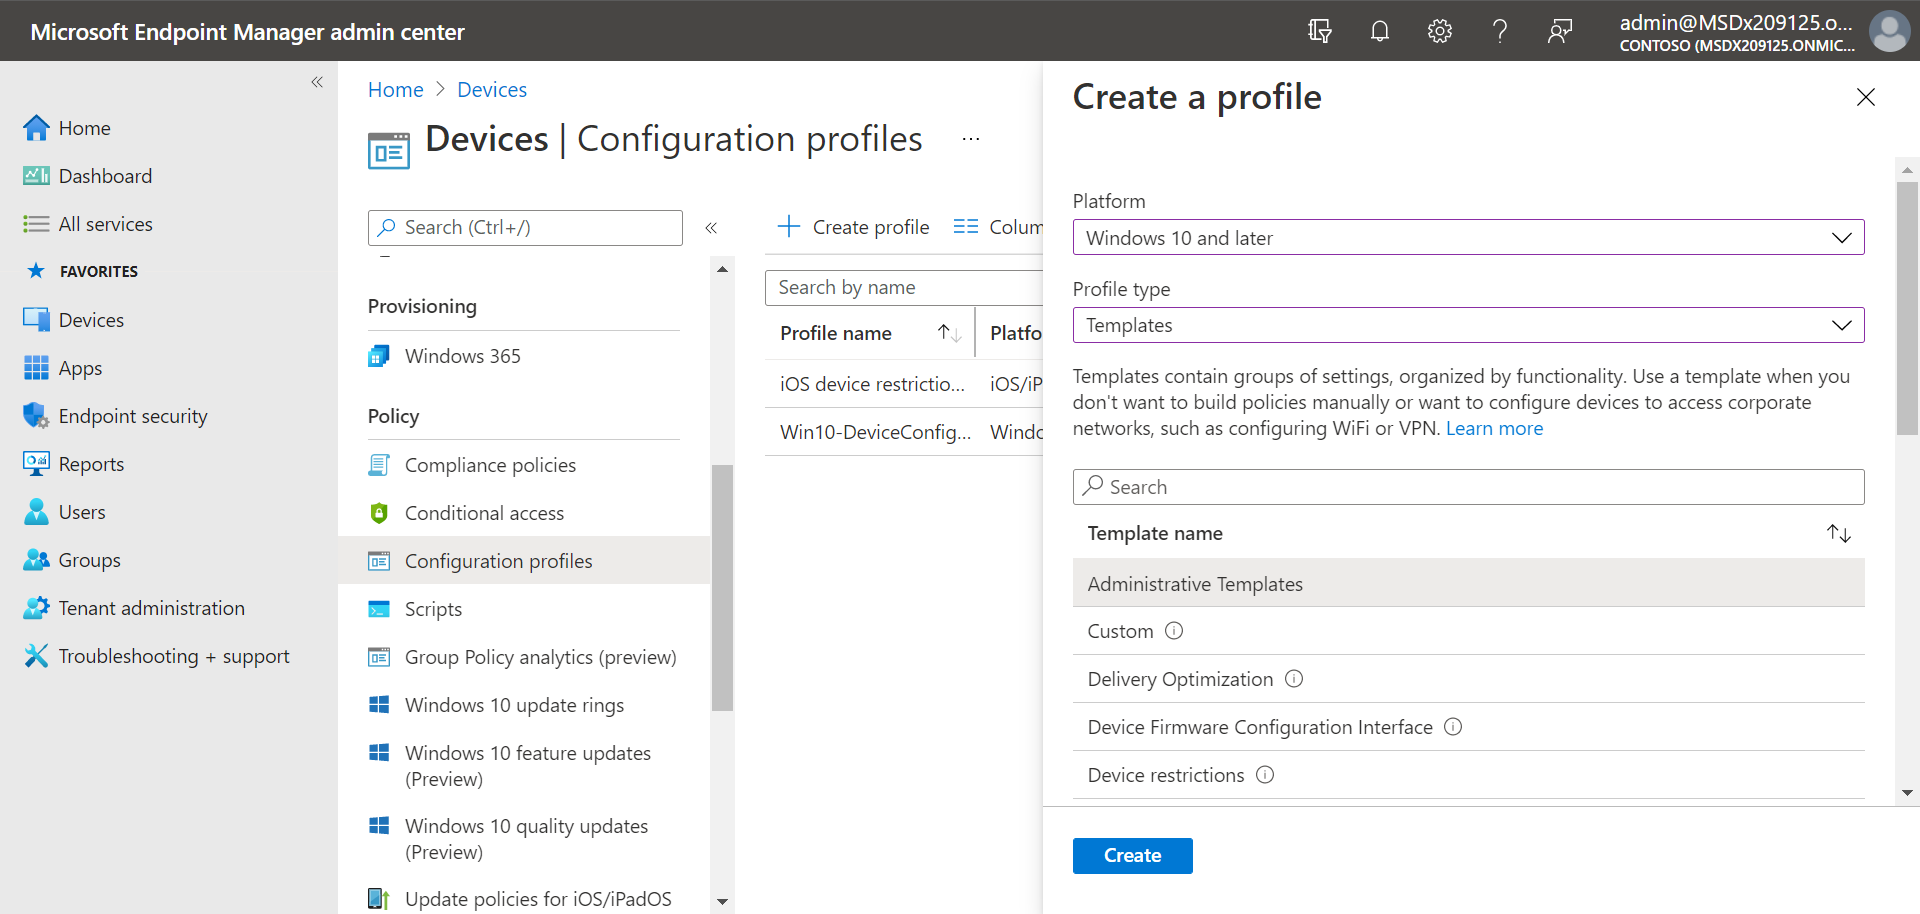
Select Devices > Configuration > + Create > Create policy.
For Platform, select a profile, such as Windows 10 and later, and for Profile type, select Templates.
Under Template name, select Administrative Templates, and then choose Create.
On the Basics tab, name the policy and add a description. Select Next.
On the Configuration settings tab, select All Settings. Then in the search box, type
Removableto see all the settings that pertain to removable devices.Select an item in the list, such as All Removable Storage classes: Deny all access, to open its flyout pane. The flyout for each setting explains what happens when it's enabled, disabled, or not configured. Select a setting, and then choose OK.
Repeat step 6 for each setting that you want to configure. Then choose Next.
On the Scope tags tab, if your organization is using scope tags, choose + Select scope tags, and then select the tags you want to use. Then, choose Next.
To learn more about scope tags, see Use role-based access control (RBAC) and scope tags for distributed IT.
On the Assignments tab, select Add all users and + Add all devices, and then choose Next. (You can alternately specify specific groups of users or devices.)
On the Review + create tab, review the settings for your policy, and then choose Create. The policy is applied to any endpoints that were onboarded to Defender for Endpoint shortly.
Tip
For more information, see How to control USB devices and other removable media using Microsoft Defender for Endpoint.
Network protection
With network protection, you can help protect your organization against dangerous domains that might host phishing scams, exploits, and other malicious content on the Internet. We recommend using Intune to turn on network protection.
Go to the Intune admin center and sign in.
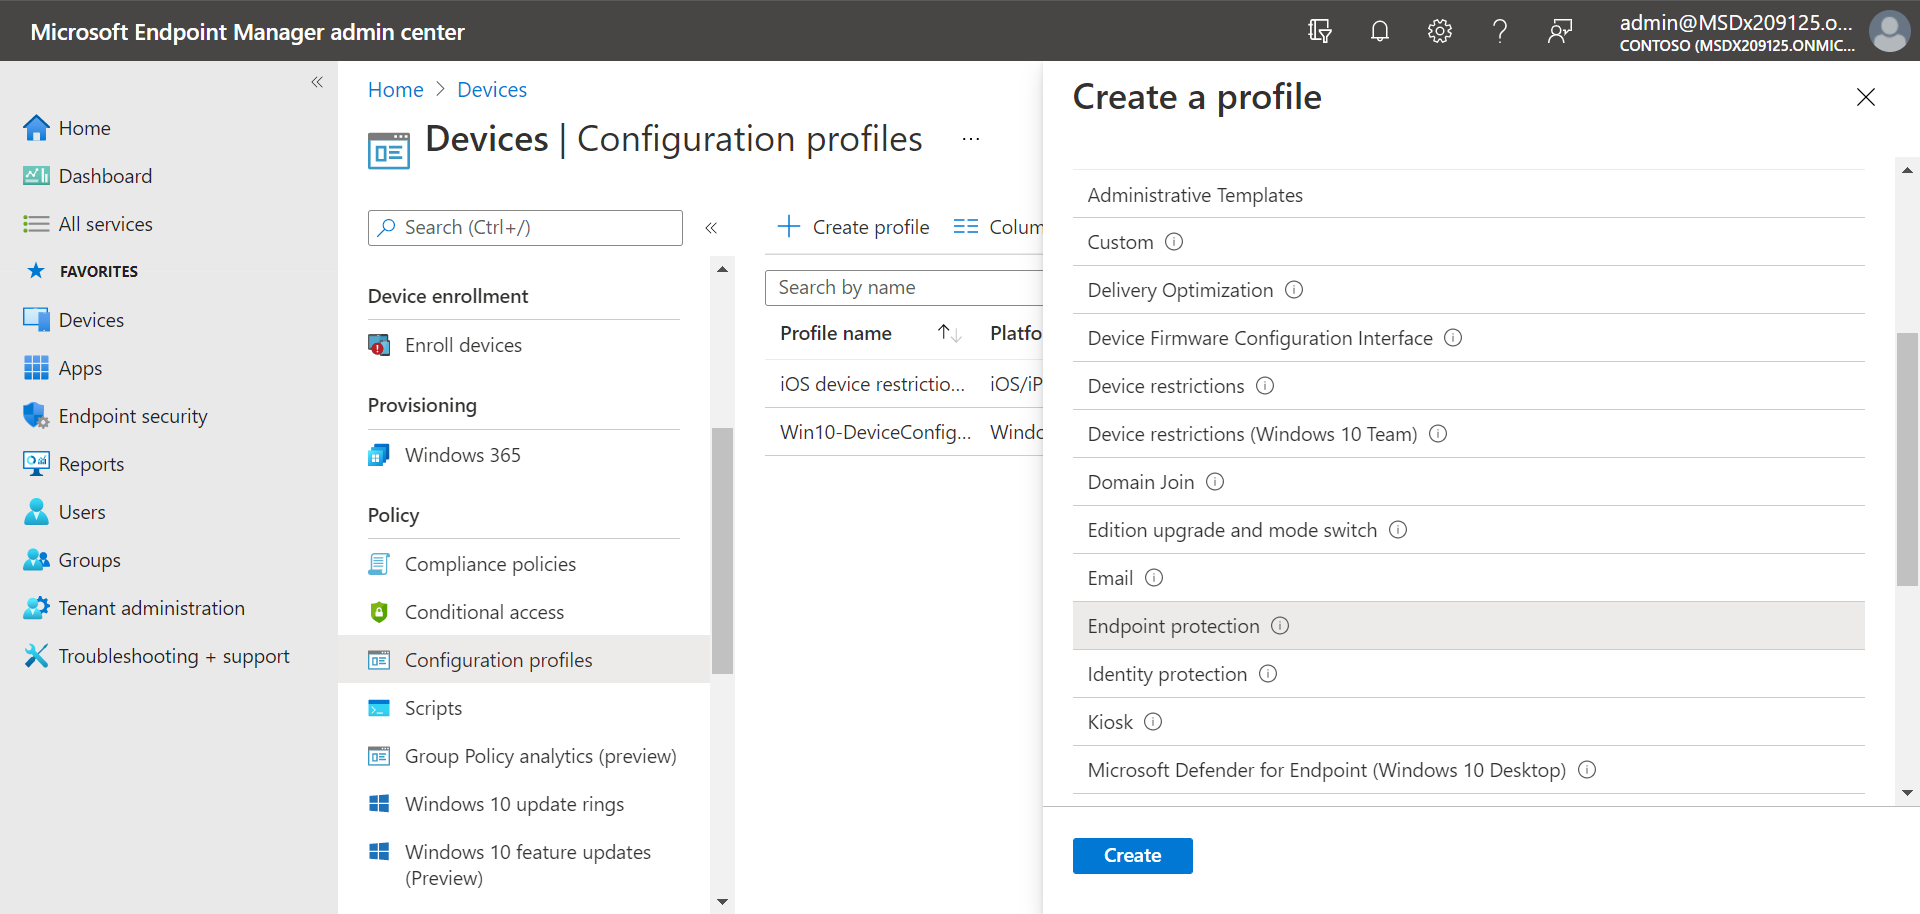
Select Devices > Configuration > + Create > Create policy.
For Platform, select a profile, such as Windows 10 and later, and for Profile type, select Templates.
Under Template name, select Endpoint protection, and then choose Create.
On the Basics tab, name the policy and add a description. Select Next.
On the Configuration settings tab, expand Microsoft Defender Exploit Guard, and then expand Network filtering.
Set Network protection to Enable. (You can alternately choose Audit to see how network protection works in your environment at first.)
Then choose Next.
On the Assignments tab, select Add all users and + Add all devices, and then choose Next. (You can alternately specify specific groups of users or devices.)
On the Applicability Rules tab, set up a rule. The profile you're configuring is applied only to devices that meet the combined criteria you specify.
For example, you might choose to assign the policy to endpoints that are running a certain OS edition only.
Then choose Next.
On the Review + create tab, review the settings for your policy, and then choose Create. The policy is applied to any endpoints that were onboarded to Defender for Endpoint shortly.
Tip
You can use other methods, such as Windows PowerShell or Group Policy, to enable network protection. To learn more, see Turn on network protection.
Web protection
With web protection, you can protect your organization's devices from web threats and unwanted content. Your web protection includes web threat protection and web content filtering. Configure both sets of capabilities. We recommend using Intune to configure your web protection settings.
Configure web threat protection
Go to the Intune admin center, and sign in.
Choose Endpoint security > Attack surface reduction, and then choose + Create policy.
Select a platform, such as Windows 10 and later, select the Web protection profile, and then choose Create.
On the Basics tab, specify a name and description, and then choose Next.
On the Configuration settings tab, expand Web Protection, specify the settings in the following table, and then choose Next.
Setting Recommendation Enable network protection Set to Enabled. Prevents users from visiting malicious sites or domains.
Alternately, you can set network protection to Audit mode to see how it works in your environment. In audit mode, network protection doesn't prevent users from visiting sites or domains, but it does track detections as events.Require SmartScreen for Microsoft Edge Legacy Set to Yes. Helps protect users from potential phishing scams and malicious software. Block malicious site access Set to Yes. Prevents users from bypassing warnings about potentially malicious sites. Block unverified file download Set to Yes. Prevents users from bypassing the warnings and downloading unverified files. On the Scope tags tab, if your organization is using scope tags, choose + Select scope tags, and then select the tags you want to use. Then, choose Next.
To learn more about scope tags, see Use role-based access control (RBAC) and scope tags for distributed IT.
On the Assignments tab, specify the users and devices to receive the web protection policy, and then choose Next.
On the Review + create tab, review your policy settings, and then choose Create.
Tip
To learn more about web threat protection, see Protect your organization against web threats.
Configure web content filtering
Go to the Microsoft Defender portal and sign in.
Choose Settings > Endpoints.
Under Rules, choose Web content filtering, and then choose + Add policy.
In the Add policy flyout, on the General tab, specify a name for your policy, and then choose Next.
On the Blocked categories, select one or more categories that you want to block, and then choose Next.
On the Scope tab, select the device groups you want to receive this policy, and then choose Next.
On the Summary tab, review your policy settings, and then choose Save.
Tip
To learn more about configuring web content filtering, see Web content filtering.
Network firewall
Network firewall helps reduce the risk of network security threats. Your security team can set rules that determine which traffic is permitted to flow to or from your organization's devices. We recommend using Intune to configure your network firewall.
::: alt-text="Screenshot of Firewall policy in the Intune portal.":::
To configure basic firewall settings, follow these steps:
Go to the Intune admin center, and sign in.
Choose Endpoint security > Firewall, and then choose + Create Policy.
Select a platform, such as Windows 10, Windows 11, and Windows Server, select the Microsoft Firewall profile, and then choose Create.
On the Basics tab, specify a name and description, and then choose Next.
Expand Firewall, and then scroll down to the bottom of the list.
Set each of the following settings to True:
- Enable Domain Network Firewall
- Enable Private Network Firewall
- Enable Public Network Firewall
Review the list of settings under each of domain networks, private networks, and public networks. You can leave them set to Not configured, or change them to suit your organization's needs.
Then choose Next.
On the Scope tags tab, if your organization is using scope tags, choose + Select scope tags, and then select the tags you want to use. Then, choose Next.
To learn more about scope tags, see Use role-based access control (RBAC) and scope tags for distributed IT.
On the Assignments tab, select Add all users and + Add all devices, and then choose Next. (You can alternately specify specific groups of users or devices.)
On the Review + create tab, review your policy settings, and then choose Create.
Tip
Firewall settings are detailed and can seem complex. Refer to Best practices for configuring Windows Defender Firewall.
Application control
Windows Defender Application Control (WDAC) helps protect your Windows endpoints by only allowing trusted applications and processes to run. Most organizations used a phased deployment of WDAC. That is, most organizations don't roll out WDAC across all Windows endpoints at first. In fact, depending on whether your organization's Windows endpoints are fully managed, lightly managed, or "Bring Your Own Device" endpoints, you might deploy WDAC on all or some endpoints.
To help with planning your WDAC deployment, see the following resources:
Windows Defender Application Control policy design decisions
Windows Defender Application Control deployment in different scenarios: types of devices
Next steps
Now that you've finished the setup and configuration process, your next step is to get started using Defender for Endpoint.
Tip
Do you want to learn more? Engage with the Microsoft Security community in our Tech Community: Microsoft Defender for Endpoint Tech Community.
