Get started with Microsoft Defender Experts for XDR
Applies to:
For onboarding instructions, check out this short video.
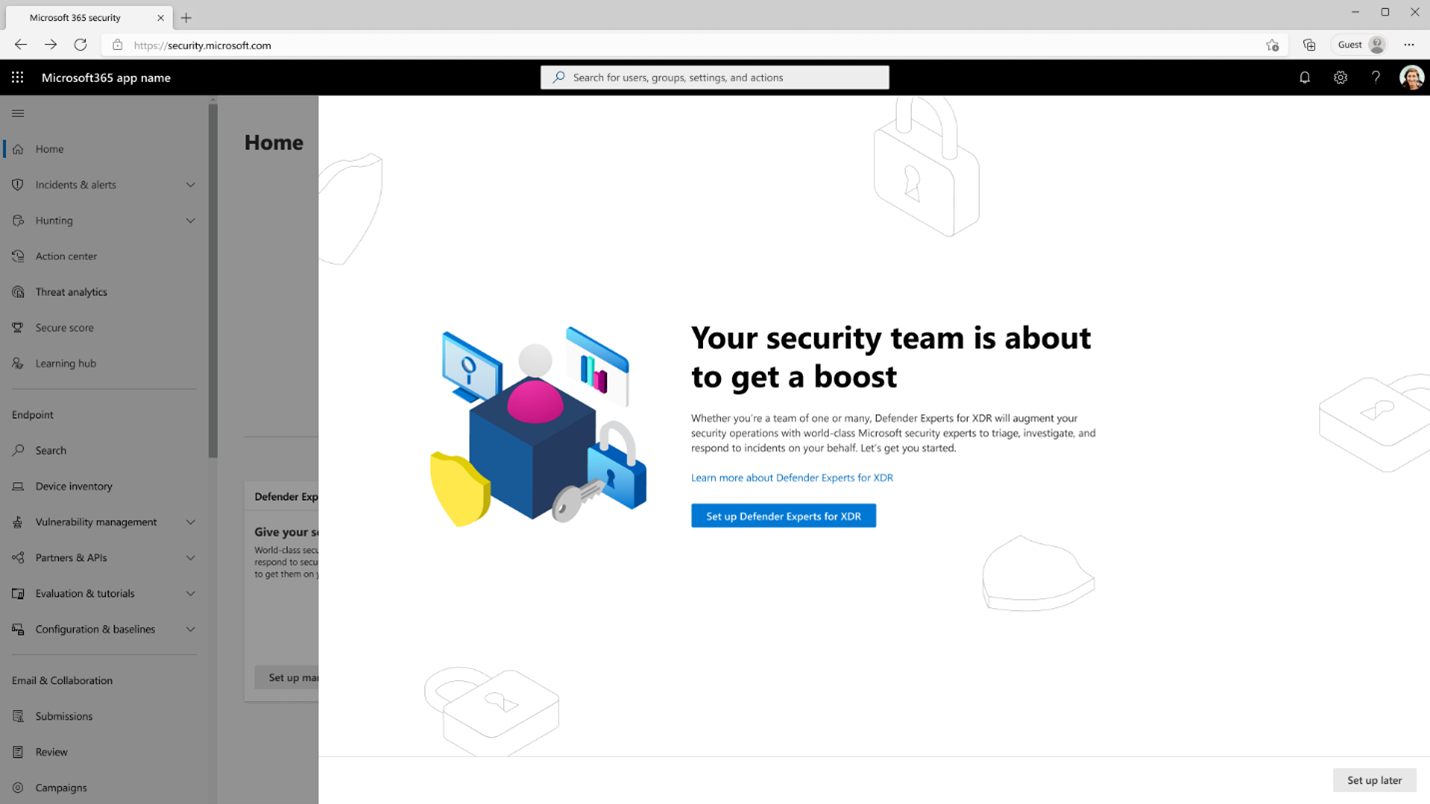
Once the Defender Experts for XDR team is ready to onboard your organization, you'll receive a welcome email to continue the setup and get you started.
Select the link in the welcome email to directly launch the Defender Experts settings setup in the Microsoft Defender portal. You can also open this setup by going to Settings > Defender Experts and selecting Get started.
Grant permissions to our experts
Important
Microsoft recommends that you use roles with the fewest permissions. This helps improve security for your organization. Global Administrator is a highly privileged role that should be limited to emergency scenarios when you can't use an existing role.
By default, Defender Experts for XDR requires Service provider access that lets our experts sign into your tenant and deliver services based on assigned security roles. Learn more about cross-tenant access
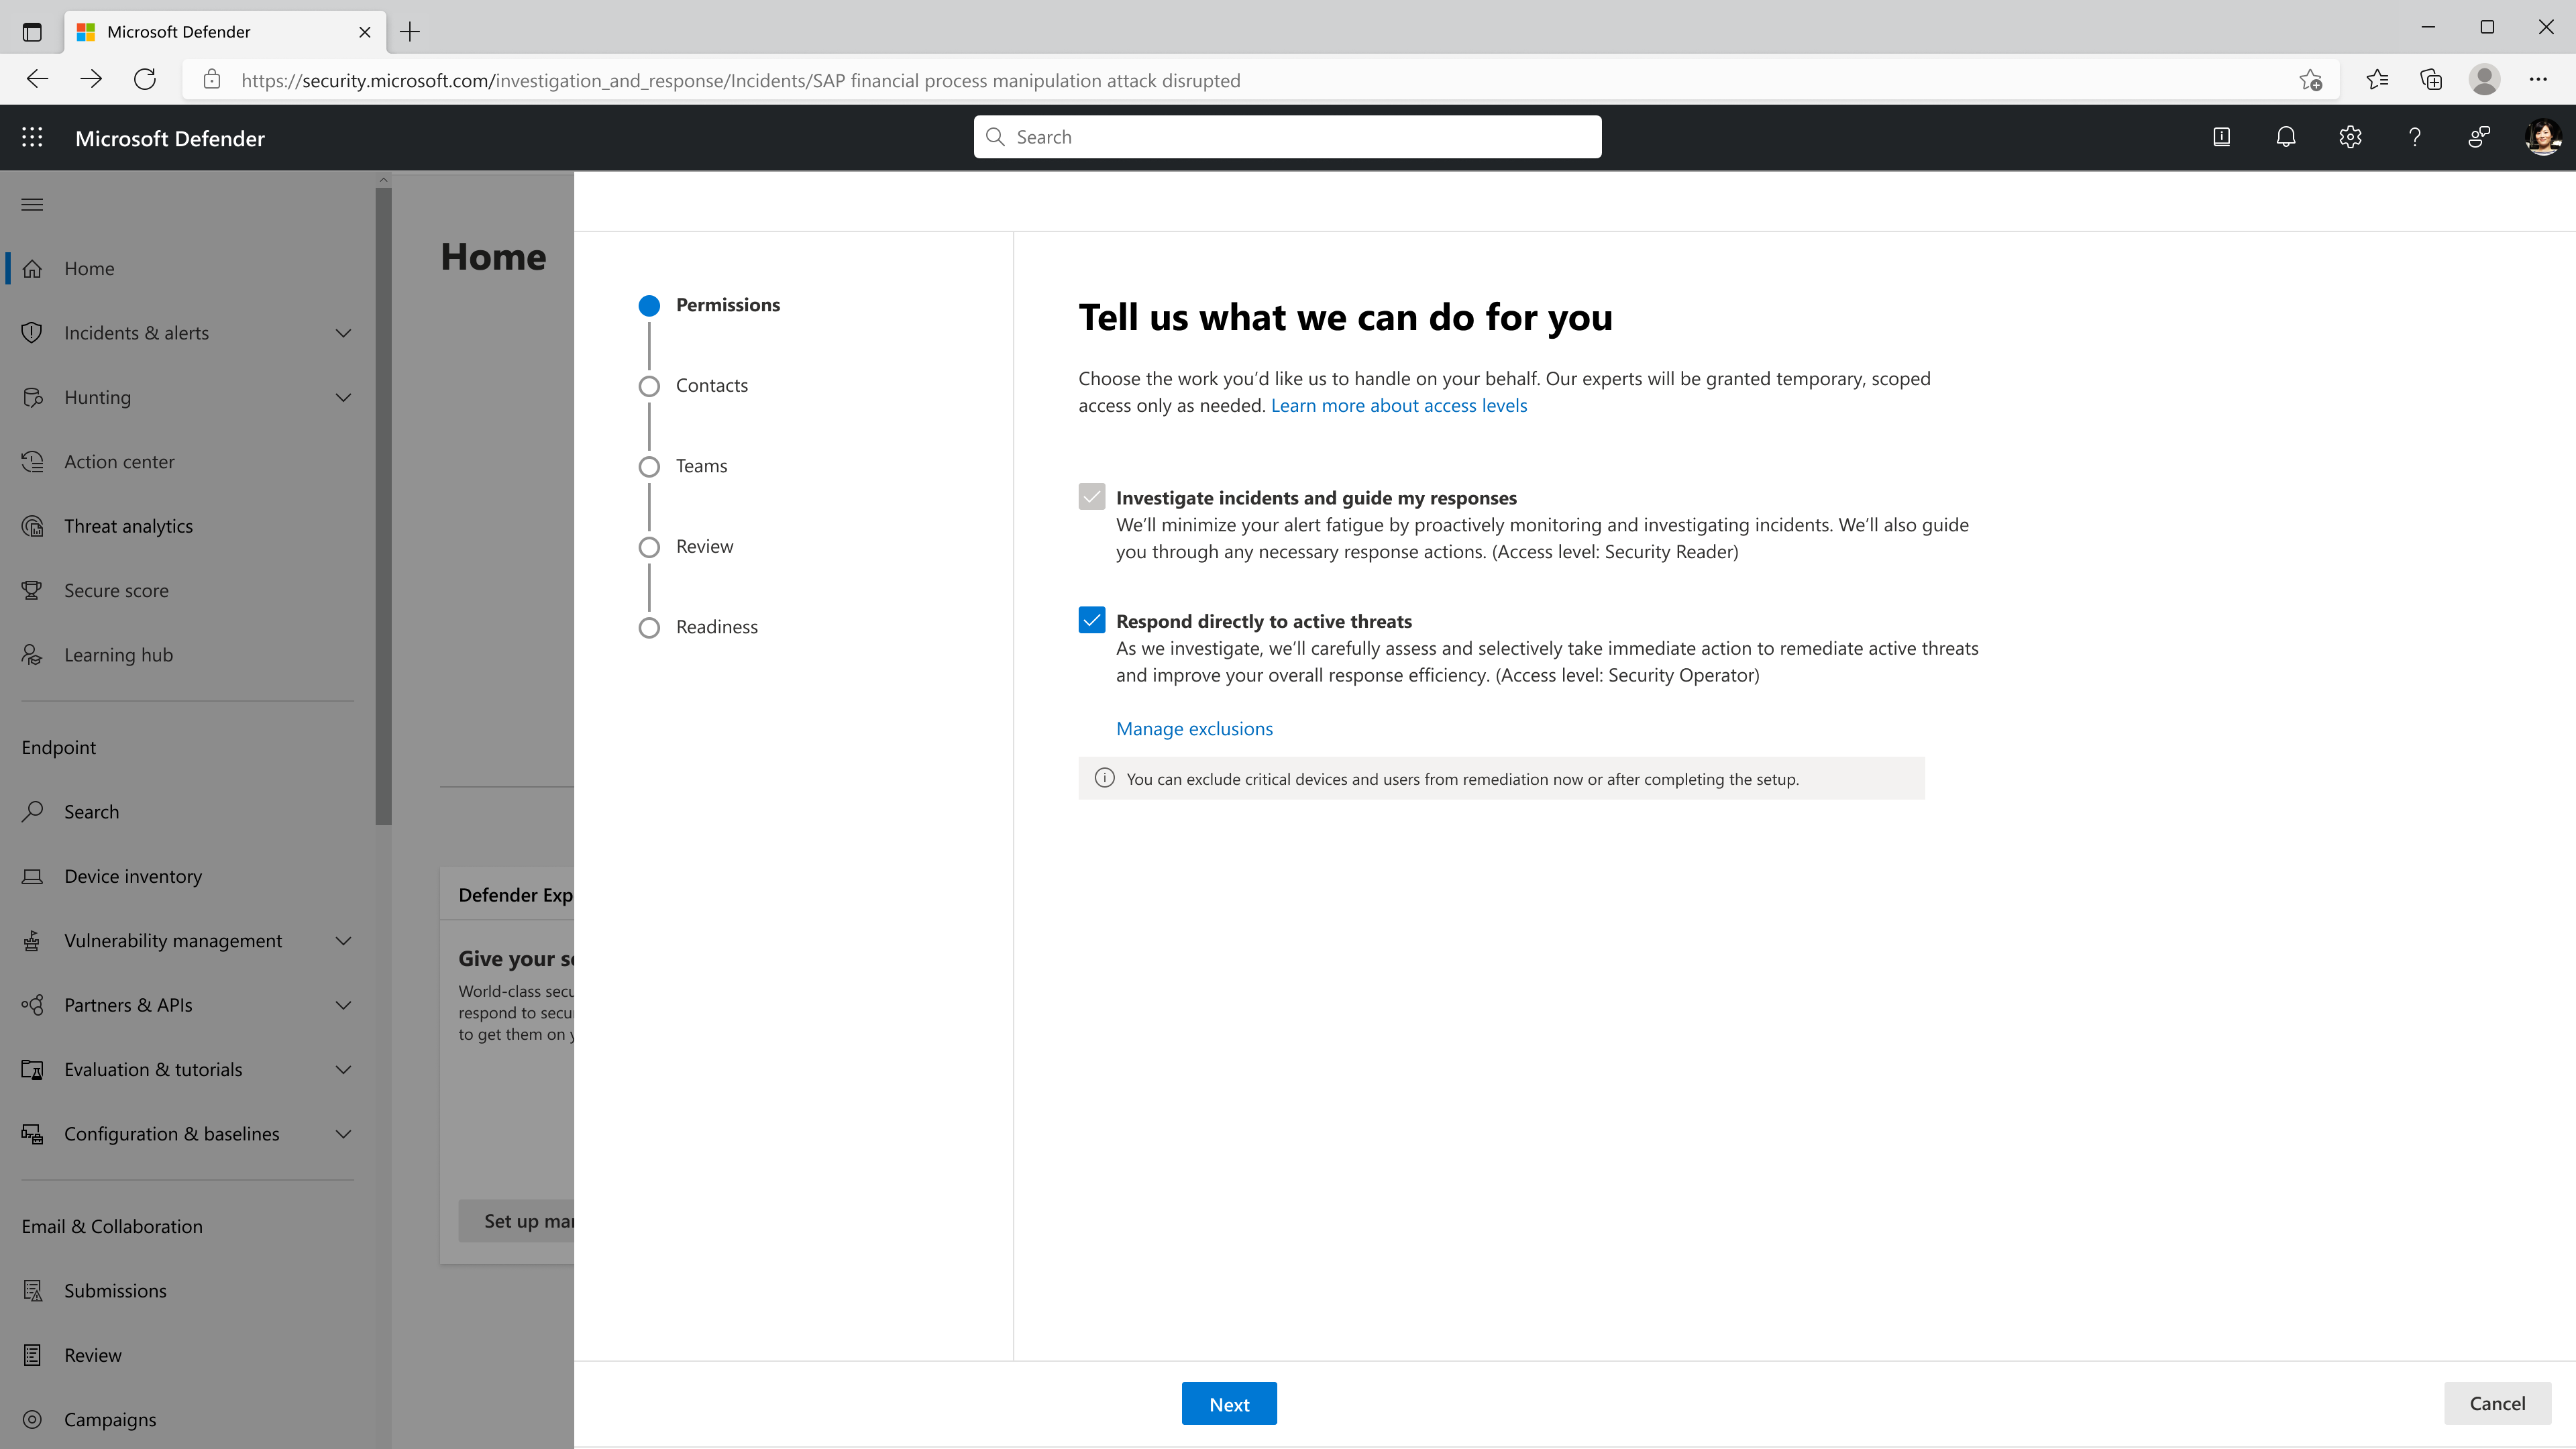
You also need to grant our experts one or both of the following permissions:
- Investigate incidents and guide my responses (default) – This option lets our experts proactively monitor and investigate incidents and guide you through any necessary response actions. (Access level: Security Reader)
- Respond directly to active threats (recommended) – This option lets our experts contain and remediate active threats immediately while investigating, thus reducing the threat's impact, and improving your overall response efficiency. (Access level: Security Operator)
Important
If you skip providing additional permissions, our experts won't be able to take certain response actions to secure your organization.
Even though our experts are granted these relatively powerful permissions, they will only have individual access to specific areas for a limited period. Learn more about how Defender Experts for XDR permissions work
To grant our experts permissions:
In the same Defender Experts settings setup, under Permissions, choose the access level(s) you want to grant our experts.
If you wish to exclude device and user groups in your organization from remediation actions, select Manage exclusions.
Select Next to add contact persons or groups.
To edit or update permissions after the initial setup, go to Settings > Defender Experts > Permissions.
Exclude devices and users from remediation
Defender Experts for XDR lets you exclude devices and users from remediation actions taken by our experts and instead get remediation guidance for those entities. These exclusions are based on identified device groups in Microsoft Defender for Endpoint and identified user groups in Microsoft Entra ID.
To exclude device groups:
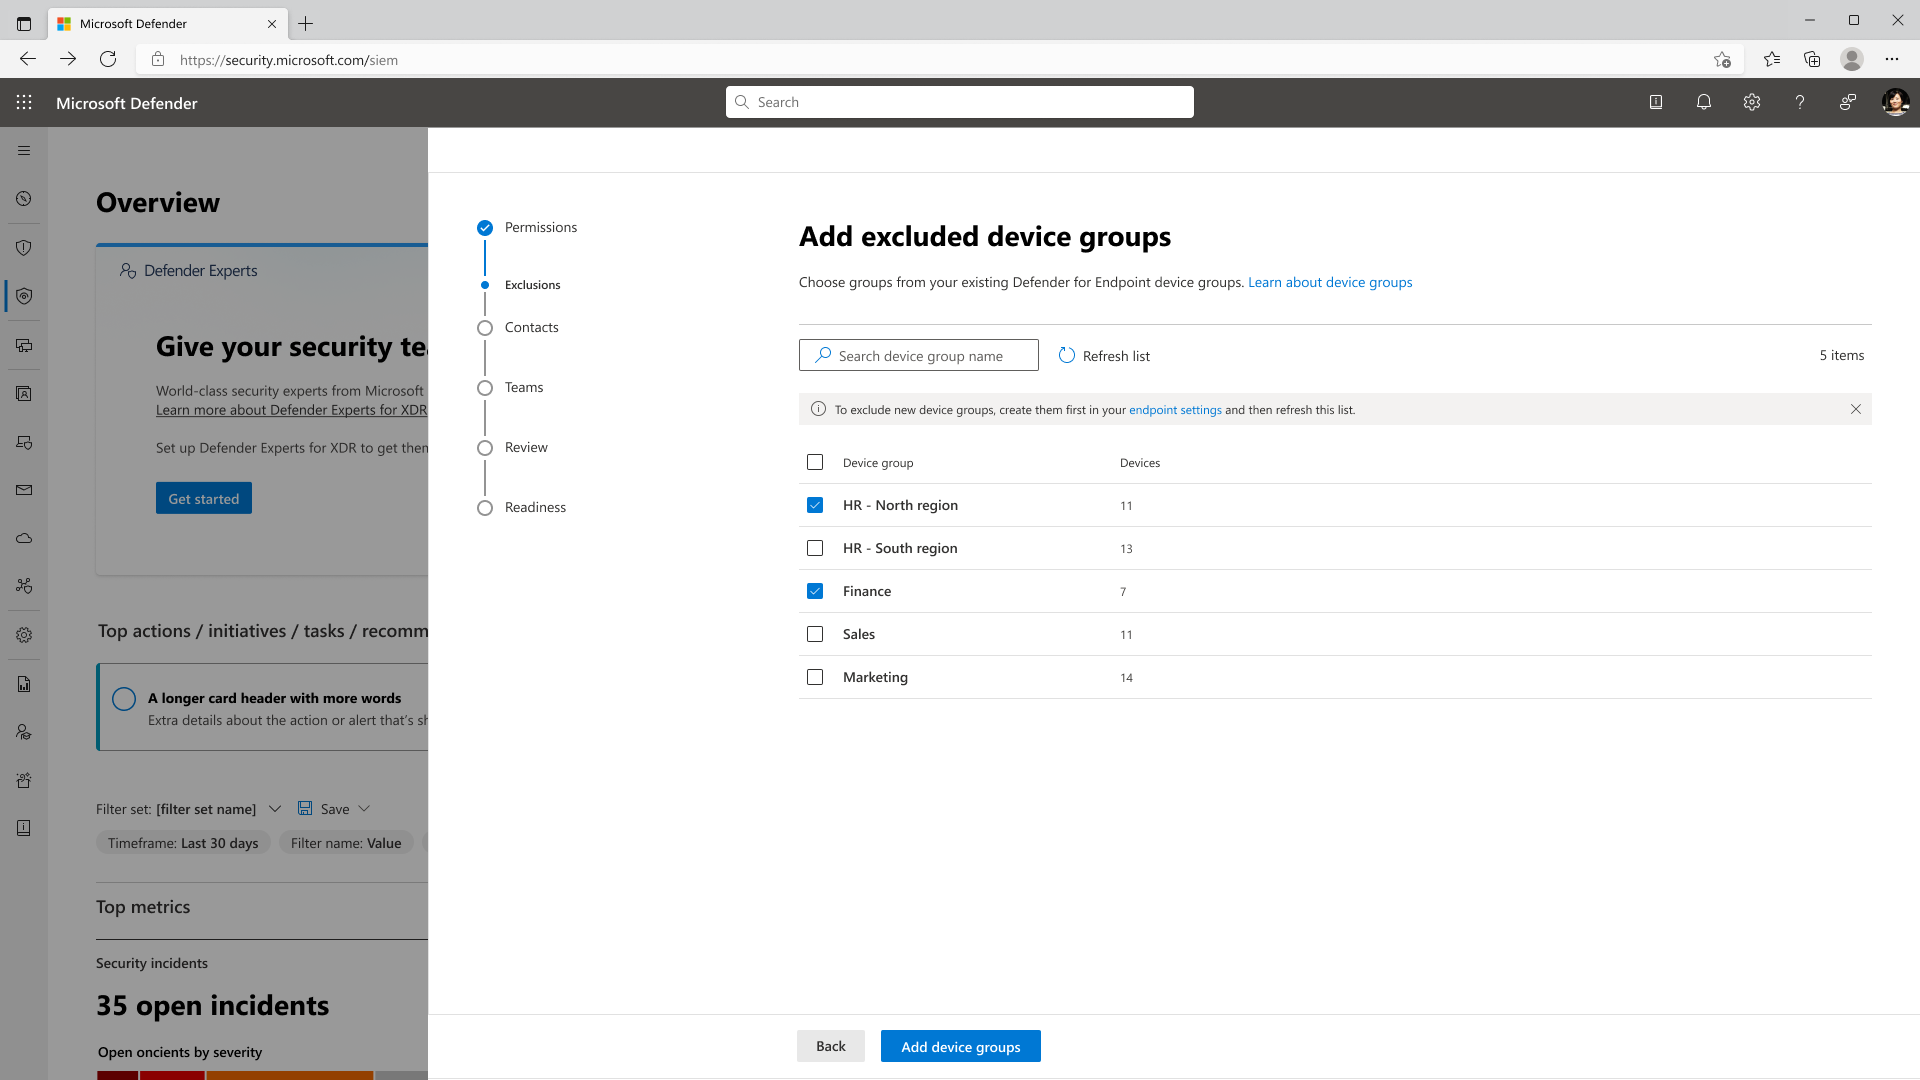
In the same Defender Experts settings setup, under Exclusions, go to the Device groups tab.
Select + Add device groups, then search for and choose the device group(s) that you wish to exclude.
Note
This page only lists existing device groups. If you wish to create a new device group, you first need to go to the Defender for Endpoint settings in your Microsoft Defender portal. Then, refresh this page to search for and choose the newly created group. Learn more about creating device groups
Select Add device groups.
Back on the Device groups tab, review the list of excluded device groups. If you wish to remove a device group from the exclusion list, choose it then select Remove device group.
Select Next to confirm your exclusion list and proceed to adding contact persons or groups. Otherwise, select Skip, and all your added exclusions are discarded.
To exclude user groups:
In the same Defender Experts settings setup, under Exclusions, go to the User groups tab.
Select + Add user groups, then search for and choose the user group(s) that you wish to exclude.
Note
This page only lists existing user groups. If you wish to create a new user group, you first need to sign into the Microsoft Entra ID admin center as a Global Administrator. Then, refresh this page to search for and choose the newly created group. Learn more about creating user groups
Select Add user groups.
Back on the User groups tab, review the list of excluded user groups. If you wish to remove a user group from the exclusion list, choose it then select Remove user group.
Select Next to confirm your exclusion list and proceed to adding contact persons or groups. Otherwise, select Skip, and all your added exclusions are discarded.
Note
You can only exclude users by adding them to an Microsoft Entra ID security group. On-prem Entra ID users cannot be excluded at this time.
To edit or update exclusions after the initial setup, go to Settings > Defender Experts > Exclusions, then go to the Device groups or User groups tab.
Tell us who to contact for important matters
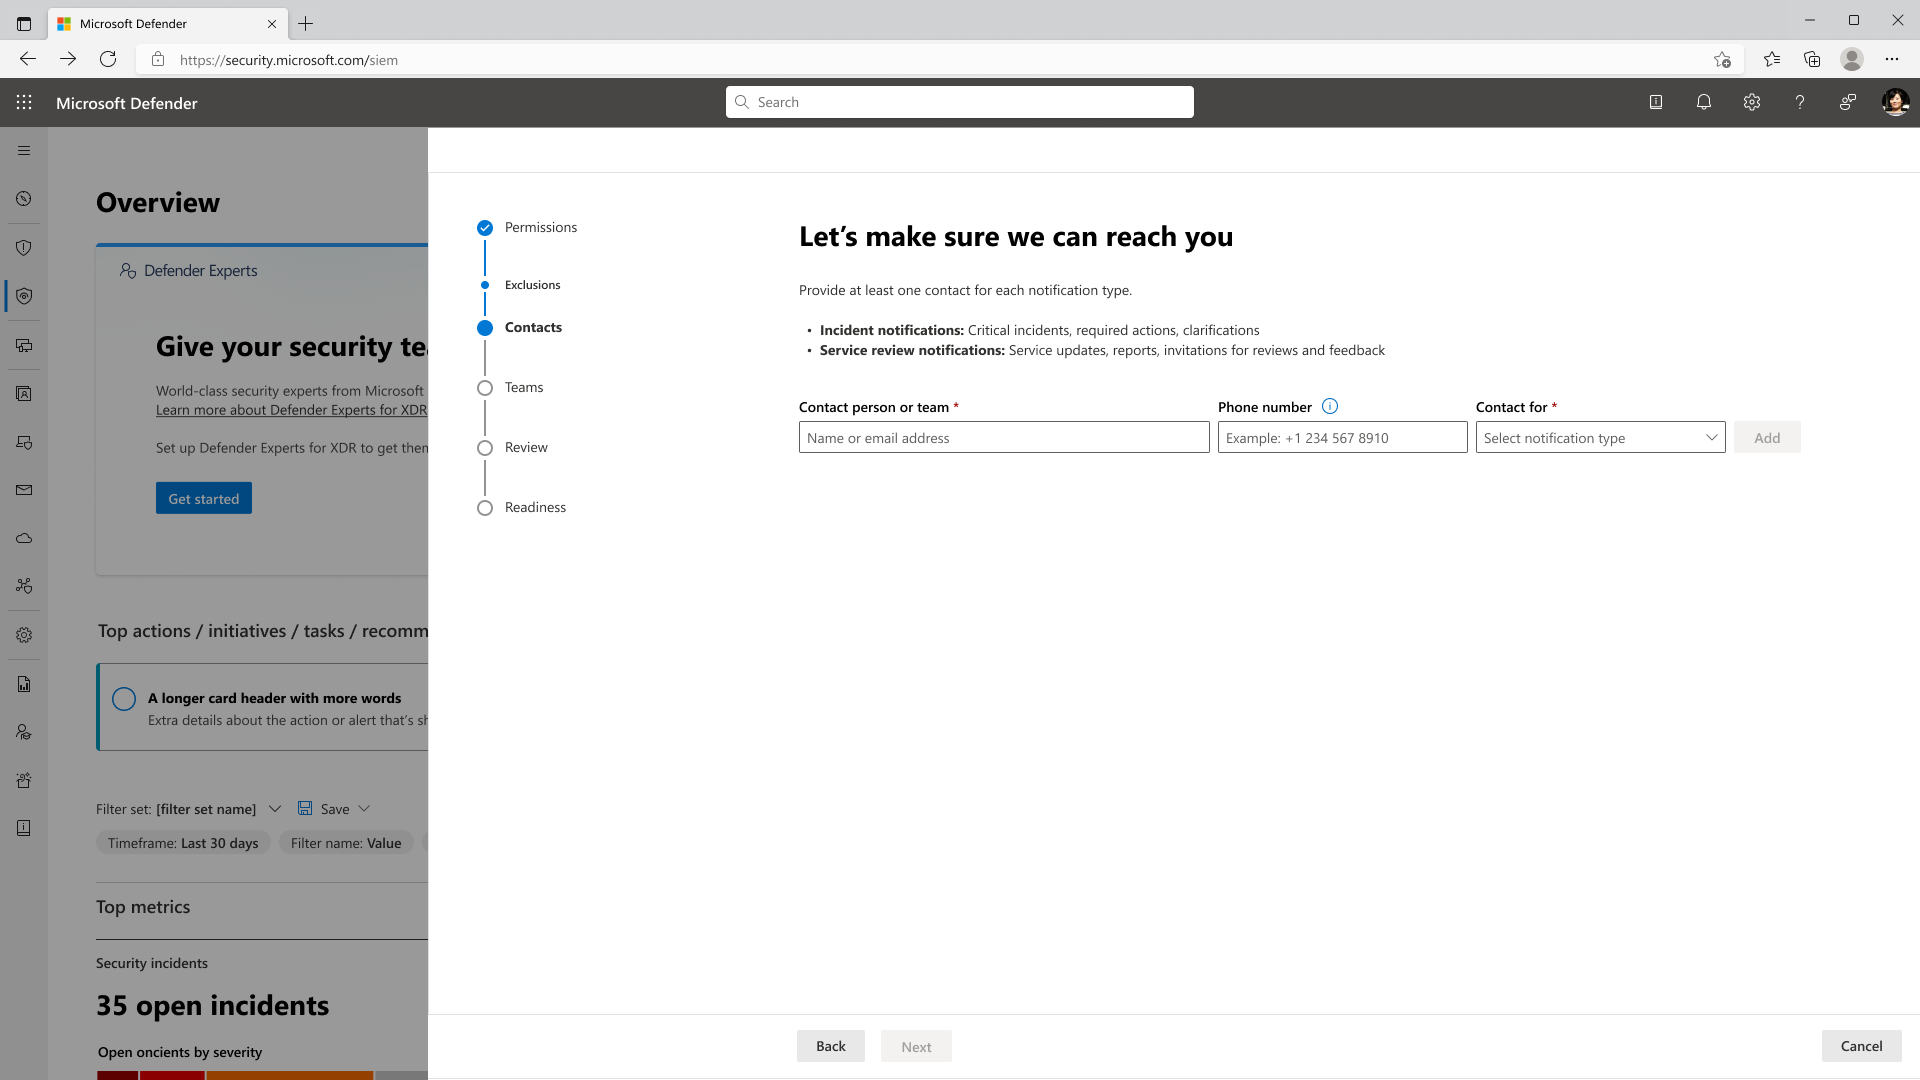
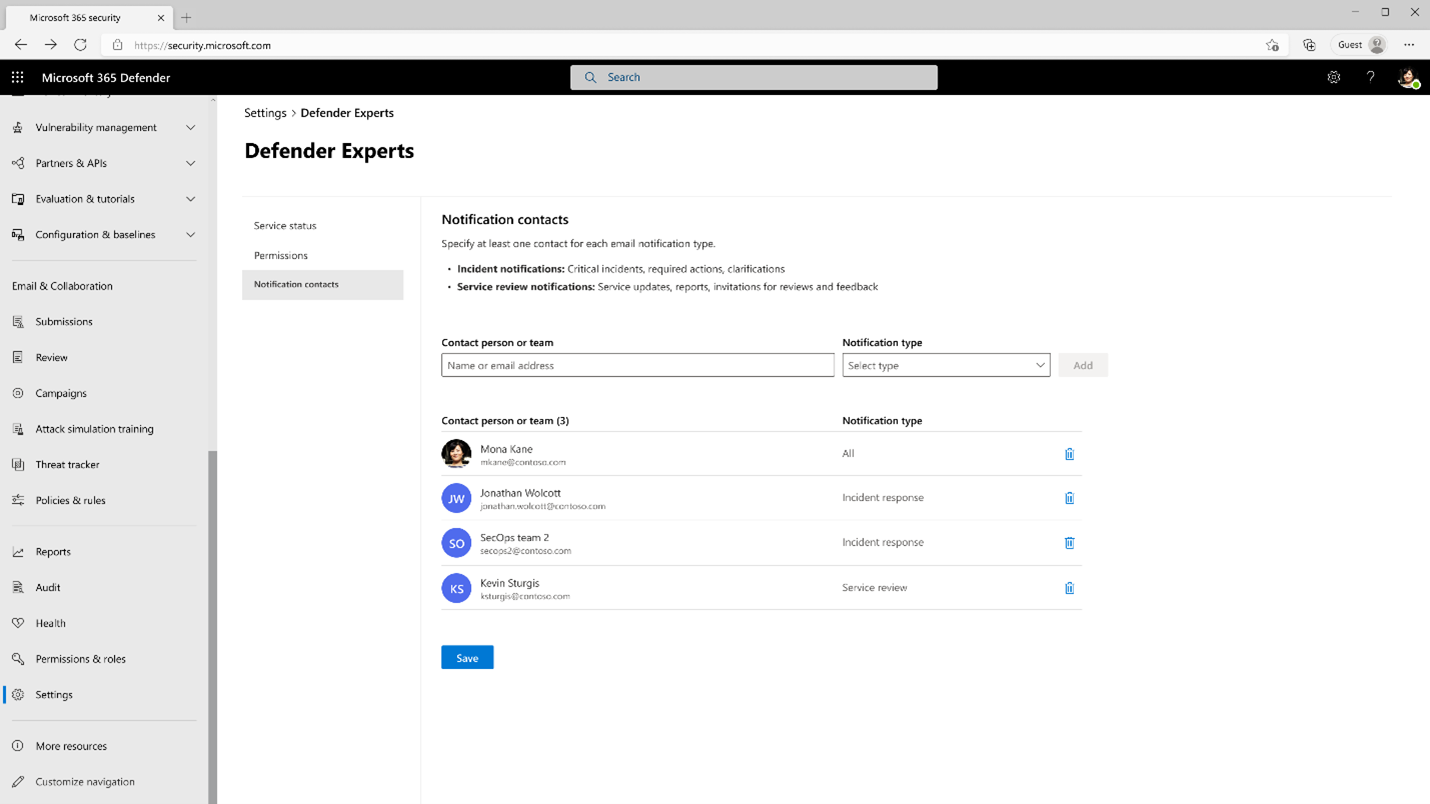
Defender Experts for XDR lets you determine the individuals or groups within your organization that need to be notified if there are critical incidents, service updates, occasional queries, and other recommendations:
- Incident notification contacts – These contacts are persons or teams that we can notify for managed response actions or any communication that requires immediate response. Given the urgent nature of the communications, we recommended that these contacts are always available.
- Service review contacts – These contacts are persons or teams that we can engage with for ongoing security briefings done by our service delivery team.
Once identified, the individuals or groups will receive an email notifying them that they were as a contact for incident notification or service review purposes.
To add notification contacts:
In the same Defender Experts settings setup, under Contacts, search for and add your Contact person or team in the text field provided.
Add a Phone number (optional) that Defender Experts can call for matters that require immediate attention.
Under the Contact for dropdown box, choose Incident notification or Service review.
Select Add.
Select Next to confirm your contacts list and proceed to creating a Teams channel where you can also receive incident notifications.
To edit or update your notification contacts after the initial setup, go to Settings > Defender Experts > Notification contacts.
Receive managed response notifications and updates in Microsoft Teams
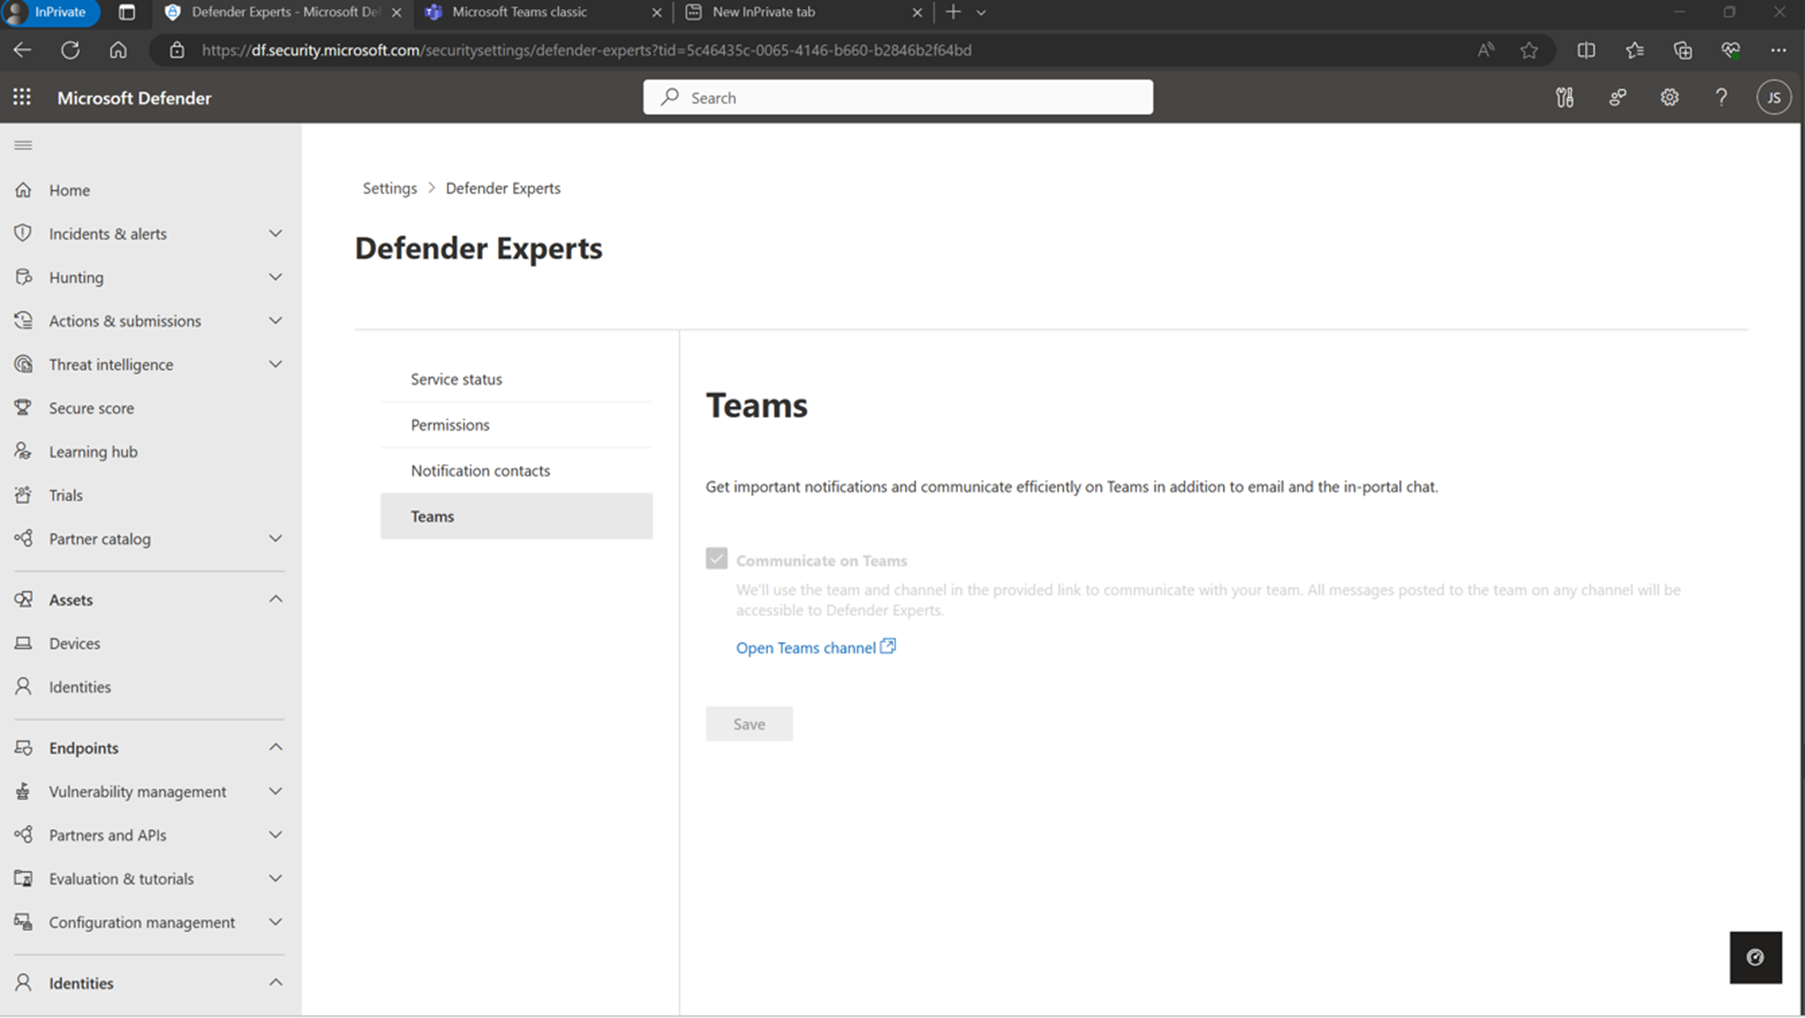
Apart from email and in-portal chat, you also have to option to use Microsoft Teams to receive updates about managed responses and communicate with our experts in real time. When this setting is turned on, a new team named Defender Experts team is created, where managed response notifications related to ongoing incidents are sent as new posts in the Managed response channel. Learn more about using Teams chat
Important
Defender Experts will have access to all messages posted on any channel in the created Defender Experts team. To prevent Defender Experts from accessing messages in this team, go to Apps in Teams then navigate to Manage your apps > Defender Experts > Remove. This removal action cannot be reversed.
To turn on Teams notifications and chat:
In the same Defender Experts settings setup, under Teams, select the Communicate on Teams checkbox.
Select Next to review your settings.
Select Submit. The step-by-step guide then completes the initial setup.
Select View readiness assessment to complete the necessary actions required to optimize your security posture.
Note
To set up the Defender Experts Teams application, you must have either the Global administrator or Security administrator role assigned, and a Microsoft Teams license.
To turn on Teams notifications and chat after the initial setup, go to Settings > Defender Experts > Teams.
- You can add new members to the channel by navigating to Defender Experts team > More options (...) > Manage team > Add member.
- You can limit who can join this team by navigating to Defender Experts team > More options (...) > Settings > Edit > Manage team > Private.
Prepare your environment for the Defender Experts service
Apart from onboarding service delivery, our expertise on the Microsoft Defender XDR product suite enables Defender Experts for XDR to let you run a readiness assessment and help you get the most out of your Microsoft security products.
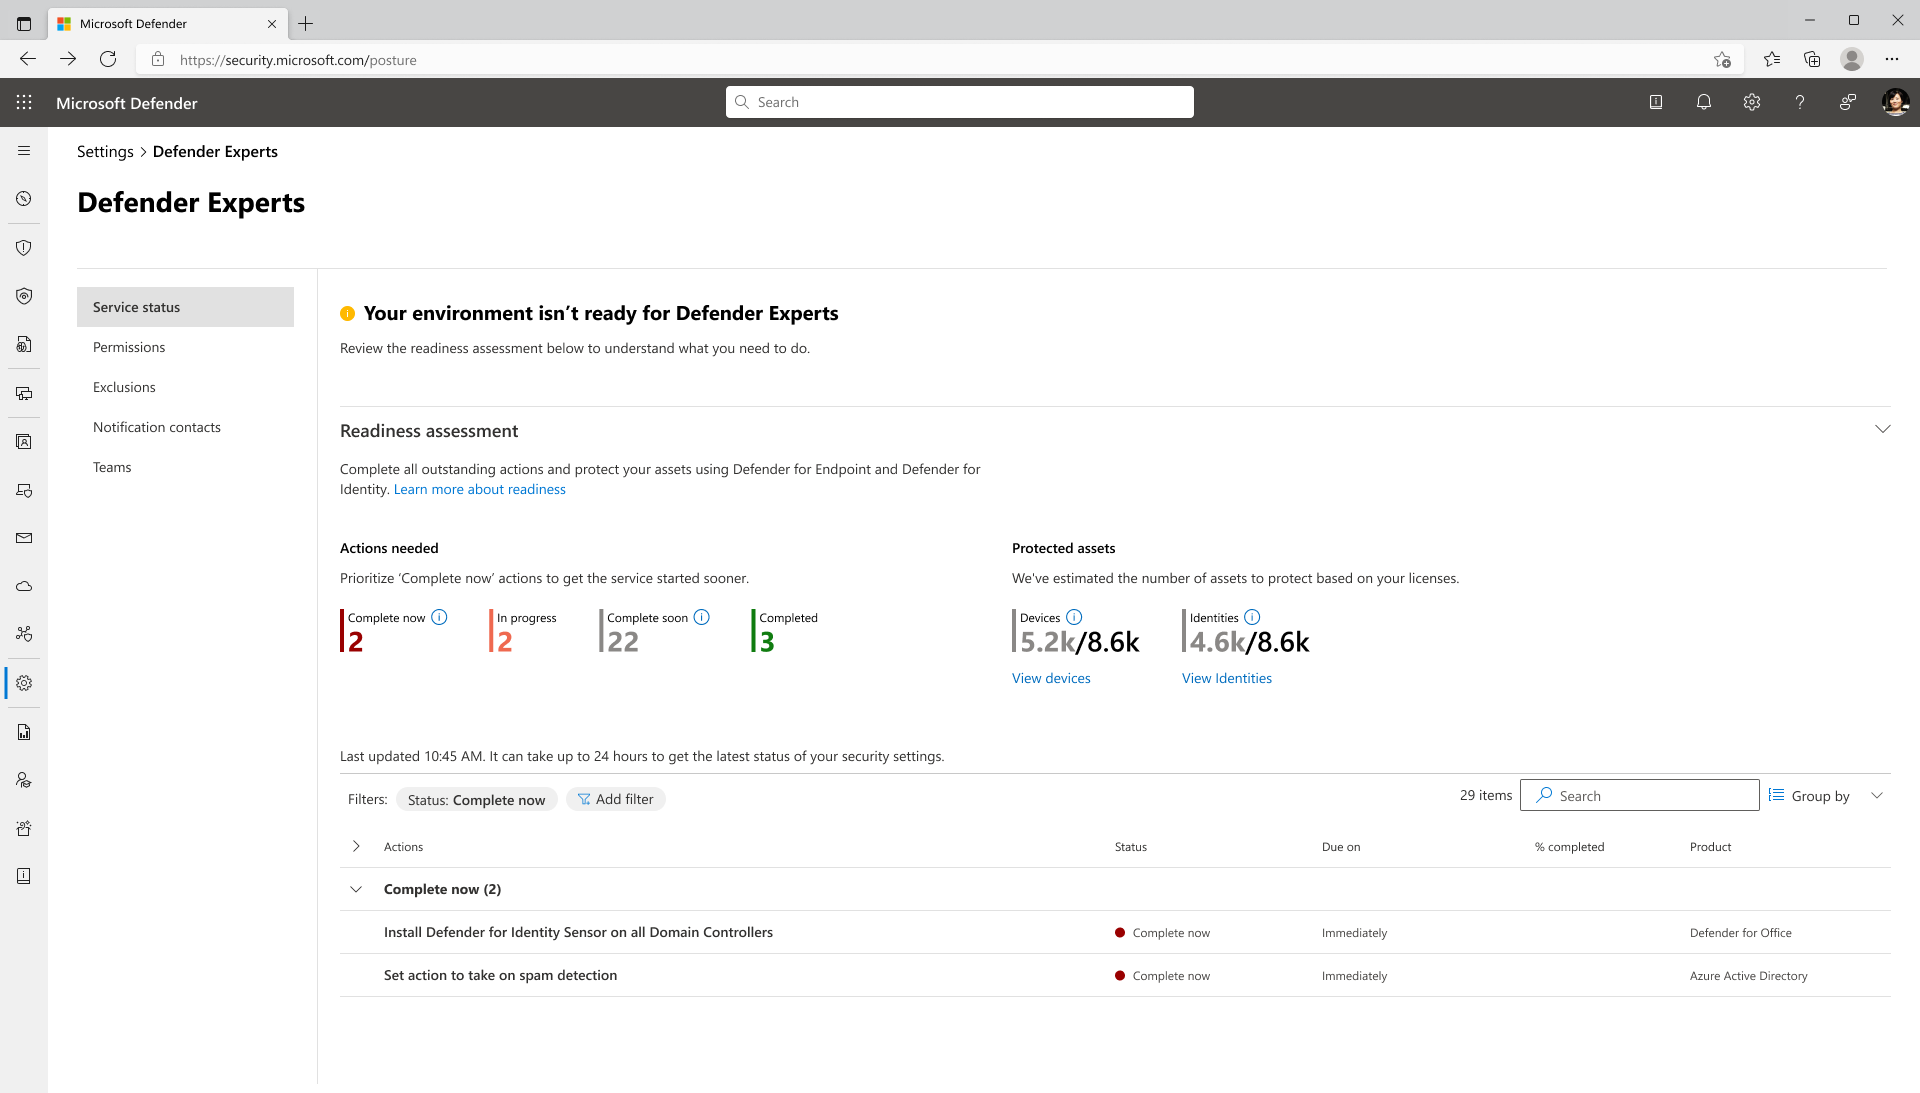
The readiness assessment is based on the number of protected devices and identities in your environment, and Defender Experts' policy recommendations. To view the assessment, in your Microsoft Defender portal, go to Settings > Defender Experts then select Service status.
The readiness assessment has two parts:
Actions needed – This section shows the number of actions or security settings that you need to complete, are in progress, or have been completed. These actions are listed in a table at the bottom part of the page.
The list outlines the required steps you need to take before initiating the service. Prioritize the actions that have the Complete now status to get the Defender Experts for XDR service started sooner.
Note
It can take up to 24 hours to get the latest status of your security settings.
Protected assets – This section shows the current number of protected devices and identities versus the ones that you still need to protect to get the Defender Experts for XDR service started.
The figures are based on your Defender for Endpoint and Defender for Identity licenses; to achieve these target number of protected assets, onboard more devices to Defender for Endpoint or install more Defender for Identity sensors.
Important
Defender Experts for XDR reviews your readiness assessment periodically, especially if there are any changes to your environment, such as the addition of new devices and identities. It's important that you regularly monitor and run the readiness assessment beyond the initial onboarding to ensure that your environment has strong security posture to reduce risk.
After you complete all the required tasks and met the onboarding targets in your readiness assessment, your service delivery manager (SDM) initiates the monitoring phase of the Defender Experts for XDR service, where, for a few days, our experts start monitoring your environment closely to identify latent threats, sources of risk, and normal activity. As we get better understanding of your critical assets, we can streamline the service and fine-tune our responses.
Once our experts begin to perform comprehensive response work on your behalf, you'll start receiving notifications about incidents that require remediation steps and targeted recommendations on critical incidents. You can also chat with our experts or your SDMs regarding important queries and regular business and security posture reviews. Additionally you can also view real-time reports on the number of incidents we've investigated and resolved on your behalf.
Next step
- Managed detection and response
- Get real-time visibility with Defender Experts for XDR reports
- Communicating with experts in the Microsoft Defender Experts for XDR service
See also
- General information on Defender Experts for XDR service
- How Microsoft Defender Experts for XDR permissions work
Tip
Do you want to learn more? Engage with the Microsoft Security community in our Tech Community: Microsoft Defender XDR Tech Community.
