Localization
 Browse the sample
Localization is the process of adapting an app to meet the specific language or cultural requirements of a target market. To localize an app, its text and images might need to be translated into multiple languages. A localized app automatically displays translated text based on the culture settings of the device.
.NET includes a mechanism for localizing apps using resource files. A resource file stores text and other content as name/value pairs that allow the app to retrieve content for a provided key. Resource files allow localized content to be separated from app code. In addition to storing text, resource files can also store images and binary data. However, devices have a range of screen sizes and densities and each platform has functionality for displaying density-dependent images. Therefore, platform functionality should be used for localizing images instead of storing them in resource files.
To localize a .NET Multi-platform App UI (.NET MAUI) app, you should:
- Create resource files to store strings. For more information, see Create resource files to store strings.
- Specify the app's neutral language. For more information, see Specify the app's neutral language.
- Perform platform setup. For more information, see Perform platform setup.
- Localize text. For more information, see Localize text.
- Localize images. For more information, see Localize images.
- Localize the app name. For more information, see Localize the app name.
- Test localization. For more information, see Test localization.
In addition, the layout direction of an app can be specified. For more information, see Right to left localization.
Create resource files to store strings
.NET resource files are XML files with a .resx extension that are compiled into binary resource (.resources) files during the build process. A localized app typically contains a default resource file with all strings used in the app, and resource files for each supported language.
Resource files contain the following information for each item:
- Name specifies the key used to access the text in code.
- Value specifies the translated text.
- Comment is an optional field containing additional information.
A resource file can be added with the Add New Item dialog in Visual Studio:
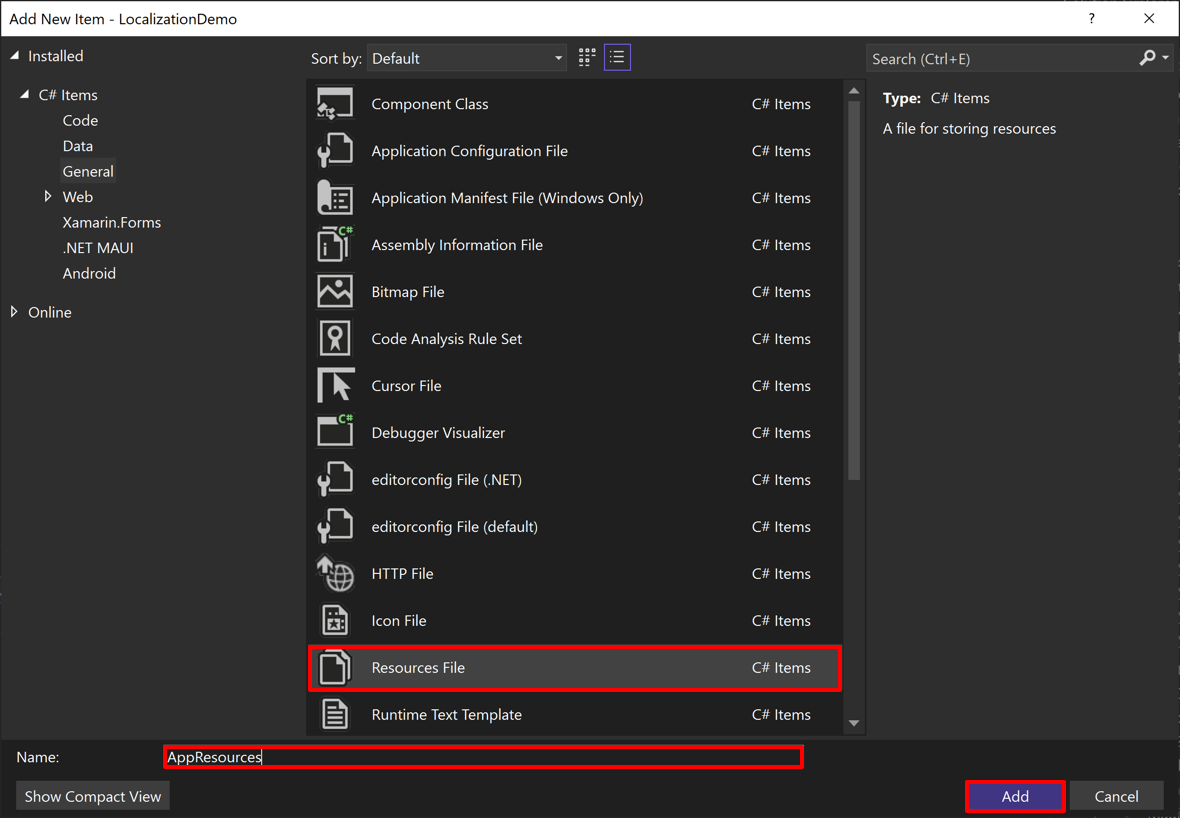
Once the file is added, rows can be added for each text resource:
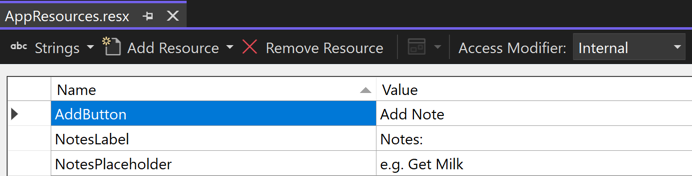
The Access Modifier drop-down determines how Visual Studio generates the class used to access resources. Setting the Access Modifier to Public or Internal results in a generated class with the specified accessibility level. Setting the Access Modifier to No code generation doesn't generate a class file. The default resource file should be configured to generate a class file, which results in a file with the .Designer.cs extension being added to the project.
Once the default resource file is created, additional files can be created for each locale the app supports. Each additional resource file should have the same root filename as the default resource file, but should also include the language and optional culture in the filename. For example, if you add a resource file named AppResources.resx, you might also create resource files named AppResources.en-US.resx and AppResources.fr-FR.resx to hold localized resources for the English (United States) and French (France) cultures, respectively. In addition, you should set the Access Modifier for each additional resource file to No code generation.
At runtime, your app attempts to resolve a resource request in order of specificity. For example, if the device culture is en-US the application looks for resource files in this order:
- AppResources.en-US.resx
- AppResources.en.resx
- AppResources.resx (default)
The following screenshot shows a Spanish translation file named AppResources.es.resx:
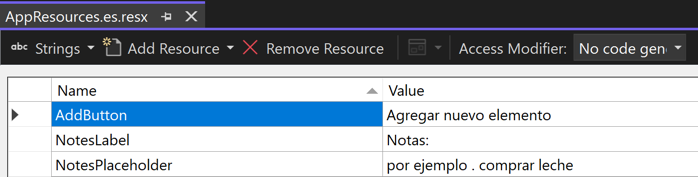
The localized resource file uses the same Name values specified in the default file but contains Spanish language strings in the Value column. Additionally, the Access Modifier is set to No code generation.
Specify the app's neutral language
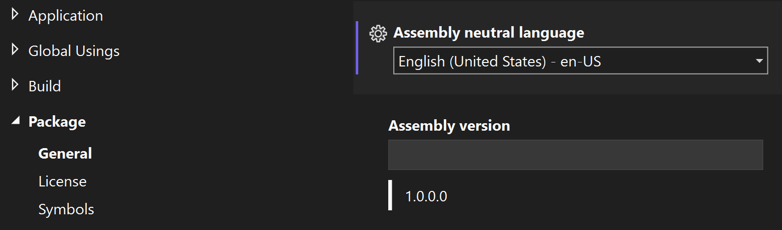
For .NET resource files to work correctly, the app must have a neutral language specified. This is the language whose resources are used if resources for a locale can't be found. To specify the neutral language:
In Solution Explorer, right-click your .NET MAUI app project and select Properties.
Select the Package > General property page and select the appropriate language and culture from the Assembly neutral language drop-down:
Save your changes.
Alternatively, add the <NeutralLanguage> element to the first <PropertyGroup> in your project file, and specify your chosen locale as its value:
<NeutralLanguage>en-US</NeutralLanguage>
Warning
If you don'y specify a neutral language, the ResourceManager class returns null values for any languages without a resource file. When a neutral language is specified, the ResourceManager class returns results from the neutral language resource file for unsupported languages. Therefore, it's recommended that you always specify a neutral language so that text is displayed for unsupported languages.
Perform platform setup
Additional setup is required on iOS, Mac Catalyst, and Windows, so that all .NET MAUI controls are localized.
iOS and Mac Catalyst
On iOS and Mac Catalyst, you must declare all supported languages in the platform's Info.plist file in your .NET MAUI app project. To do this, open the Info.plist file for your chosen platform in an XML editor and create an array for the CFBundleLocalizations key. Then provide array values that correspond to the resource files. In addition, ensure you set an expected language via the CFBundleDevelopmentRegion key:
<key>CFBundleLocalizations</key>
<array>
    <string>de</string>
    <string>es</string>
    <string>fr</string>
    <string>ja</string>
    <string>pt</string> <!-- Brazil -->
    <string>pt-PT</string> <!-- Portugal -->
    <string>ru</string>
    <string>zh-Hans</string>
    <string>zh-Hant</string>
</array>
<key>CFBundleDevelopmentRegion</key>
<string>en</string>
Alternatively, in Solution Explorer in Visual Studio, open the Info.plist file for your chosen platform in the Generic PList Editor. Then, create an array for the CFBundleLocalizations key and provide array values that correspond to the resource files. In addition, ensure you set an expected language via the CFBundleDevelopmentRegion key:
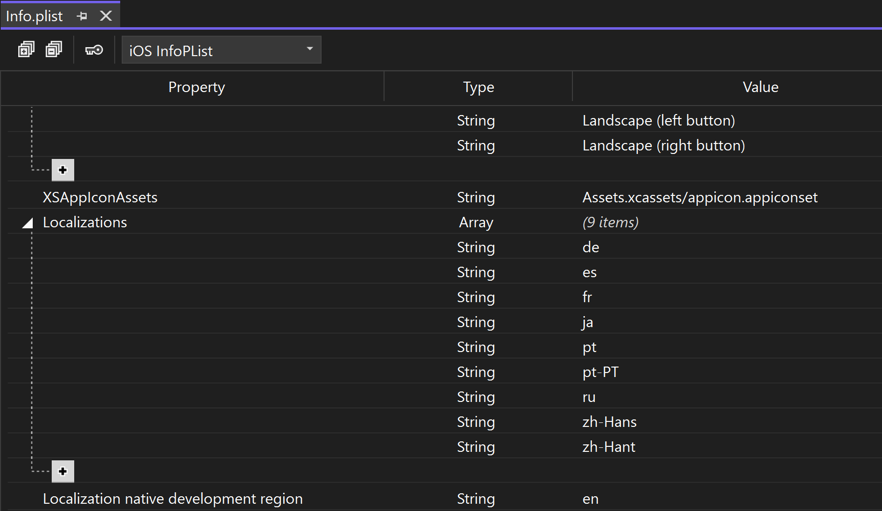
For more information about the Info.plist file, see Information property list.
Windows
To support multiple languages in a .NET MAUI app on Windows, you must declare each supported language in the Platforms\Windows\Package.appxmanifest file of your .NET MAUI app project:
Open the Package.appxmanifest file in a text editor and locate the following section:
<Resources>
    <Resource Language="x-generate"/>
</Resources>
Replace
<Resource Language="x-generate">with<Resource />elements for each of your supported languages:<Resources> <Resource Language="en-US"/> <Resource Language="de-DE"/> <Resource Language="es-ES"/> <Resource Language="fr-FR"/> <Resource Language="ja-JP"/> <Resource Language="pt-BR"/> <Resource Language="pt-PT"/> <Resource Language="ru-RU"/> <Resource Language="zh-CN"/> <Resource Language="zh-TW"/> </Resources>Save your changes.
Localize text
Text is localized using a class generated from your default resources file. The class is named based on the default resource filename. Given a default resource filename of AppResources.resx, Visual Studio generates a matching class named AppResources containing static properties for each entry in the resource file.
In XAML, localized text can be retrieved by using the x:Static markup extension to access the generated static properties:
<ContentPage ...
             xmlns:strings="clr-namespace:LocalizationDemo.Resources.Strings">
    <VerticalStackLayout>
        <Label Text="{x:Static strings:AppResources.NotesLabel}" />
        <Entry Placeholder="{x:Static strings:AppResources.NotesPlaceholder}" />
        <Button Text="{x:Static strings:AppResources.AddButton}" />
    </VerticalStackLayout>
</ContentPage>
For more information about the x:Static markup extension, see x:Static markup extension.
Localized text can also be retrieved in code:
Label notesLabel = new Label();
notesLabel.Text = AppResources.NotesLabel,

Entry notesEntry = new Entry();
notesEntry.Placeholder = AppResources.NotesPlaceholder,

Button addButton = new Button();
addButton.Text = AppResources.AddButton,
The properties in the AppResources class use the CurrentUICulture property value to determine which resource file to retrieve values from.
Localize images
In addition to storing text, resource files can also store images and binary data. However, devices have a range of screen sizes and densities and each platform has functionality for displaying density-dependent images. Therefore, platform functionality should be used for localizing images instead of storing them in resource files.
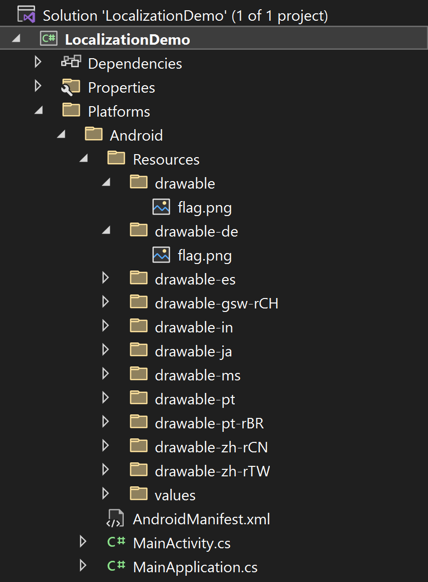
Android
On Android, localized images, known as drawables, are stored using a folder-based naming convention in the Platforms\Android\Resources folder. Folders should be named drawable with a suffix for the language and culture. For example, the Spanish-language folder is named drawable-es. The folder name drawable should contain the images for your default language and culture. The build action of each image should be set to AndroidResource.
Note
Rather than set individual files to the AndroidResource build action, the contents of a specific folder can be set to this build action by adding the following XML to your app's project (.csproj) file:
<ItemGroup Condition="$(TargetFramework.Contains('-android'))">
  <AndroidResource Include="Platforms\Android\Resources\**" TargetPath="%(RecursiveDir)%(Filename)%(Extension)" />
</ItemGroup>
This example sets any content in the Platforms\Android\Resources folder, including content in sub-folders, to the AndroidResource build action. It also sets the output path for each file with this build action.
Only two characters are required in the folder name when specifying a top-level language, such as es. However, when specifying a full locale, the folder name format requires a dash and lowercase r to separate the language from the culture. For example, the Mexico locale (es-MX) folder should be named drawable-es-rMX. The image file names in each locale folder should be identical:
iOS
On iOS, localized images are stored using a folder-based naming convention in the Platforms\iOS\Resources folder. Folders should be named with the language, and optional culture, followed by .lproj. For example, the Spanish-language folder is named es.lproj. The build action of each image should be set to BundleResource.
Note
Rather than set individual files to the BundleResource build action, the contents of a specific folder can be set to this build action by adding the following XML to your app's project (.csproj) file:
<ItemGroup Condition="$(TargetFramework.Contains('-ios'))">
  <BundleResource Include="Platforms\iOS\Resources\**" TargetPath="%(RecursiveDir)%(Filename)%(Extension)" />
</ItemGroup>
This example sets any content in the Platforms\iOS\Resources folder, including content in sub-folders, to the BundleResource build action. It also sets the output path for each file with this build action.
Only two characters are required in the folder name when specifying a top-level language, such as es. However, when specifying a full locale, the folder name format requires a dash to separate the language from the culture. For example, the Mexico locale (es-MX) folder should be named es-MX.lproj. The image file names in each locale folder should be identical:
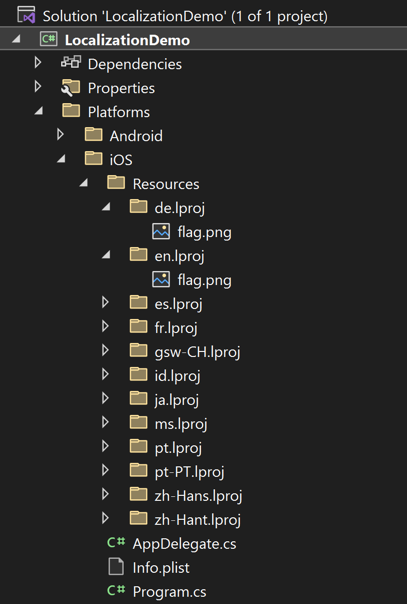
In addition, in your project file you must set the IPhoneResourcePrefix build property to the folder that contains the localized image folders:
<PropertyGroup Condition="$(TargetFramework.Contains('-ios'))">
  <IPhoneResourcePrefix>Platforms/iOS/Resources</IPhoneResourcePrefix>
</PropertyGroup>
If an image isn't present for a particular language, iOS falls back to the default native language folder and loads the image from there.
Mac Catalyst
On Mac Catalyst, localized images are stored using a folder-based naming convention in the Platforms\MacCatalyst\Resources folder. Folders should be named with the language, and optional culture, followed by .lproj. For example, the Spanish-language folder is named es.lproj. The build action of each image should be set to BundleResource.
Note
Rather than set individual files to the BundleResource build action, the contents of a specific folder can be set to this build action by adding the following XML to your app's project (.csproj) file:
<ItemGroup Condition="$(TargetFramework.Contains('-maccatalyst'))">
  <BundleResource Include="Platforms\MacCatalyst\Resources\**" TargetPath="%(RecursiveDir)%(Filename)%(Extension)" />
</ItemGroup>
This example sets any content in the Platforms\MacCatalyst\Resources folder, including content in sub-folders, to the BundleResource build action. It also sets the output path for each file with this build action.
Only two characters are required in the folder name when specifying a top-level language, such as es. However, when specifying a full locale, the folder name format requires a dash to separate the language from the culture. For example, the Mexico locale (es-MX) folder should be named es-MX.lproj. The image file names in each locale folder should be identical:
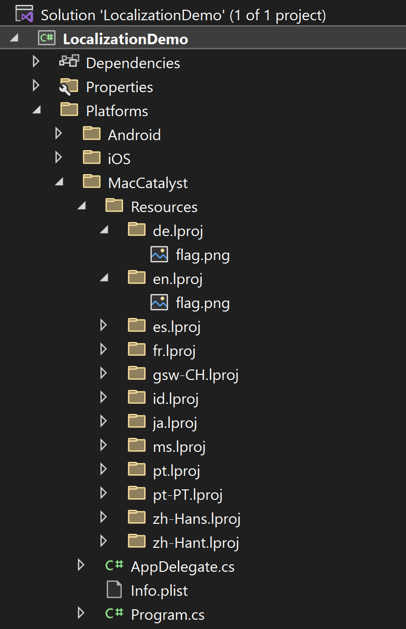
In addition, in your project file you must set the IPhoneResourcePrefix build property to the folder that contains the localized image folders:
<PropertyGroup Condition="$(TargetFramework.Contains('-maccatalyst'))">
  <IPhoneResourcePrefix>Platforms/MacCatalyst/Resources</IPhoneResourcePrefix>
</PropertyGroup>
If an image isn't present for a particular language, Mac Catalyst falls back to the default native language folder and loads the image from there.
Windows
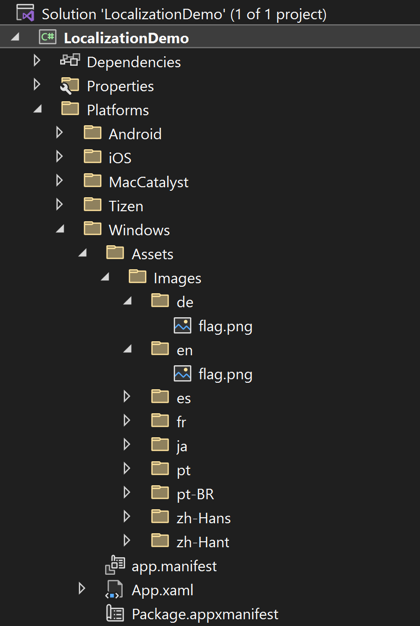
On Windows, localized images are stored using a folder-based naming convention in the Platforms\Windows\Assets\Images folder. Folders should be named with the language, and optional culture. For example, the Spanish-language folder is named es and the Mexico locale folder should be named es-MX. The build action of each image should be set to Content.
Note
Rather than set individual files to the Content build action, the contents of a specific folder can be set to this build action by adding the following XML to your app's project (.csproj) file:
<ItemGroup Condition="$(TargetFramework.Contains('-windows'))">
  <Content Include="Platforms\Windows\Assets\Images\**" TargetPath="%(RecursiveDir)%(Filename)%(Extension)" />
</ItemGroup>
This example sets any content in the Platforms\Windows\Assets\Images folder, including content in sub-folders, to the Content build action. It also sets the output path for each file with this build action.
Only two characters are required in the folder name when specifying a top-level language, such as es. However, when specifying a full locale, the folder name format requires a dash to separate the language from the culture. For example, the Mexico locale (es-MX) folder should be named es-MX. The image file names in each locale folder should be identical:
Consume localized images
On Android, iOS, Mac Catalyst, and Windows, localized images can be consumed by setting the Source property of an Image to the image filename:
<Image Source="flag.png" />
However, for this to work on Windows it's necessary to modify your app's project file if you've added a <Content /> MSBuild item for each localized image. This can be accomplished by modifying your .csproj file to remove the <Content /> MSBuild item for each image. Then, add the following MSBuild item:
<ItemGroup Condition="$(TargetFramework.Contains('-windows'))">
  <Content Include="Platforms\Windows\Assets\Images\**" TargetPath="%(RecursiveDir)%(Filename)%(Extension)" />
</ItemGroup>
This ensures that all images in the subfolders of the Platforms\Windows\Assets\Images folder are copied to the root of your app package.
Localize the app name
Platform functionality is required for localizing the app's name.
Android
On Android, the localized app name can be stored using a folder-based naming convention in the Platforms\Android\Resources folder. Folders should be named values with a suffix for the language and culture. For example, the Spanish-language folder is named values-es. Add a Strings.xml file with a build action of AndroidResource to each folder that sets a string to the localized app name.
Note
Rather than set individual files to the AndroidResource build action, the contents of a specific folder can be set to this build action by adding the following XML to your app's project (.csproj) file:
<ItemGroup Condition="$(TargetFramework.Contains('-android'))">
  <AndroidResource Include="Platforms\Android\Resources\**" TargetPath="%(RecursiveDir)%(Filename)%(Extension)" />
</ItemGroup>
This example sets any content in the Platforms\Android\Resources folder, including content in sub-folders, to the AndroidResource build action. It also sets the output path for each file with this build action.
Only two characters are required in the folder name when specifying a top-level language, such as es. However, when specifying a full locale, the folder name format requires a dash and lowercase r to separate the language from the culture. For example, the Mexico locale (es-MX) folder should be named values-es-rMX.
Each translatable string is an XML element with the resource ID specified as the name attribute and the translated string as the value. You need to escape your string according to normal XML rules, and the name must be a valid Android resource ID (no spaces or dashes).
Therefore, to localize the app name create a Strings.xml file and add a <string> element as the child of a <resources> element. Then, set its name attribute to a suitable ID with the translated string as the value:
<resources>
    <!-- French -->
    <string name="app_name">Maison</string>
</resources>
Then, to use the localized app name in your app add the Label property to the Activity in your app's MainActivity class, and set its value to @string/id:
[Activity(Label = "@string/app_name", Theme = "@style/Maui.SplashTheme", MainLauncher = true, ConfigurationChanges = ConfigChanges.ScreenSize | ConfigChanges.Orientation | ConfigChanges.UiMode | ConfigChanges.ScreenLayout | ConfigChanges.SmallestScreenSize | ConfigChanges.Density)]
public class MainActivity : MauiAppCompatActivity
{
    protected override void OnCreate(Bundle savedInstanceState)
    {
        base.OnCreate(savedInstanceState);
    }
}
iOS
On iOS, the localized app name is stored using a folder-based naming convention in the Platforms\iOS\Resources folder. Folders should be named with the language, and optional culture, followed by .lproj. For example, the Spanish-language folder is named es.lproj. Add a InfoPlist.strings file with a build action of BundleResource to each folder that sets the CFBundleDisplayName key and value.
Note
Rather than set individual files to the BundleResource build action, the contents of a specific folder can be set to this build action by adding the following XML to your app's project (.csproj) file:
<ItemGroup Condition="$(TargetFramework.Contains('-ios'))">
  <BundleResource Include="Platforms\iOS\Resources\**" TargetPath="%(RecursiveDir)%(Filename)%(Extension)" />
</ItemGroup>
This example sets any content in the Platforms\iOS\Resources folder, including content in sub-folders, to the BundleResource build action. It also sets the output path for each file with this build action.
The syntax for localized string values is:
/* comment */
"key"="localized-value";
You should escape the following characters in strings:
\"quote\\backslash\nnewline
Therefore, to localize the app name create a InfoPlist.strings file and add a value for the CFBundleDisplayName key to the file:
/* French */
CFBundleDisplayName="Maisons";
Other keys that you can use to localize app-specific strings are:
CFBundleName- specifies the short name of the app bundle, which might be displayed to users in situations such as the absence of a value forCFBundleDisplayName.CFBundleShortVersionString- specifies the release version number of the app bundle.NSHumanReadableCopyright- the copyright notice for the app bundle.
In addition, in your project file you must set the IPhoneResourcePrefix build property to the folder that contains the localized folders:
<PropertyGroup Condition="$(TargetFramework.Contains('-ios'))">
  <IPhoneResourcePrefix>Platforms/iOS/Resources</IPhoneResourcePrefix>
</PropertyGroup>
Mac Catalyst
On Mac Catalyst, the localized app name is stored using a folder-based naming convention in the Platforms\MacCatalyst\Resources folder. Folders should be named with the language, and optional culture, followed by .lproj. For example, the Spanish-language folder is named es.lproj. Add a InfoPlist.strings file with a build action of BundleResource to each folder that sets the CFBundleDisplayName key and value.
Note
Rather than set individual files to the BundleResource build action, the contents of a specific folder can be set to this build action by adding the following XML to your app's project (.csproj) file:
<ItemGroup Condition="$(TargetFramework.Contains('-maccatalyst'))">
  <BundleResource Include="Platforms\MacCatalyst\Resources\**" TargetPath="%(RecursiveDir)%(Filename)%(Extension)" />
</ItemGroup>
This example sets any content in the Platforms\MacCatalyst\Resources folder, including content in sub-folders, to the BundleResource build action. It also sets the output path for each file with this build action.
The syntax for localized string values is:
/* comment */
"key"="localized-value";
You should escape the following characters in strings:
\"quote\\backslash\nnewline
Therefore, to localize the app name create a InfoPlist.strings file and add a value for the CFBundleDisplayName key to the file:
/* French */
CFBundleDisplayName="Maisons";
Other keys that you can use to localize app-specific strings are:
CFBundleName- specifics the short name of the app bundle, which might be displayed to users in situations such as the absence of a value forCFBundleDisplayName.CFBundleShortVersionString- specifies the release version number of the app bundle.NSHumanReadableCopyright- the copyright notice for the app bundle.
In addition, in your project file you must set the IPhoneResourcePrefix build property to the folder that contains the localized folders:
<PropertyGroup Condition="$(TargetFramework.Contains('-maccatalyst'))">
  <IPhoneResourcePrefix>Platforms/MacCatalyst/Resources</IPhoneResourcePrefix>
</PropertyGroup>
Windows
On Windows, the app name is defined in your app package manifest. Localizing the app name requires you to first specify the default language for the app, and then create a string resource file for each locale you intend to support. The string resource that represents the localized app name can then be consumed in your app package manifest by using the ms-resource URI scheme.
For more information about localizing strings in your app package manifest, see Localize strings in your UI and app package manifest.
Specify the default language
To localize an app name, your Windows app must first have a default language specified. This is the language whose resources are used if no localized resources for a particular language can be found. To specify the default language:
In Solution Explorer, open the Packageappxmanifest file in the package manifest editor.
In the package manifest editor, on the Application tab, set the Default language field to your chosen default language:
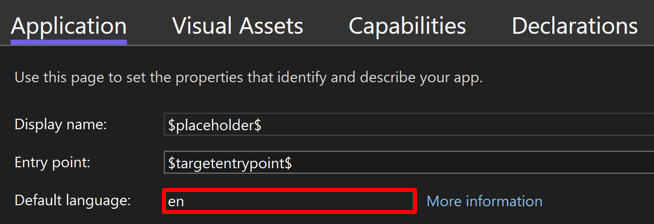
Save your changes.
At a minimum, you need to provide a string resource for the app name for the default language. This is the resource that is loaded if no better match can be found for the user's preferred language or display language settings.
Create Windows resource files
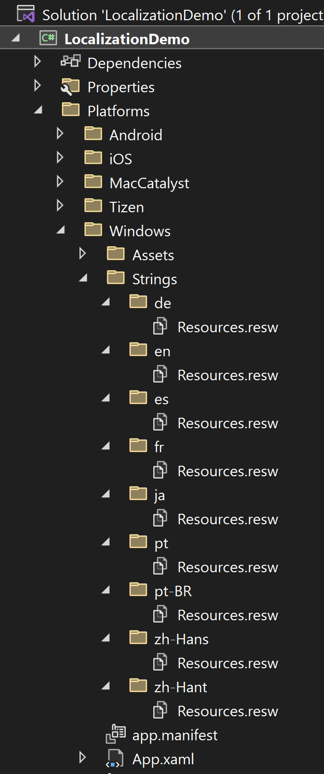
On Windows, the localized app name should be stored in a Windows resource file for each locale. A Windows resource file is an XML file with a .resw extension that's compiled into a binary format and stored in a .pri file. The .resw file for each locale should be named Resources.resw and stored using a folder-based naming convention in the Platforms\Windows\Strings folder. Folders should be named with the language, and optional culture. For example, the Spanish-language folder is named es and the Mexico locale folder should be named es-MX.
There's currently no Visual Studio item template for creating a Windows resource file in a .NET MAUI app. Therefore, to create a Windows resource file for each locale:
In the Platforms\Windows folder of your .NET MAUI app project, create a Strings folder.
In the Strings folder, create a folder for each locale.
In the folder for each locale, create a file named Resources.resw that contains the following XML:
<?xml version="1.0" encoding="utf-8"?>
<root>
  <!--
    Microsoft ResX Schema

    Version 2.0

    The primary goals of this format is to allow a simple XML format
    that is mostly human readable. The generation and parsing of the
    various data types are done through the TypeConverter classes
    associated with the data types.

    Example:

    ... ado.net/XML headers & schema ...
    <resheader name="resmimetype">text/microsoft-resx</resheader>
    <resheader name="version">2.0</resheader>
    <resheader name="reader">System.Resources.ResXResourceReader, System.Windows.Forms, ...</resheader>
    <resheader name="writer">System.Resources.ResXResourceWriter, System.Windows.Forms, ...</resheader>
    <data name="Name1"><value>this is my long string</value><comment>this is a comment</comment></data>
    <data name="Color1" type="System.Drawing.Color, System.Drawing">Blue</data>
    <data name="Bitmap1" mimetype="application/x-microsoft.net.object.binary.base64">
        <value>[base64 mime encoded serialized .NET Framework object]</value>
    </data>
    <data name="Icon1" type="System.Drawing.Icon, System.Drawing" mimetype="application/x-microsoft.net.object.bytearray.base64">
        <value>[base64 mime encoded string representing a byte array form of the .NET Framework object]</value>
        <comment>This is a comment</comment>
    </data>

    There are any number of "resheader" rows that contain simple
    name/value pairs.

    Each data row contains a name, and value. The row also contains a
    type or mimetype. Type corresponds to a .NET class that support
    text/value conversion through the TypeConverter architecture.
    Classes that don't support this are serialized and stored with the
    mimetype set.

    The mimetype is used for serialized objects, and tells the
    ResXResourceReader how to depersist the object. This is currently not
    extensible. For a given mimetype the value must be set accordingly:

    Note - application/x-microsoft.net.object.binary.base64 is the format
    that the ResXResourceWriter will generate, however the reader can
    read any of the formats listed below.

    mimetype: application/x-microsoft.net.object.binary.base64
    value   : The object must be serialized with
            : System.Runtime.Serialization.Formatters.Binary.BinaryFormatter
            : and then encoded with base64 encoding.

    mimetype: application/x-microsoft.net.object.soap.base64
    value   : The object must be serialized with
            : System.Runtime.Serialization.Formatters.Soap.SoapFormatter
            : and then encoded with base64 encoding.

    mimetype: application/x-microsoft.net.object.bytearray.base64
    value   : The object must be serialized into a byte array
            : using a System.ComponentModel.TypeConverter
            : and then encoded with base64 encoding.
    -->
  <xsd:schema id="root" xmlns="" xmlns:xsd="http://www.w3.org/2001/XMLSchema" xmlns:msdata="urn:schemas-microsoft-com:xml-msdata">
    <xsd:import namespace="http://www.w3.org/XML/1998/namespace" />
    <xsd:element name="root" msdata:IsDataSet="true">
      <xsd:complexType>
        <xsd:choice maxOccurs="unbounded">
          <xsd:element name="metadata">
            <xsd:complexType>
              <xsd:sequence>
                <xsd:element name="value" type="xsd:string" minOccurs="0" />
              </xsd:sequence>
              <xsd:attribute name="name" use="required" type="xsd:string" />
              <xsd:attribute name="type" type="xsd:string" />
              <xsd:attribute name="mimetype" type="xsd:string" />
              <xsd:attribute ref="xml:space" />
            </xsd:complexType>
          </xsd:element>
          <xsd:element name="assembly">
            <xsd:complexType>
              <xsd:attribute name="alias" type="xsd:string" />
              <xsd:attribute name="name" type="xsd:string" />
            </xsd:complexType>
          </xsd:element>
          <xsd:element name="data">
            <xsd:complexType>
              <xsd:sequence>
                <xsd:element name="value" type="xsd:string" minOccurs="0" msdata:Ordinal="1" />
                <xsd:element name="comment" type="xsd:string" minOccurs="0" msdata:Ordinal="2" />
              </xsd:sequence>
              <xsd:attribute name="name" type="xsd:string" use="required" msdata:Ordinal="1" />
              <xsd:attribute name="type" type="xsd:string" msdata:Ordinal="3" />
              <xsd:attribute name="mimetype" type="xsd:string" msdata:Ordinal="4" />
              <xsd:attribute ref="xml:space" />
            </xsd:complexType>
          </xsd:element>
          <xsd:element name="resheader">
            <xsd:complexType>
              <xsd:sequence>
                <xsd:element name="value" type="xsd:string" minOccurs="0" msdata:Ordinal="1" />
              </xsd:sequence>
              <xsd:attribute name="name" type="xsd:string" use="required" />
            </xsd:complexType>
          </xsd:element>
        </xsd:choice>
      </xsd:complexType>
    </xsd:element>
  </xsd:schema>
  <resheader name="resmimetype">
    <value>text/microsoft-resx</value>
  </resheader>
  <resheader name="version">
    <value>2.0</value>
  </resheader>
  <resheader name="reader">
    <value>System.Resources.ResXResourceReader, System.Windows.Forms, Version=4.0.0.0, Culture=neutral, PublicKeyToken=b77a5c561934e089</value>
  </resheader>
  <resheader name="writer">
    <value>System.Resources.ResXResourceWriter, System.Windows.Forms, Version=4.0.0.0, Culture=neutral, PublicKeyToken=b77a5c561934e089</value>
  </resheader>
</root>
Note
Windows resource files use a build action of
PRIResource. This build action doesn't need setting on each .resw file in a .NET MAUI app, because it's implicitly applied.Open each Resources.resw file and add a string resource that represents the app's name:

Note
Resource identifiers are case insensitive, and must be unique per resource file.
Save each Windows resource file.
An example of the required folder and file structure is shown in the following screenshot:
Consume the localized app name
The string resource that represents the localized app name can be consumed by using the ms-resource URI scheme:
In Solution Explorer, open the Packageappxmanifest file in the package manifest editor.
In the package manifest editor, on the Application tab, set the Display name field to
ms-resource:followed by the name of the string resource that identifies your app name: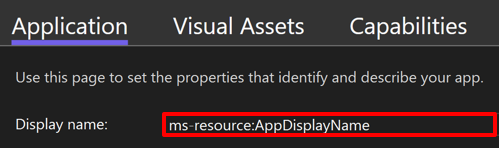
Save your changes.
Important
If your .resw files are stored in a different assembly to your .NET MAUI app project, you'll have to specify a fully qualified path to your resource name. This uses the format ms-resource:Assembly/ResourceFilename/Resource.
Right-to-left localization
Flow direction, or layout direction, is the direction in which the UI elements on the page are scanned by the eye. Some languages, such as Arabic and Hebrew, require that UI elements are laid out in a right-to-left flow direction. .NET MAUI apps automatically respect the device's flow direction based on the selected language and region. For information about how to retrieve the flow direction of the device, based on its locale, see Get the layout direction.
To override the flow direction of an app, set the Window.FlowDirection property. Alternatively, set the VisualElement.FlowDirection property on a per element basis. These properties get or set the direction in which UI elements flow within any parent element that controls their layout, and should be set to one of the FlowDirection enumeration values:
LeftToRightRightToLeftMatchParent
Setting the FlowDirection property to RightToLeft on an element sets the alignment to the right, the reading order to right-to-left, and the layout of the control to flow from right-to-left.
Warning
Changing the FlowDirection property at runtime causes an expensive layout process that will affect performance.
The default FlowDirection property value for an element is MatchParent. Therefore, an element inherits the FlowDirection property value from its parent in the visual tree, and any element can override the value it gets from its parent.
Tip
If you do need to change the flow direction, set the FlowDirection property on a window, page or root layout. This causes all of the elements contained within the app, page, or root layout, to respond appropriately to the flow direction.
Platform setup
Specific platform setup is required to enable right-to-left locales.
Android
Apps created using the .NET MAUI app project template automatically include support for right-to-left locales. This support is enabled by the android:supportsRtl attribute being set to true on the <application> node in the app's AndroidManifest.xml file:
<?xml version="1.0" encoding="utf-8"?>
<manifest xmlns:android="http://schemas.android.com/apk/res/android">
    <application ... android:supportsRtl="true" />
    ...
</manifest>
Right-to-left localization can then be tested by changing the device or emulator to use the right-to-left language. Alternatively, if you've activated developer options in the Settings app, you can enable Force RTL layout direction in Settings > Developer Options. For information on configuring developer options, see Configure on-device developer options on developer.android.com.
iOS and Mac Catalyst
The required right-to-left locale should be added as a supported language to the array items for the CFBundleLocalizations key in Info.plist. The following example shows Arabic having been added to the array for the CFBundleLocalizations key:
<key>CFBundleLocalizations</key>
<array>
    <string>en</string>
    <string>ar</string>
</array>
Right-to-left localization can then be tested by changing the language and region on the device or simulator to a right-to-left locale that was specified in Info.plist.
Windows
The required language resources should be specified in the <Resources> node of the Package.appxmanifest file. Replace <Resource Language="x-generate"> with <Resource /> elements for each of your supported languages. For example, the following markup specifies that "en" and "ar" localized resources are available:
<Resources>
    <Resource Language="en" />
    <Resource Language="ar" />
</Resources>
Right-to-left localization can then be tested by changing the language and region on the device to the appropriate right-to-left locale.
Test localization
At runtime, your app loads the appropriate localized resources on a per-thread basis, based on the culture specified by the CurrentUICulture property.
Testing localization is best accomplished by changing your device language in the Settings app on each device.
Warning
While it's possible to set the value of CurrentUICulture in code, the resulting behavior is inconsistent across platforms so this isn't recommended for testing.
.NET MAUI
คำติชม
เร็วๆ นี้: ตลอดปี 2024 เราจะขจัดปัญหา GitHub เพื่อเป็นกลไกคำติชมสำหรับเนื้อหา และแทนที่ด้วยระบบคำติชมใหม่ สำหรับข้อมูลเพิ่มเติม ให้ดู: https://aka.ms/ContentUserFeedback
ส่งและดูข้อคิดเห็นสำหรับ