Create a profile with custom settings in Intune
Microsoft Intune includes many built-in settings to control different features on a device. If there are device settings and features that aren't built in to Intune, then you can create custom profiles. Custom profiles are created similar to built-in profiles.
This feature applies to:
- Android device administrator
- Android Enterprise personally owned devices with a work profile
- iOS/iPadOS
- macOS
- Windows 10/11
Important
Microsoft Intune is ending support for Android device administrator management on devices with access to Google Mobile Services (GMS) on December 31, 2024. After that date, device enrollment, technical support, bug fixes, and security fixes will be unavailable. If you currently use device administrator management, we recommend switching to another Android management option in Intune before support ends. For more information, see Ending support for Android device administrator on GMS devices.
Custom settings are configured differently for each platform. For example, to control features on Android and Windows devices, you enter Open Mobile Alliance Uniform Resource Identifier (OMA-URI) values. For Apple devices, you import a file you created with the Apple Configurator or Apple Profile Manager.
For an overview of device configuration profiles, go to What are Microsoft Intune device profiles?.
This article shows you how to create a custom device configuration profile in Intune. You can also see all the available settings for the different platforms.
Create the profile
Sign in to the Microsoft Intune admin center.
Select Devices > Manage devices > Configuration > Create > New policy.
Enter the following properties:
Platform: Choose the platform of your devices. Your options:
- Android device administrator
- Android Enterprise
- iOS/iPadOS
- macOS
- Windows 10 and later
Profile type: Select Custom. Or, select Templates > Custom.
Select Create.
In Basics, enter the following properties:
- Name: Enter a descriptive name for the policy. Name your policies so you can easily identify them later. For example, a good policy name is Windows: AllowVPNOverCellular custom OMA-URI.
- Description: Enter a description for the policy. This setting is optional, but recommended.
Select Next.
In Configuration settings, depending on the platform you chose, the settings you can configure are different. Choose your platform for detailed settings:
Select Next.
In Scope tags (optional), assign a tag to filter the profile to specific IT groups, such as
US-NC IT TeamorJohnGlenn_ITDepartment. For more information about scope tags, go to Use RBAC and scope tags for distributed IT.Select Next.
In Assignments, select the users or groups that will receive your profile. For more information on assigning profiles, go to Assign user and device profiles.
Select Next.
In Review + create, review your settings. When you select Create, your changes are saved, and the profile is assigned. The policy is also shown in the profiles list.
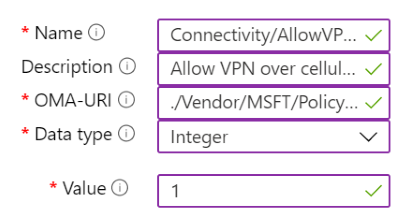
Example
In the following example, the Connectivity/AllowVPNOverCellular setting is enabled. This setting allows a Windows client device to open a VPN connection when on a cellular network.