หมายเหตุ
การเข้าถึงหน้านี้ต้องได้รับการอนุญาต คุณสามารถลอง ลงชื่อเข้าใช้หรือเปลี่ยนไดเรกทอรีได้
การเข้าถึงหน้านี้ต้องได้รับการอนุญาต คุณสามารถลองเปลี่ยนไดเรกทอรีได้
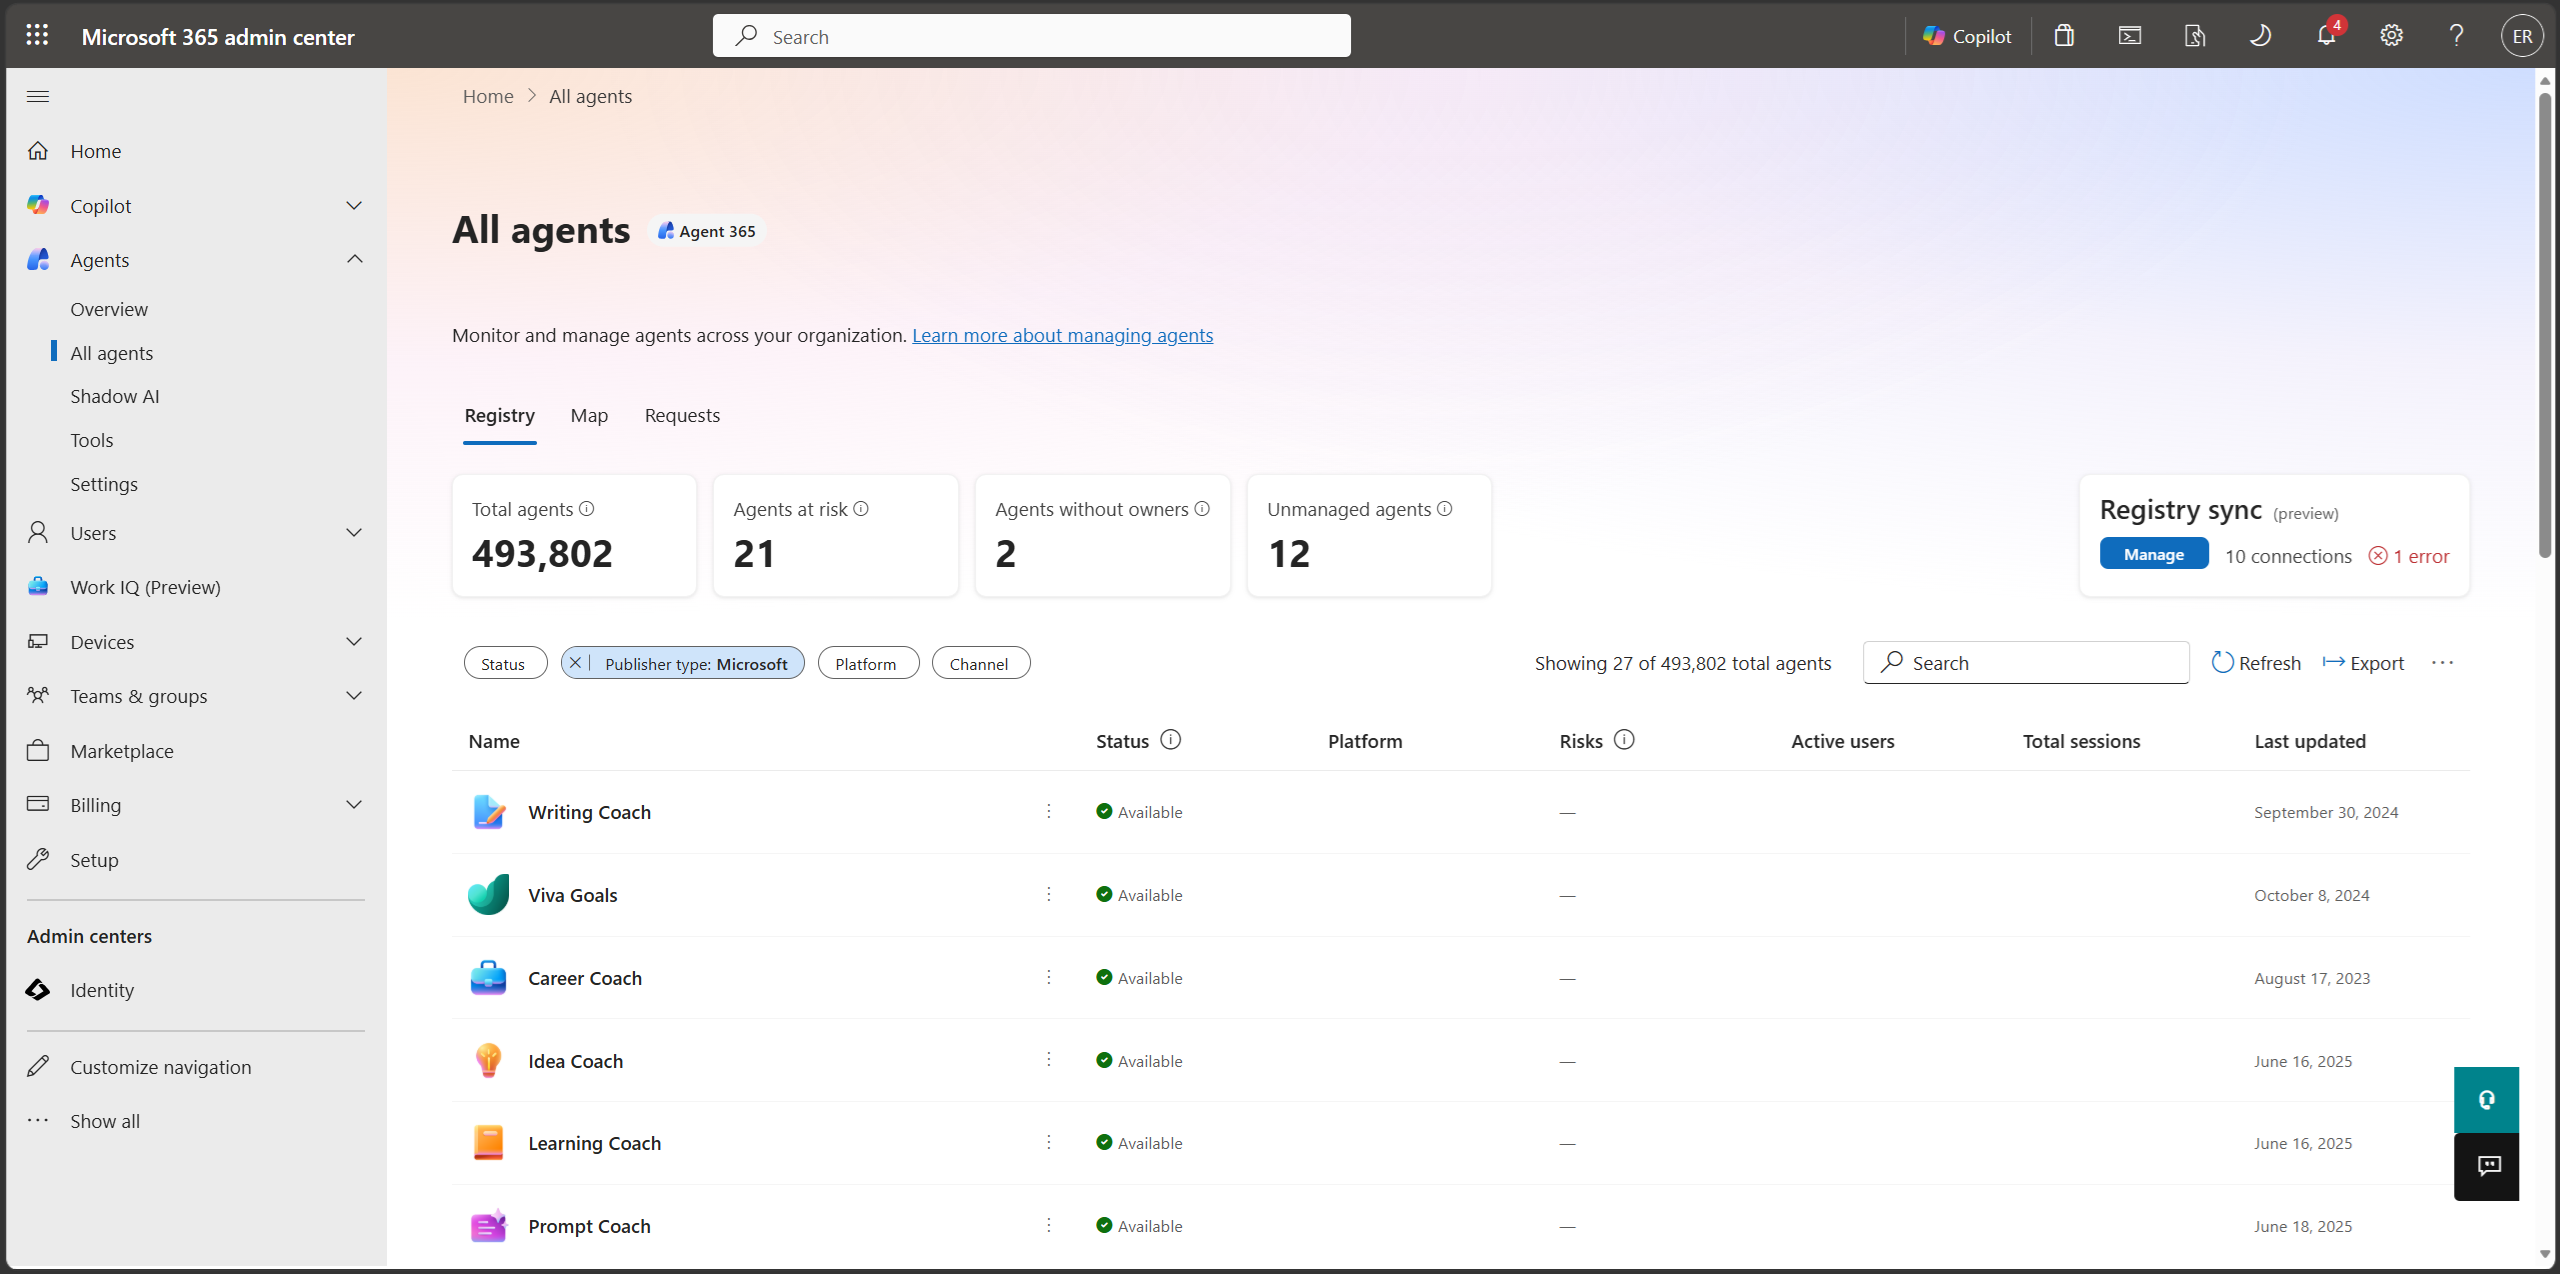
The agent registry in Microsoft 365 admin center provides a centralized view of all agents available for your organization. This list helps you monitor, manage, and govern agents for your organization.
View agent registry
Sign in to the Microsoft 365 admin center.
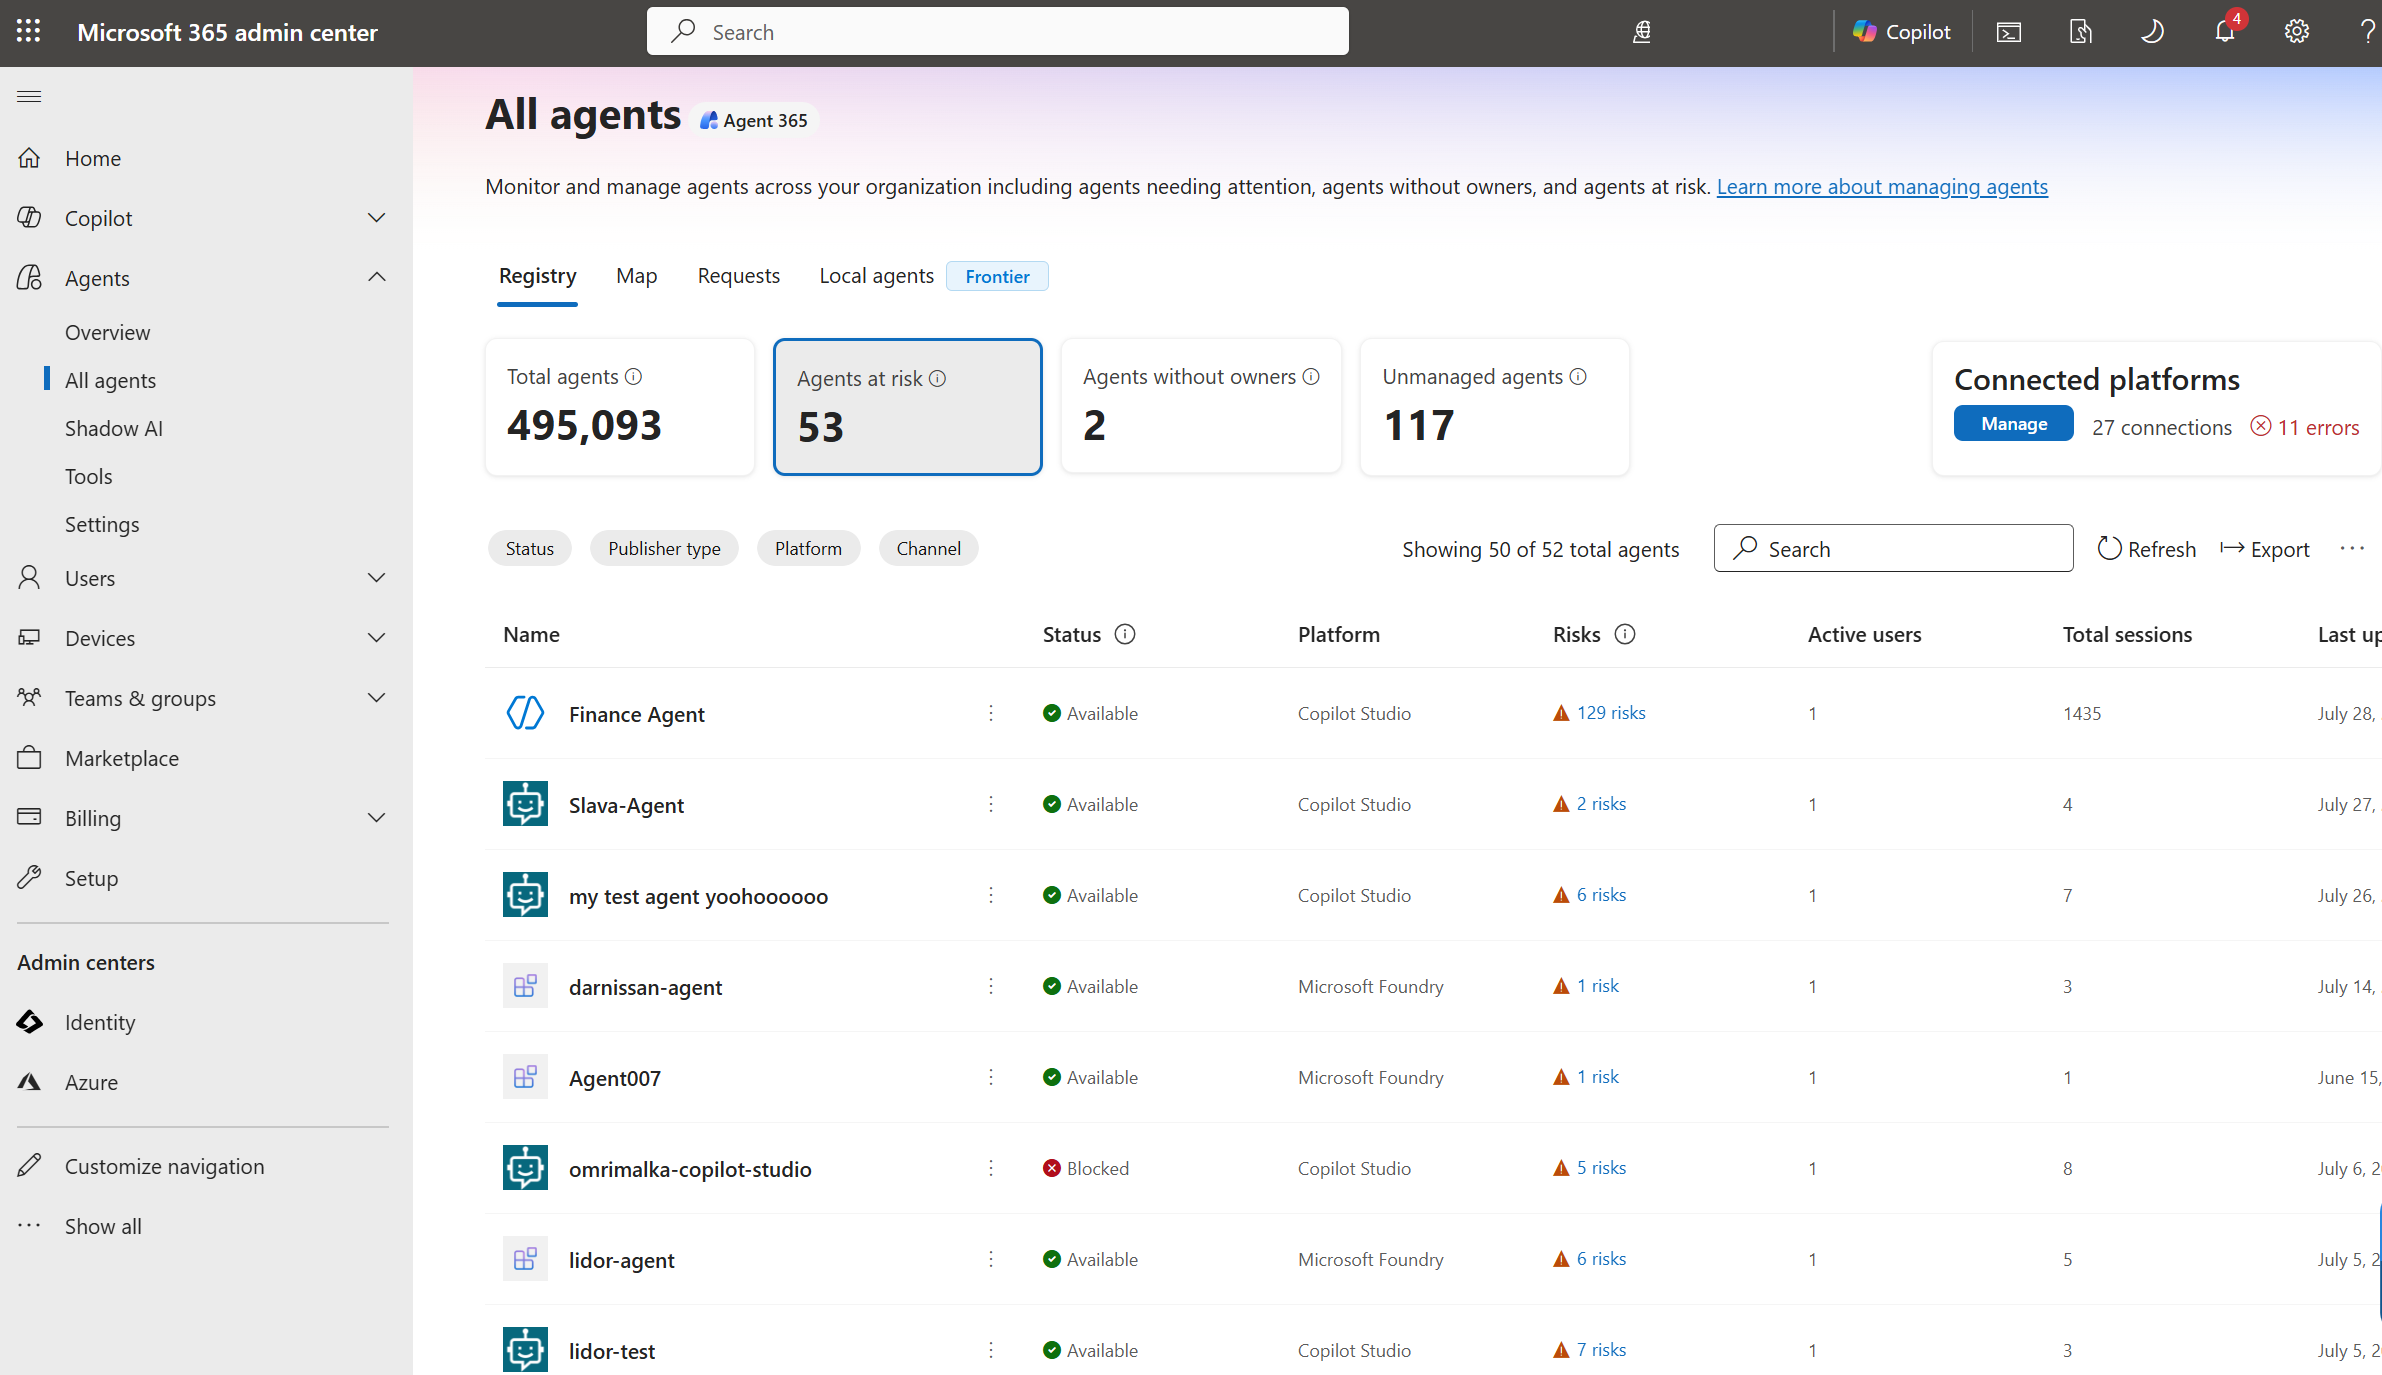
In the left navigation pane, select Agents > All Agents > Registry.
Agent types
The agent Registry lists all agents that are available to your organization. Agents are divided into four main types, as shown in the following table:
| Agent type | Description |
|---|---|
| Microsoft agents | Agents built and maintained by Microsoft. |
| External partner-built agents | Agents built by trusted non-Microsoft developers and published for broader or public availability. |
| Published by your org | Custom agents approved and published by your organization for broader use. These agents might be referred to as LOB (Line of Business) agents. |
| Shared by creator | Agents created and shared by individual users or developers at your organization. These agents are commonly referred to as Shared agents. |
Agent registry summary
The agent Registry provides quick details about the agents your organization has available, as shown in the following table:
| Tenant-wide agent details | Description |
|---|---|
| Total agents | The number of agents available in your organization's tenant. Note: Applying filters to the list of agents doesn't change the Total agents count. |
| Agents without owners | The number of agents that no longer have owners at your organization. |
| Unmanaged agents | The number of agents created or managed outside of Agent 365, without its risk protection and observability. |
Agent registry filters
The agent Registry can contain a large and diverse inventory of agents. As your organization's agent adoption increases, management of all your agents can be more involved and complex. In addition to sorting the list of agents by column, you can filter the list. Filtering this list helps you narrow the view to the agents that you want to focus on at the moment that allows you to:
- Be more efficient.
- Make focused decisions.
- Better apply your agent governance processes.
You can filter the agent list based on the following criteria:
- Status - You can filter the agent list based on status of the agent.
- Publisher Type - The publisher filter indicates who owns and distributes the agent, rather than where or how it was built. This filter is primarily used to distinguish between Microsoft agents, external partner-built agents, and internally owned agents published by your organization.
- Channel - The channel filter is the location where the agent is deployed. It's the surface through which members of your organization can discover and interact with the agent. Channel values include Copilot, Teams, Outlook, Microsoft 365 apps, and SharePoint.
- Platform - The platform filter indicates which platform or product was used to create the agent.
- Data source - The data source filter allows you to select Embedded knowledge and Fine-tuned models as data source options. Embedded knowledge refers to agents that include files that were uploaded by the agent maker or developer as knowledge sources. Fine-tuned models indicates that the agent was created using Microsoft Copilot Tuning, allowing the agent to tune LLMs with their own organization data.
Tip
If you don't see the agents that you expect to see in the agent registry list, check to make sure you don't have an existing filter set.
Certain columns allow you to sort the agent registry list. To sort the list, select the column title.
Applying filters to the list of agents will not change the Total agents count.
Agent registry actions
The agent Registry provides agent actions that relate specifically to your tenant's list of agents, as shown in the following table:
| Action | Description |
|---|---|
| Refresh | Updates the list to provide the most current view of the agent list. |
| Export | Exports agents to a CSV file. This action could take some time depending on the number of agents in the tenant. For more information, see Export to Excel. |
| Add agent | Provides a method to upload an agent manifest file (.zip). For more information, see Upload custom agent. |
| Manage pinned agents | Select which agents are pinned for the user. Pinned agents are more prominently displayed in each available channel where the agent is deployed. You can change the priority of pinned agents by moving them up and down in this list. If a user has more than three pinned agents, users don't see agents with lower priority. For more information, see Managed pinned agents. |
| Customize view | Customize how the columns that are displayed in the agent list. For more information, see Custom view. |
| Search | Use the search option to quickly find an agent in your agent Registry. |
Tip
In addition to the above actions, you can change the view of the list from Normal list to Compact list by selecting the list icon next to the Search box.
Agents without owners
Shared agents can become ownerless when you delete the user who created them from the organization.
To help administrators manage these scenarios, the Microsoft 365 admin center enables you to identify and manage ownerless shared agents. The dashboard displays the total count of such agents, a one-click filter to quickly isolate them, and real-time updates that reflect user deletions. When administrators use these features, they can efficiently review and address ownership gaps by blocking or deleting affected agents.
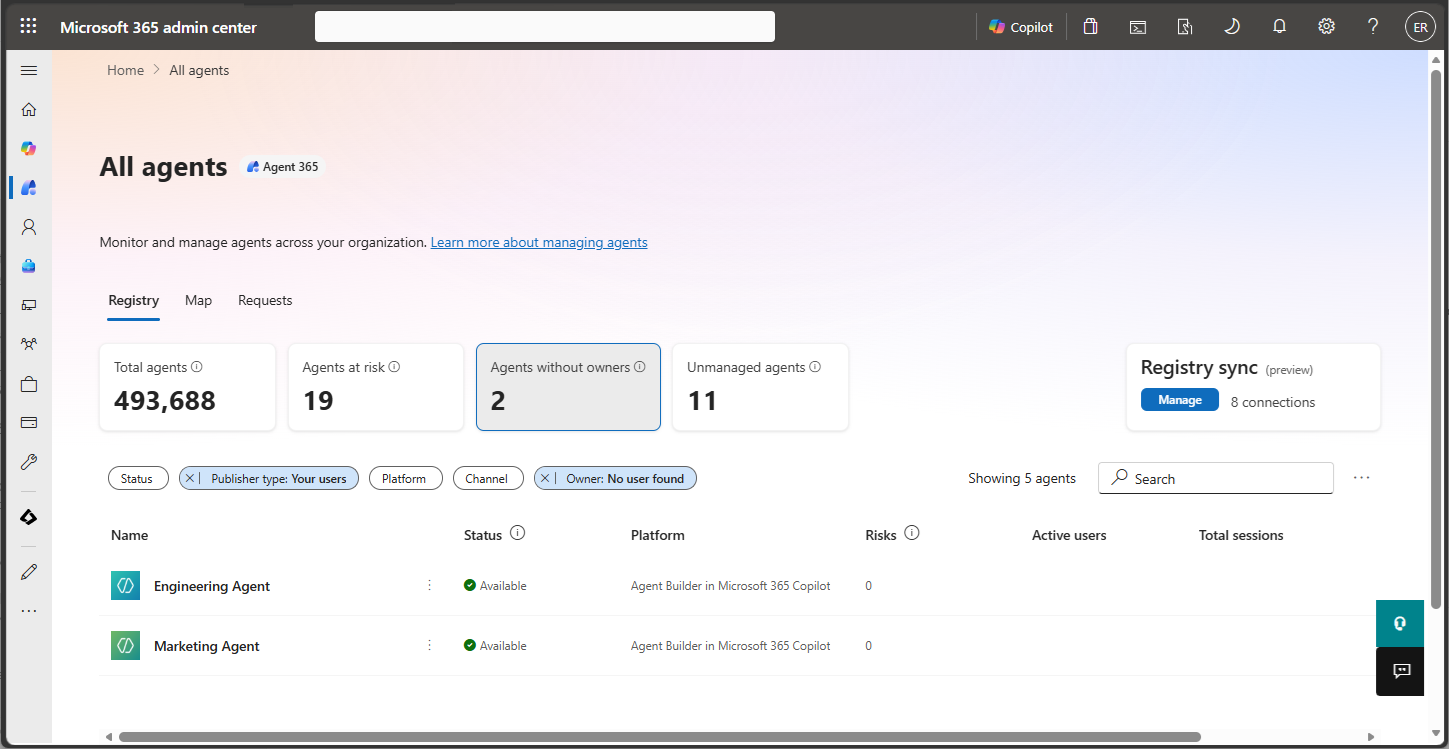
When you select the Agents without owners card, the agent list will be filtered to show the agents based on Publisher type and Owner. You can review the list of agents without owners and take appropriate actions for each agent, such as blocking or deleting the agent.
Key features
- Ownerless agent count - Administrators can view the total number of agents without a valid owner directly from the dashboard. For example, the dashboard shows 20 ownerless agents, which indicates that users who left the organization created these agents.
- One-click filter - Selecting the dashboard pane instantly filters the agent list to display only shared agents missing an owner. This feature allows for quick triage and action.
- Real-time updates - The ownerless agent count automatically updates when you hard delete a user from the organization. This feature ensures that the dashboard reflects the current state without requiring manual refreshes.
Agent risks
Note
The updated risk details experience is rolling out gradually. If you see the previous interface, the updated experience hasn't reached your region yet.
Risk signals in the Agent Registry are a consolidated set of agent-related security detections that give IT administrators a single view of agent risks across their tenant. By bringing signals from multiple security platforms into one place, IT administrators can understand what is flagged without switching between portals or elevating their permissions to different security roles.
Security platforms detect risk signals when an agent's activities conflict with your organization's security policies. You can share these details with your security team for investigation and remediation.
Prerequisites for viewing risk signals
- Your tenant must have an E7 or A365 license. To view your subscriptions in the Microsoft 365 admin center, select Billing > Licenses > Subscriptions. For more information, see Licensing for agent management.
The Risks column and risk details
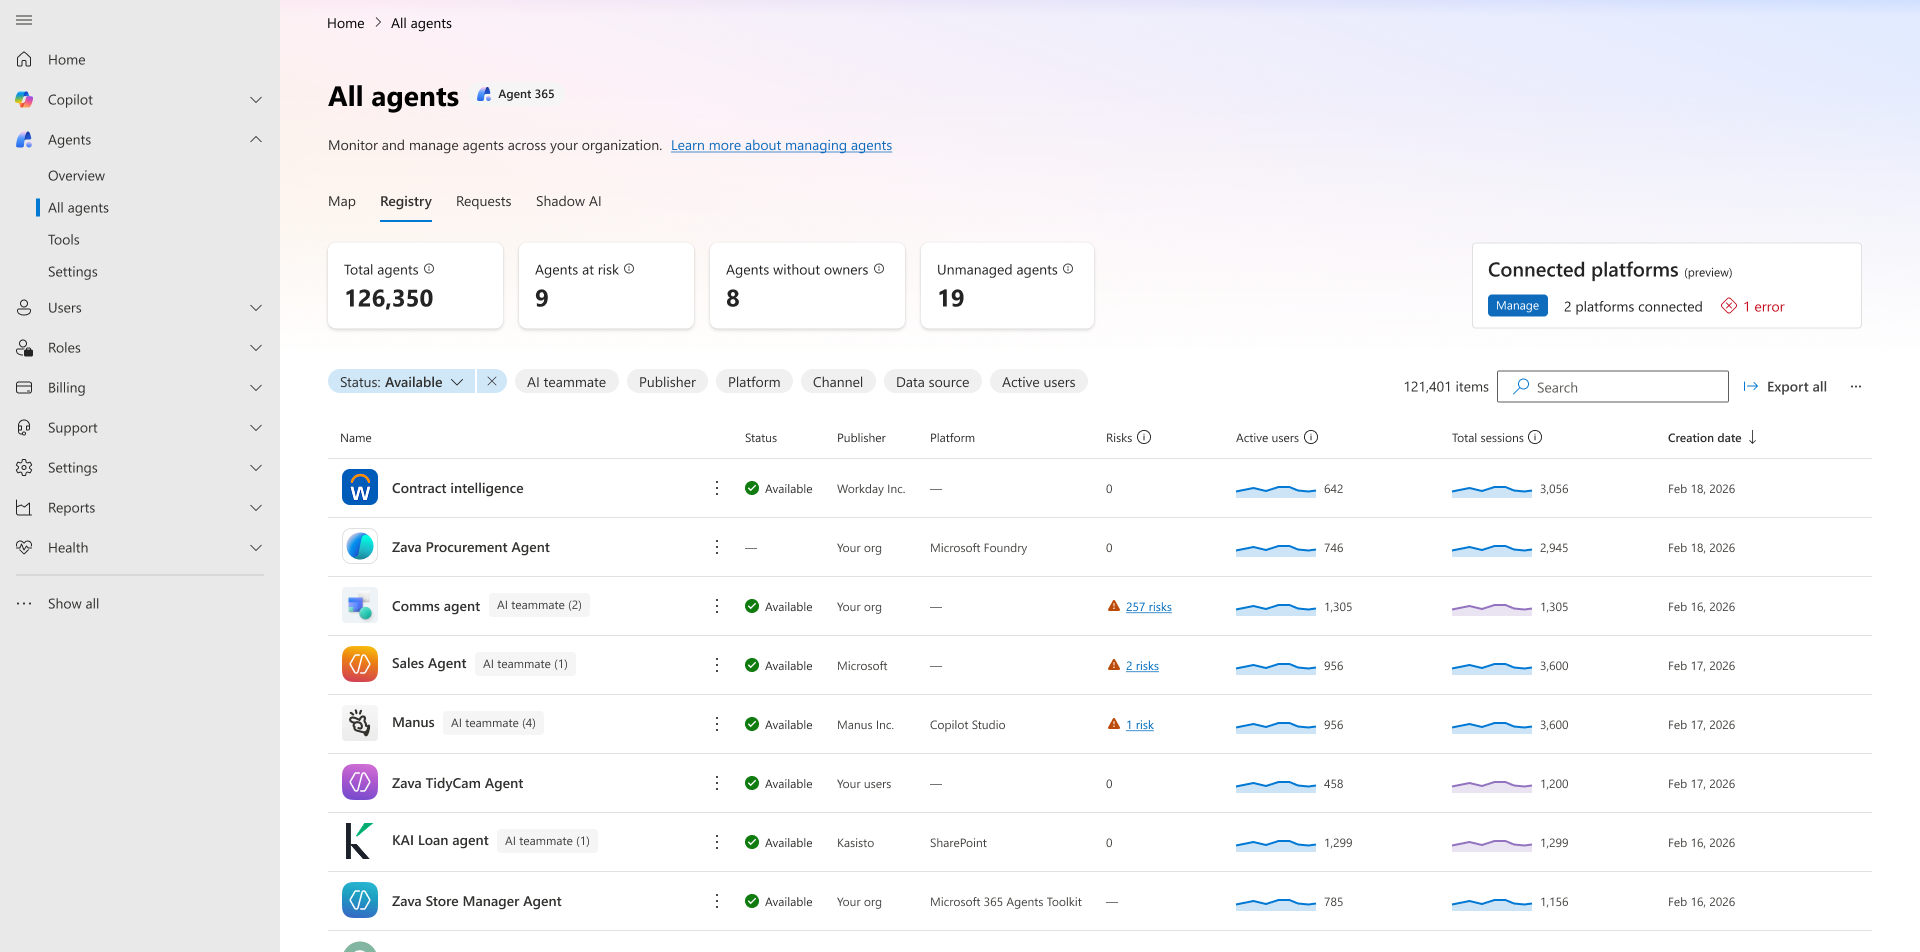
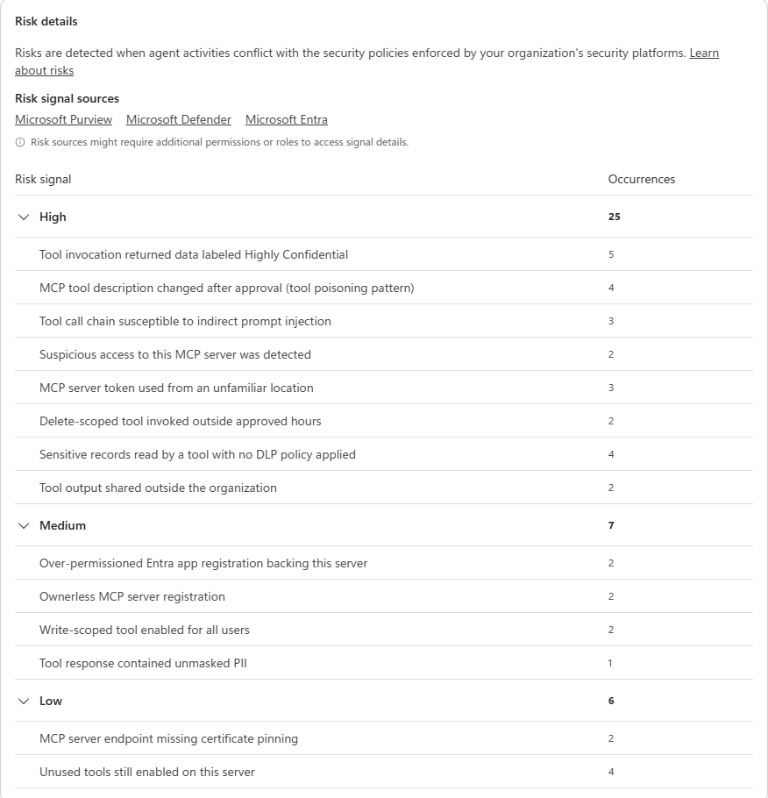
The Risks column on the All agents page shows the aggregated count of risk signals for each agent. When you select the count, the Risk details pane opens. This pane offers a focused, actionable view of the agent's risk signals. It provides:
- Full coverage across all high, medium, and low risk signals.
- Risk signals grouped into expandable high, medium, and low severity sections.
- Detailed descriptions of individual risk signals.
- An Occurrences count for each individual risk signal, showing how many times that signal was raised.
- Risk signals are sourced from: Displays the Microsoft security platforms contributing risk signals for the agent, such as Microsoft Purview, Microsoft Entra, and Microsoft Defender. Only platforms with contributing signals are shown. Each platform name is a deep link to the respective portal for further investigation, subject to the user’s roles and permissions.
- When an agent has multiple instances, risk signals are grouped by instance, allowing you to drill down into the aggregated signals for the selected agent instance.
Important
The risk signal counts in the Microsoft 365 admin center might be up to an hour behind what the security portals show. Counts reflect active risk signals. A count of zero indicates that no active signals are currently detected for that agent across the connected platforms.
Roles required to access source attribution deep links
| Security portal | Required role — any one |
|---|---|
| Microsoft Entra | Global Administrator, Global Reader, Security Reader, Security Administrator, or AI Administrator |
| Microsoft Defender | Global Administrator, Global Reader, Security Reader, Security Administrator, or AI Administrator |
| Microsoft Purview — IRM alerts | IRM Analyst or IRM Investigator. Global Administrator alone is insufficient; a Global Administrator can assign themselves the additional IRM role. |
Agents at risk tile
The Agents at risk tile on the All agents page displays the total number of agents in the tenant that have one or more risk signals. Selecting the tile opens a prefiltered view showing only agents with detected risk signals, so you can prioritize investigation and remediation.
Agents at risk card on the Overview page
The Agents at risk card on the Microsoft 365 admin center Overview page lists the three agents with the highest aggregated risk counts across Microsoft security platforms and connected third-party platforms.
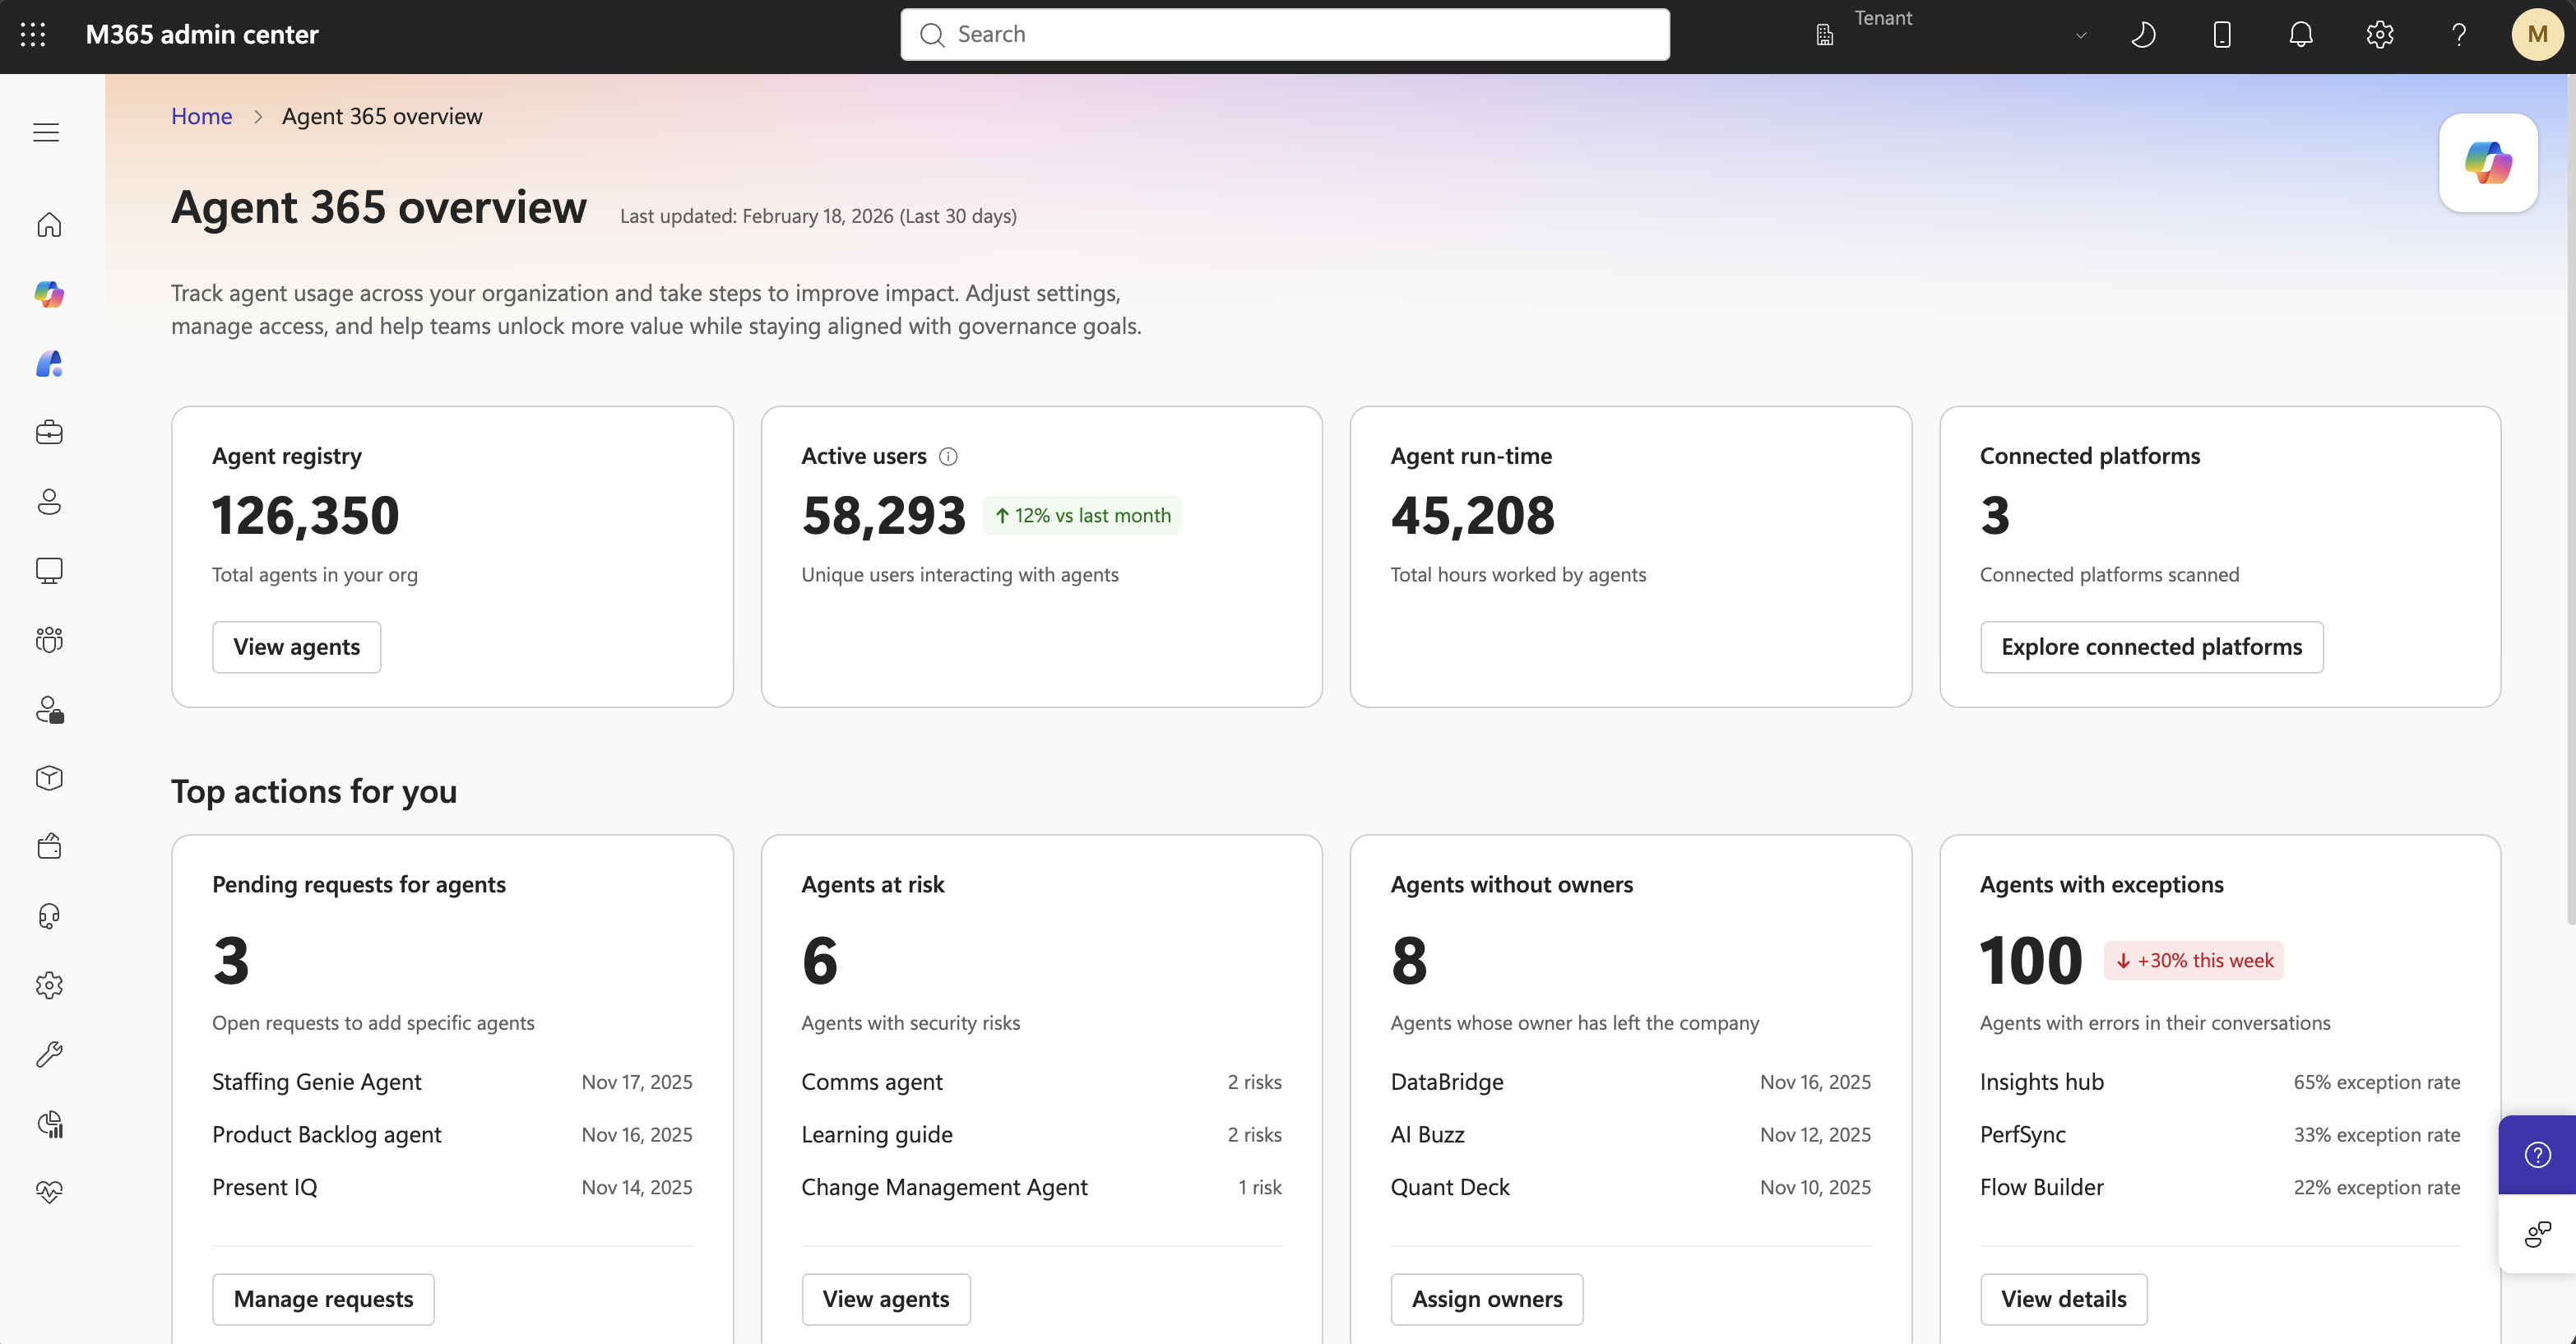
Select View agents to open All agents > Registry, where the list is filtered and sorted by risk level so that you can prioritize investigation and remediation.
Upload custom agent
The agent Registry within Microsoft 365 admin center provides a method to upload a custom agent, so that you can manage those agents for your organization.
Note
You can also update an existing agent in Agent Store. For more information, see View agent details.
To upload an agent, the agent must be contained in a ZIP packet file. The ZIP file contains resources, such as manifest files, configuration files, icons, branding, and embedded knowledge files.
Note
You can download your agent ZIP file from Copilot Studio or from Agent Builder in Copilot.
To download your agent ZIP file from Copilot Studio, select Agents > the name of your agent > Channels. Select the channel you use to publish, such as Teams and Microsoft Copilot. Select Availability options > Download .zip.
To download your declarative agent ZIP file from Agent Builder in Copilot, select All agents > select the ellipses next to your agent > Edit > select the ellipses on the right > Download .zip file.
To upload an agent as a ZIP packet file to the Microsoft 365 admin center:
In Microsoft 365 admin center, select Agents > All agents > Add agent.
Select Choose file to find and select the agent ZIP file. The ZIP file is validated. Then, select Next.
Verify the agent's name, icon, and host products.
Under Publish, select the users or groups who can install the agent.
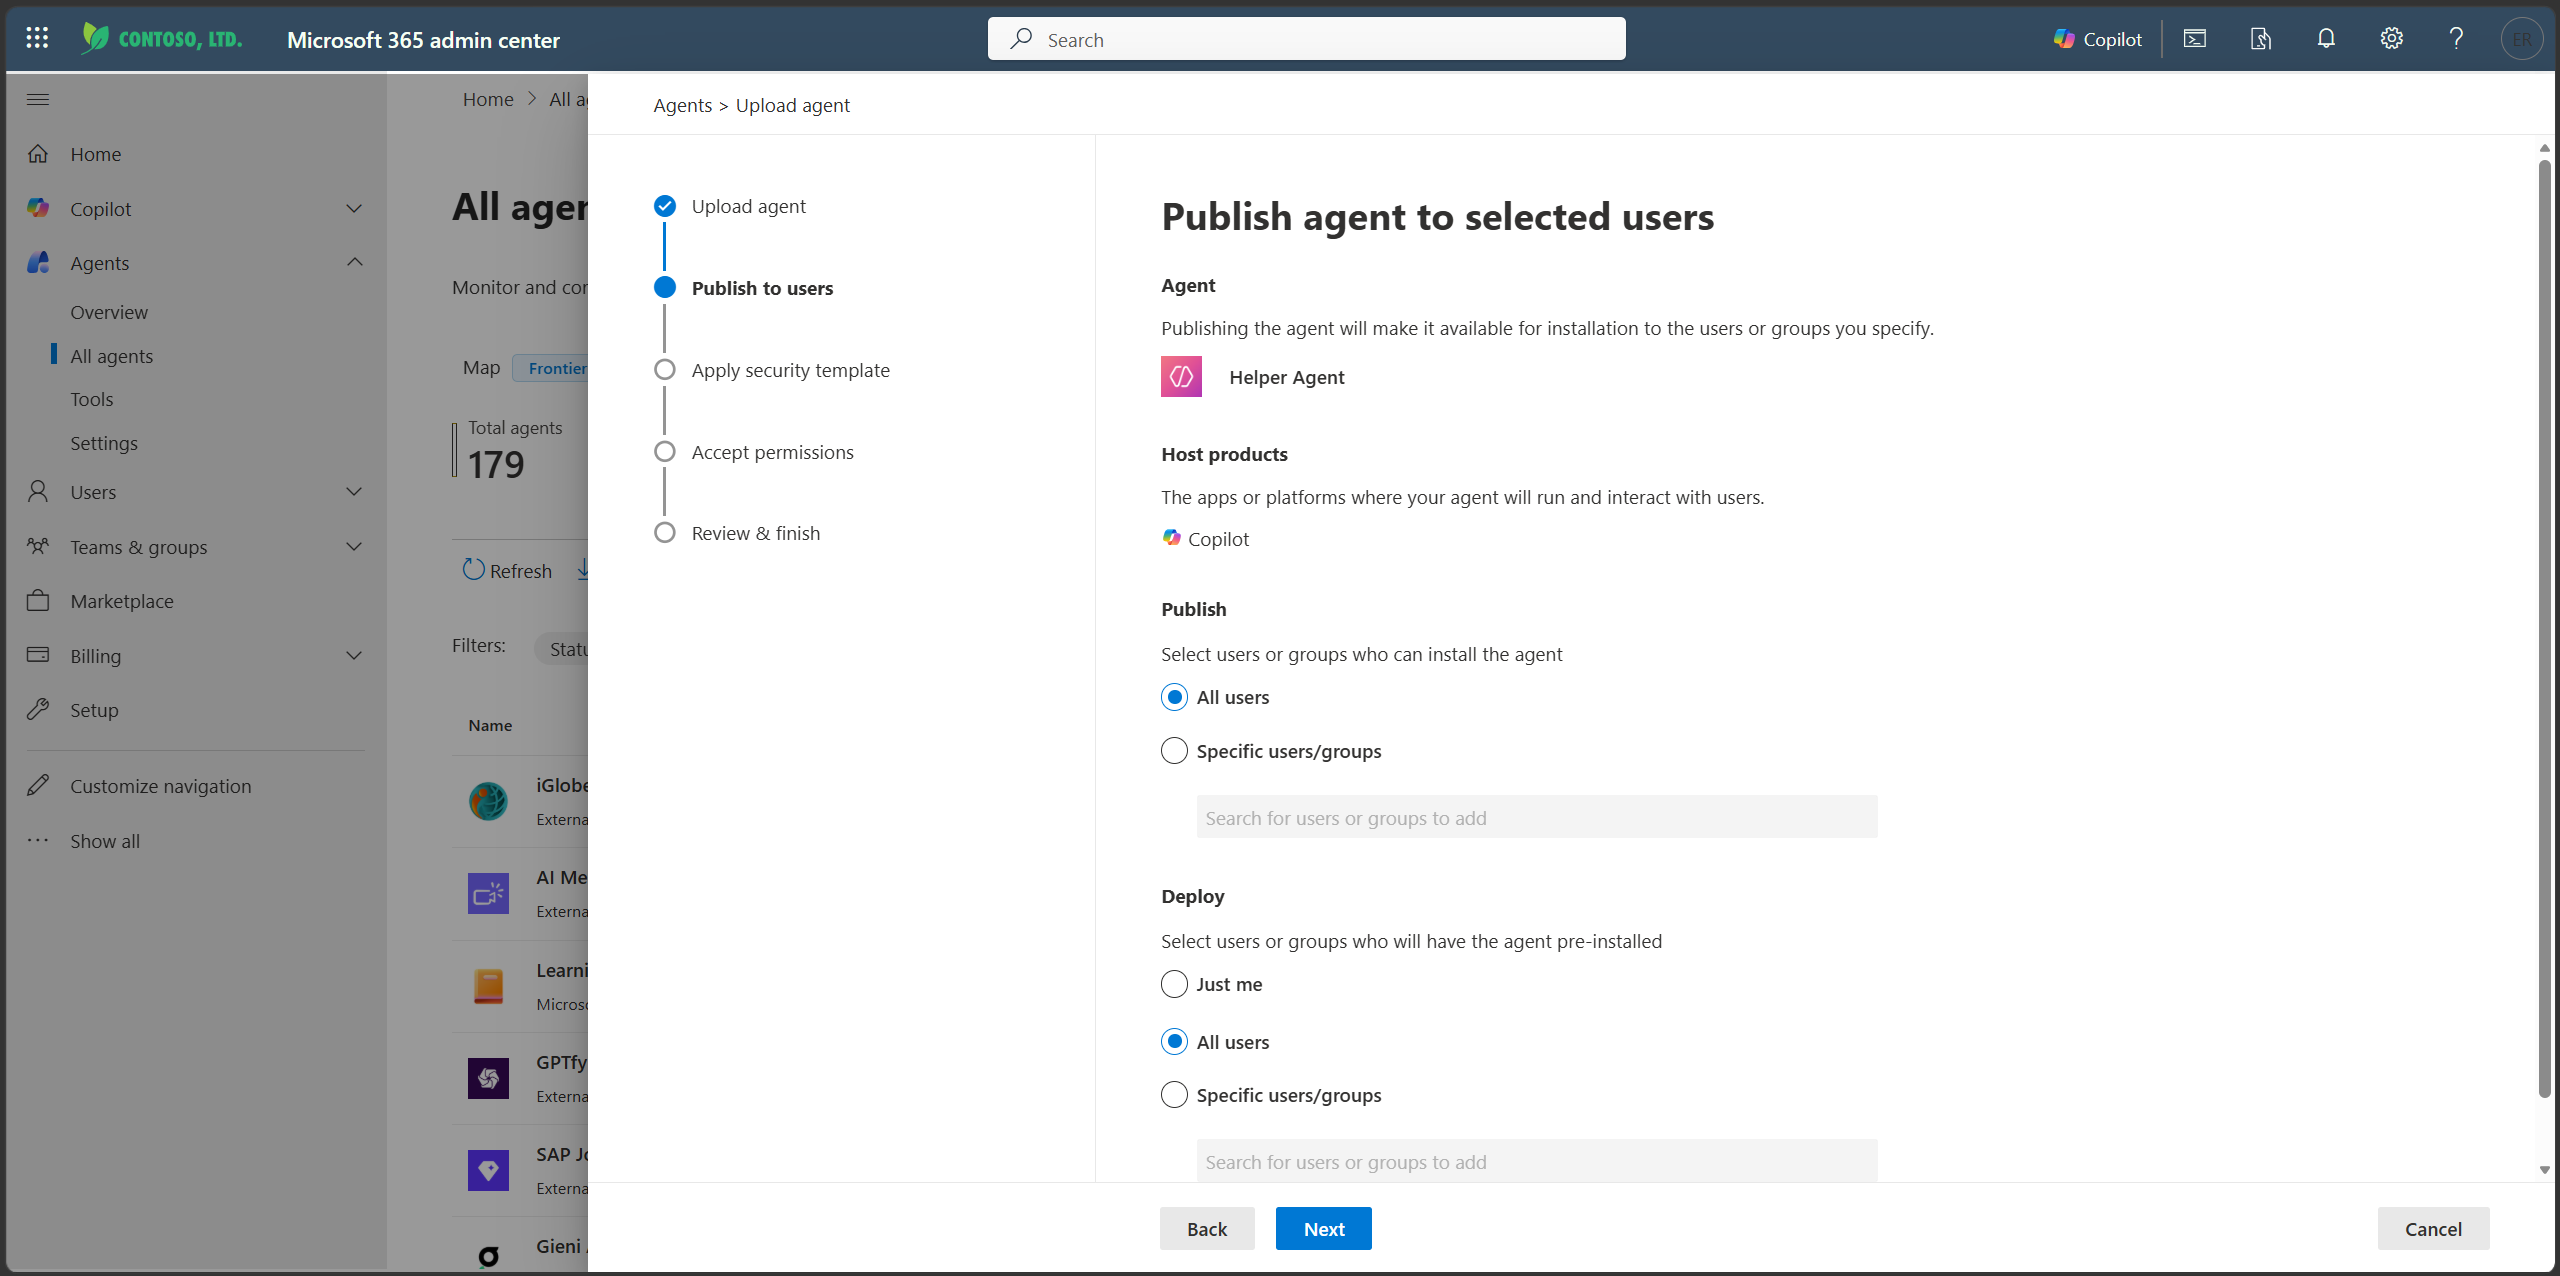
Under Deploy (optional), select the users or groups who will have the agent preinstalled. Then, select Next.
Note
You can select a small audience for testing purposes. For instance, select Just me, or a single test group to narrow the availability of the agent.
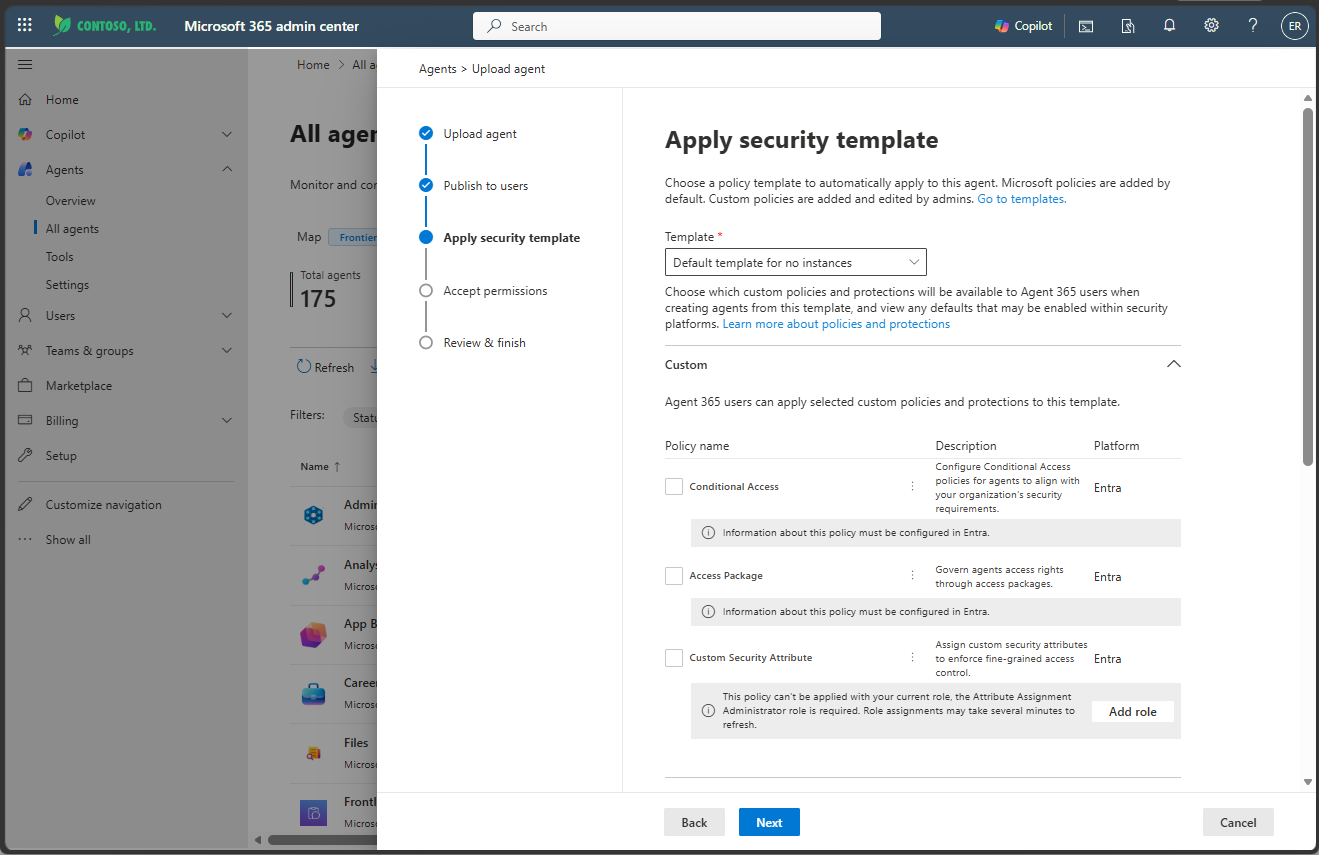
Choose to apply either an existing policy template, a custom policy, or the default policy. For more existing policy template information, see Security templates. Agent 365 users can apply selected custom policies and protections. Default policies and protections are managed through their security platform. Check the status of each in the platform. Note policies and protections might not be enabled. Then, select Next.
Review agent permissions. Then, select Next.
Review and finished. Select Finish deployment.
Note
If your tenant uses unified agent and app management, all changes to org-wide tenant settings in Microsoft 365 admin center (MAC) are automatically synchronized in Teams admin center (TAC) and vice versa. For more information, see Unified agent and app management.
Manage pinned agents
As an administrator, you can choose to pin a deployed agent to the Agents list within Microsoft Copilot. By pinning agents in Microsoft Copilot, you can ensure that those agents are visible and accessible for all members of your organization, or only specific users or groups. You can choose to pin and unpin agents. Also, you can rank the list of pinned agents.
Microsoft Copilot includes agents pinned by Microsoft, admins, and users. Microsoft pinned agents are specific agents that are pinned by default for all users. You can pin agents for your organization within Microsoft 365 admin center. In addition, individual users can pin agents in their own Microsoft Copilot Chat or Microsoft Copilot experience.
Note
After you pin an agent, it might take up to six hours for end-users to see the agent pinned.
This section explains how administrators can pin, unpin, or manage agents for everyone or specific groups by using the Microsoft 365 admin center. It also covers related actions like ranking the list of pinned agents and editing the scope of pinned agents.
Pinning agents is a feature that enables administrators to preselect and pin agents for end-users by using Microsoft Copilot. The administrator pins the agent to ensure that the agent automatically appears in the end user's Copilot interface without requiring any user action. The agent is now readily accessible to the user in the Copilot interface.
Prerequisites
To pin agents so that each agent is more visible and accessible to members of your organization, there are prerequisites for your users (members of your organization). Additionally, you must have specific permissions and role.
For end users - Members of your organization must have access to the following:
- Microsoft 365 work account
- Access to Microsoft Copilot Chat (for example, via Teams, web, or the Microsoft Copilot app)
- The agent to pin must be discoverable by the member of your organization
For administrators - You, as the administrator, must have the following role and access:
- AI Administrator
- Access to the Microsoft 365 admin center
- (Optional) Power Platform admin center access (if you use Pay-as-you-go for agents)
Pinned agents
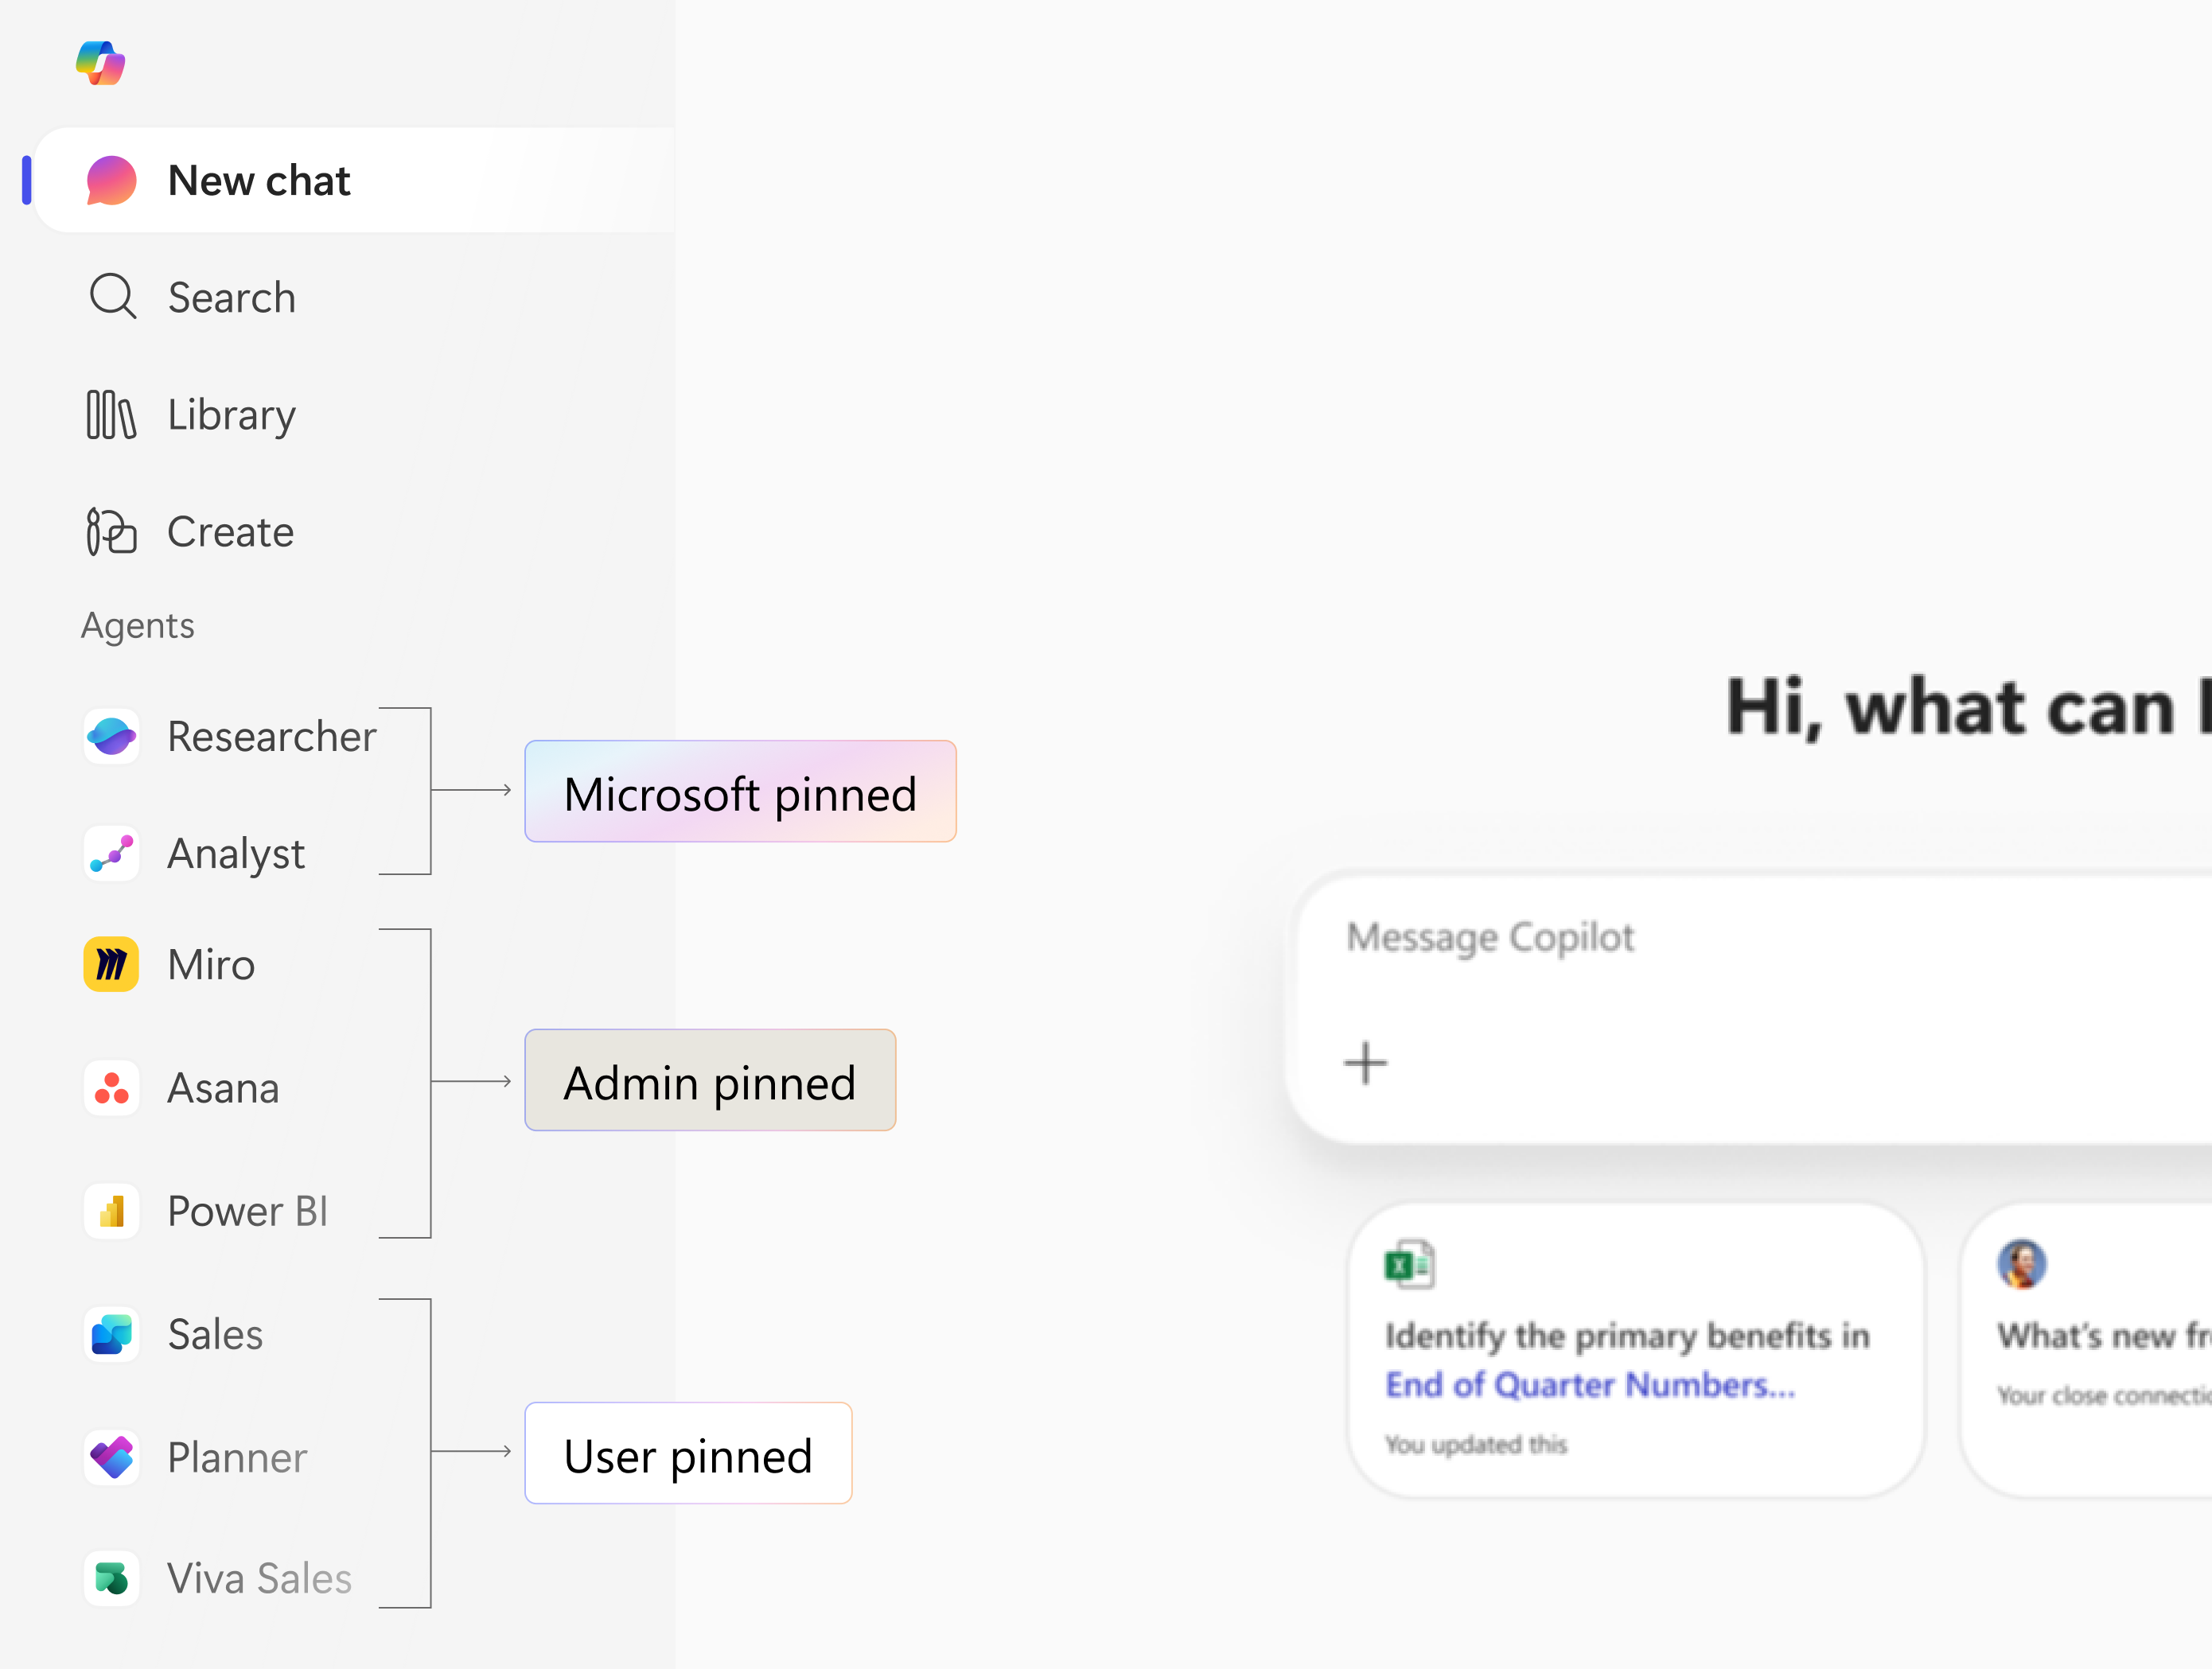
Microsoft-pinned agents
- These agents are agents that Microsoft pins by default for all users.
- Ensures essential or high-value agents, like core Copilot features, are always visible.
- End users can't unpin these agents. They're fixed in the pinned list.
Administrator-pinned agents
- Pinned by your organization's administrator through the Microsoft 365 admin center.
- Can be pinned for:
- All users.
- Specific groups.
- Specific users.
- End users usually can't unpin these agents. They're fixed in the pinned list.
User-pinned agents
- Pinned by individual users in their own Microsoft Copilot Chat experience.
- Users can:
- Pin agents they frequently use.
- Unpin them anytime.
- This list is fully under the user's control, except for Microsoft-pinned or administrator-pinned agents, which remain locked.
Features
- Administrator-pinned agents appear by default for end-users, making them easier to discover and helping highlight new or important agents.
- Administrators can view the Microsoft-pinned agents in Microsoft 365 admin center.
- Administrators can pin up to three agents in Microsoft 365 admin center for end-users using Microsoft Copilot in the organization.
- Administrators can choose to pin an agent for all users in the tenant or for specific users or groups. For example:
- Pin Sales Coach agent only for the sales department.
- Pin HR Q&A agent for all users.
- The end-user can't unpin the Administrator-pinned and Microsoft-pinned agents.
Pin agents
You can select to pin agents using the following steps:
In the All agents page, select the ellipse on the right to display a dropdown menu.
Select the Manage pinned agents. In the Pinned agents pane, agents Pinned by your org and agents Pinned by Microsoft lists are displayed.
Select Pin agent to pin a new agent.
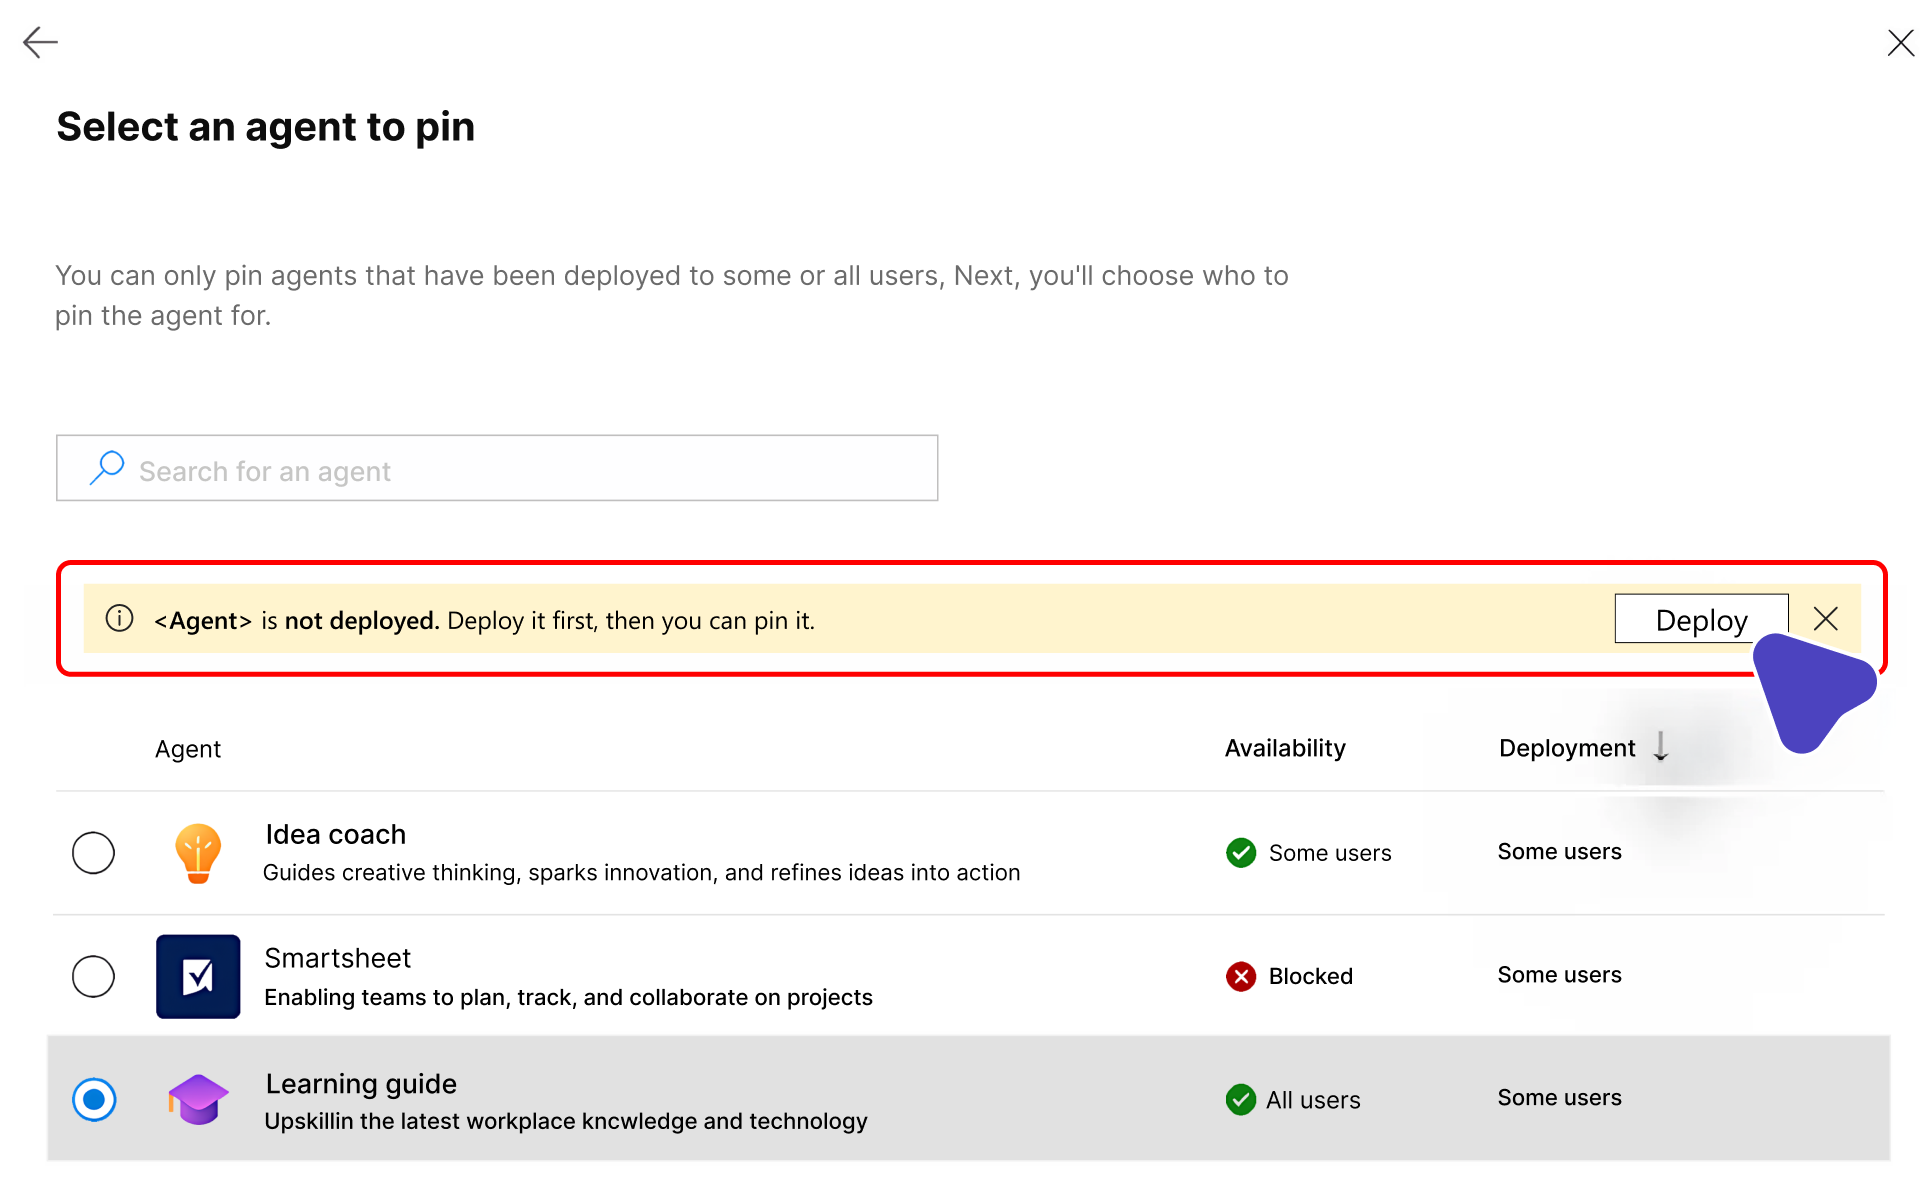
In the Select an agent to pin pane, find the agent you want to pin from the list of agents. You can search the list to find a specific agent by name. You can only pin agents that are deployed to some or all users.
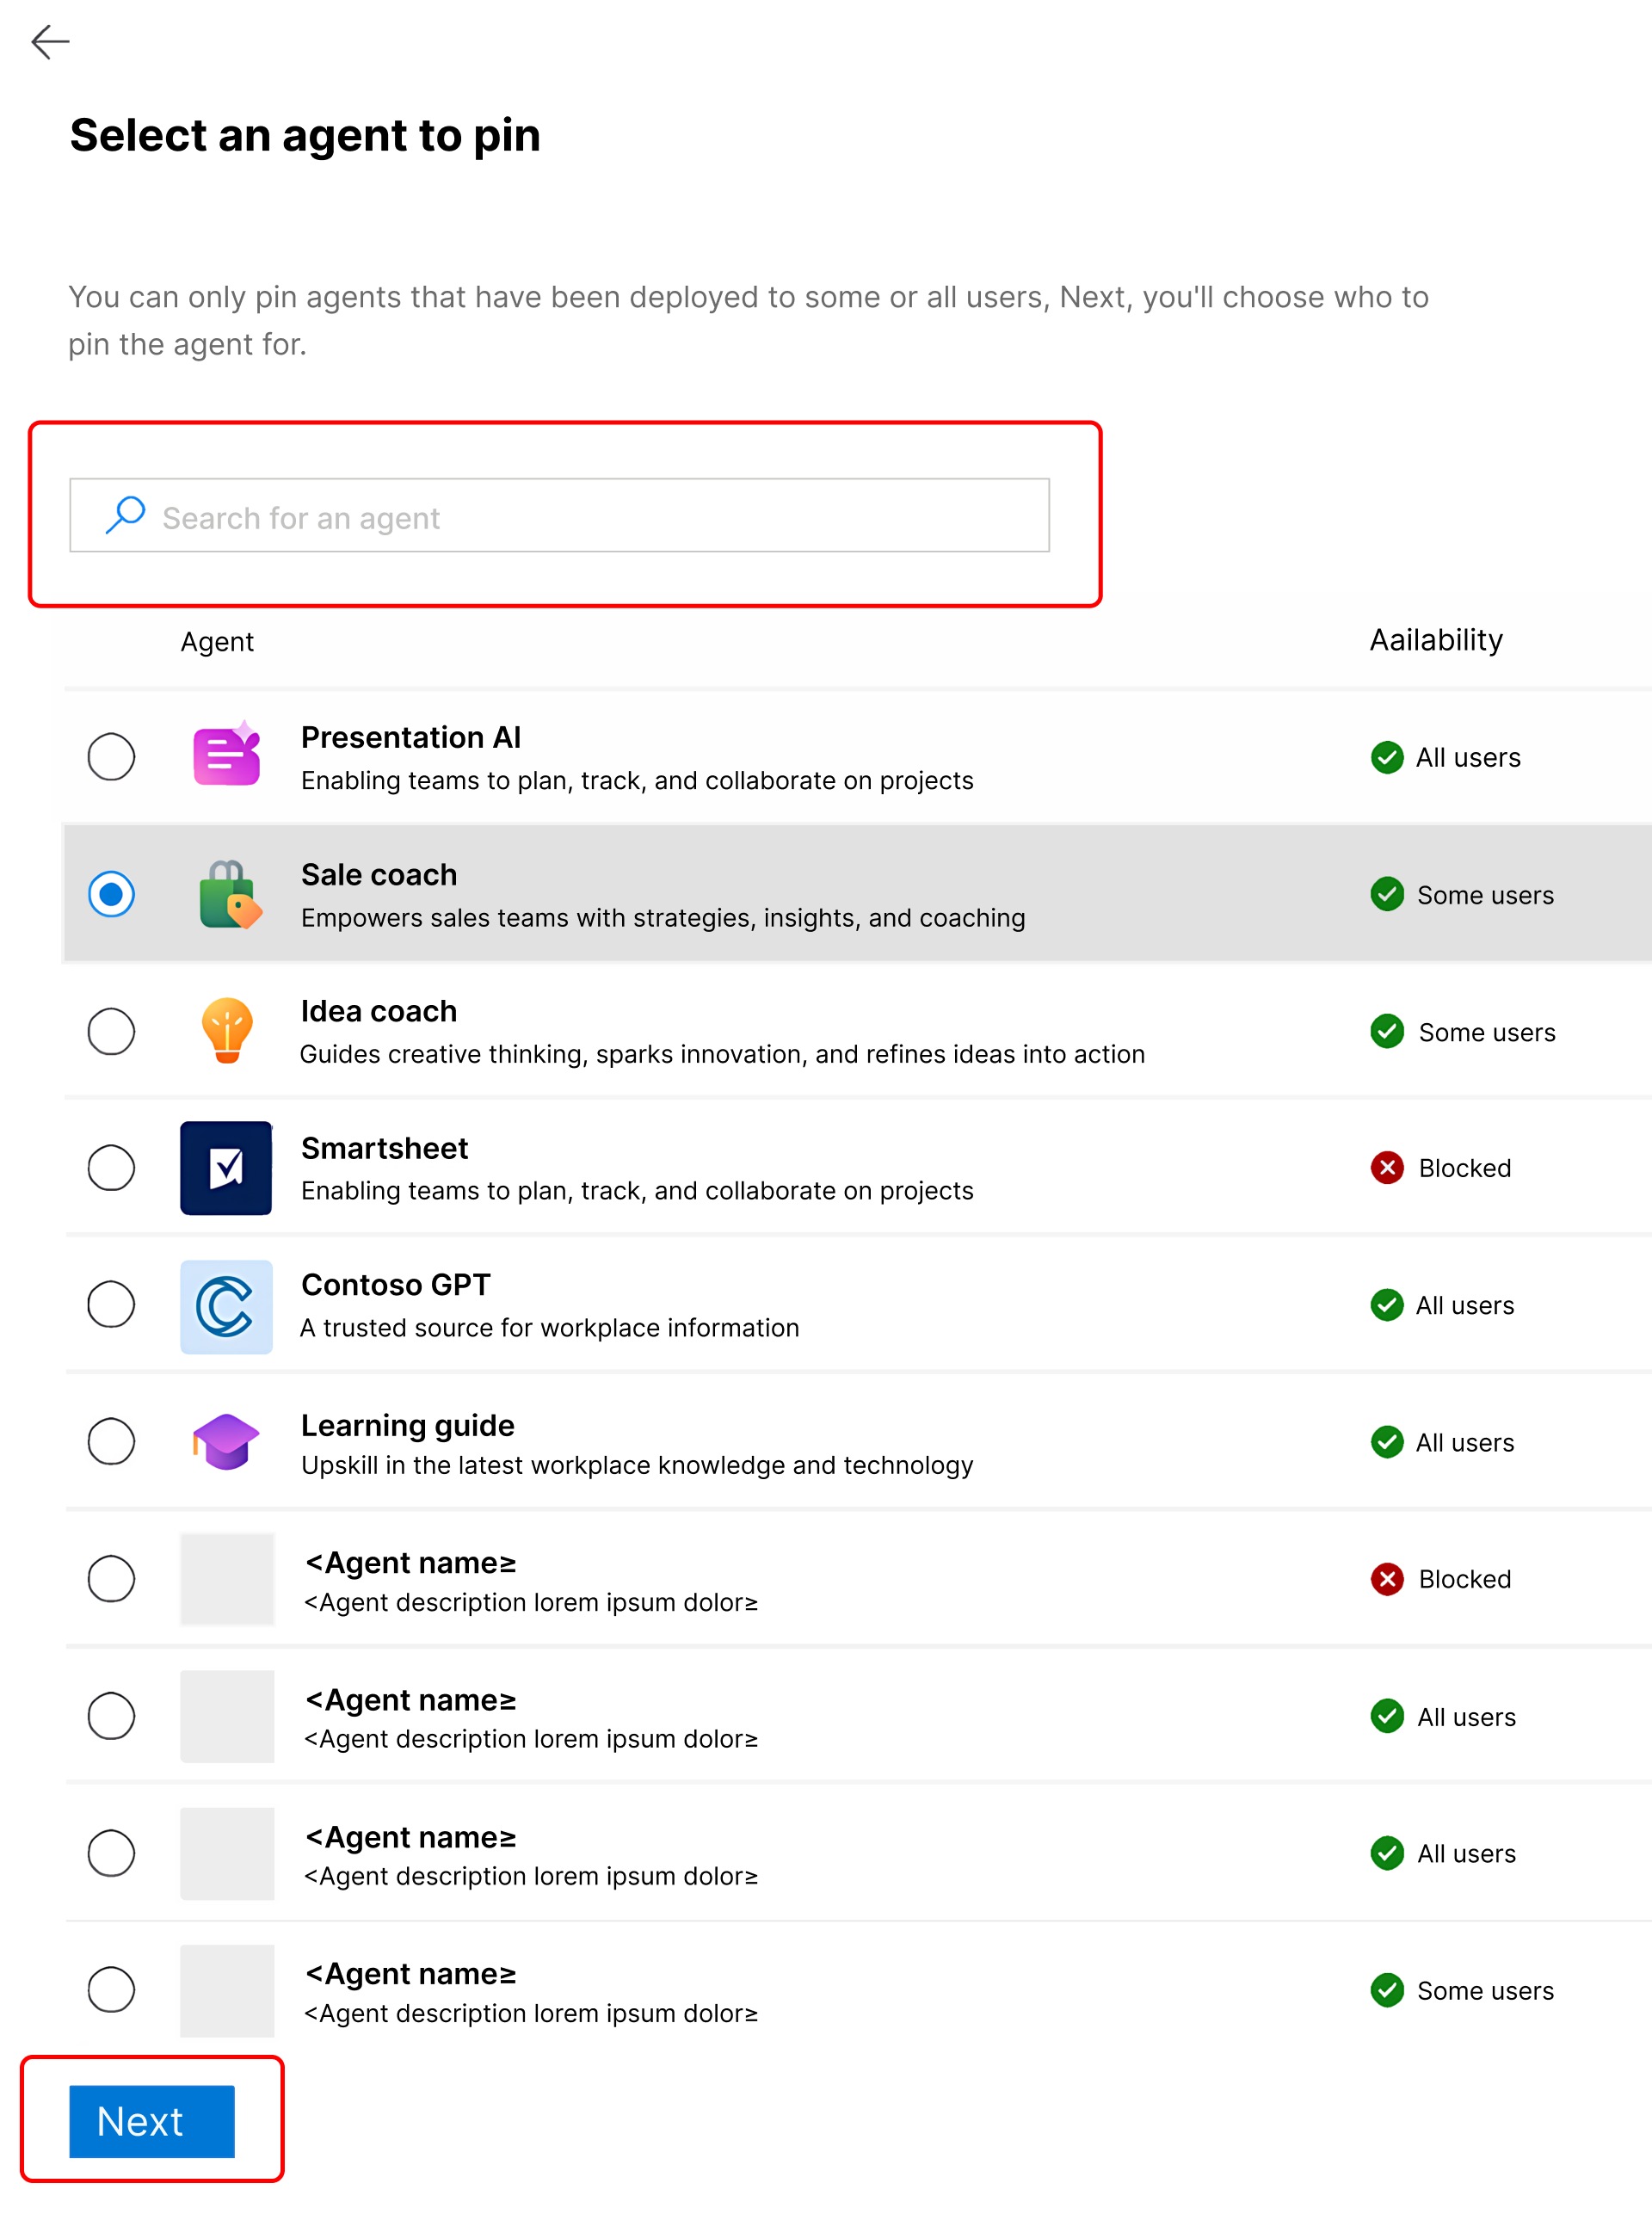
When you find the desired agent, select it and then select Next.
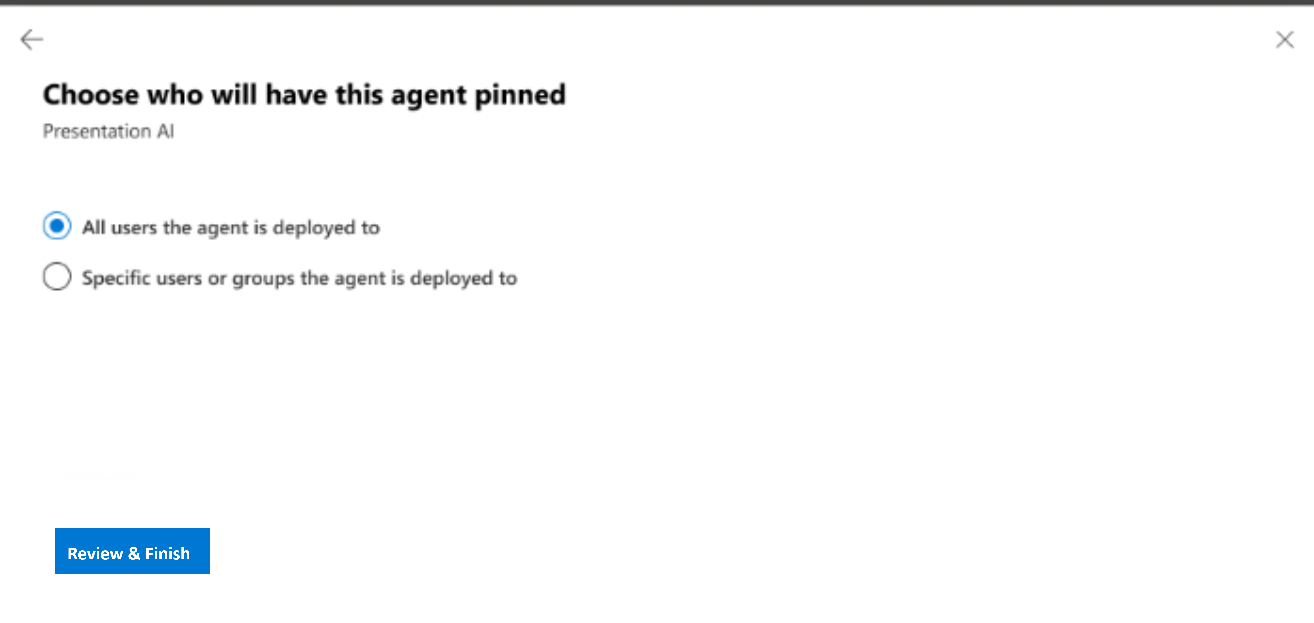
In the Choose who will have this agent pinned pane, choose the scope for the agent that you want to pin.
All users the agent is deployed to - Pin the agent for all users that the agent is deployed to in the tenant.
Note
If you don't see this option, the selected agent probably isn't deployed.
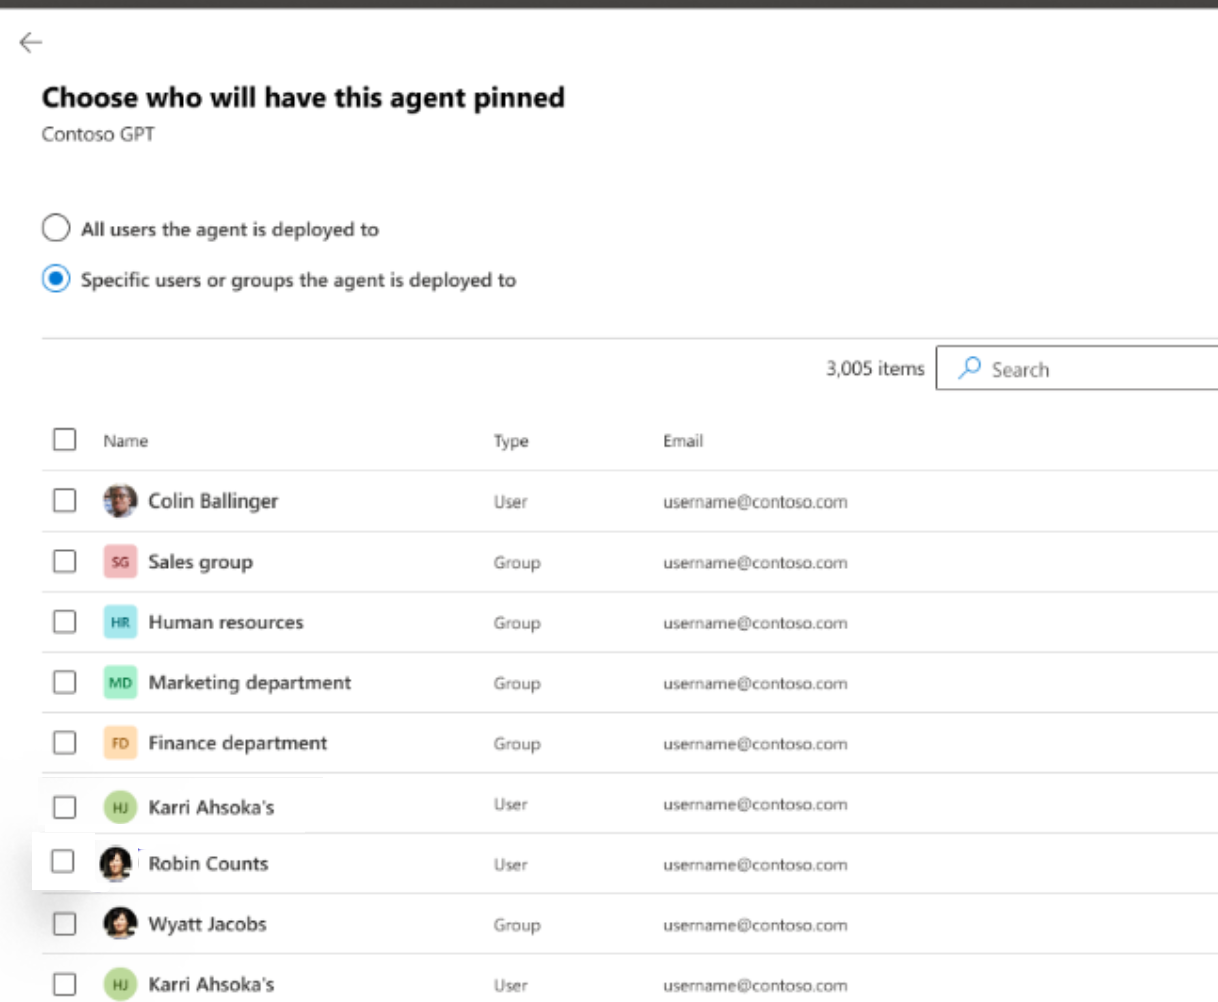
Specific users or groups the agent is deployed to - Pin for one or more groups or individual accounts.
If you select Specific users or groups the agent is deployed to, select the specific users or groups to pin the agent.
Select Save.
After you save the configuration, the system records which agent is pinned for the selected audience.
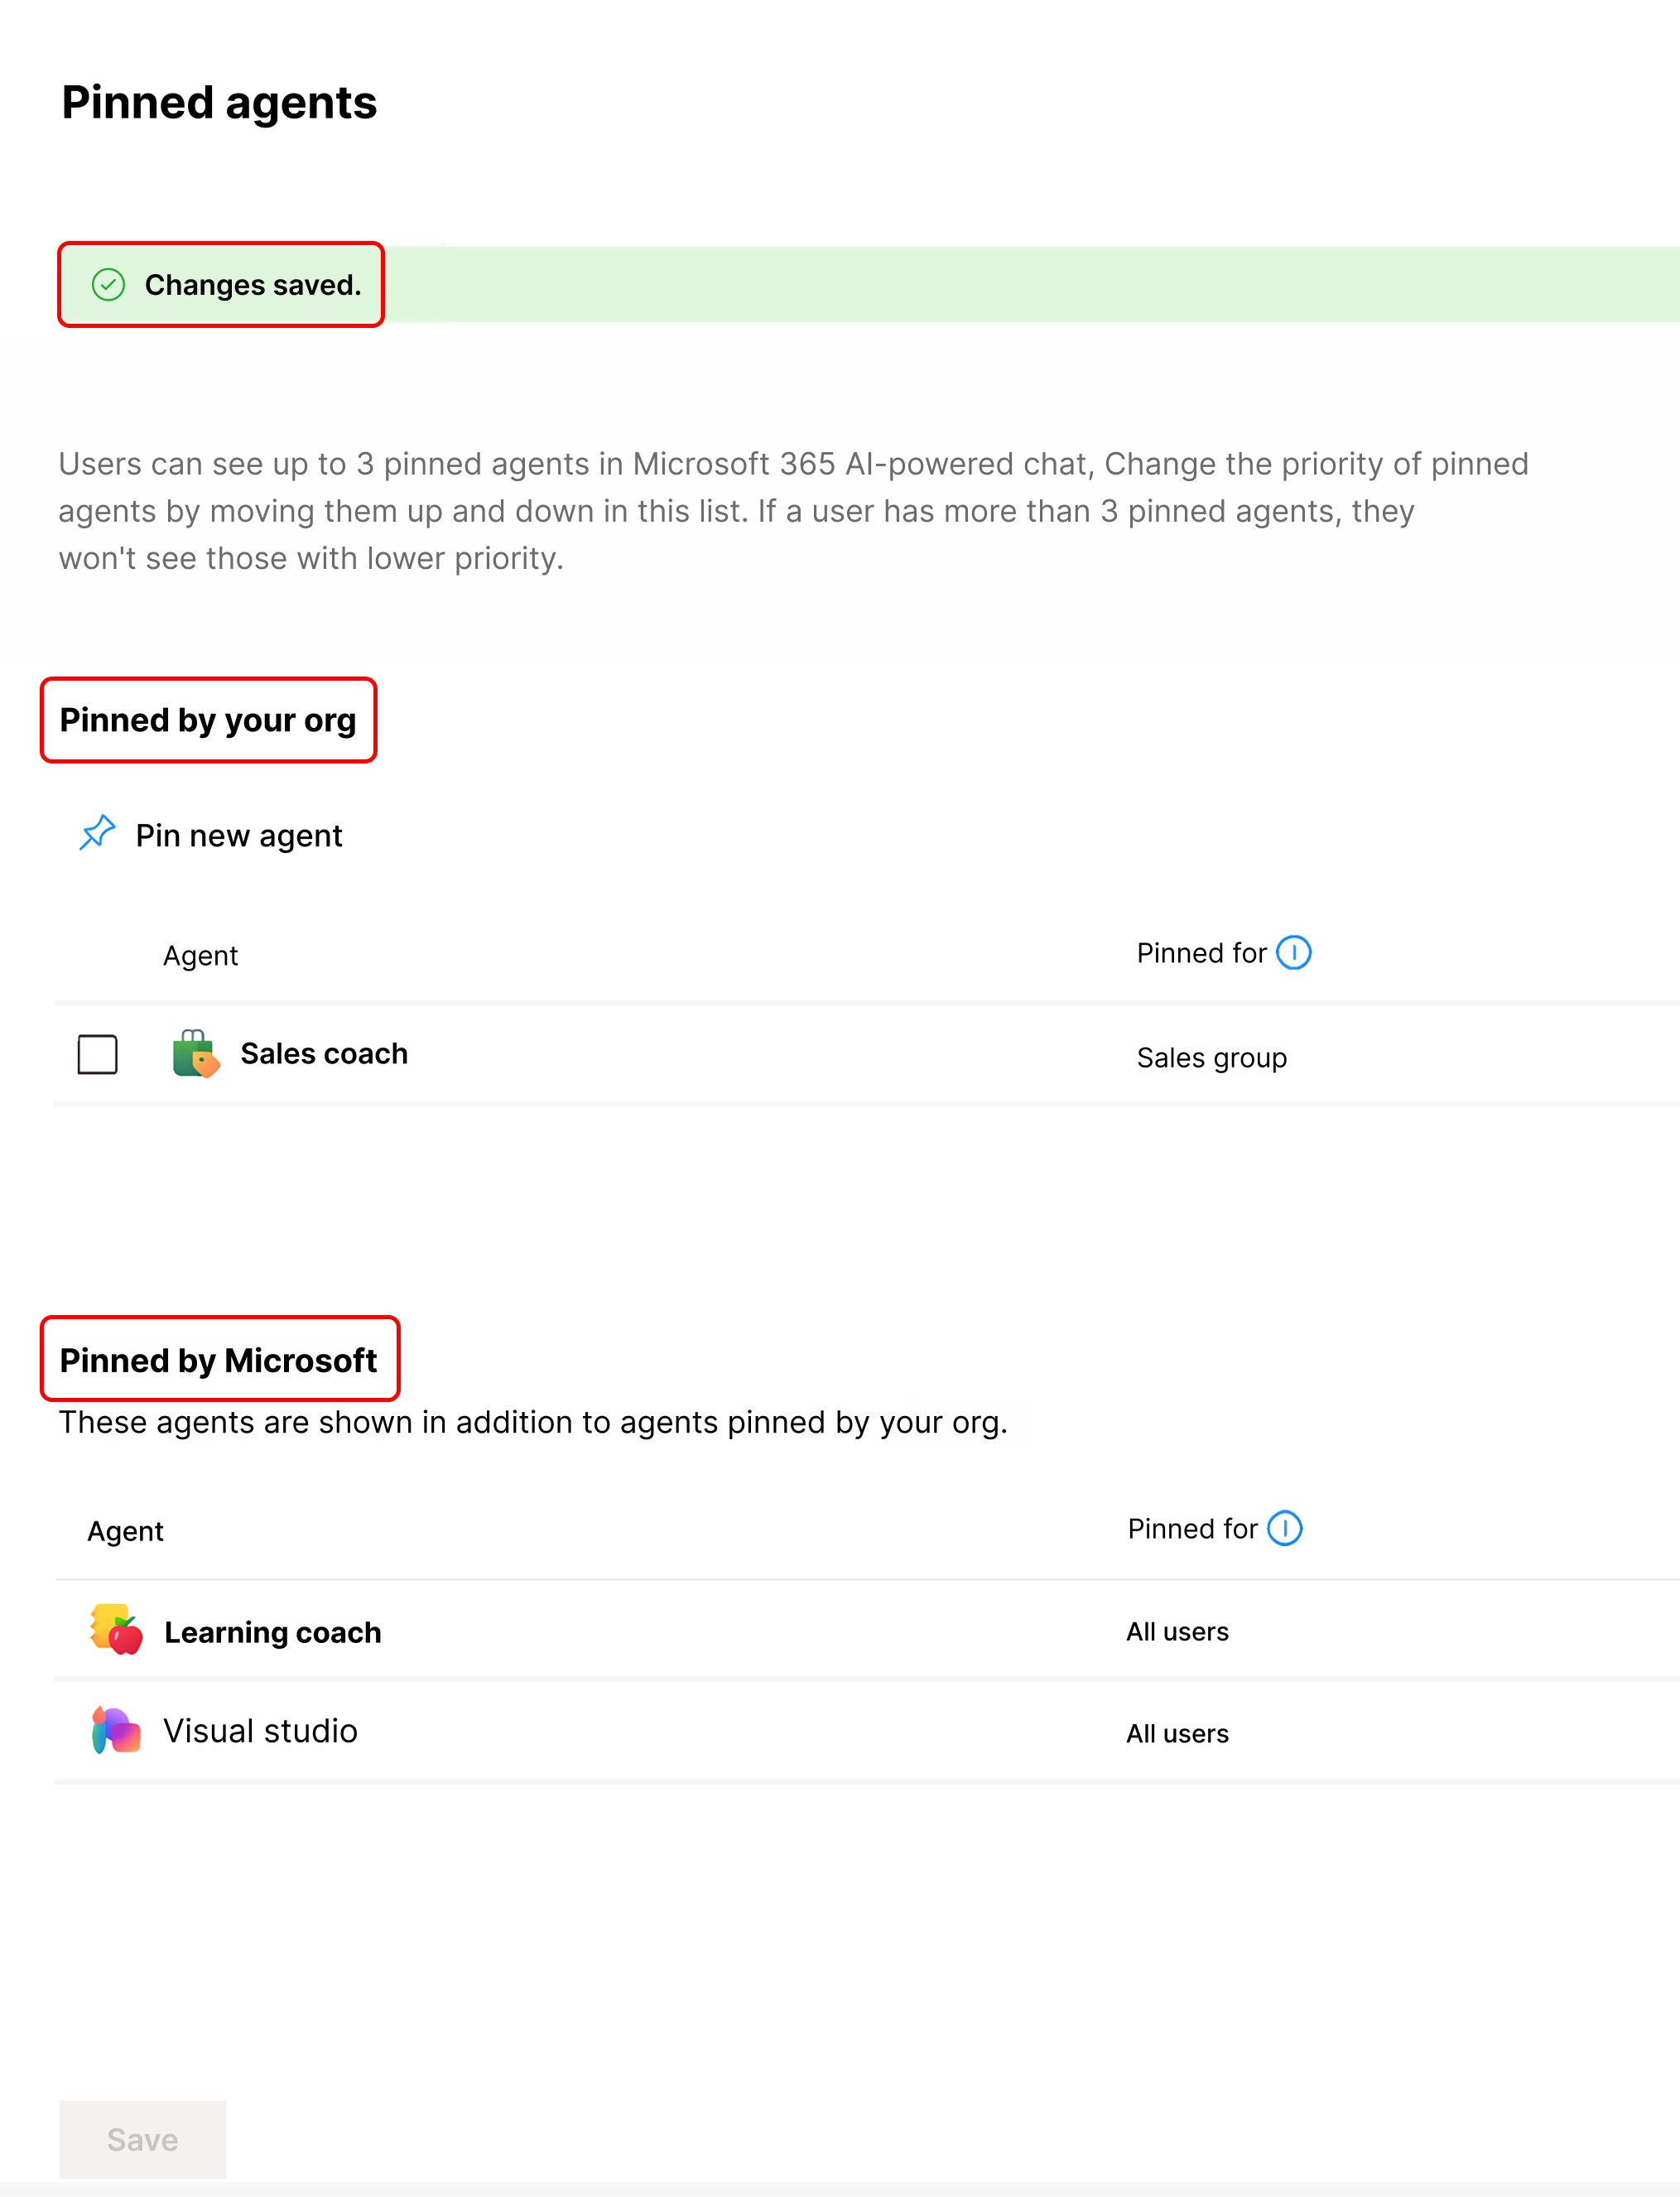
Agents that can be pinned
You can only pin deployed agents. If the agent isn't deployed, you see a banner with a message to first deploy the agent.
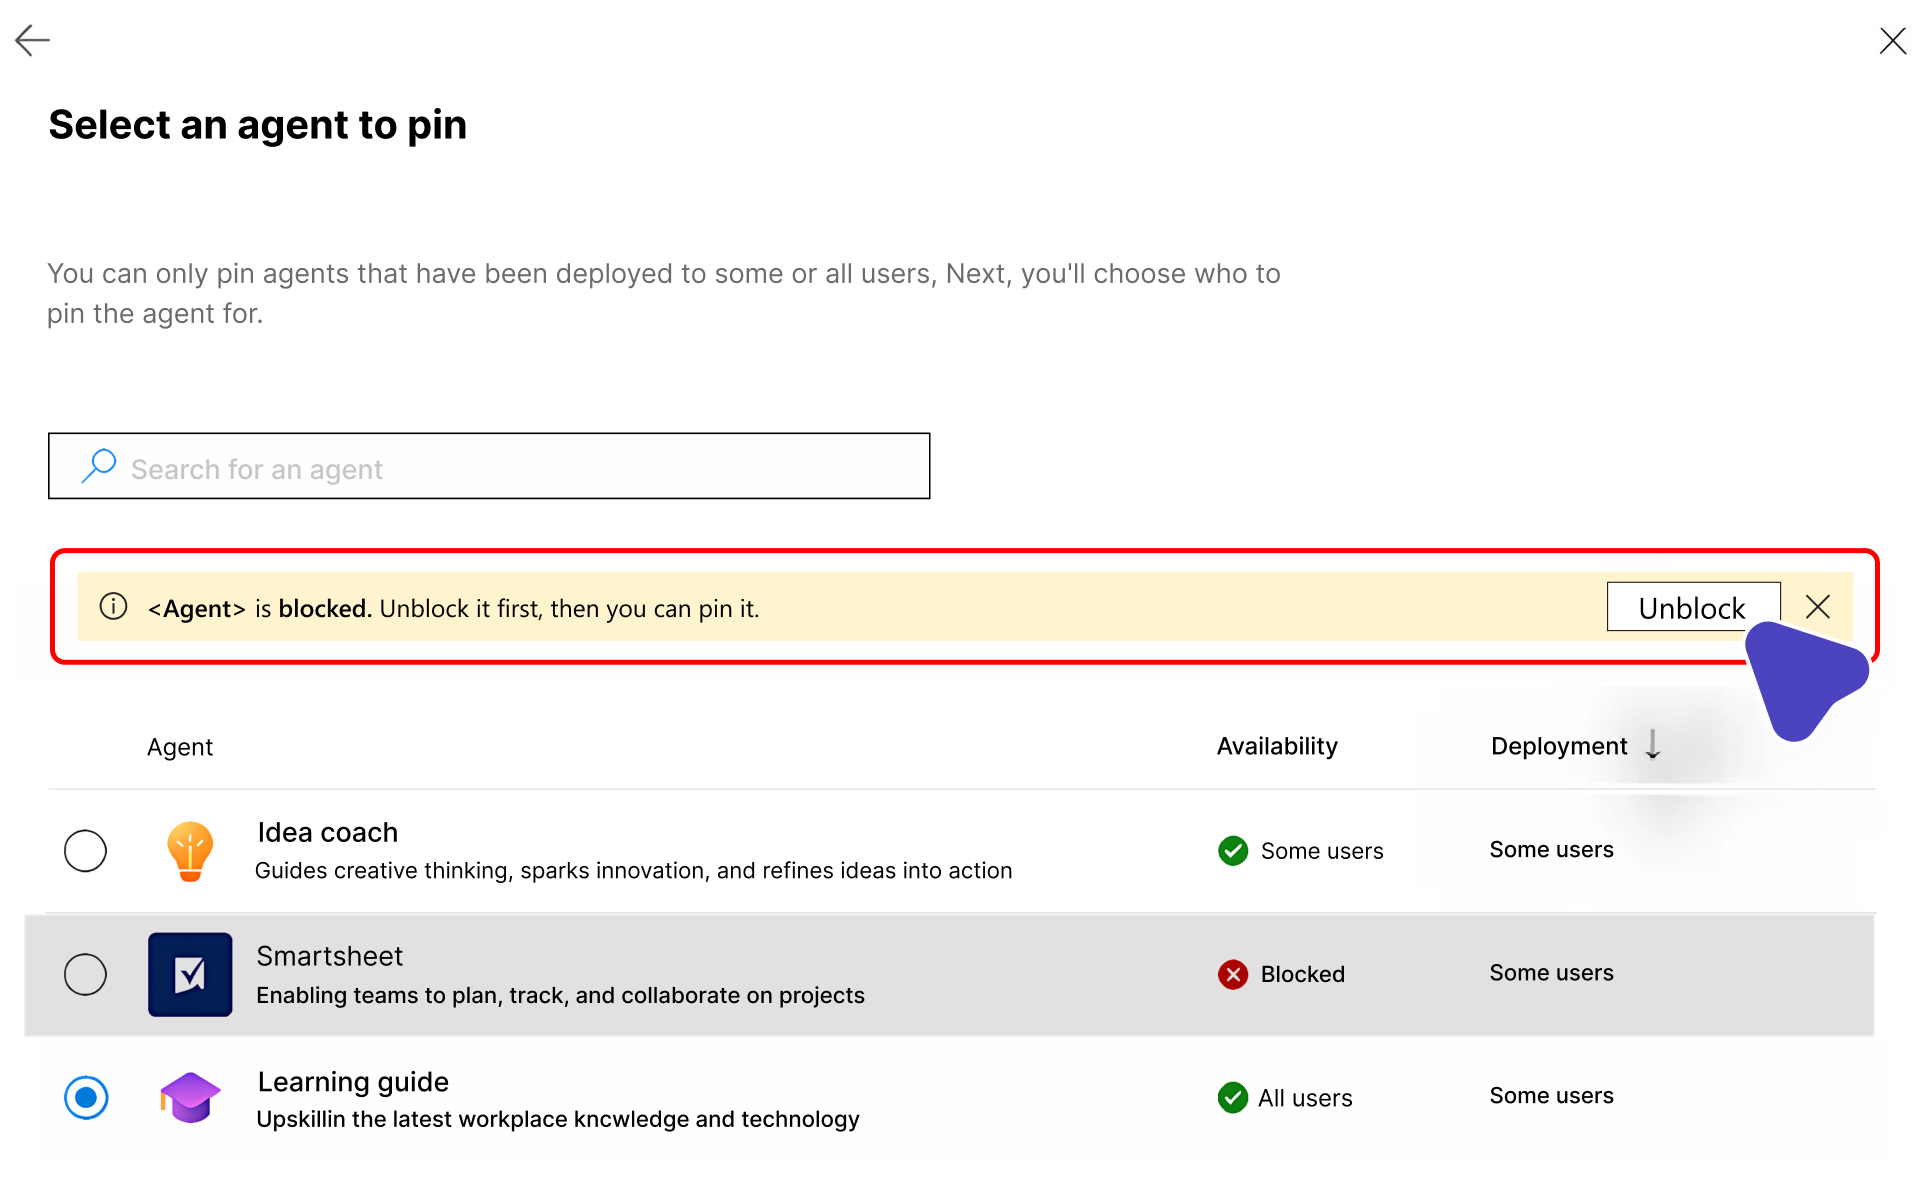
If the agent is blocked, unblock the agent before you pin it.
Rank the list of pinned agents
The administrator has three slots reserved for the pinned agents for each user.
The administrator can use the Move up and Move down buttons to reorder the list of pinned agents by priority to control what is shown to the user.
Unpin an agent
From the list of pinned agents, find the agent that you want to unpin and select Unpin. When you remove the pin, the agent is no longer available under the Pinned by your org section.
Edit the pinning scope of an agent
Select the agent and choose Edit users to modify the scope of users for which an agent is pinned.
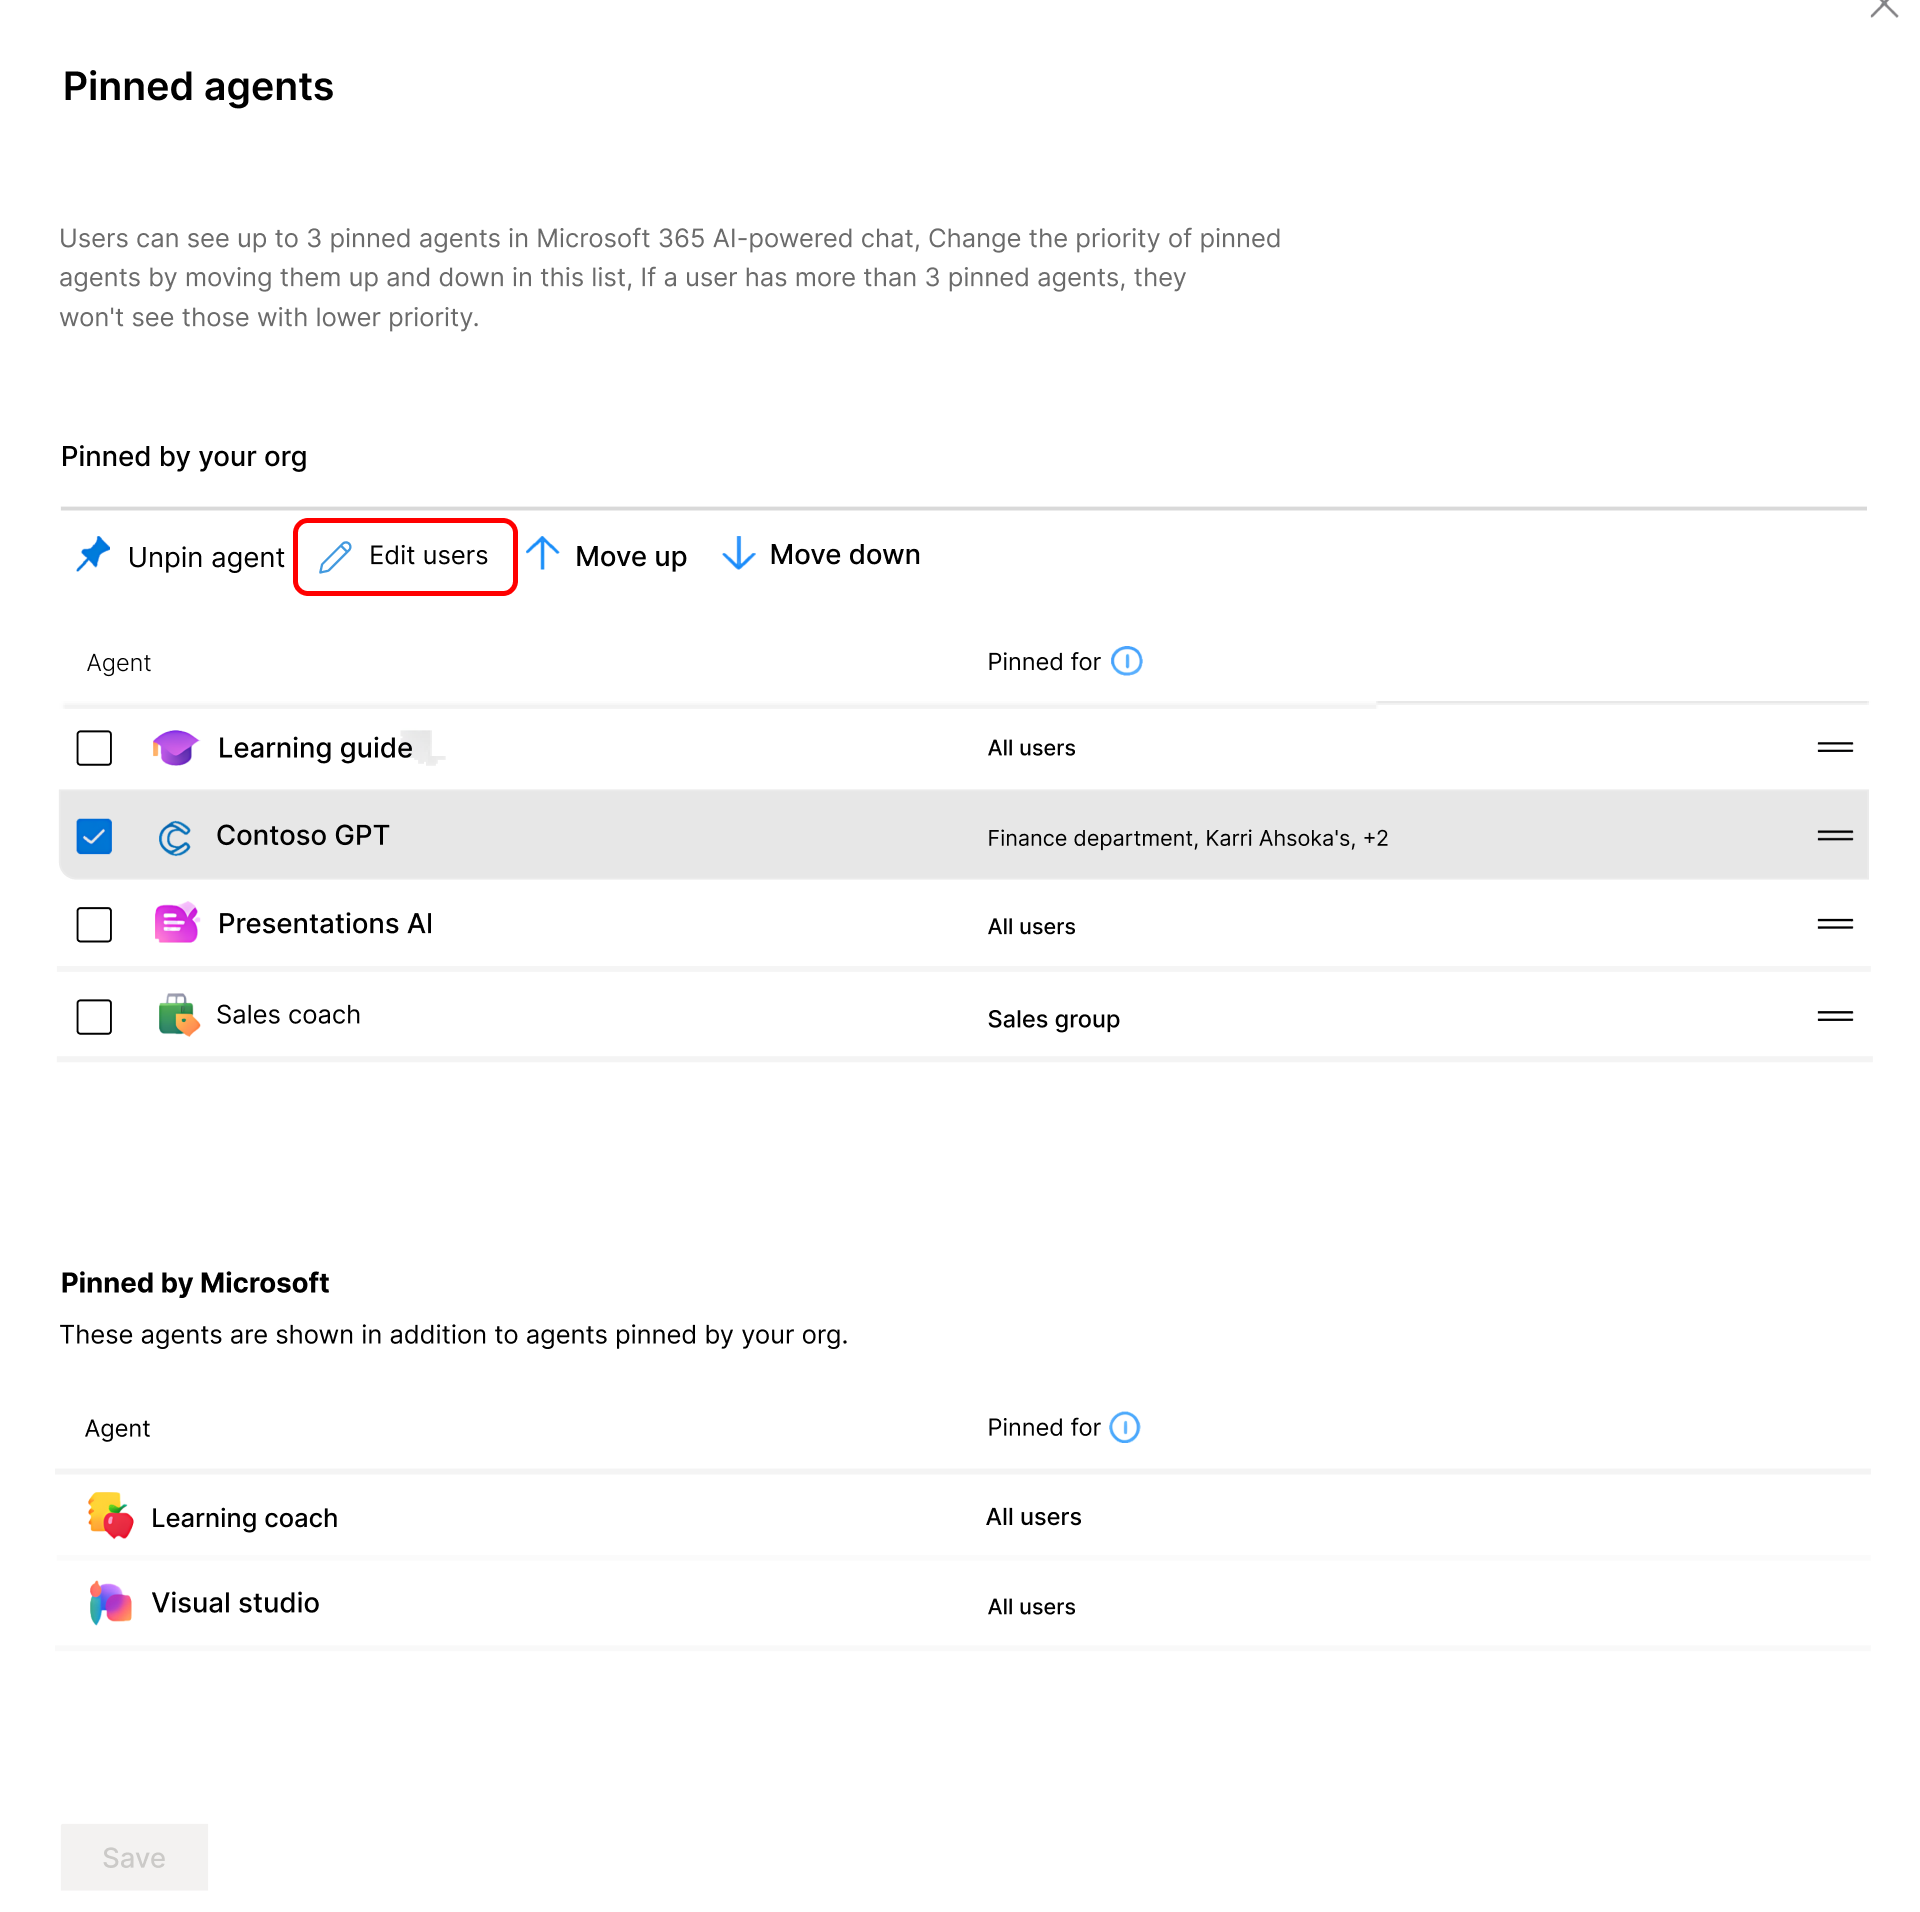
Alternate entry point for pinning
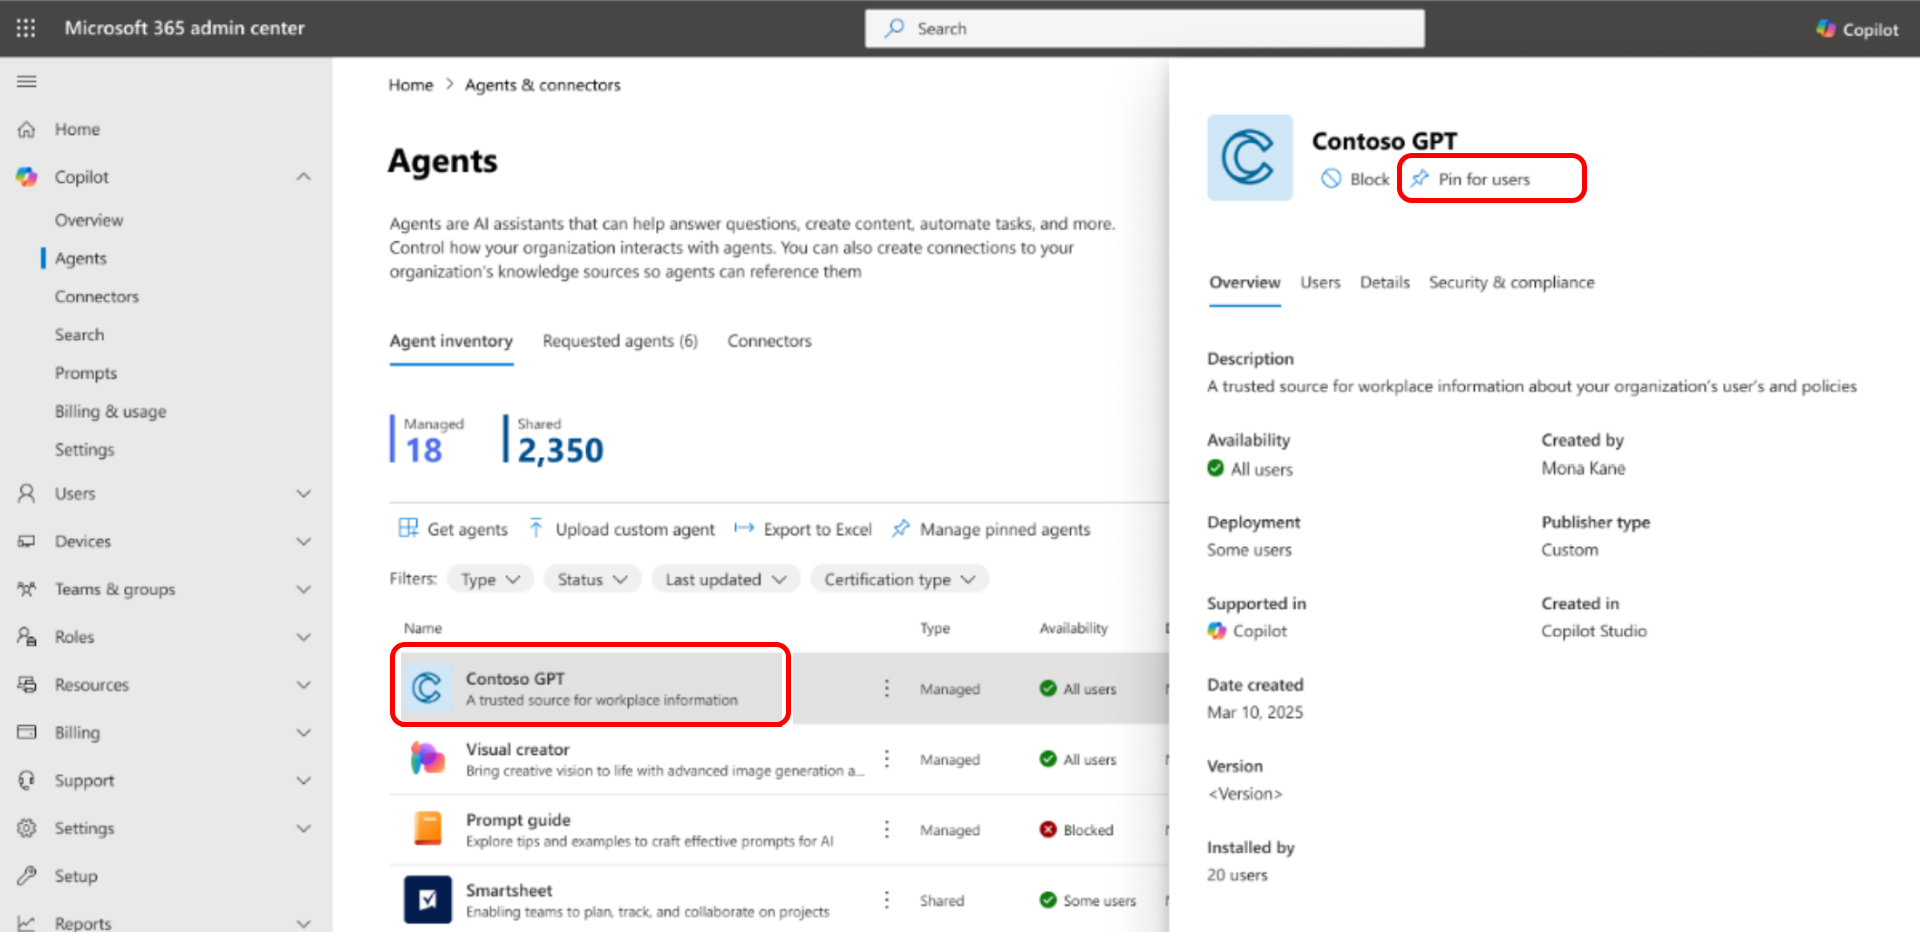
You can also pin an agent from the agent details pane. Select the pin for the user icon. The icon is only enabled if the agent is deployed.
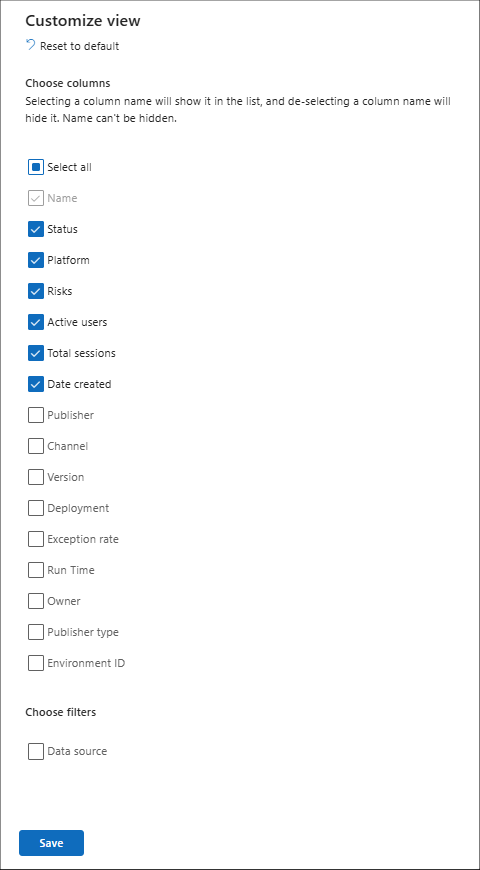
Customize view
The agent list provided on the All agents page can be customized. You can choose which columns to display.
Microsoft Graph API for Agent Registry and Agent Details (preview)
You can also access Agent Registry data programmatically through Microsoft Graph APIs, which gives you scalable and programmatic control over agent management. By using the new Microsoft Graph API endpoints, now in preview, administrators can integrate the following tasks into existing workflows across agents in Microsoft 365:
- Automate bulk agent management.
- Streamline onboarding.
- Integrate governance.
Beyond manual UX-driven agent management, the Microsoft Graph API helps you accelerate agent management, maintain security and compliance, and ensure agents are available to the right users at the right time.
Get all agents in your inventory - By using the GET packages API, administrators can retrieve a comprehensive list of all agents in their tenant to support compliance and reporting needs.
Get details of a particular agent in your inventory - The GET package details API provides rich metadata and details for any agent, making it easier to audit, manage, and optimize agent management.
The API works with the AI Admin Role. For more information, see Agent and app Package Management API overview (preview).
The following example shows how to retrieve a list of all agents in your tenant using Microsoft Graph PowerShell.
Connect-MgGraph -Scopes 'CopilotPackages.Read.All'

$uri = "https://graph.microsoft.com/v1.0/copilot/admin/catalog/packages"
$agentCount = 0

do {
    $response = Invoke-MgGraphRequest -Method GET -Uri $uri
    $agentCount += @($response.value).Count
    $response.value | ForEach-Object { Write-Host $_.displayName }
    $uri = $response.'@odata.nextLink'
} while ($uri)

Write-Host "Total agents: $agentCount"
Export to Excel for users and agents
You can export the list of agents to an Excel file. Set the export scope to All agents or Filtered agents for analysis and reporting.
The export can include agent details such as:
- Name
- Status
- Channel
- Date created
- Last modified
- Publisher
- Publisher type
- Version
- Owner
- Description
- Platform
- Instructions
Tip
There are over 30 different items for each agent that can be included in the exported list.
With this information, you can efficiently manage and review the shared agents within your organization, ensuring compliance and optimizing resource allocation.
Export the list of active users for the last 30 days to an Excel file. This feature is essential for detailed analysis and reporting.
The exported file includes comprehensive information about each active user, such as:
- User Principal Name
- Total Agents Used
- Total Sessions
- Last Activity Date
Additional information
Important
Non-Microsoft tools including third-party MCP servers available in [catalog/registry/offering name] ("Third-Party Tools") are Non-Microsoft Products under your agreement governing use of the corresponding Microsoft Product. When you connect to a Third-Party Tool, you do so at your own risk. You are responsible for any terms and charges associated with use of Third-Party Tools. Microsoft has no responsibility to you or others in relation to your use of Third-Party Tools. We recommend that you carefully review and track the Third-Party Tools you add to your MCP client.
Some of your information and data (such as authentication keys and prompt content) may be passed to the Third-Party Tool, or your MCP client might receive data from the Third-Party Tool. We recommend reviewing all data shared with Third-Party Tools and being cognizant of third-party practices for retention and location of data. It is your responsibility to manage whether your data will flow outside of your organization’s compliance and geographic boundaries and any related implications.
MCP implementations are susceptible to risks, such as attacks, cascading failures, and loss of human oversight. You can mitigate these risks by vetting MCP servers for security and reliability, following Microsoft’s recommended practices and industry best practices, and implementing approval mechanisms and monitoring cascading behaviors.
For your convenience only, Microsoft offers endpoints to facilitate transmittals of data to and from MCP servers through a monitored gateway. We recommend reviewing all technical documentation covering your configuration of any monitoring tools enabled by Microsoft. These endpoints do not imply and should no be interpreted as an endorsement, attribution or ownership of any third-party tools. The corresponding licensor, and not Microsoft, makes the third-party MCP servers available to you. Microsoft has no responsibility to you or others in relation to your use of third-party MCP servers.