หมายเหตุ
การเข้าถึงหน้านี้ต้องได้รับการอนุญาต คุณสามารถลอง ลงชื่อเข้าใช้หรือเปลี่ยนไดเรกทอรีได้
การเข้าถึงหน้านี้ต้องได้รับการอนุญาต คุณสามารถลองเปลี่ยนไดเรกทอรีได้
เมื่อสร้าง API แบบกําหนดเอง คุณต้องใช้โซลูชัน หากคุณไม่คุ้นเคยกับโซลูชัน ก่อนอื่นให้อ่าน สร้างโซลูชัน
โซลูชันของคุณต้องเชื่อมโยงกับผู้เผยแพร่ ผู้เผยแพร่มีคํานํหน้าการปรับแต่งเฉพาะที่เกี่ยวข้องกับมัน คุณต้องใช้คํานําหน้าการกําหนดค่าเมื่อสร้าง API แบบกําหนดเองและคํานําหน้านี้ควรใช้โดยผู้เผยแพร่โซลูชันของคุณเหมือนกัน คําแนะนําต่อไปนี้ใช้ค่า sample เป็นคํานําหน้าการกําหนดค่าเนื่องจากเป็นชุดหนึ่งสําหรับผู้เผยแพร่
สําคัญ
- ตอนนี้มีประสบการณ์ที่ดีกว่าสําหรับการสร้าง API แบบกําหนดเอง คุณสามารถใช้ตัวออกแบบภายในเครื่องมือการลงทะเบียนปลั๊กอินได้ ข้อมูลเพิ่มเติม: สร้าง API แบบกําหนดเองโดยใช้เครื่องมือลงทะเบียนปลั๊กอิน
- หลายเขตข้อมูลที่เกี่ยวข้องกับการสร้าง API แบบกําหนดเองไม่สามารถเปลี่ยนแปลงหลังจากที่คุณสร้าง คุณควรวางแผนการออกแบบ API แบบกําหนดเองอย่างระมัดระวังก่อนที่คุณจะเริ่ม ถ้าคุณตัดสินใจในภายหลังว่า คุณจําเป็นต้องเปลี่ยนสิ่งต่าง ๆ หลังจากที่คุณสร้าง API แบบกําหนดเองคุณอาจจําเป็นต้องลบระเบียนที่มีอยู่ และสร้าง API แบบกําหนดเองอีกครั้ง ตรวจทานข้อมูลเกี่ยวกับคอลัมน์ที่ไม่สามารถเปลี่ยนแปลงได้ที่นี่: ตาราง CustomAPI
สร้างระเบียน API แบบกําหนดเอง
ในโซลูชันของคุณ เลือกใหม่>เพิ่มเติม>API แบบกําหนดเอง> จากรายการแบบดรอปดาวน์
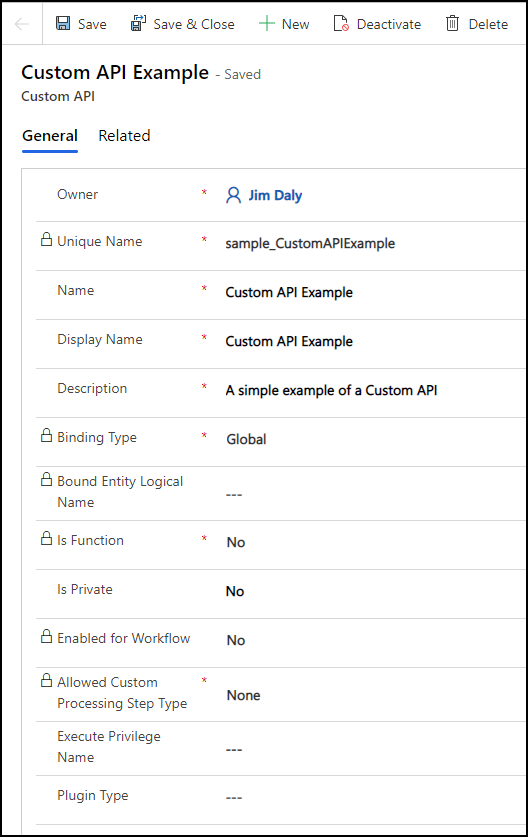
แก้ไขเขตข้อมูลเพื่อตั้งค่าคุณสมบัติของ API แบบกําหนดเองของคุณ คุณต้องตั้งค่าสําหรับเขตข้อมูลต่อไปนี้ สําหรับข้อมูลเพิ่มเติม ดู คอลัมน์ตาราง API แบบกําหนดเอง
คุณไม่สามารถตั้งค่าสําหรับ ชนิดปลั๊กอิน ก่อนที่คุณจะสร้างปลั๊กอิน คุณสามารถเปลี่ยนแปลงภายหลังได้
เลือก บันทึก ฟอร์มของคุณควรมีลักษณะดังนี้:
สร้างพารามิเตอร์ Request ใดๆ
API แบบกําหนดเองไม่จําเป็นต้องใช้พารามิเตอร์ สร้างพารามิเตอร์มากเท่าที่คุณต้องการเพื่อส่งผ่านข้อมูลที่จําเป็นสําหรับตรรกะของคุณ
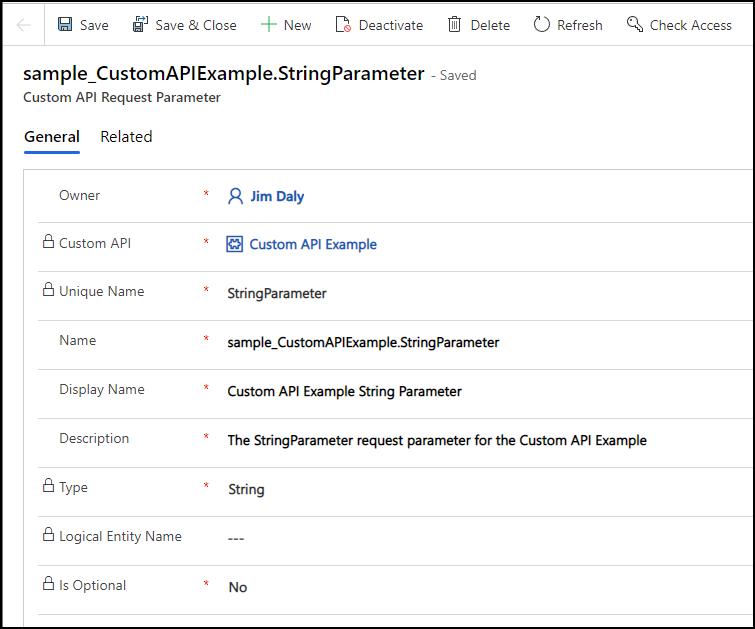
ในโซลูชันของคุณ เลือกใหม่>เพิ่มเติม>พารามิเตอร์คําขอ API แบบกําหนดเอง> จากรายการแบบเลื่อนลง
แก้ไขเขตข้อมูลเพื่อตั้งค่าคุณสมบัติของพารามิเตอร์คําขอ API แบบกําหนดเองของคุณ สําหรับข้อมูลเพิ่มเติม โปรดดู คอลัมน์ตาราง CustomAPIRequestParameter
เลือก บันทึก ฟอร์มของคุณควรมีลักษณะดังนี้:
สร้างคุณสมบัติการตอบสนองใด ๆ
API แบบกําหนดเองที่แสดงการดําเนินการไม่จําเป็นต้องมีคุณสมบัติการตอบสนอง ฟังก์ชันต้องมีอย่างน้อยหนึ่งฟังก์ชัน ถ้าการดําเนินการสําเร็จ จะส่งกลับการตอบสนองความสําเร็จ ถ้าล้มเหลว จะแสดงข้อผิดพลาด คุณควรกําหนดคุณสมบัติการตอบสนองสําหรับข้อมูลใด ๆ ที่ API ของคุณส่งกลับ
ถ้ามีเพียง เอนทิตี เดียวหรือคุณสมบัติการตอบสนอง EntityCollection ที่กําหนด คําตอบคือของชนิดนั้น ถ้ามีคุณสมบัติหลายอย่าง หรือคุณสมบัติอย่าง น้อยหนึ่งของประเภทง่ายๆ API จะส่งกลับชนิดที่ซับซ้อนโดยที่แต่ละคุณสมบัติการตอบสนองเป็นคุณสมบัติของประเภทที่ซับซ้อนนั้น
ตัวอย่างเช่น ถ้าชื่อ API ที่ไม่ซ้ํากันแบบกําหนดเองของคุณคือ sample_CustomAPIExampleจะส่งกลับชนิดที่ซับซ้อนที่ sample_CustomAPIExampleResponse ชื่อว่าด้วยคุณสมบัติสําหรับแต่ละคุณสมบัติการตอบสนองที่คุณกําหนด
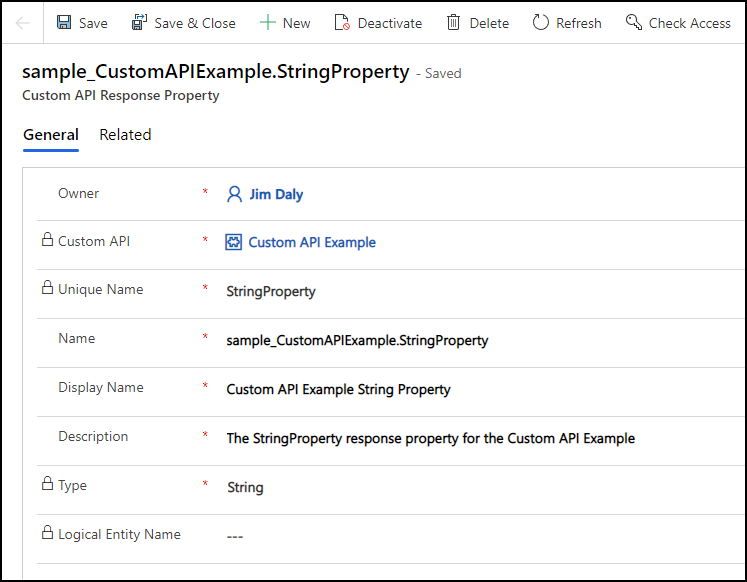
ในโซลูชันของคุณ เลือกใหม่>เพิ่มเติม>คุณสมบัติการตอบสนอง API แบบกําหนดเอง> จากรายการแบบดรอปดาวน์
แก้ไขเขตข้อมูลเพื่อตั้งค่าคุณสมบัติของคุณสมบัติการตอบสนอง API แบบกําหนดเองของคุณ สําหรับข้อมูลเพิ่มเติม ดู คอลัมน์ตาราง CustomAPIResponseProperty
เลือก บันทึก ฟอร์มของคุณควรมีลักษณะดังนี้:
สังเกตผลลัพธ์ในเอกสารบริการ
ถ้าคุณยังไม่ได้ตั้งค่า IsPrivate คุณสมบัติสําหรับ API แบบกําหนดเองของคุณ ตอนนี้คุณสามารถเรียกใช้ข้อกําหนดบริการจาก เอกสาร CSDL $metadata โดยใช้ GET คําขอ แม้แต่จากเบราว์เซอร์ของคุณ ถ้า URL สําหรับสภาพแวดล้อมของคุณคือ https://yourorg.crm.dynamics.comคุณสามารถพิมพ์ URL นี้ในเขตข้อมูลที่อยู่เบราว์เซอร์ของคุณเพื่อดึงข้อมูล$metadata: https://yourorg.crm.dynamics.com/api/data/v9.1/$metadata
ค้นหาผลลัพธ์เพื่อค้นหาชื่อของ API แบบกําหนดเอง ตัวอย่างเช่น API ที่กําหนดไว้โดยใช้ขั้นตอนข้างต้นจะมีลักษณะดังนี้:
<ComplexType Name="sample_CustomAPIExampleResponse">
    <Property Name="StringProperty" Type="Edm.String" Unicode="false" />
</ComplexType>
<Action Name="sample_CustomAPIExample">
    <Parameter Name="StringParameter" Type="Edm.String" Nullable="false" Unicode="false" />
    <ReturnType Type="mscrm.sample_CustomAPIExampleResponse" Nullable="false" />
</Action>
ทดสอบ API แบบกําหนดเองของคุณ
หลังจากที่คุณสร้าง API แบบกําหนดเองของคุณแล้ว คุณสามารถลองใช้ได้ แม้ว่าคุณยังไม่ได้ตั้งค่าชนิดปลั๊กอินเพื่อกําหนดการดําเนินการหลัก แต่คุณสามารถทดสอบได้ทันทีเพื่อตรวจสอบว่าคุณสามารถเรียกใช้ได้อย่างถูกต้อง คุณสมบัติการตอบสนองใด ๆ จะส่งกลับค่าเริ่มต้นเช่น null ข้อมูลเพิ่มเติม: การเรียก API แบบกําหนดเอง
อัปเดตประเภทปลั๊กอิน API แบบกําหนดเอง
สําหรับข้อมูลเกี่ยวกับวิธีการเขียนปลั๊กอินสําหรับ API แบบกําหนดเอง ดูเขียนปลั๊กอินสําหรับ API แบบกําหนดเองของคุณ
หลังจากที่คุณลงทะเบียนแอสเซมบลีของคุณแล้ว คุณจําเป็นต้องตั้งค่า ประเภทปลั๊กอิน สําหรับ API แบบกําหนดเองที่คุณสร้างขึ้น นี่คือคุณสมบัติการค้นหา ดังนั้นคุณเพียงแค่ต้องค้นหาชนิดปลั๊กอินที่แสดงชนิดที่สร้างขึ้นเมื่อคุณลงทะเบียนแอสเซมบลี

เมื่อคุณตั้งค่า ประเภทปลั๊กอิน คุณสามารถทดสอบ API แบบกําหนดเองของคุณเพื่อตรวจสอบผลลัพธ์ที่ถูกต้องถูกส่งกลับได้
วิธีอื่น ๆ ในการสร้าง API แบบกําหนดเอง
เครื่องมือลงทะเบียนปลั๊กอินมีตัวออกแบบ API แบบกําหนดเอง ข้อมูลเพิ่มเติม: สร้าง API แบบกําหนดเองโดยใช้เครื่องมือลงทะเบียนปลั๊กอิน
คุณอาจมีข้อกําหนดในการสร้างแอปพลิเคชันไคลเอ็นต์ที่อนุญาตให้สร้าง API แบบกําหนดเองภายนอกตัวออกแบบได้ เนื่องจากข้อมูลสําหรับ API แบบกําหนดเองถูกจัดเก็บในตาราง คุณสามารถสร้างโดยใช้โค้ดได้ ข้อมูลเพิ่มเติม:สร้าง API แบบกําหนดเองด้วยรหัส
กระบวนการ ALM ของคุณอาจจะทํางานได้ดียิ่งขึ้นด้วยการสร้าง API แบบกําหนดเองโดยการแก้ไขไฟล์โซลูชัน ข้อมูลเพิ่มเติม: สร้าง API แบบกําหนดเองด้วยไฟล์โซลูชัน
ดูเพิ่มเติม
สร้างและใช้ API แบบกําหนดเอง
สร้าง API แบบกําหนดเองโดยใช้เครื่องมือลงทะเบียนปลั๊กอิน
สร้าง API แบบกําหนดเองด้วยรหัส
สร้าง API แบบกําหนดเองด้วยไฟล์โซลูชัน
สร้างข้อความของคุณเอง