Öğretici: Mağaza bulucu oluşturmak için Azure Haritalar kullanma
Bu öğretici, Azure Haritalar kullanarak basit bir depo bulucu oluşturma işleminde size yol gösterir.
Bu öğreticide aşağıdakilerin nasıl yapılacağını öğreneceksiniz:
- Azure Harita Denetimi API'sini kullanarak yeni bir web sayfası oluşturun.
- Bir dosyadan özel verileri yükleyin ve haritada görüntüleyin.
- Adresi bulmak veya sorgu girmek için Azure Haritalar Arama hizmeti kullanın.
- Kullanıcının konumunu tarayıcıdan alın ve haritada gösterin.
- Haritada özel simgeler oluşturmak için birden çok katmanı birleştirin.
- Küme veri noktaları.
- Haritaya yakınlaştırma denetimleri ekleyin.
Önkoşullar
- Bu öğretici için Visual Studio Code önerilir, ancak uygun tümleştirilmiş geliştirme ortamlarını (IDE) kullanabilirsiniz.
- Azure Haritalar hesabı
- Abonelik anahtarı
Not
Azure Haritalar kimlik doğrulaması hakkında daha fazla bilgi için bkz. Azure Haritalar kimlik doğrulamasını yönetme.
Örnek kod
Bu öğreticide Contoso Coffee adlı kurgusal bir şirket için mağaza bulucunun nasıl oluşturulacağı ve mağaza bulucusunu ek işlevlerle genişletmeye yönelik ipuçları gösterilmektedir.
Bu öğreticide oluşturdukların canlı bir örneğini görmek için Azure Haritalar Kod Örnekleri sitesindeki Basit Mağaza Bulucu'ya bakın.
Bu öğreticiyi daha kolay takip etmek ve etkileşime geçmek için aşağıdaki kaynakları indirin:
- Basit Mağaza Bulucu kaynak kodu.
- Depolama bulucu veri kümesine içeri aktarmak için kullanılan konum verilerini depolayın.
- Harita görüntüleri.
Mağaza bulucu özellikleri
Bu bölümde, bu öğreticide oluşturulan Contoso Coffee store bulucu uygulamasında görüntülenen Azure Haritalar özellikleri listelenmiştir.
Kullanıcı arabirimi özellikleri
- Üst bilgide mağaza logosu
- Kaydırmayı ve yakınlaştırmayı destekleyen bir harita
- Kullanıcının geçerli konumu üzerinde arama yapmak için Konumum düğmesi.
- Cihazlar ekranının genişliğine göre ayarlanan sayfa düzeni
- Arama kutusu ve arama düğmesi
İşlevsellik özellikleri
keypressArama kutusuna eklenen bir olay, kullanıcı Enter tuşuna bastığında bir arama tetikler.- Harita hareket ettiğinde, haritanın merkezinden her konuma olan uzaklık yeniden hesaplanır. Sonuç listesi, haritanın en üstünde en yakın konumları görüntüleyecek şekilde güncelleştirilir.
- Kullanıcı sonuç listesinden bir sonuç seçtiğinde, harita seçilen konumun üzerinde ortalanır ve konum hakkındaki bilgiler bir açılır pencerede görüntülenir.
- Kullanıcı belirli bir konumu seçtiğinde, harita bir açılır pencere tetikler.
- Kullanıcı uzaklaştırıldığında konumlar kümeler halinde gruplandırılır. Her küme, daire içinde bir sayı bulunan bir daireyle temsil edilir. Kullanıcı yakınlaştırma düzeyini değiştirdikçe kümeler oluşur ve ayrılır.
- Bir küme seçildiğinde harita üzerinde iki düzey yakınlaştırılıp kümenin konumunu ortalar.
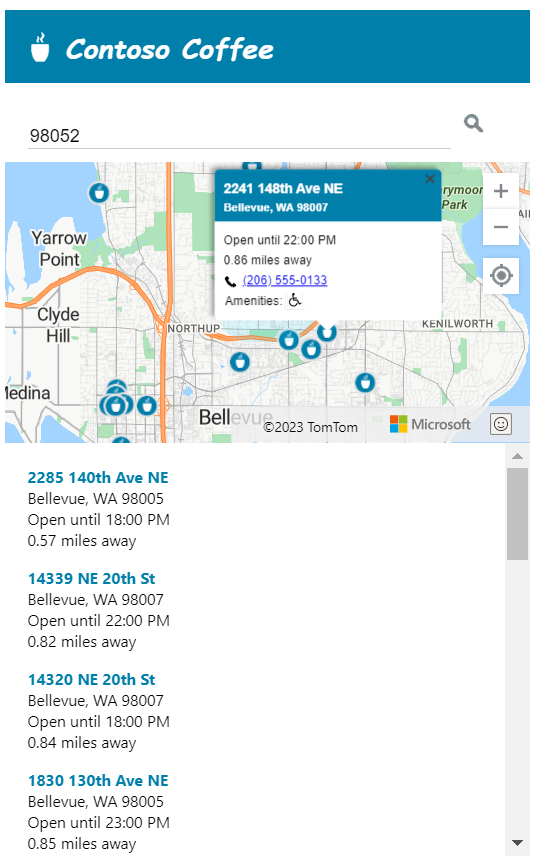
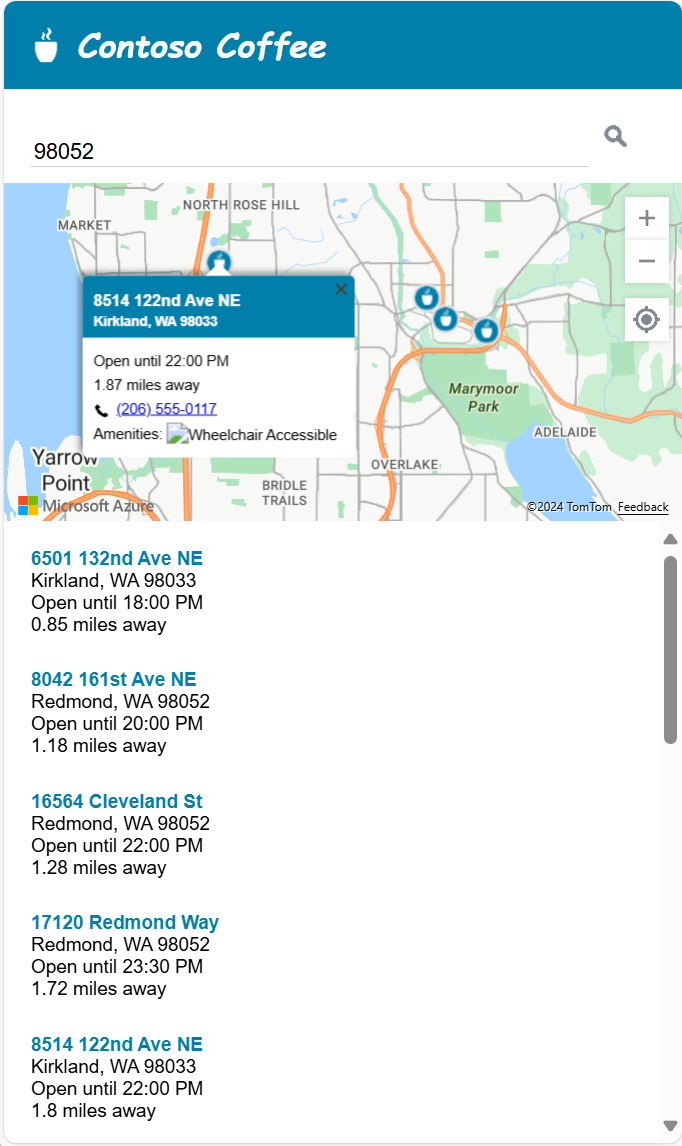
Mağaza bulucu tasarımı
Aşağıdaki ekran görüntüsünde Contoso Coffee store bulucu uygulamasının genel düzeni gösterilmektedir. Canlı örneği görüntülemek ve bunlarla etkileşime geçmek için Azure Haritalar Kod Örnekleri sitesindeki Basit Mağaza Bulucu örnek uygulamasına bakın.

Bu mağaza bulucunun kullanışlılığını en üst düzeye çıkarmak için, kullanıcının ekran genişliği 700 pikselden daha küçük olduğunda ayarlanan duyarlı bir düzen ekleriz. Hızlı yanıt veren düzen, mağaza bulucuyu mobil cihazda olduğu gibi küçük bir ekranda kullanmayı kolaylaştırır. Küçük ekran düzeninin bir örneğini gösteren ekran görüntüsü:
Mağaza konumu veri kümesini oluşturma
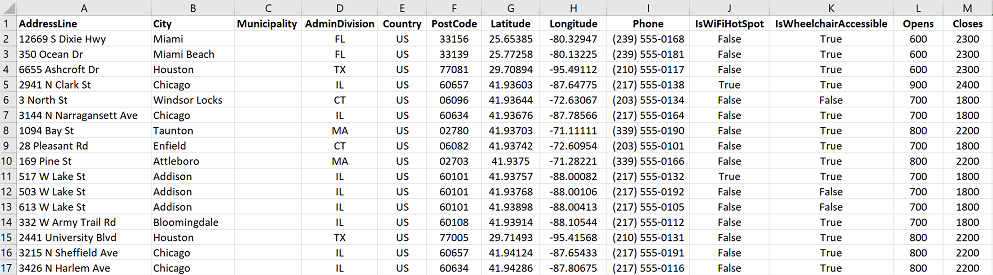
Bu bölümde, haritada görüntülemek istediğiniz depoların veri kümesinin nasıl oluşturulacağı açıklanmaktadır. Contoso Coffee bulucu için veri kümesi bir Excel çalışma kitabı içinde oluşturulur. Veri kümesi dokuz ülke veya bölgeye yayılmış 10.213 Contoso Kahve dükkanı konumu içerir: Birleşik Devletler, Kanada, Birleşik Krallık, Fransa, Almanya, İtalya, Hollanda, Danimarka ve İspanya. Verilerin nasıl göründüğünün ekran görüntüsü aşağıdadır:
Contoso Coffee bulucu örnek uygulamasının tam veri kümesini içeren Excel dosyasını GitHub'daki Azure Haritalar kod örnekleri deposunun veri klasöründen indirin.
Verilerin yukarıdaki ekran görüntüsünden aşağıdaki gözlemleri gerçekleştirebiliriz:
- Konum bilgileri şu altı sütunda depolanır: AddressLine, City, Belediye (ilçe), Yönetici Division (eyalet/il), PostCode (posta kodu) ve Ülke.
- Enlem ve Boylam sütunları her Contoso Kahve konumunun koordinatlarını içerir. Koordinat bilgileriniz yoksa, konum koordinatlarını belirlemek için Arama hizmeti kullanabilirsiniz.
- Diğer bazı sütunlar kahve dükkanları ile ilgili meta veriler içerir: telefon numarası, Boole sütunları ve 24 saatlik biçimde açılış ve kapanış saatlerini depolar. Boole sütunları Wi-Fi ve tekerlekli sandalye erişilebilirliği içindir. Konum verilerinizle daha ilgili meta veriler içeren kendi sütunlarınızı oluşturabilirsiniz.
Not
Azure Haritalar verileri Küresel Mercator projeksiyonu "EPSG:3857", ancak "EPSG:4326" içinde WGS84 datum kullanan verileri okur.
Contoso Coffee shop bulucu veri kümesini yükleme
Contoso Coffee shop bulucu veri kümesi küçük olduğundan, uygulama yüklendiğinde tarayıcının indirebileceği sekmeyle ayrılmış bir metin dosyasına dönüştürülebilir.
İpucu
Veri kümeniz istemci indirmesi için çok büyükse veya sık sık güncelleştiriliyorsa, veri kümenizi bir veritabanında depolamayı düşünebilirsiniz. Verileriniz bir veritabanına yüklendikten sonra, veriler için sorguları kabul eden ve ardından sonuçları kullanıcının tarayıcısına gönderen bir web hizmeti ayarlayabilirsiniz.
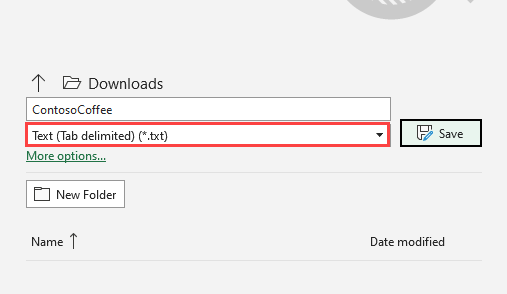
Verileri sekmeyle ayrılmış metin dosyasına dönüştürme
Bir Excel çalışma kitabındaki Contoso Coffee shop konum verilerini sekmeyle ayrılmış metin dosyasına dönüştürmek için:
ContosoCoffee.xlsx Excel çalışma kitabını indirin ve Excel'de açın.
Dosya > Farklı Kaydet... seçeneğini belirleyin.
Kayıt türü açılan listesinde Metin (Sekmeyle ayrılmış)(*.txt)'ni seçin.
Dosyayı ContosoCoffee olarak adlandırın.
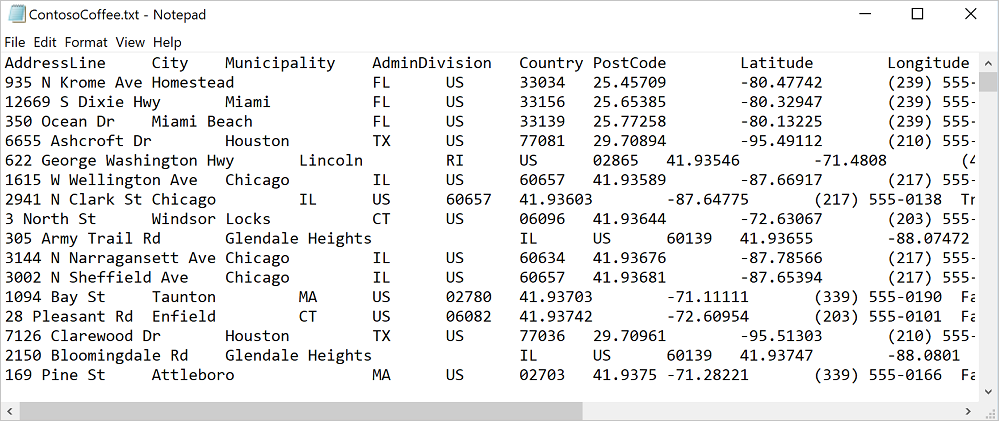
Metin dosyasını Not Defteri açarsanız, aşağıdaki metne benzer:
Projeyi ayarlama
Visual Studio Code'ı veya seçtiğiniz geliştirme ortamlarını açın.
Dosya > Çalışma Alanını Aç... seçeneğini belirleyin.
ContosoCoffee adlı yeni bir klasör oluşturun.
Gezginde ContosoCoffee'yi seçin.
Uygulamanın düzenini, stilini ve mantığını tanımlayan aşağıdaki üç dosyayı oluşturun:
- Index.html
- index.css
- index.js
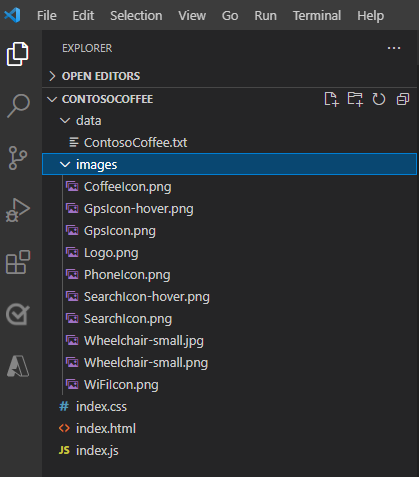
data adlı bir klasör oluşturun.
Excel çalışma kitabı ContosoCoffee.xlsx daha önce oluşturduğunuz ContosoCoffee.txt dosyasını veri klasörüne ekleyin.
images adlı başka bir klasör oluşturun.
Henüz yapmadıysanız GitHub Deposu'ndaki images dizininden 10 Harita görüntüsü indirin ve images klasörüne ekleyin.
Çalışma alanı klasörünüz artık aşağıdaki ekran görüntüsüne benzer olmalıdır:
HTML oluşturma
HTML oluşturmak için:
aşağıdaki
metaetiketleriheadindex.html ekleyin:<meta charset="utf-8"> <meta http-equiv="x-ua-compatible" content="IE=Edge"> <meta name="viewport" content="width=device-width, initial-scale=1, shrink-to-fit=no">Azure Haritalar web denetimi JavaScript ve CSS dosyalarına başvurular ekleyin:
<!-- Add references to the Azure Maps Map control JavaScript and CSS files. -->
<link rel="stylesheet" href="https://atlas.microsoft.com/sdk/javascript/mapcontrol/3/atlas.min.css" type="text/css">
<script src="https://atlas.microsoft.com/sdk/javascript/mapcontrol/3/atlas.min.js"></script>
index.js ve index.css başvuruları ekleyin.
<!-- Add references to the store locator JavaScript and CSS files. -->
<link rel="stylesheet" href="index.css" type="text/css">
<script src="index.js"></script>
Belgenin gövdesine bir
headeretiket ekleyin. Etiketinheaderiçine logoyu ve şirket adını ekleyin.<header> <img src="images/Logo.png" /> <span>Contoso Coffee</span> </header>Etiket
mainekleyin ve metin kutusu ve arama düğmesi olan bir arama paneli oluşturun. Ayrıca harita, liste paneli ve Konumum GPS düğmesi için başvurular ekleyindiv.<main> <div class="searchPanel"> <div> <input id="searchTbx" type="search" placeholder="Find a store" /> <button id="searchBtn" title="Search"></button> </div> </div> <div id="listPanel"></div> <div id="myMap"></div> <button id="myLocationBtn" title="My Location"></button> </main>
İşlem tamamlandıktan sonra index.html öğretici örnek kodunda Basit Mağaza Locator.html gibi görünmelidir.
CSS stillerini tanımlama
Sonraki adım CSS stillerini tanımlamaktır. CSS stilleri, uygulama bileşenlerinin nasıl yerleştirılacağını ve uygulamanın görünümünü tanımlar.
index.css'i açın.
Aşağıdaki css kodunu ekleyin:
Not
Stil,
@mediaekran genişliği 700 pikselden küçük olduğunda kullanılacak alternatif stil seçeneklerini tanımlar.html, body { padding: 0; margin: 0; font-family: Gotham, Helvetica, sans-serif; overflow-x: hidden; } header { width: calc(100vw - 10px); height: 30px; padding: 15px 0 20px 20px; font-size: 25px; font-style: italic; font-family: "Comic Sans MS", cursive, sans-serif; line-height: 30px; font-weight: bold; color: white; background-color: #007faa; } header span { vertical-align: middle; } header img { height: 30px; vertical-align: middle; } .searchPanel { position: relative; width: 350px; } .searchPanel div { padding: 20px; } .searchPanel input { width: calc(100% - 50px); font-size: 16px; border: 0; border-bottom: 1px solid #ccc; } #listPanel { position: absolute; top: 135px; left: 0px; width: 350px; height: calc(100vh - 135px); overflow-y: auto; } #myMap { position: absolute; top: 65px; left: 350px; width: calc(100vw - 350px); height: calc(100vh - 65px); } .statusMessage { margin: 10px; } #myLocationBtn, #searchBtn { margin: 0; padding: 0; border: none; border-collapse: collapse; width: 32px; height: 32px; text-align: center; cursor: pointer; line-height: 32px; background-repeat: no-repeat; background-size: 20px; background-position: center center; z-index: 200; } #myLocationBtn { position: absolute; top: 150px; right: 10px; box-shadow: 0px 0px 4px rgba(0,0,0,0.16); background-color: white; background-image: url("images/GpsIcon.png"); } #myLocationBtn:hover { background-image: url("images/GpsIcon-hover.png"); } #searchBtn { background-color: transparent; background-image: url("images/SearchIcon.png"); } #searchBtn:hover { background-image: url("images/SearchIcon-hover.png"); } .listItem { height: 50px; padding: 20px; font-size: 14px; } .listItem:hover { cursor: pointer; background-color: #f1f1f1; } .listItem-title { color: #007faa; font-weight: bold; } .storePopup { min-width: 150px; } .storePopup .popupTitle { border-top-left-radius: 4px; border-top-right-radius: 4px; padding: 8px; height: 30px; background-color: #007faa; color: white; font-weight: bold; } .storePopup .popupSubTitle { font-size: 10px; line-height: 12px; } .storePopup .popupContent { font-size: 11px; line-height: 18px; padding: 8px; } .storePopup img { vertical-align:middle; height: 12px; margin-right: 5px; } /* Adjust the layout of the page when the screen width is fewer than 700 pixels. */ @media screen and (max-width: 700px) { .searchPanel { width: 100vw; } #listPanel { top: 385px; width: 100%; height: calc(100vh - 385px); } #myMap { width: 100vw; height: 250px; top: 135px; left: 0px; } #myLocationBtn { top: 220px; } } .mapCenterIcon { display: block; width: 10px; height: 10px; border-radius: 50%; background: orange; border: 2px solid white; cursor: pointer; box-shadow: 0 0 0 rgba(0, 204, 255, 0.4); animation: pulse 3s infinite; } @keyframes pulse { 0% { box-shadow: 0 0 0 0 rgba(0, 204, 255, 0.4); } 70% { box-shadow: 0 0 0 50px rgba(0, 204, 255, 0); } 100% { box-shadow: 0 0 0 0 rgba(0, 204, 255, 0); } }
Uygulamayı bu noktada çalıştırırsanız üst bilgi, arama kutusu ve arama düğmesi görüntülenir. Ancak harita henüz yüklenmediğinden görünür değildir. Arama yapmaya çalışırsanız hiçbir şey olmaz. Sonraki bölümde depo bulucunun tüm işlevlerine erişmek için gereken JavaScript mantığının eklenmesi açıklanmaktadır.
JavaScript kodu ekleme
Contoso Coffee shop bulucu uygulamasındaki JavaScript kodu aşağıdaki işlemleri etkinleştirir:
Sayfa yükleme işlemini tamamlayana kadar beklemesi için adlı
readybir olay dinleyicisi ekler. Sayfa yükleme işlemi tamamlandığında, olay işleyicisi haritanın yüklenmesini izlemek için daha fazla olay dinleyicisi oluşturur ve arama ve Konumum düğmelerine işlevsellik verir.Kullanıcı arama düğmesini seçtiğinde veya arama kutusuna bir konum yazdığınızda enter tuşuna bastığında, kullanıcının sorgusunda benzer bir arama başlar. Kod, bir ülke/bölge ISO 2 değerleri dizisini
countrySetarama sonuçlarını bu ülkeler/bölgeler ile sınırlama seçeneğine geçirir. Ülke/bölgelerin aranacak şekilde sınırlandırılması, döndürülen sonuçların doğruluğunu artırmaya yardımcı olur.Arama tamamlandıktan sonra haritanın orta odağı olarak ilk konum sonucu kullanılır. Kullanıcı Konumum düğmesini seçtiğinde kod, tarayıcıda yerleşik olarak bulunan HTML5 Coğrafi Konum API'sini kullanarak kullanıcının konumunu alır. Konum alındıktan sonra kod, haritayı kullanıcının konumu üzerinde ortalar.
JavaScript'i eklemek için:
index.js'i açın.
Ayarları güncelleştirmeyi kolaylaştırmak için genel seçenekler ekleyin. Harita, açılır pencere, veri kaynağı, simge katmanı ve HTML işaretçisi için değişkenleri tanımlayın. HTML işaretçisini arama alanının merkezini gösterecek şekilde ayarlayın. Ayrıca, Azure Haritalar arama hizmeti istemcisinin bir örneğini tanımlayın.
//The maximum zoom level to cluster data point data on the map.
var maxClusterZoomLevel = 11;

//The URL to the store location data.
var storeLocationDataUrl = 'data/ContosoCoffee.txt';

//The URL to the icon image.
var iconImageUrl = 'images/CoffeeIcon.png';

//An array of country region ISO2 values to limit searches to.
var countrySet = ['US', 'CA', 'GB', 'FR','DE','IT','ES','NL','DK'];

//
var map, popup, datasource, iconLayer, centerMarker;

// Used in function updateListItems
var listItemTemplate = '<div class="listItem" onclick="itemSelected(\'{id}\')"><div class="listItem-title">{title}</div>{city}<br />Open until {closes}<br />{distance} miles away</div>';
Aşağıdaki başlatma kodunu ekleyin. değerini Azure Haritalar abonelik anahtarınızla değiştirdiğinden
<Your Azure Maps Key>emin olun.İpucu
Açılır pencereleri kullandığınızda, en iyisi tek
Popupbir örnek oluşturmak ve içeriğini ve konumunu güncelleştirerek örneği yeniden kullanmaktır. Kodunuza eklediğiniz herPopupörnek için sayfaya birden çok DOM öğesi eklenir. Sayfada ne kadar çok DOM öğesi varsa, tarayıcının izlemesi gereken şeyler de o kadar fazla olur. Çok fazla öğe varsa tarayıcı yavaşlayabilir.function initialize() { //Initialize a map instance. map = new atlas.Map('myMap', { center: [-90, 40], zoom: 2, //Add your Azure Maps subscription key to the map SDK. authOptions: { authType: 'subscriptionKey', subscriptionKey: '<Your Azure Maps Key>' } }); //Create a pop-up window, but leave it closed so we can update it and display it later. popup = new atlas.Popup(); //If the user selects the search button, geocode the value the user passed in. document.getElementById('searchBtn').onclick = performSearch; //If the user presses Enter in the search box, perform a search. document.getElementById('searchTbx').onkeyup = function(e) { if (e.keyCode === 13) { performSearch(); } }; //If the user selects the My Location button, use the Geolocation API to get the user's location. Center and zoom the map on that location. document.getElementById('myLocationBtn').onclick = setMapToUserLocation; //Wait until the map resources are ready. map.events.add('ready', function() { //Add your maps post load functionality. }); } function performSearch() { var query = document.getElementById('searchTbx').value; //Pass in the array of country/region ISO2 for which we want to limit the search to. var url = `https://atlas.microsoft.com/search/fuzzy/json?api-version=1.0&countrySet=${countrySet}&query=${query}&view=Auto`; //Perform a fuzzy search on the users query. fetch(url, { headers: { "Subscription-Key": map.authentication.getToken() } }) .then((response) => response.json()) .then((response) => { if (Array.isArray(response.results) && response.results.length > 0) { var result = response.results[0]; var bbox = [ result.viewport.topLeftPoint.lon, result.viewport.btmRightPoint.lat, result.viewport.btmRightPoint.lon, result.viewport.topLeftPoint.lat ]; //Set the camera to the bounds of the first result. map.setCamera({ bounds: bbox, padding: 40 }); } else { document.getElementById('listPanel').innerHTML = '<div class="statusMessage">Unable to find the location you searched for.</div>'; } }); } function setMapToUserLocation() { //Request the user's location. navigator.geolocation.getCurrentPosition(function(position) { //Convert the geolocation API position into a longitude/latitude position value the map can understand and center the map over it. map.setCamera({ center: [position.coords.longitude, position.coords.latitude], zoom: maxClusterZoomLevel + 1 }); }, function(error) { //If an error occurs when trying to access the users position information, display an error message. switch (error.code) { case error.PERMISSION_DENIED: alert('User denied the request for geolocation.'); break; case error.POSITION_UNAVAILABLE: alert('Position information is unavailable.'); break; case error.TIMEOUT: alert('The request to get user position timed out.'); break; case error.UNKNOWN_ERROR: alert('An unknown error occurred.'); break; } }); } //Initialize the application when the page is loaded. window.onload = initialize;Haritanın
readyolay işleyicisinde, arama alanının merkezini görüntülemek için bir yakınlaştırma denetimi ve HTML işaretçisi ekleyin.//Add a zoom control to the map. map.controls.add(new atlas.control.ZoomControl(), { position: 'top-right' }); //Add an HTML marker to the map to indicate the center to use for searching. centerMarker = new atlas.HtmlMarker({ htmlContent: '<div class="mapCenterIcon"></div>', position: map.getCamera().center }); map.markers.add(centerMarker);Eşlemenin olay işleyicisine
readybir veri kaynağı ekleyin. Ardından veri kümesini yüklemek ve ayrıştırmak için bir çağrı yapın. Veri kaynağında kümele oluşturmayı etkinleştirin. Veri kaynağında kümeleme, noktaları kümede bir araya getiren grupları oluşturur. Kullanıcı yakınlaştırdıkça, kümeler ayrı noktalara ayrılır. Bu davranış daha iyi bir kullanıcı deneyimi sağlar ve performansı artırır.//Create a data source, add it to the map, and then enable clustering. datasource = new atlas.source.DataSource(null, { cluster: true, clusterMaxZoom: maxClusterZoomLevel - 1 }); map.sources.add(datasource); //Load all the store data now that the data source has been defined. loadStoreData();Veri kümesi haritanın
readyolay işleyicisine yüklendikten sonra, verileri işlemek için bir katman kümesi tanımlayın. Kabarcık katmanı, kümelenmiş veri noktalarını işler. Sembol katmanı, her kümedeki noktaların sayısını kabarcık katmanının üzerinde işler. İkinci bir sembol katmanı, haritadaki tek tek konumlar için özel bir simge oluşturur.Kullanıcı haritada bir kümenin veya simgenin üzerine geldiğinde fare imlecini değiştirmek için kabarcık ve simge katmanlarına ve
mouseoutolayları ekleyinmouseover. Küme kabarcık katmanına birclickolay ekleyin. Buclickolay haritayı iki düzey yakınlaştırıp kullanıcı herhangi bir kümeyi seçtiğinde haritayı bir küme üzerinde ortalar. Simge katmanına birclickolay ekleyin. Buclickolay, bir kullanıcı tek bir konum simgesini seçtiğinde bir kafenin ayrıntılarını gösteren bir açılır pencere görüntüler. Haritanın taşınma işleminin ne zaman bittiğini izlemek için haritaya bir olay ekleyin. Bu olay tetiklendiğinde, liste panelindeki öğeleri güncelleştirin.//Create a bubble layer to render clustered data points. var clusterBubbleLayer = new atlas.layer.BubbleLayer(datasource, null, { radius: 12, color: '#007faa', strokeColor: 'white', strokeWidth: 2, filter: ['has', 'point_count'] //Only render data points that have a point_count property; clusters have this property. }); //Create a symbol layer to render the count of locations in a cluster. var clusterLabelLayer = new atlas.layer.SymbolLayer(datasource, null, { iconOptions: { image: 'none' //Hide the icon image. }, textOptions: { textField: ['get', 'point_count_abbreviated'], size: 12, font: ['StandardFont-Bold'], offset: [0, 0.4], color: 'white' } }); map.layers.add([clusterBubbleLayer, clusterLabelLayer]); //Load a custom image icon into the map resources. map.imageSprite.add('myCustomIcon', iconImageUrl).then(function() { //Create a layer to render a coffee cup symbol above each bubble for an individual location. iconLayer = new atlas.layer.SymbolLayer(datasource, null, { iconOptions: { //Pass in the ID of the custom icon that was loaded into the map resources. image: 'myCustomIcon', //Optionally, scale the size of the icon. font: ['SegoeUi-Bold'], //Anchor the center of the icon image to the coordinate. anchor: 'center', //Allow the icons to overlap. allowOverlap: true }, filter: ['!', ['has', 'point_count']] //Filter out clustered points from this layer. }); map.layers.add(iconLayer); //When the mouse is over the cluster and icon layers, change the cursor to a pointer. map.events.add('mouseover', [clusterBubbleLayer, iconLayer], function() { map.getCanvasContainer().style.cursor = 'pointer'; }); //When the mouse leaves the item on the cluster and icon layers, change the cursor back to the default (grab). map.events.add('mouseout', [clusterBubbleLayer, iconLayer], function() { map.getCanvasContainer().style.cursor = 'grab'; }); //Add a click event to the cluster layer. When the user selects a cluster, zoom into it by two levels. map.events.add('click', clusterBubbleLayer, function(e) { map.setCamera({ center: e.position, zoom: map.getCamera().zoom + 2 }); }); //Add a click event to the icon layer and show the shape that was selected. map.events.add('click', iconLayer, function(e) { showPopup(e.shapes[0]); }); //Add an event to monitor when the map has finished rendering. map.events.add('render', function() { //Update the data in the list. updateListItems(); }); });Kafe veri kümesi gerektiğinde, önce indirilmesi gerekir. İndirildikten sonra dosyanın satırlara bölünmesi gerekir. İlk satır üst bilgi bilgilerini içerir. Kodun daha kolay takip edilebilir olmasını sağlamak için, üst bilgiyi bir nesneye ayrıştırıyoruz. Bunu kullanarak her özelliğin hücre dizinini arayabiliriz. İlk satırdan sonra kalan satırlar arasında döngü yapın ve bir nokta özelliği oluşturun. Nokta özelliğini veri kaynağına ekleyin. Son olarak liste panelini güncelleştirin.
function loadStoreData() {

//Download the store location data.
fetch(storeLocationDataUrl)
    .then(response => response.text())
    .then(function(text) {

        //Parse the tab-delimited file data into GeoJSON features.
        var features = [];

        //Split the lines of the file.
        var lines = text.split('\n');

        //Grab the header row.
        var row = lines[0].split('\t');

        //Parse the header row and index each column to make the code for parsing each row easier to follow.
        var header = {};
        var numColumns = row.length;
        for (var i = 0; i < row.length; i++) {
            header[row[i]] = i;
        }

        //Skip the header row and then parse each row into a GeoJSON feature.
        for (var i = 1; i < lines.length; i++) {
            row = lines[i].split('\t');

            //Ensure that the row has the correct number of columns.
            if (row.length >= numColumns) {

                features.push(new atlas.data.Feature(new atlas.data.Point([parseFloat(row[header['Longitude']]), parseFloat(row[header['Latitude']])]), {
                    AddressLine: row[header['AddressLine']],
                    City: row[header['City']],
                    Municipality: row[header['Municipality']],
                    AdminDivision: row[header['AdminDivision']],
                    Country: row[header['Country']],
                    PostCode: row[header['PostCode']],
                    Phone: row[header['Phone']],
                    StoreType: row[header['StoreType']],
                    IsWiFiHotSpot: (row[header['IsWiFiHotSpot']].toLowerCase() === 'true') ? true : false,
                    IsWheelchairAccessible: (row[header['IsWheelchairAccessible']].toLowerCase() === 'true') ? true : false,
                    Opens: parseInt(row[header['Opens']]),
                    Closes: parseInt(row[header['Closes']])
                }));
            }
        }

        //Add the features to the data source.
        datasource.add(new atlas.data.FeatureCollection(features));

        //Initially, update the list items.
        updateListItems();
    });
}
Liste paneli güncelleştirildiğinde uzaklık hesaplanır. Bu uzaklık, haritanın merkezinden geçerli harita görünümündeki tüm nokta özelliklerine kadardır. Ardından özellikler mesafeye göre sıralanır. Liste panelindeki her konumu görüntülemek için HTML oluşturulur.
var listItemTemplate = '<div class="listItem" onclick="itemSelected(\'{id}\')"><div class="listItem-title">{title}</div>{city}<br />Open until {closes}<br />{distance} miles away</div>';

function updateListItems() {
    //Hide the center marker.
    centerMarker.setOptions({
        visible: false
    });

    //Get the current camera and view information for the map.
    var camera = map.getCamera();
    var listPanel = document.getElementById('listPanel');

    //Check to see if the user is zoomed out a substantial distance. If they are, tell them to zoom in and to perform a search or select the My Location button.
    if (camera.zoom < maxClusterZoomLevel) {
        //Close the pop-up window; clusters might be displayed on the map.
        popup.close();
        listPanel.innerHTML = '<div class="statusMessage">Search for a location, zoom the map, or select the My Location button to see individual locations.</div>';
    } else {
        //Update the location of the centerMarker property.
        centerMarker.setOptions({
            position: camera.center,
            visible: true
        });

        //List the ten closest locations in the side panel.
        var html = [], properties;

        /*
        Generating HTML for each item that looks like this:
        <div class="listItem" onclick="itemSelected('id')">
            <div class="listItem-title">1 Microsoft Way</div>
            Redmond, WA 98052<br />
            Open until 9:00 PM<br />
            0.7 miles away
        </div>
        */

        //Get all the shapes that have been rendered in the bubble layer.
        var data = map.layers.getRenderedShapes(map.getCamera().bounds, [iconLayer]);

        //Create an index of the distances of each shape.
        var distances = {};

        data.forEach(function (shape) {
            if (shape instanceof atlas.Shape) {

                //Calculate the distance from the center of the map to each shape and store in the index. Round to 2 decimals.
                distances[shape.getId()] = Math.round(atlas.math.getDistanceTo(camera.center, shape.getCoordinates(), 'miles') * 100) / 100;
            }
        });

        //Sort the data by distance.
        data.sort(function (x, y) {
            return distances[x.getId()] - distances[y.getId()];
        });

        data.forEach(function(shape) {
            properties = shape.getProperties();
            html.push('<div class="listItem" onclick="itemSelected(\'', shape.getId(), '\')"><div class="listItem-title">',
            properties['AddressLine'],
            '</div>',
            //Get a formatted addressLine2 value that consists of City, Municipality, AdminDivision, and PostCode.
            getAddressLine2(properties),
            '<br />',

            //Convert the closing time to a format that is easier to read.
            getOpenTillTime(properties),
            '<br />',

            //Get the distance of the shape.
            distances[shape.getId()],
            ' miles away</div>');
        });

        listPanel.innerHTML = html.join('');

        //Scroll to the top of the list panel in case the user has scrolled down.
        listPanel.scrollTop = 0;
    }
}

//This converts a time that's in a 24-hour format to an AM/PM time or noon/midnight string.
function getOpenTillTime(properties) {
    var time = properties['Closes'];
    var t = time / 100;
    var sTime;

    if (time === 1200) {
        sTime = 'noon';
    } else if (time === 0 || time === 2400) {
        sTime = 'midnight';
    } else {
        sTime = Math.round(t) + ':';

        //Get the minutes.
        t = (t - Math.round(t)) * 100;

        if (t === 0) {
            sTime += '00';
        } else if (t < 10) {
            sTime += '0' + t;
        } else {
            sTime += Math.round(t);
        }

        if (time < 1200) {
            sTime += ' AM';
        } else {
            sTime += ' PM';
        }
    }

    return 'Open until ' + sTime;
}

//Create an addressLine2 string that contains City, Municipality, AdminDivision, and PostCode.
function getAddressLine2(properties) {
    var html = [properties['City']];

    if (properties['Municipality']) {
        html.push(', ', properties['Municipality']);
    }

    if (properties['AdminDivision']) {
        html.push(', ', properties['AdminDivision']);
    }

    if (properties['PostCode']) {
        html.push(' ', properties['PostCode']);
    }

    return html.join('');
}
Kullanıcı liste panelinde bir öğe seçtiğinde, öğenin ilişkili olduğu şekil veri kaynağından alınır. Şekilde depolanan özellik bilgilerini temel alan bir açılır pencere oluşturulur. Harita şeklin üzerinde ortalar. Harita 700 pikselden daha az genişlikteyse, harita görünümü uzaklığı gösterir ve böylece açılır pencere görünür.
//When a user selects a result in the side panel, look up the shape by its ID value and display the pop-up window.
function itemSelected(id) {
    //Get the shape from the data source by using its ID.
    var shape = datasource.getShapeById(id);
    showPopup(shape);

    //Center the map over the shape on the map.
    var center = shape.getCoordinates();
    var offset;

    //If the map is fewer than 700 pixels wide, then the layout is set for small screens.
    if (map.getCanvas().width < 700) {
        //When the map is small, offset the center of the map relative to the shape so that there is room for the popup to appear.
        offset = [0, -80];
    }

    map.setCamera({
        center: center,
        centerOffset: offset
    });
}

function showPopup(shape) {
    var properties = shape.getProperties();

    /* Generating HTML for the pop-up window that looks like this:

        <div class="storePopup">
            <div class="popupTitle">
                3159 Tongass Avenue
                <div class="popupSubTitle">Ketchikan, AK 99901</div>
            </div>
            <div class="popupContent">
                Open until 22:00 PM<br/>
                <img title="Phone Icon" src="images/PhoneIcon.png">
                <a href="tel:1-800-XXX-XXXX">1-800-XXX-XXXX</a>
                <br>Amenities:
                <img title="Wi-Fi Hotspot" src="images/WiFiIcon.png">
                <img title="Wheelchair Accessible" src="images/WheelChair-small.png">
            </div>
        </div>
    */

     //Calculate the distance from the center of the map to the shape in miles, round to 2 decimals.
    var distance = Math.round(atlas.math.getDistanceTo(map.getCamera().center, shape.getCoordinates(), 'miles') * 100)/100;

    var html = ['<div class="storePopup">'];
    html.push('<div class="popupTitle">',
        properties['AddressLine'],
        '<div class="popupSubTitle">',
        getAddressLine2(properties),
        '</div></div><div class="popupContent">',

        //Convert the closing time to a format that's easier to read.
        getOpenTillTime(properties),

        //Add the distance information.
        '<br/>', distance,
        ' miles away',
        '<br /><img src="images/PhoneIcon.png" title="Phone Icon"/><a href="tel:',
        properties['Phone'],
        '">',
        properties['Phone'],
        '</a>'
    );

    if (properties['IsWiFiHotSpot'] || properties['IsWheelchairAccessible']) {
        html.push('<br/>Amenities: ');

        if (properties['IsWiFiHotSpot']) {
            html.push('<img src="images/WiFiIcon.png" title="Wi-Fi Hotspot"/>');
        }

        if (properties['IsWheelchairAccessible']) {
            html.push('<img src="images/WheelChair-small.png" title="Wheelchair Accessible"/>');
        }
    }

    html.push('</div></div>');

    //Update the content and position of the pop-up window for the specified shape information.
    popup.setOptions({

        //Create a table from the properties in the feature.
        content:  html.join(''),
        position: shape.getCoordinates()
    });

    //Open the pop-up window.
    popup.open(map);
}
Artık tamamen işlevsel bir depo bulucunuz var. index.html dosyasını bir web tarayıcısında açın. Kümeler haritada göründüğünde, aşağıdaki yöntemlerden herhangi birini kullanarak bir konum arayabilirsiniz:
- Arama kutusu.
- Konumum düğmesini seçme
- Küme seçme
- Tek tek konumları görmek için haritayı yakınlaştırın.
Kullanıcı Konumum düğmesini ilk kez seçtiğinde, tarayıcı kullanıcının konumuna erişim izni isteyen bir güvenlik uyarısı görüntüler. Kullanıcı konumunu paylaşmayı kabul ederse harita kullanıcının konumunu yakınlaştırır ve yakındaki kahve dükkanları gösterilir.

Kafe konumları olan bir alanı yeterince yakınlaştırırsanız, kümeler ayrı konumlara ayrılır. Bir açılır pencere görmek için haritadaki simgelerden birini seçin veya yan panelde bir öğe seçin. Açılan pencerede seçili konumla ilgili bilgiler gösterilir.

Tarayıcı penceresini 700 pikselden daha az genişliğe yeniden boyutlandırıyorsanız veya uygulamayı mobil cihazda açarsanız, düzen daha küçük ekranlar için daha uygun olacak şekilde değişir.
Bu öğreticide, Azure Haritalar kullanarak temel bir depo bulucu oluşturmayı öğrendiniz. Bu öğreticide oluşturduğunuz mağaza bulucu ihtiyacınız olan tüm işlevlere sahip olabilir. Mağaza bulucunuza özellikler ekleyebilir veya daha özel bir kullanıcı deneyimi için daha gelişmiş özellikler kullanabilirsiniz:
- Arama kutusuna yazarken önerileri etkinleştirin.
- Birden çok dil için destek ekleyin.
- Kullanıcının yol boyunca konumları filtrelemesine izin verin.
- Filtre ayarlama özelliğini ekleyin.
- Sorgu dizesi kullanarak ilk arama değerini belirtmek için destek ekleyin. Bu seçeneği mağaza bulucunuza eklediğinizde, kullanıcılar aramalara yer işareti ekleyip paylaşabilir. Ayrıca, aramaları başka bir sayfadan bu sayfaya geçirmeniz için kolay bir yöntem sağlar.
- Mağaza bulucunuzu Azure Uygulaması Service Web Uygulaması olarak dağıtın.
- Verilerinizi bir veritabanında depolayın ve yakındaki konumları arayın. Daha fazla bilgi edinmek için bkz. SQL Server uzamsal veri türlerine genel bakış ve En yakın komşu için uzamsal verileri sorgulama.
Ek bilgi
- Tamamlanan kod için GitHub'da Basit Mağaza Bulucu öğreticisine bakın.
- Bu örneği canlı olarak görüntülemek için Azure Haritalar Kod Örnekleri sitesindeki Basit Mağaza Bulucu'ya bakın.
- Yakınlaştırma düzeylerini ve kutucuk kılavuzunu kullanarak Azure Haritalar kapsamı ve özellikleri hakkında daha fazla bilgi edinin.
- İş mantığınıza uygulamak için veri temelli stil ifadelerini de kullanabilirsiniz.
Sonraki adımlar
Daha fazla kod örneği ve etkileşimli bir kodlama deneyimi için: