Şirket içinden Azure’a yük devretme çalıştırma
Bu makalede, Azure Site Recovery'de şirket içi makinelerin Azure'a nasıl yük devreddiği açıklanır
Başlamadan önce
- Olağanüstü durum kurtarmada yük devretme işlemi hakkında bilgi edinin .
- Birden çok makinede yük devretme yapmak istiyorsanız, makineleri bir kurtarma planında bir araya toplamayı öğrenin .
- Tam yük devretme işlemi gerçekleştirmeden önce, her şeyin beklendiği gibi çalıştığından emin olmak için bir olağanüstü durum kurtarma tatbikatı çalıştırın.
Yük devretmeden sonra bağlanmaya hazırlanma
Yük devretmeden sonra oluşturulan Azure VM'lerine bağlanabildiğinize emin olmak için, yük devretmeden önce şirket içinde yapmanız gereken birkaç şey aşağıdadır.
Yük devretmeden sonra bağlanmak için şirket içi hazırlama
Yük devretmeden sonra RDP/SSH kullanarak Azure VM'lerine bağlanmak istiyorsanız, yük devretmeden önce şirket içinde yapmanız gereken birkaç şey vardır.
| Yük devretmeden sonra | Location | Eylemler |
|---|---|---|
| Windows çalıştıran Azure VM | Yük devretmeden önce şirket içi makine | Azure VM'ye İnternet üzerinden erişmek için RDP'yi etkinleştirin ve Genel için TCP ve UDP kurallarının eklendiğinden ve Windows Güvenlik Duvarı>İzin Verilen Uygulamalar'daki tüm profiller için RDP'ye izin verildiğinden emin olun. Siteden siteye bağlantı üzerinden Azure VM'ye erişmek için makinede RDP'yi etkinleştirin ve Etki Alanı ve Özel ağlar için Windows Güvenlik Duvarı İzin> verilen uygulamalar ve özelliklerde RDP'ye izin verildiğinden emin olun. Tüm statik kalıcı yolları ve WinHTTP ara sunucusunu kaldırın. İşletim sistemi SAN ilkesinin OnlineAll olarak ayarlandığından emin olun. Daha fazla bilgi edinin. Yük devretme tetiklerken VM'de bekleyen Windows güncelleştirmeleri olmadığından emin olun. Yük devretme yaptığınızda Windows güncelleştirmesi başlatılabilir ve güncelleştirme tamamlanana kadar VM'de oturum alamayacaksınız. |
| Linux çalıştıran Azure VM | Yük devretmeden önce şirket içi makine | VM'de Secure Shell hizmetinin sistem önyüklemesinde otomatik olarak başlatacak şekilde ayarlandığından emin olun. Güvenlik duvarı kurallarının gerçekleştirilecek SSH bağlantısına izin verdiğinden emin olun. |
Yük devretme çalıştırma
Bu yordamda, kurtarma planı için yük devretmenin nasıl çalıştırıldığı açıklanır. Tek bir VM için yük devretme çalıştırmak istiyorsanız VMware VM, fiziksel sunucu veya Hyper-V VM yönergelerini izleyin.
Kurtarma planı yük devretmesini aşağıdaki gibi çalıştırın:
Site Recovery kasasında Kurtarma Planları>recoveryplan_name'i seçin.
Yük Devretme'ye tıklayın.
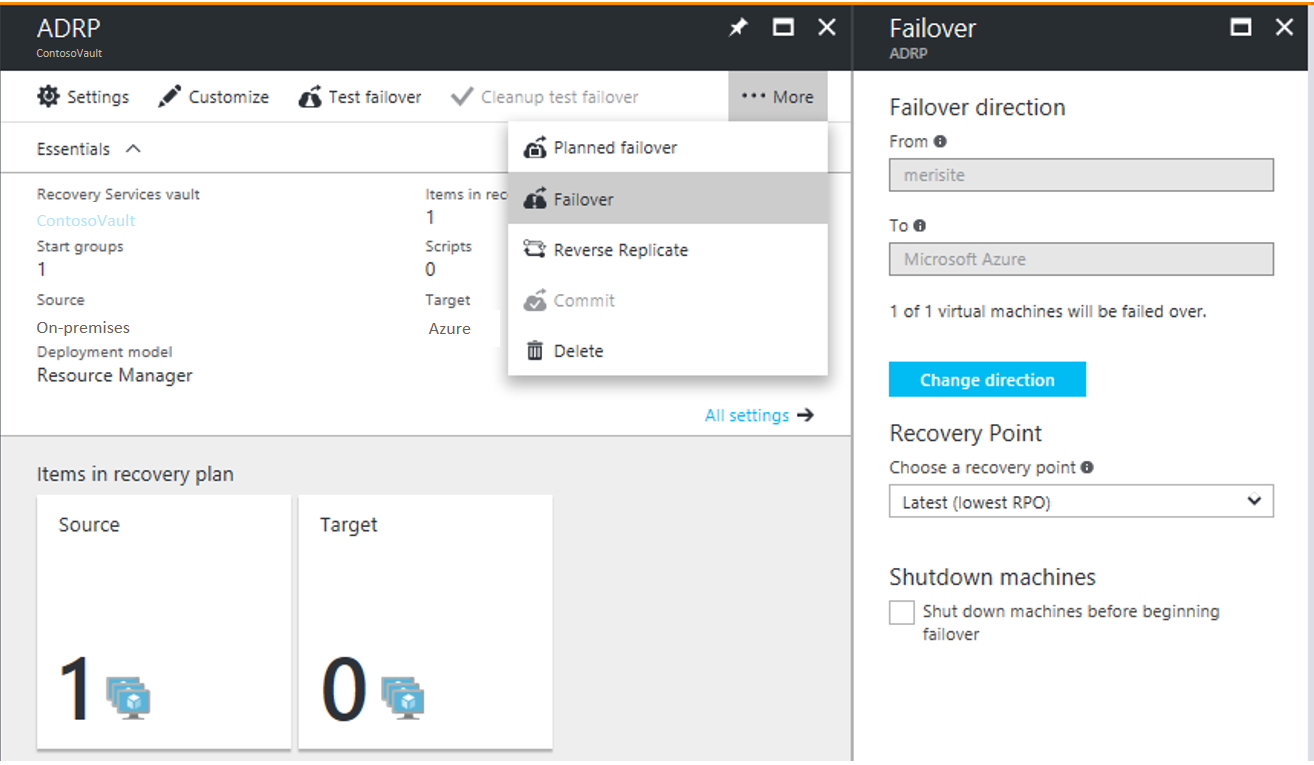
Yük Devretme>Yük Devretme yönünde, Azure'a çoğaltma yapıyorsanız varsayılan değeri değiştirmeyin.
Yük Devretme bölümünde yük devretmenin yük devredildiği bir Kurtarma Noktası seçin.
- En son: En son noktayı kullanın. Bu, Site Recovery hizmetine gönderilen tüm verileri işler ve her makine için bir kurtarma noktası oluşturur. Yük devretmeden sonra oluşturulan VM, yük devretme tetiklendiğinde Site Recovery'ye çoğaltılan tüm verilere sahip olduğundan bu seçenek en düşük RPO'yu (Kurtarma Noktası Hedefi) sağlar. Kaynak bölge kapandığında günlük işlemenin mümkün olmadığını lütfen unutmayın. Bu nedenle, En Son İşlenen kurtarma noktasına yük devretmeniz gerekir. Daha fazla bilgi edinmek için sonraki noktaya bakın.
- En son işlenen: Vm'leri Site Recovery tarafından işlenmiş en son kurtarma noktasına devretmek için bu seçeneği kullanın. VM En Son Kurtarma Noktaları'nda en son işlenen kurtarma noktasını görebilirsiniz. İşlenmemiş verileri işlemek için zaman harcanmadıkça bu seçenek düşük bir RTO sağlar
- En son uygulamayla tutarlı: Vm'leri Site Recovery tarafından işlenen en son uygulamayla tutarlı kurtarma noktasına devretmek için bu seçeneği kullanın.
- İşlenen en son çoklu VM: Bu seçenekle, çoğaltma grubunun en son ortak çoklu VM tutarlı kurtarma noktasına yük devretmesinin parçası olan VM'ler. Diğer sanal makineler en son işlenen kurtarma noktasına yük devreder. Bu seçenek yalnızca çoklu VM tutarlılığı etkinleştirilmiş en az bir VM'ye sahip kurtarma planları içindir.
- En son çok VM uygulamasıyla tutarlı: Bu seçenekle, çoğaltma grubunun parçası olan VM'ler en son ortak çok VM uygulamayla tutarlı kurtarma noktasına yük devreder. Diğer sanal makineler, en son uygulamayla tutarlı kurtarma noktalarına yük devreder. Yalnızca birden çok VM tutarlılığının etkinleştirildiği en az bir VM'ye sahip kurtarma planları için.
- Özel: Kurtarma planları için kullanılamaz. Bu seçenek yalnızca tek tek VM'lerin yük devretmesine yöneliktir.
Site Recovery'nin yük devretmeyi başlatmadan önce kaynak VM'leri kapatmasını istiyorsanız Yük devretmeye başlamadan önce makineyi kapat'ı seçin. Kapatma işlemi başarısız olsa bile yük devretme devam eder.
Dekont
Hyper-V VM'lerine yük devrediyorsanız kapatma, yük devretmeyi tetiklemeden önce henüz hizmete gönderilmemiş şirket içi verileri eşitlemeyi ve çoğaltmayı dener.
İşler sayfasında yük devretme ilerleme durumunu izleyin. Hatalar oluşsa bile kurtarma planı tamamlanana kadar çalışır.
Yük devretme işleminden sonra doğrulamak için VM'de oturum açın.
Yük devretme için kullanılacak farklı bir kurtarma noktasına geçmek istiyorsanız Kurtarma noktasını değiştir'i kullanın.
Hazır olduğunuzda yük devretmeyi işleyebilirsiniz. İşleme eylemi, hizmetle kullanılabilen tüm kurtarma noktalarını siler. Kurtarma noktasını değiştir seçeneği artık kullanılamaz.
Planlı yük devretme çalıştırma (Hyper-V)
Hyper-V VM'leri için planlı yük devretme çalıştırabilirsiniz.
- Planlı yük devretme, sıfır veri kaybı yük devretme seçeneğidir.
- Planlı yük devretme tetiklendiğinde, önce kaynak sanal makineler kapatılır, en son veriler eşitlenir ve ardından bir yük devretme tetiklenir.
- Planlı yük devretme seçeneğini kullanarak planlı bir yük devretme çalıştırırsınız. Normal yük devretmeye benzer şekilde çalışır.
Yük devretmeleri izleme
Yük devretmeyle ilişkili birkaç iş vardır.
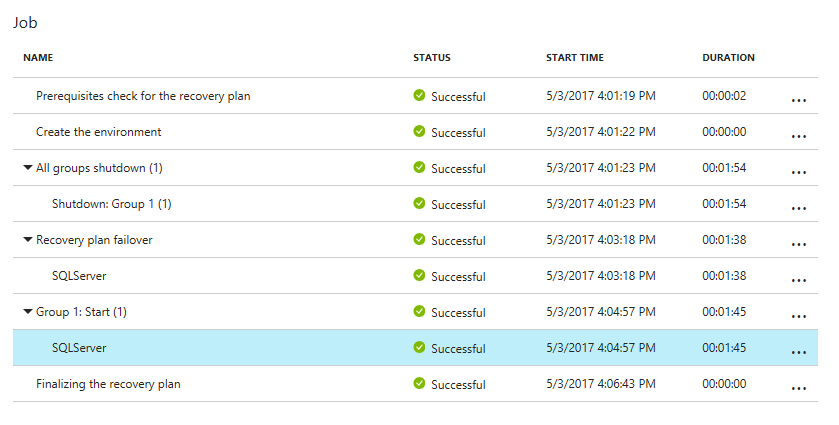
- Önkoşul denetimi: Yük devretme için gereken tüm koşulların karşılanmasını sağlar.
- Yük devretme: Azure VM'sinin oluşturulabilmesi için verileri işler. En son kurtarma noktasını seçtiyseniz, hizmete gönderilen verilerden bir kurtarma noktası oluşturulur.
- Başlangıç: Önceki adımda işlenen verileri kullanarak bir Azure VM oluşturur.
Uyarı
Devam eden bir yük devretmeyi iptal etmeyin: Yük devretme başlatılmadan önce VM için çoğaltma durduruldu. Devam eden bir işi iptal ederseniz yük devretme durdurulur, ancak VM çoğaltmaya başlamaz. Çoğaltma yeniden başlatılamıyor.
Ek yük devretme süresi
Bazı durumlarda VM yük devretme işleminin tamamlanması genellikle sekiz ile 10 dakika kadar süren bir ara adım gerektirir. Bu ek adım/zaman tarafından etkilenen makineler şunlardır:
- 9.8'den eski bir Ulaşım hizmeti sürümü çalıştıran VMware sanal makineleri.
- Fiziksel sunucular ve fiziksel sunucu olarak korunan Hyper-V VM'leri.
- VMware Linux VM'leri.
- Bu sürücülerin önyükleme sürücüsü olarak bulunmadığı VMware VM'leri:
- storvsc
- vmbus
- storflt
- intelide
- Atapı
- DHCP etkin olmayan VMware VM'leri, DHCP mi yoksa statik IP adresleri mi kullandıklarından bağımsız olarak.
Yük devretme sırasında eylemleri otomatikleştirme
Yük devretme sırasında eylemleri otomatikleştirmek isteyebilirsiniz. Bunu yapmak için kurtarma planlarında betikleri veya Azure otomasyonu runbook'larını kullanabilirsiniz.
- Betik ekleme de dahil olmak üzere kurtarma planları oluşturma ve özelleştirme hakkında bilgi edinin .
- Kurtarma planlarına Azure Otomasyonu runbook'ları ekleme hakkında bilgi edinin.
Yük devretmeden sonra ayarları yapılandırma
Yük devretmeden sonra sürücü harflerini koruma
Site Recovery, sürücü harflerini saklamayı işler. VM çoğaltması sırasında diskleri dışlarsanız, bunun nasıl çalıştığına ilişkin bir örneği gözden geçirin.
Yük devretmeden sonra bağlanmak için Azure'da hazırlanma
RDP veya SSH kullanarak yük devretme sonrasında oluşturulan Azure VM'lerine bağlanmak istiyorsanız tabloda özetlenen gereksinimleri izleyin.
| Yük devretme | Location | Eylemler |
|---|---|---|
| Windows çalıştıran Azure VM | Yük devretmeden sonra Azure VM | VM için bir ortak IP adresi ekleyin. Yük devredilen VM'deki (ve bağlandığı Azure alt ağındaki) ağ güvenlik grubu kurallarının RDP bağlantı noktasına gelen bağlantılara izin vermeleri gerekir. VM'nin ekran görüntüsünü doğrulamak için Önyükleme tanılamasını denetleyin. Bağlanamıyorsanız VM'nin çalışıp çalışmadığını denetleyin ve bu sorun giderme ipuçlarını gözden geçirin. |
| Linux çalıştıran Azure VM | Yük devretmeden sonra Azure VM | Yük devredilen VM'deki (ve bağlandığı Azure alt ağındaki) ağ güvenlik grubu kurallarının SSH bağlantı noktasına gelen bağlantılara izin vermeleri gerekir. VM için bir ortak IP adresi ekleyin. VM'nin ekran görüntüsü için Önyükleme tanılamasını denetleyin. |
Yük devretme sonrasında karşılaştığınız bağlantı sorunlarını gidermek için burada anlatılan adımları izleyin.
IP adreslemini ayarlama
- İç IP adresleri: Yük devretme sonrasında Azure VM'sinin iç IP adresini ayarlamak için birkaç seçeneğiniz vardır:
- Aynı IP adresini koruma: Azure VM'de şirket içi makineye ayrılan IP adresiyle aynı IP adresini kullanabilirsiniz.
- Farklı IP adresi kullan: Azure VM için farklı bir IP adresi kullanabilirsiniz.
- İç IP adreslerini ayarlama hakkında daha fazla bilgi edinin.
- Dış IP adresleri: Yük devretme sırasında genel IP adreslerini koruyabilirsiniz. Yük devretme işleminin bir parçası olarak oluşturulan Azure VM'lerine Azure bölgesinde kullanılabilen bir Azure genel IP adresi atanmalıdır. Genel IP adresini el ile veya kurtarma planıyla işlemi otomatikleştirerek atayabilirsiniz. Daha fazla bilgi edinin.
Sonraki adımlar
Yük devretme işlemini tamamladıktan sonra Azure VM'lerini şirket içi siteye çoğaltmaya başlamak için yeniden koruma yapmanız gerekir. Çoğaltma çalışır duruma geldikten sonra, hazır olduğunuzda şirket içinde yeniden çalıştırabilirsiniz.