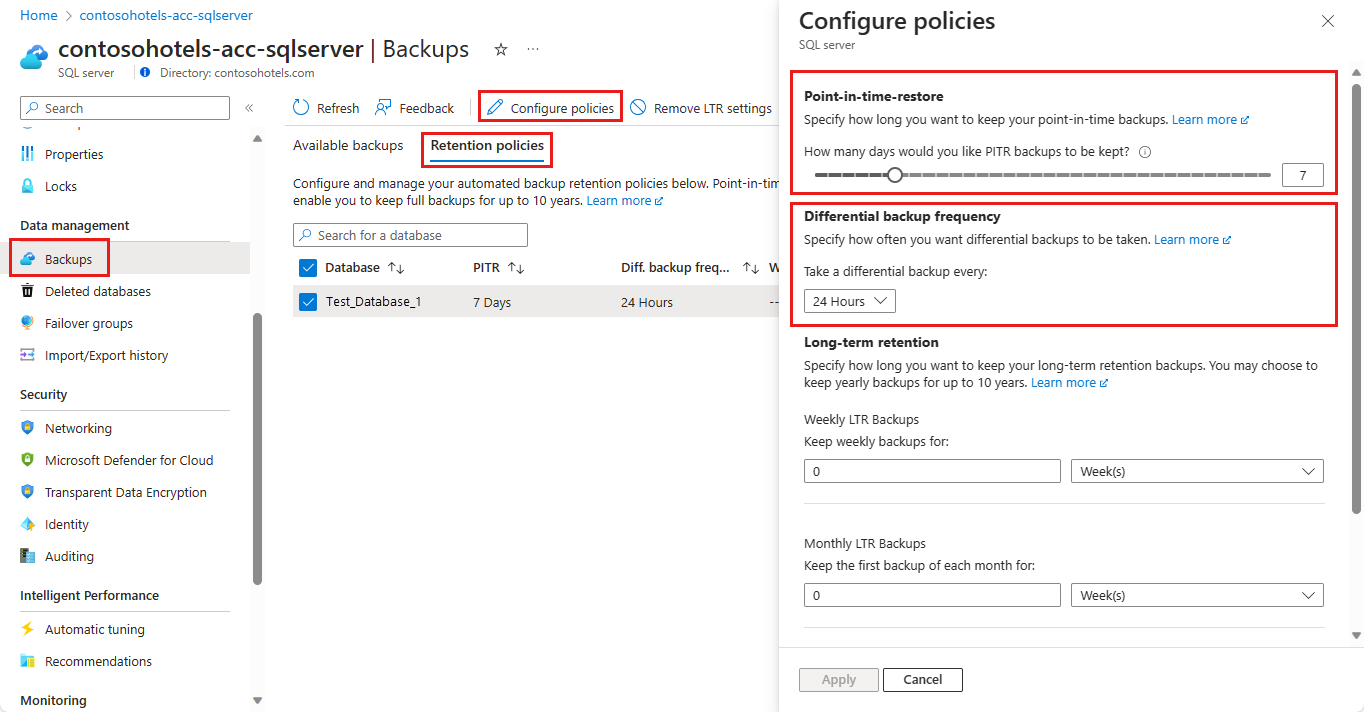
You can change the default point-in-time recovery (PITR) backup retention period and the differential backup frequency by using the Azure portal, the Azure CLI, PowerShell, or the REST API. The following examples illustrate how to change the PITR retention to 28 days and the differential backups to a 24-hour interval.
Warning
If you reduce the current retention period, you lose the ability to restore to points in time older than the new retention period. Backups that are no longer needed to provide PITR within the new retention period are deleted.
If you increase the current retention period, you don't immediately gain the ability to restore to older points in time within the new retention period. You gain that ability over time, as the system starts to retain backups for longer periods.
To change the PITR backup retention period or the differential backup frequency for active databases by using the Azure portal:
- Go to the logical server in Azure with the databases whose retention period you want to change.
- Select Backups on the left pane, and then select the Retention policies tab.
- Select the databases for which you want to change the PITR backup retention.
- Select Configure policies from the action bar.
- To change the retention period for point-in-time restore backups, use the slider under Point-in-time restore.
- To change differential backup frequency, select 12 Hours or 24 hours from the drop-down menu under Differential backup frequency .

Prepare your environment for the Azure CLI:
Use the Bash environment in Azure Cloud Shell. For more information, see Quickstart for Bash in Azure Cloud Shell.

If you prefer to run CLI reference commands locally, install the Azure CLI. If you're running on Windows or macOS, consider running Azure CLI in a Docker container. For more information, see How to run the Azure CLI in a Docker container.
If you're using a local installation, sign in to the Azure CLI by using the az login command. To finish the authentication process, follow the steps displayed in your terminal. For other sign-in options, see Sign in with the Azure CLI.
When you're prompted, install the Azure CLI extension on first use. For more information about extensions, see Use extensions with the Azure CLI.
Run az version to find the version and dependent libraries that are installed. To upgrade to the latest version, run az upgrade.
Change the PITR backup retention and differential backup frequency for active databases by using the following example:
# Set new PITR differential backup frequency on an active individual database
# Valid backup retention must be 1 to 35 days
# Valid differential backup frequency must be ether 12 or 24 hours
az sql db str-policy set \
    --resource-group myresourcegroup \
    --server myserver \
    --name mydb \
    --retention-days 28 \
    --diffbackup-hours 24
To change the PITR backup retention and differential backup frequency for active databases, use the following PowerShell example:
# Set a new PITR backup retention period on an active individual database
# Valid backup retention must be 1 to 35 days
Set-AzSqlDatabaseBackupShortTermRetentionPolicy -ResourceGroupName resourceGroup -ServerName testserver -DatabaseName testDatabase -RetentionDays 28
# Set a new PITR differential backup frequency on an active individual database
# Valid differential backup frequency must be ether 12 or 24 hours
Set-AzSqlDatabaseBackupShortTermRetentionPolicy -ResourceGroupName resourceGroup -ServerName testserver -DatabaseName testDatabase -RetentionDays 28 -DiffBackupIntervalInHours 24
Sample request
PUT https://management.azure.com/subscriptions/00000000-1111-2222-3333-444444444444/resourceGroups/resourceGroup/providers/Microsoft.Sql/servers/testserver/databases/testDatabase/backupShortTermRetentionPolicies/default?api-version=2021-02-01-preview
Request body
{
    "properties":{
        "retentionDays":28,
        "diffBackupIntervalInHours":24
  }
}
Sample response
{
  "id": "/subscriptions/00000000-1111-2222-3333-444444444444/providers/Microsoft.Sql/resourceGroups/resourceGroup/servers/testserver/databases/testDatabase/backupShortTermRetentionPolicies/default",
  "name": "default",
  "type": "Microsoft.Sql/resourceGroups/servers/databases/backupShortTermRetentionPolicies",
  "properties": {
    "retentionDays": 28,
    "diffBackupIntervalInHours":24
  }
}
For more information, see Backup retention REST API.
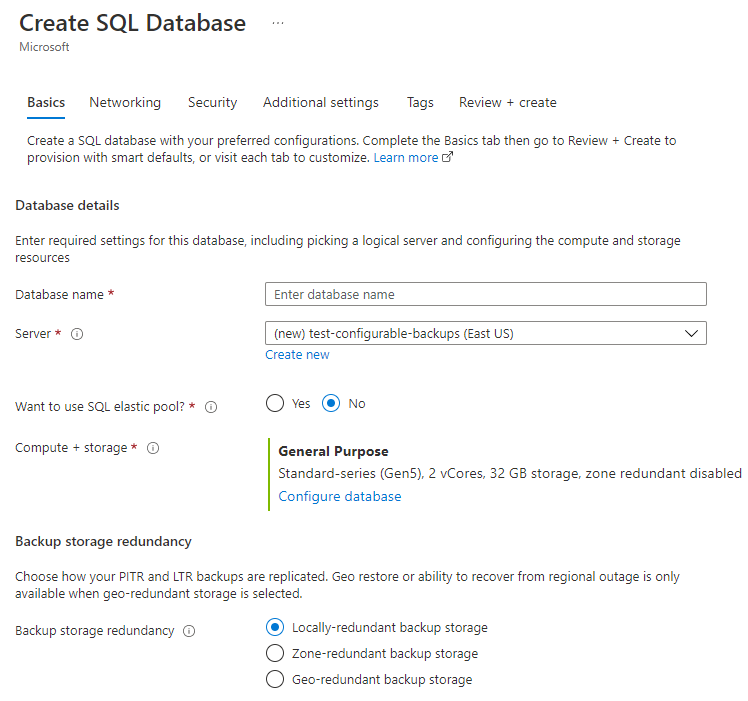
You can configure backup storage redundancy for databases in Azure SQL Database when you create your database. You can also change the storage redundancy after the database is already created.
Backup storage redundancy changes made to existing databases apply to future backups only. The default value is geo-redundant storage. For differences in pricing between locally redundant, zone-redundant, and geo-redundant backup storage, see the SQL Database pricing page.
In the Azure portal, you can choose a backup storage redundancy option when you create your database. You can later update the backup storage redundancy from the Compute & storage page of your database settings.
When you're creating your database, choose the backup storage redundancy option on the Basics tab.

For existing databases, go to your database in the Azure portal. Select Compute & storage under Settings, and then choose your desired option for backup storage redundancy.

To configure backup storage redundancy when you're creating a new database, you can specify the --backup-storage-redundancy parameter with the az sql db create command. Possible values are Geo, Zone, and Local.
By default, all databases in Azure SQL Database use geo-redundant storage for backups. Geo-restore is disabled if a database is created or updated with locally redundant or zone-redundant backup storage.
This example creates a database in the General Purpose service tier with local backup redundancy:
az sql db create \
    --resource-group myresourcegroup \
    --server myserver \
    --name mydb \
    --tier GeneralPurpose \
    --backup-storage-redundancy Local
Except for Hyperscale and Basic databases, you can update the backup storage redundancy setting for an existing database by using the --backup-storage-redundancy parameter and the az sql db update command. It might take up to 48 hours for the changes to be applied on the database. Switching from geo-redundant backup storage to locally redundant or zone-redundant storage disables geo-restore.
This example code changes the backup storage redundancy to Local:
az sql db update \
    --resource-group myresourcegroup \
    --server myserver \
    --name mydb \
    --backup-storage-redundancy Local
Hyperscale
Carefully consider the configuration option for --backup-storage-redundancy when you're creating a Hyperscale database. The storage redundancy can be specified only during the database creation process for Hyperscale databases. You can't update it later. The selected storage redundancy option will be used for the lifetime of the database for both data storage redundancy and backup storage redundancy. Learn more in Hyperscale backup storage redundancy.
Existing Hyperscale databases can migrate to different storage redundancy through active geo-replication, which causes minimal downtime. Alternatively, you can migrate to a different storage redundancy by using database copy or point-in-time restore. This example creates a database in the Hyperscale service tier with zone redundancy:
az sql db create \
    --resource-group myresourcegroup \
    --server myserver \
    --name mydb \
    --tier Hyperscale \
    --backup-storage-redundancy Zone
For more information, see az sql db create and az sql db update.
You can't update the backup storage redundancy of a Hyperscale database directly. However, you can change it by using the database copy command with the --backup-storage-redundancy parameter. This example copies a Hyperscale database to a new database that uses Gen5 hardware and two vCores. The new database has the backup redundancy set to Zone.
az sql db copy \
    --resource-group myresourcegroup \
    --server myserver
    --name myHSdb
    --dest-resource-group mydestresourcegroup
    --dest-server destdb
    --dest-name myHSdb
    --service-objective HS_Gen5_2
    --read-replicas 0
    --backup-storage-redundancy Zone
For syntax details, see az sql db copy. For an overview of database copy, see Copy a transactionally consistent copy of a database in Azure SQL Database.
To configure backup storage redundancy when you're creating a new database, you can specify the -BackupStorageRedundancy parameter with the New-AzSqlDatabase cmdlet. Possible values are Geo, Zone, and Local. By default, all databases in Azure SQL Database use geo-redundant storage for backups. Geo-restore is disabled if a database is created with locally redundant or zone-redundant backup storage.
This example creates a database in the General Purpose service tier with local backup redundancy:
# Create a new database with geo-redundant backup storage.
New-AzSqlDatabase -ResourceGroupName "ResourceGroup01" -ServerName "Server01" -DatabaseName "Database03" -Edition "GeneralPurpose" -Vcore 2 -ComputeGeneration "Gen5" -BackupStorageRedundancy Local
Except for Hyperscale and Basic databases, you can use the -BackupStorageRedundancy parameter with the Set-AzSqlDatabase cmdlet to update the backup storage redundancy setting for an existing database. Possible values are Geo, Zone, and Local. It might take up to 48 hours for the changes to be applied on the database. Switching from geo-redundant backup storage to locally redundant or zone-redundant storage disables geo-restore.
This example code changes the backup storage redundancy to Local:
# Change the backup storage redundancy for Database01 to zone-redundant.
Set-AzSqlDatabase -ResourceGroupName "ResourceGroup01" -DatabaseName "Database01" -ServerName "Server01" -BackupStorageRedundancy Local
For details, see Set-AzSqlDatabase.
Hyperscale
Carefully consider the configuration option for --backup-storage-redundancy when you're creating a Hyperscale database. You can specify storage redundancy only during the database creation process for Hyperscale databases. The selected storage redundancy option will be used for the lifetime of the database for both data storage redundancy and backup storage redundancy. Learn more in Hyperscale backups and storage redundancy.
Existing databases can migrate to different storage redundancy through database copy or point-in-time restore. This example creates a database in the Hyperscale service tier with zone redundancy:
# Create a new database with geo-redundant backup storage.
New-AzSqlDatabase -ResourceGroupName "ResourceGroup01" -ServerName "Server01" -DatabaseName "Database03" -Edition "Hyperscale" -Vcore 2 -ComputeGeneration "Gen5" -BackupStorageRedundancy Zone
For syntax details, see New-AzSqlDatabase.
Backup storage redundancy of an existing Hyperscale database can't be updated. However, you can use the database copy command to create a copy of the database. Then you can use the -BackupStorageRedundancy parameter to update the backup storage redundancy.
This example copies a Hyperscale database to a new database by using Gen5 hardware and two vCores. The new database has the backup redundancy set to Zone.
# Change the backup storage redundancy for Database01 to zone-redundant.
New-AzSqlDatabaseCopy -ResourceGroupName "ResourceGroup01" -ServerName "Server01" -DatabaseName "HSSourceDB" -CopyResourceGroupName "DestResourceGroup" -CopyServerName "DestServer" -CopyDatabaseName "HSDestDB" -Vcore 2 -ComputeGeneration "Gen5" -ComputeModel Provisioned -BackupStorageRedundancy Zone
For syntax details, see New-AzSqlDatabaseCopy. For an overview of database copy, see Copy a transactionally consistent copy of a database in Azure SQL Database.
Note
To use the -BackupStorageRedundancy parameter with database restore, database copy, or create secondary operations, use Azure PowerShell version Az.Sql 2.11.0 or later.
It's not currently possible to change backup storage redundancy by using the REST API.
Azure SQL Database


