Tutorial: Part 3 - Evaluate and deploy a custom chat application with the prompt flow SDK
In this tutorial, you use the prompt flow SDK (and other libraries) to evaluate and deploy the chat app you built in Part 2 of the tutorial series. In this part three, you learn how to:
- Evaluate the quality of chat app responses
- Deploy the chat app to Azure
- Verify the deployment
This tutorial is part three of a three-part tutorial.
Prerequisites
Complete part 2 of the tutorial series to build the chat application.
You must have the necessary permissions to add role assignments in your Azure subscription. Granting permissions by role assignment is only allowed by the Owner of the specific Azure resources. You might need to ask your Azure subscription owner (who might be your IT admin) for help with endpoint access later in the tutorial.
Evaluate the quality of the chat app responses
Now that you know your chat app responds well to your queries, including with chat history, it's time to evaluate how it does across a few different metrics and more data.
You use the prompt flow evaluator with an evaluation dataset and the get_chat_response() target function, then assess the evaluation results.
Once you run an evaluation, you can then make improvements to your logic, like improving your system prompt, and observing how the chat app responses change and improve.
Set your evaluation model
Choose the evaluation model you want to use. It can be the same as a chat model you used to build the app. If you want a different model for evaluation, you need to deploy it, or specify it if it already exists. For example, you might be using gpt-35-turbo for your chat completions, but want to use gpt-4 for evaluation since it might perform better.
Add your evaluation model name in your .env file:
AZURE_OPENAI_EVALUATION_DEPLOYMENT=<your evaluation model deployment name>
Create evaluation dataset
Use the following evaluation dataset, which contains example questions and expected answers (truth).
Create a file called eval_dataset.jsonl in your rag-tutorial folder. See the application code structure for reference.
Paste this dataset into the file:
{"chat_input": "Which tent is the most waterproof?", "truth": "The Alpine Explorer Tent has the highest rainfly waterproof rating at 3000m"}
{"chat_input": "Which camping table holds the most weight?", "truth": "The Adventure Dining Table has a higher weight capacity than all of the other camping tables mentioned"}
{"chat_input": "How much do the TrailWalker Hiking Shoes cost? ", "truth": "The Trailewalker Hiking Shoes are priced at $110"}
{"chat_input": "What is the proper care for trailwalker hiking shoes? ", "truth": "After each use, remove any dirt or debris by brushing or wiping the shoes with a damp cloth."}
{"chat_input": "What brand is for TrailMaster tent? ", "truth": "OutdoorLiving"}
{"chat_input": "How do I carry the TrailMaster tent around? ", "truth": " Carry bag included for convenient storage and transportation"}
{"chat_input": "What is the floor area for Floor Area? ", "truth": "80 square feet"}
{"chat_input": "What is the material for TrailBlaze Hiking Pants?", "truth": "Made of high-quality nylon fabric"}
{"chat_input": "What color does TrailBlaze Hiking Pants come in?", "truth": "Khaki"}
{"chat_input": "Can the warrenty for TrailBlaze pants be transfered? ", "truth": "The warranty is non-transferable and applies only to the original purchaser of the TrailBlaze Hiking Pants. It is valid only when the product is purchased from an authorized retailer."}
{"chat_input": "How long are the TrailBlaze pants under warrenty for? ", "truth": " The TrailBlaze Hiking Pants are backed by a 1-year limited warranty from the date of purchase."}
{"chat_input": "What is the material for PowerBurner Camping Stove? ", "truth": "Stainless Steel"}
{"chat_input": "Is France in Europe?", "truth": "Sorry, I can only queries related to outdoor/camping gear and equipment"}
Evaluate with prompt flow evaluators
Now define an evaluation script that will:
- Import the
evaluatefunction and evaluators from the Prompt flowevalspackage. - Load the sample
.jsonldataset. - Generate a target function wrapper around our chat app logic.
- Run the evaluation, which takes the target function, and merges the evaluation dataset with the responses from the chat app.
- Generate a set of GPT-assisted metrics (relevance, groundedness, and coherence) to evaluate the quality of the chat app responses.
- Output the results locally, and logs the results to the cloud project.
The script allows you to review the results locally, by outputting the results in the command line, and to a json file.
The script also logs the evaluation results to the cloud project so that you can compare evaluation runs in the UI.
Create a file called evaluate.py in your rag-tutorial folder.
Add the following code. Update the
dataset_pathandevaluation_nameto fit your use case.import json import os # set environment variables before importing any other code from dotenv import load_dotenv load_dotenv() import pandas as pd from promptflow.core import AzureOpenAIModelConfiguration from promptflow.evals.evaluate import evaluate from promptflow.evals.evaluators import ( RelevanceEvaluator, GroundednessEvaluator, CoherenceEvaluator, ) # Helper methods def load_jsonl(path): with open(path, "r") as f: return [json.loads(line) for line in f.readlines()] def copilot_wrapper(*, chat_input, **kwargs): from copilot_flow.copilot import get_chat_response result = get_chat_response(chat_input) parsedResult = {"answer": str(result["reply"]), "context": str(result["context"])} return parsedResult def run_evaluation(eval_name, dataset_path): model_config = AzureOpenAIModelConfiguration( azure_deployment=os.getenv("AZURE_OPENAI_EVALUATION_DEPLOYMENT"), api_version=os.getenv("AZURE_OPENAI_API_VERSION"), azure_endpoint=os.getenv("AZURE_OPENAI_ENDPOINT"), ) # Initializing Evaluators relevance_eval = RelevanceEvaluator(model_config) groundedness_eval = GroundednessEvaluator(model_config) coherence_eval = CoherenceEvaluator(model_config) output_path = "./eval_results.jsonl" result = evaluate( target=copilot_wrapper, evaluation_name=eval_name, data=dataset_path, evaluators={ "relevance": relevance_eval, "groundedness": groundedness_eval, "coherence": coherence_eval, }, evaluator_config={ "relevance": {"question": "${data.chat_input}"}, "coherence": {"question": "${data.chat_input}"}, }, # to log evaluation to the cloud AI Studio project azure_ai_project={ "subscription_id": os.getenv("AZURE_SUBSCRIPTION_ID"), "resource_group_name": os.getenv("AZURE_RESOURCE_GROUP"), "project_name": os.getenv("AZUREAI_PROJECT_NAME"), }, ) tabular_result = pd.DataFrame(result.get("rows")) tabular_result.to_json(output_path, orient="records", lines=True) return result, tabular_result if __name__ == "__main__": eval_name = "tutorial-eval" dataset_path = "./eval_dataset.jsonl" result, tabular_result = run_evaluation( eval_name=eval_name, dataset_path=dataset_path ) from pprint import pprint pprint("-----Summarized Metrics-----") pprint(result["metrics"]) pprint("-----Tabular Result-----") pprint(tabular_result) pprint(f"View evaluation results in AI Studio: {result['studio_url']}")
The main function at the end allows you to view the evaluation result locally, and gives you a link to the evaluation results in AI Studio.
Run the evaluation script
From your console, sign in to your Azure account with the Azure CLI:
az loginInstall the required packages:
pip install promptflow-evals
pip install promptflow-azure
Now run the evaluation script:
python evaluate.py
For more information about using the prompt flow SDK for evaluation, see Evaluate with the prompt flow SDK.
Interpret the evaluation output
In the console output, you see for each question an answer and the summarized metrics in this nice table format. (You might see different columns in your output.)
'-----Summarized Metrics-----'
{'coherence.gpt_coherence': 4.3076923076923075,
 'groundedness.gpt_groundedness': 4.384615384615385,
 'relevance.gpt_relevance': 4.384615384615385}

'-----Tabular Result-----'
                                             question  ... gpt_coherence
0                  Which tent is the most waterproof?  ...             5
1          Which camping table holds the most weight?  ...             5
2       How much does TrailWalker Hiking Shoes cost?   ...             5
3   What is the proper care for trailwalker hiking...  ...             5
4                What brand is the TrailMaster tent?   ...             1
5        How do I carry the TrailMaster tent around?   ...             5
6             What is the floor area for Floor Area?   ...             3
7    What is the material for TrailBlaze Hiking Pants  ...             5
8     What color do the TrailBlaze Hiking Pants come   ...             5
9   Can the warranty for TrailBlaze pants be trans...  ...             3
10  How long are the TrailBlaze pants under warren...  ...             5
11  What is the material for PowerBurner Camping S...  ...             5
12                               Is France in Europe?  ...             1
The script writes the full evaluation results to ./eval_results.jsonl.
And there's a link in the console to view evaluation results in your Azure AI Studio project.
Note
You may see an ERROR:asyncio:Unclosed client session - this can be safely ignored and does not affect the evaluation results.
View evaluation results in AI Studio
Once the evaluation run completes, follow the link to view the evaluation results on the Evaluation page in the Azure AI Studio.

You can also look at the individual rows and see metric scores per row, and view the full context/documents that were retrieved. These metrics can be helpful in interpreting and debugging evaluation results.

For more information about evaluation results in AI Studio, see How to view evaluation results in AI Studio.
Now that you verified your chat app behaves as expected, you're ready to deploy your application.
Deploy the chat app to Azure
Now let's go ahead and deploy this chat app to a managed endpoint so that it can be consumed by an external application or website.
The deploy script will:
- Create a managed online endpoint
- Define our flow as a model
- Deploy our flow to a managed environment on that endpoint that has our environment variables
- Route all traffic to that deployment
- Output the link to view and test the deployment in the Azure AI Studio
The deployment defines a build context (Dockerfile) that relies on the requirement.txt specified in our flow folder, and also sets our environment variables to the deployed environment, so we can be confident that our chat app runs the same in a production environment as it did locally.
Build context for the deployment (Dockerfile)
The deployed environment needs a build context, so let's define a Dockerfile for the deployed environment. The deploy script creates an environment based on this Dockerfile. Create this Dockerfile in the copilot_flow folder:
FROM mcr.microsoft.com/azureml/promptflow/promptflow-runtime:latest
COPY ./requirements.txt .
RUN pip install -r requirements.txt
Deploy chat app to a managed endpoint
To deploy your application to a managed endpoint in Azure, create an online endpoint, then create a deployment in that endpoint, and then route all traffic to that deployment.
As part of creating the deployment, your copilot_flow folder is packaged as a model and a cloud environment is built. The endpoint is set up with Microsoft Entra ID authentication. You can update the auth mode you want in the code, or in the Azure AI Studio on the endpoint details page.
Important
Deploying your application to a managed endpoint in Azure has associated compute cost based on the instance type you choose. Make sure you are aware of the associated cost and have quota for the instance type you specify. Learn more about online endpoints.
Create the file deploy.py in the rag-tutorial folder. Add the following code:
import os
from dotenv import load_dotenv

load_dotenv()

from azure.ai.ml import MLClient
from azure.identity import DefaultAzureCredential
from azure.ai.ml.entities import (
    ManagedOnlineEndpoint,
    ManagedOnlineDeployment,
    Model,
    Environment,
    BuildContext,
)

client = MLClient(
    DefaultAzureCredential(),
    os.getenv("AZURE_SUBSCRIPTION_ID"),
    os.getenv("AZURE_RESOURCE_GROUP"),
    os.getenv("AZUREAI_PROJECT_NAME"),
)
endpoint_name = "tutorial-endpoint"
deployment_name = "tutorial-deployment"

endpoint = ManagedOnlineEndpoint(
    name=endpoint_name,
    properties={
        "enforce_access_to_default_secret_stores": "enabled"  # for secret injection support
    },
    auth_mode="aad_token",  # using aad auth instead of key-based auth
)

# Get the directory of the current script
script_dir = os.path.dirname(os.path.abspath(__file__))

# Define the path to the directory, appending the script directory to the relative path
copilot_path = os.path.join(script_dir, "copilot_flow")
deployment = ManagedOnlineDeployment(
    name=deployment_name,
    endpoint_name=endpoint_name,
    model=Model(
        name="copilot_flow_model",
        path=copilot_path,  # path to promptflow folder
        properties=[  # this enables the chat interface in the endpoint test tab
            ["azureml.promptflow.source_flow_id", "basic-chat"],
            ["azureml.promptflow.mode", "chat"],
            ["azureml.promptflow.chat_input", "chat_input"],
            ["azureml.promptflow.chat_output", "reply"],
        ],
    ),
    environment=Environment(
        build=BuildContext(
            path=copilot_path,
        ),
        inference_config={
            "liveness_route": {
                "path": "/health",
                "port": 8080,
            },
            "readiness_route": {
                "path": "/health",
                "port": 8080,
            },
            "scoring_route": {
                "path": "/score",
                "port": 8080,
            },
        },
    ),
    instance_type="Standard_DS3_v2",
    instance_count=1,
    environment_variables={
        "PRT_CONFIG_OVERRIDE": f"deployment.subscription_id={client.subscription_id},deployment.resource_group={client.resource_group_name},deployment.workspace_name={client.workspace_name},deployment.endpoint_name={endpoint_name},deployment.deployment_name={deployment_name}",
        "AZURE_OPENAI_ENDPOINT": os.getenv("AZURE_OPENAI_ENDPOINT"),
        "AZURE_SEARCH_ENDPOINT": os.getenv("AZURE_SEARCH_ENDPOINT"),
        "AZURE_OPENAI_API_VERSION": os.getenv("AZURE_OPENAI_API_VERSION"),
        "AZURE_OPENAI_CHAT_DEPLOYMENT": os.getenv("AZURE_OPENAI_CHAT_DEPLOYMENT"),
        "AZURE_OPENAI_EVALUATION_DEPLOYMENT": os.getenv(
            "AZURE_OPENAI_EVALUATION_DEPLOYMENT"
        ),
        "AZURE_OPENAI_EMBEDDING_DEPLOYMENT": os.getenv(
            "AZURE_OPENAI_EMBEDDING_DEPLOYMENT"
        ),
        "AZUREAI_SEARCH_INDEX_NAME": os.getenv("AZUREAI_SEARCH_INDEX_NAME"),
    },
)

# 1. create endpoint
created_endpoint = client.begin_create_or_update(
    endpoint
).result()  # result() means we wait on this to complete

# 2. create deployment
created_deployment = client.begin_create_or_update(deployment).result()

# 3. update endpoint traffic for the deployment
endpoint.traffic = {deployment_name: 100}  # 100% of traffic
client.begin_create_or_update(endpoint).result()
Important
The endpoint and deployment name must be unique within an Azure region. If you get an error that the endpoint or deployment name already exists, try different names.
Output deployment details
Add the following lines to the end your deploy script to view the evaluation result locally, and get a link to the studio:
def get_ai_studio_url_for_deploy(
    client: MLClient, endpoint_name: str, deployment_name
) -> str:
    studio_base_url = "https://ai.azure.com"
    deployment_url = f"{studio_base_url}/projectdeployments/realtime/{endpoint_name}/{deployment_name}/detail?wsid=/subscriptions/{client.subscription_id}/resourceGroups/{client.resource_group_name}/providers/Microsoft.MachineLearningServices/workspaces/{client.workspace_name}&deploymentName={deployment_name}"

    return deployment_url


print("\n ~~~Deployment details~~~")
print(f"Your online endpoint name is: {endpoint_name}")
print(f"Your deployment name is: {deployment_name}")

print("\n ~~~Test in the Azure AI Studio~~~")
print("\n Follow this link to your deployment in the Azure AI Studio:")
print(
    get_ai_studio_url_for_deploy(
        client=client, endpoint_name=endpoint_name, deployment_name=deployment_name
    )
)
Now, run the script with:
python deploy.py
Note
Deployment may take over 10 minutes to complete. We suggest you follow the next step to assign access to the endpoint while you wait.
Once the deployment is completed, you get a link to the Azure AI Studio deployment page, where you can test your deployment.
Verify the deployment
We recommend you test your application in the Azure AI Studio. If you prefer to test your deployed endpoint locally, you can invoke it with some custom code.
Note your endpoint name, which you need for the next steps.
Endpoint access for Azure OpenAI resource
You might need to ask your Azure subscription owner (who might be your IT admin) for help with this section.
While you wait for your application to deploy, you or your administrator can assign role-based access to the endpoint. These roles allow the application to run without keys in the deployed environment, just like it did locally.
Previously, you provided your account with a specific role to be able to access the resource using Microsoft Entra ID authentication. Now, assign the endpoint that same Cognitive Services OpenAI User role.
Note
These steps are similar to how you assigned a role for your user identity to use the Azure OpenAI Service in the quickstart.
To grant yourself access to the Azure AI Services resource that you're using:
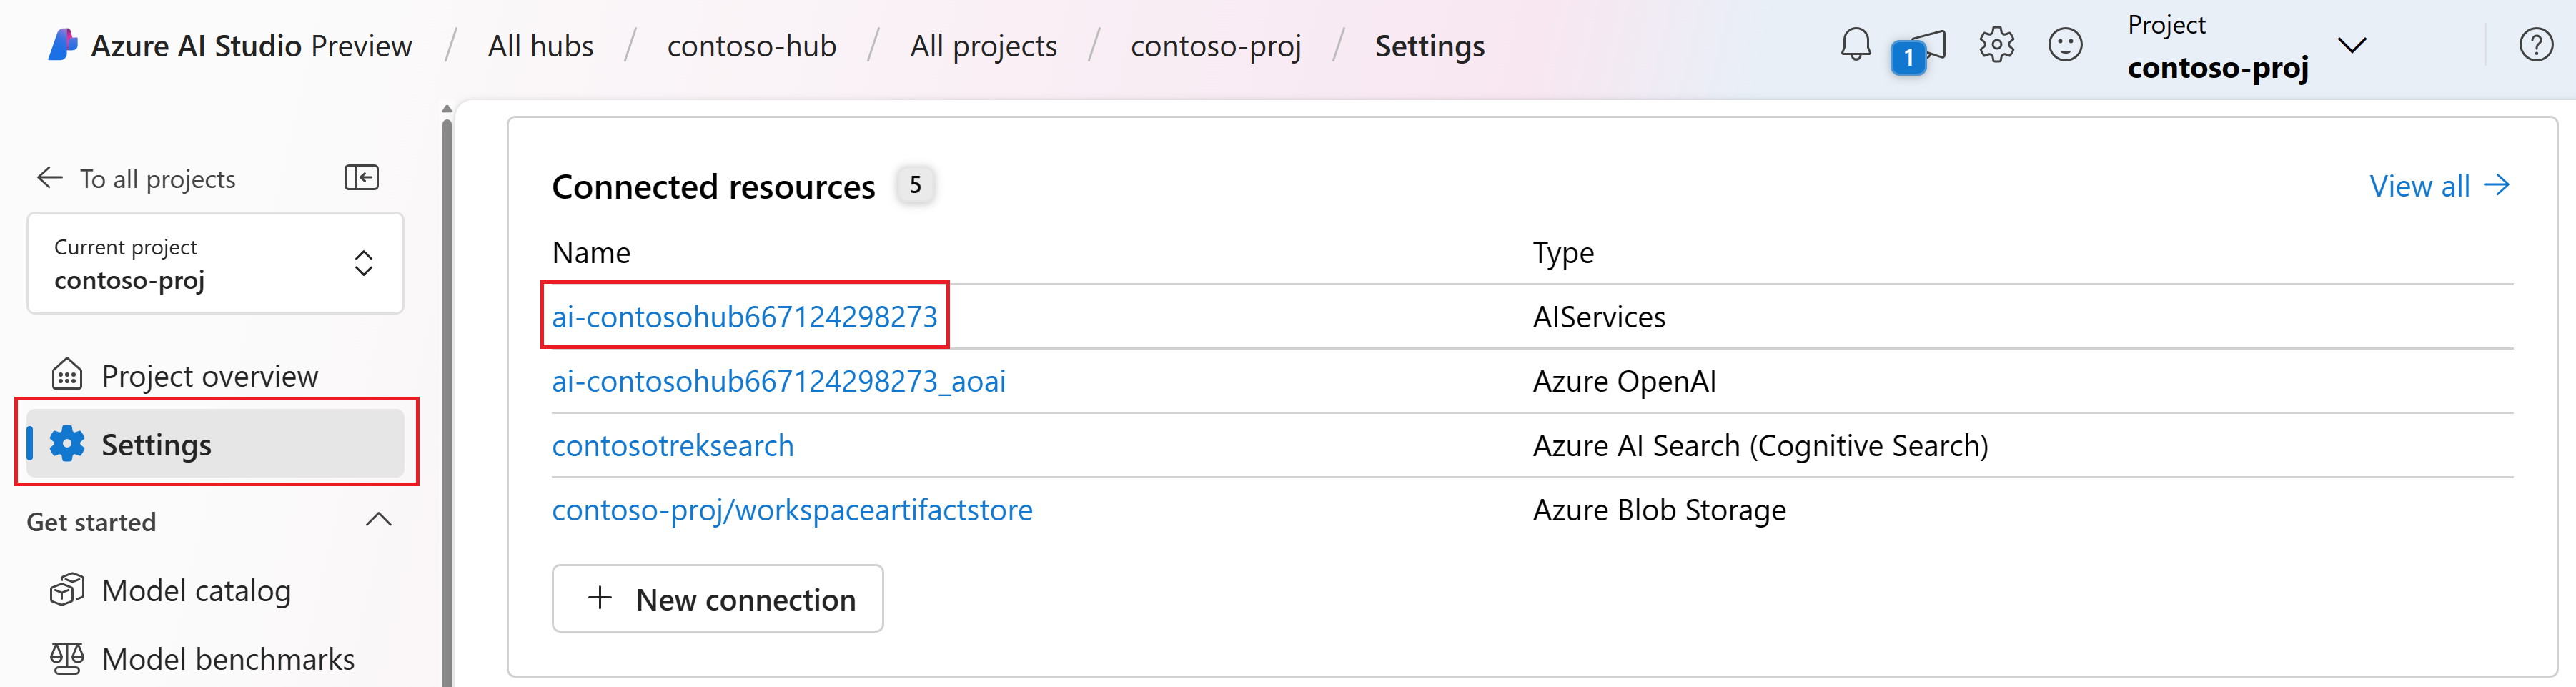
In AI Studio, go to your project and select Settings from the left pane.
In the Connected resources section, select the connection name with type AIServices.
Note
If you don't see the AIServices connection, use the Azure OpenAI connection instead.
On the resource details page, select the link under the Resource heading to open the AI services resource in the Azure portal.

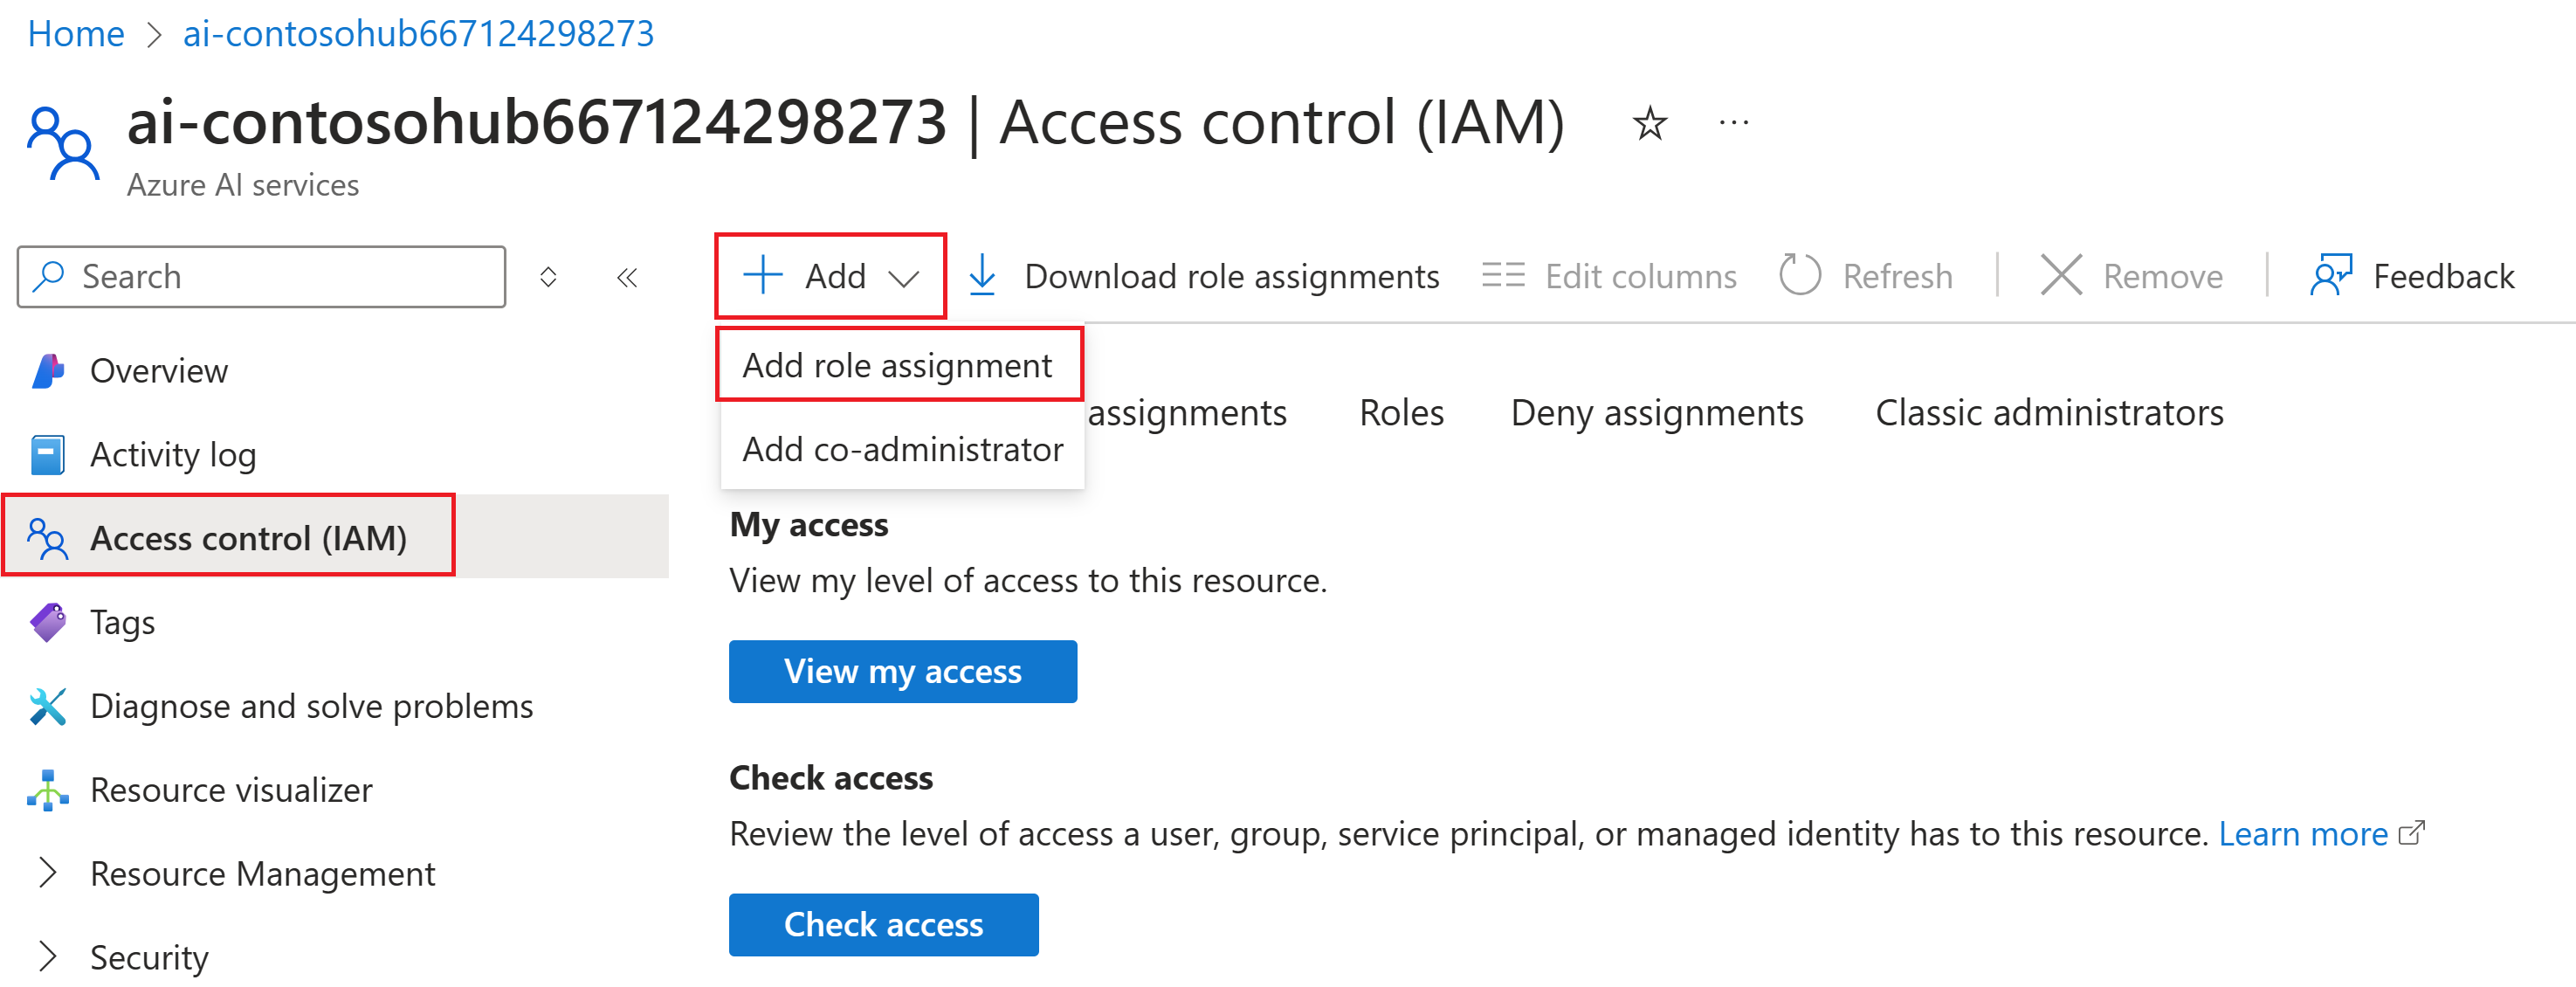
From the left page in the Azure portal, select Access control (IAM) > + Add > Add role assignment.
Search for the Cognitive Services OpenAI User role and then select it. Then select Next.
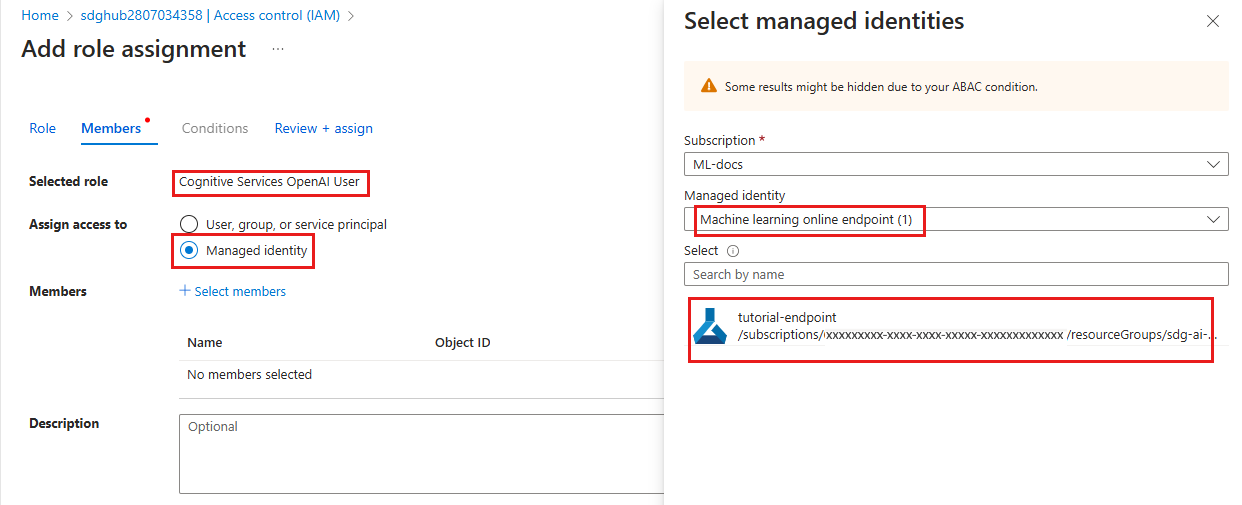
Select Managed identity. Then select Select members.
In the Select members pane that opens, select Machine learning online endpoint for the Managed identity, and then search for your endpoint name. Select the endpoint and then select Select.
Continue through the wizard and select Review + assign to add the role assignment.


Note
It may take a few minutes for the access to propagate. If you get an unauthorized error when testing in the next step, try again after a few minutes.
Endpoint access for Azure AI Search resource
You might need to ask your Azure subscription owner (who might be your IT admin) for help with this section.
Similar to how you assigned the Search Index Data Contributor role to your Azure AI Search service, you need to assign the same role for your endpoint.
In Azure AI Studio, select Settings and navigate to the connected Azure AI Search service.
Select the link to open a summary of the resource. Select the link on the summary page to open the resource in the Azure portal.
From the left page in the Azure portal, select Access control (IAM) > + Add > Add role assignment.

Search for the Search Index Data Contributor role and then select it. Then select Next.
Select Managed identity. Then select Select members.
In the Select members pane that opens, select Machine learning online endpoint for the Managed identity, and then search for your endpoint name. Select the endpoint and then select Select.

Continue through the wizard and select Review + assign to add the role assignment.
Note
It may take a few minutes for the access to propagate. If you get an unauthorized error when testing in the next step, try again after a few minutes.
Test your deployment in AI Studio
Once the deployment is completed, you get a handy link to your deployment. If you don't use the link, navigate to the Deployments tab in your project and select your new deployment.

Select the Test tab, and try asking a question in the chat interface.
For example, type "Are the Trailwalker hiking shoes waterproof?" and enter.
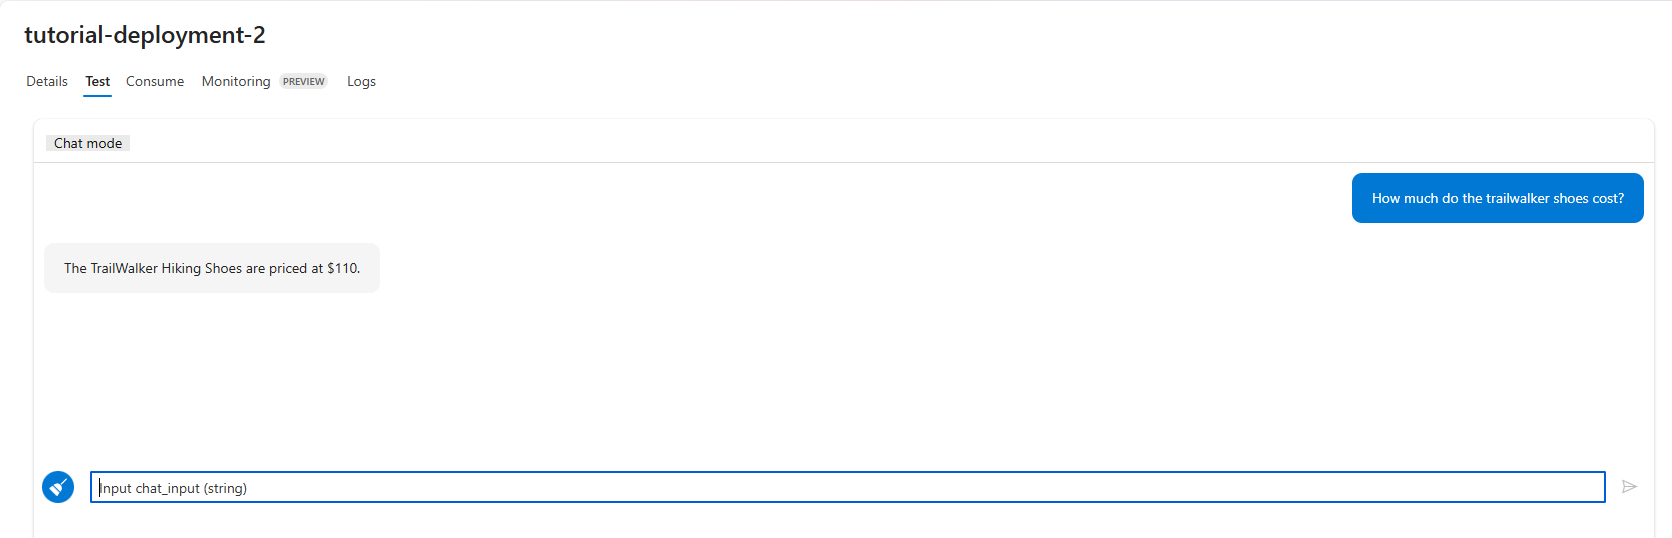
Seeing the response come back verifies your deployment.
If you get an error, select the Logs tab to get more details.
Note
If you get an unauthorized error, your endpoint access may not have been applied yet. Try again in a few minutes.
Invoke the deployed chat app locally
If you prefer to verify your deployment locally, you can invoke it via a Python script.
Define a script that will:
- Construct a well-formed request to our scoring URL.
- Post the request and handle the response.
Create an invoke-local.py file in your rag-tutorial folder, with the following code. Modify the query and endpoint_name (and other parameters as needed) to fit your use case.
import os
from dotenv import load_dotenv

load_dotenv()

import requests
from azure.ai.ml import MLClient
from azure.identity import DefaultAzureCredential

query = "Are the trailwalker shoes waterproof?"
endpoint_name = "tutorial-endpoint"

client = MLClient(
    DefaultAzureCredential(),
    os.getenv("AZURE_SUBSCRIPTION_ID"),
    os.getenv("AZURE_RESOURCE_GROUP"),
    os.getenv("AZUREAI_PROJECT_NAME"),
)


scoring_url = client.online_endpoints.get(endpoint_name).scoring_uri

headers = {
    "Content-Type": "application/json",
    "Authorization": f"Bearer {client._credential.get_token('https://ml.azure.com').token}",
    "Accept": "application/json",
}

response = requests.post(
    scoring_url,
    headers=headers,
    json={"chat_input": query},
)
(print(response.json()["reply"]))
You should see the chat app reply to your query in the console.
Note
If you get an unauthorized error, your endpoint access may not have been applied yet. Try again in a few minutes.
Clean up resources
To avoid incurring unnecessary Azure costs, you should delete the resources you created in this tutorial if they're no longer needed. To manage resources, you can use the Azure portal.
Related content
- Learn more about prompt flow
- For a sample chat app application that implements RAG, see Azure-Samples/rag-data-openai-python-promptflow