Investigate alerts in Microsoft Defender XDR
Applies to:
- Microsoft Defender XDR
Note
This article describes security alerts in Microsoft Defender XDR. However, you can use activity alerts to send email notifications to yourself or other admins when users perform specific activities in Microsoft 365. For more information, see Create activity alerts - Microsoft Purview | Microsoft Docs.
Alerts are the basis of all incidents and indicate the occurrence of malicious or suspicious events in your environment. Alerts are typically part of a broader attack and provide clues about an incident.
In Microsoft Defender XDR, related alerts are aggregated together to form incidents. Incidents will always provide the broader context of an attack, however, analyzing alerts can be valuable when deeper analysis is required.
The Alerts queue shows the current set of alerts. You get to the alerts queue from Incidents & alerts > Alerts on the quick launch of the Microsoft Defender portal.

Alerts from different Microsoft security solutions like Microsoft Defender for Endpoint, Defender for Office 365, Microsoft Sentinel, Defender for Cloud, Defender for Identity, Defender for Cloud Apps, Defender XDR, App Governance, Microsoft Entra ID Protection, and Microsoft Data Loss Prevention appear here.
By default, the alerts queue in the Microsoft Defender portal displays the new and in progress alerts from the last seven days. The most recent alert is at the top of the list so you can see it first.
From the default alerts queue, you can select Filter to see a Filter pane, from which you can specify a subset of the alerts. Here's an example.

You can filter alerts according to these criteria:
- Severity
- Status
- Categories
- Service/detection sources
- Tags
- Policy
- Entities (the impacted assets)
- Automated investigation state
- Alert subscription IDs
Note
Microsoft Defender XDR customers can now filter incidents with alerts where a compromised device communicated with operational technology (OT) devices connected to the enterprise network through the device discovery integration of Microsoft Defender for IoT and Microsoft Defender for Endpoint. To filter these incidents, select Any in the Service/detection sources, then select Microsoft Defender for IoT in the Product name or see Investigate incidents and alerts in Microsoft Defender for IoT in the Defender portal. You can also use device groups to filter for site-specific alerts. For more information about Defender for IoT prerequisites, see Get started with enterprise IoT monitoring in Microsoft Defender XDR.
An alert can have system tags and/or custom tags with certain color backgrounds. Custom tags use the white background while system tags typically use red or black background colors. System tags identify the following in an incident:
- A type of attack, like ransomware or credential phishing
- Automatic actions, like automatic investigation and response and automatic attack disruption
- Defender Experts handling an incident
- Critical assets involved in the incident
Tip
Microsoft's Security Exposure Management, based on predefined classifications, automatically tags devices, identities, and cloud resources as a critical asset. This out-of-the-box capability ensures the protection of an organization's valuable and most important assets. It also helps security operations teams to prioritize investigation and remediation. Know more about critical asset management.
Required roles for Defender for Office 365 alerts
You'll need to have any of the following roles to access Microsoft Defender for Office 365 alerts:
For Microsoft Entra global roles:
- Global Administrator
- Security Administrator
- Security Operator
- Global Reader
- Security Reader
Office 365 Security & Compliance Role Groups
- Compliance Administrator
- Organization Management
Note
Microsoft recommends using roles with fewer permissions for better security. The Global Administrator role, which has many permissions, should only be used in emergencies when no other role fits.
Analyze an alert
To see the main alert page, select the name of the alert. Here's an example.

You can also select the Open the main alert page action from the Manage alert pane.
An alert page is composed of these sections:
- Alert story, which is the chain of events and alerts related to this alert in chronological order
- Summary details
Throughout an alert page, you can select the ellipses (...) beside any entity to see available actions, such as linking the alert to another incident. The list of available actions depends on the type of alert.
Alert sources
Microsoft Defender XDR alerts come from solutions like Microsoft Defender for Endpoint, Defender for Office 365, Defender for Identity, Defender for Cloud Apps, the app governance add-on for Microsoft Defender for Cloud Apps, Microsoft Entra ID Protection, and Microsoft Data Loss Prevention. You might notice alerts with prepended characters in the alert. The following table provides guidance to help you understand the mapping of alert sources based on the prepended character on the alert.
Note
- The prepended GUIDs are specific only to unified experiences such as unified alerts queue, unified alerts page, unified investigation, and unified incident.
- The prepended character does not change the GUID of the alert. The only change to the GUID is the prepended component.
| Alert source | Alert ID with prepended characters |
|---|---|
| Microsoft Defender XDR | ra{GUID} ta{GUID} for alerts from ThreatExperts ea{GUID} for alerts from custom detections |
| Microsoft Defender for Office 365 | fa{GUID} Example: fa123a456b-c789-1d2e-12f1g33h445h6i |
| Microsoft Defender for Endpoint | da{GUID} ed{GUID} for alerts from custom detections |
| Microsoft Defender for Identity | aa{GUID} Example: aa123a456b-c789-1d2e-12f1g33h445h6i |
| Microsoft Defender for Cloud Apps | ca{GUID} Example: ca123a456b-c789-1d2e-12f1g33h445h6i |
| Microsoft Entra ID Protection | ad{GUID} |
| App Governance | ma{GUID} |
| Microsoft Data Loss Prevention | dl{GUID} |
| Microsoft Defender for Cloud | dc{GUID} |
| Microsoft Sentinel | sn{GUID} |
Configure Microsoft Entra IP alert service
Go to the Microsoft Defender portal (security.microsoft.com), select Settings > Microsoft Defender XDR.
From the list, select Alert service settings, and then configure your Microsoft Entra ID Protection alert service.
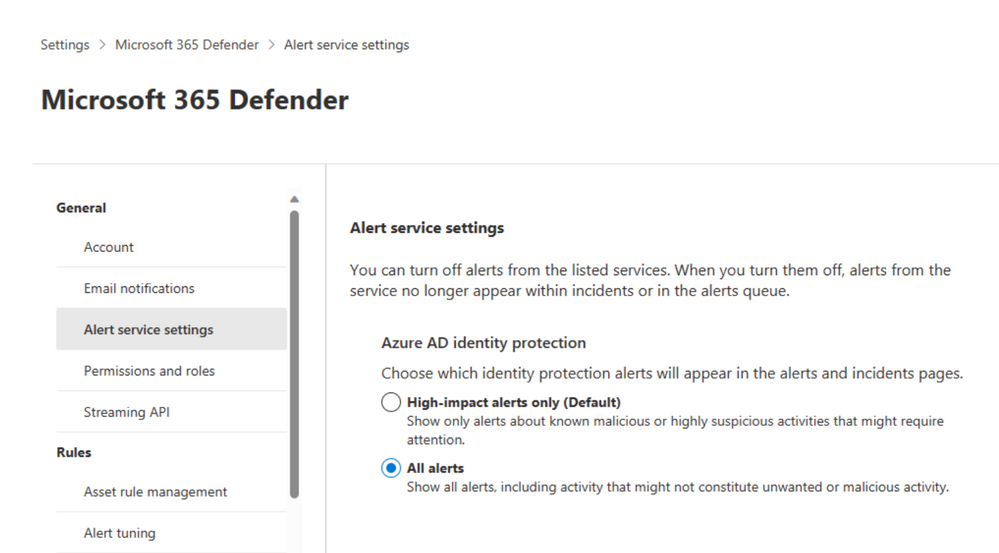

By default, only the most relevant alerts for the security operation center are enabled. If you want to get all Microsoft Entra IP risk detections, you can change it in the Alert service settings section.
You can also access Alert service settings directly from the Incidents page in the Microsoft Defender portal.
Important
Some information relates to prereleased product which may be substantially modified before it's commercially released. Microsoft makes no warranties, express or implied, with respect to the information provided here.
Analyze affected assets
The Actions taken section has a list of impacted assets, such as mailboxes, devices, and users affected by this alert.
You can also select View in action center to view the History tab of the Action center in the Microsoft Defender portal.
Trace an alert's role in the alert story
The alert story displays all assets or entities related to the alert in a process tree view. The alert in the title is the one in focus when you first land on your selected alert's page. Assets in the alert story are expandable and clickable. They provide additional information and expedite your response by allowing you to take action right in the context of the alert page.
Note
The alert story section may contain more than one alert, with additional alerts related to the same execution tree appearing before or after the alert you've selected.
View more alert information on the details page
The details page shows the details of the selected alert, with details and actions related to it. If you select any of the affected assets or entities in the alert story, the details page changes to provide contextual information and actions for the selected object.
Once you've selected an entity of interest, the details page changes to display information about the selected entity type, historic information when it's available, and options to take action on this entity directly from the alert page.
Manage alerts
To manage an alert, select Manage alert in the summary details section of the alert page. For a single alert, here's an example of the Manage alert pane.

The Manage alert pane allows you to view or specify:
- The alert status (New, Resolved, In progress).
- The user account that has been assigned the alert.
- The alert's classification:
- Not Set (default).
- True positive with a type of threat. Use this classification for alerts that accurately indicate a real threat. Specifying this threat type alerts your security team see threat patterns and act to defend your organization from them.
- Informational, expected activity with a type of activity. Use this option for alerts that are technically accurate, but represent normal behavior or simulated threat activity. You generally want to ignore these alerts but expect them for similar activities in the future where the activities are triggered by actual attackers or malware. Use the options in this category to classify alerts for security tests, red team activity, and expected unusual behavior from trusted apps and users.
- False positive for types of alerts that were created even when there's no malicious activity or for a false alarm. Use the options in this category to classify alerts that are mistakenly identified as normal events or activities as malicious or suspicious. Unlike alerts for 'Informational, expected activity', which can also be useful for catching real threats, you generally don't want to see these alerts again. Classifying alerts as false positive helps Microsoft Defender XDR improve its detection quality.
- A comment on the alert.
Note
Around August 29th, 2022, previously supported alert determination values ('Apt' and 'SecurityPersonnel') will be deprecated and no longer available via the API.
Note
One way of managing alerts it through the use of tags. The tagging capability for Microsoft Defender for Office 365 is incrementally being rolled out and is currently in preview.
Currently, modified tag names are only applied to alerts created after the update. Alerts that were generated before the modification will not reflect the updated tag name.
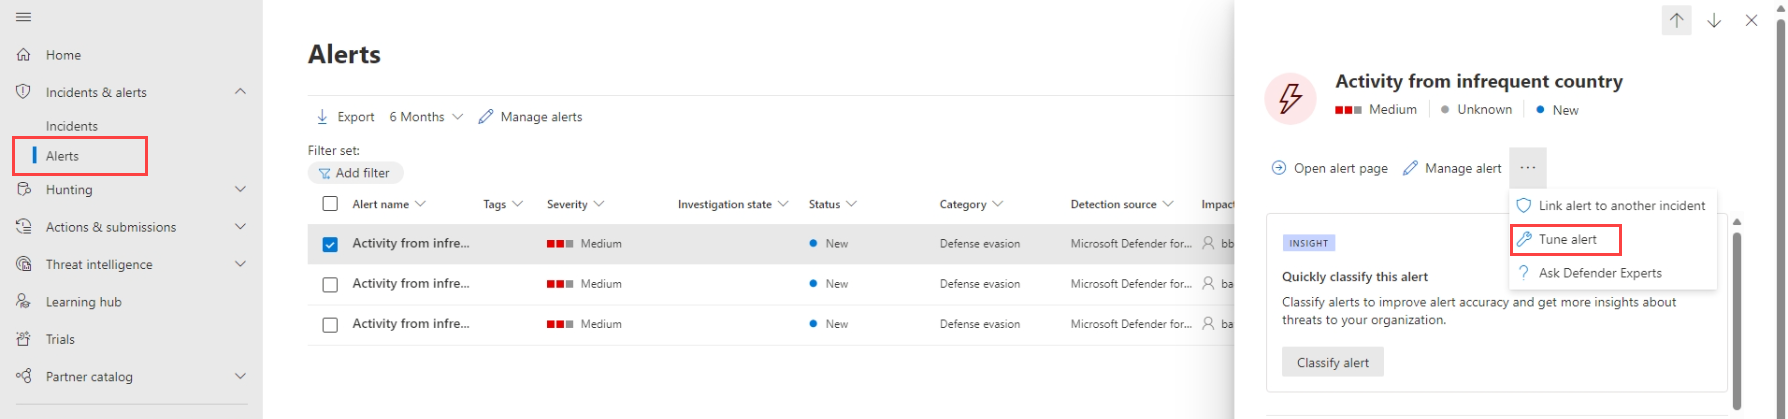
To manage a set of alerts similar to a specific alert, select View similar alerts in the INSIGHT box in the summary details section of the alert page.

From the Manage alerts pane, you can then classify all of the related alerts at the same time. Here's an example.

If similar alerts were already classified in the past, you can save time by using Microsoft Defender XDR recommendations to learn how the other alerts were resolved. From the summary details section, select Recommendations.

The Recommendations tab provides next-step actions and advice for investigation, remediation, and prevention. Here's an example.

Tune an alert
As a security operations center (SOC) analyst, one of the top issues is triaging the sheer number of alerts that are triggered daily. An analyst's time is valuable, wanting to focus only on high severity and high priority alerts. Meanwhile, analysts are also required to triage and resolve lower priority alerts, which tends to be a manual process.
Alert tuning, previously known as alert suppression, provides the ability to tune and manage alerts in advance. This streamlines the alert queue and saves triage time by hiding or resolving alerts automatically, each time a certain expected organizational behavior occurs and rule conditions are met.
Alert tuning rules support conditions based on evidence types such as files, processes, scheduled tasks, and other types of evidence that trigger alerts. After creating an alert tuning rule, apply it to the selected alert or any alert type that meets the defined conditions to tune the alert.
Alert tuning as general availability captures alerts only from Defender for Endpoint. However, in preview, alert tuning is also extended to other Microsoft Defender XDR services, including Defender for Office 365, Defender for Identity, Defender for Cloud Apps, Microsoft Entra ID Protection (Microsoft Entra IP), and others if they are available on your platform and plan.
Caution
We recommend using alert tuning with caution, for scenarios where known, internal business applications or security tests trigger an expected activity and you don't want to see the alerts.
Create rule conditions to tune alerts
Create alert tuning rules from the Microsoft Defender XDR Settings area or from an alert details page. Select one of the following tabs to continue.
In the Microsoft Defender portal, select Settings > Microsoft Defender XDR > Alert tuning.
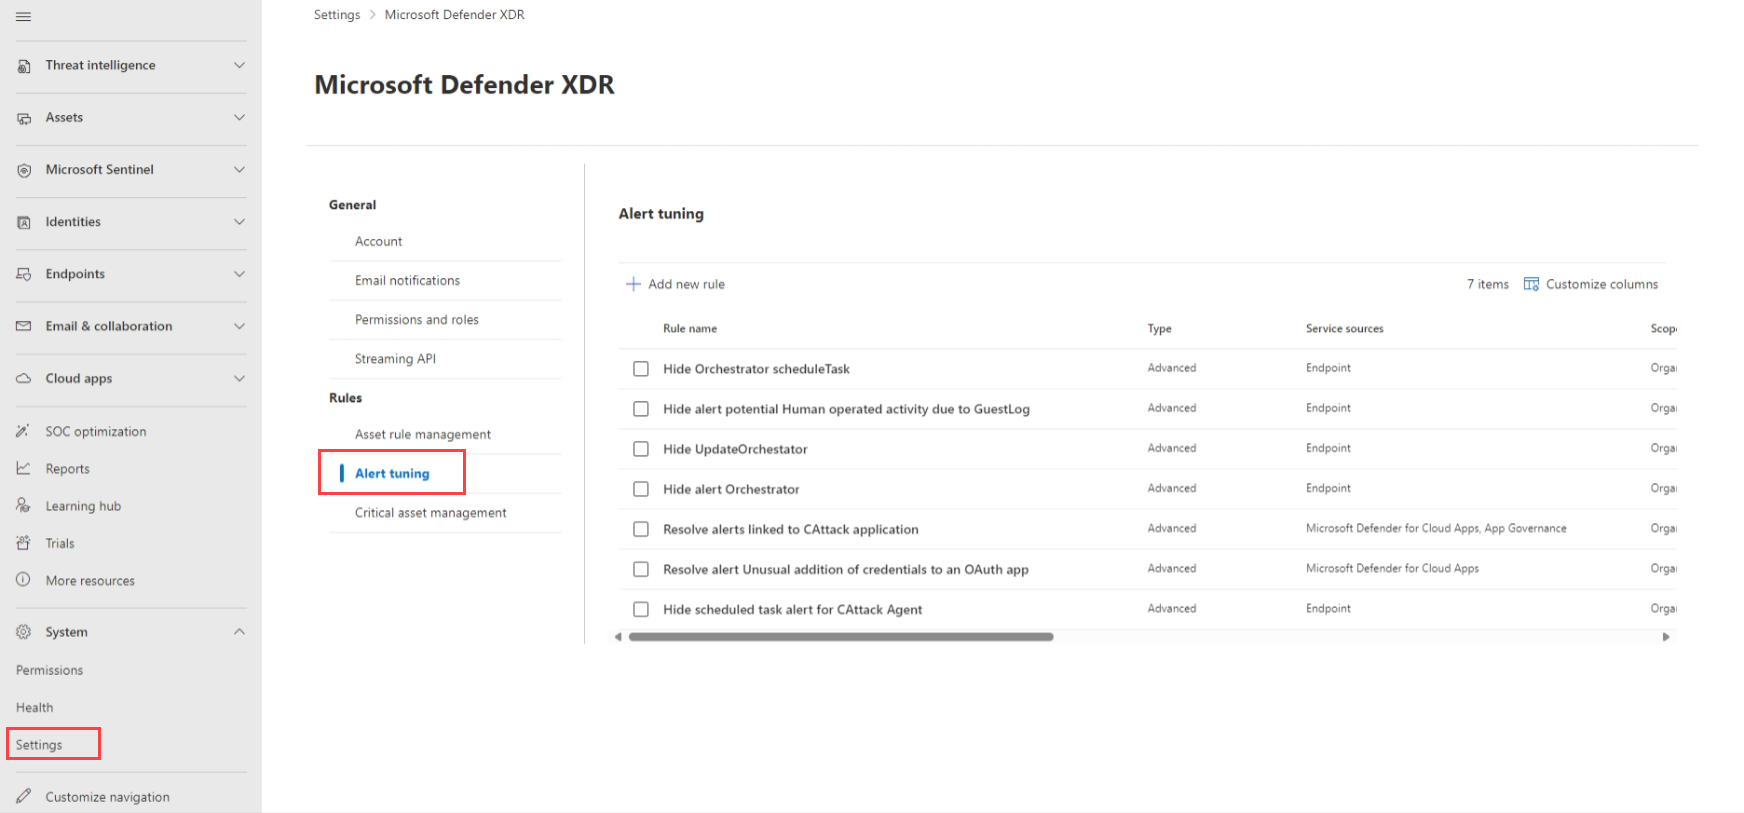
Select Add new rule to tune a new alert, or select an existing rule row to make changes. Selecting the rule title opens a rule details page, where you can view a list of associated alerts, edit conditions, or turn the rule on and off.
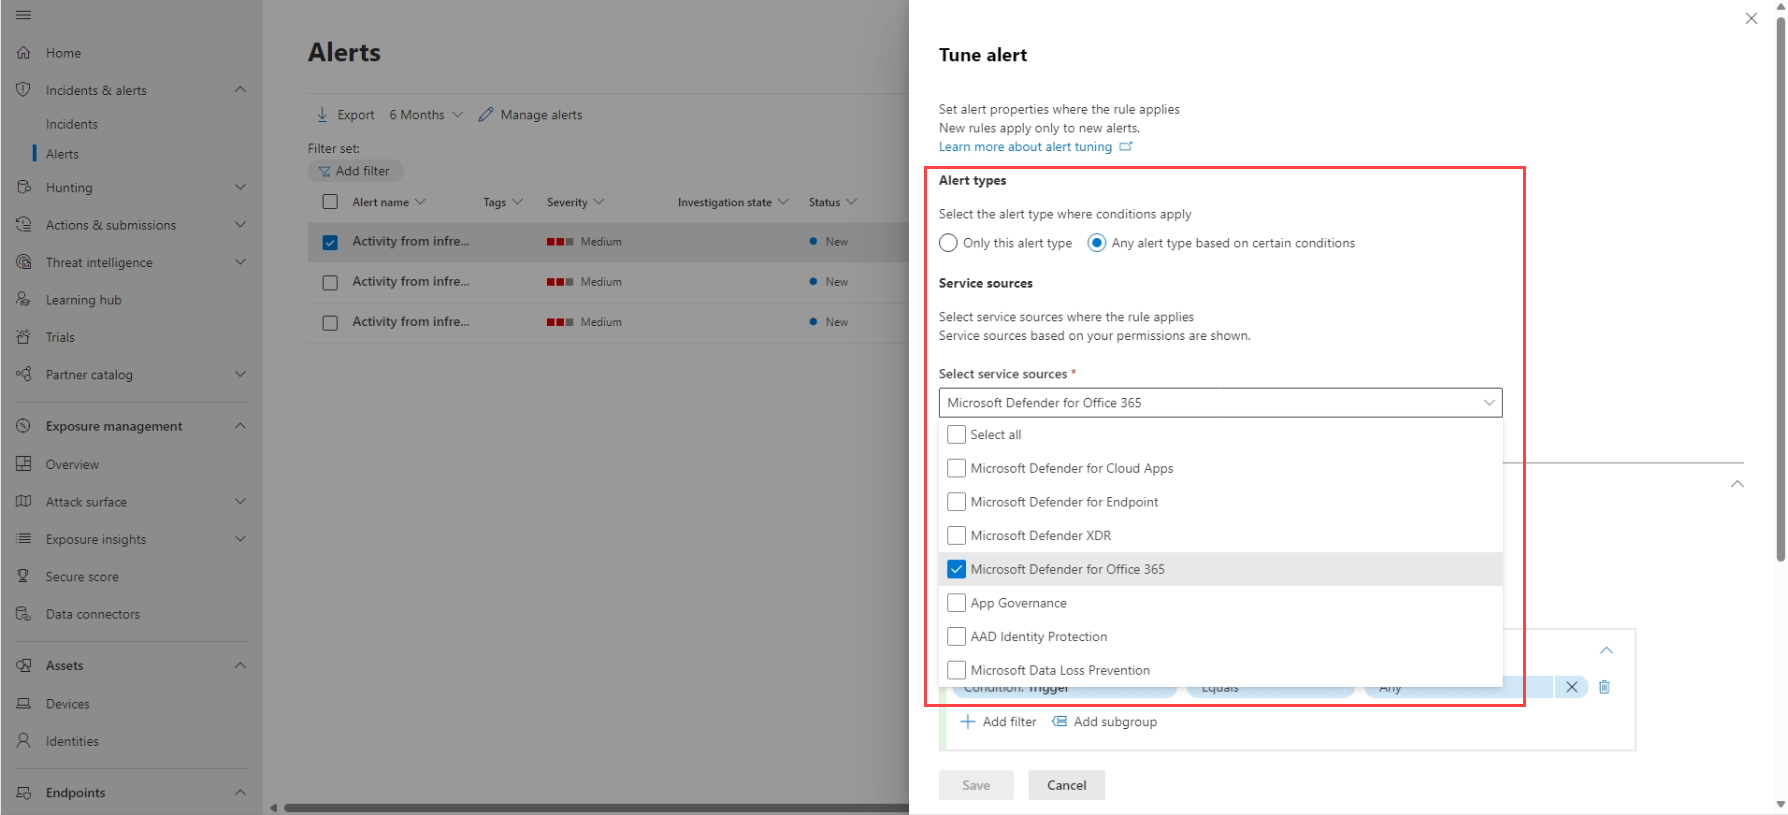
In the Tune alert pane, under Select service sources, select the service sources where you want to the rule to apply. Only services where you have permissions are shown in the list. For example:

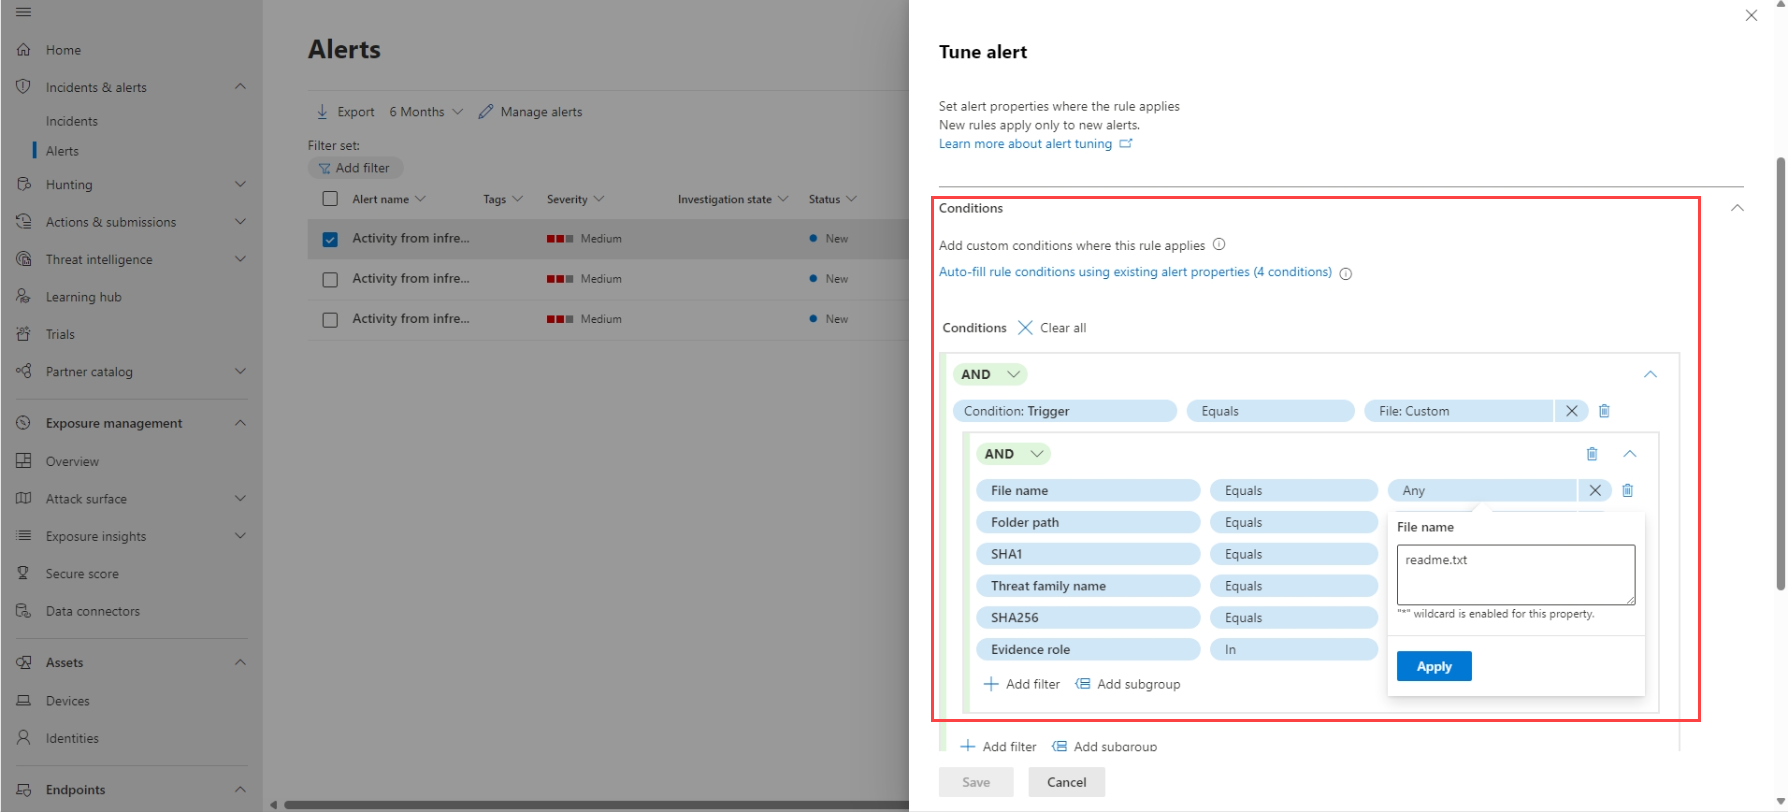
In the Conditions area, add a condition for the alert's triggers. For example, if you want to prevent an alert from being triggered when a specific file is created, define a condition for the File:Custom trigger, and define the file details:
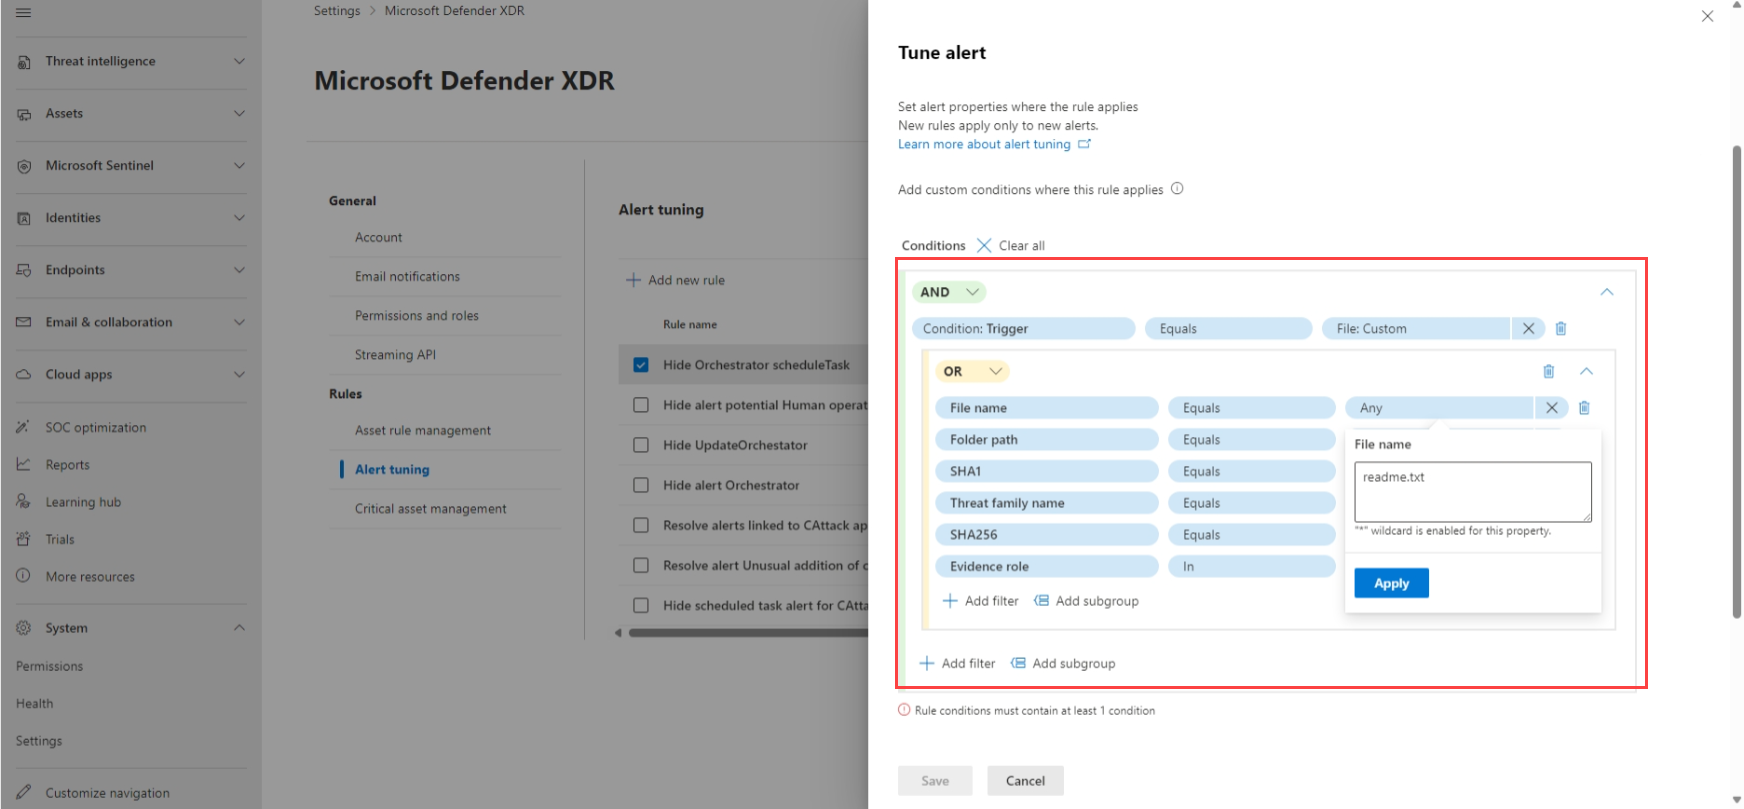
Listed triggers differ, depending on the service sources you selected. Triggers are all indicators of compromise (IOCs), such as files, processes, scheduled tasks, and other evidence types that might trigger an alert, including AntiMalware Scan Interface (AMSI) scripts, Windows Management Instrumentation (WMI) events, or scheduled tasks.
To set multiple rule conditions, select Add filter and use AND, OR, and grouping options to define the relationships between the multiple evidence types that trigger the alert. Further evidence properties are automatically populated as a new subgroup, where you can define your condition values. Condition values aren't case sensitive, and some properties support wildcards.
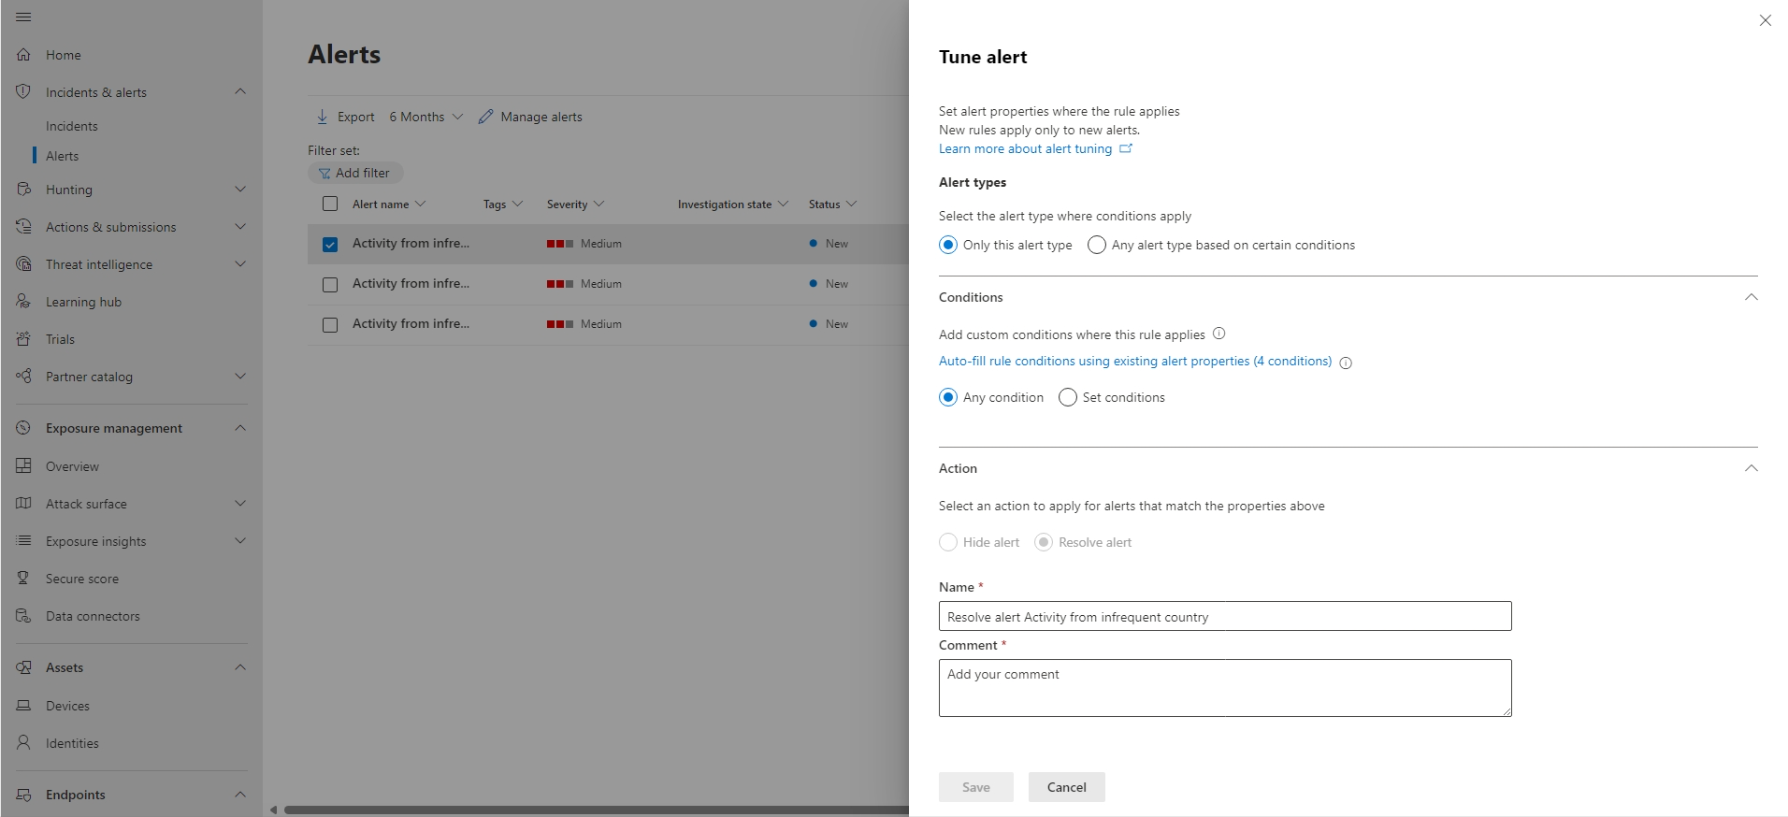
In the Action area of the Tune alert pane, select the relevant action you want the rule to take, either Hide alert or Resolve alert.
Enter a meaningful name for your alert and a comment to describe the alert, and then select Save.


Note
The alert title (Name) is based on the alert type (IoaDefinitionId), which decides the alert title. Two alerts that have the same alert type can change to a different alert title.
Resolve an alert
Once you're done analyzing an alert and it can be resolved, go to the Manage alert pane for the alert or similar alerts and mark the status as Resolved and then classify it as a True positive with a type of threat, an Informational, expected activity with a type of activity, or a False positive.
Classifying alerts helps Microsoft Defender XDR improve its detection quality.
Use Power Automate to triage alerts
Modern security operations (SecOps) teams need automation to work effectively. To focus on hunting and investigating real threats, SecOps teams use Power Automate to triage through the list of alerts and eliminate the ones that aren't threats.
Criteria for resolving alerts
- User has Out-of-office message turned on
- User isn't tagged as high risk
If both are true, SecOps marks the alert as legitimate travel and resolves it. A notification is posted in Microsoft Teams after the alert is resolved.
Connect Power Automate to Microsoft Defender for Cloud Apps
To create the automation, you'll need an API token before you can connect Power Automate to Microsoft Defender for Cloud Apps.
Open Microsoft Defender and select Settings > Cloud Apps > API token, and then select Add token in the API tokens tab.
Provide a name for your token, and then select Generate. Save the token as you'll need it later.
Create an automated flow
Watch this short video to learn how automation works efficiently to create a smooth workflow and how to connect Power Automate to Defender for Cloud Apps.
Next steps
As needed for in-process incidents, continue your investigation.
See also
- Incidents overview
- Manage incidents
- Investigate incidents
- Investigate data loss prevention alerts in Defender
- Microsoft Entra ID Protection
Tip
Do you want to learn more? Engage with the Microsoft Security community in our Tech Community: Microsoft Defender XDR Tech Community.