Lưu ý
Cần có ủy quyền mới truy nhập được vào trang này. Bạn có thể thử đăng nhập hoặc thay đổi thư mục.
Cần có ủy quyền mới truy nhập được vào trang này. Bạn có thể thử thay đổi thư mục.
This article teaches you about which versions of .NET are supported on macOS, how to install .NET, and what the difference is between the SDK and runtime.
The latest version of .NET is 10.
Supported versions
The following table lists the supported .NET releases, and which macOS they're supported on. These versions remain supported until either the version of .NET reaches end-of-support or the version of macOS is no longer supported.
| macOS Version | .NET |
|---|---|
| macOS 26 "Tahoe" | 10.0, 9.0, 8.0 |
| macOS 15 "Sequoia" | 10.0, 9.0, 8.0 |
| macOS 14 "Sonoma" | 10.0, 9.0, 8.0 |
The following versions of .NET are ❌ no longer supported:
- .NET 7
- .NET 6
- .NET 5
- .NET Core 3.1
- .NET Core 3.0
- .NET Core 2.2
- .NET Core 2.1
- .NET Core 2.0
Runtime or SDK
The runtime is used to run apps created with .NET. When an app author publishes an app, they can include the runtime with their app. If they don't include the runtime, it's up to the user to install the correct runtime.
There are two runtimes you can install on macOS, and both are included with the SDK.
ASP.NET Core Runtime
Runs ASP.NET Core apps. Includes the .NET runtime. Not available as an installer..NET Runtime
This runs normal .NET apps, but not specialized apps, such as apps built on ASP.NET Core.
The SDK is used to build and publish .NET apps and libraries. The latest SDK supports building apps for previous versions of .NET. In normal circumstances, you would only need the latest SDK installed.
Installing the SDK includes both the standard .NET Runtime and the ASP.NET Core Runtime. For example, if you have .NET SDK 9.0 installed, then .NET Runtime 9.0 and ASP.NET Core 9.0 Runtime are both installed. However, any other runtime version wouldn't be installed with the SDK and would require you to install it separately.
Choose how to install .NET
There are different ways to install .NET, and some products might manage their own version of .NET. If you install .NET through software that manages its own version of .NET, it might not be enabled system-wide. Make sure you understand the implications of installing .NET through other software.
If you're unsure which method you should choose after reviewing the lists in the following sections, you probably want to use the .NET Installer package.
Developers
Visual Studio Code - C# Dev Kit
Install the C# Dev Kit extension for Visual Studio Code to develop .NET apps. The extension can use an already installed SDK or install one for you.
Users and Developers
-
Use the standalone installer to install .NET. This method is the typical way to install .NET on your developer or user machine.
-
A bash script that can automate the install of the SDK or Runtime. You can choose which version of .NET to install.
-
Use this installation method when you need to install .NET to a specific folder, and run it apart from other copies of .NET.
Install .NET
Installer packages are available for macOS, an easy way of installing .NET.
Open a browser and navigate to https://dotnet.microsoft.com/download/dotnet.
Select the link to the .NET version you want to install, such as .NET 10.0.
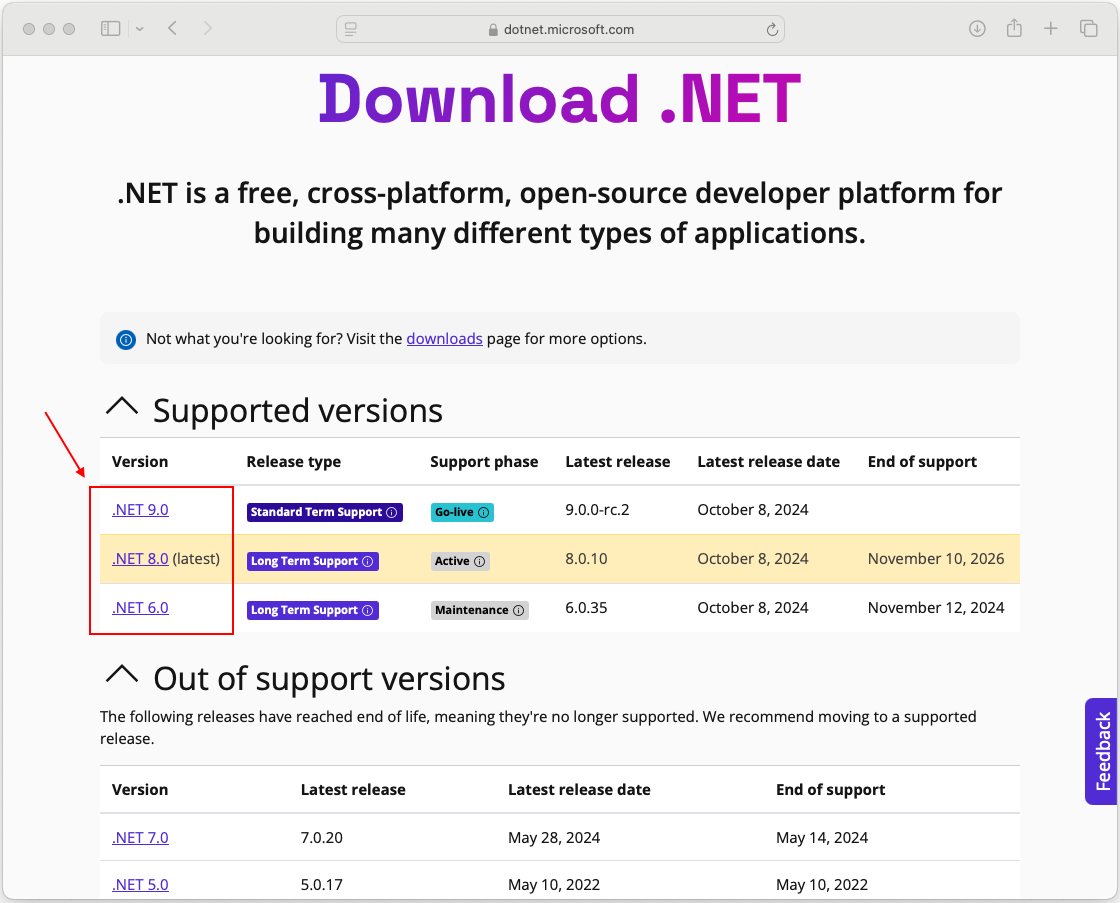
This link brings you to the page with links to download that version of .NET
If you're going to install the SDK, choose the latest .NET version. The SDK supports building apps for previous versions of .NET.
Tip
If you're unsure which version to download, choose the version marked latest.
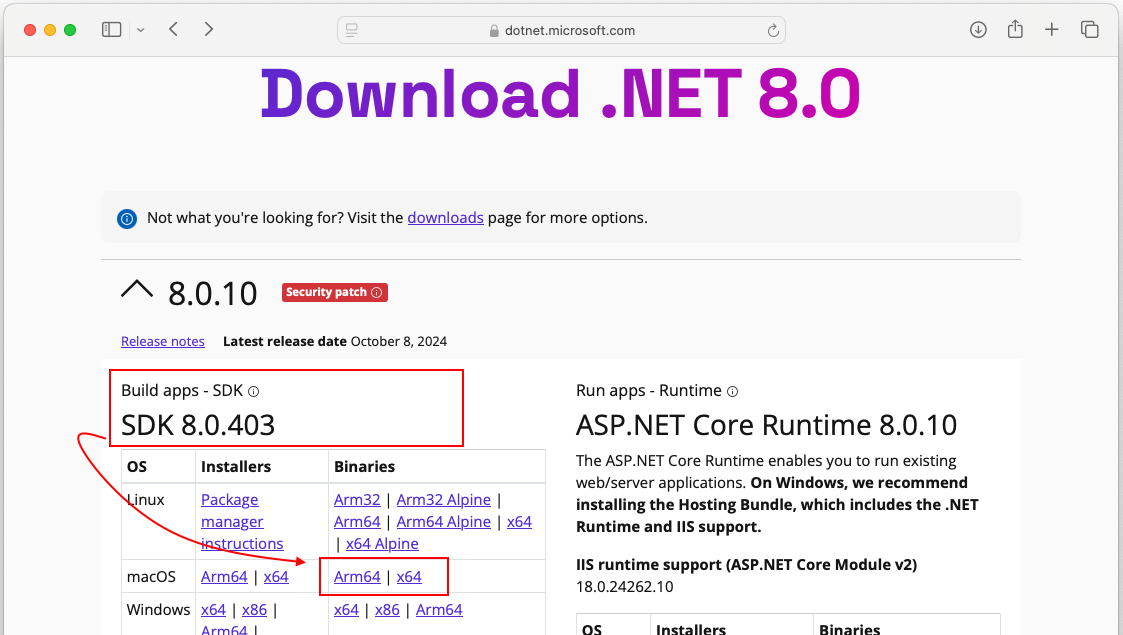
This page presents the download links for the SDK and the Runtime. Here you download the .NET SDK or .NET Runtime.

There are two sections highlighted in the previous image. If you're downloading the SDK, refer to section 1. For the .NET Runtime, refer to section 2.
Section 1 (SDK)
This section is the SDK download area. Under the Installers column for the macOS row, two architectures are listed: Arm64 and x64.
- If you're running an Apple processor, such as an M1 or an M3 Pro, select Arm64.
- If you're running an Intel processor, select x64.
Section 2 (Runtime)
This section contains the runtime downloads. Notice that links for the Installers column in the macOS row are empty! This section is empty because the ASP.NET Core Runtime, is only provided in the SDK, or through binary installation.
Scroll further down to find the standard .NET Runtime for download.
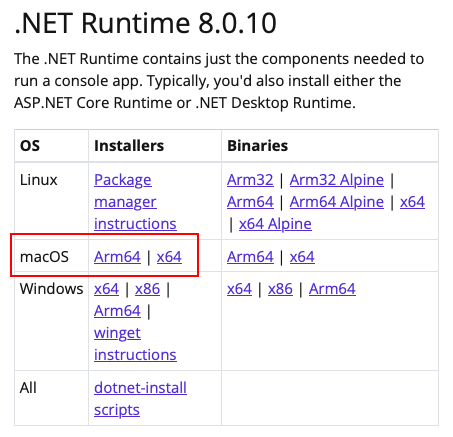
- If you're running an Apple processor, such as an M1 or an M3 Pro, select Arm64.
- If you're running an Intel processor, select x64.
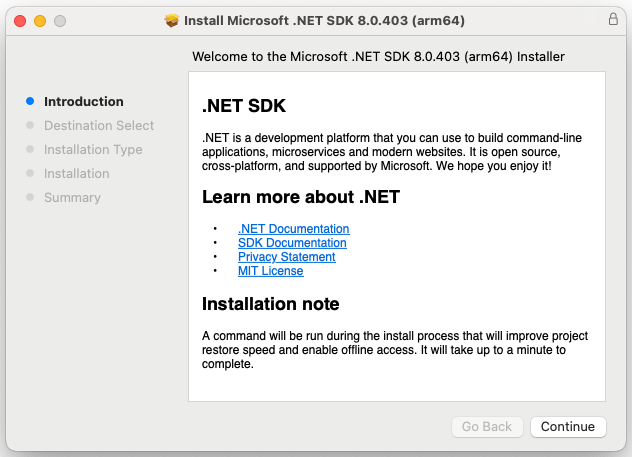
Once the download completes, open it.
Follow the steps in the Installer.
Install .NET manually
As an alternative to the macOS installers, you can download and manually install the SDK and runtime. Manual installation is usually performed as part automation in a continuous integration scenario. Developers and users usually want to use the installer.
Tip
Use the install-dotnet.sh script to perform these steps automatically.
Open a browser and navigate to https://dotnet.microsoft.com/download/dotnet.
Select the link to the .NET version you want to install, such as .NET 8.0.
This link brings you to the page with links to download that version of .NET
If you're going to install the SDK, choose the latest .NET version. The SDK supports building apps for previous versions of .NET.
Tip
If you're unsure which version to download, choose the version marked latest.
Select the link to the SDK or Runtime you want to install. Look for the Binaries column in the macOS row.
- If you're running an Apple processor, such as an M1 or an M3 Pro, select Arm64.
- If you're running an Intel processor, select x64.
Open a terminal and navigate to where the .NET binary was downloaded.
Extract the tarball to where you want to .NET on your system. The following example uses the HOME directory
~/Applications/.dotnet.mkdir -p ~/Applications/.dotnet tar -xf "dotnet-sdk-9.0.100-rc.2.24474.11-osx-arm64.tar" -C ~/Applications/.dotnet/
Test that .NET is working by changing the directory to where .NET was installed, and run the dotnet --info command:
chdir ~/Applications/.dotnet/
./dotnet --info
Install .NET with a script
The dotnet-install scripts are used for automation and unelevated installs of the runtime. You can download the script from https://dot.net/v1/dotnet-install.sh.
The script defaults to installing the latest long term support (LTS) version, which is .NET 8. You can choose a specific release by specifying the channel switch. Include the runtime switch to install a runtime. Otherwise, the script installs the SDK.
Tip
These commands are provided a script snippet at the end of this procedure.
Open a terminal.
Navigate to a folder where you want to download the script, such as ~/Downloads.
If you don't have the
wgetcommand, install it with Brewbrew install wgetRun the following command to download the script:
wget https://dot.net/v1/dotnet-install.shGive the script execute permissions
chmod +x dotnet-install.shRun the script to install .NET.
The script defaults to installing the latest SDK to the
~/.dotnetdirectory../dotnet-install.sh
Here are all the commands as a single bash script:
chdir ~/Downloads
brew install wget
wget https://dot.net/v1/dotnet-install.sh
chmod +x dotnet-install.sh
./dotnet-install.sh
Test .NET by navigating to the ~/.dotnet folder and running the dotnet --info command:
chdir ~/.dotnet
./dotnet --info
Important
Some programs might use environment variables to find .NET on your system, and using the dotnet command might not work when opening a new terminal. For help resolving this issue, see Make .NET available system-wide section.
Install .NET for Visual Studio Code
Visual Studio Code is a powerful and lightweight source code editor that runs on your desktop. Visual Studio Code can use the SDK already installed on your system. Additionally, the C# Dev Kit extension will install .NET for you if it's not already installed.
For instructions on installing .NET through Visual Studio Code, see Getting Started with C# in VS Code.
Notarization
Software created for macOS that's distributed with a Developer ID must be notarized, including apps made with .NET.
If you run a non-notarized app, an error window similar to the following image is displayed:
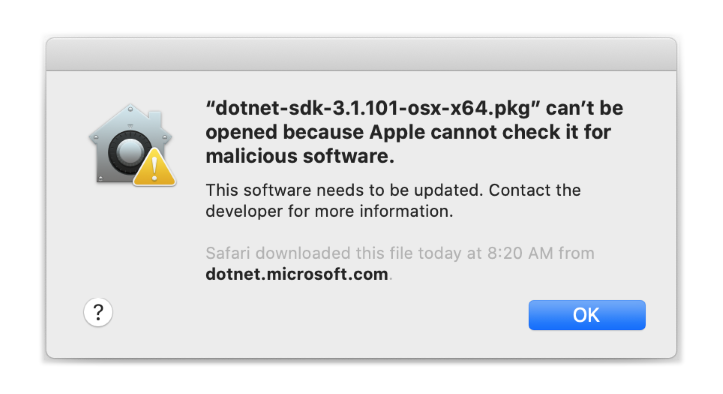
For more information about how enforced-notarization affects .NET (and your .NET apps), see Working with macOS Catalina Notarization.
Validation
After downloading an installer or binary release, verify it to make sure that the file hasn't been changed or corrupted. You can verify the checksum on your computer and then compare it to what was reported on the download website.
When you download the file from an official download page, the checksum for the file is displayed in a text box. Select the Copy button to copy the checksum value to your clipboard.
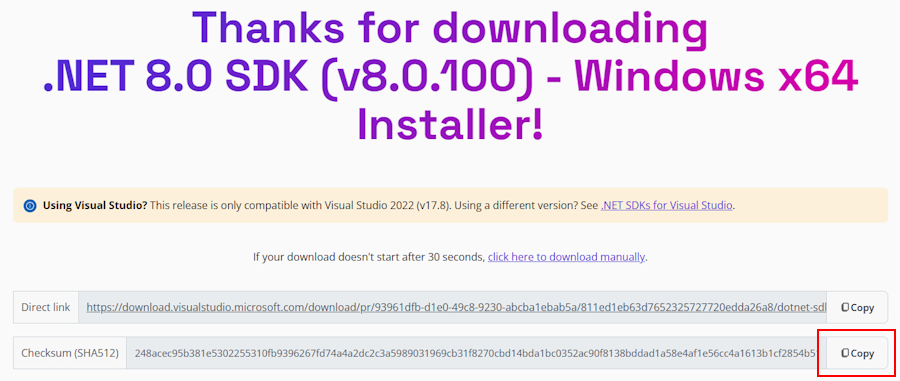
Use the shasum -a 512 command to print the checksum of the file you've downloaded. For example, the following command reports the checksum of the dotnet-sdk-9.0.306-osx-x64.tar.gz file:
$ shasum -a 512 dotnet-sdk-9.0.306-osx-x64.tar.gz
a9700f98e5aa4f70b2a08ddba2b1c6085106b0d17828bd719fdcef460b06c890b32d752fbff8e4659cd1ca4174b4b211b301fe682439ea9a24b6521ca5a64c69  dotnet-sdk-9.0.306-osx-x64.tar.gz
Compare the checksum with the value provided by the download site.
Use a checksum file to validate
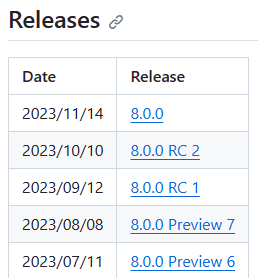
The .NET release notes contain a link to a checksum file you can use to validate your downloaded file. The following steps describe how to download the checksum file and validate a .NET install binary:
The release notes page for .NET 9 on GitHub at https://github.com/dotnet/core/tree/main/release-notes/9.0#releases contains a section named Releases. The table in that section links to the downloads and checksum files for each .NET 9 release. The following image shows the .NET 8 release table as a reference:
Select the link for the version of .NET that you downloaded.
The previous section used .NET SDK 9.0.306, which is in the .NET 9.0.10 release.
In the release page, you can see the .NET Runtime and .NET SDK version, and a link to the checksum file. The following image shows the .NET 8 release table as a reference:
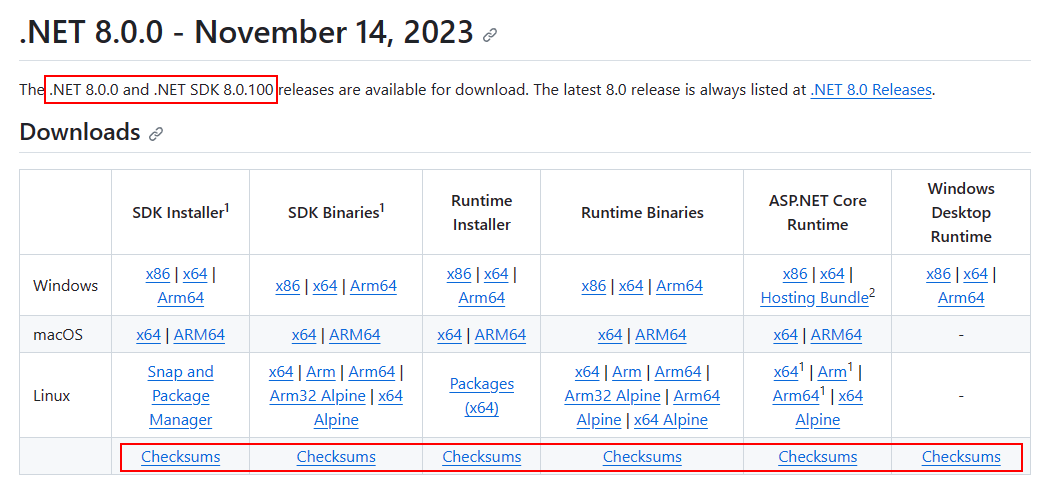
Right-click on the Checksum link and copy it to your clipboard.
Open a terminal.
Use
curl -O {link}to download the checksum file.Replace the link in the following command with the link you copied.
curl -O https://builds.dotnet.microsoft.com/dotnet/checksums/9.0.10-sha.txtWith both the checksum file and the .NET release file downloaded to the same directory, use the
shasum -a 512 -c {file}command to validate the downloaded file.When validation passes, you see the file printed with the OK status:
$ shasum -a 512 -c 9.0.10-sha.txt
dotnet-sdk-9.0.306-osx-x64.tar.gz: OK
If you see the file marked as FAILED, the file you downloaded isn't valid and shouldn't be used.
$ shasum -a 512 -c 9.0.10-sha.txt
dotnet-sdk-9.0.306-osx-x64.tar.gz: FAILED
shasum: WARNING: 1 computed checksum did NOT match
Arm-based Macs
The following sections describe things you should consider when installing .NET on an Arm-based Mac.
Path differences
On an Arm-based Mac, all Arm64 versions of .NET are installed to the normal /usr/local/share/dotnet/ folder. However, when you install the x64 version of .NET SDK, it's installed to the /usr/local/share/dotnet/x64/dotnet/ folder.
Path variables
Environment variables that add .NET to system path, such as the PATH variable, might need to be changed if you have both the x64 and Arm64 versions of the .NET SDK installed. Additionally, some tools rely on the DOTNET_ROOT environment variable, which would also need to be updated to point to the appropriate .NET SDK installation folder.
Troubleshooting
The following sections are available to help troubleshoot issues:
Make .NET available system-wide
Sometimes apps on your system, including the terminal, need to find where .NET is installed. The .NET macOS Installer package should automatically configure your system. However, if you used the manual installation method or the .NET install script, you must add the directory where .NET was installed to the PATH variable.
Some apps might look for the DOTNET_ROOT variable when trying to determine where .NET is installed.
There are many different shells available for macOS and each has a different profile. For example:
- Bash Shell: ~/.profile, /etc/profile
- Korn Shell: ~/.kshrc or .profile
- Z Shell: ~/.zshrc or .zprofile
Set the following two environment variables in your shell profile:
DOTNET_ROOTThis variable is set to the folder .NET was installed to, such as
$HOME/.dotnet:export DOTNET_ROOT=$HOME/.dotnetPATHThis variable should include both the
DOTNET_ROOTfolder and theDOTNET_ROOT/toolsfolder:export PATH=$PATH:$DOTNET_ROOT:$DOTNET_ROOT/tools
Related content
Cộng tác với chúng tôi trên GitHub
Bạn có thể tìm thấy nguồn cho nội dung này trên GitHub, nơi bạn cũng có thể tạo và xem lại các vấn đề và yêu cầu kéo. Để biết thêm thông tin, hãy xem hướng dẫn dành cho người đóng góp của chúng tôi.