作者 :Erik Reitan
下载 Wingtip Toys 示例项目 (C#) 或 下载电子书 (PDF)
本教程系列将介绍如何使用 ASP.NET 4.5 和 Microsoft Visual Studio Express 2013 for Web 生成 ASP.NET Web Forms应用程序。 本教程系列随附了包含 C# 源代码的Visual Studio 2013项目。
本教程介绍如何修改 Wingtip Toys 示例应用程序,以包含使用 PayPal 的用户授权、注册和付款。 只有登录的用户才有权购买产品。 ASP.NET 4.5 Web Forms项目模板的内置用户注册功能已包含所需的大部分内容。 你将添加 PayPal 快速结帐功能。 在本教程中,你将使用 PayPal 开发人员测试环境,因此不会转移任何实际资金。 在本教程结束时,你将通过选择要添加到购物车的产品、单击结帐按钮并将数据传输到 PayPal 测试网站来测试应用程序。 在 PayPal 测试网站上,确认发货和付款信息,然后返回到本地 Wingtip Toys 示例应用程序以确认并完成购买。
有几个经验丰富的第三方支付处理器专门处理在线购物,解决可伸缩性和安全性问题。 ASP.NET 开发人员在实施购物和购买解决方案之前,应考虑利用第三方支付解决方案的优势。
注意
Wingtip Toys 示例应用程序旨在显示可供 ASP.NET Web 开发人员使用的特定 ASP.NET 概念和功能。 此示例应用程序并未针对可伸缩性和安全性的所有可能情况进行优化。
学习内容:
- 如何限制对文件夹中特定页面的访问。
- 如何从匿名购物车创建已知的购物车。
- 如何为项目启用 SSL。
- 如何将 OAuth 提供程序添加到项目。
- 如何使用 PayPal 通过 PayPal 测试环境购买产品。
- 如何在 DetailsView 控件中显示 PayPal 的详细信息。
- 如何使用从 PayPal 获取的详细信息更新 Wingtip Toys 应用程序的数据库。
添加订单跟踪
在本教程中,你将创建两个新类来跟踪用户创建的顺序中的数据。 课程将跟踪有关发货信息、购买总额和付款确认的数据。
添加 Order 和 OrderDetail 模型类
在本系列教程的前面部分,通过在 Models 文件夹中创建 Category、 Product和 类,定义了类别、产品和CartItem购物车项的架构。 现在,你将添加两个新类来定义产品订单的架构和订单的详细信息。
在 Models 文件夹中,添加名为 Order.cs 的新类。
新的类文件显示在编辑器中。将默认代码替换为以下内容:
using System;
using System.ComponentModel.DataAnnotations;
using System.Collections.Generic;
using System.ComponentModel;

namespace WingtipToys.Models
{
  public class Order
  {
    public int OrderId { get; set; }

    public DateTime OrderDate { get; set; }

    public string Username { get; set; }

    [Required(ErrorMessage = "First Name is required")]
    [DisplayName("First Name")]
    [StringLength(160)]
    public string FirstName { get; set; }

    [Required(ErrorMessage = "Last Name is required")]
    [DisplayName("Last Name")]
    [StringLength(160)]
    public string LastName { get; set; }

    [Required(ErrorMessage = "Address is required")]
    [StringLength(70)]
    public string Address { get; set; }

    [Required(ErrorMessage = "City is required")]
    [StringLength(40)]
    public string City { get; set; }

    [Required(ErrorMessage = "State is required")]
    [StringLength(40)]
    public string State { get; set; }

    [Required(ErrorMessage = "Postal Code is required")]
    [DisplayName("Postal Code")]
    [StringLength(10)]
    public string PostalCode { get; set; }

    [Required(ErrorMessage = "Country is required")]
    [StringLength(40)]
    public string Country { get; set; }

    [StringLength(24)]
    public string Phone { get; set; }

    [Required(ErrorMessage = "Email Address is required")]
    [DisplayName("Email Address")]
    [RegularExpression(@"[A-Za-z0-9._%+-]+@[A-Za-z0-9.-]+\.[A-Za-z]{2,4}",
        ErrorMessage = "Email is is not valid.")]
    [DataType(DataType.EmailAddress)]
    public string Email { get; set; }

    [ScaffoldColumn(false)]
    public decimal Total { get; set; }

    [ScaffoldColumn(false)]
    public string PaymentTransactionId { get; set; }

    [ScaffoldColumn(false)]
    public bool HasBeenShipped { get; set; }

    public List<OrderDetail> OrderDetails { get; set; }
  }
}
将 OrderDetail.cs 类添加到 Models 文件夹。
将默认代码替换为以下代码:
using System.ComponentModel.DataAnnotations;

namespace WingtipToys.Models
{
    public class OrderDetail
    {
        public int OrderDetailId { get; set; }

        public int OrderId { get; set; }

        public string Username { get; set; }

        public int ProductId { get; set; }

        public int Quantity { get; set; }

        public double? UnitPrice { get; set; }

    }
}
Order和 OrderDetail 类包含用于定义用于购买和发货的订单信息的架构。
此外,还需要更新管理实体类并提供数据库数据访问权限的数据库上下文类。 为此,需要将新创建的 Order 和 OrderDetail model 类添加到 ProductContext 类。
在 解决方案资源管理器 中,找到并打开 ProductContext.cs 文件。
将突出显示的代码添加到 ProductContext.cs 文件,如下所示:
using System.Data.Entity;

namespace WingtipToys.Models
{
  public class ProductContext : DbContext
  {
    public ProductContext()
      : base("WingtipToys")
    {
    }
    public DbSet<Category> Categories { get; set; }
    public DbSet<Product> Products { get; set; }
    public DbSet<CartItem> ShoppingCartItems { get; set; }
    public DbSet<Order> Orders { get; set; }
    public DbSet<OrderDetail> OrderDetails { get; set; }
  }
}
如本系列教程前面所述, ProductContext.cs 文件中的代码会添加 System.Data.Entity 命名空间,以便你可以访问实体框架的所有核心功能。 此功能包括通过使用强类型对象来查询、插入、更新和删除数据的功能。 类中的 ProductContext 上述代码将实体框架访问权限添加到新添加 Order 的 和 OrderDetail 类。
添加 Checkout Access
Wingtip Toys 示例应用程序允许匿名用户查看产品并将其添加到购物车。 但是,当匿名用户选择购买他们添加到购物车的产品时,他们必须登录到该网站。 登录后,他们可以访问处理结帐和购买过程的 Web 应用程序的受限页面。 这些受限页面包含在应用程序的 Checkout 文件夹中。
添加签出文件夹和页面
现在,你将创建 Checkout 文件夹以及客户将在结帐过程中看到的页面。 本教程稍后将更新这些页面。
右键单击解决方案资源管理器中 Wingtip Toys) (项目名称,然后选择“添加新文件夹”。
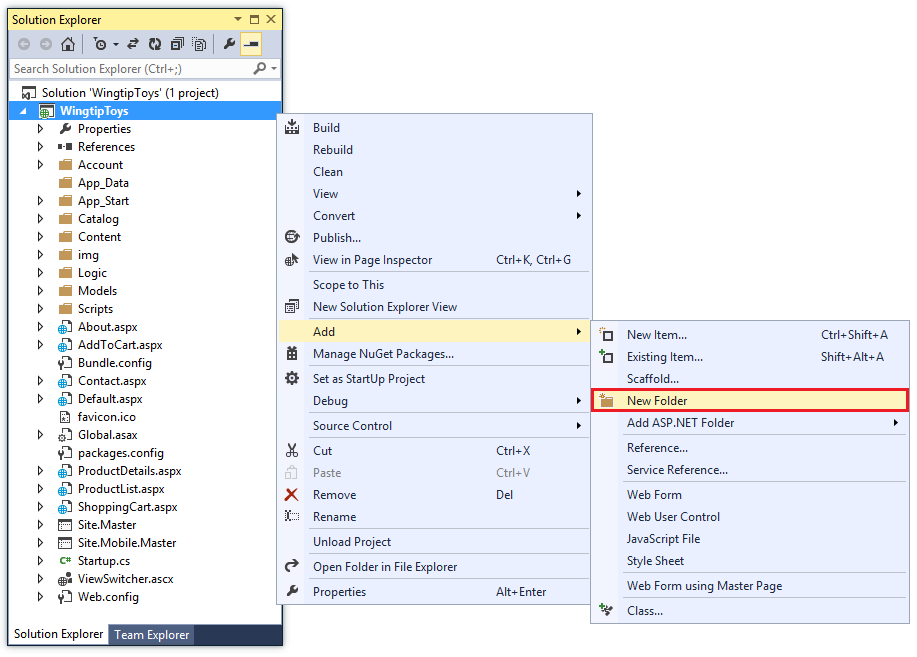
将新文件夹命名为 Checkout。
右键单击“签出”文件夹,然后选择“添加新>项”。
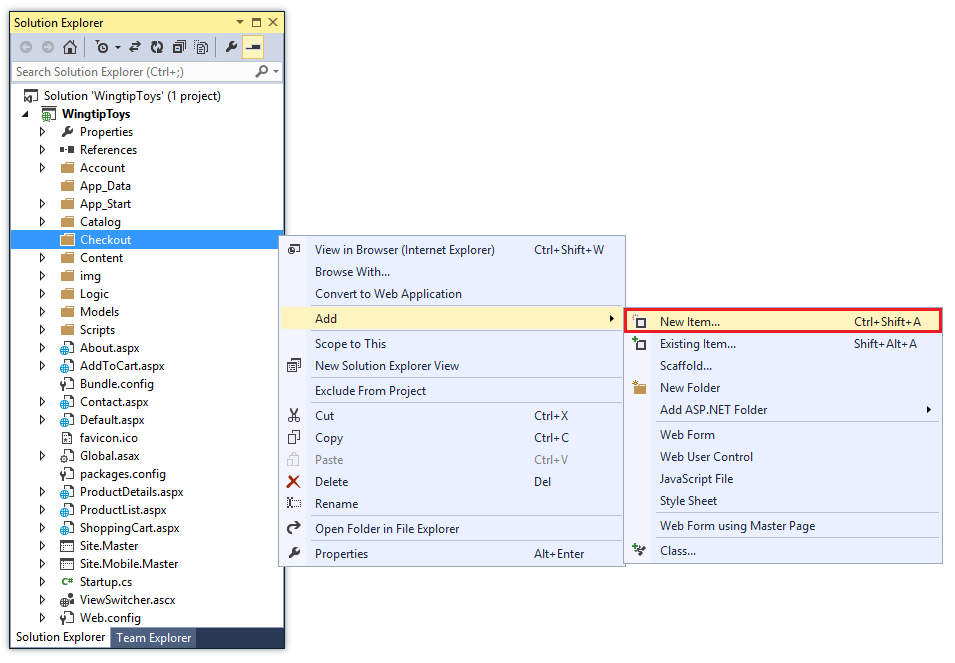
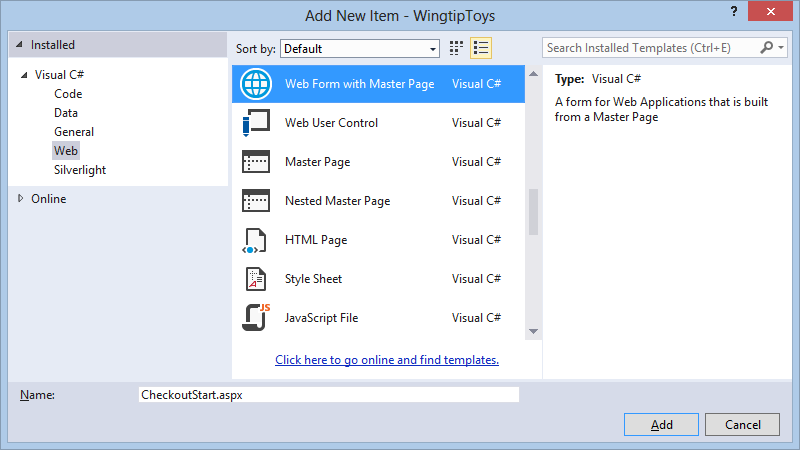
随即出现“添加新项”对话框。
选择左侧的 “Visual C# ->Web 模板”组。 然后,从中间窗格中,选择“ 带母版页的 Web 窗体”,并将其命名为 CheckoutStart.aspx。
与之前一样,选择 Site.Master 文件作为母版页。
使用上述相同步骤将以下其他页面添加到 Checkout 文件夹:
- CheckoutReview.aspx
- CheckoutComplete.aspx
- CheckoutCancel.aspx
- CheckoutError.aspx
添加 Web.config 文件
通过将新的 Web.config 文件添加到 Checkout 文件夹,你将能够限制对文件夹中包含的所有页面的访问。
右键单击“ 签出 ”文件夹,然后选择“ 添加 ->新建项目”。
随即出现“添加新项”对话框。选择左侧的 “Visual C# ->Web 模板”组。 然后,在中间窗格中,选择“ Web 配置文件”,接受 默认名称“Web.config”,然后选择“ 添加”。
将 Web.config 文件中的现有 XML 内容替换为以下内容:
<?xml version="1.0"?>
<configuration>
  <system.web>
    <authorization>
      <deny users="?"/>
    </authorization>
  </system.web>
</configuration>
保存 Web.config 文件。
Web.config 文件指定必须拒绝 Web 应用程序的所有未知用户访问 Checkout 文件夹中包含的页面。 但是,如果用户已注册帐户并已登录,他们将是已知用户,并且将有权访问 Checkout 文件夹中的页面。
请务必注意,ASP.NET 配置遵循层次结构,其中每个 Web.config 文件将配置设置应用于它所在的文件夹及其下的所有子目录。
为项目启用 SSL
安全套接字层 (SSL) 是一种协议,定义为允许 Web 服务器与 Web 客户端通过使用加密以更安全的方式通信。 如果不使用 SSL,在客户端与服务器之间发送数据时,对网络具有实际访问权限的任何人都可以探查数据包。 此外,通过一般 HTTP 进行的几种常见身份验证方案也是不安全的。 尤其是,基本身份验证和窗体身份验证会发送未加密的凭据。 为确保安全,这些身份验证方案必须使用 SSL。
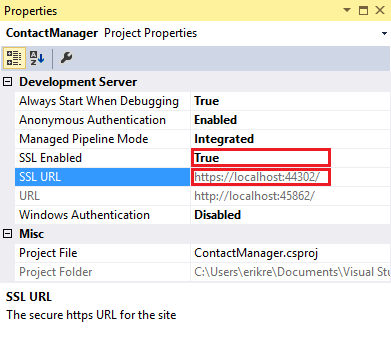
- 在解决方案资源管理器中,单击 WingtipToys 项目,然后按 F4 显示“属性”窗口。
- 将“已启用 SSL”更改为
true。 - 复制 SSL URL ,以便稍后使用。
除非之前已创建 SSL 网站 (,否则 SSL URL 将为https://localhost:44300/,如下所示) 。
- 在解决方案资源管理器中,右键单击 WingtipToys 项目,然后单击“属性”。
- 在左侧选项卡中,单击“ Web”。
- 更改 “项目 URL” 以使用之前保存的 SSL URL 。
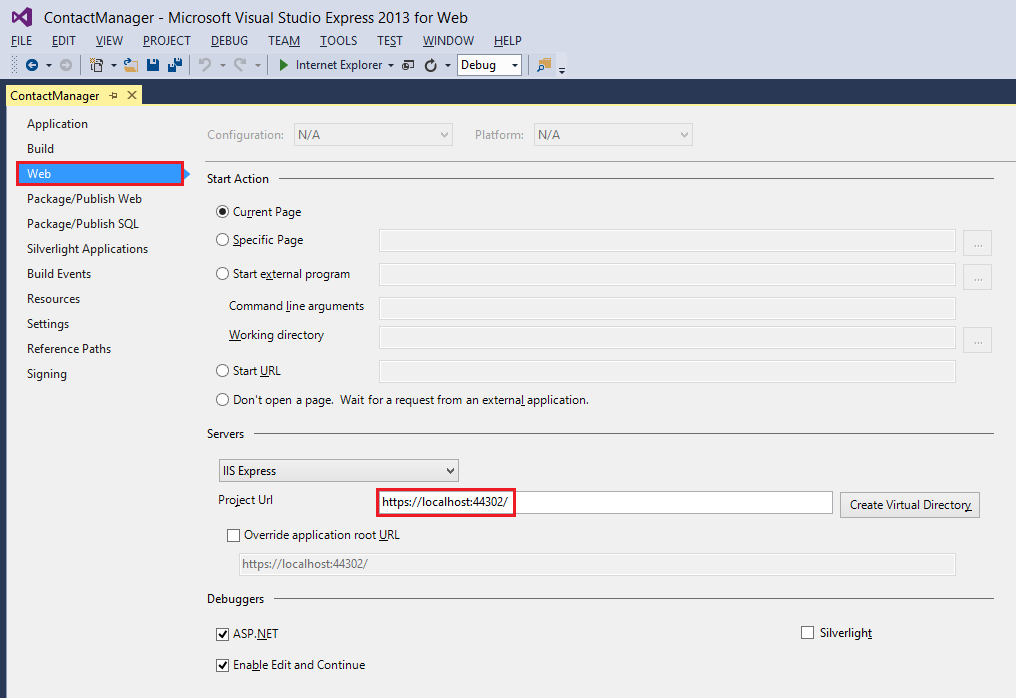
- 按 Ctrl+S 保存页面。
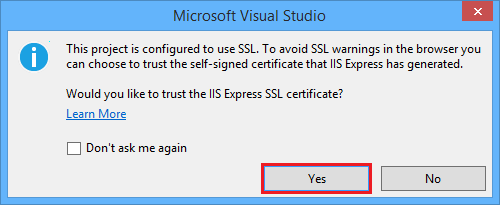
- 按“Ctrl+F5” 运行应用程序。 Visual Studio 将显示一个选项用于避免 SSL 警告。
- 单击“是”信任IIS Express SSL 证书并继续。
此时将显示一条安全警告。 - 单击“ 是 ”将证书安装到 localhost。
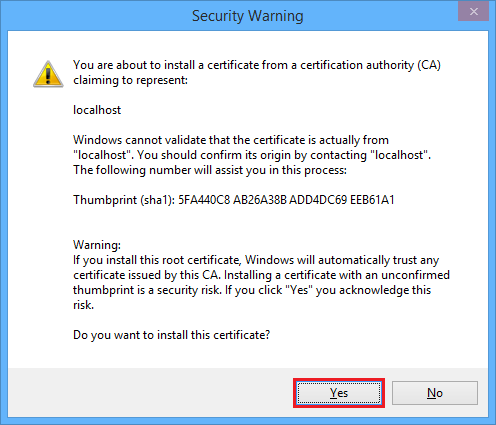
此时将显示浏览器窗口。
现在,可以使用 SSL 轻松地在本地测试 Web 应用程序。
添加 OAuth 2.0 提供程序
ASP.NET Web 窗体为成员资格和身份验证提供了增强的选项。 这些增强功能包括 OAuth。 OAuth 是一种开放协议,允许以一种简单而标准的方法从 Web、移动和桌面应用程序进行安全授权。 ASP.NET Web Forms模板使用 OAuth 将 Facebook、Twitter、Google 和 Microsoft 公开为身份验证提供程序。 虽然本教程仅使用 Google 作为身份验证提供程序,但你可轻松修改代码以使用任何提供程序。 实施其他提供程序的步骤与你将在本教程中看到的步骤非常类似。
除了身份验证外,本教程还将使用角色实施授权。 只有添加到该角色的用户 canEdit 才能更改数据 (创建、编辑或删除联系人) 。
注意
Windows Live 应用程序仅接受工作网站的实时 URL,因此不能使用本地网站 URL 来测试登录名。
可以执行以下步骤来添加 Google 身份验证提供程序。
打开 App_Start\Startup.Auth.cs 文件。
从
app.UseGoogleAuthentication()方法中删除注释字符,使方法如下所示:app.UseGoogleAuthentication(new GoogleOAuth2AuthenticationOptions() { ClientId = "", ClientSecret = "" });导航到 Google 开发人员控制台。 你还需要使用 Google 开发人员电子邮件帐户 (gmail.com) 登录。 如果没有 Google 帐户,请选择“ 创建帐户” 链接。
接下来,你将看到 Google 开发人员控制台。
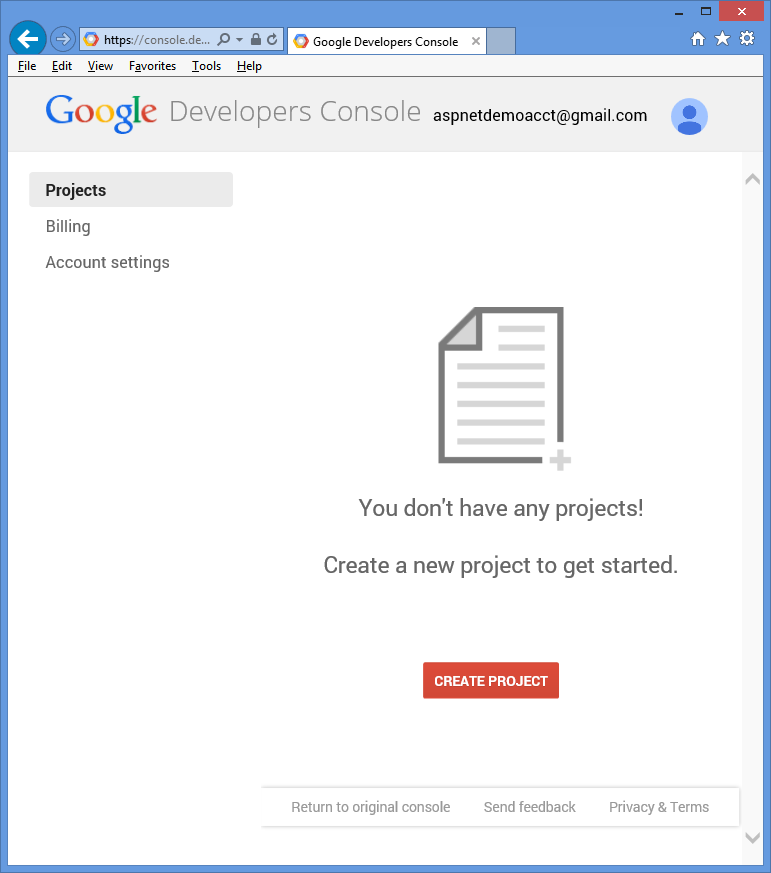
单击“ 创建项目 ”按钮,输入项目名称和 ID (可以使用默认值) 。 然后,单击 协议复选框 和 “创建 ”按钮。
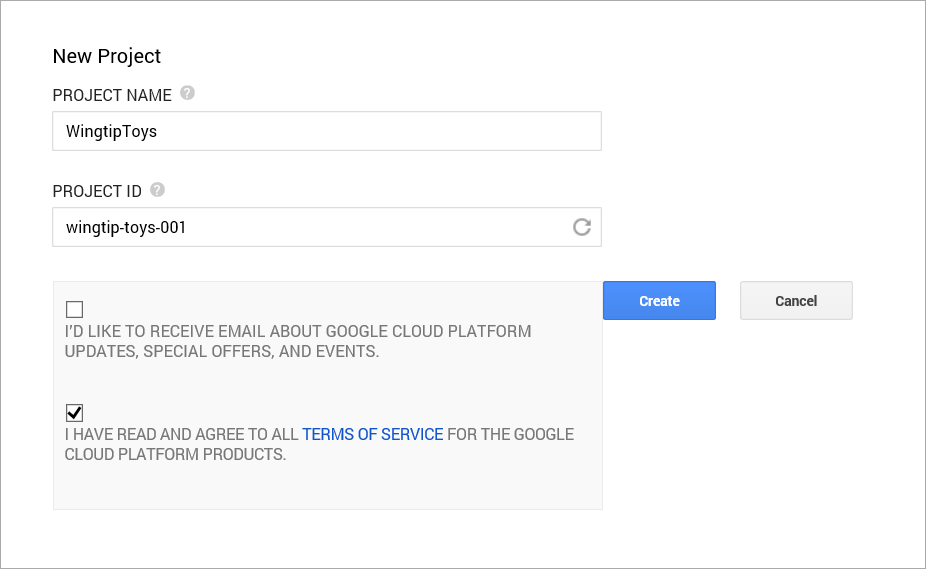
几秒钟后,将会创建新项目,并且浏览器将显示新项目页。
在左侧选项卡中,单击“ API & 身份验证”,然后单击“ 凭据”。
单击“OAuth”下的“创建新客户端 ID”。
将显示“ 创建客户端 ID ”对话框。
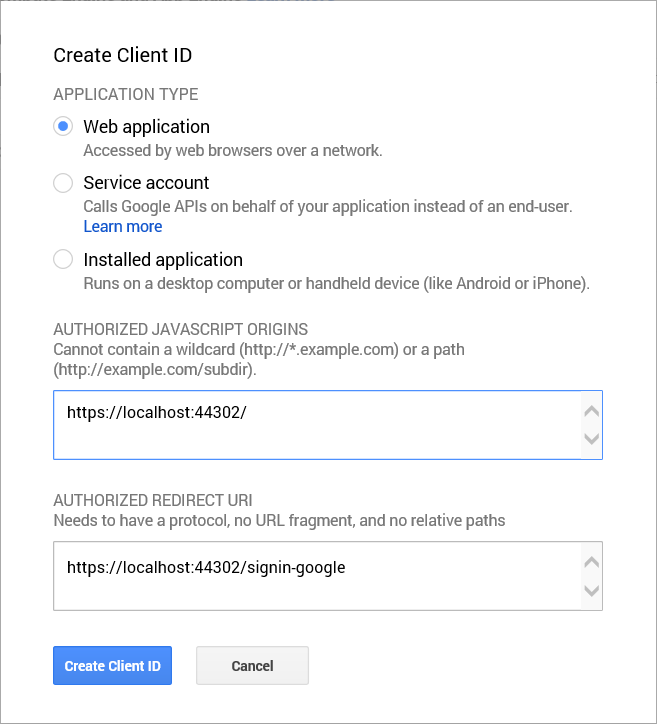
在 “创建客户端 ID ”对话框中,保留应用程序类型的默认 Web 应用程序。
除非已) 创建了其他 SSL 项目,否则请将授权 的 JavaScript 源 设置为之前在本教程 (
https://localhost:44300/中使用的 SSL URL。
此 URL 是应用程序的来源。 对于此示例,你只需输入 localhost 测试 URL。 但是,可以输入多个 URL 来说明 localhost 和 production。将 “授权重定向 URI ”设置为以下内容:
https://localhost:44300/signin-google此值是 ASP.NET OAuth 用户与 Google OAuth 服务器通信时使用的 URI。 请记住上面使用的 SSL URL (
https://localhost:44300/除非) 创建了其他 SSL 项目。单击“ 创建客户端 ID ”按钮。
在 Google 开发人员控制台的左侧菜单中,单击 “同意”屏幕 菜单项,然后设置电子邮件地址和产品名称。 完成表单后,单击“ 保存”。
单击“API”菜单项,向下滚动并单击 Google+ API 旁边的“关闭”按钮。
接受此选项将启用 Google+ API。还必须将 Microsoft.Owin NuGet 包更新到版本 3.0.0。
在“ 工具 ”菜单中,选择“ NuGet 包管理器 ”,然后选择“ 管理解决方案的 NuGet 包”。
在 “管理 NuGet 包” 窗口中,查找 Microsoft.Owin 包并将其更新到版本 3.0.0。在 Visual Studio 中,通过将客户端 ID 和客户端密码复制并粘贴到 方法中,更新
UseGoogleAuthenticationStartup.Auth.cs 页的方法。 下面显示的 客户端 ID 和 客户端机密 值是示例,不起作用。using System; using Microsoft.AspNet.Identity; using Microsoft.AspNet.Identity.EntityFramework; using Microsoft.AspNet.Identity.Owin; using Microsoft.Owin; using Microsoft.Owin.Security.Cookies; using Microsoft.Owin.Security.DataProtection; using Microsoft.Owin.Security.Google; using Owin; using WingtipToys.Models; namespace WingtipToys { public partial class Startup { // For more information on configuring authentication, please visit https://go.microsoft.com/fwlink/?LinkId=301883 public void ConfigureAuth(IAppBuilder app) { // Configure the db context, user manager and signin manager to use a single instance per request app.CreatePerOwinContext(ApplicationDbContext.Create); app.CreatePerOwinContext<ApplicationUserManager>(ApplicationUserManager.Create); app.CreatePerOwinContext<ApplicationSignInManager>(ApplicationSignInManager.Create); // Enable the application to use a cookie to store information for the signed in user // and to use a cookie to temporarily store information about a user logging in with a third party login provider // Configure the sign in cookie app.UseCookieAuthentication(new CookieAuthenticationOptions { AuthenticationType = DefaultAuthenticationTypes.ApplicationCookie, LoginPath = new PathString("/Account/Login"), Provider = new CookieAuthenticationProvider { OnValidateIdentity = SecurityStampValidator.OnValidateIdentity<ApplicationUserManager, ApplicationUser>( validateInterval: TimeSpan.FromMinutes(30), regenerateIdentity: (manager, user) => user.GenerateUserIdentityAsync(manager)) } }); // Use a cookie to temporarily store information about a user logging in with a third party login provider app.UseExternalSignInCookie(DefaultAuthenticationTypes.ExternalCookie); // Enables the application to temporarily store user information when they are verifying the second factor in the two-factor authentication process. app.UseTwoFactorSignInCookie(DefaultAuthenticationTypes.TwoFactorCookie, TimeSpan.FromMinutes(5)); // Enables the application to remember the second login verification factor such as phone or email. // Once you check this option, your second step of verification during the login process will be remembered on the device where you logged in from. // This is similar to the RememberMe option when you log in. app.UseTwoFactorRememberBrowserCookie(DefaultAuthenticationTypes.TwoFactorRememberBrowserCookie); // Uncomment the following lines to enable logging in with third party login providers //app.UseMicrosoftAccountAuthentication( // clientId: "", // clientSecret: ""); //app.UseTwitterAuthentication( // consumerKey: "", // consumerSecret: ""); //app.UseFacebookAuthentication( // appId: "", // appSecret: ""); app.UseGoogleAuthentication(new GoogleOAuth2AuthenticationOptions() { ClientId = "000000000000.apps.googleusercontent.com", ClientSecret = "00000000000" }); } } }按 Ctrl+F5 生成并运行应用程序。 单击“ 登录” 链接。
在 “使用其他服务登录”下,单击“ Google”。
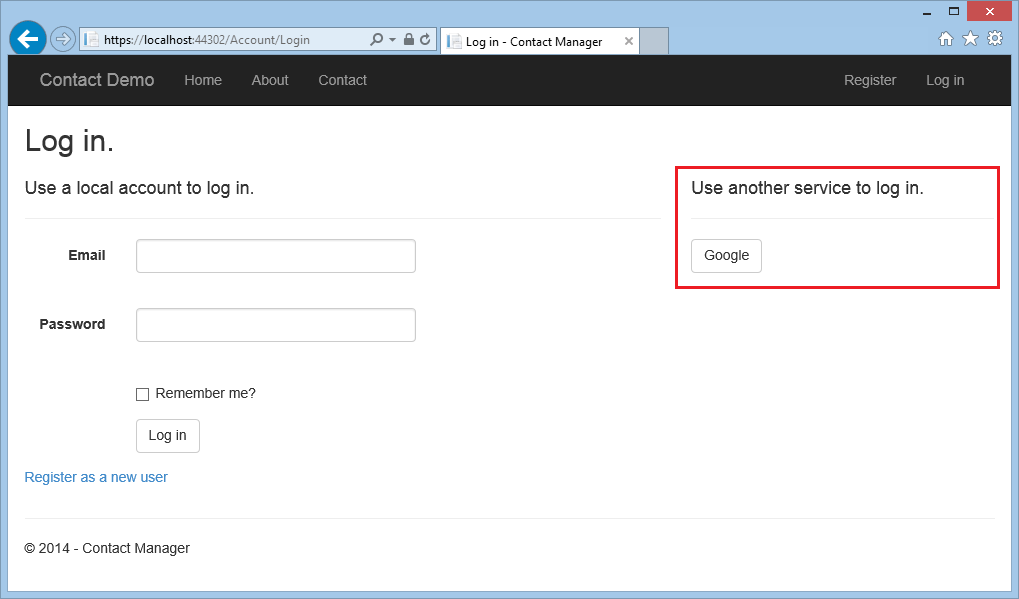
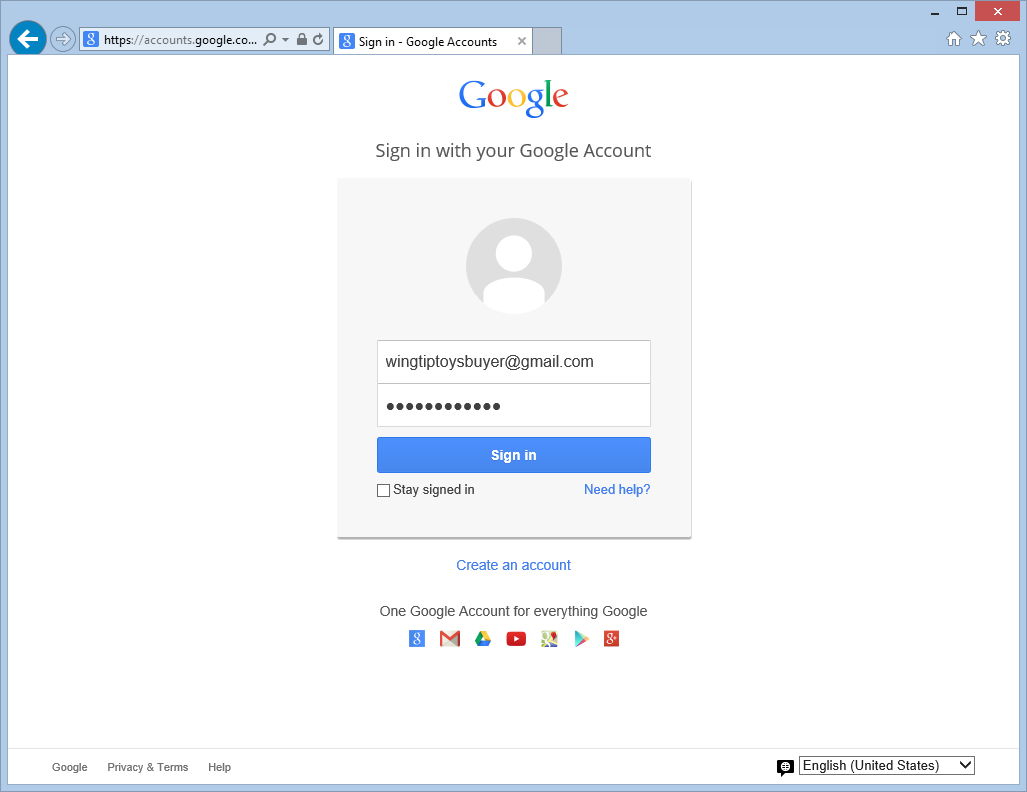
如果你需要输入你的凭据,你将重定向到 google 站点将在此输入你的凭据。
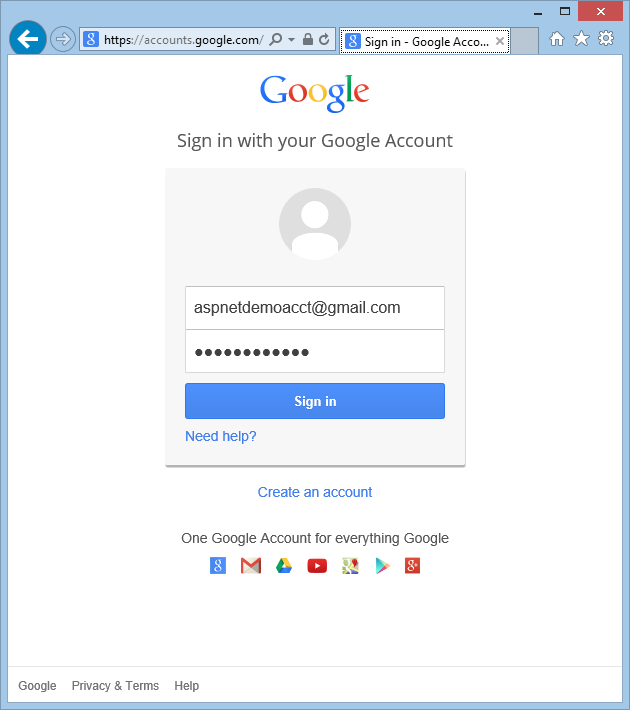
输入凭据后,系统会提示你为刚创建的 Web 应用程序授予权限。
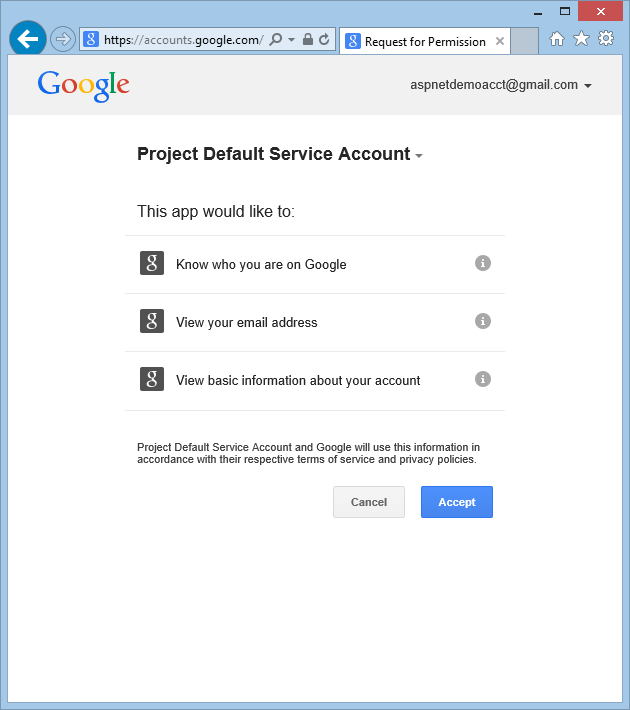
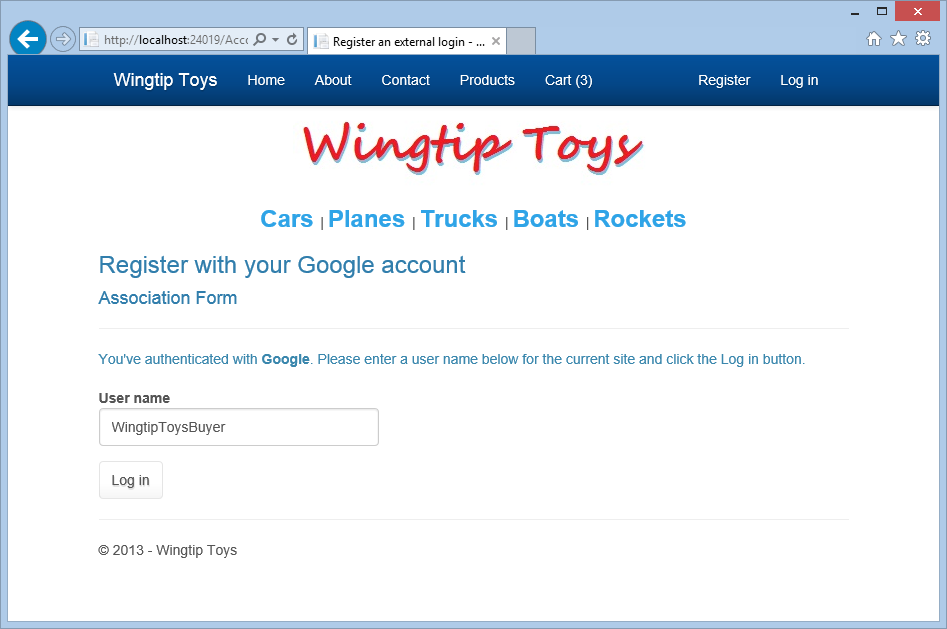
单击“接受”。 现在,你将重定向回 WingtipToys 应用程序的“注册”页,你可以在其中注册 Google 帐户。
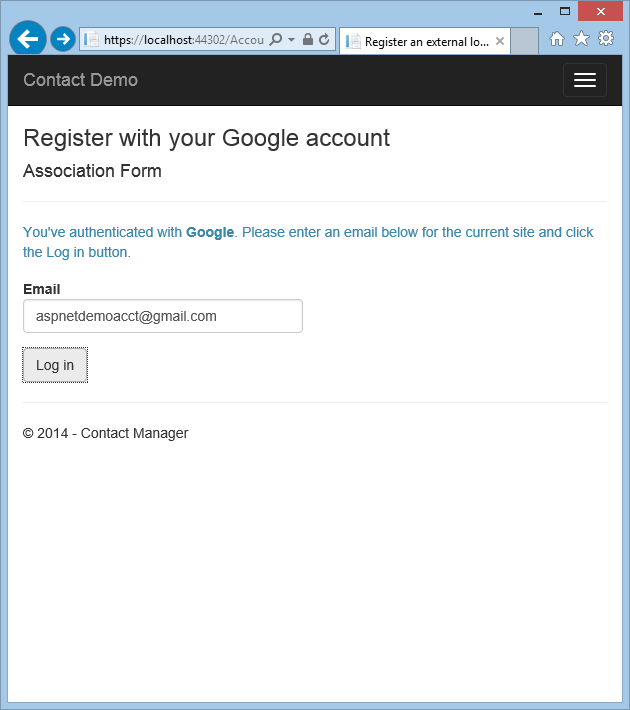
你可以选择更改 Gmail 帐户使用的本地电子邮件注册名称,但是,你通常会保留默认电子邮件别名(即,用于身份验证的名称)。 单击“ 登录” ,如上所示。
修改登录功能
如本教程系列前面所述,默认情况下,ASP.NET Web Forms模板中包括了大部分用户注册功能。 现在,你将修改默认的 Login.aspx 和 Register.aspx 页面以调用 MigrateCart 方法。 方法 MigrateCart 将新登录的用户与匿名购物车相关联。 通过将用户和购物车关联,Wingtip Toys 示例应用程序将能够维护用户访问之间的购物车。
在“解决方案资源管理器”中,找到并打开“帐户”文件夹。
修改名为 Login.aspx.cs 的代码隐藏页,使其包含以黄色突出显示的代码,使其如下所示:
using System;
using System.Web;
using System.Web.UI;
using Microsoft.AspNet.Identity;
using Microsoft.AspNet.Identity.Owin;
using Owin;
using WingtipToys.Models;

namespace WingtipToys.Account
{
    public partial class Login : Page
    {
        protected void Page_Load(object sender, EventArgs e)
        {
            RegisterHyperLink.NavigateUrl = "Register";
            // Enable this once you have account confirmation enabled for password reset functionality
            //ForgotPasswordHyperLink.NavigateUrl = "Forgot";
            OpenAuthLogin.ReturnUrl = Request.QueryString["ReturnUrl"];
            var returnUrl = HttpUtility.UrlEncode(Request.QueryString["ReturnUrl"]);
            if (!String.IsNullOrEmpty(returnUrl))
            {
                RegisterHyperLink.NavigateUrl += "?ReturnUrl=" + returnUrl;
            }
        }

        protected void LogIn(object sender, EventArgs e)
        {
            if (IsValid)
            {
                // Validate the user password
                var manager = Context.GetOwinContext().GetUserManager<ApplicationUserManager>();
                var signinManager = Context.GetOwinContext().GetUserManager<ApplicationSignInManager>();

                // This doen't count login failures towards account lockout
                // To enable password failures to trigger lockout, change to shouldLockout: true
                var result = signinManager.PasswordSignIn(Email.Text, Password.Text, RememberMe.Checked, shouldLockout: false);

                switch (result)
                {
                    case SignInStatus.Success:
                        WingtipToys.Logic.ShoppingCartActions usersShoppingCart = new WingtipToys.Logic.ShoppingCartActions();
                        String cartId = usersShoppingCart.GetCartId();
                        usersShoppingCart.MigrateCart(cartId, Email.Text);

                        IdentityHelper.RedirectToReturnUrl(Request.QueryString["ReturnUrl"], Response);
                        break;
                    case SignInStatus.LockedOut:
                        Response.Redirect("/Account/Lockout");
                        break;
                    case SignInStatus.RequiresVerification:
                        Response.Redirect(String.Format("/Account/TwoFactorAuthenticationSignIn?ReturnUrl={0}&RememberMe={1}",
                                                        Request.QueryString["ReturnUrl"],
                                                        RememberMe.Checked),
                                          true);
                        break;
                    case SignInStatus.Failure:
                    default:
                        FailureText.Text = "Invalid login attempt";
                        ErrorMessage.Visible = true;
                        break;
                }
            }
        }
    }
}
保存 Login.aspx.cs 文件。
现在,可以忽略方法没有定义的 MigrateCart 警告。 本教程稍后将添加它。
Login.aspx.cs 代码隐藏文件支持 LogIn 方法。 通过检查 Login.aspx 页,你将看到此页面包含一个“登录”按钮,单击该按钮会触发 LogIn 代码隐藏上的处理程序。
Login调用 Login.aspx.cs 上的 方法时,将创建名为 usersShoppingCart 的购物车的新实例。 将检索 (GUID) 的购物车 ID 并将其设置为 cartId 变量。 然后, MigrateCart 调用 方法,将 和 登录用户的名称传递给 cartId 此方法。 迁移购物车时,用于标识匿名购物车的 GUID 将替换为用户名。
除了修改 Login.aspx.cs 代码隐藏文件以在用户登录时迁移购物车外,还必须修改 Register.aspx.cs 代码隐藏文件 ,以在用户创建新帐户并登录时迁移购物车。
在 “帐户” 文件夹中,打开名为 Register.aspx.cs 的代码隐藏文件。
通过将代码包含在黄色中来修改代码隐藏文件,使其如下所示:
using System;
using System.Linq;
using System.Web;
using System.Web.UI;
using Microsoft.AspNet.Identity;
using Microsoft.AspNet.Identity.Owin;
using Owin;
using WingtipToys.Models;

namespace WingtipToys.Account
{
    public partial class Register : Page
    {
        protected void CreateUser_Click(object sender, EventArgs e)
        {
            var manager = Context.GetOwinContext().GetUserManager<ApplicationUserManager>();
            var user = new ApplicationUser() { UserName = Email.Text, Email = Email.Text };
            IdentityResult result = manager.Create(user, Password.Text);
            if (result.Succeeded)
            {
                // For more information on how to enable account confirmation and password reset please visit https://go.microsoft.com/fwlink/?LinkID=320771
                //string code = manager.GenerateEmailConfirmationToken(user.Id);
                //string callbackUrl = IdentityHelper.GetUserConfirmationRedirectUrl(code, user.Id, Request);
                //manager.SendEmail(user.Id, "Confirm your account", "Please confirm your account by clicking <a href=\"" + callbackUrl + "\">here</a>.");

                IdentityHelper.SignIn(manager, user, isPersistent: false);

                using (WingtipToys.Logic.ShoppingCartActions usersShoppingCart = new WingtipToys.Logic.ShoppingCartActions())
                {
                  String cartId = usersShoppingCart.GetCartId();
                  usersShoppingCart.MigrateCart(cartId, user.Id);
                }

                IdentityHelper.RedirectToReturnUrl(Request.QueryString["ReturnUrl"], Response);
            }
            else
            {
                ErrorMessage.Text = result.Errors.FirstOrDefault();
            }
        }
    }
}
保存 Register.aspx.cs 文件。 请再次忽略有关 方法的
MigrateCart警告。
请注意,在事件处理程序中使用的 CreateUser_Click 代码与方法中使用的 LogIn 代码非常相似。 当用户注册或登录到站点时,将调用 MigrateCart 方法。
迁移购物车
现在,你已更新登录和注册过程,可以添加代码以使用 MigrateCart 方法迁移购物车。
在 解决方案资源管理器 中找到 Logic 文件夹并打开 ShoppingCartActions.cs 类文件。
将黄色突出显示的代码添加到 ShoppingCartActions.cs 文件中的现有代码,以便 ShoppingCartActions.cs 文件中的代码如下所示:
using System;
using System.Collections.Generic;
using System.Linq;
using System.Web;
using WingtipToys.Models;

namespace WingtipToys.Logic
{
  public class ShoppingCartActions : IDisposable
  {
    public string ShoppingCartId { get; set; }

    private ProductContext _db = new ProductContext();

    public const string CartSessionKey = "CartId";

    public void AddToCart(int id)
    {
      // Retrieve the product from the database.
      ShoppingCartId = GetCartId();

      var cartItem = _db.ShoppingCartItems.SingleOrDefault(
          c => c.CartId == ShoppingCartId
          && c.ProductId == id);
      if (cartItem == null)
      {
        // Create a new cart item if no cart item exists.
        cartItem = new CartItem
        {
          ItemId = Guid.NewGuid().ToString(),
          ProductId = id,
          CartId = ShoppingCartId,
          Product = _db.Products.SingleOrDefault(
           p => p.ProductID == id),
          Quantity = 1,
          DateCreated = DateTime.Now
        };

        _db.ShoppingCartItems.Add(cartItem);
      }
      else
      {
        // If the item does exist in the cart,
        // then add one to the quantity.
        cartItem.Quantity++;
      }
      _db.SaveChanges();
    }

    public void Dispose()
    {
      if (_db != null)
      {
        _db.Dispose();
        _db = null;
      }
    }

    public string GetCartId()
    {
      if (HttpContext.Current.Session[CartSessionKey] == null)
      {
        if (!string.IsNullOrWhiteSpace(HttpContext.Current.User.Identity.Name))
        {
          HttpContext.Current.Session[CartSessionKey] = HttpContext.Current.User.Identity.Name;
        }
        else
        {
          // Generate a new random GUID using System.Guid class.
          Guid tempCartId = Guid.NewGuid();
          HttpContext.Current.Session[CartSessionKey] = tempCartId.ToString();
        }
      }
      return HttpContext.Current.Session[CartSessionKey].ToString();
    }

    public List<CartItem> GetCartItems()
    {
      ShoppingCartId = GetCartId();

      return _db.ShoppingCartItems.Where(
          c => c.CartId == ShoppingCartId).ToList();
    }

    public decimal GetTotal()
    {
      ShoppingCartId = GetCartId();
      // Multiply product price by quantity of that product to get
      // the current price for each of those products in the cart.
      // Sum all product price totals to get the cart total.
      decimal? total = decimal.Zero;
      total = (decimal?)(from cartItems in _db.ShoppingCartItems
                         where cartItems.CartId == ShoppingCartId
                         select (int?)cartItems.Quantity *
                         cartItems.Product.UnitPrice).Sum();
      return total ?? decimal.Zero;
    }

    public ShoppingCartActions GetCart(HttpContext context)
    {
      using (var cart = new ShoppingCartActions())
      {
        cart.ShoppingCartId = cart.GetCartId();
        return cart;
      }
    }

    public void UpdateShoppingCartDatabase(String cartId, ShoppingCartUpdates[] CartItemUpdates)
    {
      using (var db = new WingtipToys.Models.ProductContext())
      {
        try
        {
          int CartItemCount = CartItemUpdates.Count();
          List<CartItem> myCart = GetCartItems();
          foreach (var cartItem in myCart)
          {
            // Iterate through all rows within shopping cart list
            for (int i = 0; i < CartItemCount; i++)
            {
              if (cartItem.Product.ProductID == CartItemUpdates[i].ProductId)
              {
                if (CartItemUpdates[i].PurchaseQuantity < 1 || CartItemUpdates[i].RemoveItem == true)
                {
                  RemoveItem(cartId, cartItem.ProductId);
                }
                else
                {
                  UpdateItem(cartId, cartItem.ProductId, CartItemUpdates[i].PurchaseQuantity);
                }
              }
            }
          }
        }
        catch (Exception exp)
        {
          throw new Exception("ERROR: Unable to Update Cart Database - " + exp.Message.ToString(), exp);
        }
      }
    }

    public void RemoveItem(string removeCartID, int removeProductID)
    {
      using (var _db = new WingtipToys.Models.ProductContext())
      {
        try
        {
          var myItem = (from c in _db.ShoppingCartItems where c.CartId == removeCartID && c.Product.ProductID == removeProductID select c).FirstOrDefault();
          if (myItem != null)
          {
            // Remove Item.
            _db.ShoppingCartItems.Remove(myItem);
            _db.SaveChanges();
          }
        }
        catch (Exception exp)
        {
          throw new Exception("ERROR: Unable to Remove Cart Item - " + exp.Message.ToString(), exp);
        }
      }
    }

    public void UpdateItem(string updateCartID, int updateProductID, int quantity)
    {
      using (var _db = new WingtipToys.Models.ProductContext())
      {
        try
        {
          var myItem = (from c in _db.ShoppingCartItems where c.CartId == updateCartID && c.Product.ProductID == updateProductID select c).FirstOrDefault();
          if (myItem != null)
          {
            myItem.Quantity = quantity;
            _db.SaveChanges();
          }
        }
        catch (Exception exp)
        {
          throw new Exception("ERROR: Unable to Update Cart Item - " + exp.Message.ToString(), exp);
        }
      }
    }

    public void EmptyCart()
    {
      ShoppingCartId = GetCartId();
      var cartItems = _db.ShoppingCartItems.Where(
          c => c.CartId == ShoppingCartId);
      foreach (var cartItem in cartItems)
      {
        _db.ShoppingCartItems.Remove(cartItem);
      }
      // Save changes.
      _db.SaveChanges();
    }

    public int GetCount()
    {
      ShoppingCartId = GetCartId();

      // Get the count of each item in the cart and sum them up
      int? count = (from cartItems in _db.ShoppingCartItems
                    where cartItems.CartId == ShoppingCartId
                    select (int?)cartItems.Quantity).Sum();
      // Return 0 if all entries are null
      return count ?? 0;
    }

    public struct ShoppingCartUpdates
    {
      public int ProductId;
      public int PurchaseQuantity;
      public bool RemoveItem;
    }

    public void MigrateCart(string cartId, string userName)
    {
      var shoppingCart = _db.ShoppingCartItems.Where(c => c.CartId == cartId);
      foreach (CartItem item in shoppingCart)
      {
        item.CartId = userName;
      }
      HttpContext.Current.Session[CartSessionKey] = userName;
      _db.SaveChanges();
    }
  }
}
方法 MigrateCart 使用现有 cartId 查找用户的购物车。 接下来,代码遍历所有购物车项,并将架构) 指定的 CartItem 属性 (替换为CartId登录用户名。
更新数据库连接
如果使用 预生成的 Wingtip Toys 示例应用程序遵循本教程,则必须重新创建默认成员身份数据库。 通过修改默认连接字符串,将在下次运行应用程序时创建成员资格数据库。
在项目的根目录中打开 Web.config 文件。
更新默认连接字符串,使其如下所示:
<add name="DefaultConnection" connectionString="Data Source=(LocalDb)\MSSQLLocalDB;Initial Catalog=aspnet-WingtipToys;Integrated Security=True" providerName="System.Data.SqlClient" />
集成 PayPal
PayPal 是一个基于 Web 的计费平台,可接受在线商家付款。 本教程接下来介绍如何将 PayPal 的快速结帐功能集成到应用程序中。 快速结帐允许你的客户使用 PayPal 支付他们添加到购物车中的商品。
创建 PayPal 测试帐户
若要使用 PayPal 测试环境,必须创建并验证开发人员测试帐户。 你将使用开发人员测试帐户创建买家测试帐户和卖方测试帐户。 开发人员测试帐户凭据还将允许 Wingtip Toys 示例应用程序访问 PayPal 测试环境。
在浏览器中,导航到 PayPal 开发人员测试站点:
https://developer.paypal.com如果没有 PayPal 开发人员帐户,请单击“ 注册”并按照注册步骤创建新帐户。 如果你有现有的 PayPal 开发人员帐户,请单击“ 登录”登录。 本教程稍后需要 PayPal 开发人员帐户来测试 Wingtip Toys 示例应用程序。
如果刚刚注册了 PayPal 开发人员帐户,则可能需要使用 PayPal 验证 PayPal 开发人员帐户。 可以按照 PayPal 发送到电子邮件帐户的步骤验证帐户。 验证 PayPal 开发人员帐户后,请重新登录到 PayPal 开发人员测试站点。
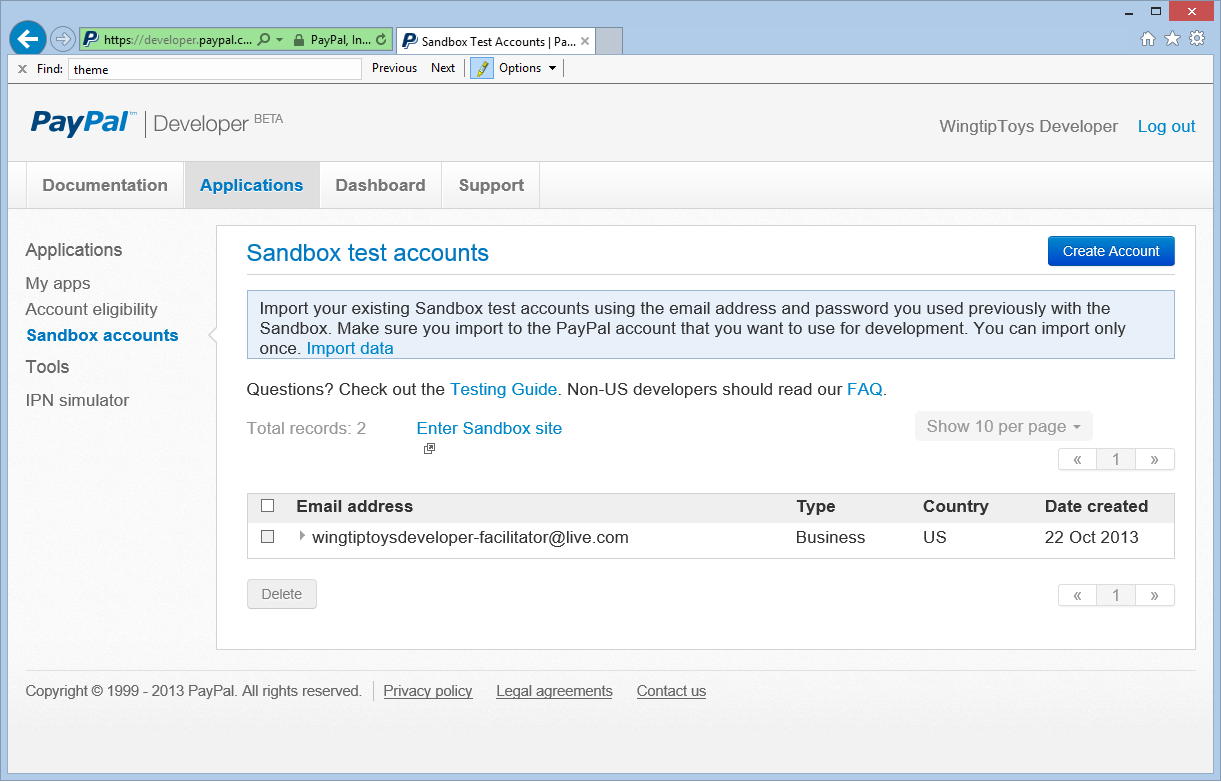
使用 PayPal 开发人员帐户登录到 PayPal 开发人员网站后,如果还没有 PayPal 买家测试帐户,则需要创建一个。 若要创建买家测试帐户,请在 PayPal 站点上单击“ 应用程序 ”选项卡,然后单击“ 沙盒帐户”。
将显示 “沙盒测试帐户 ”页。注意
PayPal 开发人员网站已提供商家测试帐户。
在“沙盒测试帐户”页上,单击“ 创建帐户”。
在 “创建测试帐户 ”页上,选择所选的买家测试帐户电子邮件和密码。
注意
在本教程结束时,你将需要购买者电子邮件地址和密码来测试 Wingtip Toys 示例应用程序。
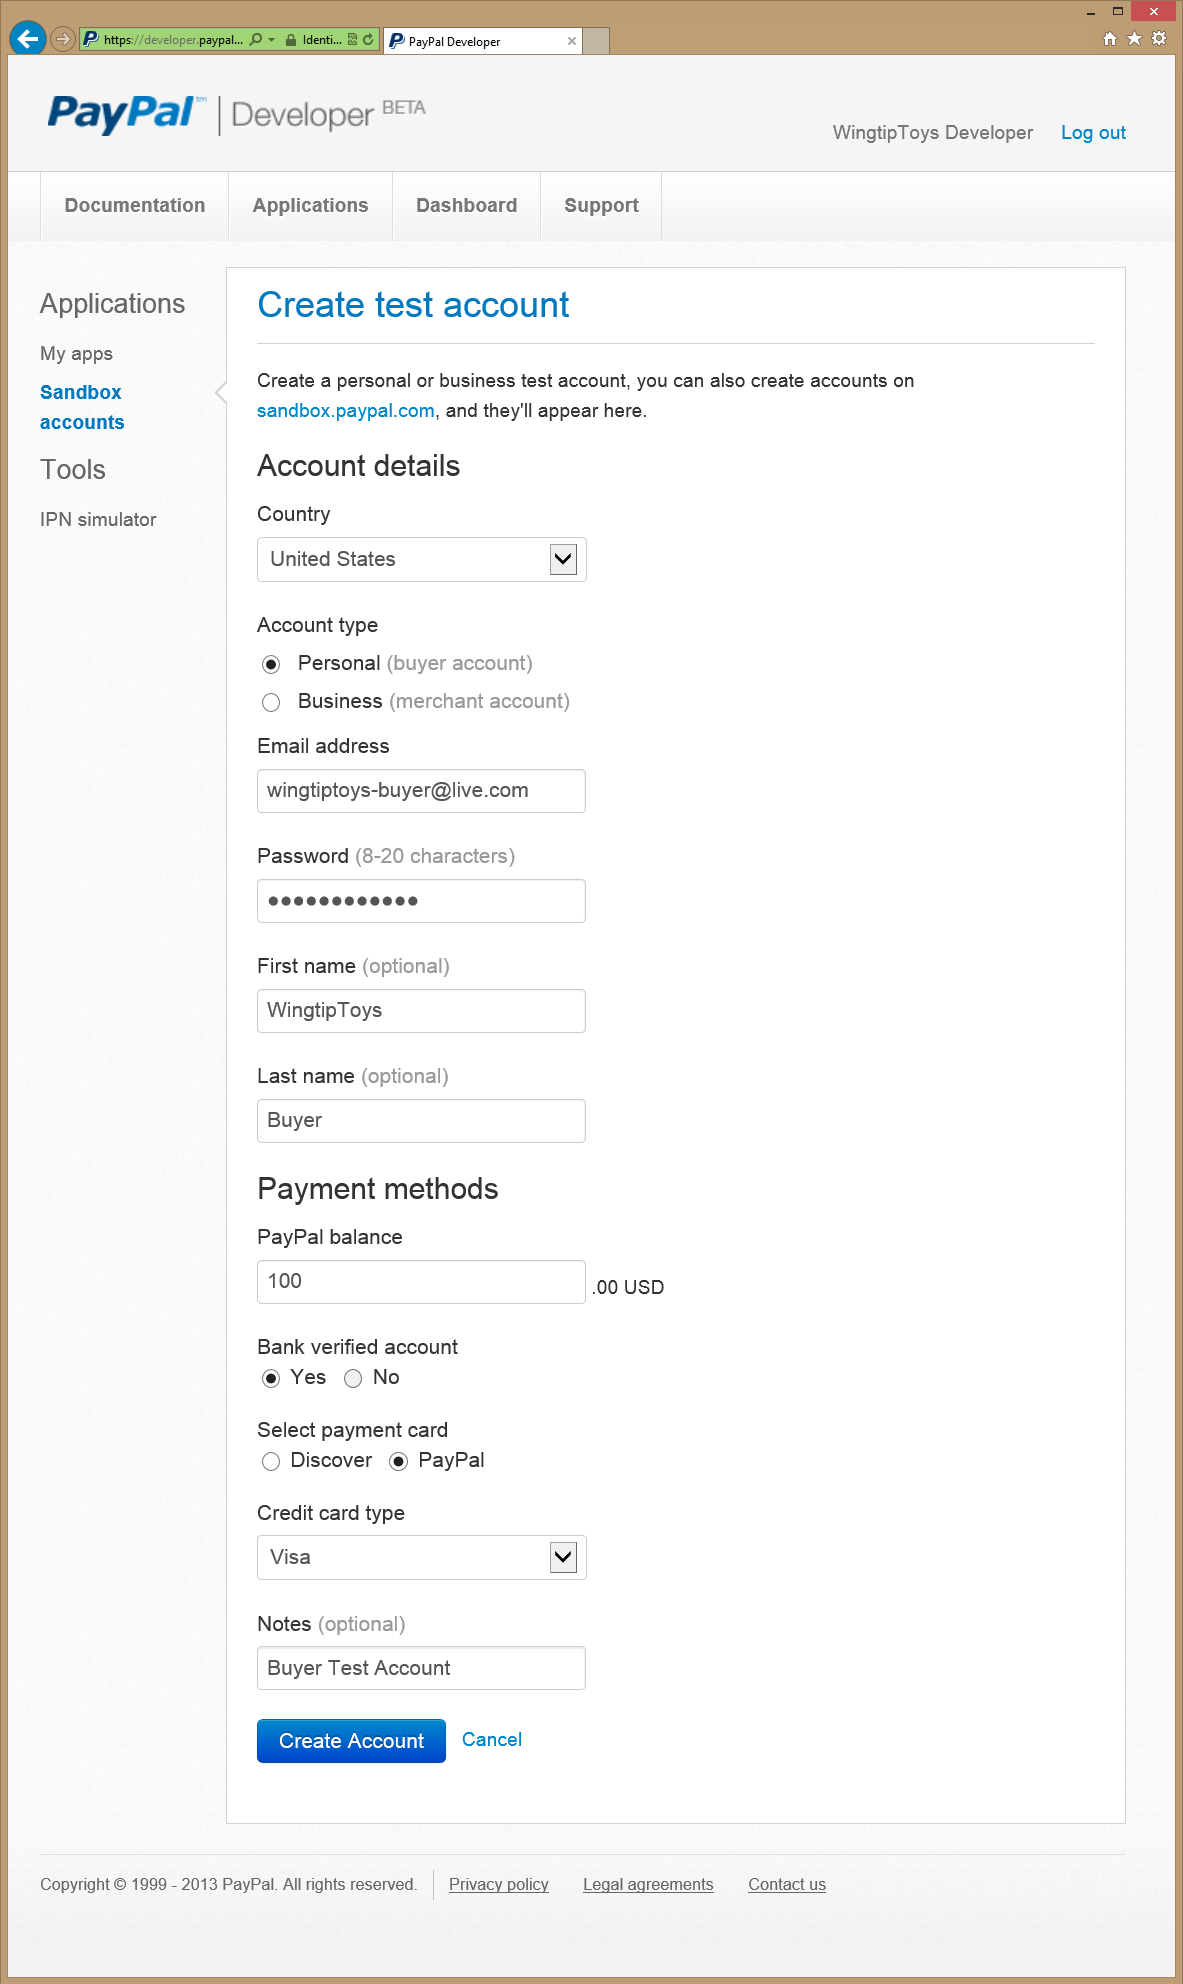
单击“创建帐户”按钮创建买家测试 帐户 。
将显示 “沙盒测试帐户 ”页。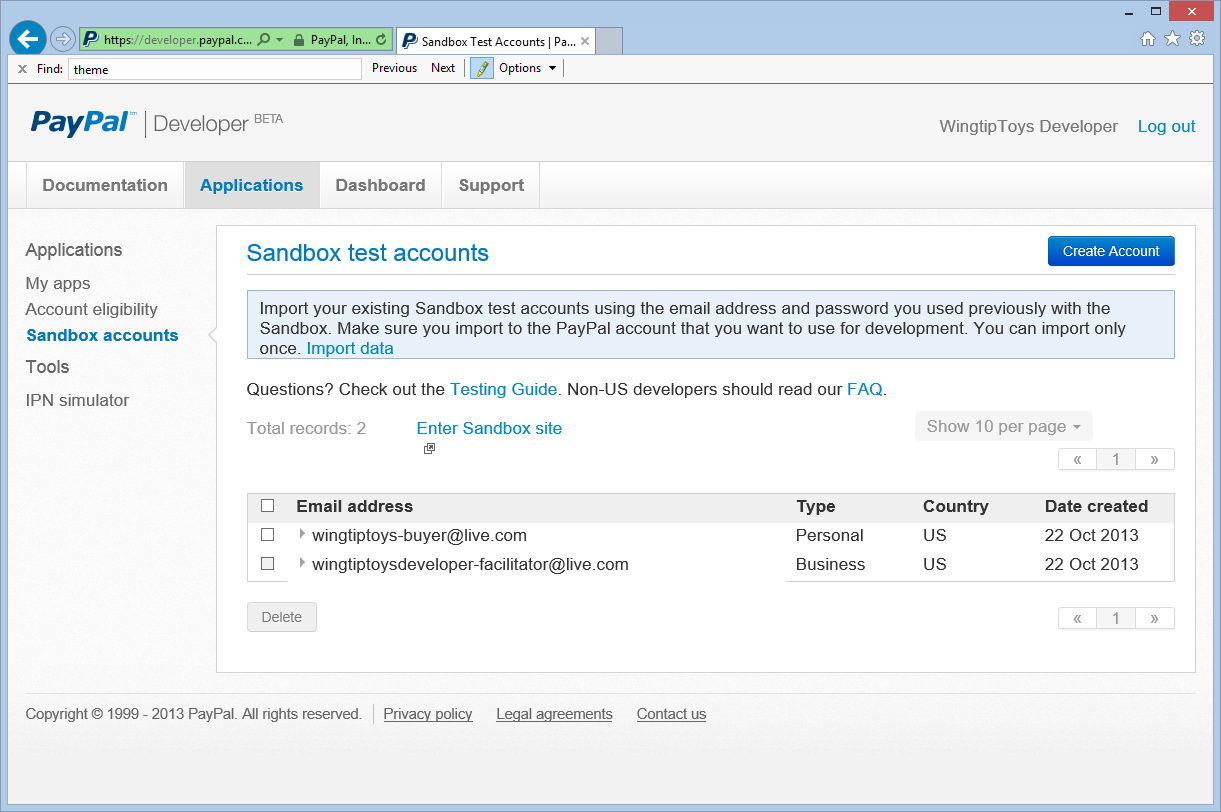
在 沙盒测试帐户 页上,单击 主持人 电子邮件帐户。
将显示“配置文件” 和 “通知 ”选项。选择 “配置文件” 选项,然后单击“ API 凭据 ”查看商家测试帐户的 API 凭据。
将测试 API 凭据复制到记事本。
需要显示经典测试 API 凭据 (用户名、密码和签名) ,才能从 Wingtip Toys 示例应用程序向 PayPal 测试环境调用 API。 将在下一步中添加凭据。
添加 PayPal 类和 API 凭据
将大部分 PayPal 代码放入单个类中。 此类包含用于与 PayPal 通信的方法。 此外,你将将 PayPal 凭据添加到此类。
在 Visual Studio 中的 Wingtip Toys 示例应用程序中,右键单击“逻辑”文件夹,然后选择“添加新>项”。
随即出现“添加新项”对话框。在左侧“已安装”窗格中的“Visual C#”下,选择“代码”。
在中间窗格中,选择“ 类”。 将此新类命名 为 PayPalFunctions.cs。
单击“添加”。
新的类文件将显示在编辑器中。将默认代码替换为以下代码:
using System;
using System.Collections;
using System.Collections.Specialized;
using System.IO;
using System.Net;
using System.Text;
using System.Data;
using System.Configuration;
using System.Web;
using WingtipToys;
using WingtipToys.Models;
using System.Collections.Generic;
using System.Linq;

public class NVPAPICaller
{
  //Flag that determines the PayPal environment (live or sandbox)
  private const bool bSandbox = true;
  private const string CVV2 = "CVV2";

  // Live strings.
  private string pEndPointURL = "https://api-3t.paypal.com/nvp";
  private string host = "www.paypal.com";

  // Sandbox strings.
  private string pEndPointURL_SB = "https://api-3t.sandbox.paypal.com/nvp";
  private string host_SB = "www.sandbox.paypal.com";

  private const string SIGNATURE = "SIGNATURE";
  private const string PWD = "PWD";
  private const string ACCT = "ACCT";

  //Replace <Your API Username> with your API Username
  //Replace <Your API Password> with your API Password
  //Replace <Your Signature> with your Signature
  public string APIUsername = "<Your API Username>";
  private string APIPassword = "<Your API Password>";
  private string APISignature = "<Your Signature>";
  private string Subject = "";
  private string BNCode = "PP-ECWizard";

  //HttpWebRequest Timeout specified in milliseconds
  private const int Timeout = 15000;
  private static readonly string[] SECURED_NVPS = new string[] { ACCT, CVV2, SIGNATURE, PWD };

  public void SetCredentials(string Userid, string Pwd, string Signature)
  {
    APIUsername = Userid;
    APIPassword = Pwd;
    APISignature = Signature;
  }

  public bool ShortcutExpressCheckout(string amt, ref string token, ref string retMsg)
  {
    if (bSandbox)
    {
      pEndPointURL = pEndPointURL_SB;
      host = host_SB;
    }

    string returnURL = "https://localhost:44300/Checkout/CheckoutReview.aspx";
    string cancelURL = "https://localhost:44300/Checkout/CheckoutCancel.aspx";

    NVPCodec encoder = new NVPCodec();
    encoder["METHOD"] = "SetExpressCheckout";
    encoder["RETURNURL"] = returnURL;
    encoder["CANCELURL"] = cancelURL;
    encoder["BRANDNAME"] = "Wingtip Toys Sample Application";
    encoder["PAYMENTREQUEST_0_AMT"] = amt;
    encoder["PAYMENTREQUEST_0_ITEMAMT"] = amt;
    encoder["PAYMENTREQUEST_0_PAYMENTACTION"] = "Sale";
    encoder["PAYMENTREQUEST_0_CURRENCYCODE"] = "USD";

    // Get the Shopping Cart Products
    using (WingtipToys.Logic.ShoppingCartActions myCartOrders = new WingtipToys.Logic.ShoppingCartActions())
    {
      List<CartItem> myOrderList = myCartOrders.GetCartItems();

      for (int i = 0; i < myOrderList.Count; i++)
      {
        encoder["L_PAYMENTREQUEST_0_NAME" + i] = myOrderList[i].Product.ProductName.ToString();
        encoder["L_PAYMENTREQUEST_0_AMT" + i] = myOrderList[i].Product.UnitPrice.ToString();
        encoder["L_PAYMENTREQUEST_0_QTY" + i] = myOrderList[i].Quantity.ToString();
      }
    }

    string pStrrequestforNvp = encoder.Encode();
    string pStresponsenvp = HttpCall(pStrrequestforNvp);

    NVPCodec decoder = new NVPCodec();
    decoder.Decode(pStresponsenvp);

    string strAck = decoder["ACK"].ToLower();
    if (strAck != null && (strAck == "success" || strAck == "successwithwarning"))
    {
      token = decoder["TOKEN"];
      string ECURL = "https://" + host + "/cgi-bin/webscr?cmd=_express-checkout" + "&token=" + token;
      retMsg = ECURL;
      return true;
    }
    else
    {
      retMsg = "ErrorCode=" + decoder["L_ERRORCODE0"] + "&" +
          "Desc=" + decoder["L_SHORTMESSAGE0"] + "&" +
          "Desc2=" + decoder["L_LONGMESSAGE0"];
      return false;
    }
  }

  public bool GetCheckoutDetails(string token, ref string PayerID, ref NVPCodec decoder, ref string retMsg)
  {
    if (bSandbox)
    {
      pEndPointURL = pEndPointURL_SB;
    }

    NVPCodec encoder = new NVPCodec();
    encoder["METHOD"] = "GetExpressCheckoutDetails";
    encoder["TOKEN"] = token;

    string pStrrequestforNvp = encoder.Encode();
    string pStresponsenvp = HttpCall(pStrrequestforNvp);

    decoder = new NVPCodec();
    decoder.Decode(pStresponsenvp);

    string strAck = decoder["ACK"].ToLower();
    if (strAck != null && (strAck == "success" || strAck == "successwithwarning"))
    {
      PayerID = decoder["PAYERID"];
      return true;
    }
    else
    {
      retMsg = "ErrorCode=" + decoder["L_ERRORCODE0"] + "&" +
          "Desc=" + decoder["L_SHORTMESSAGE0"] + "&" +
          "Desc2=" + decoder["L_LONGMESSAGE0"];

      return false;
    }
  }

  public bool DoCheckoutPayment(string finalPaymentAmount, string token, string PayerID, ref NVPCodec decoder, ref string retMsg)
  {
    if (bSandbox)
    {
      pEndPointURL = pEndPointURL_SB;
    }

    NVPCodec encoder = new NVPCodec();
    encoder["METHOD"] = "DoExpressCheckoutPayment";
    encoder["TOKEN"] = token;
    encoder["PAYERID"] = PayerID;
    encoder["PAYMENTREQUEST_0_AMT"] = finalPaymentAmount;
    encoder["PAYMENTREQUEST_0_CURRENCYCODE"] = "USD";
    encoder["PAYMENTREQUEST_0_PAYMENTACTION"] = "Sale";

    string pStrrequestforNvp = encoder.Encode();
    string pStresponsenvp = HttpCall(pStrrequestforNvp);

    decoder = new NVPCodec();
    decoder.Decode(pStresponsenvp);

    string strAck = decoder["ACK"].ToLower();
    if (strAck != null && (strAck == "success" || strAck == "successwithwarning"))
    {
      return true;
    }
    else
    {
      retMsg = "ErrorCode=" + decoder["L_ERRORCODE0"] + "&" +
          "Desc=" + decoder["L_SHORTMESSAGE0"] + "&" +
          "Desc2=" + decoder["L_LONGMESSAGE0"];

      return false;
    }
  }

  public string HttpCall(string NvpRequest)
  {
    string url = pEndPointURL;

    string strPost = NvpRequest + "&" + buildCredentialsNVPString();
    strPost = strPost + "&BUTTONSOURCE=" + HttpUtility.UrlEncode(BNCode);

    HttpWebRequest objRequest = (HttpWebRequest)WebRequest.Create(url);
    objRequest.Timeout = Timeout;
    objRequest.Method = "POST";
    objRequest.ContentLength = strPost.Length;

    try
    {
      using (StreamWriter myWriter = new StreamWriter(objRequest.GetRequestStream()))
      {
        myWriter.Write(strPost);
      }
    }
    catch (Exception)
    {
      // No logging for this tutorial.
    }

    //Retrieve the Response returned from the NVP API call to PayPal.
    HttpWebResponse objResponse = (HttpWebResponse)objRequest.GetResponse();
    string result;
    using (StreamReader sr = new StreamReader(objResponse.GetResponseStream()))
    {
      result = sr.ReadToEnd();
    }

    return result;
  }

  private string buildCredentialsNVPString()
  {
    NVPCodec codec = new NVPCodec();

    if (!IsEmpty(APIUsername))
      codec["USER"] = APIUsername;

    if (!IsEmpty(APIPassword))
      codec[PWD] = APIPassword;

    if (!IsEmpty(APISignature))
      codec[SIGNATURE] = APISignature;

    if (!IsEmpty(Subject))
      codec["SUBJECT"] = Subject;

    codec["VERSION"] = "88.0";

    return codec.Encode();
  }

  public static bool IsEmpty(string s)
  {
    return s == null || s.Trim() == string.Empty;
  }
}

public sealed class NVPCodec : NameValueCollection
{
  private const string AMPERSAND = "&";
  private const string EQUALS = "=";
  private static readonly char[] AMPERSAND_CHAR_ARRAY = AMPERSAND.ToCharArray();
  private static readonly char[] EQUALS_CHAR_ARRAY = EQUALS.ToCharArray();

  public string Encode()
  {
    StringBuilder sb = new StringBuilder();
    bool firstPair = true;
    foreach (string kv in AllKeys)
    {
      string name = HttpUtility.UrlEncode(kv);
      string value = HttpUtility.UrlEncode(this[kv]);
      if (!firstPair)
      {
        sb.Append(AMPERSAND);
      }
      sb.Append(name).Append(EQUALS).Append(value);
      firstPair = false;
    }
    return sb.ToString();
  }

  public void Decode(string nvpstring)
  {
    Clear();
    foreach (string nvp in nvpstring.Split(AMPERSAND_CHAR_ARRAY))
    {
      string[] tokens = nvp.Split(EQUALS_CHAR_ARRAY);
      if (tokens.Length >= 2)
      {
        string name = HttpUtility.UrlDecode(tokens[0]);
        string value = HttpUtility.UrlDecode(tokens[1]);
        Add(name, value);
      }
    }
  }

  public void Add(string name, string value, int index)
  {
    this.Add(GetArrayName(index, name), value);
  }

  public void Remove(string arrayName, int index)
  {
    this.Remove(GetArrayName(index, arrayName));
  }

  public string this[string name, int index]
  {
    get
    {
      return this[GetArrayName(index, name)];
    }
    set
    {
      this[GetArrayName(index, name)] = value;
    }
  }

  private static string GetArrayName(int index, string name)
  {
    if (index < 0)
    {
      throw new ArgumentOutOfRangeException("index", "index cannot be negative : " + index);
    }
    return name + index;
  }
}
(在本教程前面显示的用户名、密码和签名) 添加商家 API 凭据,以便可以对 PayPal 测试环境进行函数调用。
public string APIUsername = "<Your API Username>";
private string APIPassword = "<Your API Password>";
private string APISignature = "<Your Signature>";
注意
在此示例应用程序中,只需将凭据添加到 C# 文件 (.cs) 。 但是,在实现的解决方案中,应考虑在配置文件中加密凭据。
NVPAPICaller 类包含大部分 PayPal 功能。 类中的代码提供从 PayPal 测试环境进行测试购买所需的方法。 以下三个 PayPal 函数用于进行购买:
-
SetExpressCheckout函数 -
GetExpressCheckoutDetails函数 -
DoExpressCheckoutPayment函数
方法 ShortcutExpressCheckout 从购物车收集测试购买信息和产品详细信息, SetExpressCheckout 并调用 PayPal 函数。 方法 GetCheckoutDetails 在进行测试购买之前确认购买详细信息并调用 GetExpressCheckoutDetails PayPal 函数。 方法 DoCheckoutPayment 通过调用 DoExpressCheckoutPayment PayPal 函数从测试环境完成测试购买。 其余代码支持 PayPal 方法和进程,例如编码字符串、解码字符串、处理数组和确定凭据。
注意
PayPal 允许你根据 PayPal 的 API 规范包含可选的购买详细信息。 通过扩展 Wingtip Toys 示例应用程序中的代码,可以包括本地化详细信息、产品说明、税务、客户服务号码以及许多其他可选字段。
请注意, 在 ShortcutExpressCheckout 方法中指定的返回和取消 URL 使用端口号。
string returnURL = "https://localhost:44300/Checkout/CheckoutReview.aspx";
       string cancelURL = "https://localhost:44300/Checkout/CheckoutCancel.aspx";
当 Visual Web Developer 使用 SSL 运行 Web 项目时,端口 44300 通常用于 Web 服务器。 如上所示,端口号为 44300。 运行应用程序时,可以看到不同的端口号。 需要在代码中正确设置端口号,以便在本教程结束时成功运行 Wingtip Toys 示例应用程序。 本教程的下一部分介绍如何检索本地主机端口号并更新 PayPal 类。
更新 PayPal 类中的 LocalHost 端口号
Wingtip Toys 示例应用程序通过导航到 PayPal 测试站点并返回到 Wingtip Toys 示例应用程序的本地实例来购买产品。 若要使 PayPal 返回到正确的 URL,需要在上述 PayPal 代码中指定本地运行的示例应用程序的端口号。
在 解决方案资源管理器 中右键单击 WingtipToys (WingtipToys) 项目名称,然后选择“属性”。
在左侧列中,选择“ Web ”选项卡。
从“ 项目 URL ”框中检索端口号。
如果需要,更新
returnURLPayPal 类中的 和cancelURL(NVPAPICallerPayPalFunctions.cs 文件中的) ,以使用 Web 应用程序的端口号:string returnURL = "https://localhost:<Your Port Number>/Checkout/CheckoutReview.aspx"; string cancelURL = "https://localhost:<Your Port Number>/Checkout/CheckoutCancel.aspx";
现在,添加的代码将匹配本地 Web 应用程序的预期端口。 PayPal 将能够返回到本地计算机上的正确 URL。
添加 PayPal 结帐按钮
将主要 PayPal 函数添加到示例应用程序后,可以开始添加调用这些函数所需的标记和代码。 首先,必须添加用户将在购物车页面上看到的结帐按钮。
打开 ShoppingCart.aspx 文件。
滚动到文件底部并找到
<!--Checkout Placeholder -->批注。将注释替换为控件
ImageButton,以便按如下所示替换标记:<asp:ImageButton ID="CheckoutImageBtn" runat="server" ImageUrl="https://www.paypal.com/en_US/i/btn/btn_xpressCheckout.gif" Width="145" AlternateText="Check out with PayPal" OnClick="CheckoutBtn_Click" BackColor="Transparent" BorderWidth="0" />在 ShoppingCart.aspx.cs 文件中,在
UpdateBtn_Click文件末尾附近的事件处理程序后面添加CheckOutBtn_Click事件处理程序:protected void CheckoutBtn_Click(object sender, ImageClickEventArgs e) { using (ShoppingCartActions usersShoppingCart = new ShoppingCartActions()) { Session["payment_amt"] = usersShoppingCart.GetTotal(); } Response.Redirect("Checkout/CheckoutStart.aspx"); }此外,在 ShoppingCart.aspx.cs 文件中,添加对
CheckoutBtn的引用,以便按如下所示引用新图像按钮:protected void Page_Load(object sender, EventArgs e) { using (ShoppingCartActions usersShoppingCart = new ShoppingCartActions()) { decimal cartTotal = 0; cartTotal = usersShoppingCart.GetTotal(); if (cartTotal > 0) { // Display Total. lblTotal.Text = String.Format("{0:c}", cartTotal); } else { LabelTotalText.Text = ""; lblTotal.Text = ""; ShoppingCartTitle.InnerText = "Shopping Cart is Empty"; UpdateBtn.Visible = false; CheckoutImageBtn.Visible = false; } } }保存对 ShoppingCart.aspx 文件和 ShoppingCart.aspx.cs 文件的更改。
从菜单中选择 “调试->生成 WingtipToys”。
将使用新添加的 ImageButton 控件重新生成项目。
将购买详细信息发送到 PayPal
当用户单击购物车页面上的“ 结帐 ”按钮 (ShoppingCart.aspx) 时,他们将开始购买过程。 以下代码调用购买产品所需的第一个 PayPal 函数。
在 Checkout 文件夹中,打开名为 CheckoutStart.aspx.cs 的代码隐藏文件。
请务必打开代码隐藏文件。将现有代码替换为以下代码:
using System;
using System.Collections.Generic;
using System.Linq;
using System.Web;
using System.Web.UI;
using System.Web.UI.WebControls;

namespace WingtipToys.Checkout
{
    public partial class CheckoutStart : System.Web.UI.Page
    {
        protected void Page_Load(object sender, EventArgs e)
        {
            NVPAPICaller payPalCaller = new NVPAPICaller();
            string retMsg = "";
            string token = "";

            if (Session["payment_amt"] != null)
            {
                string amt = Session["payment_amt"].ToString();

                bool ret = payPalCaller.ShortcutExpressCheckout(amt, ref token, ref retMsg);
                if (ret)
                {
                    Session["token"] = token;
                    Response.Redirect(retMsg);
                }
                else
                {
                    Response.Redirect("CheckoutError.aspx?" + retMsg);
                }
            }
            else
            {
                Response.Redirect("CheckoutError.aspx?ErrorCode=AmtMissing");
            }
        }
    }
}
当应用程序的用户单击购物车页上的“ 签出 ”按钮时,浏览器将导航到 CheckoutStart.aspx 页。 加载 CheckoutStart.aspx 页面时, ShortcutExpressCheckout 将调用 方法。 此时,用户将被转移到 PayPal 测试网站。 在 PayPal 网站上,用户输入其 PayPal 凭据、查看购买详细信息、接受 PayPal 协议并返回到方法完成的 ShortcutExpressCheckout Wingtip Toys 示例应用程序。
ShortcutExpressCheckout方法完成后,它会将用户重定向到 方法中指定的 ShortcutExpressCheckoutCheckoutReview.aspx 页。 这允许用户从 Wingtip Toys 示例应用程序中查看订单详细信息。
查看订单详细信息
从 PayPal 返回后,Wingtip Toys 示例应用程序的 CheckoutReview.aspx 页将显示订单详细信息。 此页面允许用户在购买产品之前查看订单详细信息。 必须按如下所示创建 CheckoutReview.aspx 页:
在 “签出” 文件夹中,打开名为 CheckoutReview.aspx 的页面。
将现有标记替换为以下内容:
<%@ Page Title="" Language="C#" MasterPageFile="~/Site.Master" AutoEventWireup="true" CodeBehind="CheckoutReview.aspx.cs" Inherits="WingtipToys.Checkout.CheckoutReview" %>
<asp:Content ID="Content1" ContentPlaceHolderID="MainContent" runat="server">
    <h1>Order Review</h1>
    <p></p>
    <h3 style="padding-left: 33px">Products:</h3>
    <asp:GridView ID="OrderItemList" runat="server" AutoGenerateColumns="False" GridLines="Both" CellPadding="10" Width="500" BorderColor="#efeeef" BorderWidth="33">
        <Columns>
            <asp:BoundField DataField="ProductId" HeaderText=" Product ID" />
            <asp:BoundField DataField="Product.ProductName" HeaderText=" Product Name" />
            <asp:BoundField DataField="Product.UnitPrice" HeaderText="Price (each)" DataFormatString="{0:c}"/>
            <asp:BoundField DataField="Quantity" HeaderText="Quantity" />
        </Columns>
    </asp:GridView>
    <asp:DetailsView ID="ShipInfo" runat="server" AutoGenerateRows="false" GridLines="None" CellPadding="10" BorderStyle="None" CommandRowStyle-BorderStyle="None">
        <Fields>
        <asp:TemplateField>
            <ItemTemplate>
                <h3>Shipping Address:</h3>
                <br />
                <asp:Label ID="FirstName" runat="server" Text='<%#: Eval("FirstName") %>'></asp:Label>
                <asp:Label ID="LastName" runat="server" Text='<%#: Eval("LastName") %>'></asp:Label>
                <br />
                <asp:Label ID="Address" runat="server" Text='<%#: Eval("Address") %>'></asp:Label>
                <br />
                <asp:Label ID="City" runat="server" Text='<%#: Eval("City") %>'></asp:Label>
                <asp:Label ID="State" runat="server" Text='<%#: Eval("State") %>'></asp:Label>
                <asp:Label ID="PostalCode" runat="server" Text='<%#: Eval("PostalCode") %>'></asp:Label>
                <p></p>
                <h3>Order Total:</h3>
                <br />
                <asp:Label ID="Total" runat="server" Text='<%#: Eval("Total", "{0:C}") %>'></asp:Label>
            </ItemTemplate>
            <ItemStyle HorizontalAlign="Left" />
        </asp:TemplateField>
          </Fields>
    </asp:DetailsView>
    <p></p>
    <hr />
    <asp:Button ID="CheckoutConfirm" runat="server" Text="Complete Order" OnClick="CheckoutConfirm_Click" />
</asp:Content>
打开名为 CheckoutReview.aspx.cs 的代码隐藏页,并将现有代码替换为以下内容:
using System;
using System.Collections.Generic;
using System.Linq;
using System.Web;
using System.Web.UI;
using System.Web.UI.WebControls;
using WingtipToys.Models;

namespace WingtipToys.Checkout
{
  public partial class CheckoutReview : System.Web.UI.Page
  {
    protected void Page_Load(object sender, EventArgs e)
    {
      if (!IsPostBack)
      {
        NVPAPICaller payPalCaller = new NVPAPICaller();

        string retMsg = "";
        string token = "";
        string PayerID = "";
        NVPCodec decoder = new NVPCodec();
        token = Session["token"].ToString();

        bool ret = payPalCaller.GetCheckoutDetails(token, ref PayerID, ref decoder, ref retMsg);
        if (ret)
        {
          Session["payerId"] = PayerID;

          var myOrder = new Order();
          myOrder.OrderDate = Convert.ToDateTime(decoder["TIMESTAMP"].ToString());
          myOrder.Username = User.Identity.Name;
          myOrder.FirstName = decoder["FIRSTNAME"].ToString();
          myOrder.LastName = decoder["LASTNAME"].ToString();
          myOrder.Address = decoder["SHIPTOSTREET"].ToString();
          myOrder.City = decoder["SHIPTOCITY"].ToString();
          myOrder.State = decoder["SHIPTOSTATE"].ToString();
          myOrder.PostalCode = decoder["SHIPTOZIP"].ToString();
          myOrder.Country = decoder["SHIPTOCOUNTRYCODE"].ToString();
          myOrder.Email = decoder["EMAIL"].ToString();
          myOrder.Total = Convert.ToDecimal(decoder["AMT"].ToString());

          // Verify total payment amount as set on CheckoutStart.aspx.
          try
          {
            decimal paymentAmountOnCheckout = Convert.ToDecimal(Session["payment_amt"].ToString());
            decimal paymentAmoutFromPayPal = Convert.ToDecimal(decoder["AMT"].ToString());
            if (paymentAmountOnCheckout != paymentAmoutFromPayPal)
            {
              Response.Redirect("CheckoutError.aspx?" + "Desc=Amount%20total%20mismatch.");
            }
          }
          catch (Exception)
          {
            Response.Redirect("CheckoutError.aspx?" + "Desc=Amount%20total%20mismatch.");
          }

          // Get DB context.
          ProductContext _db = new ProductContext();

          // Add order to DB.
          _db.Orders.Add(myOrder);
          _db.SaveChanges();

          // Get the shopping cart items and process them.
          using (WingtipToys.Logic.ShoppingCartActions usersShoppingCart = new WingtipToys.Logic.ShoppingCartActions())
          {
            List<CartItem> myOrderList = usersShoppingCart.GetCartItems();

            // Add OrderDetail information to the DB for each product purchased.
            for (int i = 0; i < myOrderList.Count; i++)
            {
              // Create a new OrderDetail object.
              var myOrderDetail = new OrderDetail();
              myOrderDetail.OrderId = myOrder.OrderId;
              myOrderDetail.Username = User.Identity.Name;
              myOrderDetail.ProductId = myOrderList[i].ProductId;
              myOrderDetail.Quantity = myOrderList[i].Quantity;
              myOrderDetail.UnitPrice = myOrderList[i].Product.UnitPrice;

              // Add OrderDetail to DB.
              _db.OrderDetails.Add(myOrderDetail);
              _db.SaveChanges();
            }

            // Set OrderId.
            Session["currentOrderId"] = myOrder.OrderId;

            // Display Order information.
            List<Order> orderList = new List<Order>();
            orderList.Add(myOrder);
            ShipInfo.DataSource = orderList;
            ShipInfo.DataBind();

            // Display OrderDetails.
            OrderItemList.DataSource = myOrderList;
            OrderItemList.DataBind();
          }
        }
        else
        {
          Response.Redirect("CheckoutError.aspx?" + retMsg);
        }
      }
    }

    protected void CheckoutConfirm_Click(object sender, EventArgs e)
    {
      Session["userCheckoutCompleted"] = "true";
      Response.Redirect("~/Checkout/CheckoutComplete.aspx");
    }
  }
}
DetailsView 控件用于显示已从 PayPal 返回的订单详细信息。 此外,上述代码将订单详细信息作为 OrderDetail 对象保存到 Wingtip Toys 数据库。 当用户单击“ 完成订单 ”按钮时,会重定向到 CheckoutComplete.aspx 页。
注意
提示
请注意,在 CheckoutReview.aspx 页的标记中 <ItemStyle> ,标记用于更改页面底部附近的 DetailsView 控件中的项样式。 通过在 Visual Studio) 左下角选择“设计”来查看“设计视图” (页面,然后选择“DetailsView”控件,然后选择“智能标记” (控件) 右上角的箭头图标,你将能够看到 DetailsView 任务。
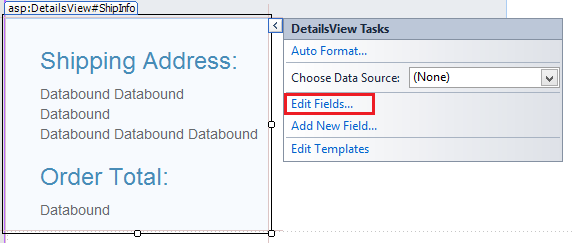
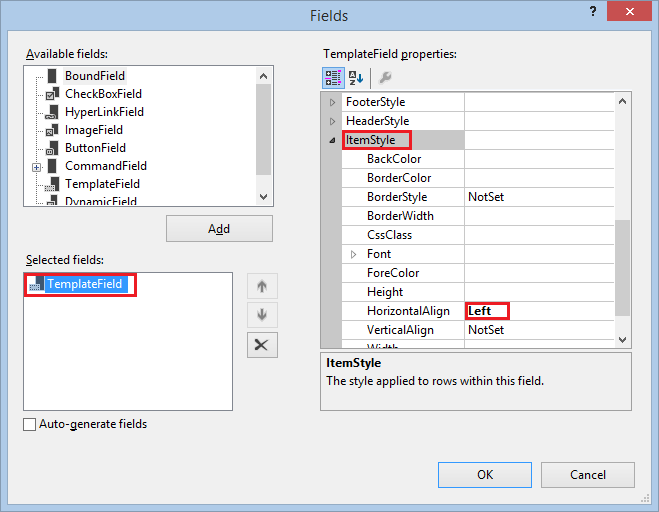
通过选择 “编辑字段”,将显示“ 字段 ”对话框。 在此对话框中,可以轻松控制 DetailsView 控件的视觉属性,如 ItemStyle。
完成购买
CheckoutComplete.aspx 页面从 PayPal 进行购买。 如上所述,用户必须单击“ 完成订单 ”按钮,应用程序才能导航到 CheckoutComplete.aspx 页。
在 Checkout 文件夹中,打开名为 CheckoutComplete.aspx 的页面。
将现有标记替换为以下内容:
<%@ Page Title="" Language="C#" MasterPageFile="~/Site.Master" AutoEventWireup="true" CodeBehind="CheckoutComplete.aspx.cs" Inherits="WingtipToys.Checkout.CheckoutComplete" %>
<asp:Content ID="Content1" ContentPlaceHolderID="MainContent" runat="server">
    <h1>Checkout Complete</h1>
    <p></p>
    <h3>Payment Transaction ID:</h3> <asp:Label ID="TransactionId" runat="server"></asp:Label>
    <p></p>
    <h3>Thank You!</h3>
    <p></p>
    <hr />
    <asp:Button ID="Continue" runat="server" Text="Continue Shopping" OnClick="Continue_Click" />
</asp:Content>
打开名为 CheckoutComplete.aspx.cs 的代码隐藏页,并将现有代码替换为以下内容:
using System;
using System.Collections.Generic;
using System.Linq;
using System.Web;
using System.Web.UI;
using System.Web.UI.WebControls;
using WingtipToys.Models;

namespace WingtipToys.Checkout
{
  public partial class CheckoutComplete : System.Web.UI.Page
  {
    protected void Page_Load(object sender, EventArgs e)
    {
      if (!IsPostBack)
      {
        // Verify user has completed the checkout process.
        if ((string)Session["userCheckoutCompleted"] != "true")
        {
          Session["userCheckoutCompleted"] = string.Empty;
          Response.Redirect("CheckoutError.aspx?" + "Desc=Unvalidated%20Checkout.");
        }

        NVPAPICaller payPalCaller = new NVPAPICaller();

        string retMsg = "";
        string token = "";
        string finalPaymentAmount = "";
        string PayerID = "";
        NVPCodec decoder = new NVPCodec();

        token = Session["token"].ToString();
        PayerID = Session["payerId"].ToString();
        finalPaymentAmount = Session["payment_amt"].ToString();

        bool ret = payPalCaller.DoCheckoutPayment(finalPaymentAmount, token, PayerID, ref decoder, ref retMsg);
        if (ret)
        {
          // Retrieve PayPal confirmation value.
          string PaymentConfirmation = decoder["PAYMENTINFO_0_TRANSACTIONID"].ToString();
          TransactionId.Text = PaymentConfirmation;

          ProductContext _db = new ProductContext();
          // Get the current order id.
          int currentOrderId = -1;
          if (Session["currentOrderId"] != string.Empty)
          {
            currentOrderId = Convert.ToInt32(Session["currentOrderID"]);
          }
          Order myCurrentOrder;
          if (currentOrderId >= 0)
          {
            // Get the order based on order id.
            myCurrentOrder = _db.Orders.Single(o => o.OrderId == currentOrderId);
            // Update the order to reflect payment has been completed.
            myCurrentOrder.PaymentTransactionId = PaymentConfirmation;
            // Save to DB.
            _db.SaveChanges();
          }

          // Clear shopping cart.
          using (WingtipToys.Logic.ShoppingCartActions usersShoppingCart =
              new WingtipToys.Logic.ShoppingCartActions())
          {
            usersShoppingCart.EmptyCart();
          }

          // Clear order id.
          Session["currentOrderId"] = string.Empty;
        }
        else
        {
          Response.Redirect("CheckoutError.aspx?" + retMsg);
        }
      }
    }

    protected void Continue_Click(object sender, EventArgs e)
    {
      Response.Redirect("~/Default.aspx");
    }
  }
}
加载 CheckoutComplete.aspx 页时, DoCheckoutPayment 将调用 方法。 如前所述, DoCheckoutPayment 方法从 PayPal 测试环境完成购买。 PayPal 完成订单购买后, CheckoutComplete.aspx 页面将显示向购买者付款交易 ID 。
处理取消购买
如果用户决定取消购买,他们将被定向到 CheckoutCancel.aspx 页面,他们将在其中看到其订单已取消。
在 Checkout 文件夹中打开名为 CheckoutCancel.aspx 的页面。
将现有标记替换为以下内容:
<%@ Page Title="" Language="C#" MasterPageFile="~/Site.Master" AutoEventWireup="true" CodeBehind="CheckoutCancel.aspx.cs" Inherits="WingtipToys.Checkout.CheckoutCancel" %>
<asp:Content ID="Content1" ContentPlaceHolderID="MainContent" runat="server">
    <h1>Checkout Cancelled</h1>
    <p></p>
    <h3>Your purchase has been cancelled.</h3>
</asp:Content>
处理购买错误
购买过程中的错误将由 CheckoutError.aspx 页面处理。 如果发生错误, CheckoutStart.aspx 页、 CheckoutReview.aspx 页和 CheckoutComplete.aspx 页的代码隐藏将分别重定向到 CheckoutError.aspx 页。
在 Checkout 文件夹中打开名为 CheckoutError.aspx 的页面。
将现有标记替换为以下内容:
<%@ Page Title="" Language="C#" MasterPageFile="~/Site.Master" AutoEventWireup="true" CodeBehind="CheckoutError.aspx.cs" Inherits="WingtipToys.Checkout.CheckoutError" %>
<asp:Content ID="Content1" ContentPlaceHolderID="MainContent" runat="server">
    <h1>Checkout Error</h1>
    <p></p>
<table id="ErrorTable">
    <tr>
        <td class="field"></td>
        <td><%=Request.QueryString.Get("ErrorCode")%></td>
    </tr>
    <tr>
        <td class="field"></td>
        <td><%=Request.QueryString.Get("Desc")%></td>
    </tr>
    <tr>
        <td class="field"></td>
        <td><%=Request.QueryString.Get("Desc2")%></td>
    </tr>
</table>
    <p></p>
</asp:Content>
当签出过程中发生错误时, CheckoutError.aspx 页会显示错误详细信息。
运行应用程序
运行应用程序以查看如何购买产品。 请注意,你将在 PayPal 测试环境中运行。 没有实际的资金被交换。
确保所有文件都保存在 Visual Studio 中。
打开 Web 浏览器并导航到 https://developer.paypal.com。
使用之前在本教程中创建的 PayPal 开发人员帐户登录。
对于 PayPal 的开发人员沙盒,你需要登录 https://developer.paypal.com 以测试快速结帐。 这仅适用于 PayPal 的沙盒测试,不适用于 PayPal 的实时环境。在 Visual Studio 中,按 F5 运行 Wingtip Toys 示例应用程序。
重新生成数据库后,浏览器将打开并显示 Default.aspx 页。通过选择产品类别(例如“汽车”),然后单击每个产品旁边的“添加到购物车”,将三种不同的产品 添加到购物车 。
购物车将显示你选择的产品。单击 PayPal 按钮进行结帐。
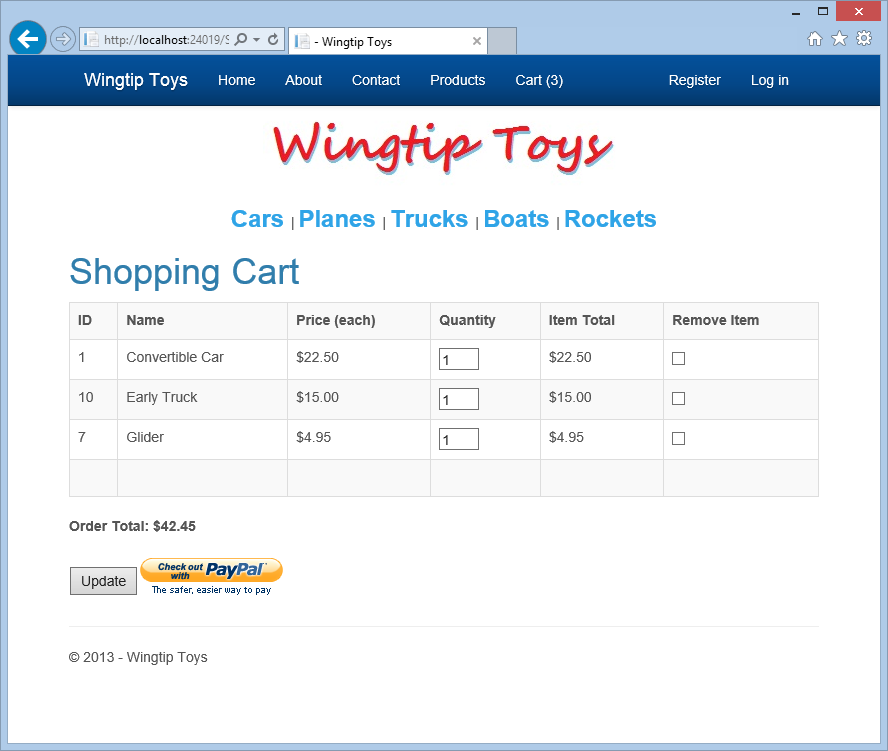
签出需要有 Wingtip Toys 示例应用程序的用户帐户。
单击页面右侧的 Google 链接,使用现有的 gmail.com 电子邮件帐户登录。
如果没有 gmail.com 帐户,可以在 www.gmail.com 创建一个用于测试的帐户。 还可以通过单击“注册”使用标准本地帐户。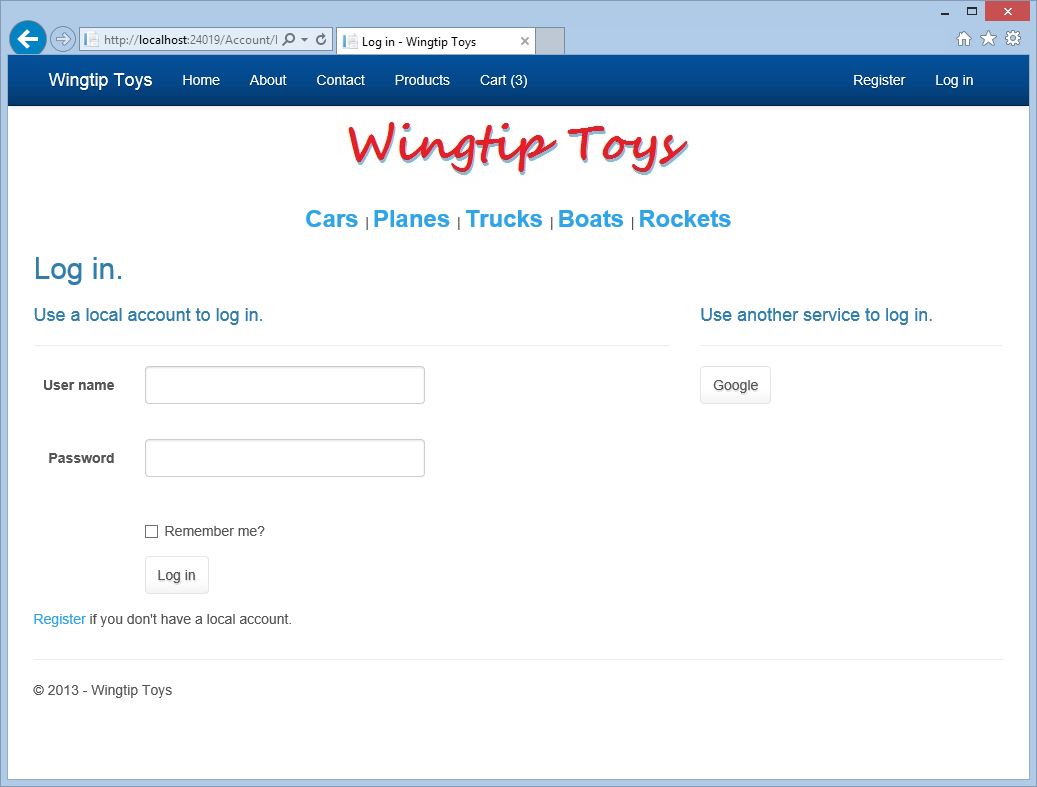
使用 gmail 帐户和密码登录。
单击“ 登录 ”按钮,使用 Wingtip Toys 示例应用程序用户名注册 gmail 帐户。
在 PayPal 测试站点上,添加之前在本教程中创建的 买家 电子邮件地址和密码,然后单击“ 登录 ”按钮。
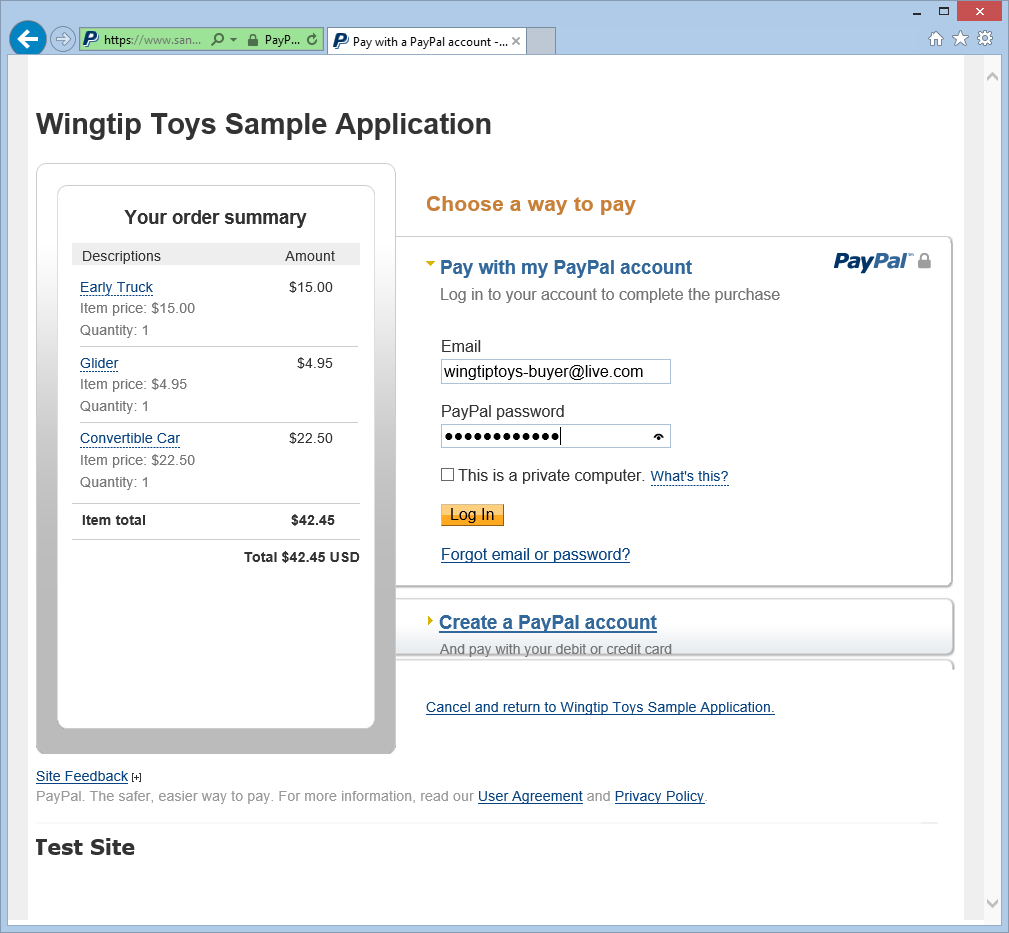
同意 PayPal 策略,然后单击“ 同意并继续 ”按钮。
请注意,此页面仅在首次使用此 PayPal 帐户时显示。 再次请注意,这是一个测试帐户,没有实际资金交换。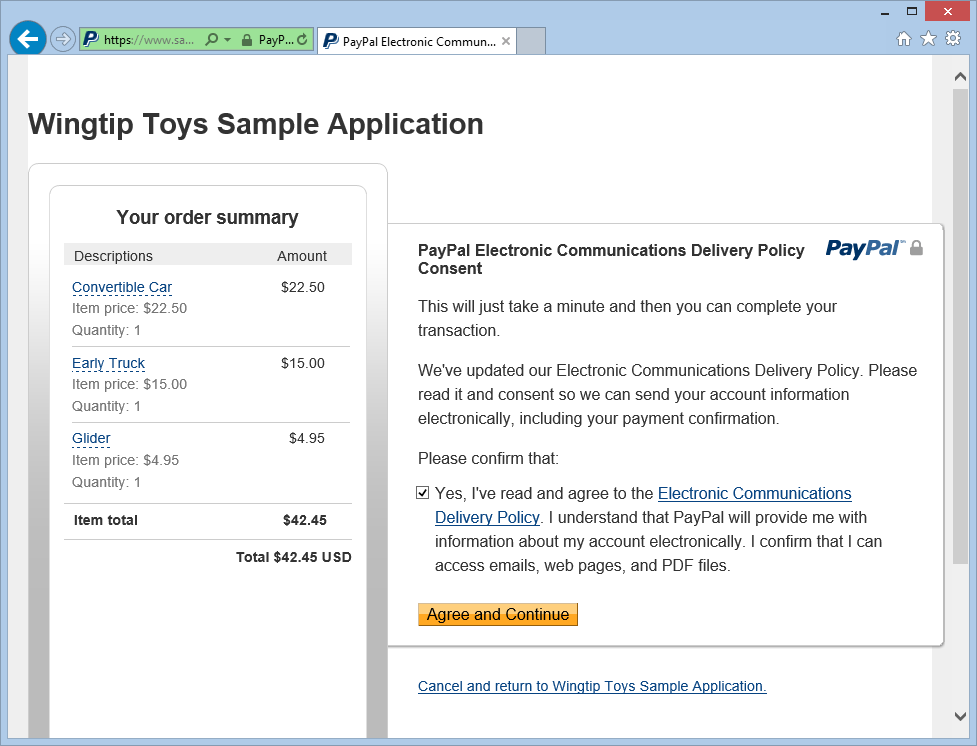
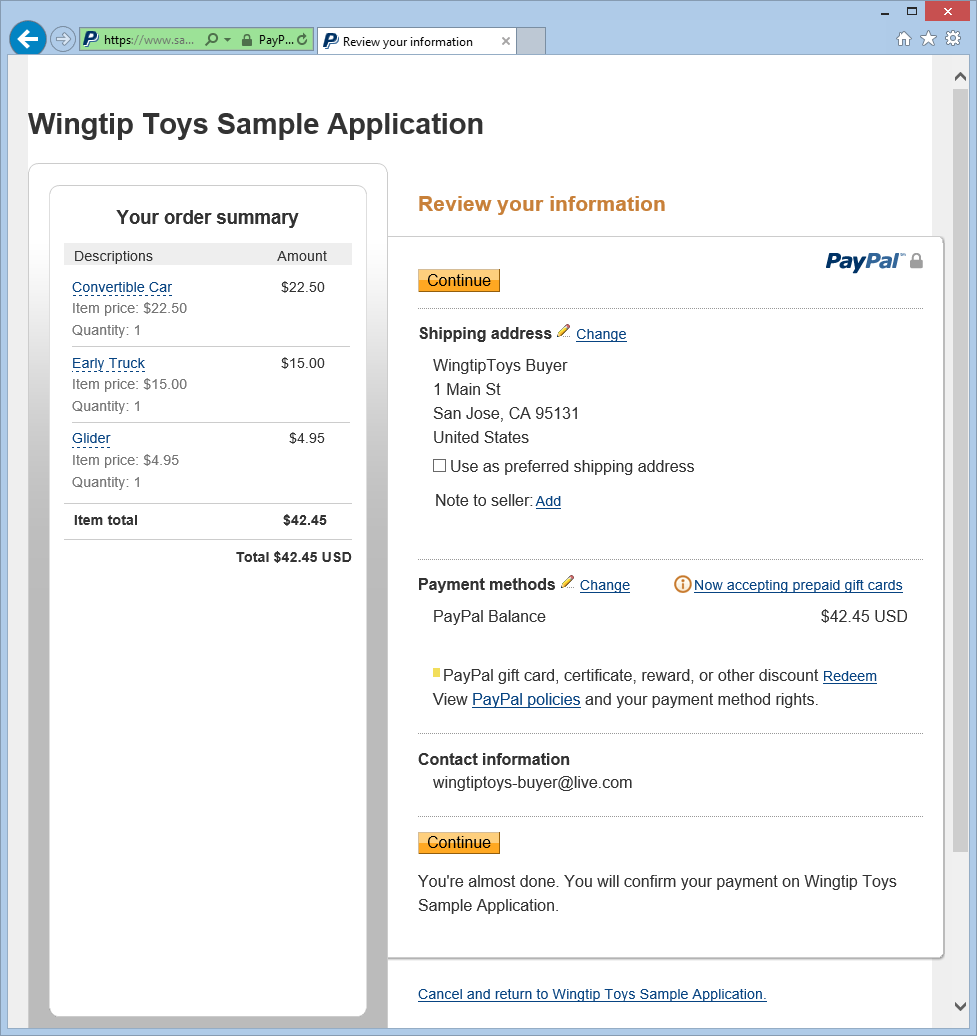
在 PayPal 测试环境评审页上查看订单信息,然后单击“ 继续”。
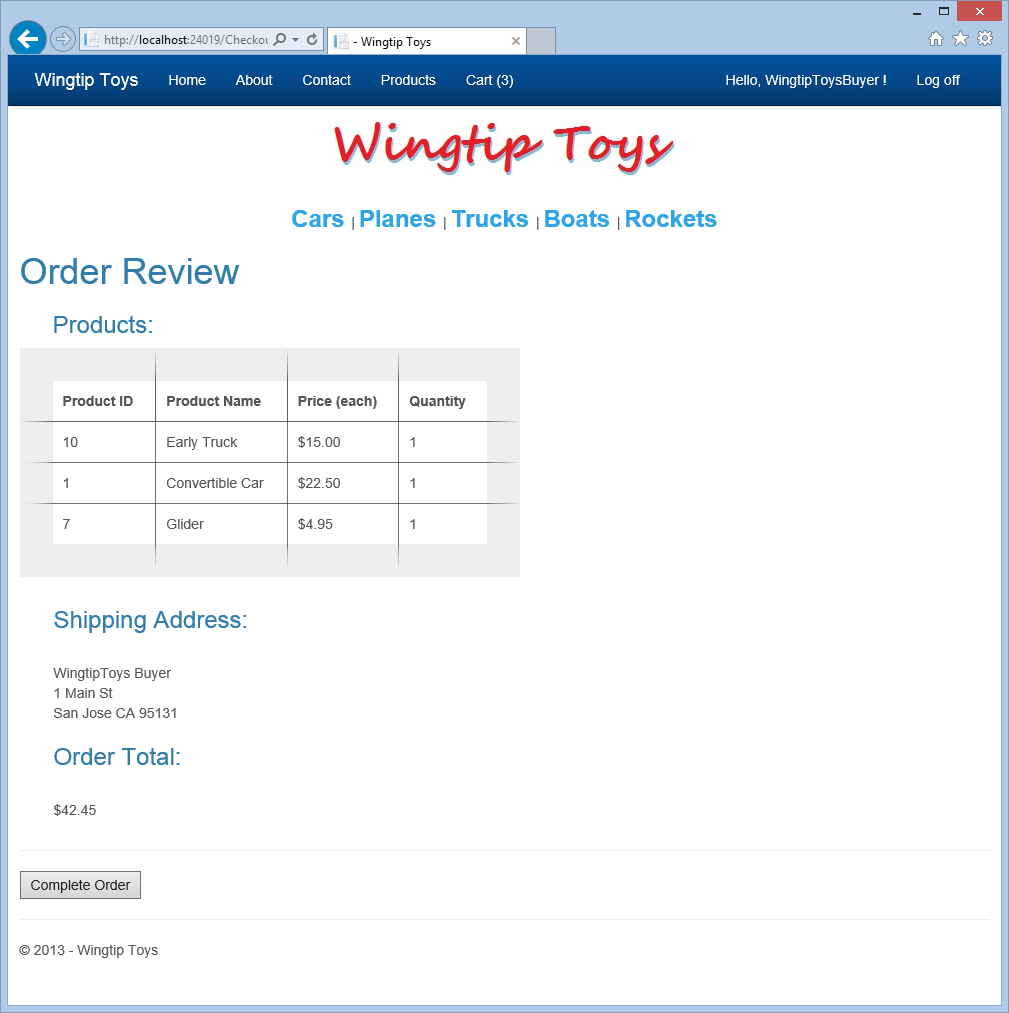
在 CheckoutReview.aspx 页上,验证订单金额并查看生成的送货地址。 然后,单击“ 完成订单” 按钮。
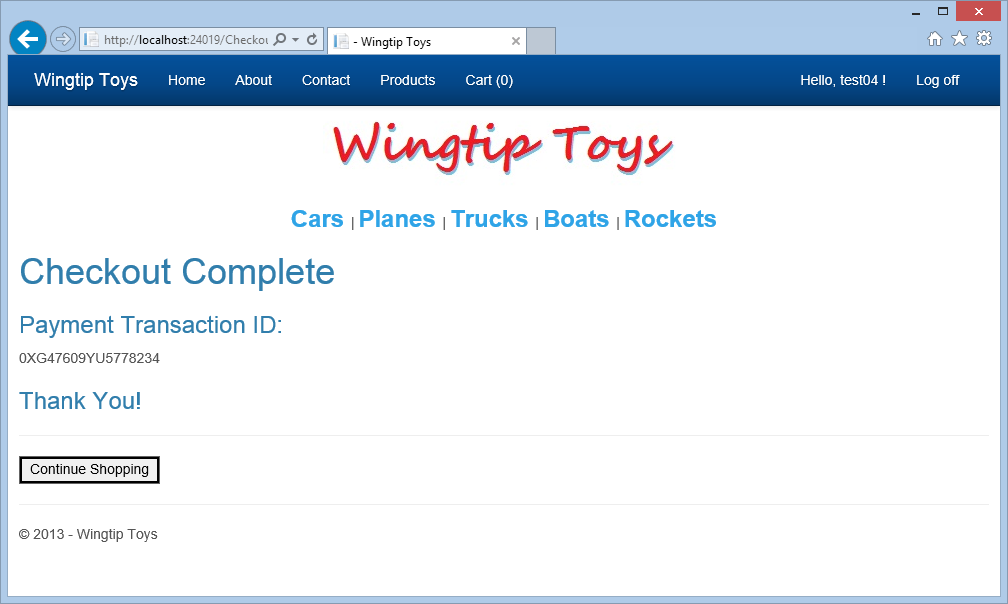
CheckoutComplete.aspx 页显示付款交易 ID。
查看数据库
运行应用程序后,通过查看 Wingtip Toys 示例应用程序数据库中的更新数据,可以看到应用程序已成功记录产品的购买。
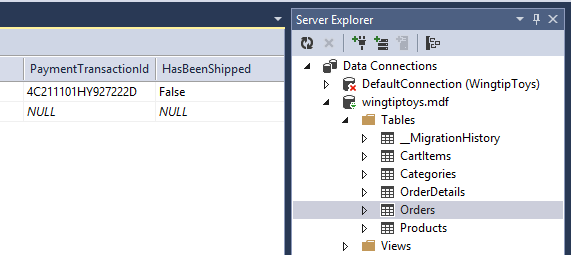
可以使用 Visual Studio 中的“数据库资源管理器”窗口 (“服务器资源管理器”窗口检查 Wingtiptoys.mdf 数据库文件中包含的数据) ,如本系列教程前面所述。
如果浏览器窗口仍处于打开状态,请将其关闭。
在 Visual Studio 中,选择解决方案资源管理器顶部的“显示所有文件”图标,以便展开App_Data文件夹。
展开 “App_Data ”文件夹。
可能需要选择文件夹的 “显示所有文件” 图标。右键单击 Wingtiptoys.mdf 数据库文件,然后选择“ 打开”。
将显示服务器资源管理器。展开 “表” 文件夹。
右键单击“ 订单”表,然后选择“ 显示表数据”。
将显示 “订单” 表。查看 PaymentTransactionID 列以确认交易成功。
关闭“ 订单 表”窗口。
在服务器资源管理器中,右键单击“ OrderDetails ”表,然后选择“ 显示表数据”。
OrderId查看 OrderDetails 表中的 和Username值。 请注意,这些值与 Orders 表中包含的 和Username值匹配OrderId。关闭 “OrderDetails 表”窗口。
右键单击 Wingtip Toys 数据库文件 (Wingtiptoys.mdf) 并选择“ 关闭连接”。
如果未看到“解决方案资源管理器”窗口,请单击“服务器资源管理器”窗口底部的“解决方案资源管理器”,再次显示解决方案资源管理器。
总结
在本教程中,你添加了订单和订单详细信息架构来跟踪产品的购买情况。 还将 PayPal 功能集成到 Wingtip Toys 示例应用程序中。
其他资源
ASP.NET 配置概述
将具有成员身份、OAuth 和SQL 数据库的安全 ASP.NET Web Forms应用部署到Azure 应用服务
Microsoft Azure - 免费试用版
免责声明
本教程包含示例代码。 此类示例代码“按原样”提供,不提供任何形式的担保。 因此,Microsoft 不保证示例代码的准确性、完整性或质量。 你同意使用示例代码,风险自担。 在任何情况下,Microsoft 都不会以任何方式对任何示例代码、内容(包括但不限于任何示例代码、内容中的任何错误或遗漏)或因使用任何示例代码而造成的任何类型的任何损失或损害负责。 你在此收到通知,并特此同意赔偿、保存和使 Microsoft 免受任何及所有损失、索赔、伤害或损害的损害,包括但不限于由你发布、传输、使用或依赖的材料而引发的损失、索赔、伤害或损害,包括但不限于其中表达的观点。