你当前正在访问 Microsoft Azure Global Edition 技术文档网站。 如果需要访问由世纪互联运营的 Microsoft Azure 中国技术文档网站,请访问 https://docs.azure.cn。
快速入门:使用高级消息发送 WhatsApp 消息
Azure 通信服务让你能够发送和接收 WhatsApp 消息。 在本快速入门中,开始将应用与 Azure 通信高级消息 SDK 集成,并开始发送/接收 WhatsApp 消息。 完成本快速入门会从你的 Azure 帐户中扣取最多几美分的费用。
先决条件
用于接收消息的活动的 WhatsApp 电话号码
.NET 开发环境(如 Visual Studio、Visual Studio Code 或 .NET CLI)
设置
创建 .NET 项目
若要创建项目,请按照使用 Visual Studio 创建 .NET 控制台应用程序的教程进行操作。
若要编译代码,请按 Ctrl+F7。
安装包
将 Azure.Communication.Messages NuGet 包安装到你的 C# 项目。
- 打开 NuGet 包管理器:
Project>Manage NuGet Packages...。 - 搜索包
Azure.Communication.Messages。 - 安装最新版本。
设置应用框架
在文本编辑器中,打开“Program.cs” 文件。
使用以下代码替换你的 Program.cs 的内容:
using System;
using System.Collections.Generic;
using System.Threading.Tasks;
using Azure;
using Azure.Communication.Messages;

namespace AdvancedMessagingQuickstart
{
    class Program
    {
        public static async Task Main(string[] args)
        {
            Console.WriteLine("Azure Communication Services - Send WhatsApp Messages");

            // Quickstart code goes here
        }
    }
}
若要使用高级消息传送功能,我们要添加一个 using 指令以包含 Azure.Communication.Messages 命名空间。
using Azure.Communication.Messages;
对象模型
以下类和接口处理适用于 .NET 的 Azure 通信服务高级消息传送 SDK 的某些主要功能。
| 名称 | 描述 |
|---|---|
| NotificationMessagesClient | 此类连接到你的 Azure 通信服务资源。 它会发送消息。 |
| MessageTemplate | 此类定义你为消息使用哪个模板以及模板属性的内容。 |
| TemplateNotificationContent | 此类定义要发送的模板消息的“谁”和“什么”。 |
| TextNotificationContent | 此类定义要发送的文本消息的“谁”和“什么”。 |
| MediaNotificationContent | 此类定义要发送的媒体消息的“谁”和“什么”。 |
代码示例
按照以下步骤将必要的代码片段添加到你的 Program.cs 文件的 Main 函数。
验证客户端
NotificationMessagesClient 用于连接到你的 Azure 通信服务资源。
为简单起见,本快速入门使用连接字符串进行身份验证。 在生产环境中,我们建议使用服务主体。
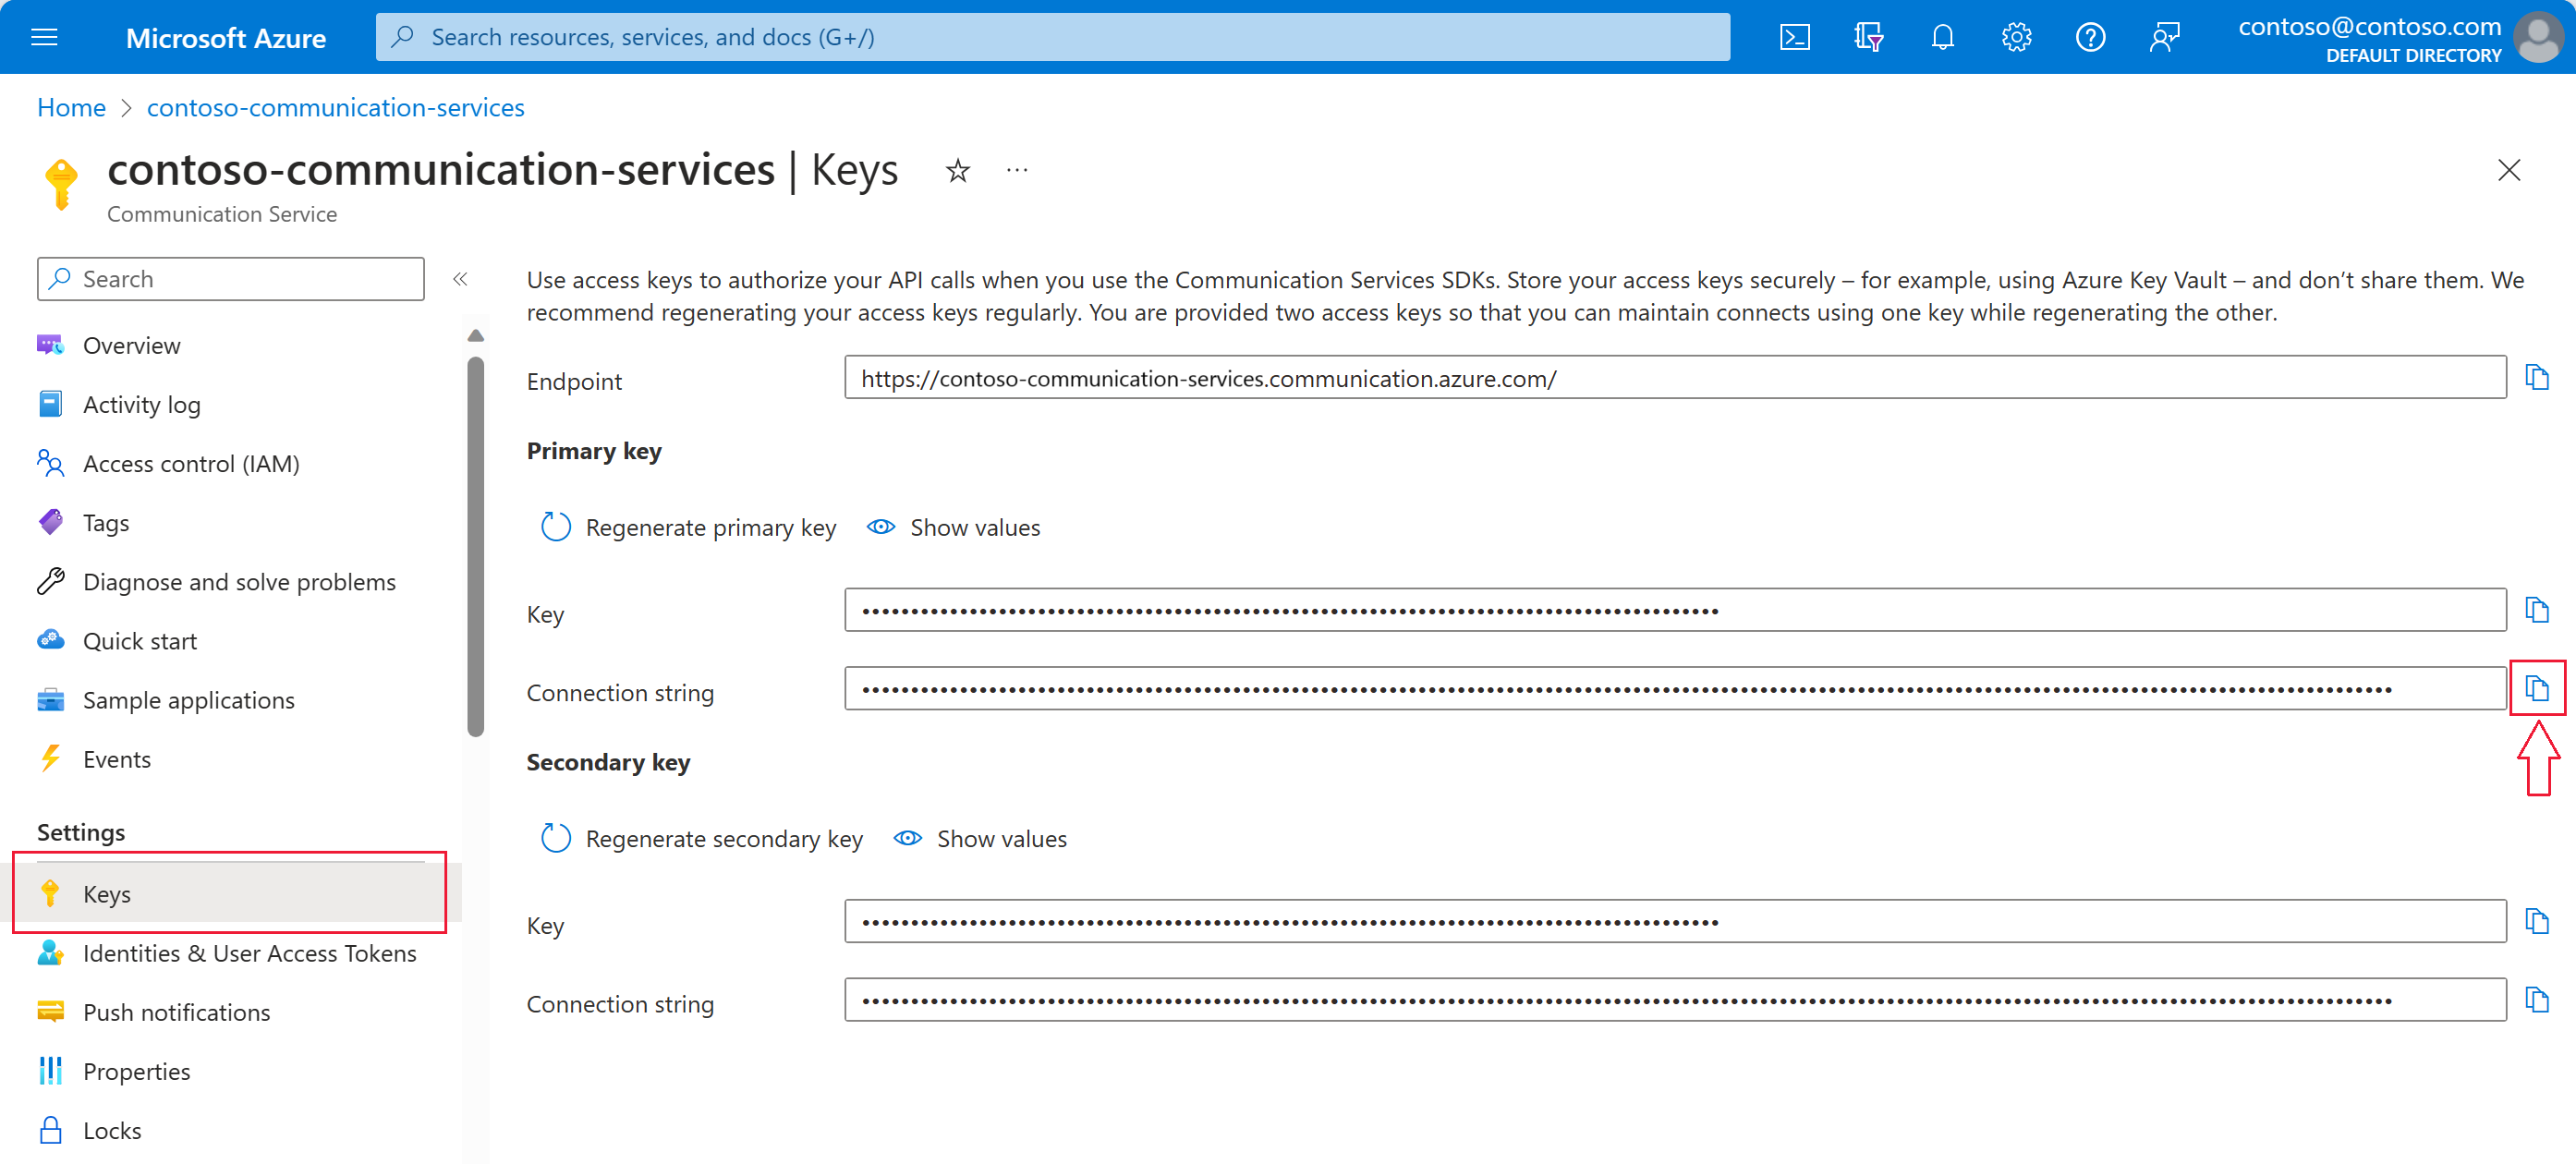
从 Azure 门户中的 Azure 通信服务资源获取连接字符串。 在左侧,导航到“Keys”选项卡。复制主键的 Connection string 字段。 连接字符串采用 endpoint=https://{your Azure Communication Services resource name}.communication.azure.com/;accesskey={secret key} 格式。

将环境变量 COMMUNICATION_SERVICES_CONNECTION_STRING 设置为连接字符串的值。
打开控制台窗口并输入以下命令:
setx COMMUNICATION_SERVICES_CONNECTION_STRING "<your connection string>"
添加环境变量后,可能需要重启任何正在运行的、需要读取环境变量的程序(包括控制台窗口)。 例如,如果使用 Visual Studio 作为编辑器,请在运行示例之前重启 Visual Studio。
有关如何为系统设置环境变量的详细信息,请按照在环境变量中存储连接字符串的步骤操作。
若要实例化 NotificationMessagesClient,请将以下代码添加到 Main 方法:
// Retrieve connection string from environment variable
string connectionString =
    Environment.GetEnvironmentVariable("COMMUNICATION_SERVICES_CONNECTION_STRING");

// Instantiate the client
var notificationMessagesClient = new NotificationMessagesClient(connectionString);

设置频道注册 ID
频道注册 ID GUID 是在频道注册期间创建的。 可在门户中,访问 Azure 通信服务资源的“频道”选项卡来查找它。

将它分配给名为 channelRegistrationId 的变量。
var channelRegistrationId = new Guid("<your channel registration ID GUID>");
设置收件人列表
你需要提供一个与 WhatsApp 帐户关联的真实电话号码。 此 WhatsApp 帐户会接收本快速入门中发送的模版、文本和媒体消息。 在本快速入门中,此电话号码可能是你的个人电话号码。
收件人电话号码不能是与 WhatsApp 频道注册关联的业务电话号码(发件人 ID)。 发件人 ID 显示为发送给收件人的文本和媒体消息的发件人。
电话号码应包括国家/地区代码。 有关电话号码格式的详细信息,请查看 WhatsApp 文档中的电话号码格式。
注意
收件人列表中当前仅支持一个电话号码。
创建如下所示的收件人列表:
var recipientList = new List<string> { "<to WhatsApp phone number>" };
示例:
// Example only
var recipientList = new List<string> { "+14255550199" };
开始在企业和 WhatsApp 用户之间发送消息
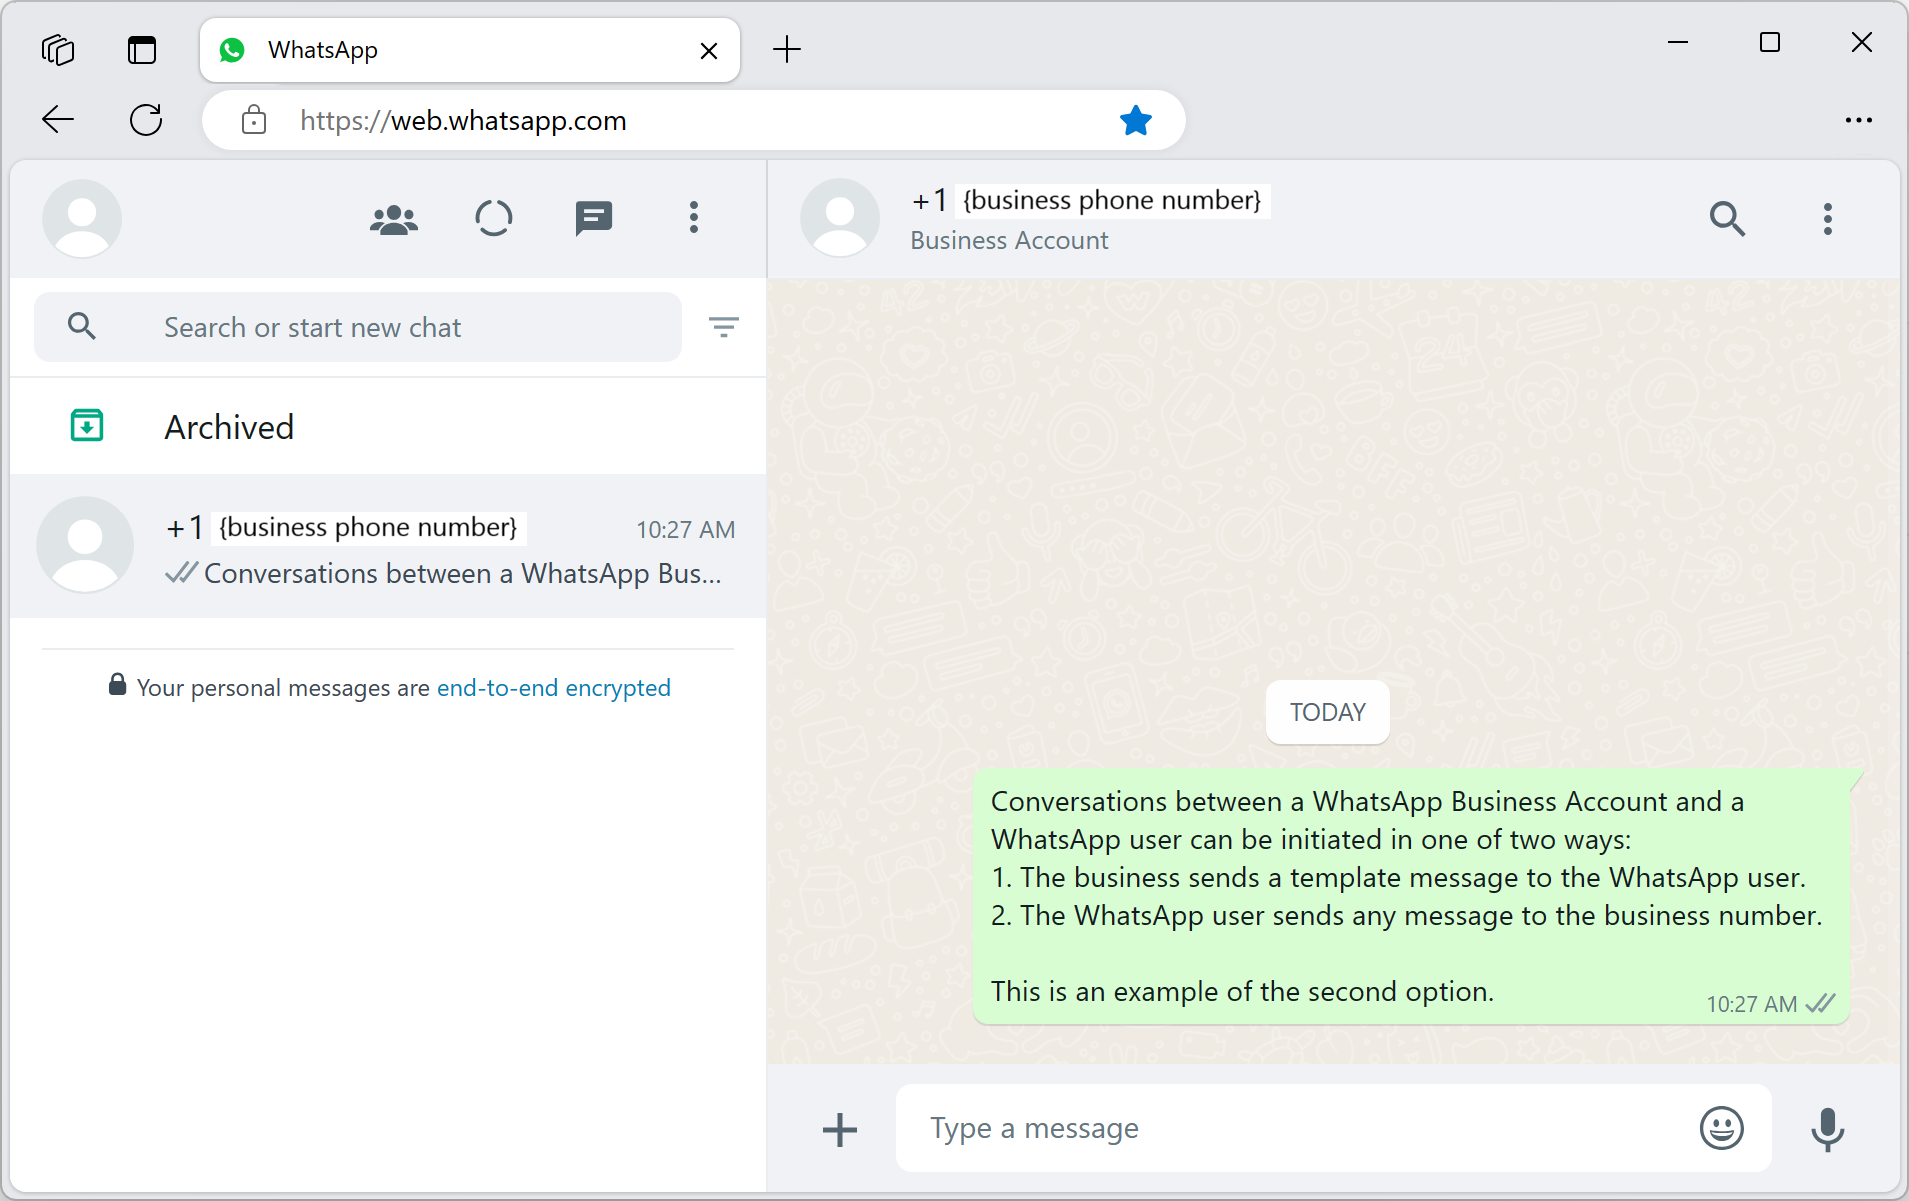
可通过下面两种方式之一发起 WhatsApp Business 帐户与 WhatsApp 用户之间的对话:
- 企业向 WhatsApp 用户发送模板消息。
- WhatsApp 用户向企业号码发送任何消息。
无论对话是如何启动的,在用户向企业发送消息之前,企业只能发送模板消息。只有在用户向企业发送消息后,企业才能在活动对话期间向用户发送文本或媒体消息。 24 小时对话窗口到期后,必须重新发起对话。 若要了解有关对话的详细信息,请访问 WhatsApp Business 平台查看定义。
(选项 1)从企业发起对话 - 发送模板消息
通过发送模板消息来发起对话。
首先,使用模板的值创建 MessageTemplate。
下面显示使用默认模板 sample_template 创建 MessageTemplate。
如果 sample_template 不可用,请跳到选项 2。 对于高级用户,请参阅“模板”页,了解如何使用选项 1 发送其他模板。
消息 SDK 允许 Contoso 将模板化的 WhatsApp 消息发送给 WhatsApp 用户。 若要发送模板消息,需要提供以下详细信息:
- WhatsApp 频道 ID
- E16 格式的收件人电话号码
- 模板详细信息
- 名称(如“sample_template”)
- 语言(如“en_us”)
- 参数(如果有)
// Assemble the template content
string templateName = "sample_template";
string templateLanguage = "en_us";
var messageTemplate = new MessageTemplate(templateName, templateLanguage);
有关如何组装 MessageTemplate 以及如何创建自己的模板的更多示例,请参阅以下资源:
有关模板的更多 WhatsApp 要求,请查看 WhatsApp Business Platform API 参考:
组装然后发送模板消息:
// Assemble template message
var templateContent =
    new TemplateNotificationContent(channelRegistrationId, recipientList, messageTemplate);

// Send template message
Response<SendMessageResult> sendTemplateMessageResult =
    await notificationMessagesClient.SendAsync(templateContent);
现在,用户需要响应模板消息。 从 WhatsApp 用户帐户,回复从 WhatsApp 企业帐户接收的模板消息。 消息的内容与此场景无关。
重要
收件人必须回复模板消息来发起对话,然后才能将文本或媒体消息传递到收件人。
(选项 2)从用户发起对话
要在 WhatsApp Business 帐户和 WhatsApp 用户之间发起会话,还可以让用户发起会话。 为此,请从 WhatsApp 个人帐户向企业号码发送消息(发件人 ID)。

向 WhatsApp 用户发送文本消息
消息 SDK 允许 Contoso 发送WhatsApp 文本消息,它可发起 WhatsApp 用户启动的会话。 若要发送文本消息,需要提供以下详细信息:
- WhatsApp 频道 ID
- E16 格式的收件人电话号码
- 要发送的消息正文/文本
重要
若要向 WhatsApp 用户发送文本消息,WhatsApp 用户必须先向 WhatsApp 企业帐户发送消息。 有关详细信息,请参阅开始在企业和 WhatsApp 用户之间发送消息。
在此示例中,我们使用“感谢你提供反馈。\n来自通知消息 SDK”文本来回复 WhatsApp 用户。
组装然后发送文本消息:
// Assemble text message
var textContent =
    new TextNotificationContent(channelRegistrationId, recipientList, "Thanks for your feedback.\n From Notification Messaging SDK");

// Send text message
Response<SendMessageResult> sendTextMessageResult =
    await notificationMessagesClient.SendAsync(textContent);
向 WhatsApp 用户发送媒体消息
消息 SDK 允许 Contoso 将 WhatsApp 图片消息发送给 WhatsApp 用户。 若要发送嵌入图片的消息,需要提供以下详细信息:
- WhatsApp 频道 ID
- E16 格式的收件人电话号码
- 图片的 MediaUri
重要
若要向 WhatsApp 用户发送文本消息,WhatsApp 用户必须先向 WhatsApp 企业帐户发送消息。 有关详细信息,请参阅开始在企业和 WhatsApp 用户之间发送消息。
例如,创建 URI:
var uri = new Uri("https://aka.ms/acsicon1");
组装然后发送媒体消息:
// Assemble media message
var mediaContent =
    new MediaNotificationContent(channelRegistrationId, recipientList, uri);

// Send media message
Response<SendMessageResult> sendMediaMessageResult =
    await notificationMessagesClient.SendAsync(mediaContent);
运行代码
构建程序并运行。
若要向 WhatsApp 用户发送文本或媒体消息,WhatsApp Business 帐户和 WhatsApp 用户之间必须有活动的会话。
如果你没有活动的对话,出于本快速入门的目的,你应在发送模板消息和发送文本消息之间添加等待时间。 增加这一延迟后,你就有足够的时间来在用户的 WhatsApp 帐户上回复企业。 如需参考,示例代码中的完整示例会在发送下一条消息之前提示手动用户输入。
如果成功,你会在用户的 WhatsApp 帐户上收到三条消息。
- 若要编译代码,请按 Ctrl+F7。
- 要运行程序而不进行调试,请按 Ctrl+F5。
完整示例代码
using System;
using System.Collections.Generic;
using System.Linq;
using System.Threading.Tasks;
using Azure;
using Azure.Communication.Messages;

namespace AdvancedMessagingQuickstart
{
    class Program
    {
        public static async Task Main(string[] args)
        {
            Console.WriteLine("Azure Communication Services - Send WhatsApp Messages\n");

            string connectionString = Environment.GetEnvironmentVariable("COMMUNICATION_SERVICES_CONNECTION_STRING");
            NotificationMessagesClient notificationMessagesClient =
                new NotificationMessagesClient(connectionString);

            var channelRegistrationId = new Guid("<Your Channel ID>");
            var recipientList = new List<string> { "<Recipient's WhatsApp Phone Number>" };

            // Send sample template sample_template
            string templateName = "sample_template";
            string templateLanguage = "en_us";
            MessageTemplate sampleTemplate = new MessageTemplate(templateName, templateLanguage);
            TemplateNotificationContent templateContent =
                new TemplateNotificationContent(channelRegistrationId, recipientList, sampleTemplate);
            Response<SendMessageResult> sendTemplateMessageResult =
                await notificationMessagesClient.SendAsync(templateContent);

            PrintResult(sendTemplateMessageResult);
            Console.WriteLine("Template message sent.\nWait until the WhatsApp user responds " +
                "to the template message, then press any key to continue.\n");
            Console.ReadKey();

            // Send a text message
            string messageText = "Thanks for your feedback.";
            TextNotificationContent textContent =
                new TextNotificationContent(channelRegistrationId, recipientList, messageText);
            Response<SendMessageResult> sendTextMessageResult =
                await notificationMessagesClient.SendAsync(textContent);

            PrintResult(sendTextMessageResult);
            Console.WriteLine($"Text message sent to my phoneNumber.\nPress any key to continue.\n");
            Console.ReadKey();

            // Send a media message
            Uri uri = new Uri("https://aka.ms/acsicon1");
            MediaNotificationContent mediaContent =
                new MediaNotificationContent(channelRegistrationId, recipientList, uri);
            Response<SendMessageResult> sendMediaMessageResult =
                await notificationMessagesClient.SendAsync(mediaContent);

            PrintResult(sendMediaMessageResult);
            Console.WriteLine("Media message sent.\nPress any key to exit.\n");
            Console.ReadKey();
        }

        public static void PrintResult(Response<SendMessageResult> result)
        {
            Console.WriteLine($"Response: {result.GetRawResponse().Status} " +
                $"({result.GetRawResponse().ReasonPhrase})");
            Console.WriteLine($"Date: " +
                $"{result.GetRawResponse().Headers.First(header => header.Name == "Date").Value}");
            Console.WriteLine($"ClientRequestId: {result.GetRawResponse().ClientRequestId}");
            Console.WriteLine($"MS-CV: " +
                $"{result.GetRawResponse().Headers.First(header => header.Name == "MS-CV").Value}");
            foreach (var receipts in result.Value.Receipts)
            {
                Console.WriteLine($"MessageId: {receipts.MessageId}");
            }
            Console.WriteLine($"\n");
        }
    }
}
先决条件
用于接收消息的活动的 WhatsApp 电话号码
Java 开发工具包 (JDK) 版本 8 或更高
设置
若要设置用于发送消息的环境,请执行以下部分中所述的步骤。
创建新的 Java 应用程序
打开终端或命令窗口,并导航到要在其中创建 Java 应用程序的目录。 运行以下命令以从 maven-archetype-quickstart 模板生成 Java 项目。
mvn archetype:generate -DgroupId="com.communication.quickstart" -DartifactId="communication-quickstart" -DarchetypeArtifactId="maven-archetype-quickstart" -DarchetypeVersion="1.4" -DinteractiveMode="false"
generate 目标将创建一个名称与 artifactId 值相同的目录。 在此目录下,src/main/java 目录包含项目源代码,src/test/java 目录包含测试源,pom.xml 文件是项目的项目对象模型 (POM)。
安装包
在文本编辑器中打开 pom.xml 文件。 将以下依赖项元素添加到依赖项组。
<dependency>
    <groupId>com.azure</groupId>
    <artifactId>azure-communication-messages</artifactId>
    <version>1.0.0</version>
</dependency>
设置应用框架
在文本编辑器中打开 /src/main/java/com/communication/quickstart/App.java,添加 import 指令并删除 System.out.println("Hello world!"); 语句:
package com.communication.quickstart;

import com.azure.communication.messages.*;
import com.azure.communication.messages.models.*;

import java.util.ArrayList;
import java.util.List;
public class App
{
    public static void main( String[] args )
    {
        // Quickstart code goes here.
    }
}
对象模型
以下类和接口处理适用于 Java 的 Azure 通信服务高级消息传送 SDK 的某些主要功能。
| 名称 | 描述 |
|---|---|
| NotificationMessagesClientBuilder | 此类会创建通知消息客户端。 为其提供终结点和凭据。 |
| NotificationMessagesClient | 需要此类才能发送 WhatsApp 消息并下载媒体文件。 |
| NotificationMessagesAsyncClient | 需要此类才能异步发送 WhatsApp 消息并下载媒体文件。 |
| SendMessageResult | 此类包含用于发送通知消息的高级消息传送服务的结果。 |
| MessageTemplateClientBuilder | 此类会创建消息模板客户端。 为其提供终结点和凭据。 |
| MessageTemplateClient | 需要此类才能获取 WhatsApp 模板的列表。 |
| MessageTemplateAsyncClient | 需要此类才能异步获取 WhatsApp 模板的列表。 |
代码示例
按照以下步骤将必要的代码片段添加到 App.java 文件的主函数。
验证客户端
可使用几个不同的选项对消息客户端进行身份验证:
若要对客户端进行身份验证,请使用连接字符串实例化 NotificationMessagesClient 或 MessageTemplateClient。 还可以使用任何实现 com.azure.core.http.HttpClient 接口的自定义 HTTP 客户端来初始化此客户端。
为简单起见,本快速入门使用连接字符串进行身份验证。 在生产环境中,我们建议使用服务主体。
从 Azure 门户中的 Azure 通信服务资源获取连接字符串。 在左侧,导航到“Keys”选项卡。复制 Primary key 的 Connection string 字段。 连接字符串采用 endpoint=https://{your Azure Communication Services resource name}.communication.azure.com/;accesskey={secret key} 格式。
将环境变量 COMMUNICATION_SERVICES_CONNECTION_STRING 设置为连接字符串的值。
打开控制台窗口并输入以下命令:
setx COMMUNICATION_SERVICES_CONNECTION_STRING "<your connection string>"
有关如何为系统设置环境变量的详细信息,请按照在环境变量中存储连接字符串的步骤操作。
若要实例化 NotificationMessagesClient,请将以下代码添加到 main 方法:
// You can get your connection string from your resource in the Azure portal.
String connectionString = System.getenv("COMMUNICATION_SERVICES_CONNECTION_STRING");

NotificationMessagesClient notificationClient = new NotificationMessagesClientBuilder()
    .connectionString(connectionString)
    .buildClient();
设置频道注册 ID
频道注册 ID GUID 是在频道注册期间创建的。 可在门户中,访问 Azure 通信服务资源的“频道”选项卡来查找它。
将它分配给名为 channelRegistrationId 的变量。
String channelRegistrationId = "<your channel registration id GUID>";
设置收件人列表
你需要提供一个与 WhatsApp 帐户关联的真实电话号码。 此 WhatsApp 帐户接收本快速入门中发送的文本和媒体消息。 在本快速入门中,此电话号码可能是你的个人电话号码。
收件人电话号码不能是与 WhatsApp 频道注册关联的业务电话号码(发件人 ID)。 发件人 ID 显示为发送给收件人的文本和媒体消息的发件人。
电话号码应包括国家/地区代码。 有关电话号码格式的详细信息,请查看 WhatsApp 文档中的电话号码格式。
注意
收件人列表中当前仅支持一个电话号码。
创建如下所示的收件人列表:
List<String> recipientList = new ArrayList<>();
recipientList.add("<to WhatsApp phone number>");
示例:
// Example only
List<String> recipientList = new ArrayList<>();
recipientList.add("+14255550199");
开始在企业和 WhatsApp 用户之间发送消息
可通过下面两种方式之一发起 WhatsApp Business 帐户与 WhatsApp 用户之间的对话:
- 企业向 WhatsApp 用户发送模板消息。
- WhatsApp 用户向企业号码发送任何消息。
无论对话是如何启动的,在用户向企业发送消息之前,企业只能发送模板消息。只有在用户向企业发送消息后,企业才能在活动对话期间向用户发送文本或媒体消息。 24 小时对话窗口到期后,必须重新发起对话。 若要了解有关对话的详细信息,请访问 WhatsApp Business 平台查看定义。
(选项 1)从企业发起对话 - 发送模板消息
通过发送模板消息来发起对话。
首先,使用模板的值创建 MessageTemplate。
下面显示使用默认模板 sample_template 创建 MessageTemplate。
如果 sample_template 不可用,请跳到选项 2。 对于高级用户,请参阅“模板”页,了解如何使用选项 1 发送其他模板。
消息 SDK 允许 Contoso 将模板化的 WhatsApp 消息发送给 WhatsApp 用户。 若要发送模板消息,需要提供以下详细信息:
- WhatsApp 频道 ID
- E16 格式的收件人电话号码
- 模板详细信息
- 名称(如“sample_template”)
- 语言(如“en_us”)
- 参数(如果有)
// Assemble the template content
String templateName = "sample_template";
String templateLanguage = "en_us";
MessageTemplate messageTemplate = new MessageTemplate(templateName, templateLanguage);

// Assemble template message
TemplateNotificationContent templateContent = new TemplateNotificationContent(channelRegistrationId, recipientList, messageTemplate);

// Send template message
SendMessageResult templateMessageResult = notificationClient.send(templateContent);

// Process result
for (MessageReceipt messageReceipt : templateMessageResult.getReceipts()) {
    System.out.println("Message sent to:" + messageReceipt.getTo() + " and message id:" + messageReceipt.getMessageId());
}
现在,用户需要响应模板消息。 从 WhatsApp 用户帐户,回复从 WhatsApp 企业帐户接收的模板消息。 消息的内容与此场景无关。
重要
收件人必须回复模板消息来发起对话,然后才能将文本或媒体消息传递到收件人。
(选项 2)从用户发起对话
要在 WhatsApp Business 帐户和 WhatsApp 用户之间发起会话,还可以让用户发起会话。 为此,请从 WhatsApp 个人帐户向企业号码发送消息(发件人 ID)。
向 WhatsApp 用户发送文本消息
消息 SDK 允许 Contoso 发送WhatsApp 文本消息,它可发起 WhatsApp 用户启动的会话。 若要发送文本消息,需要提供以下详细信息:
- WhatsApp 频道 ID
- E16 格式的收件人电话号码
- 要发送的消息正文/文本
重要
若要向 WhatsApp 用户发送文本消息,WhatsApp 用户必须先向 WhatsApp 企业帐户发送消息。 有关详细信息,请参阅开始在企业和 WhatsApp 用户之间发送消息。
在此示例中,我们使用“感谢你提供反馈。\n来自通知消息 SDK”文本来回复 WhatsApp 用户。
组装然后发送文本消息:
// Assemble text message
TextNotificationContent textContent = new TextNotificationContent(channelRegistrationId, recipientList, "“Thanks for your feedback.\n From Notification Messaging SDK");

// Send text message
SendMessageResult textMessageResult = notificationClient.send(textContent);

// Process result
for (MessageReceipt messageReceipt : textMessageResult.getReceipts()) {
    System.out.println("Message sent to:" + messageReceipt.getTo() + " and message id:" + messageReceipt.getMessageId());
}
向 WhatsApp 用户发送媒体消息
消息 SDK 允许 Contoso 将 WhatsApp 图片消息发送给 WhatsApp 用户。 若要发送嵌入图片的消息,需要提供以下详细信息:
- WhatsApp 频道 ID
- E16 格式的收件人电话号码
- 图片的 MediaUri
重要
若要向 WhatsApp 用户发送文本消息,WhatsApp 用户必须先向 WhatsApp 企业帐户发送消息。 有关详细信息,请参阅开始在企业和 WhatsApp 用户之间发送消息。
例如,创建 URI:
String mediaUrl = "https://aka.ms/acsicon1";
组装然后发送媒体消息:
// Assemble media message
MediaNotificationContent mediaContent = new MediaNotificationContent(channelRegistrationId, recipientList, mediaUrl);

// Send media message
SendMessageResult mediaMessageResult = notificationClient.send(mediaContent);

// Process result
for (MessageReceipt messageReceipt : mediaMessageResult.getReceipts()) {
    System.out.println("Message sent to:" + messageReceipt.getTo() + " and message id:" + messageReceipt.getMessageId());
}
运行代码
导航到包含 pom.xml 文件的目录,并使用
mvn命令编译该项目。mvn compile通过执行以下
mvn命令运行应用。mvn exec:java -D"exec.mainClass"="com.communication.quickstart.App" -D"exec.cleanupDaemonThreads"="false"
完整示例代码
在 GitHub 上查找此快速入门的最终代码。
先决条件
用于接收消息的活动的 WhatsApp 电话号码
Node.js 活动 LTS 和维护 LTS 版本(建议使用 8.11.1 和 10.14.1)
- 在终端或命令窗口中,运行
node --version以查看是否安装了 Node.js
- 在终端或命令窗口中,运行
设置
若要设置用于发送消息的环境,请执行以下部分中所述的步骤。
创建新的 Node.js 应用程序
打开终端或命令窗口,为应用创建新目录并导航到它,然后运行以下命令。
mkdir advance-messages-quickstart && cd advance-messages-quickstart运行以下命令以使用默认设置创建 package.json 文件。
npm init -y使用文本编辑器在项目根目录中创建名为“send-messages.js”的文件。
将以下代码片段添加到文件 send-messages.js。
async function main() {
    // Quickstart code goes here.
}

main().catch((error) => {
    console.error("Encountered an error while sending message: ", error);
    process.exit(1);
});
在以下部分,你将本快速入门的所有源代码添加到了你创建的 send-messages.js 文件。
安装包
使用 npm install 命令安装适用于 JavaScript 的 Azure 通信服务高级消息传送 SDK。
npm install @azure-rest/communication-messages --save
--save 选项将该库作为 package.json 文件中的依赖项列出。
对象模型
以下类和接口处理适用于 JavaScript 的 Azure 通信服务高级消息传送 SDK 的某些主要功能。
| 名称 | 描述 |
|---|---|
| MessageClient | 此类连接到你的 Azure 通信服务资源。 它会发送消息。 |
| MessageTemplate | 此类定义你为消息使用哪个模板以及模板属性的内容。 |
代码示例
按照以下步骤将必要的代码片段添加到你的 send-messages.js 文件的主函数。
验证客户端
以下代码使用 dotenv 包从名为 COMMUNICATION_SERVICES_CONNECTION_STRING 的环境变量中检索资源的连接字符串。
为简单起见,本快速入门使用连接字符串进行身份验证。 在生产环境中,我们建议使用服务主体。
从 Azure 门户中的 Azure 通信服务资源获取连接字符串。 在左侧,导航到“Keys”选项卡。复制 Primary key 的 Connection string 字段。 连接字符串采用 endpoint=https://{your Azure Communication Services resource name}.communication.azure.com/;accesskey={secret key} 格式。
将环境变量 COMMUNICATION_SERVICES_CONNECTION_STRING 设置为连接字符串的值。
打开控制台窗口并输入以下命令:
setx COMMUNICATION_SERVICES_CONNECTION_STRING "<your connection string>"
有关如何为系统设置环境变量的详细信息,请按照在环境变量中存储连接字符串的步骤操作。
若要实例化 MessageClient,请将以下代码添加到 Main 方法:
const MessageClient = require("@azure-rest/communication-messages").default;

// Set Connection string
const connectionString = process.env["COMMUNICATION_SERVICES_CONNECTION_STRING"];

// Instantiate the client
const client = MessageClient(connectionString);
设置频道注册 ID
频道注册 ID GUID 是在频道注册期间创建的。 可在门户中,访问 Azure 通信服务资源的“频道”选项卡来查找它。
将它分配给名为 channelRegistrationId 的变量。
const channelRegistrationId = "<your channel registration id GUID>";
设置收件人列表
你需要提供一个与 WhatsApp 帐户关联的真实电话号码。 此 WhatsApp 帐户会接收本快速入门中发送的模版、文本和媒体消息。 在本快速入门中,此电话号码可能是你的个人电话号码。
收件人电话号码不能是与 WhatsApp 频道注册关联的业务电话号码(发件人 ID)。 发件人 ID 显示为发送给收件人的文本和媒体消息的发件人。
电话号码应包括国家/地区代码。 有关电话号码格式的详细信息,请查看 WhatsApp 文档中的电话号码格式。
注意
收件人列表中当前仅支持一个电话号码。
创建如下所示的收件人列表:
const recipientList = ["<to WhatsApp phone number>"];
示例:
// Example only
const recipientList = ["+14255550199"];
开始在企业和 WhatsApp 用户之间发送消息
可通过下面两种方式之一发起 WhatsApp Business 帐户与 WhatsApp 用户之间的对话:
- 企业向 WhatsApp 用户发送模板消息。
- WhatsApp 用户向企业号码发送任何消息。
无论对话是如何启动的,在用户向企业发送消息之前,企业只能发送模板消息。只有在用户向企业发送消息后,企业才能在活动对话期间向用户发送文本或媒体消息。 24 小时对话窗口到期后,必须重新发起对话。 若要了解有关对话的详细信息,请访问 WhatsApp Business 平台查看定义。
(选项 1)从企业发起对话 - 发送模板消息
通过发送模板消息来发起对话。
首先,使用模板的值创建 MessageTemplate。
下面显示使用默认模板 sample_template 创建 MessageTemplate。
如果 sample_template 不可用,请跳到选项 2。 对于高级用户,请参阅“模板”页,了解如何使用选项 1 发送其他模板。
消息 SDK 允许 Contoso 将模板化的 WhatsApp 消息发送给 WhatsApp 用户。 若要发送模板消息,需要提供以下详细信息:
- WhatsApp 频道 ID
- E16 格式的收件人电话号码
- 模板详细信息
- 名称(如“sample_template”)
- 语言(如“en_us”)
- 参数(如果有)
// Assemble the template content
const template = {
    name: "sample_template",
    language: "en_US"
};
有关如何组装 MessageTemplate 以及如何创建自己的模板的更多示例,请参阅以下资源:
有关模板的更多 WhatsApp 要求,请查看 WhatsApp Business Platform API 参考:
// Send template message
const templateMessageResult = await client.path("/messages/notifications:send").post({
    contentType: "application/json",
    body: {
        channelRegistrationId: channelRegistrationId,
        to: recipientList,
        kind: "template",
        template: template
    }
});

// Process result
if (templateMessageResult.status === "202") {
    templateMessageResult.body.receipts.forEach((receipt) => {
        console.log("Message sent to:"+receipt.to+" with message id:"+receipt.messageId);
    });
} else {
    throw new Error("Failed to send message");
}
现在,用户需要响应模板消息。 从 WhatsApp 用户帐户,回复从 WhatsApp 企业帐户接收的模板消息。 消息的内容与此场景无关。
重要
收件人必须回复模板消息来发起对话,然后才能将文本或媒体消息传递到收件人。
(选项 2)从用户发起对话
要在 WhatsApp Business 帐户和 WhatsApp 用户之间发起会话,还可以让用户发起会话。 为此,请从 WhatsApp 个人帐户向企业号码发送消息(发件人 ID)。
向 WhatsApp 用户发送文本消息
消息 SDK 允许 Contoso 发送WhatsApp 文本消息,它可发起 WhatsApp 用户启动的会话。 若要发送文本消息,需要提供以下详细信息:
- WhatsApp 频道 ID
- E16 格式的收件人电话号码
- 要发送的消息正文/文本
重要
若要向 WhatsApp 用户发送文本消息,WhatsApp 用户必须先向 WhatsApp 企业帐户发送消息。 有关详细信息,请参阅开始在企业和 WhatsApp 用户之间发送消息。
在此示例中,我们使用“感谢你提供反馈。\n来自通知消息 SDK”文本来回复 WhatsApp 用户。
组装并发送媒体消息:
// Send text message
const textMessageResult = await client.path("/messages/notifications:send").post({
    contentType: "application/json",
    body: {
        channelRegistrationId: channelRegistrationId,
        to: recipientList,
        kind: "text",
        content: "Thanks for your feedback.\n From Notification Messaging SDK"
    }
});

// Process result
if (textMessageResult.status === "202") {
    textMessageResult.body.receipts.forEach((receipt) => {
        console.log("Message sent to:"+receipt.to+" with message id:"+receipt.messageId);
    });
} else {
    throw new Error("Failed to send message");
}
向 WhatsApp 用户发送媒体消息
消息 SDK 允许 Contoso 将 WhatsApp 图片消息发送给 WhatsApp 用户。 若要发送嵌入图片的消息,需要提供以下详细信息:
- WhatsApp 频道 ID
- E16 格式的收件人电话号码
- 图片的 MediaUri
重要
若要向 WhatsApp 用户发送文本消息,WhatsApp 用户必须先向 WhatsApp 企业帐户发送消息。 有关详细信息,请参阅开始在企业和 WhatsApp 用户之间发送消息。
若要发送媒体消息,请提供图像的 URL。 例如,
const url = "https://aka.ms/acsicon1";
组装并发送媒体消息:
// Send media message
const mediaMessageResult = await client.path("/messages/notifications:send").post({
    contentType: "application/json",
    body: {
        channelRegistrationId: channelRegistrationId,
        to: recipientList,
        kind: "image",
        mediaUri: url
    }
});

// Process result
if (mediaMessageResult.status === "202") {
    mediaMessageResult.body.receipts.forEach((receipt) => {
        console.log("Message sent to:"+receipt.to+" with message id:"+receipt.messageId);
    });
} else {
    throw new Error("Failed to send message");
}
运行代码
使用 node 命令运行添加到 send-messages.js 文件中的代码。
node ./send-messages.js
完整示例代码
可以从 GitHub 下载示例应用。
先决条件
用于接收消息的活动的 WhatsApp 电话号码。
适用于操作系统的 Python 3.7+。
设置
创建新的 Python 应用程序
在终端或控制台窗口中,为应用程序创建一个新文件夹并导航到它。
mkdir messages-quickstart && cd messages-quickstart
安装包
需要使用适用于 Python 版本 1.0.0 或更高版本的 Azure 通信消息客户端库。
从控制台指示符中,执行以下命令:
pip install azure-communication-messages
设置应用框架
创建一个名为 messages-quickstart.py 的新文件并添加基本程序结构。
type nul > messages-quickstart.py
基本程序结构
import os

class MessagesQuickstart(object):
    print("Azure Communication Services - Advanced Messages SDK Quickstart")

if __name__ == '__main__':
    messages = MessagesQuickstart()
对象模型
以下类和接口用于处理适用于 Python 的 Azure 通信服务消息 SDK 的某些主要功能。
| 名称 | 描述 |
|---|---|
| NotificationMessagesClient | 此类连接到你的 Azure 通信服务资源。 它会发送消息。 |
| MessageTemplate | 此类定义你为消息使用哪个模板以及模板属性的内容。 |
| TemplateNotificationContent | 此类定义要发送的模板消息的“谁”和“什么”。 |
| TextNotificationContent | 此类定义要发送的文本消息的“谁”和“什么”。 |
| ImageNotificationContent | 此类定义要发送的图片媒体消息的“谁”和“什么”。 |
代码示例
按照以下步骤将必要的代码片段添加到 messages-quickstart.py python 程序。
验证客户端
发送的消息是使用 NotificationMessagesClient 完成的。 NotificationMessagesClient 使用从 Microsoft Azure 门户中的 Azure 通信服务资源获取的连接字符串进行身份验证。 有关连接字符串的详细信息,请参阅访问连接字符串和服务终结点。
从 Microsoft Azure 门户获取 Azure 通信资源连接字符串,如屏幕截图中所示。在左侧,导航到“Keys”选项卡。复制主键的 Connection string 字段。 连接字符串采用 endpoint=https://{your Azure Communication Services resource name}.communication.azure.com/;accesskey={secret key} 格式。
将环境变量 COMMUNICATION_SERVICES_CONNECTION_STRING 设置为连接字符串的值。
打开控制台窗口并输入以下命令:
setx COMMUNICATION_SERVICES_CONNECTION_STRING "<your connection string>"
添加环境变量后,可能需要重启任何正在运行的、需要读取环境变量的程序(包括控制台窗口)。 例如,如果使用 Visual Studio 作为编辑器,请在运行示例之前重启 Visual Studio。
有关如何为系统设置环境变量的详细信息,请按照在环境变量中存储连接字符串的步骤操作。
    # Get a connection string to our Azure Communication Services resource.
    connection_string = os.getenv("COMMUNICATION_SERVICES_CONNECTION_STRING")

    def send_template_message(self):
        from azure.communication.messages import NotificationMessagesClient

        # Create NotificationMessagesClient Client
        messaging_client = NotificationMessagesClient.from_connection_string(self.connection_string)
设置频道注册 ID
频道注册 ID GUID 是在频道注册期间创建的。 可在门户中,访问 Azure 通信服务资源的“频道”选项卡来查找它。
将它分配给名为 channelRegistrationId 的变量。
channelRegistrationId = os.getenv("WHATSAPP_CHANNEL_ID_GUID")
设置收件人列表
你需要提供一个与 WhatsApp 帐户关联的真实电话号码。 此 WhatsApp 帐户会接收本快速入门中发送的模版、文本和媒体消息。 在本快速入门中,此电话号码可能是你的个人电话号码。
收件人电话号码不能是与 WhatsApp 频道注册关联的业务电话号码(发件人 ID)。 发件人 ID 显示为发送给收件人的文本和媒体消息的发件人。
电话号码应包括国家/地区代码。 有关电话号码格式的详细信息,请查看 WhatsApp 文档中的电话号码格式。
注意
收件人列表中当前仅支持一个电话号码。
设置如下所示的收件人列表:
phone_number = os.getenv("RECIPIENT_WHATSAPP_PHONE_NUMBER")
用例:
    # Example only
    to=[self.phone_number],
开始在企业和 WhatsApp 用户之间发送消息
可通过下面两种方式之一发起 WhatsApp Business 帐户与 WhatsApp 用户之间的对话:
- 企业向 WhatsApp 用户发送模板消息。
- WhatsApp 用户向企业号码发送任何消息。
无论对话是如何启动的,在用户向企业发送消息之前,企业只能发送模板消息。只有在用户向企业发送消息后,企业才能在活动对话期间向用户发送文本或媒体消息。 24 小时对话窗口到期后,必须重新发起对话。 若要了解有关对话的详细信息,请访问 WhatsApp Business 平台查看定义。
(选项 1)从企业发起对话 - 发送模板消息
通过发送模板消息来发起对话。
首先,使用模板的值创建 MessageTemplate。
下面显示使用默认模板 sample_template 创建 MessageTemplate。
如果 sample_template 不可用,请跳到选项 2。 对于高级用户,请参阅“模板”页,了解如何使用选项 1 发送其他模板。
消息 SDK 允许 Contoso 将模板化的 WhatsApp 消息发送给 WhatsApp 用户。 若要发送模板消息,需要提供以下详细信息:
- WhatsApp 频道 ID
- E16 格式的收件人电话号码
- 模板详细信息
- 名称(如“sample_template”)
- 语言(如“en_us”)
- 参数(如果有)
有关如何组装 MessageTemplate 以及如何创建自己的模板的更多示例,请参阅以下资源:
有关模板的更多 WhatsApp 要求,请查看 WhatsApp Business Platform API 参考:
若要发送 WhatsApp 模板消息,请在 send_template_message(self) 函数中添加以下代码。
        input_template: MessageTemplate = MessageTemplate(
            name="<<template_name>>",
            language="<<template_language>>")
        template_options = TemplateNotificationContent(
            channel_registration_id=self.channelRegistrationId,
            to=[self.phone_number],
            template=input_template
        )

        # calling send() with whatsapp template details
        message_responses = messaging_client.send(template_options)
        response = message_responses.receipts[0]

        if (response is not None):
            print("WhatsApp Templated Message with message id {} was successfully sent to {}."
            .format(response.message_id, response.to))
        else:
            print("Message failed to send")
向 main 方法添加 send_template_message() 调用。
    # Calling send_template_message()
    messages.send_template_message()
现在,用户需要响应模板消息。 从 WhatsApp 用户帐户,回复从 WhatsApp 企业帐户接收的模板消息。 消息的内容与此场景无关。
重要
收件人必须回复模板消息来发起对话,然后才能将文本或媒体消息传递到收件人。
(选项 2)从用户发起对话
要在 WhatsApp Business 帐户和 WhatsApp 用户之间发起会话,还可以让用户发起会话。 为此,请从 WhatsApp 个人帐户向企业号码发送消息(发件人 ID)。
向 WhatsApp 用户发送文本消息
消息 SDK 允许 Contoso 发送WhatsApp 文本消息,它可发起 WhatsApp 用户启动的会话。 若要发送文本消息,需要提供以下详细信息:
- WhatsApp 频道 ID
- E16 格式的收件人电话号码
- 要发送的消息正文/文本
重要
若要向 WhatsApp 用户发送文本消息,WhatsApp 用户必须先向 WhatsApp 企业帐户发送消息。 有关详细信息,请参阅开始在企业和 WhatsApp 用户之间发送消息。
在此示例中,我们使用“感谢你提供反馈。\n来自通知消息 SDK”文本来回复 WhatsApp 用户。
    def send_text_message(self):
        from azure.communication.messages import NotificationMessagesClient
        from azure.communication.messages.models import ( TextNotificationContent)

        # Create NotificationMessagesClient Client
        messaging_client = NotificationMessagesClient.from_connection_string(self.connection_string)
        text_options = TextNotificationContent (
            channel_registration_id=self.channelRegistrationId,
            to= [self.phone_number],
            content="Thanks for your feedback.\n From Notification Messaging SDK",
        )

        # calling send() with whatsapp message details
        message_responses = messaging_client.send(text_options)
        response = message_responses.receipts[0]

        if (response is not None):
            print("WhatsApp Text Message with message id {} was successfully sent to {}."
            .format(response.message_id, response.to))
        else:
            print("Message failed to send")
更新 main 方法以运行 send_text_message()
    #Calling send_text_message()
    messages.send_text_message()
向 WhatsApp 用户发送媒体消息
消息 SDK 允许 Contoso 将 WhatsApp 图片消息发送给 WhatsApp 用户。 若要发送嵌入图片的消息,需要提供以下详细信息:
- WhatsApp 频道 ID
- E16 格式的收件人电话号码
- 图片的 MediaUri
重要
若要向 WhatsApp 用户发送文本消息,WhatsApp 用户必须先向 WhatsApp 企业帐户发送消息。 有关详细信息,请参阅开始在企业和 WhatsApp 用户之间发送消息。
发送 WhatsApp 媒体消息时使用的 media_uri 示例。
input_media_uri: str = "https://aka.ms/acsicon1"
    def send_image_message(self):
        from azure.communication.messages import NotificationMessagesClient
        from azure.communication.messages.models import ( ImageNotificationContent)

        # Create NotificationMessagesClient Client
        messaging_client = NotificationMessagesClient.from_connection_string(self.connection_string)
        input_media_uri: str = "https://aka.ms/acsicon1"
        image_message_options = ImageNotificationContent(
            channel_registration_id=self.channelRegistrationId,
            to=[self.phone_number],
            media_uri=input_media_uri
        )

        # calling send() with whatsapp image message
        message_responses = messaging_client.send(image_message_options)
        response = message_responses.receipts[0]

        if (response is not None):
            print("WhatsApp Image containing Message with message id {} was successfully sent to {}"
            .format(response.message_id, response.to))
        else:
            print("Message failed to send")
更新 main 方法以运行 send_image_message()
    # Calling send_image_message()
    messages.send_image_message()
运行代码
若要运行代码,请确保你位于 messages-quickstart.py 文件所在的目录中。
python messages-quickstart.py
Azure Communication Services - Advanced Messages Quickstart
WhatsApp Templated Message with message id <<GUID>> was successfully sent to <<ToRecipient>>
WhatsApp Text Message with message id <<GUID>> was successfully sent to <<ToRecipient>>
WhatsApp Image containing Message with message id <<GUID>> was successfully sent to <<ToRecipient>>
完整示例代码
import os

class MessagesQuickstart(object):
    print("Azure Communication Services - Advanced Messages SDK Quickstart using connection string.")
    # Advanced Messages SDK implementations goes in this section.

    connection_string = os.getenv("COMMUNICATION_SERVICES_CONNECTION_STRING")
    phone_number = os.getenv("RECIPIENT_PHONE_NUMBER")
    channelRegistrationId = os.getenv("WHATSAPP_CHANNEL_ID")

    def send_template_message(self):
        from azure.communication.messages import NotificationMessagesClient
        from azure.communication.messages.models import ( TemplateNotificationContent , MessageTemplate )

        # client creation
        messaging_client = NotificationMessagesClient.from_connection_string(self.connection_string)
        input_template: MessageTemplate = MessageTemplate(
            name="<<TEMPLATE_NAME>>",
            language="<<LANGUAGE>>")
        template_options = TemplateNotificationContent(
            channel_registration_id=self.channelRegistrationId,
            to=[self.phone_number],
            template=input_template
        )

        # calling send() with WhatsApp template details.
        message_responses = messaging_client.send(template_options)
        response = message_responses.receipts[0]

        if (response is not None):
            print("WhatsApp Templated Message with message id {} was successfully sent to {}"
            .format(response.message_id, response.to))
        else:
            print("Message failed to send")

    def send_text_message(self):
        from azure.communication.messages import NotificationMessagesClient
        from azure.communication.messages.models import ( TextNotificationContent )

        # client creation
        messaging_client = NotificationMessagesClient.from_connection_string(self.connection_string)

        text_options = TextNotificationContent (
            channel_registration_id=self.channelRegistrationId,
            to= [self.phone_number],
            content="Hello World via ACS Advanced Messaging SDK.",
        )

        # calling send() with WhatsApp message details
        message_responses = messaging_client.send(text_options)
        response = message_responses.receipts[0]

        if (response is not None):
            print("WhatsApp Text Message with message id {} was successfully sent to {}"
            .format(response.message_id, response.to))
        else:
            print("Message failed to send")

    def send_image_message(self):
        from azure.communication.messages import NotificationMessagesClient
        from azure.communication.messages.models import ( ImageNotificationContent)

        # Create NotificationMessagesClient Client
        messaging_client = NotificationMessagesClient.from_connection_string(self.connection_string)
        input_media_uri: str = "https://aka.ms/acsicon1"
        image_message_options = ImageNotificationContent(
            channel_registration_id=self.channelRegistrationId,
            to=[self.phone_number],
            media_uri=input_media_uri
        )

        # calling send() with whatsapp image message
        message_responses = messaging_client.send(image_message_options)
        response = message_responses.receipts[0]

        if (response is not None):
            print("WhatsApp Image containing Message with message id {} was successfully sent to {}"
            .format(response.message_id, response.to))
        else:
            print("Message failed to send")

if __name__ == '__main__':
    messages = MessagesQuickstart()
    messages.send_template_message()
    messages.send_text_message()
    messages.send_image_message()
其他示例
可以在 GitHub 上查看和下载 Python 消息 SDK 的其他示例代码。
后续步骤
在本快速入门中,你尝试了 WhatsApp SDK 的高级消息传送功能。 接下来,你可能需要查看以下文章:
反馈
即将发布:在整个 2024 年,我们将逐步淘汰作为内容反馈机制的“GitHub 问题”,并将其取代为新的反馈系统。 有关详细信息,请参阅:https://aka.ms/ContentUserFeedback。
提交和查看相关反馈