你当前正在访问 Microsoft Azure Global Edition 技术文档网站。 如果需要访问由世纪互联运营的 Microsoft Azure 中国技术文档网站,请访问 https://docs.azure.cn。
本文介绍预发电子邮件分析,该分析使用 Azure AI 检测敏感数据和不当内容。
Azure 通信服务电子邮件使组织能够使用其应用程序向客户发送大量消息。 本教程介绍如何使用 Azure AI 确保消息在发送之前准确反映企业的品牌和声誉。 Azure AI 提供相应服务来分析你的电子邮件内容中的敏感数据,并识别不当内容。
以下部分介绍如何使用 Azure AI 文本分析来检查敏感数据和 Azure AI 内容安全以识别不适当的文本内容。 在使用 Azure 通信服务发送电子邮件之前,请使用这些功能检查你的内容。
先决条件
需要完成这些快速入门才能设置 Azure AI 资源:
先决条件检查
在终端或命令窗口中,运行 dotnet 命令来查看是否安装了 .NET 客户端。
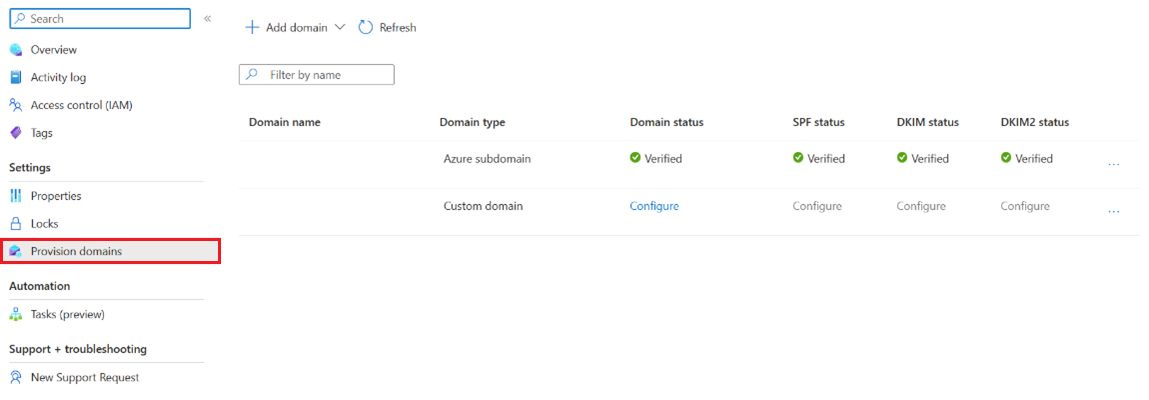
reg query "HKEY_LOCAL_MACHINE\SOFTWARE\Microsoft\NET Framework Setup\NDP"查看与你的电子邮件通信服务资源关联的子域。 登录到 Azure 门户。 找到你的电子邮件通信服务资源。 打开左侧导航窗格上的“预配域”。
注意
确保你计划用于发送电子邮件的电子邮件子域在你的电子邮件通信资源中已验证。 有关详细信息,请参阅快速入门:如何添加自定义的已验证电子邮件域。
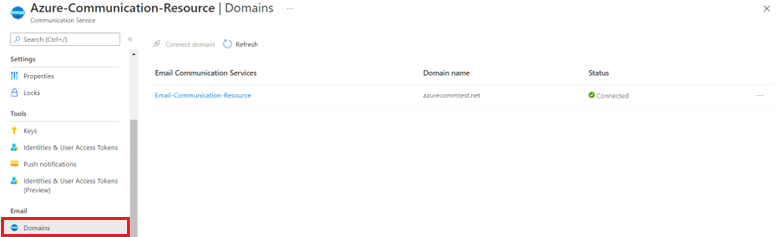
查看连接到你的 Azure 通信服务资源的域。 登录到 Azure 门户。 找到你的 Azure 通信服务资源。 打开左侧导航窗格上的“电子邮件”“域”。>
注意
使用资源发送电子邮件之前,验证的自定义子域必须与 Azure 通信服务资源连接。 有关详细信息,请参阅快速入门:如何连接已验证的电子邮件域。
新建 C# 应用程序
本部分介绍了如何创建新的 C# 应用程序、安装所需的包和创建 Main 函数。
在控制台窗口(例如 cmd、PowerShell 或 Bash)中,使用
dotnet new命令创建名为EmailPreCheck的新控制台应用。 此命令将创建包含单个源文件的简单“Hello World”C# 项目:Program.cs。dotnet new console -o EmailPreCheck将目录更改为新建的
EmailPreCheck应用文件夹,并使用dotnet build命令编译应用程序。cd EmailPreCheckdotnet build
安装所需程序包
从应用程序目录中,使用 dotnet add package 命令安装适用于 .NET 包的 Azure 通信服务电子邮件客户端和 Azure AI 库。
dotnet add package Azure.Communication.Email
dotnet add package Azure.AI.TextAnalytics
dotnet add package Microsoft.Azure.CognitiveServices.ContentModerator
dotnet add package Azure.AI.ContentSafety
创建 Main 函数
打开 Program.cs 并将现有内容替换为以下代码。
using 指令包括 Azure.Communication.Email 和 Azure.AI namespaces。 其余代码概述了程序的 SendMail 函数。
using System;
using System.Collections.Generic;
using System.Threading;
using System.Threading.Tasks;

using Azure;
using Azure.Communication.Email;
using Azure.AI.TextAnalytics;
using Azure.AI.ContentSafety;
namespace SendEmail
{
  internal class Program
  {
    static async Task Main(string[] args)    {
	// Authenticate and create the Azure Communication Services email client

	// Set sample content

    // Pre-check for sensitive data and inappropriate content

	// Send Email
    }
  }
}
添加用于检查敏感数据的函数
创建一个新函数,用于分析电子邮件主题和正文中的敏感数据,例如社会安全号码和信用卡号。
private static async Task<bool> AnalyzeSensitiveData(List<string> documents)
{
// Client authentication goes here


// Function implementation goes here

}
创建具有身份验证功能的文本分析客户端
创建使用文本分析客户端的一个新函数,该函数还检索你的连接信息。 将以下代码添加到 AnalyzeSensitiveData 函数中,以便从名为 LANGUAGE_KEY 和 LANGUAGE_ENDPOINT 的环境变量中检索资源的连接密钥和终结点。 它还会创建新的 TextAnalyticsClient 和 AzureKeyCredential 变量。 有关管理文本分析连接信息的详细信息,请参阅快速入门:检测个人身份信息 (PII) > 获取密钥和终结点。
// This example requires environment variables named "LANGUAGE_KEY" and "LANGUAGE_ENDPOINT"
string languageKey = Environment.GetEnvironmentVariable("LANGUAGE_KEY");
string languageEndpoint = Environment.GetEnvironmentVariable("LANGUAGE_ENDPOINT");
var client = new TextAnalyticsClient(new Uri(languageEndpoint), new AzureKeyCredential(languageKey));
检查内容中是否有敏感数据
循环访问内容以检查是否存在任何敏感数据。 以 false 为基线启动敏感度检查。 如果找到敏感数据,则返回 true。
将以下代码添加到 AnalyzeSensitiveData 函数中,并将其置于创建 TextAnalyticsClient 变量的行后面。
bool sensitiveDataDetected = false;  // we start with a baseline that of no sensitive data
var actions = new TextAnalyticsActions
{
    RecognizePiiEntitiesActions = new List<RecognizePiiEntitiesAction> { new RecognizePiiEntitiesAction() }
};

var operation = await client.StartAnalyzeActionsAsync(documents, actions);
await operation.WaitForCompletionAsync();

await foreach (var documentResults in operation.Value)
{
    foreach (var actionResult in documentResults.RecognizePiiEntitiesResults)
    {
        if (actionResult.HasError)
        {
            Console.WriteLine($"Error: {actionResult.Error.ErrorCode} - {actionResult.Error.Message}");

        }
        else
        {
            foreach (var document in actionResult.DocumentsResults)
            {
                foreach (var entity in document.Entities)
                {
                    if (document.Entities.Count > 0)
                    {
                        sensitiveDataDetected = true; // Sensitive data detected
                    }

                }
            }
        }

    }
}
return sensitiveDataDetected;
添加用于检查不当内容的函数
创建另一个新函数来分析电子邮件主题和正文中的不当内容,例如仇恨或暴力。
static async Task<bool> AnalyzeInappropriateContent(List<string> documents)
{
// Client authentication goes here

// Function implementation goes here
}
创建具有身份验证功能的内容安全客户端
创建使用内容安全客户端的一个新函数,该函数还检索你的连接信息。 将以下代码添加到 AnalyzeInappropriateContent 函数中,以便从名为 CONTENT_LANGUAGE_KEY 和 CONTENT_LANGUAGE_ENDPOINT 的环境变量中检索资源的连接密钥和终结点。 它还创建一个新的 ContentSafetyClient 变量。 如果你使用同一 Azure AI 实例进行文本分析,则这些值保持不变。 有关管理内容安全连接信息的详细信息,请参阅快速入门:创建内容安全资源。
// This example requires environment variables named "CONTENT_LANGUAGE_KEY" and "CONTENT_LANGUAGE_ENDPOINT"
 string contentSafetyLanguageKey = Environment.GetEnvironmentVariable("CONTENT_LANGUAGE_KEY");
string contentSafetyEndpoint = Environment.GetEnvironmentVariable("CONTENT_LANGUAGE_ENDPOINT");
var client = new ContentSafetyClient(new Uri(contentSafetyEndpoint), new AzureKeyCredential(contentSafetyLanguageKey));
检查是否存在不当内容
循环访问内容以检查是否存在任何不当内容。 以 false 为基线启动不当内容检测。 如果找到不当内容,则返回 true。
将以下代码添加到 AnalyzeInappropriateContent 函数中,并将其置于创建 ContentSafetyClient 变量的行后面。
bool inappropriateTextDetected = false;
foreach (var document in documents)
{
    var options = new AnalyzeTextOptions(document);
    AnalyzeTextResult response = await client.AnalyzeTextAsync(options);
    // Check the response
    if (response != null)
    {
        // Access the results from the response
        foreach (var category in response.CategoriesAnalysis)
        {
            if (category.Severity > 2) // Severity: 0=safe, 2=low, 4=medium, 6=high
            {
                inappropriateTextDetected = true;
            }
        }
    }
    else
    {
        Console.WriteLine("Failed to analyze content.");
    }
}
return inappropriateTextDetected; // No inappropriate content detected
更新 Main 函数以运行预检查并发送电子邮件
你已添加了用于检查是否存在敏感数据和不当内容的两个函数,现在,可以在通过 Azure 通信服务发送电子邮件之前调用它们。
创建电子邮件客户端并对其进行身份验证
你有多个选项可用于对电子邮件客户端进行身份验证。 此示例从环境变量中提取连接字符串。
在编辑器中打开 Program.cs。 将以下代码添加到 Main 函数的正文,以使用连接字符串初始化 EmailClient。 此代码从名为 COMMUNICATION_SERVICES_CONNECTION_STRING 的环境变量中检索资源的连接字符串。 有关管理资源连接字符串的详细信息,请参阅快速入门:创建和管理通信服务资源 > 存储连接字符串。
// This code shows how to fetch your connection string from an environment variable.
string connectionString = Environment.GetEnvironmentVariable("COMMUNICATION_SERVICES_CONNECTION_STRING");
EmailClient emailClient = new EmailClient(connectionString);
添加示例内容
将示例电子邮件内容添加到 Main 函数中,并将其置于创建电子邮件客户端的行后面。
你需要获取发件人电子邮件地址。 有关 Azure 通信服务电子邮件域的详细信息,请参阅快速入门:如何将 Azure 托管域添加到电子邮件通信服务。
修改收件人电子邮件地址变量。
将主题和消息正文放入 List<string>,供这两个内容检查函数使用。
//Set sample content
var sender = "donotreply@xxxxxxxx-xxxx-xxxx-xxxx-xxxxxxxxxxxx.azurecomm.net"; // get the send email from your email resource in the Azure Portal
var recipient = "emailalias@contoso.com"; // modify the recipient
var subject = "Precheck Azure Communication Service Email with Azure AI";
var htmlContent = "<html><body><h1>Precheck email test</h1><br/><h4>This email message is sent from Azure Communication Service Email. </h4>";
htmlContent += "<p> My SSN is 123-12-1234.  My Credit Card Number is: 1234 4321 5678 8765.  My address is 1011 Main St, Redmond, WA, 998052 </p>";
htmlContent += "<p>A 51-year-old man was found dead in his car. There were blood stains on the dashboard and windscreen.";
htmlContent += "At autopsy, a deep, oblique, long incised injury was found on the front of the neck. It turns out that he died by suicide.</p>";
htmlContent += "</body></html>";
List<string> documents = new List<string> { subject, htmlContent };
发送电子邮件前预先检查内容
你需要调用这两个函数来查找违规项,并使用结果来确定是否发送电子邮件。 将以下代码添加到 Main 函数中,并将其置于示例内容之后。
// Pre-Check content
bool containsSensitiveData = await AnalyzeSensitiveData(documents);
bool containsInappropriateContent = await AnalyzeInappropriateContent(documents);

// Send email only if not sensitive data or inappropriate content is detected
if (containsSensitiveData == false && containsInappropriateContent == false)
{

    /// Send the email message with WaitUntil.Started
    EmailSendOperation emailSendOperation = await emailClient.SendAsync(
        Azure.WaitUntil.Started,
        sender,
        recipient,
        subject,
        htmlContent);

    /// Call UpdateStatus on the email send operation to poll for the status manually
    try
    {
        while (true)
        {
            await emailSendOperation.UpdateStatusAsync();
            if (emailSendOperation.HasCompleted)
            {
                break;
            }
            await Task.Delay(100);
        }

        if (emailSendOperation.HasValue)
        {
            Console.WriteLine($"Email queued for delivery. Status = {emailSendOperation.Value.Status}");
        }
    }
    catch (RequestFailedException ex)
    {
        Console.WriteLine($"Email send failed with Code = {ex.ErrorCode} and Message = {ex.Message}");
    }

    /// Get the OperationId so that it can be used for tracking the message for troubleshooting
    string operationId = emailSendOperation.Id;
    Console.WriteLine($"Email operation id = {operationId}");
}
else
{
    Console.WriteLine("Sensitive data and/or inappropriate content detected, email not sent\n\n");
}
后续步骤
- 详细了解 Azure 通信服务。
- 详细了解 Azure AI Foundry。