你当前正在访问 Microsoft Azure Global Edition 技术文档网站。 如果需要访问由世纪互联运营的 Microsoft Azure 中国技术文档网站,请访问 https://docs.azure.cn。
适用于:Azure Stack Edge Pro - GPU对于 Pro 2 SKU 是必需的Azure Stack Edge Pro 2对于 Pro R SKU 是必需的Azure Stack Edge Pro R对于 Mini R SKU 是必需的Azure Stack Edge Mini RYes for Mini R SKU
你可以使用 Azure 门户、模板、Azure PowerShell cmdlet 以及通过 Azure CLI 或 Python 脚本在 Azure Stack Edge Pro GPU 设备上创建和管理虚拟机 (VM)。 本文介绍了如何使用 Azure 门户在 Azure Stack Edge Pro GPU 设备上创建和管理 VM。
重要
需要为管理从云中部署在设备上的 VM 和映像的用户启用多重身份验证。 如果用户未启用多重身份验证,则云作会失败。 有关启用多重身份验证的步骤,请参阅启用Microsoft Entra 多重身份验证。
VM 部署工作流
下面是此部署工作流的基本摘要信息:
在 Azure Stack Edge 设备上启用计算网络接口。 此步骤将在指定的网络接口上创建一个虚拟交换机。
通过 Azure 门户启用 VM 的云管理。
使用 Azure 存储资源管理器将 VHD 上传到 Azure 存储帐户。
使用上传的 VHD 将 VHD 下载到设备上,然后从 VHD 创建 VM 映像。
使用在前面的步骤中创建的服务:
- 所创建的 VM 映像。
- 与已启用计算网络接口关联的虚拟交换机。
- 与虚拟交换机关联的子网。
并创建或指定以下内联资源:
- VM 名称,为 VM 选择支持的 VM 大小和登录凭据。
- 创建新的数据磁盘或附加现有的数据磁盘。
- 为 VM 配置静态或动态 IP。 如果提供静态 IP,请在已启用计算网络接口的子网范围中选择一个可用 IP。
使用上述资源创建 VM。
先决条件
在开始通过 Azure 门户在设备上创建和管理 VM 之前,请确保:
按照 步骤 1:配置 Azure Stack Edge Pro GPU 设备中所述,在 Azure Stack Edge Pro GPU 设备上完成网络设置。
你启用计算网络接口。 此网络接口 IP 用于为 VM 部署创建虚拟交换机。 在设备的本地 UI 中,转到“计算”。 选择用于创建虚拟交换机的网络接口。
重要
只能为计算配置一个端口。
在网络接口上启用计算。 Azure Stack Edge Pro GPU 创建并管理与该网络接口相对应的虚拟交换机。
你有权访问 Windows VHD 或 Linux VHD,你使用该 VHD 为你打算创建的 VM 创建 VM 映像。
部署 VM
按照以下步骤在 Azure Stack Edge Pro GPU 设备上创建 VM。
添加 VM 映像
将 VHD 上传到 Azure 存储帐户。 请按照使用存储资源管理器进行上传中的步骤操作。
有关准备 VHD 的信息,请参阅从 Windows VHD 准备通用化映像。
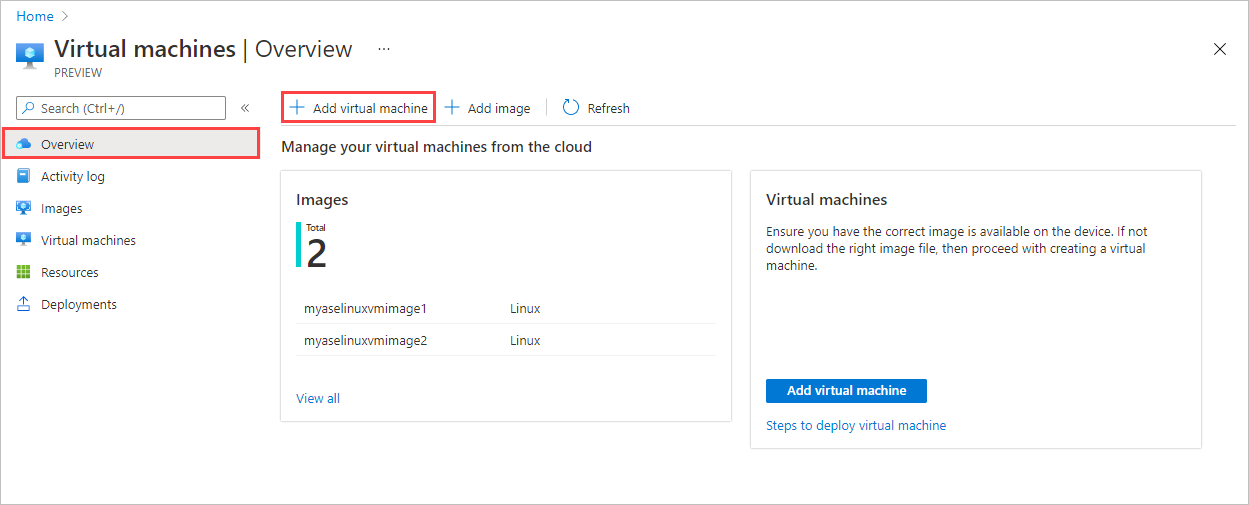
在 Azure 门户中,转到设备的 Azure Stack Edge 资源。 然后转到“Edge 服务”“虚拟机”。>
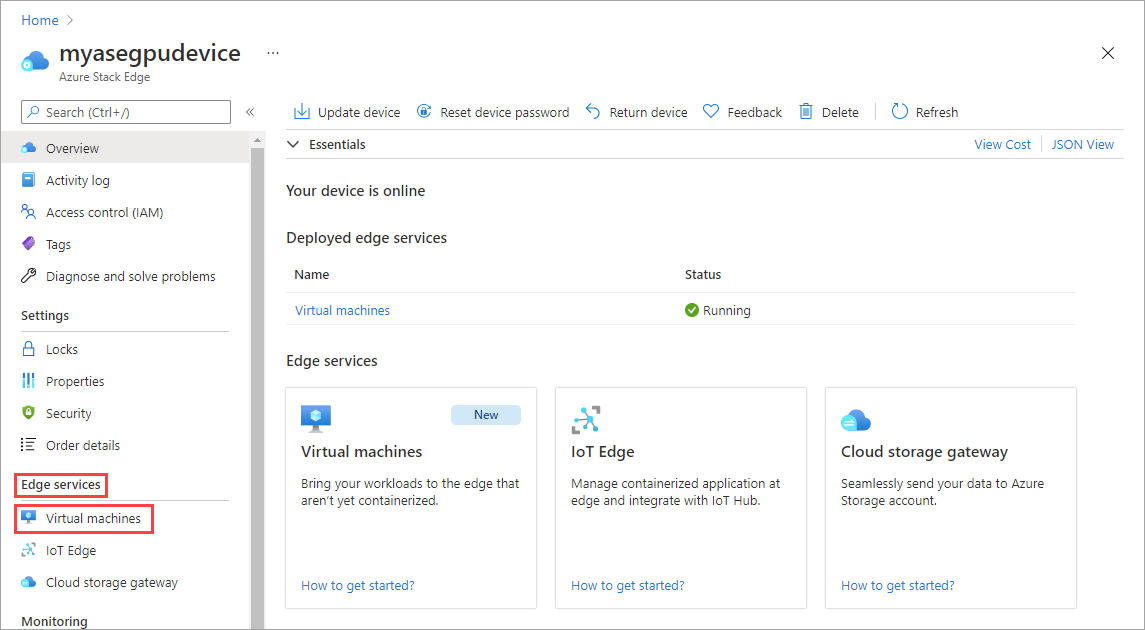
在“ 概述 ”页上,选择“ 启用 ”以启用虚拟机云管理。

第一步是添加 VM 映像。 已在前面的步骤中将 VHD 上传到存储帐户。 使用此 VHD 创建 VM 映像。
选择“+ 添加映像”,从存储帐户下载 VHD,并将其添加到设备中。 下载过程需要几分钟时间,具体取决于 VHD 的大小和用于下载的 Internet 带宽。
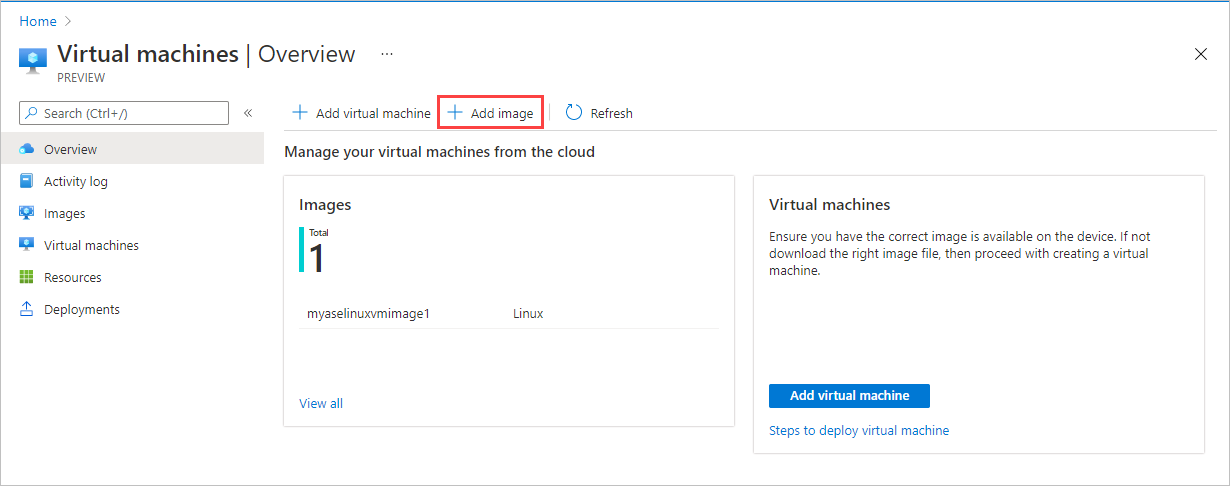
在“添加映像”窗格中,输入以下字段条目。 然后选择“添加”。
字段 说明 从存储 blob 下载 浏览到你上传 VHD 的存储账户中存储 blob 的位置。 下载到 自动设置为将要部署 VM 的当前设备。 Edge 资源组 选择要将映像添加到的资源组。 将映像另存为 将要从 VHD(该 VHD 已上传至存储帐户)创建的 VM 映像名称。 OS 类型 选择 Windows 或 Linux 作为 VHD 的操作系统,你使用此 VHD 创建 VM 映像。 VM 生成 选择第 1 代或第 2 代作为您用于创建虚拟机的映像版本。 对于第 2 代 VM,默认启用安全启动。 
随即将下载 VHD 并创建 VM 映像。 映像创建过程需要几分钟时间才能完成。 会看到 VM 映像成功完成的通知。
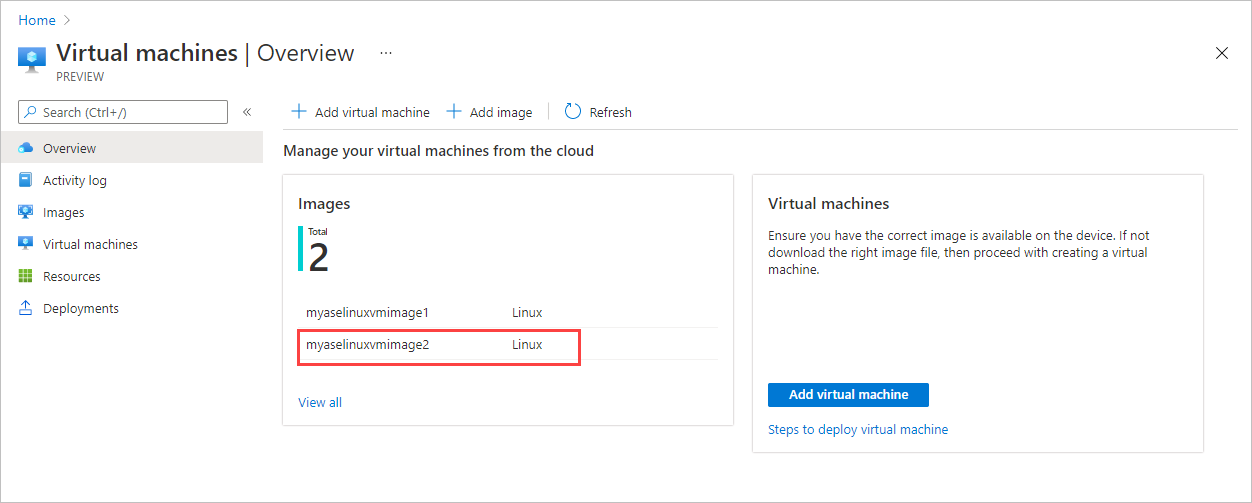
成功创建的 VM 映像将添加到“映像”窗格的映像列表中。
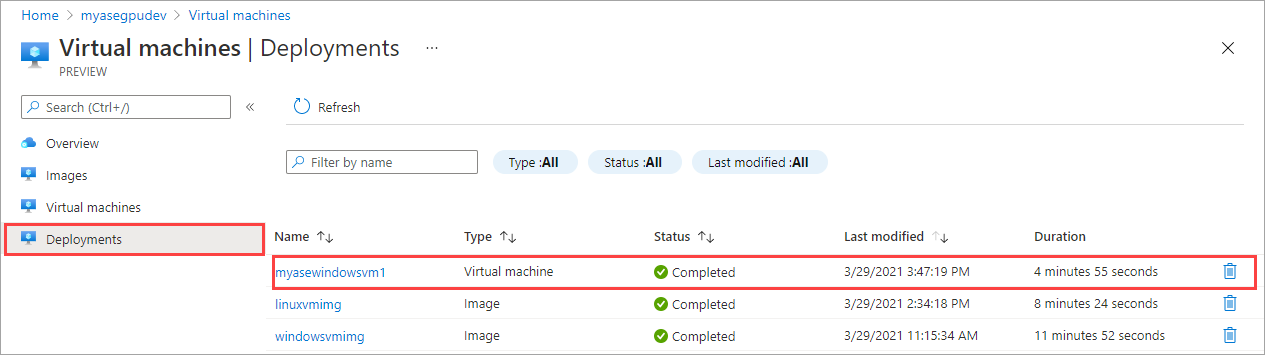
“部署”窗格将更新以指示部署状态。
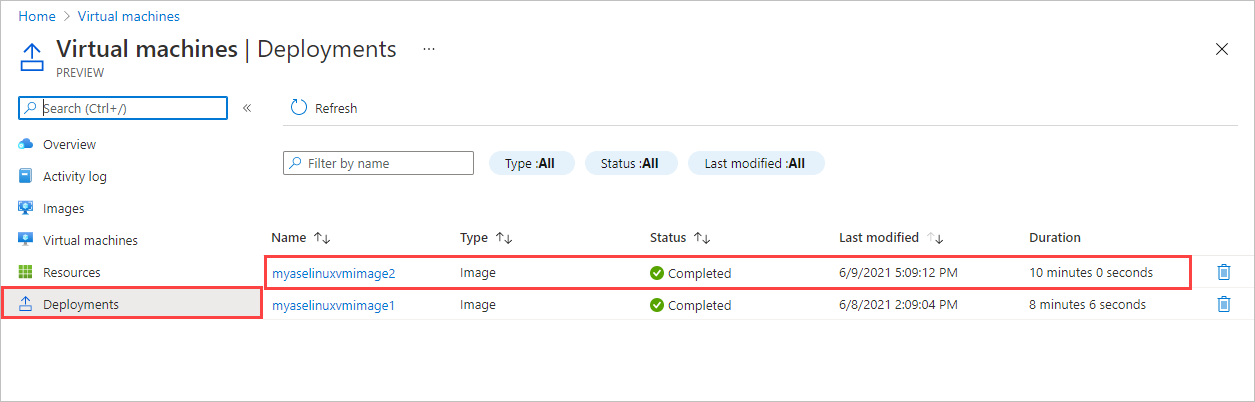
新添加的映像也将显示在“概述”页中。

添加 VM
创建 VM 映像后,请按照以下步骤创建 VM。
在“概述”页中找到“虚拟机”,然后选择“+ 添加虚拟机”。
在“基本信息”选项卡中,输入以下参数。
参数 说明 虚拟机名称 输入新虚拟机的名称。 Edge 资源组 为与 VM 关联的所有资源创建新的资源组。 映像 从设备上提供的 VM 映像中进行选择。 大小 从支持的 VM 大小中进行选择。
对于 GPU VM,请选择 NCasT4-v3 系列中的 VM 大小。用户名 使用管理员的默认用户名“azureuser”登录到 VM。 身份验证类型 可选择 SSH 公钥或用户定义密码。 SSH 公钥 选择 SSH 公钥身份验证类型时显示。 粘贴 SSH 公钥。 密码 选择密码身份验证类型时显示。 输入密码以登录到 VM。 密码必须至少 12 个字符长,且符合定义的复杂性要求。 确认密码 再次输入密码。 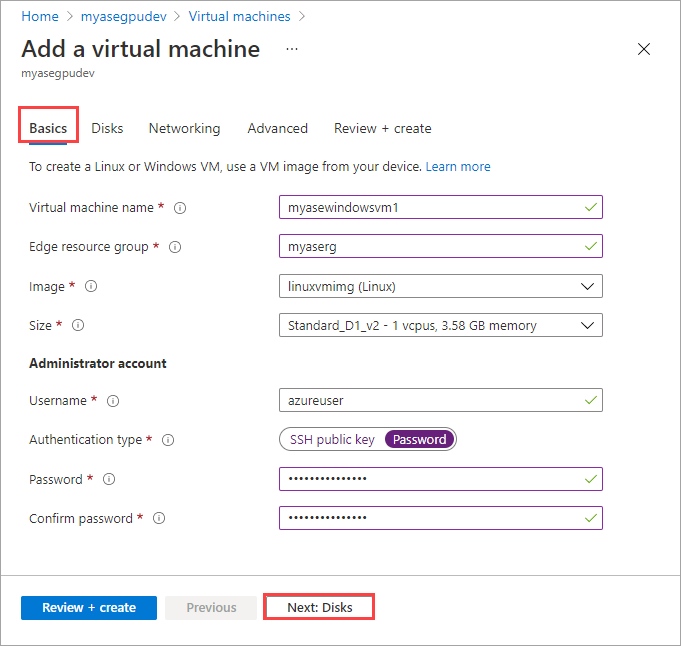
在完成时选择“下一步:磁盘” 。
在“ 磁盘 ”选项卡上,将磁盘附加到 VM。
你可以选择“创建并附加新磁盘”或“附加现有磁盘”。
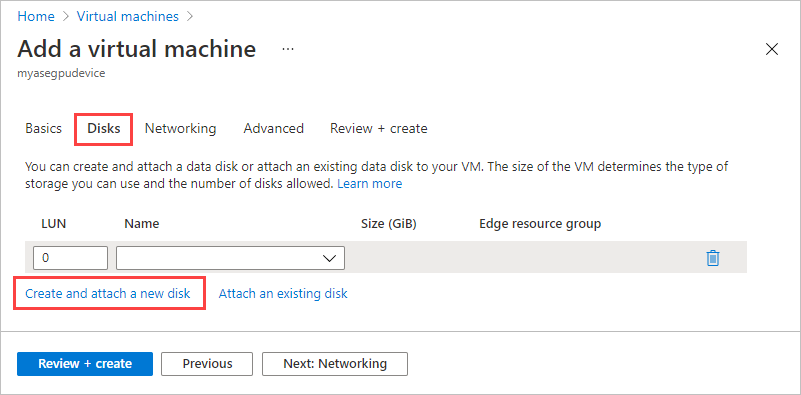
选择“创建并附加新磁盘”。 在“创建新磁盘”窗格中,提供磁盘的名称和大小 (GiB)。
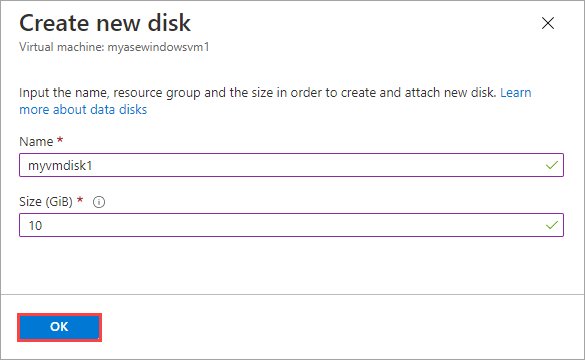
重复上述过程,添加更多磁盘。 创建的磁盘会显示在“磁盘”选项卡中。选择“下一步:网络”。
在“ 网络 ”选项卡上,为 VM 配置网络连接。
参数 说明 虚拟网络 如果在网络接口上启用了计算,请从下拉列表中选择在 Azure Stack Edge 设备上创建的虚拟交换机。 子网 此字段将自动填充与启用了计算的网络接口关联的子网。 IP 地址 为 VM 提供静态或动态 IP。 静态 IP 应该是指定子网范围内可用的空闲 IP。 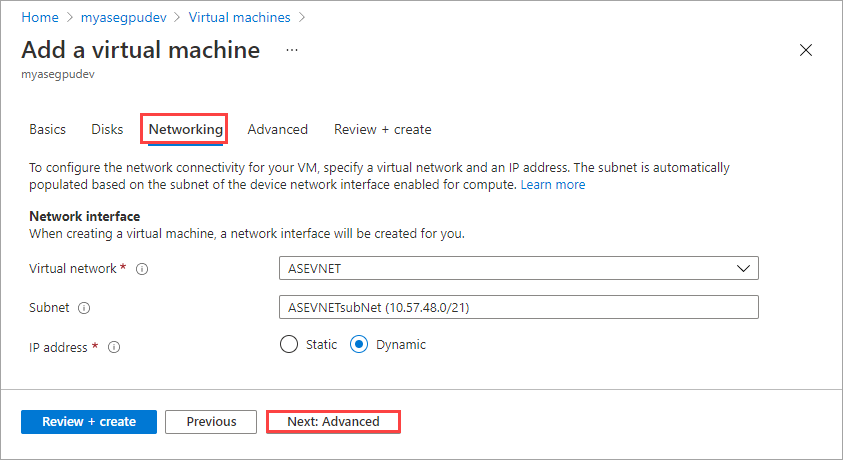
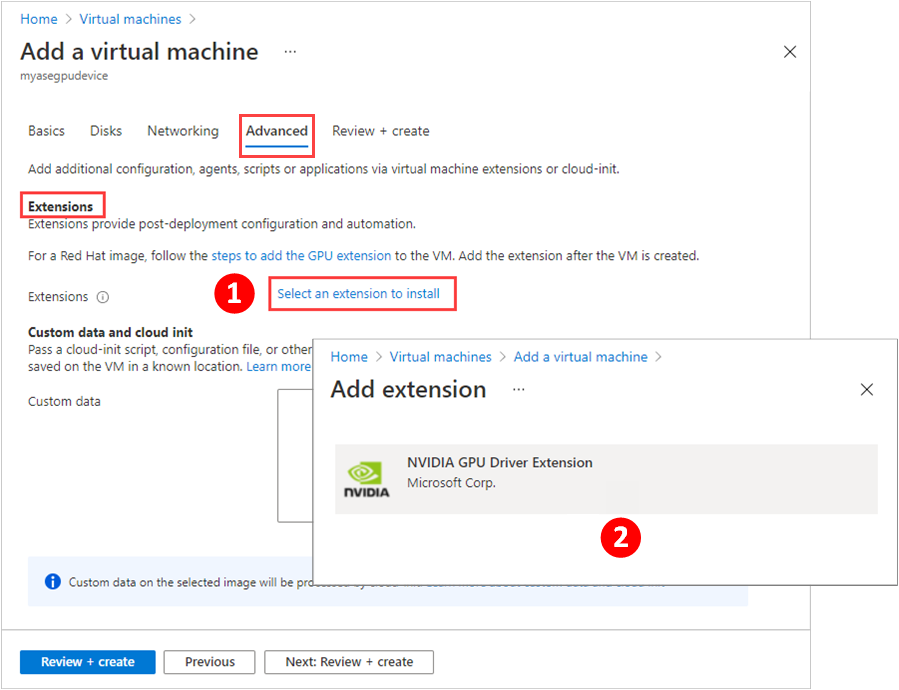
选择“下一页:高级”。 在“高级”选项卡上,可以选择在 VM 部署期间安装的扩展,并可以指定用于自定义 VM 的 脚本。
cloud-init如果要创建 VM 时在 VM 上安装扩展,请选择“选择要安装的扩展”。 在“添加扩展”屏幕上,选择该扩展。
有关在 VM 部署期间安装 GPU 扩展的详细步骤,请参阅部署 GPU VM。
如果要使用
cloud-init实用工具在新 VM 首次启动时对其进行自定义,请在“高级”选项卡中将 脚本粘贴到“自定义数据和 cloud init”下的“自定义数据”框中。cloud-init有关使用
cloud-init的详细信息,请参阅 Cloud-init 概述。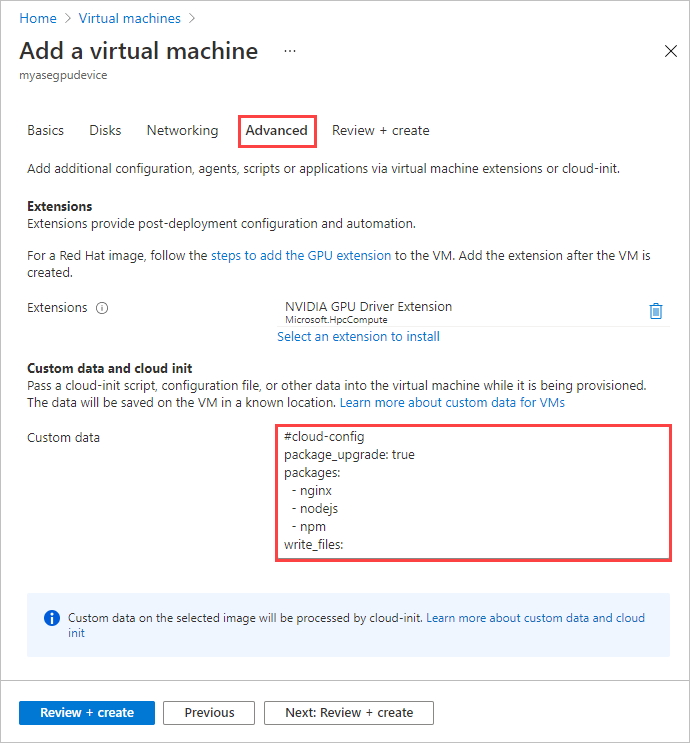
在完成时选择“下一步:查看 + 创建”。
在“查看 + 创建”选项卡中,查看 VM 的规格。 然后选择“创建”。
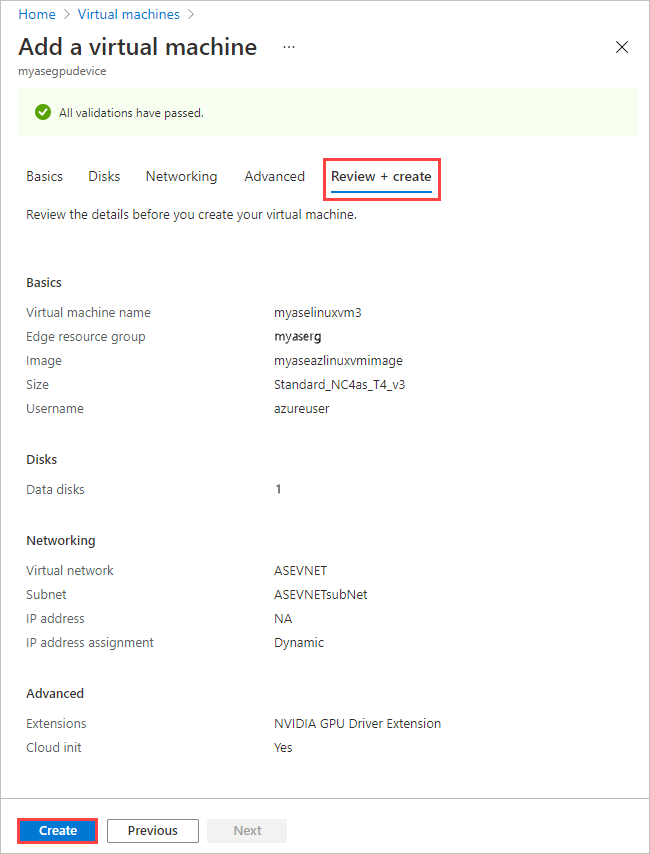
随即开始创建 VM,此过程可能最多需要 20 分钟。 你可以转到“部署”来监视 VM 的创建过程。
成功创建 VM 后,“概述”窗格上将显示新的 VM。
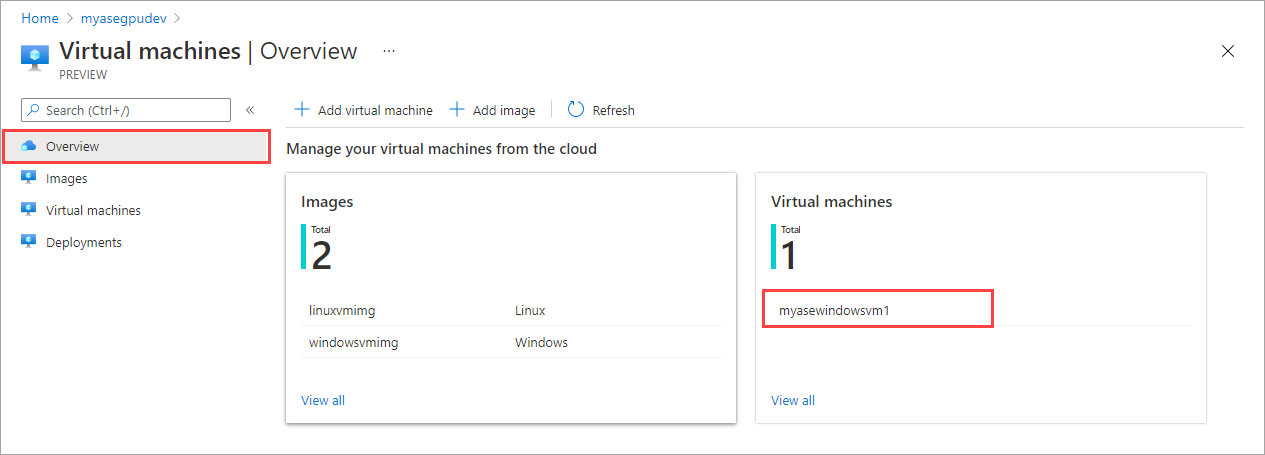
选择新创建的 VM,以转到“虚拟机”。
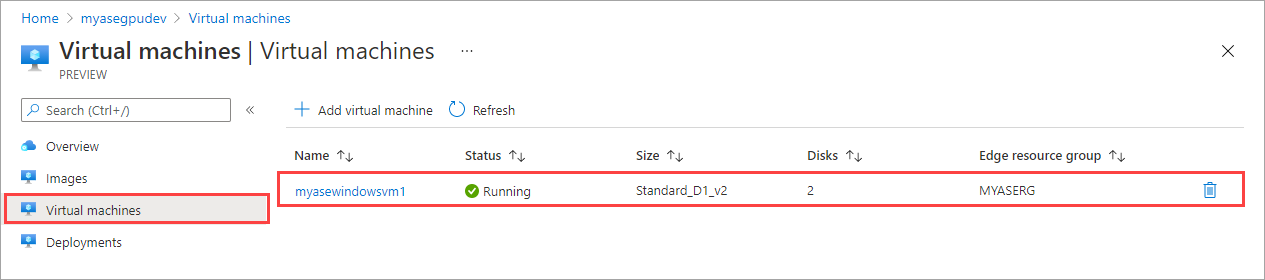
选择 VM,查看详细信息。
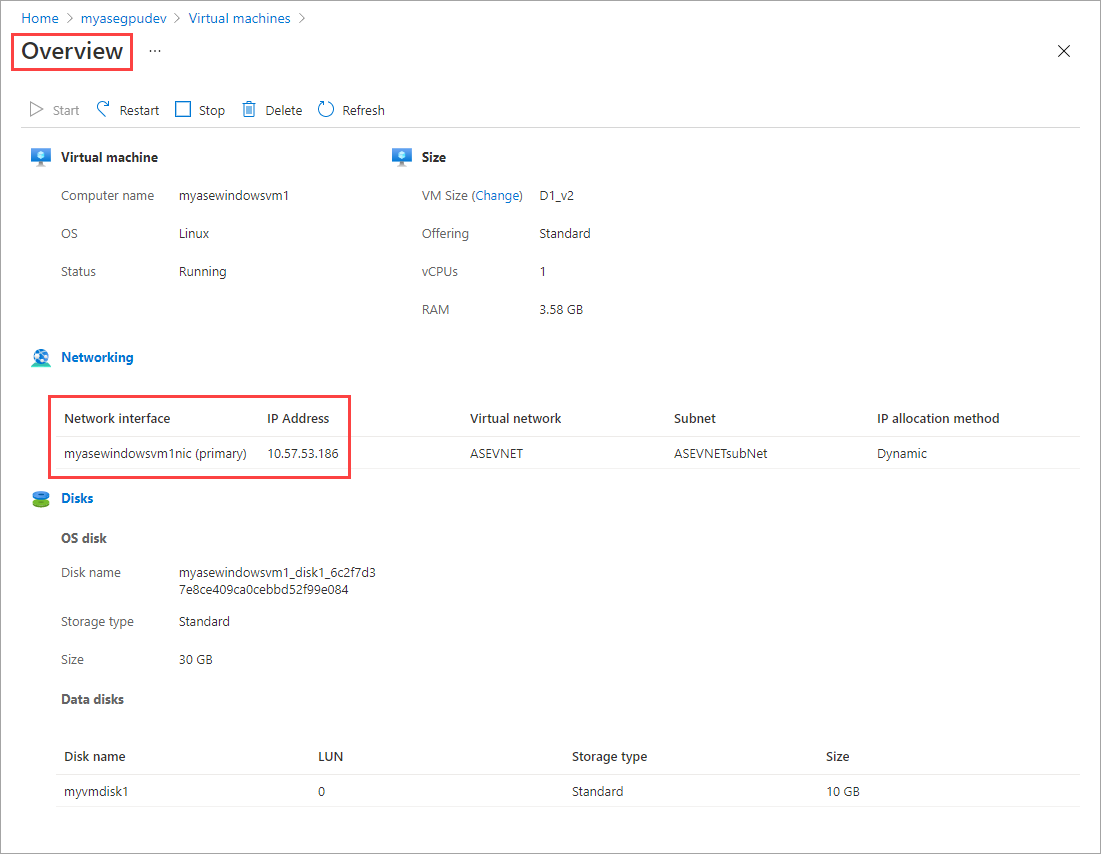
使用网络接口的 IP 地址连接到 VM。
连接到 VM
连接步骤可能会有所不同,具体取决于所创建的是 Windows VM 还是 Linux VM。 通过 Azure 门户无法连接到设备上部署的 VM。 请按照以下步骤连接到 Linux VM 或 Windows VM。
连接到 Linux VM
请按照以下步骤连接到 Linux VM。
使用 VM 创建期间传递的专用 IP 连接到 VM。
打开 SSH 会话以连接 IP 地址。
ssh -l <username> <ip address>根据提示,提供在创建 VM 时使用的密码。
如需提供 SSH 密钥,请使用此命令。
ssh -i c:/users/Administrator/.ssh/id_rsa Administrator@5.5.41.236下面是连接到 VM 时的输出示例:
PS C:\WINDOWS\system32> ssh -l myazuser "10.126.76.60"
The authenticity of host '10.126.76.60 (10.126.76.60)' can't be established.
ECDSA key fingerprint is SHA256:V649Zbo58zAYMKreeP7M6w7Na0Yf9QPg4SM7JZVV0E4.
Are you sure you want to continue connecting (yes/no/[fingerprint])? yes
Warning: Permanently added '10.126.76.60' (ECDSA) to the list of known hosts.
myazuser@10.126.76.60's password:
Welcome to Ubuntu 18.04.2 LTS (GNU/Linux 4.18.0-1013-azure x86_64)

 * Documentation:  https://help.ubuntu.com
 * Management:     https://landscape.canonical.com
 * Support:        https://ubuntu.com/advantage

 System information disabled due to load higher than 1.0

  Get cloud support with Ubuntu Advantage Cloud Guest:
    http://www.ubuntu.com/business/services/cloud

284 packages can be updated.
192 updates are security updates.

The programs included with the Ubuntu system are free software;
the exact distribution terms for each program are described in the
individual files in /usr/share/doc/*/copyright.

Ubuntu comes with ABSOLUTELY NO WARRANTY, to the extent permitted by
applicable law.

To run a command as administrator (user "root"), use "sudo <command>".
See "man sudo_root" for details.

myazuser@myazvmfriendlyname:~$ client_loop: send disconnect: Connection reset
PS C:\WINDOWS\system32>
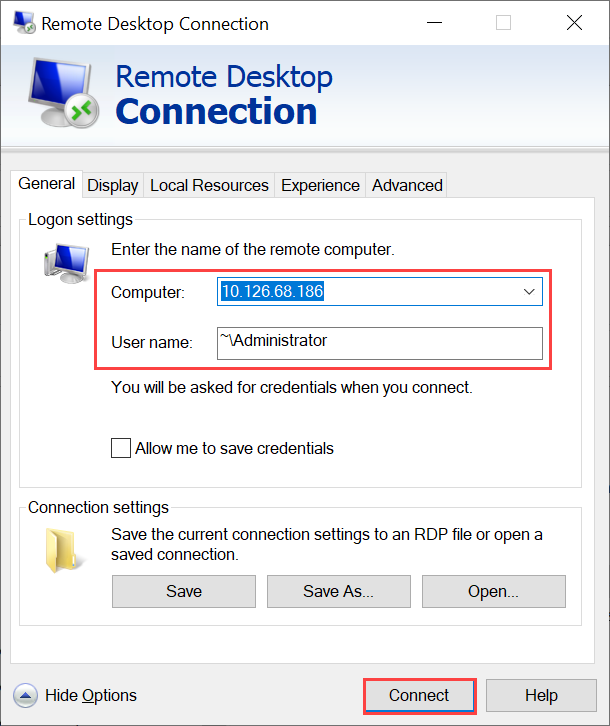
连接到 Windows VM
请按照以下步骤连接到 Windows VM。
通过在 VM 创建期间传递的 IP,使用远程桌面协议 (RDP) 连接到 Windows VM。
在客户端上,打开 RDP。
转到“开始”,然后输入 mstsc。
在“远程桌面连接”窗格上,输入 VM 的 IP 地址以及你在 VM 模板参数文件中使用的访问凭据。 然后选择“连接” 。
注意
可能需要批准连接到某个不受信任的计算机。
你现在已经登录到在设备上运行的 VM 了。