Important
此功能在 Beta 版中。
有关 Databricks 中Python单元测试的一般信息,请参阅Python单元测试。
Lakeflow 管道支持在基于 Web 的 Lakeflow 管道编辑器中编写Python单元测试。 这使你能够使用模拟数据验证Python或 SQL 转换逻辑。 使用管道测试框架,您可以测试边缘情况、验证专有管道 API(自动 CDC、流式表、期望条件、追加流),并针对受支持的表标识符操作使用模拟输入进行迭代测试。 在运行测试之前查看隔离限制。
- 独立测试执行:框架提供 SparkSession,用于将表操作重定向到管道的默认目录中的临时测试架构,以便可以模拟输入数据和写入测试输出,而不会影响生产表。 隔离适用于按名称引用表的操作;请参阅 “限制”。
- 灵活的测试范围:使用测试 SparkSession 在管道的计算资源上执行管道的一个子集(单个表、依赖表链或整个管道)。
- 结果验证:使用标准 pytest 断言验证在测试中创建的独立输出表的结果。
何时使用单元测试
典型用例包括:
- 验证新的转换逻辑:在针对生产数据运行之前,测试转换是否生成预期的架构、行计数、聚合和业务逻辑。
- 测试自动 CDC 规范:使用模拟数据验证自动 CDC 流定义是否正确处理更改事件、处理插入、更新、删除和 SCD(渐变维度)类型。
- 测试期望和数据质量规则:验证期望在应当失败时确实失败,并在数据有效时通过。
- 跨依赖表进行测试:测试转换链(例如青铜、白银和黄金),以验证数据是否通过管道图正确流动。
Requirements
管道
Owner权限,以及对该管道默认目录的USE CATALOG和CREATE SCHEMA权限。 框架需要这些特权来创建运行测试的临时测试架构。若要检查或设置管道权限,请打开管道并单击“ 共享”。 你必须是管道
Owner(IS OWNER);并且CAN RUN和CAN MANAGE不足以运行测试。 请参阅 “配置管道权限”。若要检查或设置目录权限,请在 目录资源管理器中打开目录,选择 “权限 ”选项卡,然后确认你拥有
USE CATALOG和CREATE SCHEMA。 目录所有者、元存储管理员或具有MANAGE权限的用户可以授予这些权限,包括使用 SQL:GRANT USE CATALOG, CREATE SCHEMA ON CATALOG <catalog_name> TO `<principal>`;有关详细信息,请参阅 Unity Catalog 权限参考。
管道必须配置为触发(非连续)模式。
管道必须位于 预览 通道上。 单元测试为 Beta 版,仅在预览版中可用。
不支持 Spark Connect。
注释
测试隔离涵盖按名称引用表的表操作。 绕过隔离的操作可以在测试代码和所选输出执行的任何管道代码(包括其可传递依赖项)中发生。 看起来安全的测试文件仍可以运行管道流,该流通过路径或连接器读取或写入,该流可对生产数据执行操作。 若要使测试不影响生产数据或元数据,请遵循以下规则:
- 按名称引用每个表(
catalog.schema.table),并按名称模拟所有输入。 不要按路径(/Volumes/...、、dbfs:/...、s3://...abfss://...)读取或写入,并且不从 Kafka 或自动加载程序等连接器读取。 这些会绕过隔离,并直接作用于真实的生产系统。 - 不要运行治理或所有权声明,例如
GRANT、REVOKE、ALTER ... OWNER TO或SET/UNSET TAGSCREATE/DROP POLICY。 系统会对真实生产安全对象执行这些操作。 - 不要创建目录或架构 (
CREATE CATALOG,CREATE SCHEMA)。 这些操作会访问真正的 Unity 目录元存储。 - 如果其图中包含基于路径的输入、连接器、命令式写入或其他外部副作用,请勿运行整个管道。 请仅选择其依赖项使用支持的目录表操作并且已被替换为模拟输入的输出。
有关详细信息,请参阅限制。
局限性
Warning
某些操作绕过测试隔离,可以处理实际生产数据或元数据。 在运行测试之前,请查看以下限制。
测试隔离仅基于表名
不要通过路径或连接器读取或写入。 隔离仅重定向按名称引用表的操作(例如,
spark.read.table("catalog.schema.table")或df.write.saveAsTable("catalog.schema.table"))。 通过路径或连接器解决的操作绕过隔离并直接在实际生产系统上执行操作:-
按路径写入(例如,
df.write.save("/Volumes/...")、dbfs:/路径,或云或外部位置路径,如s3://...或abfss://...)会写入真实的生产存储,并可能覆盖生产数据。 -
按路径读取(例如,
spark.read.load(path)或spark.read.format("delta").load(path))返回的是真实的生产数据,而不是你模拟的数据。 -
从连接器读取数据会连接到真实的生产数据源。 这包括 Kafka(从实际中转站读取)和自动加载程序(从真正的云存储路径进行读取的
cloudFiles)。 两者都不会重定向到模拟数据。
-
按路径写入(例如,
不要使用管道单元测试中的
event_log()表值函数。 在测试模式下,event_log()不会重定向到测试运行的事件日志。 它可以返回生产或以前注册的事件日志,因此针对它的断言可能会读取生产数据。 请改用该运行返回的event_log_table_name,并通过test_spark对其进行查询。event_log_table_name可以是None(例如,如果无法解析事件日志表名称),因此请在查询之前检查它:status = test_pipeline.run(test_spark, set(["catalog.schema.table"])) assert status.event_log_table_name is not None events = test_spark.table(status.event_log_table_name)如果您的目的是诊断更新失败的问题,请不要在读取事件日志之前断定
status.is_success。 事件日志通常是你为了解更新失败原因而会查看的内容。
治理与 DDL 操作
- 不支持目录、架构、权限、所有权、标记和策略突变。 这包括
CREATE/DROP/ALTER CATALOG、CREATE/DROP/ALTER SCHEMA(包括SET MANAGED LOCATION)、GRANT/REVOKE、ALTER ... OWNER TO、SET/UNSET TAGS和。CREATE/DROP POLICY某些通过test_spark执行的 SQL 形式会作为纵深防御措施被拒绝;而其他形式,或通过直接 API 调用执行的相同操作,则可能访问到真实的生产对象。 不要依赖这些防护作为隔离边界。 不要将这些语句放入测试代码中,也不要放入由所选输出执行的任何流水线代码中。
操作限制
- 不支持并发执行:不支持同时运行测试和管道更新,并且系统不会阻止它。 这两者之间没有协调,因此并发运行它们可能会争用资源,严重降低生产更新的性能或导致测试无法启动。 不要在管道运行更新时启动测试(或在测试运行时启动更新):等待任何正在进行的更新在运行测试之前完成。
-
异常终止后的临时架构:每次测试运行都会在管道的默认目录中创建一个临时架构(命名
redirecting_<id>),并在运行完成后自动删除该架构。 如果运行异常结束(例如,运行过程中计算资源丢失),则可能会遗留临时架构,其中保存着此运行的模拟和输出表。 它不会影响生产数据。 若要回收存储空间,请手动删除该管道默认目录中名称以redirecting_开头的任何剩余架构。 - 测试运行会消耗计算资源:测试运行会在管道的计算资源上执行,并按普通管道更新的标准计费。 测试运行不单独计量。
-
不支持完全刷新:只有选择性刷新可用。
test_pipeline.run()会刷新你选择的输出(如果未传送任何选择,则刷新所有输出);完全刷新和完全刷新选择尚未实现。
创作和保真度限制
- 仅编辑器执行:测试必须从基于 Web 的 Lakeflow 管道编辑器运行。
- 仅Python测试:测试必须以Python编写。 可以测试 SQL 管道,但测试本身必须以Python编写。
- 治理保真度:模拟数据不会继承在替换的生产表上定义的行筛选器或列掩码。 测试结果会精确反映您提供的模拟输入,并且可能与同一查询在受治理的生产数据上的表现不同。
步骤 1:更新管道设置
将管道配置为在触发模式下的 预览 通道上运行。
- 在 UI 中,打开管道并单击“设置>高级设置>通道>预览”
- 将 管道模式 设置为 触发(请勿使用 Continuous)。
或者,直接编辑管道设置 JSON:
"continuous": false,
"channel": "PREVIEW"
步骤 2:创建测试文件
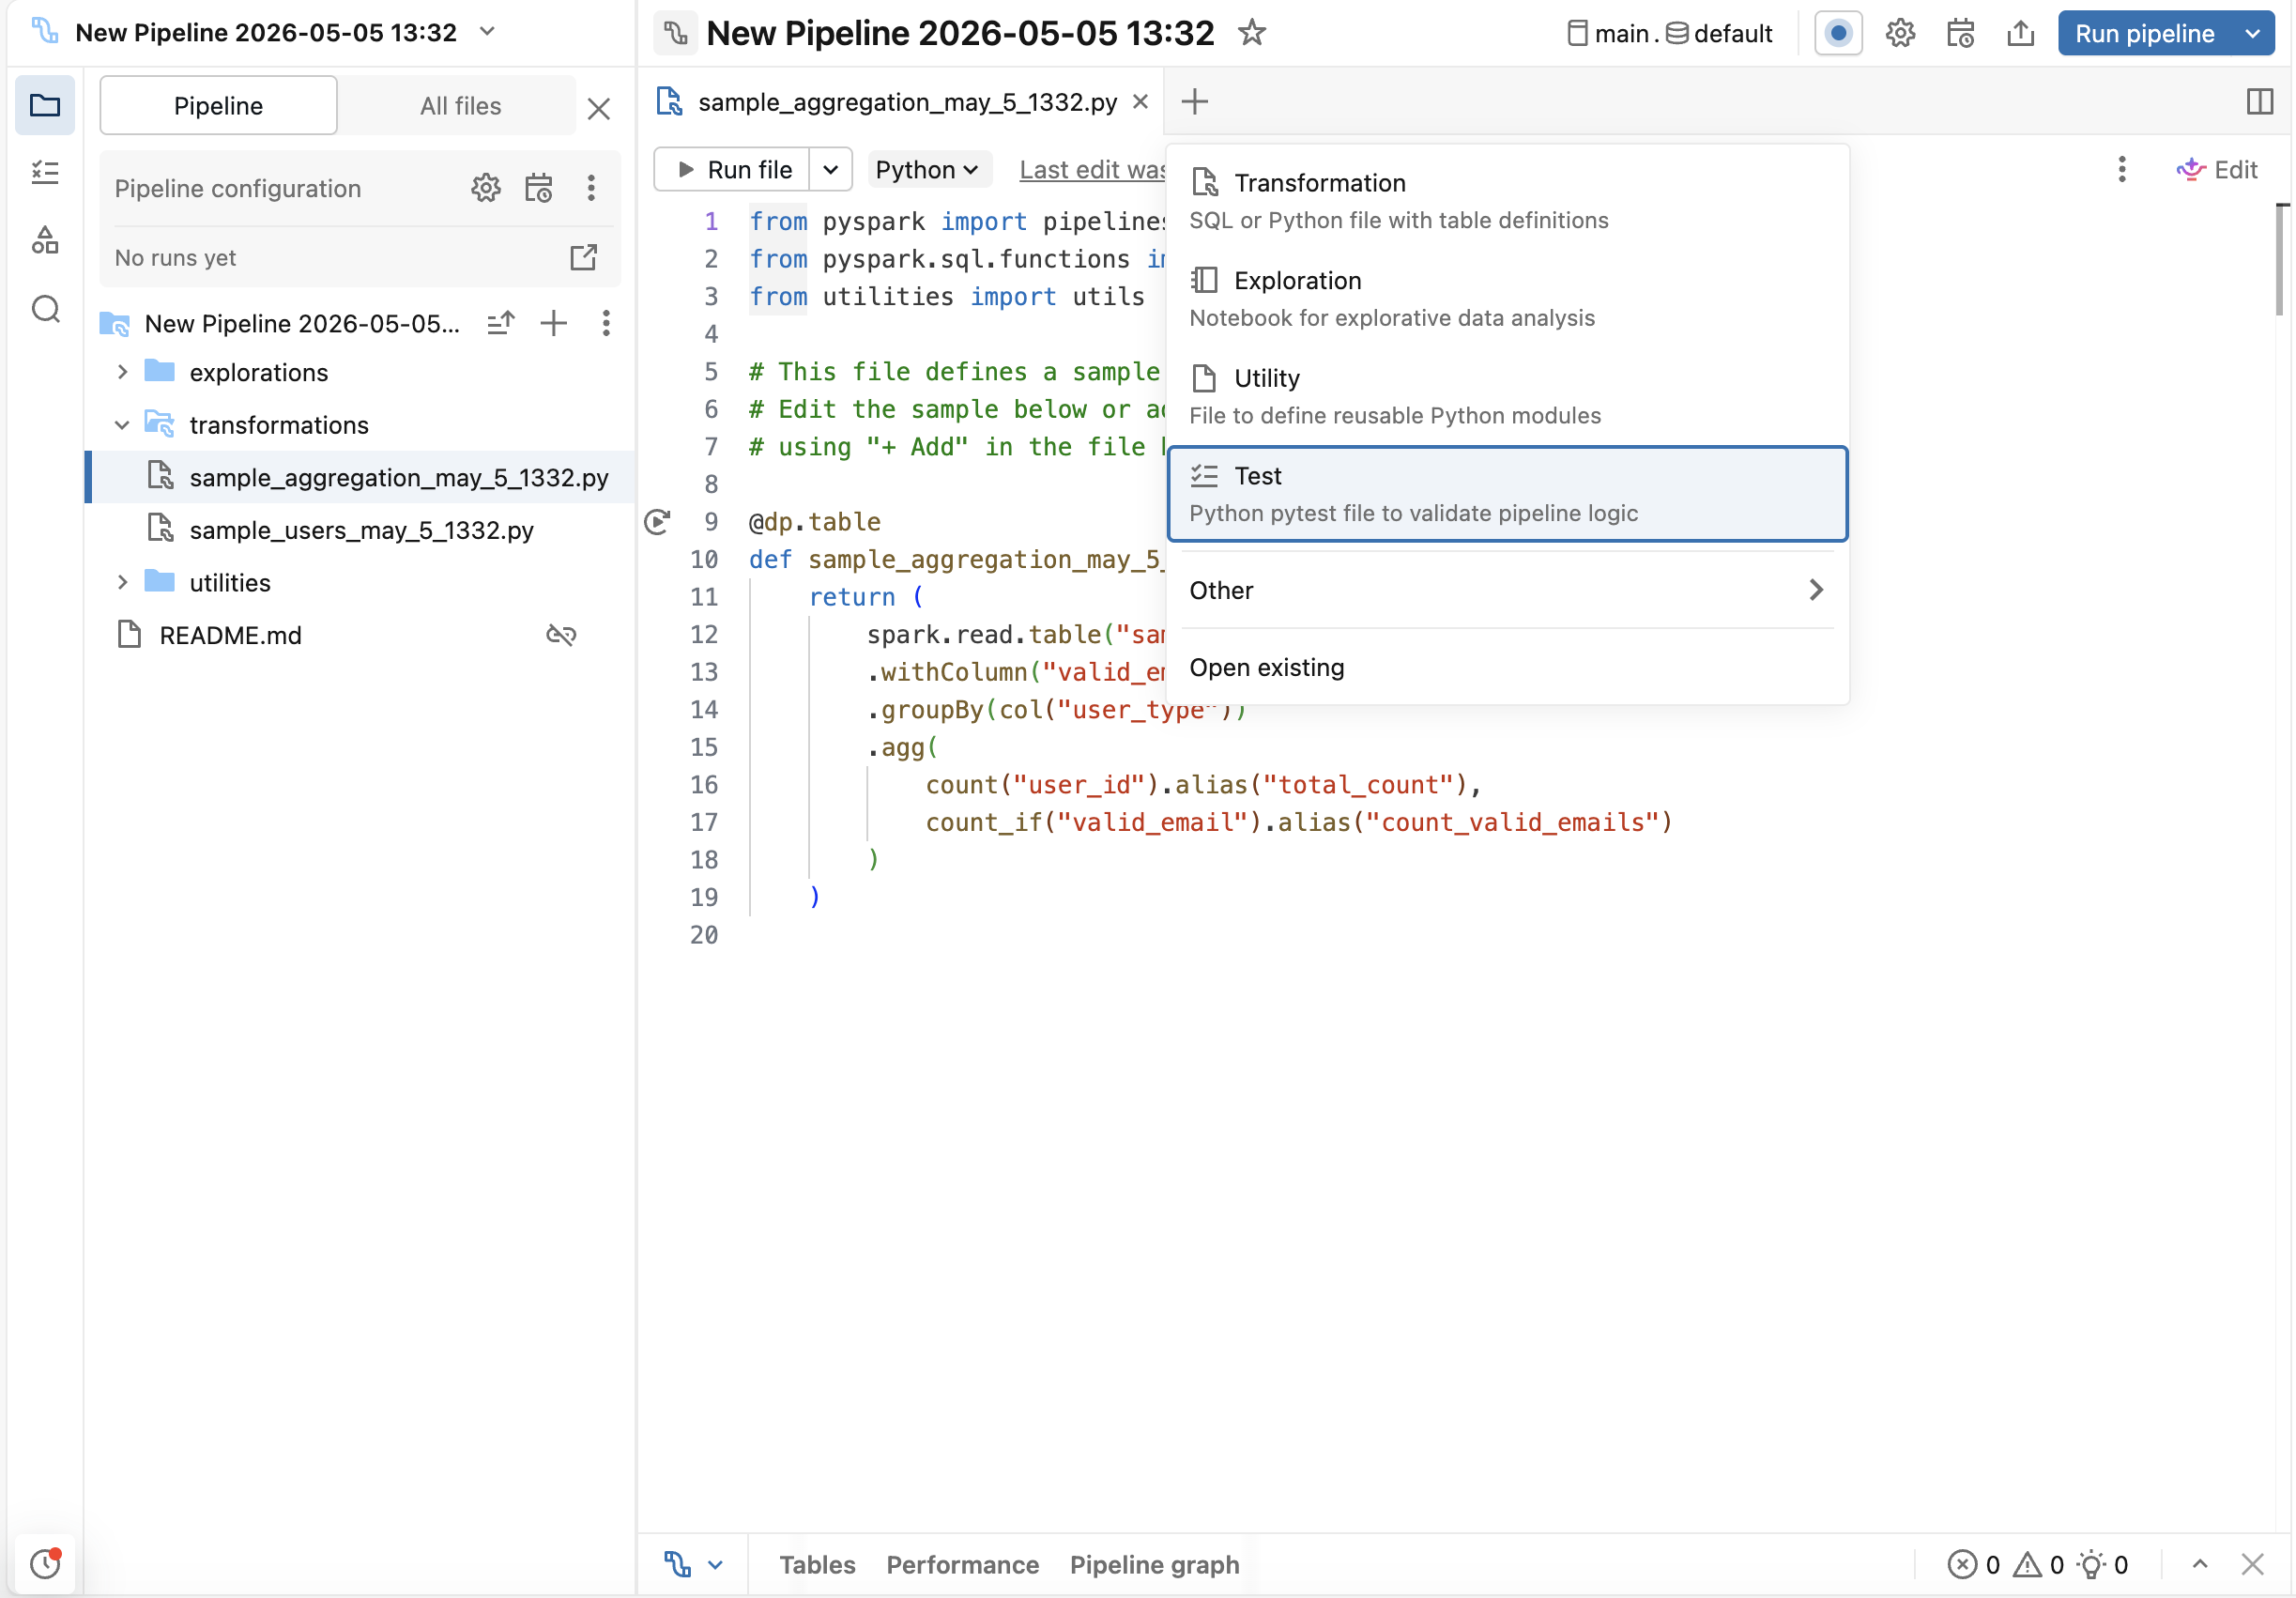
在 Lakeflow 管道编辑器中,单击 + “添加”按钮并选择“ 测试”。 这会创建管道源代码中未包含的测试文件(以及 tests 文件夹(如果尚不存在)。 无需自行创建 tests 文件夹。
步骤 3:生成测试
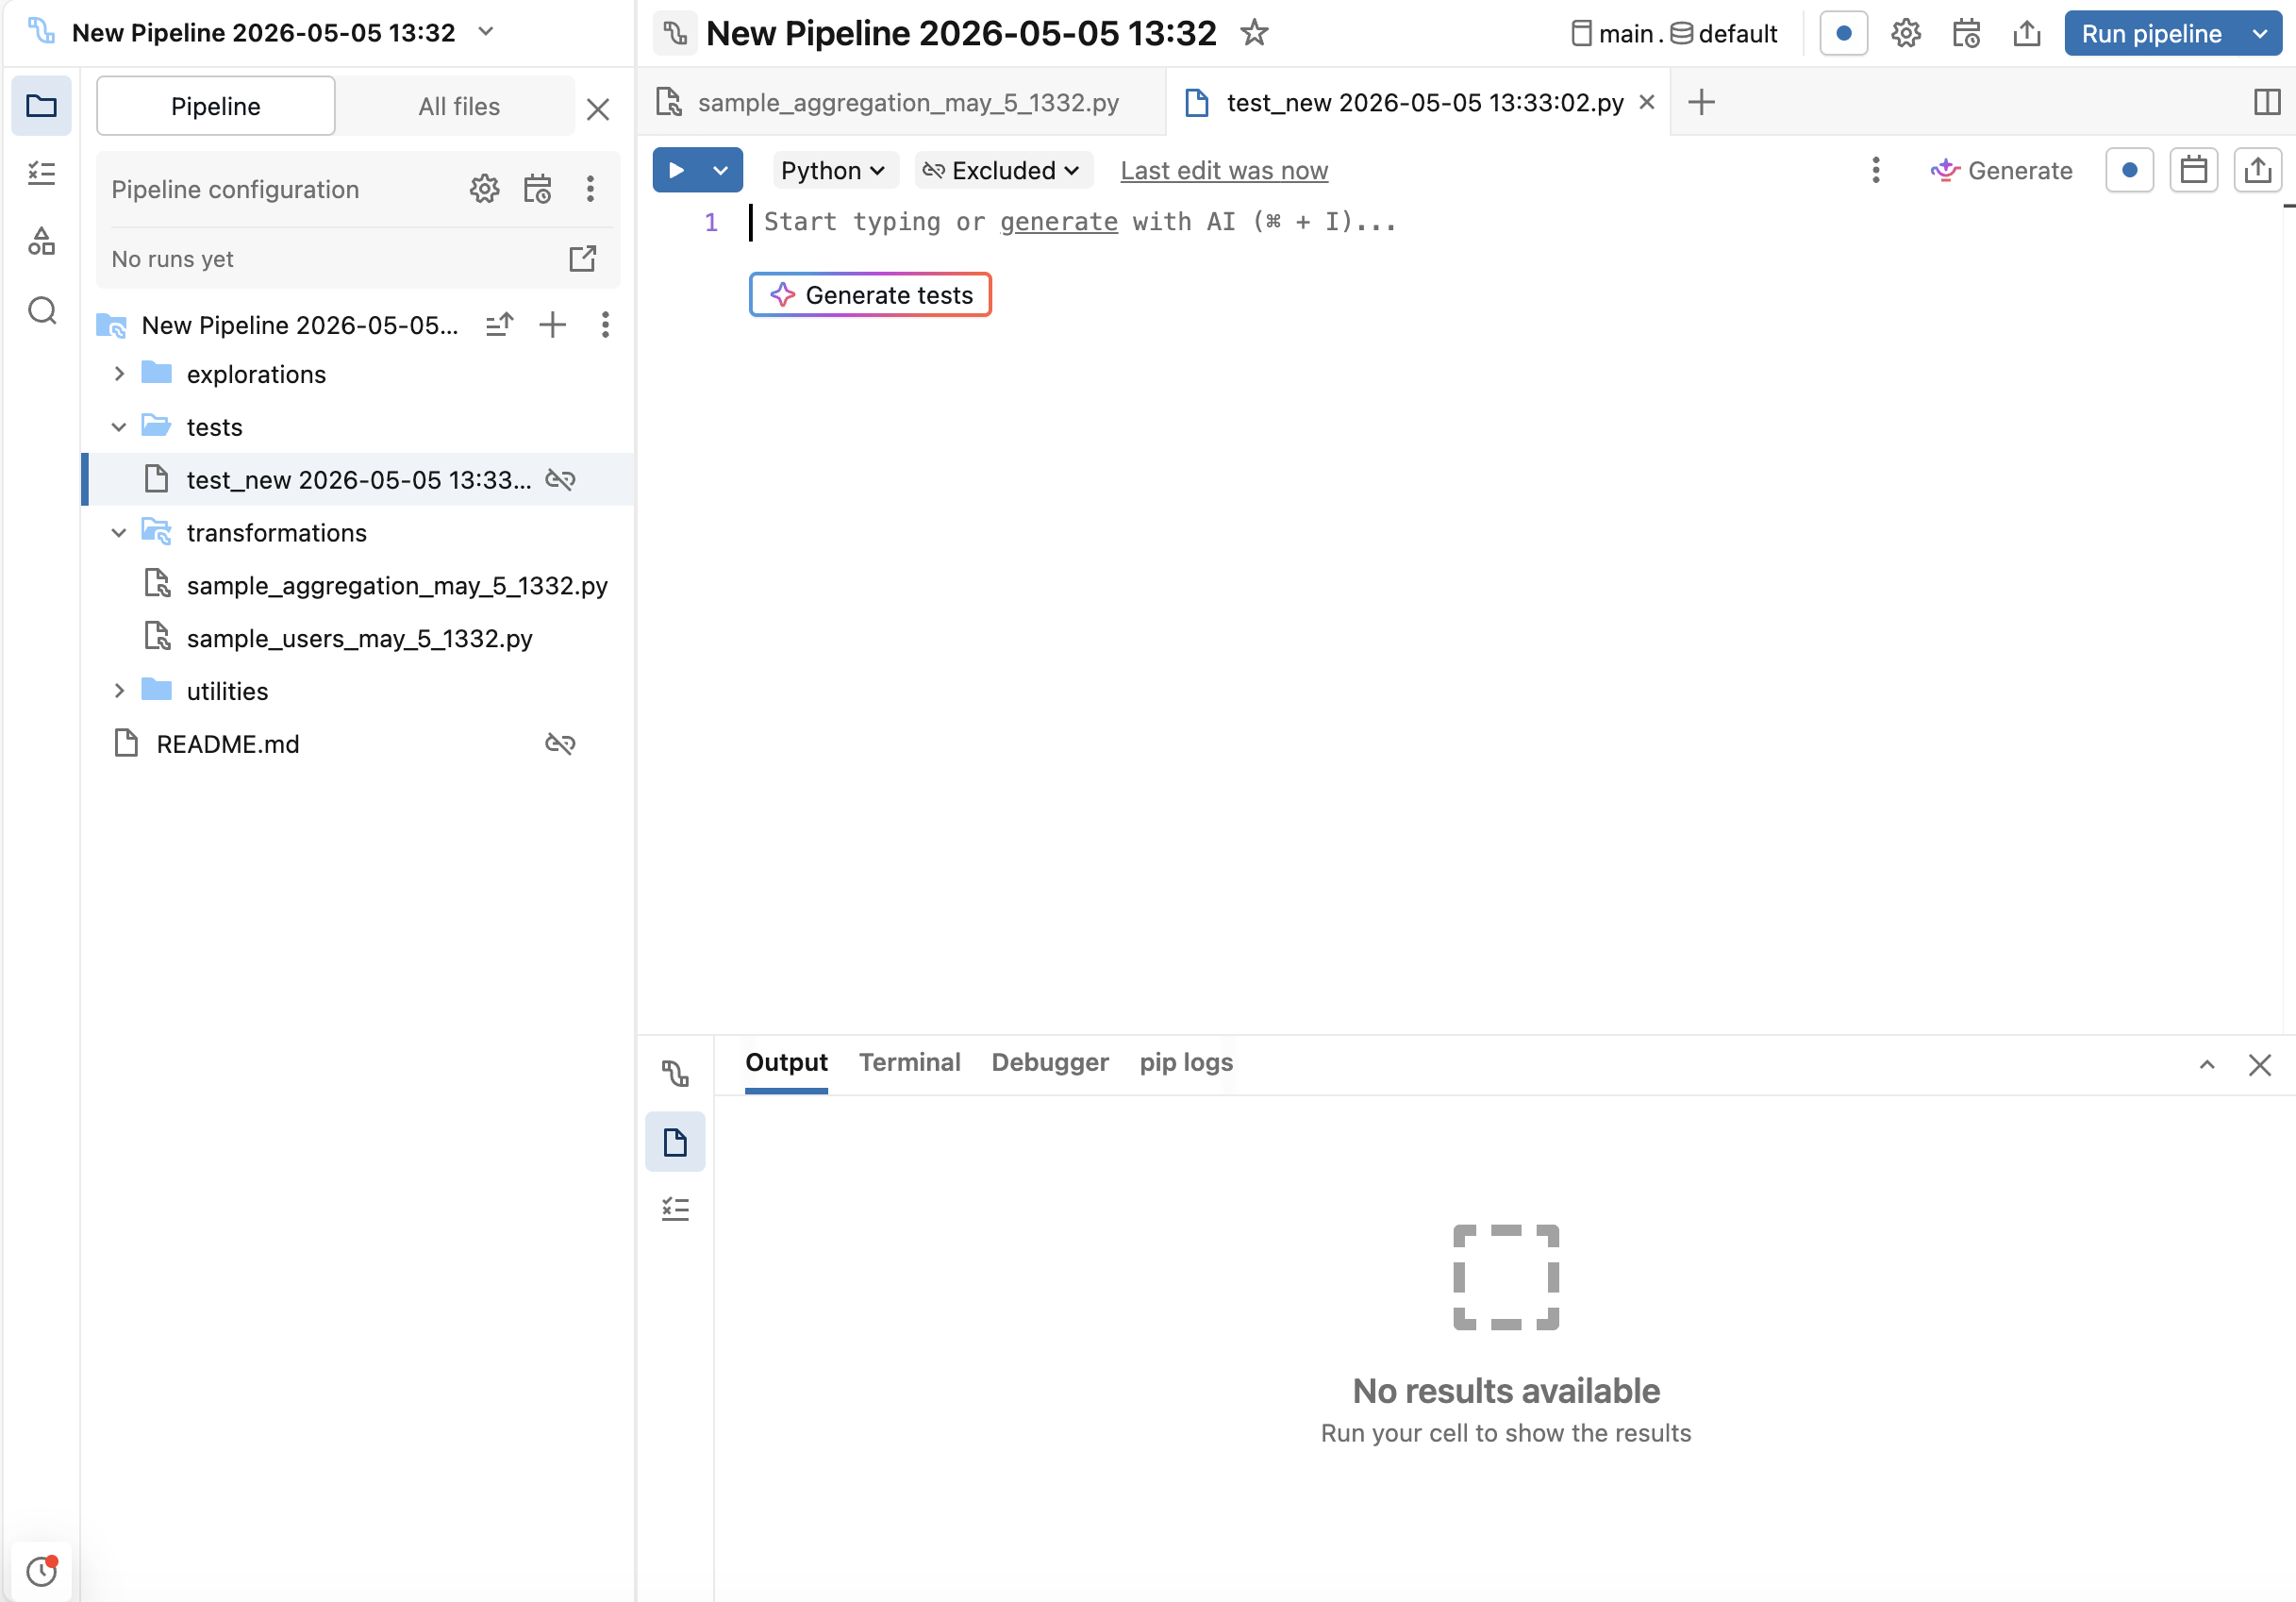
Genie Code 可以生成测试基架:
在测试文件中,单击“ 生成测试 ”按钮。
或者,在 Genie Code 代理模式下使用
/tests。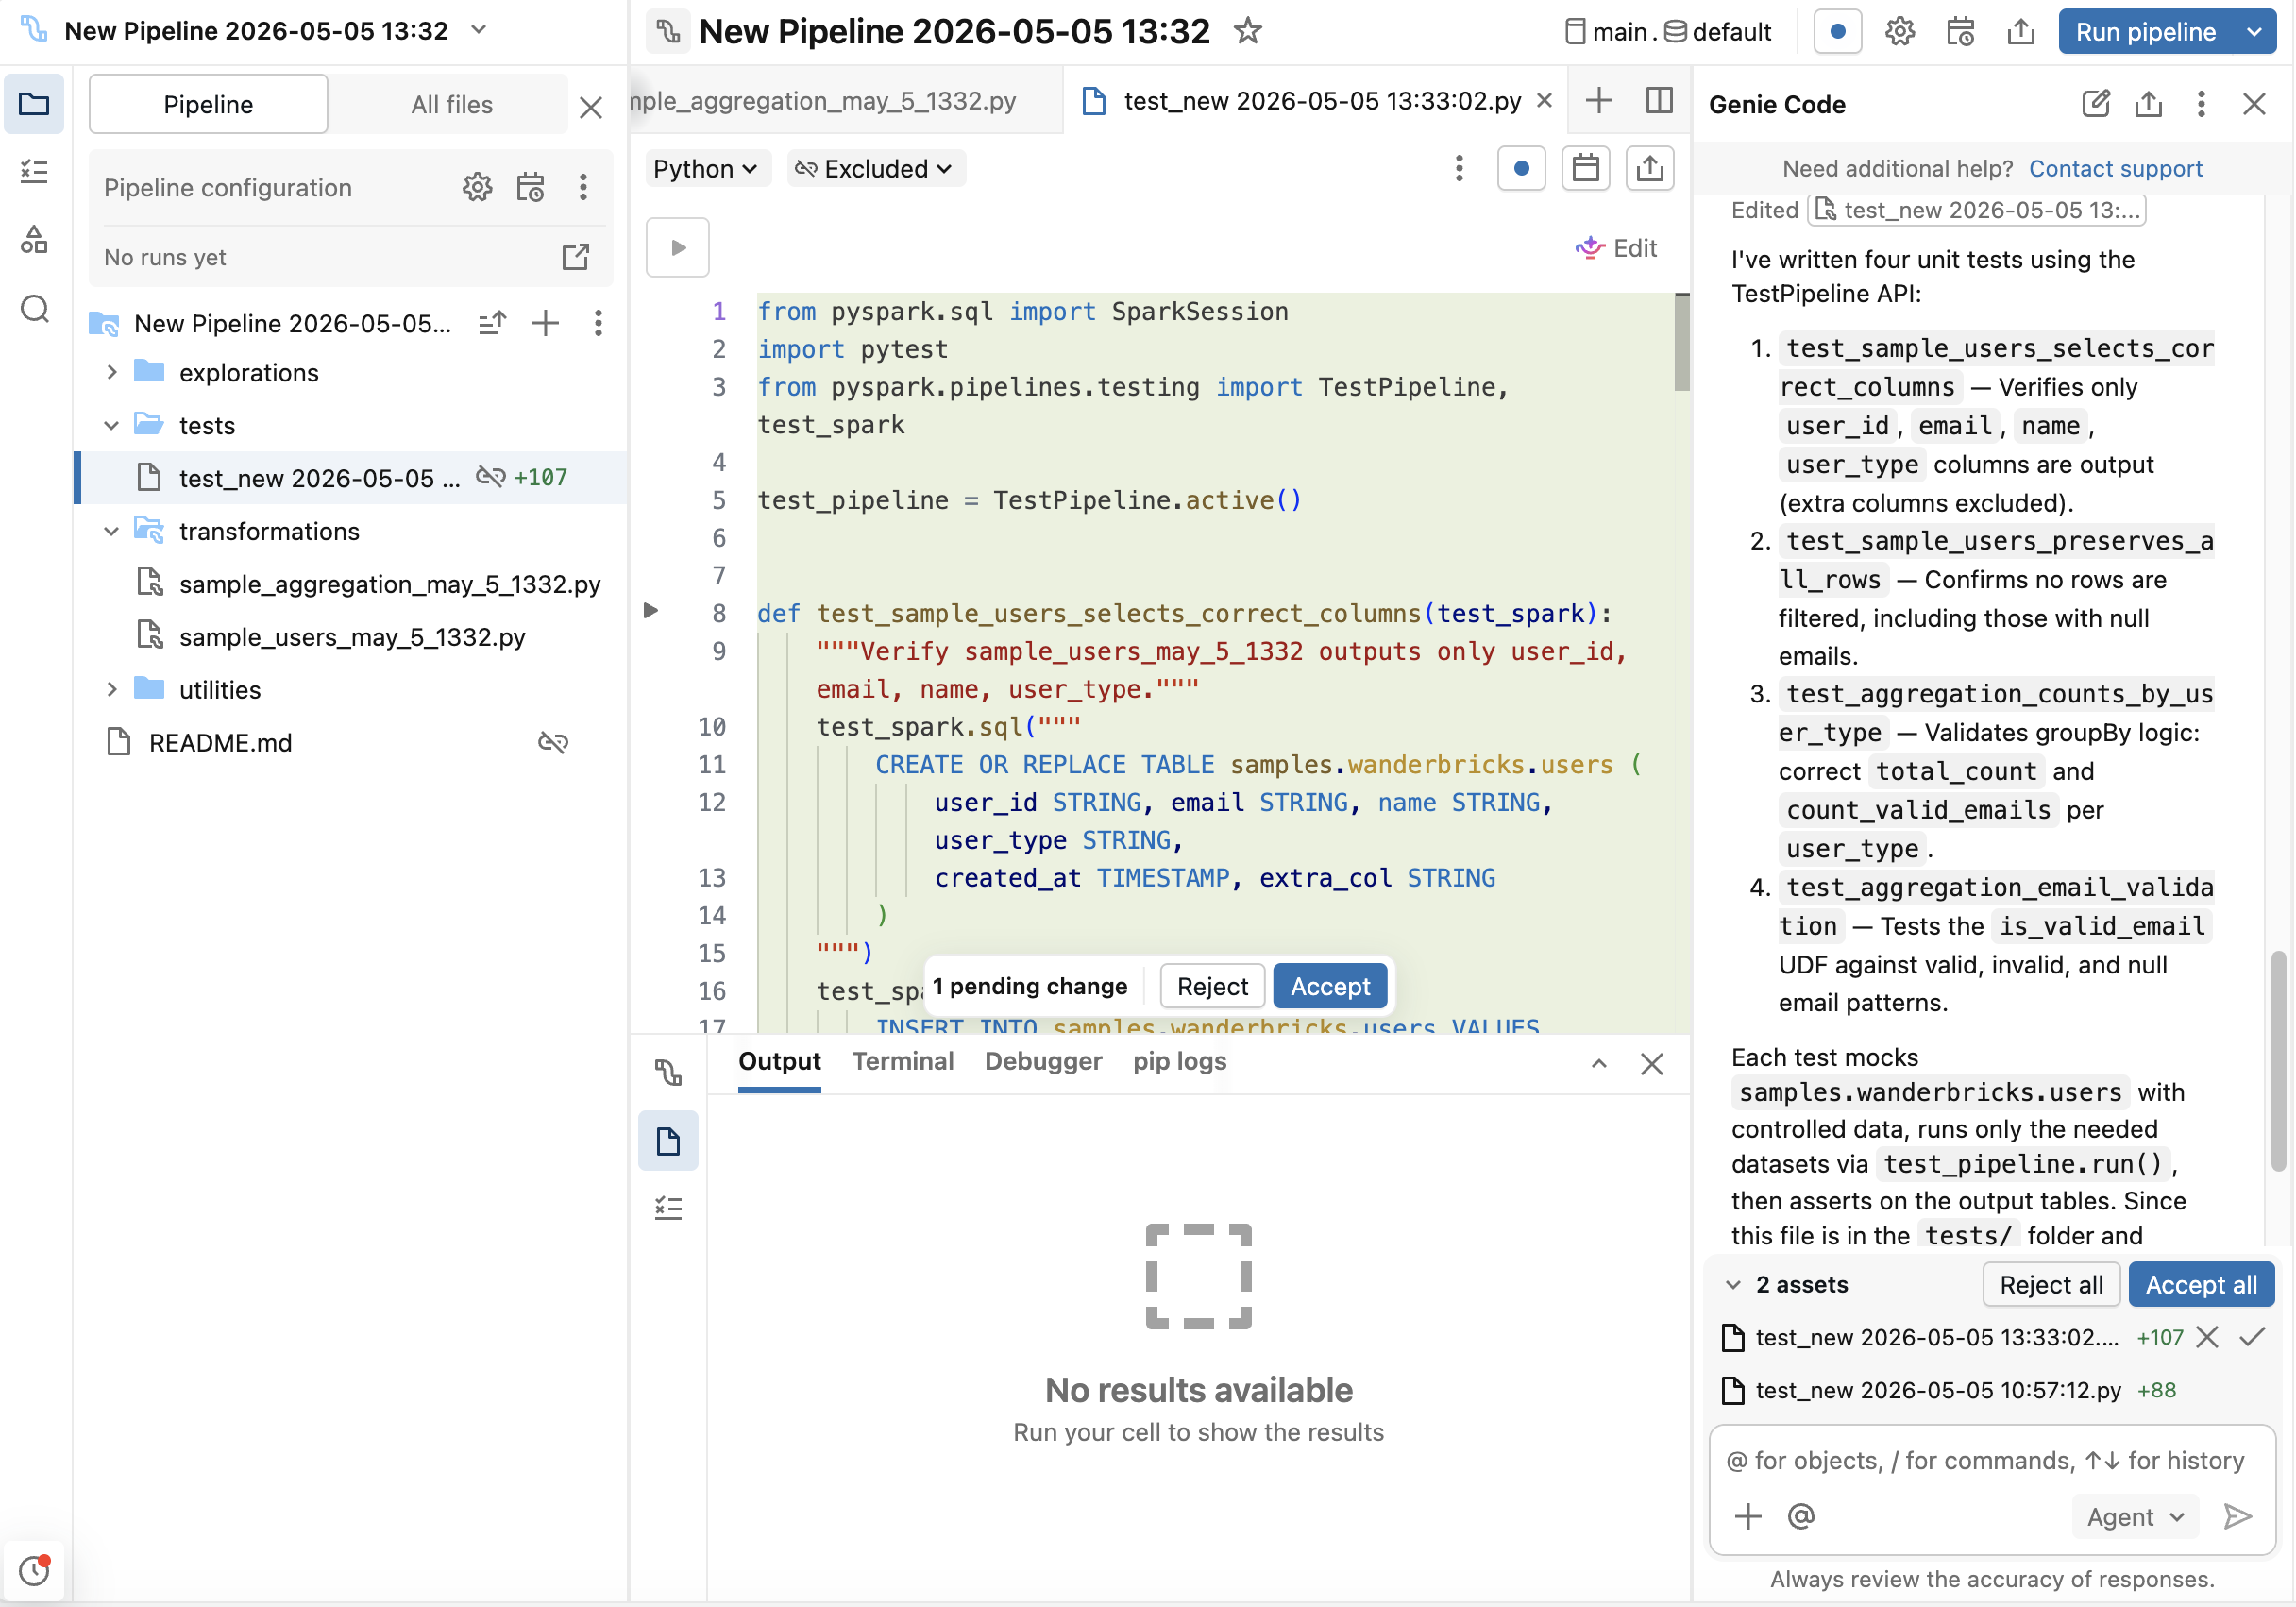
使用 Genie Code 生成样本,然后针对边缘事例进行自定义。
或者,可以自行编写测试代码。 将以下导入添加到每个测试文件的顶部:
import pytest
from pyspark.pipelines.testing import TestPipeline, test_spark

test_pipeline = TestPipeline.active()
步骤 4:运行测试
在 Lakeflow 管道编辑器中运行测试:
- 要运行单项测试,请单击测试函数旁边边栏中的
 (播放)按钮。
 - 单击测试文件顶部的 在文件中运行测试,以运行该文件中的所有测试。
测试结果(成功或失败)显示在编辑器下面板中。 查看断言错误以排查故障。
测试 API(应用程序接口)
| API | 说明 |
|---|---|
TestPipeline.active() |
返回 Lakeflow 管道编辑器中当前正在编辑的管道的 TestPipeline 对象。 此对象是对管道的引用,包括其源代码、配置、默认目录/架构等。 |
test_pipeline.run(test_spark, set([table_names])) |
同步执行管道的更新,如果指定了表名称,则执行选择性刷新。 在管道执行成功或因异常而终止后返回。 |
test_spark 夹具 |
创建一个测试 SparkSession 并重定向目录表,以将按名称(例如 spark.read.table("catalog.schema.table") 或 df.write.saveAsTable("catalog.schema.table"))引用表的表读取和写入自动重定向到临时测试架构。 重定向仅适用于基于名称的表操作;它不涵盖按路径寻址或通过连接器执行的读写操作,这些操作会直接作用于真实系统。 请参阅限制。 |
创建模拟数据
您可以使用 SQL 或 createDataFrame 来模拟输入数据:
# Option 1: Using SQL
test_spark.sql("""
    CREATE TABLE catalog.schema.table_name AS
    SELECT * FROM VALUES
        (1, 'value1'),
        (2, 'value2')
    AS t(id, name)
""")

# Option 2: Using createDataFrame
df = test_spark.createDataFrame(
    [(1, 'value1'), (2, 'value2')],
    schema=["id", "name"]
)
df.write.saveAsTable("catalog.schema.table_name")
若要生成大量真实合成数据,可以使用 Faker 库。 首先在管道中运行 %pip install faker ,然后从 Faker 支持的 UDF 生成数据帧:
# Option 3: Using Faker for synthetic data
from pyspark.sql import functions as F
from faker import Faker

fake = Faker()
fake_firstname = F.udf(fake.first_name)
fake_lastname = F.udf(fake.last_name)
fake_email = F.udf(fake.ascii_company_email)

df = (
    test_spark.range(0, 100)
    .withColumn("firstname", fake_firstname())
    .withColumn("lastname", fake_lastname())
    .withColumn("email", fake_email())
)
df.write.saveAsTable("catalog.schema.table_name")
运行管道或特定的表
# Run specific tables
test_pipeline.run(test_spark, set(["catalog.schema.table1", "catalog.schema.table2"]))

# Run all tables in the pipeline
test_pipeline.run(test_spark)
示例
示例 1:使用行计数、架构和 null 处理测试聚合
目标:验证用户聚合是否正确按类型对用户进行计数,处理 null 电子邮件,并生成预期的架构。
管道转换:
这些转换创建一个简单的双表管道: users 选择用户数据,并 counts 按类型和计数对用户和有效电子邮件进行分组。
from pyspark import pipelines as dp
from pyspark.sql.functions import col, count, count_if

@dp.table
def users():
    return (
        spark.read.table("catalog.schema.wanderbricks_users")
        .select("user_id", "email", "name", "user_type")
    )

@dp.table
def counts():
    return (
        spark.read.table("catalog.schema.users")
        .withColumn("valid_email", col("email").isNotNull())
        .groupBy("user_type")
        .agg(
            count("user_id").alias("total_count"),
            count_if("valid_email").alias("count_valid_emails")
        )
    )
测试:
这些测试通过创建具有有意 null 的模拟用户数据并隔离运行管道来验证行计数、架构结构、null 处理和聚合逻辑。
import pytest
from pyspark.pipelines.testing import TestPipeline, test_spark
from pyspark.testing import assertDataFrameEqual

test_pipeline = TestPipeline.active()

# Mock data fixture
def mock_users(session):
    session.sql("""
        CREATE TABLE catalog.schema.wanderbricks_users AS
        SELECT * FROM VALUES
            (1, 'alice@example.com', 'Alice', 'admin'),
            (2, NULL, 'Bob', 'user'),
            (3, 'charlie@example.com', 'Charlie', 'user'),
            (4, NULL, 'Dana', 'admin')
        AS t(user_id, email, name, user_type)
    """)

# Test 1: Row count
def test_users_row_count(test_spark):
    mock_users(test_spark)
    test_pipeline.run(test_spark, set(["catalog.schema.users"]))
    result = test_spark.table("catalog.schema.users")
    assert result.count() == 4

# Test 2: Schema validation
def test_users_schema(test_spark):
    mock_users(test_spark)
    test_pipeline.run(test_spark, set(["catalog.schema.users"]))
    result = test_spark.table("catalog.schema.users")
    expected_fields = {"user_id", "email", "name", "user_type"}
    actual_fields = set(f.name for f in result.schema.fields)
    assert expected_fields == actual_fields

# Test 3: Null handling
def test_users_null_handling(test_spark):
    mock_users(test_spark)
    test_pipeline.run(test_spark, set(["catalog.schema.users"]))
    result = test_spark.table("catalog.schema.users")
    null_emails = result.filter("email IS NULL").count()
    assert null_emails == 2

# Test 4: Aggregation
def test_counts(test_spark):
    mock_users(test_spark)
    # Run both tables since counts depends on users
    test_pipeline.run(test_spark, set(["catalog.schema.users", "catalog.schema.counts"]))
    result = test_spark.table("catalog.schema.counts")
    # Check counts for each user_type
    admin_row = result.filter("user_type = 'admin'").collect()[0]
    user_row = result.filter("user_type = 'user'").collect()[0]
    assert admin_row["total_count"] == 2
    assert admin_row["count_valid_emails"] == 1
    assert user_row["total_count"] == 2
    assert user_row["count_valid_emails"] == 1

# Test 5: Full DataFrame comparison with assertDataFrameEqual
def test_counts_full_dataframe(test_spark):
    mock_users(test_spark)
    test_pipeline.run(test_spark, set(["catalog.schema.users", "catalog.schema.counts"]))
    result = test_spark.table("catalog.schema.counts")
    expected = test_spark.createDataFrame(
        [("admin", 2, 1), ("user", 2, 1)],
        schema=["user_type", "total_count", "count_valid_emails"]
    )
    assertDataFrameEqual(result, expected)
示例 2:测试 Auto CDC
目标:验证 Auto CDC 是否能够正确处理包含插入和更新的变更馈送。
管道转换:
此转换从更改源设置自动 CDC,该更改源读取流式更改并将其作为 SCD 类型 1 应用于目标表(仅保留最新版本)。
from pyspark import pipelines as dp
from pyspark.sql.functions import col

@dp.view
def users():
    return spark.readStream.table("catalog.schema.change_feed")

dp.create_streaming_table("target_autocdc")
dp.create_auto_cdc_flow(
    target="target_autocdc",
    source="users",
    keys=["userId"],
    sequence_by=col("ts"),
    stored_as_scd_type=1
)
测试:
第一个测试创建了一个模拟变更馈送,其中包含同一 userId 的多条记录(模拟一次更新),并验证目标中仅保留最新的一条记录。 第二个测试通过运行管道、将更多事件附加到更改源并再次运行管道来模拟迟到和无序事件。
import pytest
from pyspark.pipelines.testing import TestPipeline, test_spark

test_pipeline = TestPipeline.active()

# Test 1: Standard inserts and updates
def test_auto_cdc_flow(test_spark):
    # Create a mock change feed table
    test_spark.sql("""
        CREATE TABLE catalog.schema.change_feed AS
        SELECT * FROM VALUES
            (1, 'Alice', 1000),
            (2, 'Bob', 1001),
            (1, 'Alice Updated', 1002)
        AS t(userId, name, ts)
    """)
    # Run the pipeline
    test_pipeline.run(test_spark, set(["catalog.schema.target_autocdc"]))
    # Read the output
    result = test_spark.table("catalog.schema.target_autocdc")
    # Verify two users exist
    user_ids = set(row["userId"] for row in result.collect())
    assert user_ids == {1, 2}
    # Verify latest record for userId=1 has ts=1002
    latest_user1 = result.filter("userId = 1").collect()[0]
    assert latest_user1["ts"] == 1002
    assert latest_user1["name"] == "Alice Updated"
    # Verify userId=2 has ts=1001
    user2 = result.filter("userId = 2").collect()[0]
    assert user2["ts"] == 1001

# Test 2: Late-arriving and out-of-order events
def test_auto_cdc_late_arriving(test_spark):
    # First batch of change events
    test_spark.sql("""
        CREATE TABLE catalog.schema.change_feed AS
        SELECT * FROM VALUES
            (1, 'Alice', 1000),
            (2, 'Bob', 1001)
        AS t(userId, name, ts)
    """)
    # Run the pipeline with the initial batch
    test_pipeline.run(test_spark, set(["catalog.schema.target_autocdc"]))

    # Append late-arriving events to the change feed:
    # - A newer event for userId=1 (ts=1003) that arrived after the first run
    # - A stale event for userId=2 (ts=999) with a timestamp older than what is already applied
    test_spark.sql("""
        INSERT INTO catalog.schema.change_feed VALUES
            (1, 'Alice Updated', 1003),
            (2, 'Bob (stale)', 999)
    """)
    # Re-run the pipeline. sequence_by=ts ensures stale events do not overwrite newer state.
    test_pipeline.run(test_spark, set(["catalog.schema.target_autocdc"]))

    result = test_spark.table("catalog.schema.target_autocdc")
    # userId=1 should reflect the newer late-arriving event
    alice = result.filter("userId = 1").collect()[0]
    assert alice["ts"] == 1003
    assert alice["name"] == "Alice Updated"
    # userId=2 should be unchanged: the stale event with an older ts is ignored
    bob = result.filter("userId = 2").collect()[0]
    assert bob["ts"] == 1001
    assert bob["name"] == "Bob"
示例 3:测试基于快照的自动 CDC
目标:验证 CDC 是否正确处理快照更改,包括插入、更新和删除。
管道转换:
此转换从快照设置自动 CDC,自动 CDC 从快照表中读取并以 SCD 类型 2 的形式跟踪随时间的变化(维护完整历史记录)。
from pyspark import pipelines as dp

@dp.view(name="source")
def source():
    return spark.read.table("catalog.schema.snapshot")

dp.create_streaming_table("catalog.schema.target")
dp.create_auto_cdc_from_snapshot_flow(
    target="target",
    source="source",
    keys=["userId"],
    stored_as_scd_type=2
)
测试:
此测试创建初始快照,运行管道,然后通过截断并插入新数据来模拟快照更新,以验证 CDC 是否捕获所有更改。
import pytest
from pyspark.pipelines.testing import TestPipeline, test_spark

test_pipeline = TestPipeline.active()

def test_auto_cdc_from_snapshot_flow(test_spark):
    # Create initial snapshot
    test_spark.sql("""
        CREATE TABLE catalog.schema.snapshot AS
        SELECT * FROM VALUES
            (1, 'Alice', '2024-01-01'),
            (2, 'Bob', '2024-01-02')
        AS t(userId, name, created_at)
    """)
    # Run the pipeline
    test_pipeline.run(test_spark, set(["catalog.schema.target"]))
    # Simulate a new snapshot by truncating and inserting updated data
    test_spark.sql("TRUNCATE TABLE catalog.schema.snapshot")
    test_spark.sql("INSERT INTO catalog.schema.snapshot VALUES (2, 'Bob', '2024-01-03')")
    test_pipeline.run(test_spark, set(["catalog.schema.target"]))
    # Verify SCD Type 2: should have 3 rows (original Alice, original Bob, updated Bob)
    result = test_spark.table("catalog.schema.target")
    assert result.count() == 3
    user_ids = [row["userId"] for row in result.collect()]
    assert set(user_ids) == {1, 2}
示例 4:测试联接和预期结果
目标:验证联接操作是否正常工作,以及预期操作是否能够筛选出无效数据。
管道转换:
此转换将房源图片与配套设施进行关联,并设置预期条件,筛选出 2024 年 1 月之前上传的图片。
from pyspark import pipelines as dp

@dp.table
@dp.expect_or_drop("uploaded after Jan 2024", "uploaded_at > '2024-01-01'")
def property_images_amenities_join():
    return (
        spark.read.table("catalog.schema.property_images")
        .join(
            spark.read.table("catalog.schema.property_amenities"),
            on="property_id",
            how="inner"
        )
    )
测试:
这些测试验证联接是否会生成正确的行数,并验证预期操作是否能成功筛选出上传日期无效的记录。
import pytest
from pyspark.pipelines.testing import TestPipeline, test_spark

test_pipeline = TestPipeline.active()

# Mock property datasets
def mock_properties(session):
    session.sql("""
        CREATE TABLE catalog.schema.property_images AS
        SELECT * FROM VALUES
            (101, 'img1.jpg', '2024-02-01'),
            (102, 'img2.jpg', '2024-01-15'),
            (103, 'img3.jpg', '2024-12-20')
        AS t(property_id, image_url, uploaded_at)
    """)
    session.sql("""
        CREATE TABLE catalog.schema.property_amenities AS
        SELECT * FROM VALUES
            (101, 'wifi'),
            (102, 'pool'),
            (103, 'parking')
        AS t(property_id, amenity)
    """)

# Test 1: Join
def test_property_join(test_spark):
    mock_properties(test_spark)
    test_pipeline.run(test_spark, set(["catalog.schema.property_images_amenities_join"]))
    result = test_spark.table("catalog.schema.property_images_amenities_join")
    # Should have 3 rows after join
    assert result.count() == 3
    # Check all property_ids are present
    property_ids = set(row["property_id"] for row in result.collect())
    assert property_ids == {101, 102, 103}

# Test 2: Expectation
def test_property_expectation(test_spark):
    mock_properties(test_spark)
    # Add a row with uploaded_at before Jan 2024
    test_spark.sql("""
        INSERT INTO catalog.schema.property_images VALUES (104, 'img4.jpg', '2023-12-31')
    """)
    # Add a matching row in the amenities table for the join
    test_spark.sql("""
        INSERT INTO catalog.schema.property_amenities VALUES (104, 'gym')
    """)
    test_pipeline.run(test_spark, set(["catalog.schema.property_images_amenities_join"]))
    result = test_spark.table("catalog.schema.property_images_amenities_join")
    # Only property_ids with uploaded_at > '2024-01-01' should be present
    valid_ids = set(row["property_id"] for row in result.collect())
    assert 104 not in valid_ids
    assert valid_ids == {101, 102, 103}