本文介绍如何在 Azure Functions 中生成、测试、调试和部署 Java Spring Cloud 函数。 完成后,函数在 消耗计划 上运行并响应 HTTP 请求。
先决条件
若要使用 Java 开发函数,请安装以下工具:
- Java 开发人员工具包版本 11
- Apache Maven 版本 3.0 或更高版本
- Azure CLI
- Azure Functions Core Tools 版本 4
重要
将 JAVA_HOME 环境变量设置为 JDK 的安装位置以完成本快速入门。
确保核心工具版本至少为 4.0.5455。
你将构建的内容
你将生成一个经典“Hello, World”函数,该函数在Azure Functions上运行,并使用 Spring Cloud 函数进行配置。
该函数接收一个 User JSON 对象,该对象包含用户名,并发送回一个 Greeting 对象,该对象包含该用户的欢迎消息。
该项目在 GitHub 上的 的 azure-function-java-worker 示例中提供。 如果您想查看本快速入门中描述的最终成果,可以直接使用该示例。
创建新的 Maven 项目
创建一个空的 Maven 项目,并使用 Spring Cloud 函数和Azure Functions对其进行配置。
在空文件夹中,创建新的 pom.xml 文件。 然后,从示例项目的 pom.xml 文件复制内容。
注意
此文件使用 Spring Boot 和 Spring Cloud 函数的 Maven 依赖项。 它还配置 Spring Boot 和 Azure Functions Maven 插件。
自定义应用程序的几个属性:
-
<functionAppName>是Azure函数的名称。 -
<functionAppRegion>是部署函数的Azure区域的名称。 -
<functionResourceGroup>是正在使用Azure资源组的名称。
直接在 pom.xml 文件的顶部附近更改这些属性,如以下示例所示:
    <properties>
        <java.version>11</java.version>

        <!-- Spring Boot start class. WARNING: correct class must be set -->
        <start-class>com.example.DemoApplication</start-class>

        <!-- customize those properties. WARNING: the functionAppName should be unique across Azure -->
        <azure.functions.maven.plugin.version>1.36.0</azure.functions.maven.plugin.version>
        <functionResourceGroup>my-spring-function-resource-group</functionResourceGroup>
        <functionAppServicePlanName>my-spring-function-service-plan</functionAppServicePlanName>
        <functionAppName>my-spring-function</functionAppName>
        <functionPricingTier>Y1</functionPricingTier>
        <functionAppRegion>eastus</functionAppRegion>
    </properties>
创建 Azure 配置文件
创建 src/main/resources 文件夹,并将以下 Azure Functions 配置文件添加到其中。
host.json:
{
  "version": "2.0",
  "extensionBundle": {
    "id": "Microsoft.Azure.Functions.ExtensionBundle",
    "version": "[4.*, 5.2.0)"
  },
  "functionTimeout": "00:10:00"
}
local.settings.json:
{
  "IsEncrypted": false,
  "Values": {
    "AzureWebJobsStorage": "",
    "FUNCTIONS_WORKER_RUNTIME": "java",
    "FUNCTIONS_EXTENSION_VERSION": "~4",
    "AzureWebJobsDashboard": ""
  }
}
创建域对象
Azure Functions 可以接收和发送 JSON 格式的对象。
创建 User 和 Greeting 表示域模型的对象。
如果要自定义本快速入门,可以创建具有更多属性的更复杂的对象。
创建 src/main/java/com/example/model 文件夹并添加以下两个文件:
User.java:
package com.example.model;

public class User {

    private String name;

    public User() {
    }

    public User(String name) {
        this.name = name;
    }

    public String getName() {
        return name;
    }

    public void setName(String name) {
        this.name = name;
    }
}
Greeting.java:
package com.example.model;

public class Greeting {

    private String message;

    public Greeting() {
    }

    public Greeting(String message) {
        this.message = message;
    }

    public String getMessage() {
        return message;
    }

    public void setMessage(String message) {
        this.message = message;
    }
}
创建 Spring Boot 应用程序
此应用程序管理所有业务逻辑,并有权访问完整的 Spring Boot 生态系统。 该功能相较于标准 Azure 函数,提供了两大主要优势:
- 它不依赖于 Azure Functions API,因此可以轻松将其移植到其他系统。 例如,可以在普通 Spring Boot 应用程序中重复使用它。
- 可以使用 Spring Boot 中的所有
@Enable批注来添加新功能。
在 src/main/java/com/example 文件夹中,创建以下文件,该文件是正常的 Spring Boot 应用程序:
DemoApplication.java:
package com.example;

import org.springframework.boot.SpringApplication;
import org.springframework.boot.autoconfigure.SpringBootApplication;

@SpringBootApplication
public class DemoApplication {
    public static void main(String[] args) throws Exception {
        SpringApplication.run(DemoApplication.class, args);
    }
}
现在,在 src/main/java/com/example/hello 文件夹中创建以下文件。 此代码包含一个 Spring Boot 组件,该组件表示要运行的函数:
Hello.java:
package com.example.hello;

import com.example.model.*;
import org.springframework.stereotype.Component;
import java.util.function.Function;

@Component
public class Hello implements Function<User, Greeting> {

    @Override
    public Greeting apply(User user) {
        return new Greeting("Hello, " + user.getName() + "!\n");
    }
}
注意
Hello 函数非常具体:
- 它是一个
java.util.function.Function。 它包含业务逻辑,并使用标准 Java API 将一个对象转换为另一个对象。 - 因为它带有
@Component注解,所以它是一个 Spring Bean。 默认情况下,其名称与类相同,但以小写字符开头:hello如果要在应用程序中创建其他函数,请遵循此命名约定非常重要。 该名称必须与在下一部分中创建的Azure Functions名称匹配。
创建 Azure 函数
若要使用完整的Azure Functions API,请创建一个Azure函数,该函数将其执行委托给在上一步中创建的 Spring Cloud 函数。
在 src/main/java/com/example/hello 文件夹中,创建以下 Azure Function 类文件:
HelloHandler.java:
package com.example.hello;

import com.microsoft.azure.functions.*;
import com.microsoft.azure.functions.annotation.AuthorizationLevel;
import com.microsoft.azure.functions.annotation.FunctionName;
import com.microsoft.azure.functions.annotation.HttpTrigger;
import com.example.model.*;
import org.springframework.beans.factory.annotation.Autowired;
import org.springframework.stereotype.Component;

import java.util.Optional;

@Component
public class HelloHandler {

    @Autowired
    private Hello hello;

    @FunctionName("hello")
    public HttpResponseMessage execute(
        @HttpTrigger(name = "request", methods = {HttpMethod.GET, HttpMethod.POST}, authLevel = AuthorizationLevel.ANONYMOUS) HttpRequestMessage<Optional<User>> request, ExecutionContext context) {
        User user = request.getBody()
                           .filter(u -> u.getName() != null)
                           .orElseGet(() -> new User(request.getQueryParameters().getOrDefault("name", "world")));
        context.getLogger().info("Greeting user name: " + user.getName());
        return request.createResponseBuilder(HttpStatus.OK)
                      .body(hello.apply(user))
                      .header("Content-Type", "application/json")
                      .build();
    }
}
此Java类是具有以下功能的Azure函数:
- 该类具有
@Component注释,因此它是 Spring Bean。 - 由
@FunctionName("hello")批注定义的函数名称是hello。 - 该类实现真正的 Azure 函数,因此可以在此处使用完整的 Azure Functions API。
添加单元测试
此步骤是可选的,但建议验证应用程序是否正常工作。
创建 src/test/java/com/example 文件夹并添加以下 JUnit 测试:
HelloTest.java:
package com.example;

import com.example.hello.Hello;
import com.example.model.Greeting;
import com.example.model.User;
import org.junit.jupiter.api.Test;

import static org.assertj.core.api.Assertions.assertThat;

public class HelloTest {

    @Test
    public void test() {
        Greeting result = new Hello().apply(new User("foo"));
        assertThat(result.getMessage()).isEqualTo("Hello, foo!\n");
    }
}
现在可以使用 Maven 测试Azure函数:
mvn clean test
在本地运行函数
将应用程序部署到Azure函数之前,请在本地测试它。
首先,将应用程序打包到 JAR 文件中:
mvn package
打包应用程序后,请使用 azure-functions Maven 插件运行它:
mvn azure-functions:run
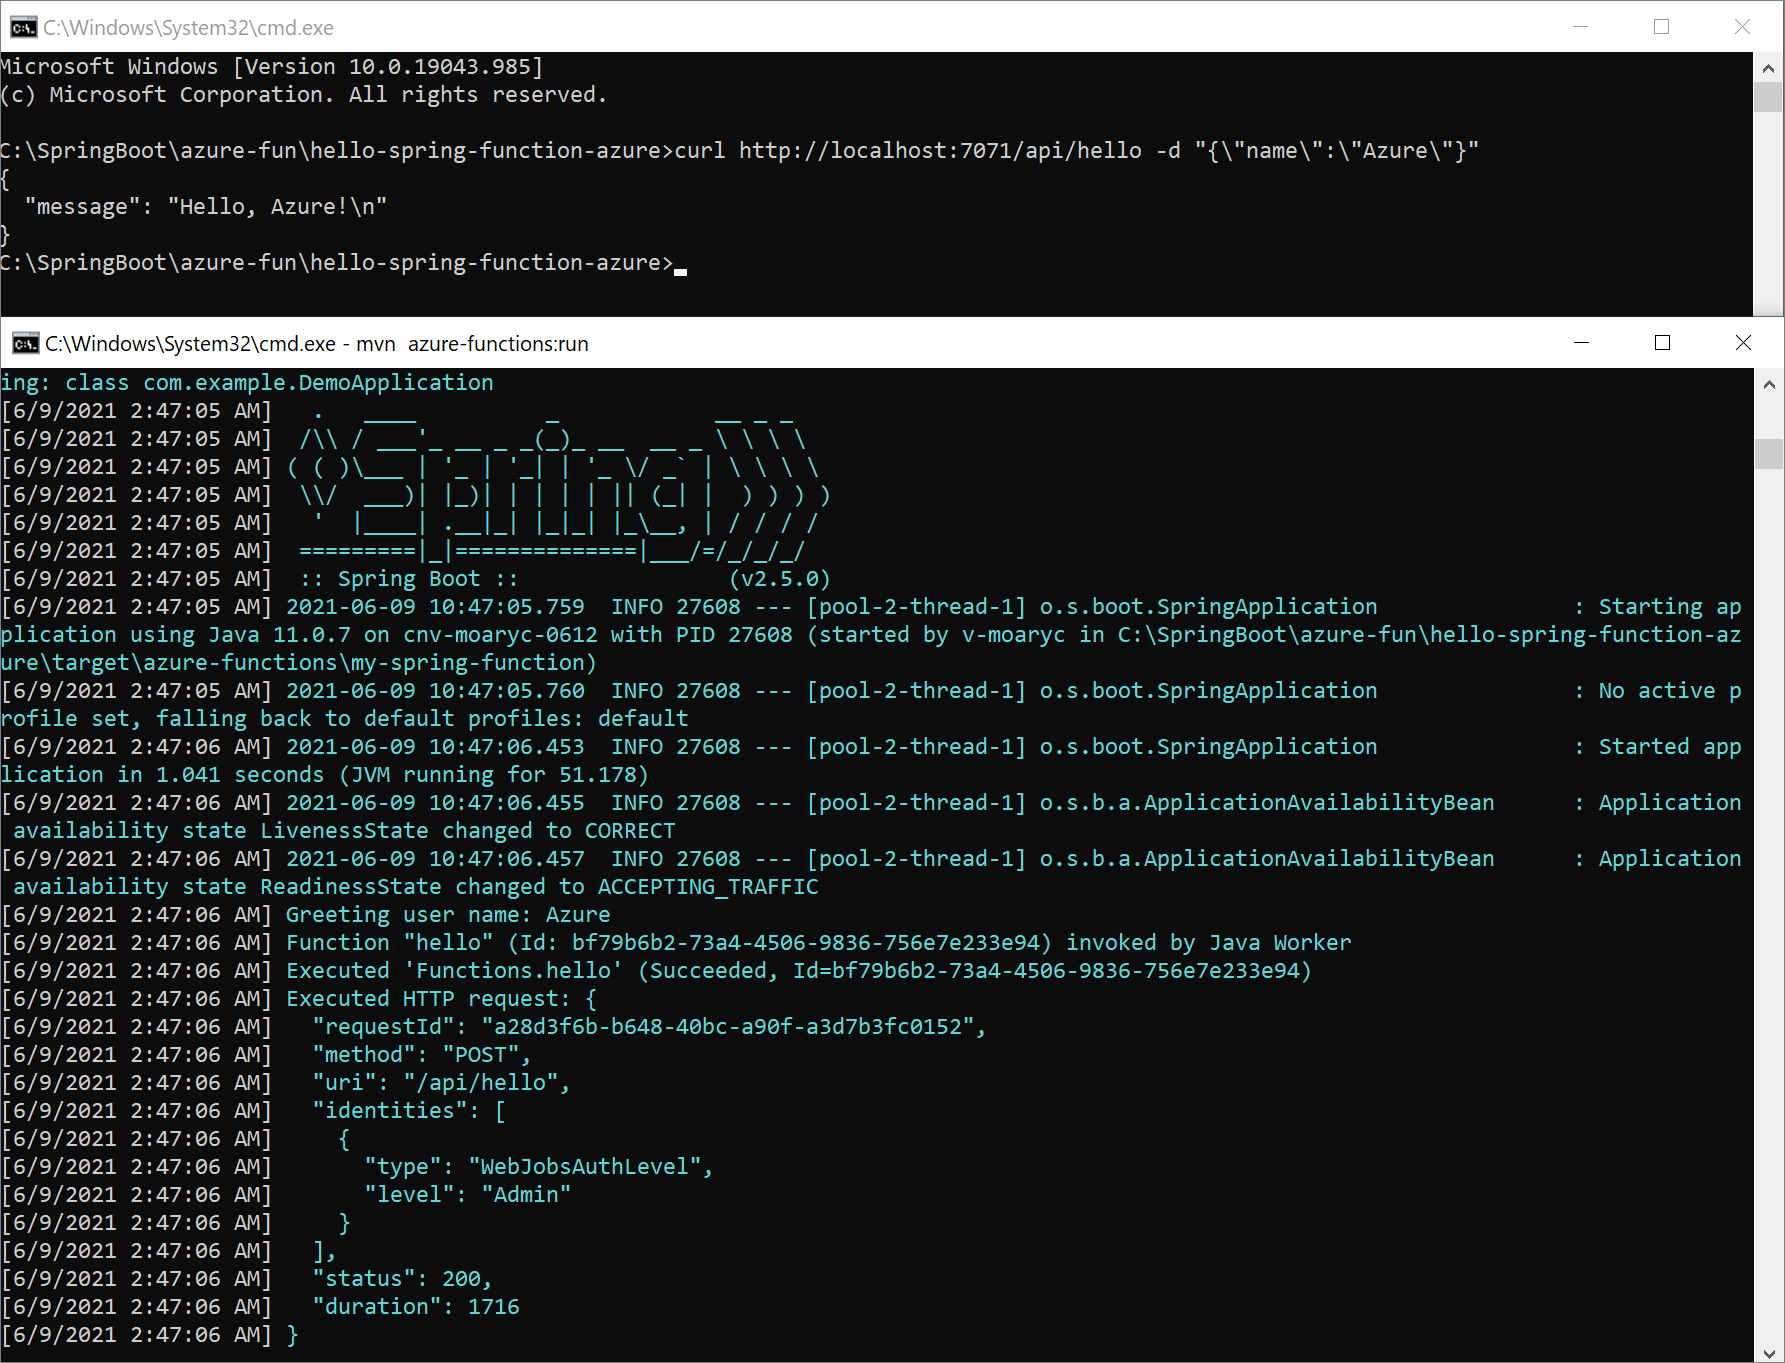
Azure函数现已在 localhost 上使用端口 7071 提供。 通过向该函数发送 POST 请求来测试它,请求中包含一个 JSON 格式的 User 对象。 例如,使用 cURL:
curl -X POST http://localhost:7071/api/hello -d "{\"name\":\"Azure\"}"
函数以 Greeting JSON 格式响应对象:
{
  "message": "Hello, Azure!\n"
}
下面是屏幕顶部的 cURL 请求的屏幕截图,以及底部的本地 Azure 函数:
在本地调试函数
以下部分介绍如何调试函数。
使用 Intellij IDEA 进行调试
在 IntelliJ IDEA 中打开项目,然后创建要附加的 远程 JVM 调试 运行配置。 有关详细信息,请参阅 教程:远程调试。
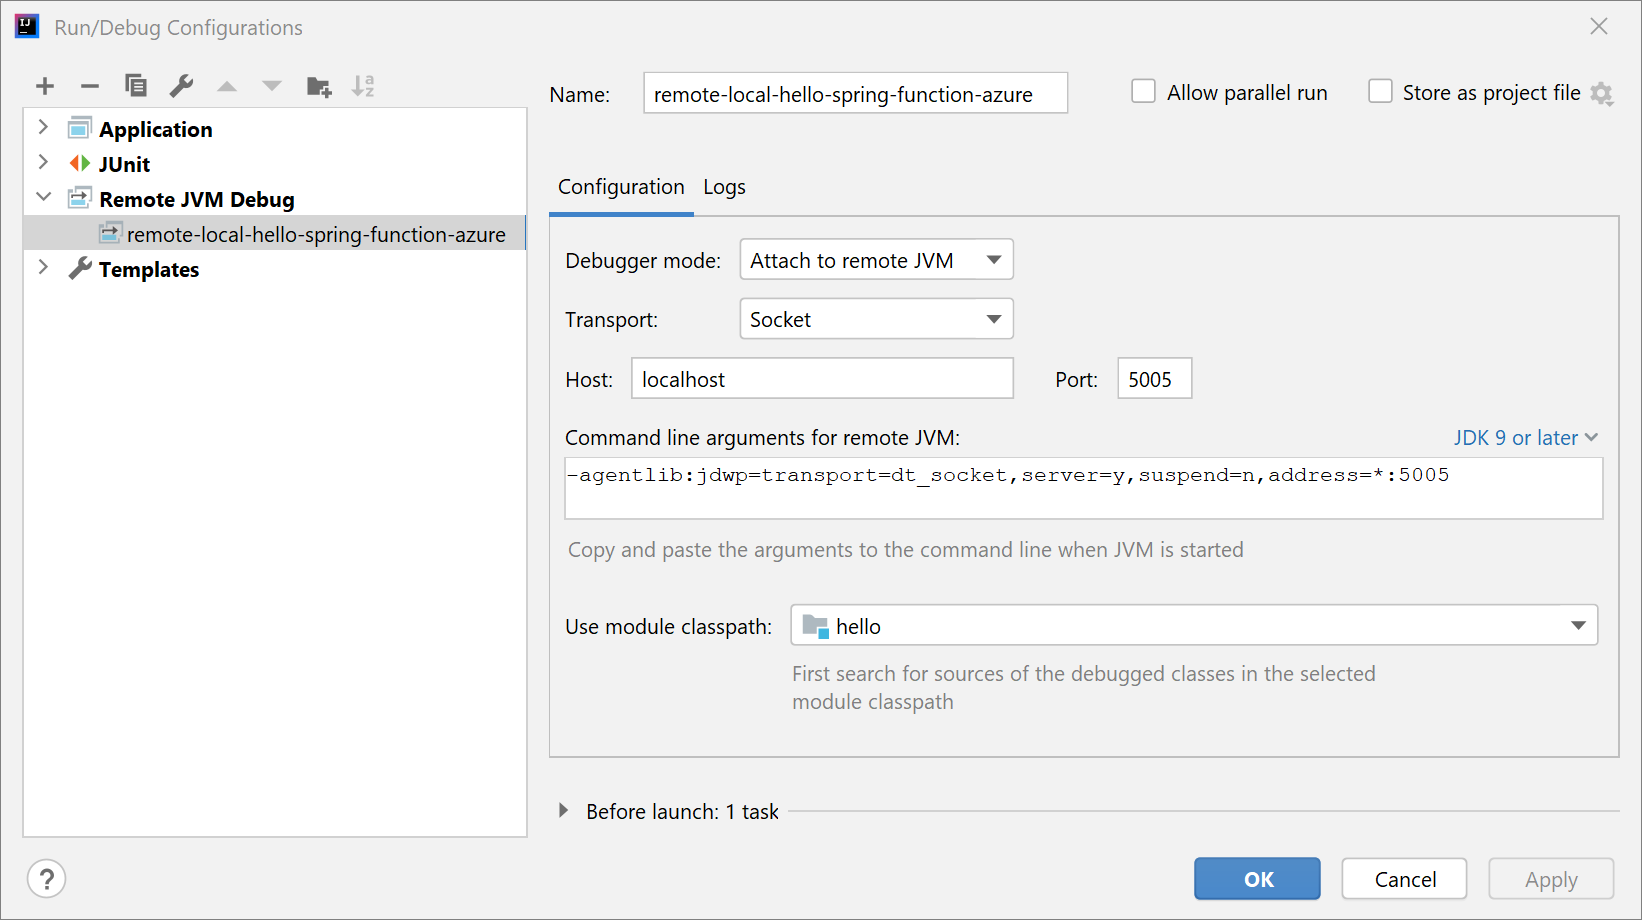
使用以下命令运行应用程序:
mvn azure-functions:run -DenableDebug
应用程序启动时,会看到以下输出:
Worker process started and initialized.
Listening for transport dt_socket at address: 5005
在 IntelliJ IDEA 中启动项目调试。 你将看到以下输出:
Connected to the target VM, address: 'localhost:5005', transport: 'socket'
标记要调试的断点。 IntelliJ IDEA 在发送请求后进入调试模式。
使用 Visual Studio Code 进行调试
在 Visual Studio Code 中打开项目,然后配置以下 launch.json 文件内容:
{
    "version": "0.2.0",
    "configurations": [
        {
            "type": "java",
            "name": "Attach to Remote Program",
            "request": "attach",
            "hostName": "127.0.0.1",
            "port": 5005
        }
    ]
}
使用以下命令运行应用程序:
mvn azure-functions:run -DenableDebug
应用程序启动时,会看到以下输出:
Worker process started and initialized.
Listening for transport dt_socket at address: 5005
在Visual Studio Code中启动项目调试,然后标记要调试的断点。 Visual Studio Code发送请求后进入调试模式。 有关详细信息,请参阅 运行和调试 Java。
将函数部署到 Azure Functions
现在,你将将 Azure 函数发布到生产环境。 请记住,在 <functionAppName> 文件中定义的 <functionAppRegion>、<functionResourceGroup>和 属性用于配置函数。
注意
Maven 插件需要使用 Azure 进行身份验证。 如果已安装 Azure CLI,请先使用 az login,然后再继续操作。
有关更多身份验证选项,请参阅存储库中的azure-maven-plugins。
运行 Maven 以自动部署函数:
mvn azure-functions:deploy
现在请转到 Azure 门户,找到已创建的 Function App。
选择函数:
- 在函数概述中,记下函数的 URL。
- 若要验证你的函数是否正在运行,请选择导航菜单上的 日志流式处理。
现在,如上一部分所示,使用 cURL 访问正在运行的函数,如以下示例所示。 请务必将 your-function-name 替换为实际函数名称。
curl https://your-function-name.azurewebsites.net/api/hello -d "{\"name\":\"Azure\"}"
与上一部分一样,函数应使用 Greeting 对象回答,仍采用 JSON 格式:
{
  "message": "Hello, Azure!\n"
}
恭喜,你已在 Azure Functions 上运行 Spring Cloud 函数! 有关 Spring Cloud 函数的详细信息和示例,请参阅以下资源:
后续步骤
若要了解有关 Spring 和 Azure 的详细信息,请继续阅读 Azure 上的 Spring 文档中心。