你当前正在访问 Microsoft Azure Global Edition 技术文档网站。 如果需要访问由世纪互联运营的 Microsoft Azure 中国技术文档网站,请访问 https://docs.azure.cn。
本文介绍你如何以管理员的身份通过应用自定义主题,更改文本,并将帮助链接修改为指向自己的自定义帮助资源,从而自定义应用程序的 UI。
以下屏幕截图显示了使用标准主题的页面:

以下屏幕截图显示了使用自定义主题的页面,其中突出显示了自定义 UI 元素:

提示
还可以自定义浏览器的地址栏和收藏夹列表中显示的图像。
创建主题
要创建自定义主题,请导航到“自定义”页面的“外观”部分。

在此页上,可以自定义应用程序的以下方面:
应用程序徽标
大小不超过 1 MB 且带有透明背景的 PNG 图像。 此徽标显示在 IoT Central 应用程序标题栏。
如果徽标图像包含应用程序的名称,你可以隐藏应用程序名称文本。 有关详细信息,请参阅管理应用程序。
浏览器图标(网站图标)
大小不超过 32 x 32 像素且带有透明背景的 PNG 图像。 Web 浏览器可以在地址栏、历史记录、书签和浏览器标签页中使用此图像。
浏览器颜色
可以更改页头的颜色,以及用于突出按钮和其他强调内容的颜色。 请使用 ##ff6347 格式的六个字符十六进制颜色值。 有关十六进制值颜色表示法的详细信息,请参阅 HTML 颜色。
注意
可以随时还原回“外观”部分的默认选项。
面向操作员的更改
如果管理员创建了自定义主题,则应用程序的操作员和其他用户不再可以在“外观”中选择主题。
替换帮助链接
若要为操作员和其他用户提供自定义帮助信息,可以修改应用程序“帮助”菜单中的链接。
要修改帮助链接,请导航到“自定义”页面的“帮助链接”部分。

还可以将新条目添加到帮助菜单,以及删除默认条目:

注意
可以随时还原到“自定义”页上的默认帮助链接。
更改应用程序文本
要更改应用程序中的文本标签,请导航到“自定义”页面的“文本”部分。
在此页上,你可以为所有支持的语言自定义应用程序的文本。 上传自定义文本文件后,应用程序文本会自动显示更新后的文本。 可以通过编辑和覆盖自定义文件进行进一步自定义。 可以对 IoT Central UI 支持的任何语言重复该过程。
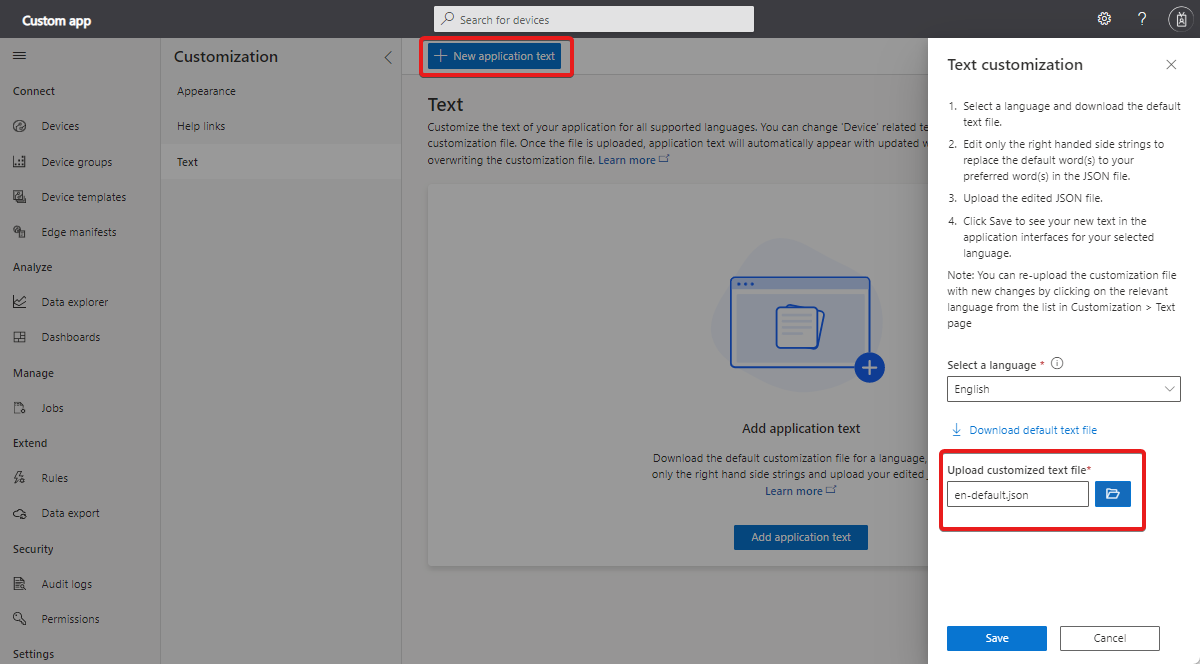
以下示例显示了当你以英文查看应用程序时如何将单词 Device 更改为 Asset:
选择“添加应用程序文本”并在下拉列表中选择英语。
下载默认文本文件。 该文件包含可以更改的文本字符串的 JSON 定义。
若要将单词
device替换为asset,在文本编辑器中打开该文件,然后编辑字符串,如以下示例所示:{ "Device": { "AllEntities": "All assets", "Approve": { "Confirmation": "Are you sure you want to approve this asset?", "Confirmation_plural": "Are you sure you want to approve these assets?" }, "Block": { "Confirmation": "Are you sure you want to block this asset?", "Confirmation_plural": "Are you sure you want to block these assets?" }, "ConnectionStatus": { "Connected": "Connected", "ConnectedAt": "Connected {{lastReportedTime}}", "Disconnected": "Disconnected", "DisconnectedAt": "Disconnected {{lastReportedTime}}" }, "Create": { "Description": "Create a new asset with the given settings", "ID_HelpText": "Enter a unique identifier this asset will use to connect.", "Instructions": "To create a new asset, select an asset template, a name, and a unique ID. <1>Learn more <1></1></1>", "Name_HelpText": "Enter a user friendly name for this asset. If not specified, this will be the same as the asset ID.", "Simulated_Label": "Simulate this asset?", "Simulated_HelpText": "A simulated asset generates telemetry that enables you to test the behavior of your application before you connect a real asset.", "Title": "Create a new asset", "Unassigned_HelpText": "Choosing this will not assign the new asset to any asset template.", "HardwareId_Label": "Hardware type", "HardwareId_HelpText": "Optionally specify the manufacturer of the asset", "MiddlewareId_Label": "Connectivity solution", "MiddlewareId_HelpText": "Optionally choose what type of connectivity solution is installed on the asset" }, "Delete": { "Confirmation": "Are you sure you want to delete this asset?", "Confirmation_plural": "Are you sure you want to delete these assets?", "Title": "Delete asset permanently?", "Title_plural": "Delete assets permanently?" }, "Entity": "Asset", "Entity_plural": "Assets", "Import": { "Title": "Import assets from a file", "HelpText": "Choose the organization that can access the assets you’re importing, and then choose the file you’ll use to import. <1>Learn more <1></1></1>", "Action": "Import assets with an org assignment from a chosen file.", "Upload_Action": "Upload a .csv file", "Browse_HelpText": "You’ll use a CSV file to import assets. Click “Learn more” for samples and formatting guidelines." }, "JoinToGateway": "Attach to gateway", "List": { "Description": "Grid displaying list of assets", "Empty": { "Text": "Assets will send data to IoT Central for you to monitor, store, and analyze. <1>Learn more <1></1></1>", "Title": "Create an Asset" } }, "Migrate": { "Confirmation": "Migrating selected asset to another template. Select migration target.", "Confirmation_plural": "Migrating selected assets to another template. Select migration target." }, "Properties": { "Definition": "Asset template", "DefinitionId": "Asset template ID", "Id": "Asset ID", "Name": "Asset name", "Scope": "Organization", "Simulated": "Simulated", "Status": "Asset status" }, "Rename": "Rename asset", "Status": { "Blocked": "Blocked", "Provisioned": "Provisioned", "Registered": "Registered", "Unassociated": "Unassociated", "WaitingForApproval": "Waiting for approval" }, "SystemAreas": { "Downstreamassets": "Downstream assets", "Module_plural": "Modules", "Properties": "Properties", "RawData": "Raw data" }, "TemplateList": { "Empty": "No definitions found.", "FilterInstructions": "Filter templates" }, "Unassigned": "Unassigned", "Unblock": { "Confirmation": "Are you sure you want to unblock this asset?", "Confirmation_plural": "Are you sure you want to unblock these assets?" } } }上传你编辑的自定义文件并选择“保存”以在应用程序中查看你的新文本:
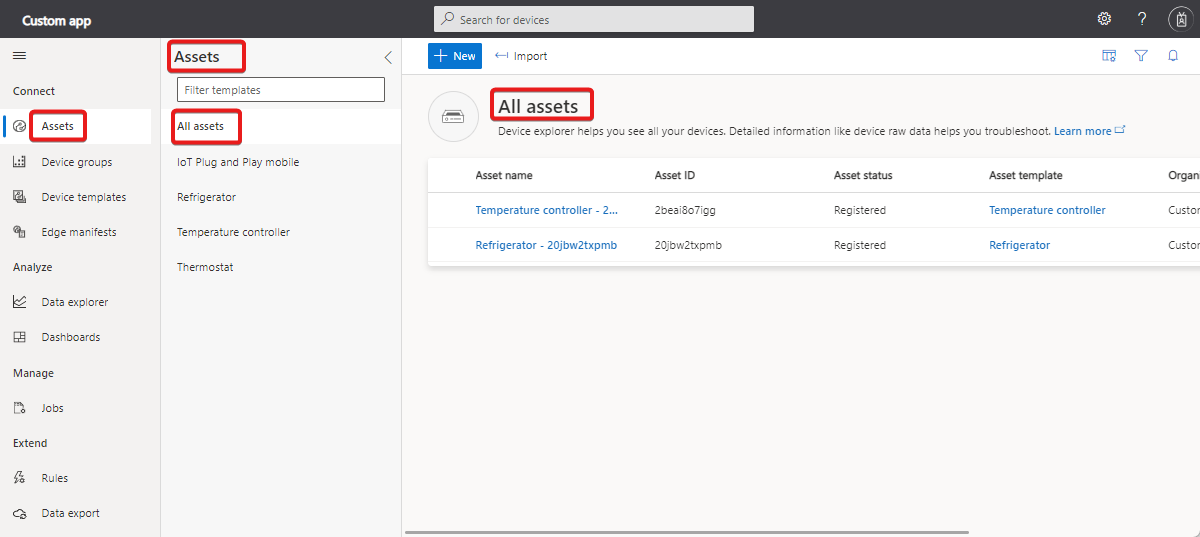
UI 现在将使用新的文本值:


可通过从“自定义”页面的“文本”部分的列表中选择相关语言,重新上传包含更多更改的自定义文件。
后续步骤
了解如何在 Azure IoT Central 应用程序中自定义 UI 后,建议接下来学习: