你当前正在访问 Microsoft Azure Global Edition 技术文档网站。 如果需要访问由世纪互联运营的 Microsoft Azure 中国技术文档网站,请访问 https://docs.azure.cn。
概述
利用 Microsoft Azure 中的推送通知支持,可以访问易于使用且横向扩展的多平台推送基础结构,这大大简化了为移动平台的使用者应用程序和企业应用程序实现推送通知的过程。
由于法规或安全约束,有时应用程序可能想要在通知中包含某些无法通过标准推送通知基础结构传输的内容。 本教程介绍如何通过客户端设备和应用后端之间安全且经过验证的连接发送敏感信息,以便获得相同的体验。
在高级别中,此流程如下所示:
- 应用后端:
- 在后端数据库中存储安全有效负载。
- 将此通知的 ID 发送到此设备(不发送任何安全信息)。
- 此设备上的应用在接收通知时:
- 此设备将联系请求安全有效负载的后端。
- 此应用可以将有效负载显示为设备上的通知。
请务必注意,在之前的流程(以及本教程中)中,我们假设此设备会在用户登录后在本地存储中存储身份验证令牌。 这可以保证无缝的体验,因为该设备可以使用此令牌检索通知的安全有效负载。 如果应用程序未在设备上存储身份验证令牌,或者如果这些令牌可能已过期,此设备应用在收到通知时应显示提示用户启动应用的通用通知。 然后,应用对用户进行身份验证并显示通知有效负载。
本安全推送教程演示如何安全地发送推送通知。 本教程以“通知用户”教程为基础,因此应先完成该教程中的步骤。
注意
本教程假设你已按照使用 Azure 通知中心将推送通知发送到 iOS 应用中所述创建并配置了通知中心。
WebAPI 项目
在 Visual Studio 中,打开在通知用户教程中创建的 AppBackend 项目。
在 Notifications.cs 中,将整个 Notifications 类替换为以下代码。 请确保将占位符替换为通知中心的连接字符串(具有完全访问权限)和中心名称。 可以从 Azure 门户获取这些值。 现在,该模块将表示要发送的其他安全通知。 在完整的实现中,通知将存储在数据库中;为简单起见,在此示例中我们将它们存储在内存中。
 public class Notification
 {
     public int Id { get; set; }
     public string Payload { get; set; }
     public bool Read { get; set; }
 }

 public class Notifications
 {
     public static Notifications Instance = new Notifications();

     private List<Notification> notifications = new List<Notification>();

     public NotificationHubClient Hub { get; set; }

     private Notifications() {
         Hub = NotificationHubClient.CreateClientFromConnectionString("{conn string with full access}",     "{hub name}");
     }

     public Notification CreateNotification(string payload)
     {
         var notification = new Notification() {
         Id = notifications.Count,
         Payload = payload,
         Read = false
         };

         notifications.Add(notification);

         return notification;
     }

     public Notification ReadNotification(int id)
     {
         return notifications.ElementAt(id);
     }
 }
在 NotificationsController.cs 中,将 NotificationsController 类定义中的代码替换为以下代码。 该组件为设备实现了一种安全检索通知的方法,还提供了一种方法来触发到设备的安全推送(用于本教程的教学目的)。 请注意,在向通知中心发送通知时,我们将只发送一个包含通知 ID(且没有实际的消息内容)的原始通知:
 public NotificationsController()
 {
     Notifications.Instance.CreateNotification("This is a secure notification!");
 }

 // GET api/notifications/id
 public Notification Get(int id)
 {
     return Notifications.Instance.ReadNotification(id);
 }

 public async Task<HttpResponseMessage> Post()
 {
     var secureNotificationInTheBackend = Notifications.Instance.CreateNotification("Secure confirmation.");
     var usernameTag = "username:" + HttpContext.Current.User.Identity.Name;

     // windows
     var rawNotificationToBeSent = new Microsoft.Azure.NotificationHubs.WindowsNotification(secureNotificationInTheBackend.Id.ToString(),
                     new Dictionary<string, string> {
                         {"X-WNS-Type", "wns/raw"}
                     });
     await Notifications.Instance.Hub.SendNotificationAsync(rawNotificationToBeSent, usernameTag);

     // apns
     await Notifications.Instance.Hub.SendAppleNativeNotificationAsync("{\"aps\": {\"content-available\": 1}, \"secureId\": \"" + secureNotificationInTheBackend.Id.ToString() + "\"}", usernameTag);

     // gcm
     await Notifications.Instance.Hub.SendGcmNativeNotificationAsync("{\"data\": {\"secureId\": \"" + secureNotificationInTheBackend.Id.ToString() + "\"}}", usernameTag);

     return Request.CreateResponse(HttpStatusCode.OK);
 }
请注意,Post 方法现在不发送 toast 通知。 它将发送只包含通知 ID 且没有任何敏感内容的原始通知。 另外,请确保注释在通知中心上未配置其凭据的平台的发送操作,因为它们会导致错误。
- 现在,我们将此应用重新部署到 Azure 网站,以便可以从所有设备对其进行访问。 右键单击 AppBackend 项目,并选择“发布”。
- 选择 Azure 网站作为发布目标。 使用 Azure 帐户登录,选择现有或新的网站,并记下“连接”选项卡中的“目标 URL”属性。在本教程后面的部分中,我们将此 URL 称为“后端终结点” 。 单击“发布” 。
修改 iOS 项目
现在,将应用后端修改为只发送通知的 ID,必须更改 iOS 应用来处理该通知并回调后端以检索要显示的安全消息。
若要实现此目标,我们必须编写逻辑来从应用后端检索安全内容。
在
AppDelegate.m中,请确保该应用将注册无提示通知,以便它可以处理从后端发送的通知 ID。 在 didFinishLaunchingWithOptions 中添加UIRemoteNotificationTypeNewsstandContentAvailability选项:[[UIApplication sharedApplication] registerForRemoteNotificationTypes: UIRemoteNotificationTypeAlert | UIRemoteNotificationTypeBadge | UIRemoteNotificationTypeSound | UIRemoteNotificationTypeNewsstandContentAvailability];在
AppDelegate.m中,通过以下声明在顶部添加实现部分:@interface AppDelegate () - (void) retrieveSecurePayloadWithId:(int)payloadId completion: (void(^)(NSString*, NSError*)) completion; @end然后将以下代码添加到实现部分,将占位符
{back-end endpoint}替换为先前获取的后端终结点:NSString *const GetNotificationEndpoint = @"{back-end endpoint}/api/notifications"; - (void) retrieveSecurePayloadWithId:(int)payloadId completion: (void(^)(NSString*, NSError*)) completion; { // check if authenticated ANHViewController* rvc = (ANHViewController*) self.window.rootViewController; NSString* authenticationHeader = rvc.registerClient.authenticationHeader; if (!authenticationHeader) return; NSURLSession* session = [NSURLSession sessionWithConfiguration:[NSURLSessionConfiguration defaultSessionConfiguration] delegate:nil delegateQueue:nil]; NSURL* requestURL = [NSURL URLWithString:[NSString stringWithFormat:@"%@/%d", GetNotificationEndpoint, payloadId]]; NSMutableURLRequest* request = [NSMutableURLRequest requestWithURL:requestURL]; [request setHTTPMethod:@"GET"]; NSString* authorizationHeaderValue = [NSString stringWithFormat:@"Basic %@", authenticationHeader]; [request setValue:authorizationHeaderValue forHTTPHeaderField:@"Authorization"]; NSURLSessionDataTask* dataTask = [session dataTaskWithRequest:request completionHandler:^(NSData *data, NSURLResponse *response, NSError *error) { NSHTTPURLResponse* httpResponse = (NSHTTPURLResponse*) response; if (!error && httpResponse.statusCode == 200) { NSLog(@"Received secure payload: %@", [[NSString alloc] initWithData:data encoding:NSUTF8StringEncoding]); NSMutableDictionary *json = [NSJSONSerialization JSONObjectWithData:data options: NSJSONReadingMutableContainers error: &error]; completion([json objectForKey:@"Payload"], nil); } else { NSLog(@"Error status: %ld, request: %@", (long)httpResponse.statusCode, error); if (error) completion(nil, error); else { completion(nil, [NSError errorWithDomain:@"APICall" code:httpResponse.statusCode userInfo:nil]); } } }]; [dataTask resume]; }此方法使用存储在共享首选项中的凭据调用应用后端来检索通知内容。
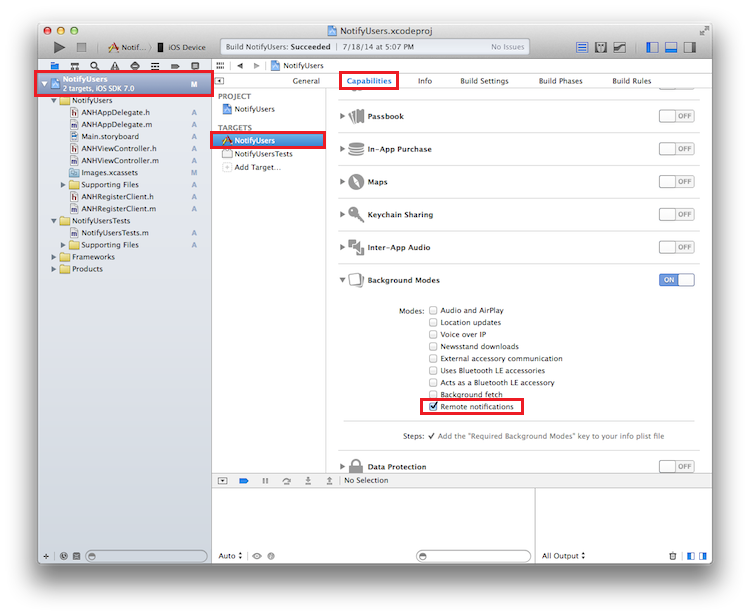
现在处理传入通知,并使用上面的方法来检索要显示的内容。 首先,使 iOS 应用能在接收推送通知时在后台运行。 在 XCode 中,在左侧面板上选择应用项目,并单击中央窗格的“目标”部分中的主应用目标。
然后,单击中央窗格顶部的“功能”选项卡,然后选中“远程通知”框 。
在
AppDelegate.m中,添加以下方法来处理推送通知:-(void)application:(UIApplication *)application didReceiveRemoteNotification:(NSDictionary *)userInfo fetchCompletionHandler:(void (^)(UIBackgroundFetchResult))completionHandler { NSLog(@"%@", userInfo); [self retrieveSecurePayloadWithId:[[userInfo objectForKey:@"secureId"] intValue] completion:^(NSString * payload, NSError *error) { if (!error) { // show local notification UILocalNotification* localNotification = [[UILocalNotification alloc] init]; localNotification.fireDate = [NSDate dateWithTimeIntervalSinceNow:0]; localNotification.alertBody = payload; localNotification.timeZone = [NSTimeZone defaultTimeZone]; [[UIApplication sharedApplication] scheduleLocalNotification:localNotification]; completionHandler(UIBackgroundFetchResultNewData); } else { completionHandler(UIBackgroundFetchResultFailed); } }]; }请注意,最好由后端处理缺失身份验证标头属性或拒绝的情况。 这些情况下的特定处理主要取决于目标用户的体验。 一种选择是显示包含用户用来进行身份验证的通用提示的通知,从而检索实际通知。
运行应用程序
若要运行应用程序,请执行以下操作:
- 在 XCode 中,在物理 iOS 设备上运行此应用(推送通知将无法在模拟器中正常工作)。
- 在 iOS 应用 UI 中,输入用户名和密码。 这些信息可以是任意字符串,但必须是相同的值。
- 在 iOS 应用 UI 中,单击“登录” 。 然后单击“发送推送” 。 应该能看到通知中心中所显示的安全通知。