你当前正在访问 Microsoft Azure Global Edition 技术文档网站。 如果需要访问由世纪互联运营的 Microsoft Azure 中国技术文档网站,请访问 https://docs.azure.cn。
本教程的内容:
- 使用 Visual Studio 创建可部署到 HoloLens 的全息应用
- 添加将本地渲染与远程渲染内容相结合所需的代码片段和项目设置
本教程重点介绍如何向本机 Holographic App 示例添加将本地渲染与 Azure 远程渲染相结合所需的位。 此应用中的唯一一种状态反馈是通过 Visual Studio 内部的调试输出面板进行的,因此建议从 Visual Studio 内部启动该示例。 添加适当的应用内反馈超出了本示例的范围,因为从头开始生成动态文本面板需要进行大量编码。 StatusDisplay 类是一个很好的起点,它是 GitHub 上远程播放器示例项目的一部分。 实际上,本教程的预设版本使用的是该类的本地副本。
提示
ARR 示例存储库包含本教程的结果作为可以使用的 Visual Studio 项目。 它还包含通过 UI 类 StatusDisplay 提供的适当错误和状态报告。 在本教程中,所有特定于 ARR 的附加项都由 #ifdef USE_REMOTE_RENDERING / #endif 限定范围,因此很容易识别远程渲染附加项。
先决条件
本教程需要:
- 帐户信息(帐户 ID、帐户密钥、帐户域、订阅 ID)。 如果你没有帐户,请创建一个帐户。
- Windows SDK 10.0.18362.0(下载)。
- Visual Studio 2022 的最新版本(下载)。
- 适用于混合现实的 Visual Studio Tools。 具体来说,必须安装以下工作负载:
- 使用 C++ 的桌面开发
- 通用 Windows 平台 (UWP) 开发
- 适用于 Visual Studio 的 Windows 混合现实应用模板(下载)。
创建新的全息应用示例
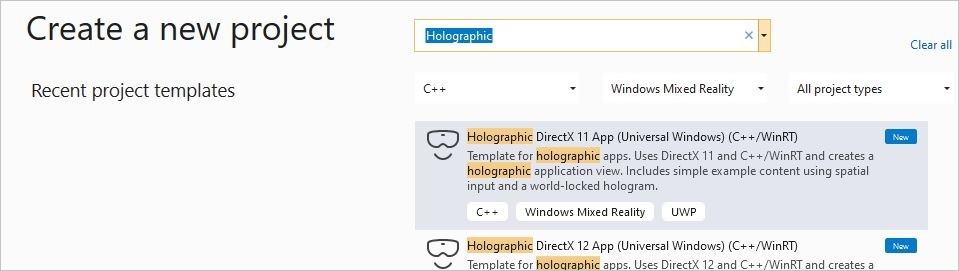
第一步是创建一个普通示例,作为远程渲染集成的基础。 打开 Visual Studio 并选择“创建新项目”,然后搜索“DirectX 11 全息应用(通用 Windows) (C++/WinRT)”
键入所选项目名称,选择一个路径,然后选择“创建”按钮。 在新项目中,将配置切换为“调试/ARM64”。 现在应该能够编译它,并将它部署到连接的 HoloLens 2 设备上。 如果在 HoloLens 上运行它,你应该会在自己面前看到一个旋转的立方体。
通过 NuGet 添加远程渲染依赖项
添加远程渲染功能的第一步是添加客户端依赖项。 相关依赖项以 NuGet 包的形式提供。 在解决方案资源管理器中,右键单击项目,然后从上下文菜单中选择“管理 NuGet 包...”。
在出现的对话框中,浏览名为“Microsoft.Azure.RemoteRendering.Cpp”的 NuGet 包:
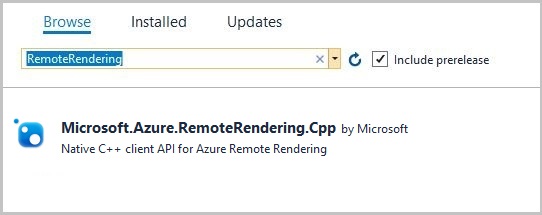
并将其添加到项目中,方法是选中该包,然后按“安装”按钮。
该 NuGet 包会向项目添加远程渲染依赖项。 具体来说:
- 链接到客户端库 (RemoteRenderingClient.lib)。
- 设置 .dll 依赖项。
- 将正确的路径设置为 include 目录。
项目准备
我们需要对现有项目进行一些小的更改。 这些更改很细微,但没有它们,远程渲染就无法正常工作。
在 DirectX 设备上启用多线程保护
DirectX11 设备必须启用多线程保护。 若要更改此设置,请打开“Common”文件夹中的 DeviceResources.cpp 文件,并在 DeviceResources::CreateDeviceResources() 函数的末尾插入以下代码:
// Enable multi thread protection as now multiple threads use the immediate context.
Microsoft::WRL::ComPtr<ID3D11Multithread> contextMultithread;
if (context.As(&contextMultithread) == S_OK)
{
    contextMultithread->SetMultithreadProtected(true);
}
启用应用清单中的网络功能
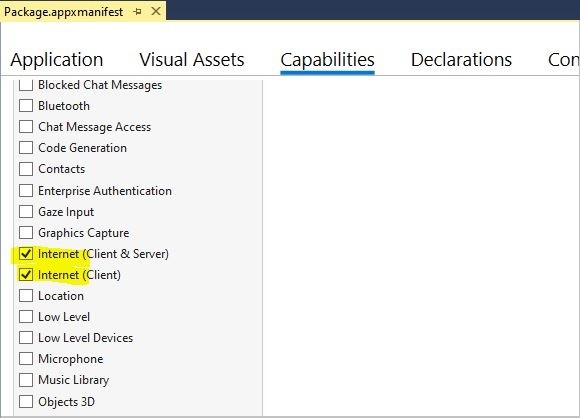
必须为已部署的应用显式启用网络功能。 如果不配置此功能,连接查询最终将导致超时。 若要启用此功能,请双击解决方案资源管理器中的 package.appxmanifest 项。 在下一个 UI 中,转到“功能”选项卡,然后选择:
- Internet(客户端和服务器)
- Internet (客户端)
集成远程渲染
现在,项目已准备完毕,我们可以开始编写代码了。 HolographicAppMain 类(HolographicAppMain.h/cpp 文件)是该应用程序一个很好的入口点,因为它具有初始化、取消初始化和渲染所需的所有挂钩。
包括
首先添加必要的 include。 向 HolographicAppMain.h 文件添加以下 include:
#include <AzureRemoteRendering.h>
...向 HolographicAppMain.cpp 文件添加以下附加的 include 指令:
#include <AzureRemoteRendering.inl>
#include <RemoteRenderingExtensions.h>
#include <windows.perception.spatial.h>
为了简化代码,我们在 HolographicAppMain.h 文件的顶部、include 指令的后面定义以下命名空间快捷方式:
namespace RR = Microsoft::Azure::RemoteRendering;
此快捷方式很有用;有了它,不管在哪里,我们都不必写出完整的命名空间,却仍然能够识别特定于 ARR 的数据结构。 当然,我们也可以使用 using namespace... 指令。
远程渲染初始化
在应用程序的生存期内,我们需要为会话等资源保留几个对象。 该生存期与应用程序的 HolographicAppMain 对象的生存期一致,因此,我们将我们的对象添加为 HolographicAppMain 类的成员。 下一步是在 HolographicAppMain.h 文件中添加以下类成员:
class HolographicAppMain
{
    ...
    // members:
    std::string m_sessionOverride;                // if we have a valid session ID, we specify it here. Otherwise a new one is created
    RR::ApiHandle<RR::RemoteRenderingClient> m_client;  // the client instance
    RR::ApiHandle<RR::RenderingSession> m_session;    // the current remote rendering session
    RR::ApiHandle<RR::RenderingConnection> m_api;       // the API instance, that is used to perform all the actions. This is just a shortcut to m_session->Connection()
    RR::ApiHandle<RR::GraphicsBindingWmrD3d11> m_graphicsBinding; // the graphics binding instance
}
HolographicAppMain 类的构造函数非常适合进行实际实现。 在这里,我们必须进行三种类型的初始化:
- 远程渲染系统的一次性初始化
- 客户端创建(身份验证)
- 会话创建
我们在构造函数中按顺序执行所有这些操作。 但在实际用例中,可能需要分开执行这些步骤。
将以下代码添加到 HolographicAppMain.cpp 文件中的构造函数主体的开头:
HolographicAppMain::HolographicAppMain(std::shared_ptr<DX::DeviceResources> const& deviceResources) :
    m_deviceResources(deviceResources)
{
    // 1. One time initialization
    {
        RR::RemoteRenderingInitialization clientInit;
        clientInit.ConnectionType = RR::ConnectionType::General;
        clientInit.GraphicsApi = RR::GraphicsApiType::WmrD3D11;
        clientInit.ToolId = "<sample name goes here>"; // <put your sample name here>
        clientInit.UnitsPerMeter = 1.0f;
        clientInit.Forward = RR::Axis::NegativeZ;
        clientInit.Right = RR::Axis::X;
        clientInit.Up = RR::Axis::Y;
        if (RR::StartupRemoteRendering(clientInit) != RR::Result::Success)
        {
            // something fundamental went wrong with the initialization
            throw std::exception("Failed to start remote rendering. Invalid client init data.");
        }
    }


    // 2. Create Client
    {
        // Users need to fill out the following with their account data and model
        RR::SessionConfiguration init;
        init.AccountId = "00000000-0000-0000-0000-000000000000";
        init.AccountKey = "<account key>";
        init.RemoteRenderingDomain = "westus2.mixedreality.azure.com"; // <change to the region that the rendering session should be created in>
        init.AccountDomain = "westus2.mixedreality.azure.com"; // <change to the region the account was created in>
        m_modelURI = "builtin://Engine";
        m_sessionOverride = ""; // If there is a valid session ID to re-use, put it here. Otherwise a new one is created
        m_client = RR::ApiHandle(RR::RemoteRenderingClient(init));
    }

    // 3. Open/create rendering session
    {
        auto SessionHandler = [&](RR::Status status, RR::ApiHandle<RR::CreateRenderingSessionResult> result)
        {
            if (status == RR::Status::OK)
            {
                auto ctx = result->GetContext();
                if (ctx.Result == RR::Result::Success)
                {
                    SetNewSession(result->GetSession());
                }
                else
                {
                    SetNewState(AppConnectionStatus::ConnectionFailed, ctx.ErrorMessage.c_str());
                }
            }
            else
            {
                SetNewState(AppConnectionStatus::ConnectionFailed, "failed");
            }
        };

        // If we had an old (valid) session that we can recycle, we call async function m_client->OpenRenderingSessionAsync
        if (!m_sessionOverride.empty())
        {
            m_client->OpenRenderingSessionAsync(m_sessionOverride, SessionHandler);
            SetNewState(AppConnectionStatus::CreatingSession, nullptr);
        }
        else
        {
            // create a new session
            RR::RenderingSessionCreationOptions init;
            init.MaxLeaseInMinutes = 10; // session is leased for 10 minutes
            init.Size = RR::RenderingSessionVmSize::Standard;
            m_client->CreateNewRenderingSessionAsync(init, SessionHandler);
            SetNewState(AppConnectionStatus::CreatingSession, nullptr);
        }
    }

    // Rest of constructor code:
    ...
}
此代码调用成员函数 SetNewSession 和 SetNewState,我们将在下一段中实现该函数,并在剩余的状态机代码中实现。
请注意,该示例中的凭据采用硬编码,需要在适当的位置填写(帐户 ID、帐户密钥、帐户域和远程渲染域)。
我们以对称的方式和相反的顺序在析构函数主体的末尾执行取消初始化操作:
HolographicAppMain::~HolographicAppMain()
{
    // Existing destructor code:
    ...

    // Destroy session:
    if (m_session != nullptr)
    {
        m_session->Disconnect();
        m_session = nullptr;
    }

    // Destroy front end:
    m_client = nullptr;

    // One-time de-initialization:
    RR::ShutdownRemoteRendering();
}
状态机
在远程渲染中,用于创建会话和加载模型的关键函数是异步函数。 为了解决这个问题,我们需要一个简单的状态机,该状态机实际上是在以下状态之间自动进行转换:
初始化 -> 会话创建 -> 会话启动 -> 模型加载(包含进度)
因此,下一步,我们向类添加一些状态机处理。 我们为应用程序可以处于的各种状态声明自己的枚举 AppConnectionStatus。 它与 RR::ConnectionStatus 类似,但具有用于失败连接的附加状态。
将以下成员和函数添加到类声明中:
namespace HolographicApp
{
    // Our application's possible states:
    enum class AppConnectionStatus
    {
        Disconnected,

        CreatingSession,
        StartingSession,
        Connecting,
        Connected,

        // error state:
        ConnectionFailed,
    };

    class HolographicAppMain
    {
        ...
        // Member functions for state transition handling
        void OnConnectionStatusChanged(RR::ConnectionStatus status, RR::Result error);
        void SetNewState(AppConnectionStatus state, const char* statusMsg);
        void SetNewSession(RR::ApiHandle<RR::RenderingSession> newSession);
        void StartModelLoading();

        // Members for state handling:

        // Model loading:
        std::string m_modelURI;
        RR::ApiHandle<RR::LoadModelAsync> m_loadModelAsync;

        // Connection state machine:
        AppConnectionStatus m_currentStatus = AppConnectionStatus::Disconnected;
        std::string m_statusMsg;
        RR::Result m_connectionResult = RR::Result::Success;
        RR::Result m_modelLoadResult = RR::Result::Success;
        bool m_isConnected = false;
        bool m_sessionStarted = false;
        RR::ApiHandle<RR::SessionPropertiesAsync> m_sessionPropertiesAsync;
        bool m_modelLoadTriggered = false;
        float m_modelLoadingProgress = 0.f;
        bool m_modelLoadFinished = false;
        double m_timeAtLastRESTCall = 0;
        bool m_needsCoordinateSystemUpdate = true;
    }
在 .cpp 文件的实现端,添加以下函数体:
void HolographicAppMain::StartModelLoading()
{
    m_modelLoadingProgress = 0.f;

    RR::LoadModelFromSasOptions options;
    options.ModelUri = m_modelURI.c_str();
    options.Parent = nullptr;

    // start the async model loading
    m_api->LoadModelFromSasAsync(options,
        // completed callback
        [this](RR::Status status, RR::ApiHandle<RR::LoadModelResult> result)
        {
            m_modelLoadResult = RR::StatusToResult(status);
            m_modelLoadFinished = true;

            if (m_modelLoadResult == RR::Result::Success)
            {
                RR::Double3 pos = { 0.0, 0.0, -2.0 };
                result->GetRoot()->SetPosition(pos);
            }
        },
        // progress update callback
            [this](float progress)
        {
            // progress callback
            m_modelLoadingProgress = progress;
            m_needsStatusUpdate = true;
        });
}


void HolographicAppMain::SetNewState(AppConnectionStatus state, const char* statusMsg)
{
    m_currentStatus = state;
    m_statusMsg = statusMsg ? statusMsg : "";

    // Some log for the VS output panel:
    const char* appStatus = nullptr;

    switch (state)
    {
        case AppConnectionStatus::Disconnected: appStatus = "Disconnected"; break;
        case AppConnectionStatus::CreatingSession: appStatus = "CreatingSession"; break;
        case AppConnectionStatus::StartingSession: appStatus = "StartingSession"; break;
        case AppConnectionStatus::Connecting: appStatus = "Connecting"; break;
        case AppConnectionStatus::Connected: appStatus = "Connected"; break;
        case AppConnectionStatus::ConnectionFailed: appStatus = "ConnectionFailed"; break;
    }

    char buffer[1024];
    sprintf_s(buffer, "Remote Rendering: New status: %s, result: %s\n", appStatus, m_statusMsg.c_str());
    OutputDebugStringA(buffer);
}

void HolographicAppMain::SetNewSession(RR::ApiHandle<RR::RenderingSession> newSession)
{
    SetNewState(AppConnectionStatus::StartingSession, nullptr);

    m_sessionStartingTime = m_timeAtLastRESTCall = m_timer.GetTotalSeconds();
    m_session = newSession;
    m_api = m_session->Connection();
    m_graphicsBinding = m_session->GetGraphicsBinding().as<RR::GraphicsBindingWmrD3d11>();
    m_session->ConnectionStatusChanged([this](auto status, auto error)
        {
            OnConnectionStatusChanged(status, error);
        });

};

void HolographicAppMain::OnConnectionStatusChanged(RR::ConnectionStatus status, RR::Result error)
{
    const char* asString = RR::ResultToString(error);
    m_connectionResult = error;

    switch (status)
    {
    case RR::ConnectionStatus::Connecting:
        SetNewState(AppConnectionStatus::Connecting, asString);
        break;
    case RR::ConnectionStatus::Connected:
        if (error == RR::Result::Success)
        {
            SetNewState(AppConnectionStatus::Connected, asString);
        }
        else
        {
            SetNewState(AppConnectionStatus::ConnectionFailed, asString);
        }
        m_modelLoadTriggered = m_modelLoadFinished = false;
        m_isConnected = error == RR::Result::Success;
        break;
    case RR::ConnectionStatus::Disconnected:
        if (error == RR::Result::Success)
        {
            SetNewState(AppConnectionStatus::Disconnected, asString);
        }
        else
        {
            SetNewState(AppConnectionStatus::ConnectionFailed, asString);
        }
        m_modelLoadTriggered = m_modelLoadFinished = false;
        m_isConnected = false;
        break;
    default:
        break;
    }

}
每帧更新
每次模拟时钟周期后必须更新客户端,并进行一些其他的状态更新。 函数 HolographicAppMain::Update 为每帧更新提供良好的挂钩。
状态机更新
我们需要轮询会话的状态,并查看它是否已转换为 Ready 状态。 如果已成功连接,最终会通过 StartModelLoading 启动模型加载。
将以下代码添加到函数 HolographicAppMain::Update 的主体:
// Updates the application state once per frame.
HolographicFrame HolographicAppMain::Update()
{
    if (m_session != nullptr)
    {
        // Tick the client to receive messages
        m_api->Update();

        if (!m_sessionStarted)
        {
            // Important: To avoid server-side throttling of the requests, we should call GetPropertiesAsync very infrequently:
            const double delayBetweenRESTCalls = 10.0;

            // query session status periodically until we reach 'session started'
            if (m_sessionPropertiesAsync == nullptr && m_timer.GetTotalSeconds() - m_timeAtLastRESTCall > delayBetweenRESTCalls)
            {
                m_timeAtLastRESTCall = m_timer.GetTotalSeconds();
                m_session->GetPropertiesAsync([this](RR::Status status, RR::ApiHandle<RR::RenderingSessionPropertiesResult> propertiesResult)
                    {
                        if (status == RR::Status::OK)
                        {
                            auto ctx = propertiesResult->GetContext();
                            if (ctx.Result == RR::Result::Success)
                            {
                                auto res = propertiesResult->GetSessionProperties();
                                switch (res.Status)
                                {
                                case RR::RenderingSessionStatus::Ready:
                                {
                                    // The following ConnectAsync is async, but we'll get notifications via OnConnectionStatusChanged
                                    m_sessionStarted = true;
                                    SetNewState(AppConnectionStatus::Connecting, nullptr);
                                    RR::RendererInitOptions init;
                                    init.IgnoreCertificateValidation = false;
                                    init.RenderMode = RR::ServiceRenderMode::Default;
                                    m_session->ConnectAsync(init, [](RR::Status, RR::ConnectionStatus) {});
                                }
                                break;
                                case RR::RenderingSessionStatus::Error:
                                    SetNewState(AppConnectionStatus::ConnectionFailed, "Session error");
                                    break;
                                case RR::RenderingSessionStatus::Stopped:
                                    SetNewState(AppConnectionStatus::ConnectionFailed, "Session stopped");
                                    break;
                                case RR::RenderingSessionStatus::Expired:
                                    SetNewState(AppConnectionStatus::ConnectionFailed, "Session expired");
                                    break;
                                }
                            }
                            else
                            {
                                SetNewState(AppConnectionStatus::ConnectionFailed, ctx.ErrorMessage.c_str());
                            }
                        }
                        else
                        {
                            SetNewState(AppConnectionStatus::ConnectionFailed, "Failed to retrieve session status");
                        }
                        m_sessionPropertiesQueryInProgress = false; // next try
                    });                }
            }
        }
        if (m_isConnected && !m_modelLoadTriggered)
        {
            m_modelLoadTriggered = true;
            StartModelLoading();
        }
    }

    if (m_needsCoordinateSystemUpdate && m_stationaryReferenceFrame && m_graphicsBinding)
    {
        // Set the coordinate system once. This must be called again whenever the coordinate system changes.
        winrt::com_ptr<ABI::Windows::Perception::Spatial::ISpatialCoordinateSystem> ptr{ m_stationaryReferenceFrame.CoordinateSystem().as<ABI::Windows::Perception::Spatial::ISpatialCoordinateSystem>() };
        m_graphicsBinding->UpdateUserCoordinateSystem(ptr.get());
        m_needsCoordinateSystemUpdate = false;
    }

    // Rest of the body:
    ...
}
坐标系统更新
我们需要同意在坐标系统上使用渲染服务。 若要访问我们要使用的坐标系统,我们需要在函数 HolographicAppMain::OnHolographicDisplayIsAvailableChanged 的末尾创建的 m_stationaryReferenceFrame。
该坐标系统通常不会更改,因此这是一次性的初始化。 如果应用程序更改了坐标系统,则必须再次调用它。
只要我们同时拥有参考坐标系统和已连接的会话,上述代码就会在 Update 函数中设置一次坐标系统。
相机更新
我们需要更新相机剪裁平面,以便服务器相机与本地相机保持同步。 可以在 Update 函数的末尾完成该操作:
    ...
    if (m_isConnected)
    {
        // Any near/far plane values of your choosing.
        constexpr float fNear = 0.1f;
        constexpr float fFar = 10.0f;
        for (HolographicCameraPose const& cameraPose : prediction.CameraPoses())
        {
            // Set near and far to the holographic camera as normal
            cameraPose.HolographicCamera().SetNearPlaneDistance(fNear);
            cameraPose.HolographicCamera().SetFarPlaneDistance(fFar);
        }

        // The API to inform the server always requires near < far. Depth buffer data will be converted locally to match what is set on the HolographicCamera.
        auto settings = m_api->GetCameraSettings();
        settings->SetNearAndFarPlane(std::min(fNear, fFar), std::max(fNear, fFar));
        settings->SetEnableDepth(true);
    }

    // The holographic frame will be used to get up-to-date view and projection matrices and
    // to present the swap chain.
    return holographicFrame;
}
渲染
最后一步是调用远程内容的渲染。 清除渲染目标并设置视区之后,我们必须在渲染管道内的正确位置进行此调用。 将以下代码片段插入 HolographicAppMain::Render 函数的 UseHolographicCameraResources 锁中:
        ...
        // Existing clear function:
        context->ClearDepthStencilView(depthStencilView, D3D11_CLEAR_DEPTH | D3D11_CLEAR_STENCIL, 1.0f, 0);

        // ...

        // Existing check to test for valid camera:
        bool cameraActive = pCameraResources->AttachViewProjectionBuffer(m_deviceResources);


        // Inject remote rendering: as soon as we are connected, start blitting the remote frame.
        // We do the blitting after the Clear, and before cube rendering.
        if (m_isConnected && cameraActive)
        {
            m_graphicsBinding->BlitRemoteFrame();
        }

        ...
运行示例
现在,示例应该处于可以编译和运行的状态。
当示例正常运行时,它会在你面前显示一个旋转的立方体;在创建一些会话和加载模型之后,它会呈现位于当前头部位置的引擎模型。 会话创建和模型加载可能需要几分钟的时间。 当前状态仅写入 Visual Studio 的输出面板。 因此,建议从 Visual Studio 内部启动示例。
注意
如果在数秒内未调用 tick 函数,客户端将与服务器断开连接。 因此,触发断点很容易导致应用程序断开连接。
若要使用文本面板正确显示状态,请在 GitHub 上参阅本教程的预设版本。
后续步骤
本教程介绍了将远程渲染添加到普通全息应用 C++/DirectX11 示例所需的所有步骤。 若要转换自己的模型,请参阅以下快速入门: