你当前正在访问 Microsoft Azure Global Edition 技术文档网站。 如果需要访问由世纪互联运营的 Microsoft Azure 中国技术文档网站,请访问 https://docs.azure.cn。
本文介绍如何使用 Azure NetApp 文件为 SAP NetWeaver 应用程序配置高可用性。
对于 SLES for SAP Applications 15 的新实施,建议在简单的装载配置中部署 SAP ASCS/ERS 的高可用性。 本文中介绍的基于 SAP 中心服务目录的群集控制文件系统的经典 Pacemaker 配置仍受支持。
在示例配置、安装命令等中,ASCS 实例的编号为 00、ERS 实例的编号为 01、主应用程序实例 (PAS) 的编号为 02、应用程序实例 (AAS) 的编号为 03。 使用 SAP 系统 ID QAS。 文本不会详细介绍数据库层。
请先阅读以下 SAP 说明和文档:
- Azure NetApp 文件文档
- SAP 说明 1928533,其中包含:
- SAP 软件部署支持的 Azure VM 大小的列表
- Azure VM 大小的重要容量信息
- 支持的 SAP 软件、操作系统 (OS) 和数据库组合
- Microsoft Azure 上 Windows 和 Linux 所需的 SAP 内核版本
- SAP 说明 2015553 列出了在 Azure 中 SAP 支持的 SAP 软件部署的先决条件。
- SAP 说明 2205917 包含适用于 SUSE Linux Enterprise Server for SAP Applications 的推荐 OS 设置
- SAP 说明 1944799 包含适用于 SUSE Linux Enterprise Server for SAP Applications 的 SAP HANA 准则
- SAP 说明 2178632 包含为 Azure 中的 SAP 报告的所有监控指标的详细信息。
- SAP 说明 2191498 包含 Azure 中的 Linux 所需的 SAP 主机代理版本。
- SAP 说明 2243692 包含 Azure 中的 Linux 上的 SAP 许可的相关信息。
- SAP 说明 1984787 包含有关 SUSE Linux Enterprise Server 12 的一般信息。
- SAP 说明 1999351 包含适用于 SAP 的 Azure 增强型监视扩展的其他故障排除信息。
- SAP Community WIKI 包含适用于 Linux 的所有必需 SAP 说明。
- 适用于 Linux 上的 SAP 的 Azure 虚拟机规划和实施
- 适用于 Linux 上的 SAP 的 Azure 虚拟机部署
- 适用于 Linux 上的 SAP 的 Azure 虚拟机 DBMS 部署
- SUSE SAP HA 最佳做法指南 这些指南包含在本地设置 Netweaver HA 和 SAP HANA 系统复制所需的所有信息。 请使用上述指南作为常规基准。 它们提供更多详细信息。
- SUSE 高可用性扩展 12 SP3 发行说明
- 使用 Azure NetApp 文件的 Microsoft Azure 上的 NetApp SAP 应用程序
- NetApp NFS 最佳做法
概述
SAP Netweaver 中心服务的高可用性 (HA) 需要共享存储。 当前,若要在 SUSE Linux 上实现该目标,需要构建单独的高可用性 NFS 群集。
现在,可以使用部署在 Azure NetApp 文件上的共享存储来实现 SAP NetWeaver HA。 通过将 Azure NetApp 文件用于共享存储,无需额外的 NFS 群集。 SAP Netweaver 中心服务 (ASCS/SCS) 的 HA 仍需要 Pacemaker。
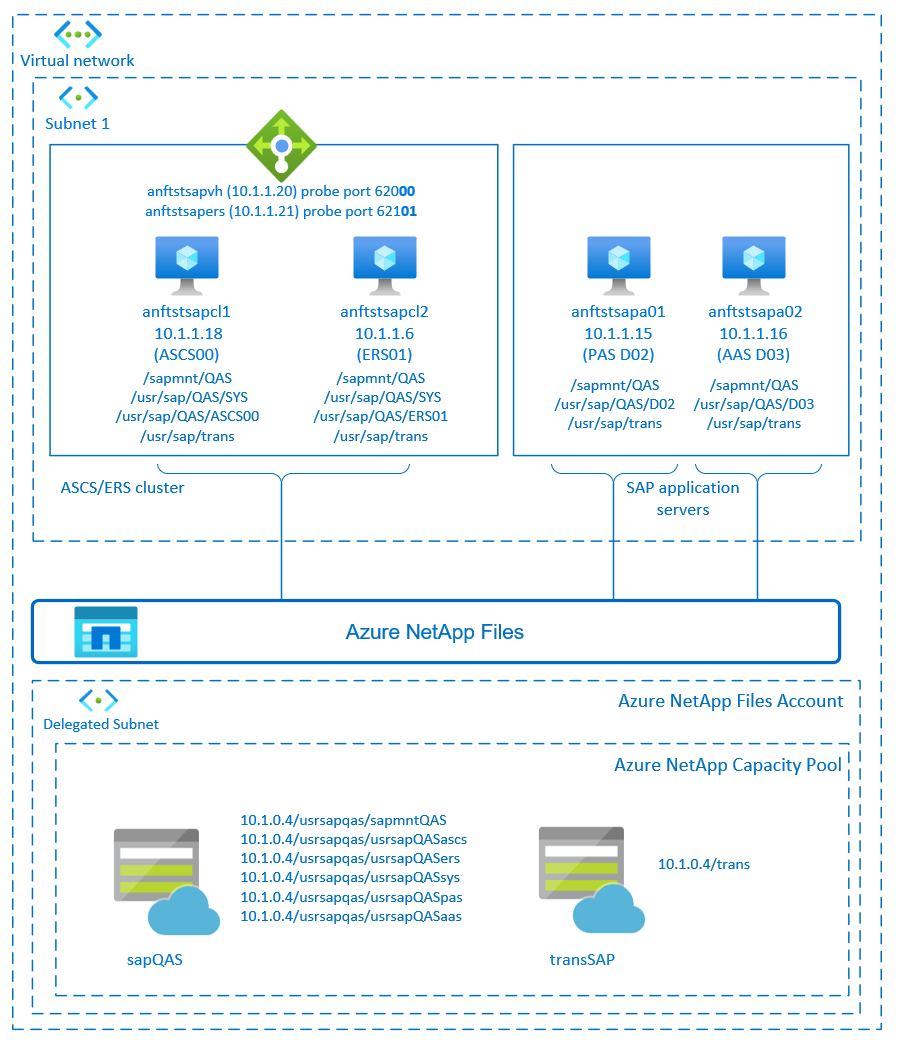
SAP NetWeaver ASCS、SAP NetWeaver SCS、SAP NetWeaver ERS 和 SAP HANA 数据库使用虚拟主机名和虚拟 IP 地址。 在 Azure 上,需要负载均衡器才能使用虚拟 IP 地址。 建议使用标准负载均衡器。 显示的配置展示了一个负载均衡器,其中:
- ASCS 的前端 IP 地址 10.1.1.20
- ERS 的前端 IP 地址 10.1.1.21
- ASCS 的探测端口 62000
- ERS 的探测端口 62101
设置 Azure NetApp 文件基础结构
SAP NetWeaver 要求对传输和配置文件目录使用共享存储。 在继续进行 Azure NetApp 文件基础结构的设置之前,请先熟悉 Azure NetApp 文件文档。 检查所选的 Azure 区域是否提供 Azure NetApp 文件。 以下链接按 Azure 区域显示 Azure NetApp 文件的可用性:按 Azure 区域划分的 Azure NetApp 文件可用性。
Azure NetApp 文件在多个 Azure 区域中可用。
部署 Azure NetApp 文件资源
这些步骤假定你已部署 Azure 虚拟网络。 Azure NetApp 文件资源和 VM(将装载 Azure NetApp 文件资源)必须部署在同一 Azure 虚拟网络或对等 Azure 虚拟网络中。
- 按照创建 NetApp 帐户的说明,在选定的 Azure 区域中创建相应 NetApp 帐户。
- 按照有关如何设置 Azure NetApp 文件容量池的说明,设置 Azure NetApp 文件容量池。
本文中介绍的 SAP Netweaver 体系结构使用单个 Azure NetApp 文件容量池、高级 SKU。 对于 Azure 上的 SAP Netweaver 应用程序工作负载,建议使用 Azure NetApp 文件高级 SKU。 - 按照将子网委派给 Azure NetApp 文件的说明中所述,将一个子网委派给 Azure NetApp 文件。
- 按照为 Azure NetApp 文件创建卷的说明,部署 Azure NetApp 文件卷。 将卷部署在指定的 Azure NetApp 文件子网中。 将自动分配 Azure NetApp 卷的 IP 地址。 请记住,Azure NetApp 文件资源和 Azure VM 必须位于同一 Azure 虚拟网络或对等 Azure 虚拟网络中。 在此示例中,我们使用两个 Azure NetApp 文件卷:sapQAS 和 trans。装载到相应装入点的文件路径是 /usrsapqas/sapmntQAS、/usrsapqas/usrsapQASsys 等。
- 卷 sapQAS (nfs://10.1.0.4/usrsapqas/sapmntQAS)
- 卷 sapQAS (nfs://10.1.0.4/usrsapqas/usrsapQASascs)
- 卷 sapQAS (nfs://10.1.0.4/usrsapqas/usrsapQASsys)
- 卷 sapQAS (nfs://10.1.0.4/usrsapqas/usrsapQASers)
- 卷 trans (nfs://10.1.0.4/trans)
- 卷 sapQAS (nfs://10.1.0.4/usrsapqas/usrsapQASpas)
- 卷 sapQAS (nfs://10.1.0.4/usrsapqas/usrsapQASaas)
在此示例中,我们将 Azure NetApp 文件用于所有 SAP Netweaver 文件系统,来演示如何使用 Azure NetApp 文件。 不需要通过 NFS 装载的 SAP 文件系统也可以部署为 Azure 磁盘存储。 在此示例中,a-e 必须位于 Azure NetApp 文件上,f-g(即 /usr/sap/QAS/D02,/usr/sap/QAS/D03)可以部署为 Azure 磁盘存储。
重要注意事项
在考虑将 Azure NetApp 文件用于 SUSE 高可用性体系结构上的 SAP Netweaver 时,请注意以下重要注意事项:
- 有关卷和容量池的限制,请参阅 Azure NetApp 文件资源限制。
- Azure NetApp 文件和所有虚拟机(将装载 Azure NetApp 文件卷)必须位于同一 Azure 虚拟网络中或同一区域中的对等虚拟网络中。 现在支持通过同一区域中的 VNET 对等互连进行 Azure NetApp 文件访问。 尚不支持通过全球对等互连进行 Azure NetApp 访问。
- 所选的虚拟网络必须具有一个委派给 Azure NetApp 文件的子网。
- Azure NetApp 文件卷的吞吐量和性能特征取决于卷配额和服务级别,如 Azure NetApp 文件的服务级别中所述。 调整 SAP Azure NetApp 卷的大小时,请确保生成的吞吐量满足应用程序要求。
- Azure NetApp 文件提供导出策略:你可以对允许的客户端、访问类型(读写、只读等)进行控制。
- Azure NetApp 文件功能尚没有区域感知性。 当前,Azure NetApp 文件功能未部署在 Azure 区域中的所有可用性区域中。 请注意某些 Azure 区域的潜在延迟影响。
- Azure NetApp 文件卷可以部署为 NFSv3 或 NFSv4.1 卷。 SAP 应用程序层(ASCS/ERS、SAP 应用程序服务器)支持这两种协议。
准备基础结构
SAP 实例的资源代理包含在 SUSE Linux Enterprise Server for SAP Applications 中。 可在 Azure 市场中找到 SUSE Linux Enterprise Server for SAP Applications 12/15 的映像。 可使用该映像来部署新的 VM。
通过 Azure 门户手动部署 Linux VM
本文档假定你已部署 Azure 虚拟网络资源组和子网。
使用 SLES for SAP Applications 映像部署虚拟机。 选择 SAP 系统支持的、合适的 SLES 映像版本。 可以通过任何一个可用性选项(虚拟机规模集、可用性区域或可用性集)来部署 VM。
配置 Azure 负载均衡器
在配置 VM 期间,你可以在网络部分中创建或选择现有的负载均衡器。 按照以下步骤为 SAP ASCS 和 SAP ERS 的高可用性设置配置标准负载均衡器。
按照创建负载均衡器指南,使用 Azure 门户为高可用性 SAP 系统设置标准负载均衡器。 在设置负载均衡器期间,请考虑以下几点。
- 前端 IP 配置:创建两个前端 IP,一个用于 ASCS,另一个用于 ERS。 选择与你的 ASCS/ERS 虚拟机相同的虚拟网络和子网。
- 后端池:创建后端池并添加 ASCS 和 ERS VM。
-
入站规则:创建两个负载均衡规则,一个用于 ASCS,另一个用于 ERS。 对两个负载均衡规则执行相同步骤。
- 前端 IP 地址:选择前端 IP
- 后端池:选择后端池
- 检查“高可用性端口”
- 协议:TCP
- 运行状况探测:创建具有以下详细信息的运行状况探测(适用于 ASCS 或 ERS)
- 协议:TCP
- 端口:[例如:对于 ASCS,为 620<Instance-no.>;对于 ERS,为 621<Instance-no.>]
- 间隔: 5
- 探测阈值: 2
- 空闲超时 (分钟):30
- 选中“启用浮动 IP”
注意
不会遵循运行状况探测配置属性 numberOfProbes(在门户中也称为“运行不正常阈值”)。 因此,要控制成功或失败的连续探测数量,请将属性“probeThreshold”设置为 2。 当前无法使用 Azure 门户设置此属性,请使用 Azure CLI 或 PowerShell 命令。
注意
如果没有公共 IP 地址的 VM 被放在内部(无公共 IP 地址)标准 Azure 负载均衡器的后端池中,就不会有出站 Internet 连接,除非执行额外的配置来允许路由到公共终结点。 有关如何实现出站连接的详细信息,请参阅 SAP 高可用性方案中使用 Azure 标准负载均衡器的虚拟机的公共终结点连接。
重要
- 不要在放置于 Azure 负载均衡器之后的 Azure VM 上启用 TCP 时间戳。 启用 TCP 时间戳将导致运行状况探测失败。 将
net.ipv4.tcp_timestamps参数设置为0。 有关详细信息,请参阅负载均衡器运行状况探测。 - 为防止 saptune 将手动设置的
net.ipv4.tcp_timestamps值从0更改回1,应将 saptune 版本更新为 3.1.1 或更高版本。 有关更多详细信息,请参阅 saptune 3.1.1 - 我是否需要更新?。
禁用 ID 映射(如果使用 NFSv4.1)
仅当使用带有 NFSv4.1 协议的 Azure NetApp 文件卷时,此部分中的说明才适用。 对将装载 Azure NetApp 文件 NFSv4.1 卷的所有 VM 执行配置。
验证 NFS 域设置。 请确保域配置为默认的 Azure NetApp 文件域,即
defaultv4iddomain.com,并且映射设置为“无人”。重要
确保在 VM 上的
/etc/idmapd.conf中设置 NFS 域,以匹配 Azure NetApp 文件上的默认域配置:“defaultv4iddomain.com”。 如果 NFS 客户端(即 VM)上的域配置和 NFS 服务器(即 Azure NetApp 配置)之间不匹配,则 VM 上已装载的 Azure NetApp 卷上文件的权限将显示为nobody。sudo cat /etc/idmapd.conf # Example [General] Verbosity = 0 Pipefs-Directory = /var/lib/nfs/rpc_pipefs Domain = defaultv4iddomain.com [Mapping] Nobody-User = nobody Nobody-Group = nobody[A] 验证
nfs4_disable_idmapping。 它应设置为“Y”。若要创建 所在的目录结构,请执行 mount 命令。 无法在 /sys/modules 下手动创建目录,因为访问权限是为内核/驱动程序保留的。# Check nfs4_disable_idmapping cat /sys/module/nfs/parameters/nfs4_disable_idmapping # If you need to set nfs4_disable_idmapping to Y mkdir /mnt/tmp mount 10.1.0.4:/sapmnt/qas /mnt/tmp umount /mnt/tmp echo "Y" > /sys/module/nfs/parameters/nfs4_disable_idmapping # Make the configuration permanent echo "options nfs nfs4_disable_idmapping=Y" >> /etc/modprobe.d/nfs.conf
设置 (A)SCS
接下来,你将做好准备并安装 SAP ASCS 和 ERS 实例。
创建 Pacemaker 群集
遵循在 Azure 中的 SUSE Linux Enterprise Server 上设置 Pacemaker 中的步骤为此 (A)SCS 服务器创建一个基本 Pacemaker 群集。
安装
以下各项带有前缀 [A] - 适用于所有节点、[1] - 仅适用于节点 1,或 [2] - 仅适用于节点 2 。
[A] 安装 SUSE 连接器
sudo zypper install sap-suse-cluster-connector注意
包 sap-suse-cluster-connector 的版本 3.1.1 中已修复在主机名中使用破折号引起的已知问题。 如果使用主机名中带有破折号的群集节点,请确保至少使用包 sap-suse-cluster-connector 的版本 3.1.1。 否则群集无法正常使用。
请确保安装 SAP SUSE 群集连接器的新版本。 旧版本称为 sap_suse_cluster_connector,新版本称为 sap-suse-cluster-connector。
sudo zypper info sap-suse-cluster-connector

# Information for package sap-suse-cluster-connector:
# ---------------------------------------------------
# Repository     : SLE-12-SP3-SAP-Updates
# Name           : sap-suse-cluster-connector
# Version        : 3.1.0-8.1
# Arch           : noarch
# Vendor         : SUSE LLC <https://www.suse.com/>
# Support Level  : Level 3
# Installed Size : 45.6 KiB
# Installed      : Yes
# Status         : up-to-date
# Source package : sap-suse-cluster-connector-3.1.0-8.1.src
# Summary        : SUSE High Availability Setup for SAP Products
[A] 更新 SAP 资源代理
使用本文中所述的新配置需要安装资源代理包的一个修补程序。 可以通过以下命令检查是否已安装了修补程序
sudo grep 'parameter name="IS_ERS"' /usr/lib/ocf/resource.d/heartbeat/SAPInstance输出应类似于
<parameter name="IS_ERS" unique="0" required="0">如果 grep 命令未找到 IS_ERS 参数,则需要安装 SUSE 下载页上列出的修补程序
# example for patch for SLES 12 SP1
sudo zypper in -t patch SUSE-SLE-HA-12-SP1-2017-885=1

# example for patch for SLES 12 SP2
sudo zypper in -t patch SUSE-SLE-HA-12-SP2-2017-886=1
[A] 设置主机名称解析
可以使用 DNS 服务器,或修改所有节点上的 /etc/hosts。 此示例演示如何使用 /etc/hosts 文件。 请替换以下命令中的 IP 地址和主机名
sudo vi /etc/hosts将以下行插入 /etc/hosts。 根据环境更改 IP 地址和主机名
# IP address of cluster node 1
10.1.1.18    anftstsapcl1
# IP address of cluster node 2
10.1.1.6     anftstsapcl2
# IP address of the load balancer frontend configuration for SAP Netweaver ASCS
10.1.1.20    anftstsapvh
# IP address of the load balancer frontend configuration for SAP Netweaver ERS
10.1.1.21    anftstsapers
[1] 在 Azure NetApp 文件卷中创建 SAP 目录。
在其中一个 VM 上暂时装载 Azure NetApp 文件卷,并创建 SAP 目录(文件路径)。
# mount temporarily the volume
sudo mkdir -p /saptmp
# If using NFSv3
sudo mount -t nfs -o rw,hard,rsize=65536,wsize=65536,nfsvers=3,tcp 10.1.0.4:/sapQAS /saptmp
# If using NFSv4.1
sudo mount -t nfs -o rw,hard,rsize=65536,wsize=65536,nfsvers=4.1,sec=sys,tcp 10.1.0.4:/sapQAS /saptmp
# create the SAP directories
sudo cd /saptmp
sudo mkdir -p sapmntQAS
sudo mkdir -p usrsapQASascs
sudo mkdir -p usrsapQASers
sudo mkdir -p usrsapQASsys
sudo mkdir -p usrsapQASpas
sudo mkdir -p usrsapQASaas
# unmount the volume and delete the temporary directory
sudo cd ..
sudo umount /saptmp
sudo rmdir /saptmp
准备 SAP Netweaver 安装
[A] 创建共享目录
sudo mkdir -p /sapmnt/QAS
sudo mkdir -p /usr/sap/trans
sudo mkdir -p /usr/sap/QAS/SYS
sudo mkdir -p /usr/sap/QAS/ASCS00
sudo mkdir -p /usr/sap/QAS/ERS01

sudo chattr +i /sapmnt/QAS
sudo chattr +i /usr/sap/trans
sudo chattr +i /usr/sap/QAS/SYS
sudo chattr +i /usr/sap/QAS/ASCS00
sudo chattr +i /usr/sap/QAS/ERS01
[A] 配置
autofssudo vi /etc/auto.master # Add the following line to the file, save and exit /- /etc/auto.direct如果使用 NFSv3,请创建包含以下内容的文件:
sudo vi /etc/auto.direct

# Add the following lines to the file, save and exit
/sapmnt/QAS -nfsvers=3,nobind 10.1.0.4:/usrsapqas/sapmntQAS
/usr/sap/trans -nfsvers=3,nobind 10.1.0.4:/trans
/usr/sap/QAS/SYS -nfsvers=3,nobind 10.1.0.4:/usrsapqas/usrsapQASsys
如果使用 NFSv4.1,请创建包含以下内容的文件:
sudo vi /etc/auto.direct

# Add the following lines to the file, save and exit
/sapmnt/QAS -nfsvers=4.1,nobind,sec=sys 10.1.0.4:/usrsapqas/sapmntQAS
/usr/sap/trans -nfsvers=4.1,nobind,sec=sys 10.1.0.4:/trans
/usr/sap/QAS/SYS -nfsvers=4.1,nobind,sec=sys 10.1.0.4:/usrsapqas/usrsapQASsys
注意
装载卷时,请确保匹配 Azure NetApp 文件卷的 NFS 协议版本。 如果将 Azure NetApp 文件卷创建为 NFSv3 卷,请使用相应的 NFSv3 配置。 如果将 Azure NetApp 文件卷创建为 NFSv4.1 卷,请按照说明禁用 ID 映射,并确保使用相应的 NFSv4.1 配置。 在此示例中,Azure NetApp 文件卷被创建为 NFSv3 卷。
重启
autofs以装载新的共享sudo systemctl enable autofs sudo service autofs restart[A] 配置交换文件
sudo vi /etc/waagent.conf

# Check if property ResourceDisk.Format is already set to y and if not, set it
ResourceDisk.Format=y

# Set the property ResourceDisk.EnableSwap to y
# Create and use swapfile on resource disk.
ResourceDisk.EnableSwap=y

# Set the size of the SWAP file with property ResourceDisk.SwapSizeMB
# The free space of resource disk varies by virtual machine size. Make sure that you do not set a value that is too big. You can check the SWAP space with command swapon
# Size of the swapfile.
ResourceDisk.SwapSizeMB=2000
重新启动代理以激活更改
sudo service waagent restart
安装 SAP NetWeaver ASCS/ERS
[1] 为 ASCS 实例创建虚拟 IP 资源和运行状况探测
重要
最近的测试表明,由于积压工作 (backlog) 及其仅处理一个连接的限制,netcat 停止响应请求。 netcat 资源停止侦听 Azure 负载均衡器请求,并且浮动 IP 变为不可用。
对于现有 Pacemaker 群集,我们过去建议将 netcat 替换为 socat。 当前,我们建议使用 azure-lb 资源代理,它是包 resource-agents 的一部分,具有以下包版本要求:- 对于 SLES 12 SP4/SP5,版本必须至少为 resource-agents-4.3.018.a7fb5035-3.30.1。
- 对于 SLES 15/15 SP1,版本必须至少为 resource-agents-4.3.0184.6ee15eb2-4.13.1。
请注意,更改将需要短暂的停机时间。
对于现有的 Pacemaker 群集,如果已经按照 Azure 负载平衡器检测强化中所述将配置更改为使用 socat,则无需立即切换到 azure-lb 资源代理。sudo crm node standby anftstsapcl2 # If using NFSv3 sudo crm configure primitive fs_QAS_ASCS Filesystem device='10.1.0.4/usrsapqas/usrsapQASascs' directory='/usr/sap/QAS/ASCS00' fstype='nfs' \ op start timeout=60s interval=0 \ op stop timeout=60s interval=0 \ op monitor interval=20s timeout=40s # If using NFSv4.1 sudo crm configure primitive fs_QAS_ASCS Filesystem device='10.1.0.4:/usrsapqas/usrsapQASascs' directory='/usr/sap/QAS/ASCS00' fstype='nfs' options='sec=sys,nfsvers=4.1' \ op start timeout=60s interval=0 \ op stop timeout=60s interval=0 \ op monitor interval=20s timeout=105s sudo crm configure primitive vip_QAS_ASCS IPaddr2 \ params ip=10.1.1.20 \ op monitor interval=10 timeout=20 sudo crm configure primitive nc_QAS_ASCS azure-lb port=62000 \ op monitor timeout=20s interval=10 sudo crm configure group g-QAS_ASCS fs_QAS_ASCS nc_QAS_ASCS vip_QAS_ASCS \ meta resource-stickiness=3000请确保群集状态正常,并且所有资源都已启动。 资源在哪个节点上运行并不重要。
sudo crm_mon -r

# Node anftstsapcl2: standby
# Online: [ anftstsapcl1 ]
#
# Full list of resources:
#
# Resource Group: g-QAS_ASCS
#     fs_QAS_ASCS        (ocf::heartbeat:Filesystem):    Started anftstsapcl1
#     nc_QAS_ASCS        (ocf::heartbeat:azure-lb):      Started anftstsapcl1
#     vip_QAS_ASCS       (ocf::heartbeat:IPaddr2):       Started anftstsapcl1
# stonith-sbd     (stonith:external/sbd): Started anftstsapcl2
[1] 安装 SAP NetWeaver ASCS
使用映射到适用于 ASCS 的负载均衡器前端配置的 IP 地址(例如 anftstsapvh、10.1.1.20)以及用于负载均衡器探测的实例编号(例如 00)的虚拟主机名,在第一个节点上以 root 身份安装 SAP NetWeaver ASCS。
可以使用 sapinst 参数 SAPINST_REMOTE_ACCESS_USER 允许非根用户连接到 sapinst。 可以使用参数 SAPINST_USE_HOSTNAME,以通过使用虚拟主机名安装 SAP。
sudo <swpm>/sapinst SAPINST_REMOTE_ACCESS_USER=sapadmin SAPINST_USE_HOSTNAME=virtual_hostname如果安装过程无法在 /usr/sap/QAS/ASCS00 中创建子文件夹,请尝试设置 ASCS00 文件夹的所有者和组,然后重试。
chown qasadm /usr/sap/QAS/ASCS00
chgrp sapsys /usr/sap/QAS/ASCS00
[1] 为 ERS 实例创建虚拟 IP 资源和运行状况探测。
sudo crm node online anftstsapcl2
sudo crm node standby anftstsapcl1

# If using NFSv3
sudo crm configure primitive fs_QAS_ERS Filesystem device='10.1.0.4:/usrsapqas/usrsapQASers' directory='/usr/sap/QAS/ERS01' fstype='nfs' \
  op start timeout=60s interval=0 \
  op stop timeout=60s interval=0 \
  op monitor interval=20s timeout=40s

# If using NFSv4.1
sudo crm configure primitive fs_QAS_ERS Filesystem device='10.1.0.4:/usrsapqas/usrsapQASers' directory='/usr/sap/QAS/ERS01' fstype='nfs' options='sec=sys,nfsvers=4.1' \
  op start timeout=60s interval=0 \
  op stop timeout=60s interval=0 \
  op monitor interval=20s timeout=105s

sudo crm configure primitive vip_QAS_ERS IPaddr2 \
  params ip=10.1.1.21 \
  op monitor interval=10 timeout=20

sudo crm configure primitive nc_QAS_ERS azure-lb port=62101 \
  op monitor timeout=20s interval=10

sudo crm configure group g-QAS_ERS fs_QAS_ERS nc_QAS_ERS vip_QAS_ERS
请确保群集状态正常,并且所有资源都已启动。 资源在哪个节点上运行并不重要。
sudo crm_mon -r

# Node anftstsapcl1: standby
# Online: [ anftstsapcl2 ]
#
# Full list of resources:
#
# stonith-sbd     (stonith:external/sbd): Started anftstsapcl2
#  Resource Group: g-QAS_ASCS
#      fs_QAS_ASCS        (ocf::heartbeat:Filesystem):    Started anftstsapcl2
#      nc_QAS_ASCS        (ocf::heartbeat:azure-lb):      Started anftstsapcl2
#      vip_QAS_ASCS       (ocf::heartbeat:IPaddr2):       Started anftstsapcl2
#  Resource Group: g-QAS_ERS
#      fs_QAS_ERS (ocf::heartbeat:Filesystem):    Started anftstsapcl2
#      nc_QAS_ERS (ocf::heartbeat:azure-lb):      Started anftstsapcl2
#      vip_QAS_ERS  (ocf::heartbeat:IPaddr2):     Started anftstsapcl2
[2] 安装 SAP Netweaver ERS
使用映射到适用于 ERS 的负载均衡器前端配置的 IP 地址(例如 anftstsapers、10.1.1.21)以及用于负载均衡器探测的实例编号(例如 01)的虚拟主机名,在第二个节点上以 root 身份安装 SAP NetWeaver ERS。
可以使用 sapinst 参数 SAPINST_REMOTE_ACCESS_USER 允许非根用户连接到 sapinst。 可以使用参数 SAPINST_USE_HOSTNAME,以通过使用虚拟主机名安装 SAP。
sudo <swpm>/sapinst SAPINST_REMOTE_ACCESS_USER=sapadmin SAPINST_USE_HOSTNAME=virtual_hostname注意
使用 SWPM SP 20 PL 05 或更高版本。 较低版本不会正确设置权限,安装将失败。
如果安装过程无法在 /usr/sap/QAS/ERS01 中创建子文件夹,请尝试设置 ERS01 文件夹的所有者和组,然后重试。
chown qasadm /usr/sap/QAS/ERS01
chgrp sapsys /usr/sap/QAS/ERS01
[1] 调整 ASCS/SCS 和 ERS 实例配置文件
ASCS/SCS 配置文件
sudo vi /sapmnt/QAS/profile/QAS_ASCS00_anftstsapvh # Change the restart command to a start command #Restart_Program_01 = local $(_EN) pf=$(_PF) Start_Program_01 = local $(_EN) pf=$(_PF) # Add the following lines service/halib = $(DIR_EXECUTABLE)/saphascriptco.so service/halib_cluster_connector = /usr/bin/sap_suse_cluster_connector # Add the keep alive parameter, if using ENSA1 enque/encni/set_so_keepalive = TRUEERS 配置文件
sudo vi /sapmnt/QAS/profile/QAS_ERS01_anftstsapers

# Change the restart command to a start command
#Restart_Program_00 = local $(_ER) pf=$(_PFL) NR=$(SCSID)
Start_Program_00 = local $(_ER) pf=$(_PFL) NR=$(SCSID)

# Add the following lines
service/halib = $(DIR_EXECUTABLE)/saphascriptco.so
service/halib_cluster_connector = /usr/bin/sap_suse_cluster_connector

# remove Autostart from ERS profile
# Autostart = 1
[A] 配置 Keep Alive
SAP NetWeaver 应用程序服务器和 ASCS/SCS 之间的通信是通过软件负载均衡器进行路由的。 负载均衡器在可配置的超时之后将断开非活动连接。 若要防止出现这种情况,需要在 SAP NetWeaver ASCS/SCS 配置文件中设置参数(如果使用 ENSA1),并在所有 SAP 服务器上为 ENSA1/ENSA2 更改 Linux 系统
keepalive设置。 有关详细信息,请参阅 SAP 说明 1410736。# Change the Linux system configuration sudo sysctl net.ipv4.tcp_keepalive_time=300[A] 在安装后配置 SAP 用户
# Add sidadm to the haclient group
sudo usermod -aG haclient qasadm
[1] 将 ASCS 和 ERS SAP 服务添加到
sapservice文件将 ASCS 服务入口添加到第二个节点,并将 ERS 服务入口复制到第一个节点。
cat /usr/sap/sapservices | grep ASCS00 | sudo ssh anftstsapcl2 "cat >>/usr/sap/sapservices"
sudo ssh anftstsapcl2 "cat /usr/sap/sapservices" | grep ERS01 | sudo tee -a /usr/sap/sapservices
[A] 禁用 ASCS 和 ERS SAP 实例的
systemd服务。 仅当 SAP 启动框架由 systemd 管理(如 SAP 说明 3115048 中描述的那样)时,此步骤才适用注意
使用 SLES 群集配置来管理 SAP ASCS 和 SAP ERS 之类的 SAP 实例时,需要进行额外的修改以将群集与基于 systemd 的原生 SAP 启动框架集成。 这可以确保维护过程不会损害群集稳定性。 按照 SAP 说明 3115048 安装 SAP 启动框架或将其切换到启用 systemd 的设置后,应该为 ASCS 和 ERS SAP 实例禁用
systemd服务。# Stop ASCS and ERS instances using <sid>adm sapcontrol -nr 00 -function Stop sapcontrol -nr 00 -function StopService sapcontrol -nr 01 -function Stop sapcontrol -nr 01 -function StopService # Execute below command on VM where you have performed ASCS instance installation (e.g. anftstsapcl1) sudo systemctl disable SAPQAS_00 # Execute below command on VM where you have performed ERS instance installation (e.g. anftstsapcl2) sudo systemctl disable SAPQAS_01[1] 创建 SAP 群集资源。
根据是运行 ENSA1 还是 ENSA2 系统,选择相应的选项卡来定义资源。 SAP 在 SAP NetWeaver 7.52 中引入了对 ENSA2 的支持,包括复制。 从 ABAP 平台 1809 开始,默认会安装 ENSA2。 有关 ENSA2 支持,请参阅 SAP 说明 2630416。
sudo crm configure property maintenance-mode="true"

# If using NFSv3
sudo crm configure primitive rsc_sap_QAS_ASCS00 SAPInstance \
   operations \$id=rsc_sap_QAS_ASCS00-operations \
   op monitor interval=11 timeout=60 on-fail=restart \
   params InstanceName=QAS_ASCS00_anftstsapvh START_PROFILE="/sapmnt/QAS/profile/QAS_ASCS00_anftstsapvh" \
   AUTOMATIC_RECOVER=false \
   meta resource-stickiness=5000 failure-timeout=60 migration-threshold=1 priority=10

# If using NFSv4.1
sudo crm configure primitive rsc_sap_QAS_ASCS00 SAPInstance \
   operations \$id=rsc_sap_QAS_ASCS00-operations \
   op monitor interval=11 timeout=105 on-fail=restart \
   params InstanceName=QAS_ASCS00_anftstsapvh START_PROFILE="/sapmnt/QAS/profile/QAS_ASCS00_anftstsapvh" \
   AUTOMATIC_RECOVER=false \
   meta resource-stickiness=5000 failure-timeout=105 migration-threshold=1 priority=10

# If using NFSv3
sudo crm configure primitive rsc_sap_QAS_ERS01 SAPInstance \
   operations \$id=rsc_sap_QAS_ERS01-operations \
   op monitor interval=11 timeout=60 on-fail=restart \
   params InstanceName=QAS_ERS01_anftstsapers START_PROFILE="/sapmnt/QAS/profile/QAS_ERS01_anftstsapers" AUTOMATIC_RECOVER=false IS_ERS=true \
   meta priority=1000

# If using NFSv4.1
sudo crm configure primitive rsc_sap_QAS_ERS01 SAPInstance \
   operations \$id=rsc_sap_QAS_ERS01-operations \
   op monitor interval=11 timeout=105 on-fail=restart \
   params InstanceName=QAS_ERS01_anftstsapers START_PROFILE="/sapmnt/QAS/profile/QAS_ERS01_anftstsapers" AUTOMATIC_RECOVER=false IS_ERS=true \
   meta priority=1000

sudo crm configure modgroup g-QAS_ASCS add rsc_sap_QAS_ASCS00
sudo crm configure modgroup g-QAS_ERS add rsc_sap_QAS_ERS01

sudo crm configure colocation col_sap_QAS_no_both -5000: g-QAS_ERS g-QAS_ASCS
sudo crm configure location loc_sap_QAS_failover_to_ers rsc_sap_QAS_ASCS00 rule 2000: runs_ers_QAS eq 1
sudo crm configure order ord_sap_QAS_first_start_ascs Optional: rsc_sap_QAS_ASCS00:start rsc_sap_QAS_ERS01:stop symmetrical=false

sudo crm_attribute --delete --name priority-fencing-delay

sudo crm node online anftstsapcl1
sudo crm configure property maintenance-mode="false"
如果要从旧版本升级并切换到排队服务器 2,请参阅 SAP 说明 2641019。
注意
由于特定于协议的暂停(与 NFSv4.1 续租相关),因此需要采用在使用 NFSv4.1 时建议的更高超时。 有关详细信息,请参阅 NetApp 中的 NFS 最佳做法。
上述配置中的超时可能需要适应特定的 SAP 设置。
请确保群集状态正常,并且所有资源都已启动。 资源在哪个节点上运行并不重要。
sudo crm_mon -r

# Full list of resources:
#
# stonith-sbd     (stonith:external/sbd): Started anftstsapcl2
#  Resource Group: g-QAS_ASCS
#      fs_QAS_ASCS        (ocf::heartbeat:Filesystem):    Started anftstsapcl1
#      nc_QAS_ASCS        (ocf::heartbeat:azure-lb):      Started anftstsapcl1
#      vip_QAS_ASCS       (ocf::heartbeat:IPaddr2):       Started anftstsapcl1
#      rsc_sap_QAS_ASCS00 (ocf::heartbeat:SAPInstance):   Started anftstsapcl1
#  Resource Group: g-QAS_ERS
#      fs_QAS_ERS (ocf::heartbeat:Filesystem):    Started anftstsapcl2
#      nc_QAS_ERS (ocf::heartbeat:azure-lb):      Started anftstsapcl2
#      vip_QAS_ERS        (ocf::heartbeat:IPaddr2):       Started anftstsapcl2
#      rsc_sap_QAS_ERS01  (ocf::heartbeat:SAPInstance):   Started anftstsapcl2
SAP NetWeaver 应用程序服务器准备
某些数据库要求在应用程序服务器上执行数据库实例安装。 请准备好应用程序服务器虚拟机,使之能够在这些场合下使用。
以下步骤假定在与 ASCS/SCS 和 HANA 服务器不同的服务器上安装应用程序服务器。 否则,无需执行以下某些步骤(如配置主机名解析)。
以下各项带有前缀 [A] - 适用于 PAS 和 AAS、 [P] - 仅适用于 PAS 或 [S] - 仅适用于 AAS。
[A] 配置操作系统
减小脏缓存的大小。 有关详细信息,请参阅 RAM 较大的 SLES 11/12 服务器的写入性能低。
sudo vi /etc/sysctl.conf

# Change/set the following settings
vm.dirty_bytes = 629145600
vm.dirty_background_bytes = 314572800
[A] 设置主机名称解析
可以使用 DNS 服务器,或修改所有节点上的 /etc/hosts。 此示例演示如何使用 /etc/hosts 文件。 请替换以下命令中的 IP 地址和主机名
sudo vi /etc/hosts将以下行插入 /etc/hosts。 根据环境更改 IP 地址和主机名
# IP address of the load balancer frontend configuration for SAP NetWeaver ASCS/SCS
10.1.1.20 anftstsapvh
# IP address of the load balancer frontend configuration for SAP NetWeaver ERS
10.1.1.21 anftstsapers
# IP address of all application servers
10.1.1.15 anftstsapa01
10.1.1.16 anftstsapa02
[A] 创建 sapmnt 目录
sudo mkdir -p /sapmnt/QAS
sudo mkdir -p /usr/sap/trans

sudo chattr +i /sapmnt/QAS
sudo chattr +i /usr/sap/trans
[P] 创建 PAS 目录
sudo mkdir -p /usr/sap/QAS/D02
sudo chattr +i /usr/sap/QAS/D02
[S] 创建 AAS 目录
sudo mkdir -p /usr/sap/QAS/D03
sudo chattr +i /usr/sap/QAS/D03
[P] 在 PAS 上配置
autofssudo vi /etc/auto.master # Add the following line to the file, save and exit /- /etc/auto.direct如果使用 NFSv3,请创建包含以下内容的新文件:
sudo vi /etc/auto.direct

# Add the following lines to the file, save and exit
/sapmnt/QAS -nfsvers=3,nobind 10.1.0.4:/usrsapqas/sapmntQAS
/usr/sap/trans -nfsvers=3,nobind 10.1.0.4:/trans
/usr/sap/QAS/D02 -nfsvers=3,nobind 10.1.0.4:/usrsapqas/usrsapQASpas
如果使用 NFSv4.1,请创建包含以下内容的新文件:
sudo vi /etc/auto.direct
# Add the following lines to the file, save and exit
/sapmnt/QAS -nfsvers=4.1,nobind,sec=sys 10.1.0.4:/usrsapqas/sapmntQAS
/usr/sap/trans -nfsvers=4.1,nobind,sec=sys 10.1.0.4:/trans
/usr/sap/QAS/D02 -nfsvers=4.1,nobind,sec=sys 10.1.0.4:/usrsapqas/usrsapQASpas
重启
autofs以装载新的共享sudo systemctl enable autofs sudo service autofs restart[P] 在 AAS 上配置
autofssudo vi /etc/auto.master # Add the following line to the file, save and exit /- /etc/auto.direct如果使用 NFSv3,请创建包含以下内容的新文件:
sudo vi /etc/auto.direct

# Add the following lines to the file, save and exit
/sapmnt/QAS -nfsvers=3,nobind 10.1.0.4:/usrsapqas/sapmntQAS
/usr/sap/trans -nfsvers=3,nobind 10.1.0.4:/trans
/usr/sap/QAS/D03 -nfsvers=3,nobind 10.1.0.4:/usrsapqas/usrsapQASaas
如果使用 NFSv4.1,请创建包含以下内容的新文件:
sudo vi /etc/auto.direct

# Add the following lines to the file, save and exit
/sapmnt/QAS -nfsvers=4.1,nobind,sec=sys 10.1.0.4:/usrsapqas/sapmntQAS
/usr/sap/trans -nfsvers=4.1,nobind,sec=sys 10.1.0.4:/trans
/usr/sap/QAS/D03 -nfsvers=4.1,nobind,sec=sys 10.1.0.4:/usrsapqas/usrsapQASaas
重启
autofs以装载新的共享sudo systemctl enable autofs sudo service autofs restart[A] 配置交换文件
sudo vi /etc/waagent.conf

# Set the property ResourceDisk.EnableSwap to y
# Create and use swapfile on resource disk.
ResourceDisk.EnableSwap=y

# Set the size of the SWAP file with property ResourceDisk.SwapSizeMB
# The free space of resource disk varies by virtual machine size. Make sure that you do not set a value that is too big. You can check the SWAP space with command swapon
# Size of the swapfile.
ResourceDisk.SwapSizeMB=2000
重新启动代理以激活更改
sudo service waagent restart
安装数据库
在此示例中,SAP NetWeaver 安装在 SAP HANA 上。 可以使用每个受支持的数据库完成此安装。 有关如何在 Azure 中安装 SAP HANA 的详细信息,请参阅 Azure 虚拟机 (VM) 上的 SAP HANA 高可用性。 有关支持的数据库列表,请参阅 SAP 说明 1928533。
运行 SAP 数据库实例安装
使用映射到适用于数据库的负载均衡器前端配置的 IP 地址的虚拟主机名以 root 身份安装 SAP NetWeaver 数据库实例。
可以使用 sapinst 参数 SAPINST_REMOTE_ACCESS_USER 允许非根用户连接到 sapinst。
sudo <swpm>/sapinst SAPINST_REMOTE_ACCESS_USER=sapadmin
SAP NetWeaver 应用程序服务器安装
请按照这些步骤安装 SAP 应用程序服务器。
[A] 准备应用程序服务器 按照上述 SAP NetWeaver 应用程序服务器准备一章中的步骤来准备应用程序服务器。
[A] 安装 SAP NetWeaver 应用程序服务器 安装主服务器或其他的 SAP NetWeaver 应用程序服务器。
可以使用 sapinst 参数 SAPINST_REMOTE_ACCESS_USER 允许非根用户连接到 sapinst。
sudo <swpm>/sapinst SAPINST_REMOTE_ACCESS_USER=sapadmin[A] 更新 SAP HANA 安全存储
更新 SAP HANA 安全存储以指向 SAP HANA 系统复制设置的虚拟名称。
运行以下命令列出条目
hdbuserstore List此命令应会列出如下所示的所有条目
DATA FILE       : /home/qasadm/.hdb/anftstsapa01/SSFS_HDB.DAT
KEY FILE        : /home/qasadm/.hdb/anftstsapa01/SSFS_HDB.KEY

KEY DEFAULT
  ENV : 10.1.1.5:30313
  USER: SAPABAP1
  DATABASE: QAS
输出显示,默认条目的 IP 地址正在指向虚拟机而不是负载均衡器的 IP 地址。 需将此条目更改为指向负载均衡器的虚拟主机名。 请确保使用相同的端口(上述输出中为“30313”)和数据库名称(上述输出中为“QAS”)!
su - qasadm

hdbuserstore SET DEFAULT qasdb:30313@QAS SAPABAP1 <password of ABAP schema>
测试群集设
全面测试 Pacemaker 群集。 执行典型的故障转移测试。
后续步骤
- 适用于 SAP 应用程序多 SID 的 SLES 上 Azure VM 中的 SAP NW 的 HA 指南
- 适用于 SAP 的 Azure 虚拟机规划和实施
- 适用于 SAP 的 Azure 虚拟机部署
- 适用于 SAP 的 Azure 虚拟机 DBMS 部署
- 若要了解如何在 Azure VM 上建立 SAP HANA 高可用性以及规划灾难恢复,请参阅 Azure 虚拟机 (VM) 上的 SAP HANA 高可用性