你当前正在访问 Microsoft Azure Global Edition 技术文档网站。 如果需要访问由世纪互联运营的 Microsoft Azure 中国技术文档网站,请访问 https://docs.azure.cn。
重要说明
将 Logstash 输出插件与数据收集规则 (DCR) 配合使用的数据引入目前以公共预览版提供。 服务级别协议未随此功能一起提供。 有关详细信息,请参阅 Microsoft Azure 预览版补充使用条款。
Microsoft Sentinel 的新 Logstash 输出插件通过数据收集规则 (DCR) 来支持管道转换和高级配置。 该插件会将外部数据源中的任何类型的日志转发到 Log Analytics 或 Microsoft Sentinel 中的自定义或标准表。
本文介绍了如何设置新的 Logstash 插件,以使用 DCR 将数据流式传输到 Log Analytics 或 Microsoft Sentinel,并可以完全控制输出架构。 了解如何部署插件。
注意
旧版 Logstash 插件允许使用数据收集 API 通过 Logstash 连接数据源。
使用新插件,你可以:
- 控制列名和类型的配置。
- 执行引入时转换,例如筛选或扩充。
- 将自定义日志引入自定义表中,或将 Syslog 输入流引入 Log Analytics Syslog 表中。
引入标准表仅限于自定义日志引入支持的标准表。
要详细了解如何使用 Logstash 数据收集引擎,请参阅 Logstash 入门。
概述
体系结构和背景
Logstash 引擎由三个组件组成:
- 输入插件:以自定义的方式从各种源收集数据。
- 筛选器插件:根据指定的条件对数据进行处理和规范化。
- 输出插件:以自定义的方式将收集和处理的数据发送到各种目标。
注意
Microsoft 仅支持此处讨论的由 Microsoft Sentinel 提供的 Logstash 输出插件。 当前插件名为 microsoft-sentinel-log-analytics-logstash-output-plugin,v1.1.3。 可以针对有关输出插件的任何问题提交支持票证。
Microsoft 不支持 Microsoft Sentinel 的第三方 Logstash 输出插件,也不支持任何其他 Logstash 插件或任何类型的组件。
请参阅该插件的 Logstash 版本支持的先决条件。
Logstash 的 Microsoft Sentinel 输出插件将使用 Log Analytics 日志引入 API 将 JSON 格式的数据发送到 Log Analytics 工作区。 数据将引入自定义日志或标准表中。
- 详细了解日志引入 API。
在 Logstash 中部署 Microsoft Sentinel 输出插件
要安装该插件,请执行以下步骤:
- 查看先决条件
- 安装插件
- 创建示例文件
- 创建所需的 DCR 相关资源
- 配置 Logstash 配置文件
- 重启 Logstash
- 在 Microsoft Sentinel 中查看传入的日志
- 监视输出插件审核日志
Prerequisites
安装支持的 Logstash 版本。 该插件支持以下 Logstash 版本:
- 7.0 - 7.17.13
- 8.0 - 8.9
- 8.11 - 8.15
注意
如果使用 Logstash 8,我们建议在管道中禁用 ECS。
验证你是否有一个你对其至少拥有参与者权限的 Log Analytics 工作区。
验证你是否有权在该工作区中创建 DCR 对象。
安装插件
Logstash 集合中提供了 Microsoft Sentinel 输出插件。
- 请按照 Logstash 使用插件文档中的说明安装 microsoft-sentinel-log-analytics-logstash-output-plugin 插件。
- 如果 Logstash 系统无法访问 Internet,请按照 Logstash 脱机插件管理文档中的说明准备和使用脱机插件包。 (这将需要构建另一个具有 Internet 访问权限的 Logstash 系统。)
创建示例文件
在本部分,你将为以下方案之一创建示例文件:
为自定义日志创建示例文件
在此方案中,你将配置 Logstash 输入插件以将事件发送到 Microsoft Sentinel。 对于此示例,我们将使用生成器输入插件来模拟事件。 你可以使用任何其他输入插件。
在此示例中,Logstash 配置文件如下所示:
input {
      generator {
            lines => [
                 "This is a test log message"
            ]
           count => 10
      }
}
将以下输出插件配置复制到 Logstash 配置文件中。
output {
    microsoft-sentinel-log-analytics-logstash-output-plugin {
      create_sample_file => true
      sample_file_path => "<enter the path to the file in which the sample data will be written>" #for example: "c:\\temp" (for windows) or "/tmp" for Linux.
    }
}
为了确保在创建示例文件之前引用的文件路径存在,请启动 Logstash。
插件会将 10 条记录写入到已配置的路径中名为
sampleFile<epoch seconds>.json的示例文件。 例如:C:\temp\sampleFile1648453501.json。 下面是插件创建的示例文件的一部分:[ { "host": "logstashMachine", "sequence": 0, "message": "This is a test log message", "ls_timestamp": "2022-03-28T17:45:01.690Z", "ls_version": "1" }, { "host": "logstashMachine", "sequence": 1 ... ]插件会自动将以下属性添加到每条记录:
ls_timestamp:从输入插件收到记录的时间ls_version:Logstash 管道版本。
在创建 DCR 时可以删除这些字段。
创建示例文件以将日志引入 Syslog 表
在此方案中,你将配置 Logstash 输入插件以将 syslog 事件发送到 Microsoft Sentinel。
如果你尚未将 syslog 消息转发到 Logstash 计算机中,可以使用 logger 命令生成消息。 例如(对于 Linux):
logger -p local4.warn --rfc3164 --tcp -t CEF: "0|Microsoft|Device|cef-test|example|data|1|here is some more data for the example" -P 514 -d -n 127.0.0.1
Here is an example for the Logstash input plugin:
input {
     syslog {
         port => 514
    }
}
将以下输出插件配置复制到 Logstash 配置文件中。
output {
    microsoft-sentinel-log-analytics-logstash-output-plugin {
      create_sample_file => true
      sample_file_path => "<enter the path to the file in which the sample data will be written>" #for example: "c:\\temp" (for windows) or "/tmp" for Linux.
    }
}
为了确保在创建示例文件之前该文件路径存在,请启动 Logstash。
插件会将 10 条记录写入到已配置的路径中名为
sampleFile<epoch seconds>.json的示例文件。 例如:C:\temp\sampleFile1648453501.json。 下面是插件创建的示例文件的一部分:[ { "logsource": "logstashMachine", "facility": 20, "severity_label": "Warning", "severity": 4, "timestamp": "Apr 7 08:26:04", "program": "CEF:", "host": "127.0.0.1", "facility_label": "local4", "priority": 164, "message": 0|Microsoft|Device|cef-test|example|data|1|here is some more data for the example", "ls_timestamp": "2022-04-07T08:26:04.000Z", "ls_version": "1" } ]插件会自动将以下属性添加到每条记录:
ls_timestamp:从输入插件收到记录的时间ls_version:Logstash 管道版本。
在创建 DCR 时可以删除这些字段。
创建所需的 DCR 资源
若要配置基于 Microsoft Sentinel DCR 的 Logstash 插件,首先需要创建 DCR 相关的资源。
在本部分,你将为以下方案之一创建用于 DCR 的资源:
创建要引入到自定义表中的 DCR 资源
要将数据引入到自定义表中,请执行以下步骤(根据使用 REST API(Azure 门户)将数据发送到 Azure Monitor 日志教程):
请查看先决条件。
-
跳过“发送示例数据”步骤。
如果遇到任何问题,请参阅故障排除步骤。
创建要引入到标准表中的 DCR 资源
若要将数据引入到 Syslog 或 CommonSecurityLog 等标准表中,请根据使用 REST API(资源管理器模板)将数据发送到 Azure Monitor 日志教程使用一个过程。 虽然本教程介绍的是如何将数据引入到自定义表中,但你可以轻松调整该过程以将数据引入到标准表中。 以下步骤指明了需要在步骤中做出的相关更改。
请查看先决条件。
-
跳过“在 Log Analytics 工作区中创建新表”步骤。 将数据引入标准表时,此步骤并不相关,因为该表已在 Log Analytics 中定义。
创建 DCR。 在此步骤中:
- 提供在上一部分创建的示例文件。
- 使用创建的示例文件来定义
streamDeclarations属性。 示例文件中的每个字段应包含一个具有相同名称和适当类型的相应列(请参阅以下示例)。 - 使用标准表而不是自定义表的名称配置
outputStream属性的值。 与自定义表不同,标准表的名称没有_CL后缀。 - 表名称的前缀应该是
Microsoft-而不是Custom-。 在本示例中,outputStream属性值为Microsoft-Syslog。
-
跳过“发送示例数据”步骤。
如果遇到任何问题,请参阅故障排除步骤。
示例:用于将数据引入到 Syslog 表中的 DCR
请注意:
streamDeclarations列的名称和类型应与示例文件字段相同,但你不必要指定所有字段。 例如,在以下 DCR 中,streamDeclarations列中省略了PRI、type和ls_version字段。dataflows属性将输入转换为 Syslog 表格式,并将outputStream设置为Microsoft-Syslog。
{
	"$schema": "https://schema.management.azure.com/schemas/2019-04-01/deploymentTemplate.json#",
	"contentVersion": "1.0.0.0",
	"parameters": {
		"dataCollectionRuleName": {
			"type": "String",
			"metadata": {
				"description": "Specifies the name of the Data Collection Rule to create."
			}
		},
		"location": {
			"defaultValue": "westus2",
			"allowedValues": [
				"westus2",
				"eastus2",
				"eastus2euap"
			],
			"type": "String",
			"metadata": {
				"description": "Specifies the location in which to create the Data Collection Rule."
			}
		},
        "location": {
            "defaultValue": "[resourceGroup().location]",
            "type": "String",
            "metadata": {
                "description": "Specifies the location in which to create the Data Collection Rule."
            }
        },
		"workspaceResourceId": {
			"type": "String",
			"metadata": {
				"description": "Specifies the Azure resource ID of the Log Analytics workspace to use."
			}
		}
	},
	"resources": [
		{
			"type": "Microsoft.Insights/dataCollectionRules",
			"apiVersion": "2021-09-01-preview",
			"name": "[parameters('dataCollectionRuleName')]",
			"location": "[parameters('location')]",
			"properties": {
				"streamDeclarations": {
					"Custom-SyslogStream": {
						"columns": [
							{
                        "name": "ls_timestamp",
                        "type": "datetime"
                    },	{
                        "name": "timestamp",
                        "type": "datetime"
                    },
                    {
                        "name": "message",
                        "type": "string"
                    },
					{
                        "name": "facility_label",
                        "type": "string"
                    },
					{
                        "name": "severity_label",
                        "type": "string"
                    },
                    {
                        "name": "host",
                        "type": "string"
                    },
                    {
                        "name": "logsource",
                        "type": "string"
                    }
	]
				      }
				},
				"destinations": {
					"logAnalytics": [
						{
							"workspaceResourceId": "[parameters('workspaceResourceId')]",
							"name": "clv2ws1"
						}
					]
				},
				"dataFlows": [
					{
					"streams": [
						"Custom-SyslogStream"
					],
					"destinations": [
						"clv2ws1"
					],
					"transformKql": "source | project TimeGenerated = ls_timestamp, EventTime = todatetime(timestamp), Computer = logsource, HostName = logsource, HostIP = host, SyslogMessage = message, Facility = facility_label, SeverityLevel = severity_label",
						"outputStream": "Microsoft-Syslog"
					}
				]
			}
		}
	],
	"outputs": {
		"dataCollectionRuleId": {
			"type": "String",
			"value": "[resourceId('Microsoft.Insights/dataCollectionRules', parameters('dataCollectionRuleName'))]"
		}
	}
}
配置 Logstash 配置文件
要配置 Logstash 配置文件以将日志引入到自定义表中,请检索以下值:
| 字段 | 如何检索 |
|---|---|
client_app_Id |
根据你在本部分使用的教程,在创建 DCR 资源时在步骤 3 中创建的 Application (client) ID 值。 |
client_app_secret |
你根据本部分中使用的教程,在创建 DCR 资源时在步骤 5 中创建的 Application (client) ID 值。 |
tenant_id |
订阅的租户 ID。 可以在“主页”>“Microsoft Entra ID”>“概述”>“基本信息”下找到该租户 ID。 |
data_collection_endpoint |
你根据本部分中使用的教程,在创建 DCR 资源时在步骤 3 中的 logsIngestion URI 的值。 |
dcr_immutable_id |
根据你在本部分使用的教程,在创建 DCR 资源时在步骤 6 中创建的 DCR immutableId 值。 |
dcr_stream_name |
对于自定义表,请根据创建 DCR 资源时的步骤 6 中所述,转到 DCR 的 JSON 视图,然后复制 dataFlows>streams 属性。 请参阅以下示例中的 dcr_stream_name。对于标准表,值为 Custom-SyslogStream。 |
检索所需值后:
- 将在上一步骤中创建的 Logstash 配置文件的输出部分替换为以下示例。
- 将以下示例中的占位符字符串替换为检索到的值。
- 请确保将
create_sample_file属性更改为false。
可选配置
| 字段 | 说明 | 默认值 |
|---|---|---|
azure_cloud |
用于指定正在使用的 Azure 云的名称,可用值为:AzureCloud、AzureChinaCloud 和 AzureUSGovernment。 |
AzureCloud |
key_names |
字符串数组。 如果你要将列的子集发送到 Log Analytics,请提供此字段。 | 无(字段为空) |
plugin_flush_interval |
定义将两条消息发送到 Log Analytics 的最大间隔时间差(以秒为单位)。 | 5 |
retransmission_time |
设置发送失败后重新传输消息的持续时间(以秒为单位)。 | 10 |
compress_data |
如果此字段为 True,则会在使用 API 之前压缩事件数据。 建议用于高吞吐量管道。 |
False |
proxy |
指定要用于所有 API 调用的代理 URL。 | 无(字段为空) |
proxy_aad |
指定要用于对 Microsoft Entra ID 进行 API 调用的代理 URL。 | 与 “proxy” 相同的值(字段为空) |
proxy_endpoint |
指定用于对数据收集终结点进行 API 调用的代理 URL。 | 与 “proxy” 相同的值(字段为空) |
示例:输出插件配置部分
output {
    microsoft-sentinel-log-analytics-logstash-output-plugin {
      client_app_Id => "<enter your client_app_id value here>"
      client_app_secret => "<enter your client_app_secret value here>"
      tenant_id => "<enter your tenant id here> "
      data_collection_endpoint => "<enter your logsIngestion URI here> "
      dcr_immutable_id => "<enter your DCR immutableId here> "
      dcr_stream_name => "<enter your stream name here> "
      create_sample_file=> false
      sample_file_path => "c:\\temp"
      proxy => "http://proxy.example.com"
    }
}
要为 Microsoft Sentinel Logstash 输出插件设置其他参数,请参阅输出插件的自述文件。
注意
出于安全原因,建议不要在 Logstash 配置文件中隐式声明 client_app_Id、client_app_secret、tenant_id、data_collection_endpoint 和 dcr_immutable_id 属性。 建议将此敏感信息存储在 Logstash KeyStore 中。
重启 Logstash
使用已更新的输出插件配置重启 Logstash,然后会看到,数据已根据 DCR 配置引入到正确的表中。
在 Microsoft Sentinel 中查看传入的日志
验证消息是否发送到输出插件。
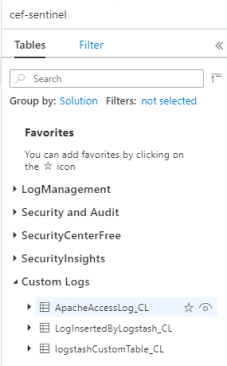
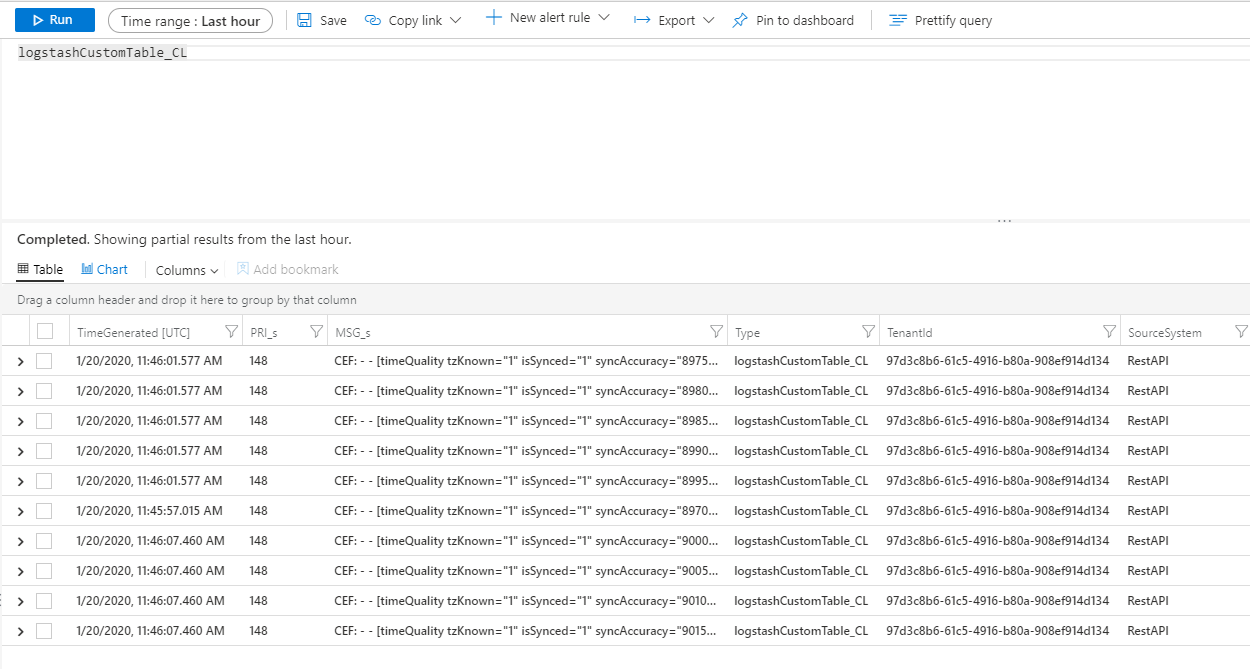
在 Microsoft Sentinel 导航菜单中单击“日志”。 在“表格”标题下,展开“自定义日志”类别。 找到在配置中指定的表格的名称(带有
_CL后缀)并单击该名称。
要查看表格中的记录,请将表格名称用作架构来查询表。

监视输出插件审核日志
若要监视 Microsoft Sentinel 输出插件的连接和活动,请启用相应的 Logstash 日志文件。 有关日志文件位置的信息,请参阅 Logstash 目录布局文档。
如果在此日志文件中看不到任何数据,请(通过输入插件和筛选器插件)在本地生成并发送一些事件以确保输出插件在接收数据。 Microsoft Sentinel 将支持只与输出插件相关的问题。
网络安全
定义网络设置并为 Microsoft Sentinel Logstash 输出插件启用网络隔离。
虚拟网络服务标记
Microsoft Sentinel 输出插件支持 Azure 虚拟网络服务标记。 需要 AzureMonitor 和 AzureActiveDirectory 标记。
Azure 虚拟网络服务标记可用于定义对网络安全组、Azure 防火墙和用户定义的路由的网络访问控制。 创建安全规则和路由时,可使用服务标记代替特定的 IP 地址。 对于无法使用 Azure 虚拟网络服务标记的场景,防火墙要求如下。
防火墙要求
下表列出了无法使用 Azure 虚拟网络服务标记的场景的防火墙要求。
| 云 | 端点 | 目的 | 端口 | 方向 | 绕过 HTTPS 检查 |
|---|---|---|---|---|---|
| Azure 商业版 | https://login.microsoftonline.com | 授权服务器(Microsoft 标识平台) | 端口 443 | 出站 | 是 |
| Azure 商业版 | https://<data collection endpoint name>.<Azure cloud region>.ingest.monitor.azure.com |
数据收集终结点 | 端口 443 | 出站 | 是 |
| Azure 政府 | https://login.microsoftonline.us | 授权服务器(Microsoft 标识平台) | 端口 443 | 出站 | 是 |
| Azure 政府 | 将上面的 “.com” 替换为 “.us” | 数据收集终结点 | 端口 443 | 出站 | 是 |
| 由世纪互联运营的 Microsoft Azure | https://login.chinacloudapi.cn | 授权服务器(Microsoft 标识平台) | 端口 443 | 出站 | 是 |
| 由世纪互联运营的 Microsoft Azure | 将上面的 “.com” 替换为 “.cn” | 数据收集终结点 | 端口 443 | 出站 | 是 |
插件版本
1.1.3
- 将用于连接到 Azure 的
rest-client库替换为excon库。
1.1.1
- 新增对中国世纪互联运营的 Azure 美国政府云和 Microsoft Azure 的支持。
1.1.0
- 允许为 API 连接设置不同的代理值。
- 将日志引入 API 的版本升级到 2023-01-01。
- 将插件重命名为 microsoft-sentinel-log-analytics-logstash-output-plugin。
1.0.0
- Microsoft Sentinel 的 Logstash 输出插件的初始版本。 此插件将数据收集规则 (DCR) 与 Azure Monitor 的日志引入 API 配合使用。
已知问题
在 Lite Ubuntu 的 Docker 映像上安装 Logstash 时,可能会出现以下警告:
java.lang.RuntimeException: getprotobyname_r failed
要解决此问题,请使用以下命令在 Dockerfile 中安装 netbase 包:
USER root
RUN apt install netbase -y
有关详细信息,请参阅 Logstash 7.17.0 (Docker) 中的 JNR 回归。
如果考虑到已分配的 Logstash 辅助角色数量,而环境中的事件速率较低,我们建议将 “plugin_flush_interval” 的值增加到 60 或更大。 这一更改将使每个辅助角色在上载到数据集合终结点 (DCE) 之前能够对更多事件进行批量处理。 可以使用 DCR 指标监视引入有效负载。 有关 plugin_flush_interval 的详细信息,请参阅前面提到的可选配置表。
限制
- 引入标准表仅限于自定义日志引入支持的标准表。
streamDeclarations属性中输入流的列必须以字母开头。 如果在列的开头使用其他字符(例如@或_),操作将会失败。TimeGenerated日期/时间字段是必填的。 必须在 KQL 转换中包含此字段。- 如果遇到其他问题,请查看教程中的故障排除部分。
后续步骤
在本文中,你已了解如何使用 Logstash 将外部数据源连接到 Microsoft Sentinel。 要详细了解 Microsoft Sentinel,请参阅以下文章:
- 了解如何洞察数据和潜在威胁。
- 开始使用 Microsoft Sentinel 检测威胁。
