你当前正在访问 Microsoft Azure Global Edition 技术文档网站。 如果需要访问由世纪互联运营的 Microsoft Azure 中国技术文档网站,请访问 https://docs.azure.cn 。
部署已启用受信任启动的虚拟机
本文内容
适用于:
受信任启动 是一种提高第 2 代 虚拟机 (VM) 安全性的方法。 受信任启动通过组合虚拟的受信任的平台模块 (vTPM) 和安全启动之类的基础结构技术来防范高级攻击和持续性攻击方法。
先决条件
我们建议你订阅 Microsoft Defender for Cloud (如果尚未订阅它)。 Defender for Cloud 有一个免费层,该层为各种 Azure 资源和混合资源提供有用的见解。 由于缺少 Defender for Cloud,受信任启动 VM 用户无法监视 VM 的启动完整性 。
将 Azure 策略计划分配到订阅。 只需为每个订阅分配一次策略计划。 策略将有助于部署受信任启动 VM 并针对其进行审核,同时在所有受支持的 VM 上自动安装所有必需的扩展。
配置受信任启动 VM 的内置策略计划 。
配置先决条件以在启用了受信任启动的 VM 上启用来宾证明。
配置计算机,以在 VM 上自动安装 Azure Monitor 和 Azure 安全代理。
允许网络安全组出站规则中的服务标记 AzureAttestation,以允许 Azure 证明的流量。 有关详细信息,请参阅虚拟网络服务标记 。
确保防火墙策略允许访问 *.attest.azure.net。
注意
如果你使用的是 Linux 映像并预计 VM 可能有未签名的或未由 Linux 发行版供应商签名的内核驱动程序,则可能需要考虑关闭安全启动。 在 Azure 门户中的“创建虚拟机”Security type 参数选中“受信任启动虚拟机”false。
部署受信任启动 VM
创建启用了受信任启动的 VM。 选择以下选项之一:
登录 Azure 门户 。
搜索“虚拟机”。
在“服务”下,选择“虚拟机” 。
在“虚拟机”页上选择“添加”,然后选择“虚拟机”
在“项目详细信息”下,确保选择了正确的订阅。
在“资源组”下,选择“新建”。 输入资源组的名称或从下拉列表中选择一个现有资源组。
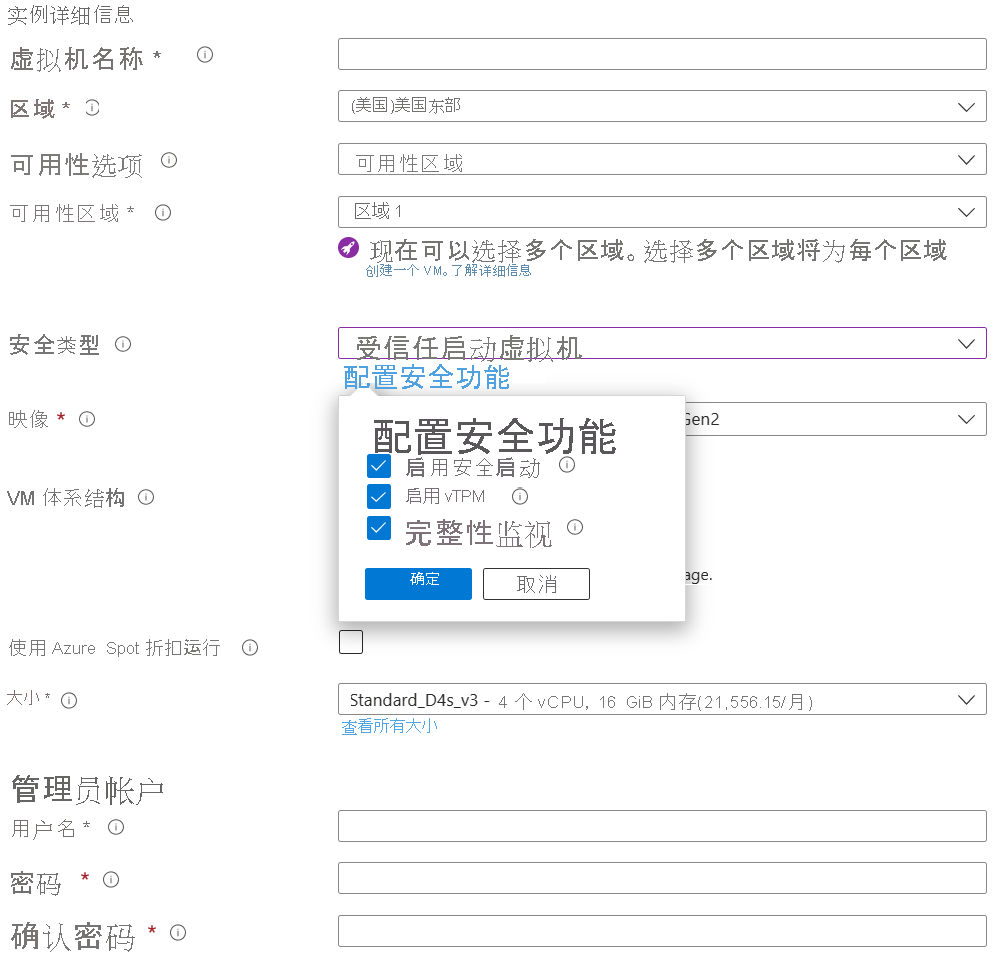
在“实例详细信息”下,输入一个名称作为 VM 名称,并选择一个支持受信任启动 的区域
对于“安全类型”已启用受信任启动的安全功能 。
在“映像”下,从“推荐的与受信任启动兼容的第 2 代映像”中选择一个映像。受信任启动 。
提示
如果下拉列表中未显示所需的 Gen2 版本映像,请选择“查看所有映像”
选择支持受信任启动的 VM 大小。 有关详细信息,请参阅支持的大小 的列表。
填写“管理员帐户”信息,然后填写“入站端口规则”。
在页面底部,选择“查看 + 创建”
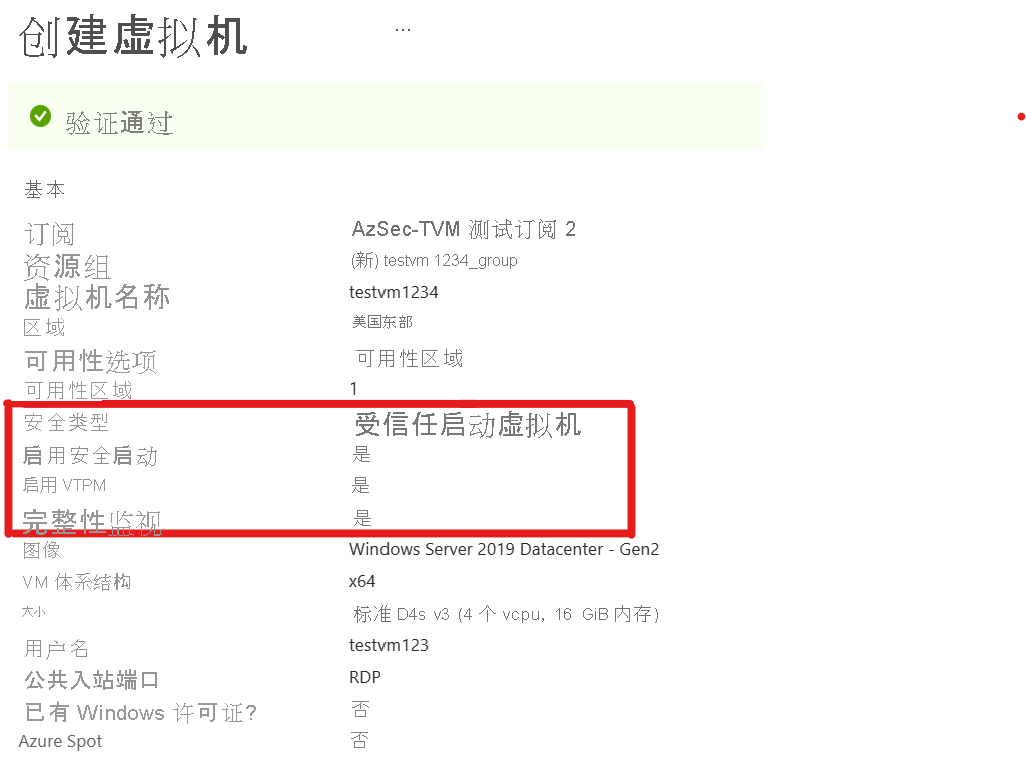
在“创建虚拟机”页上,
部署 VM 需要几分钟。
确保运行最新版本的 Azure CLI。
使用 az login 登录到 Azure。
az login
创建使用受信任启动的 VM。
az group create -n myresourceGroup -l eastus

az vm create \
   --resource-group myResourceGroup \
   --name myVM \
   --image Canonical:UbuntuServer:18_04-lts-gen2:latest \
   --admin-username azureuser \
   --generate-ssh-keys \
   --security-type TrustedLaunch \
   --enable-secure-boot true \
   --enable-vtpm true
对于现有 VM,可以启用或禁用安全启动和 vTPM 设置。 使用安全启动和 vTPM 设置更新 VM 会触发自动重启。
az vm update \
   --resource-group myResourceGroup \
   --name myVM \
   --enable-secure-boot true \
   --enable-vtpm true
有关通过来宾证明扩展安装启动完整性监视的详细信息,请参阅《启动完整性 》。
若要使用受信任启动预配 VM,首先需要使用 Set-AzVmSecurityProfile cmdlet 为其启用 TrustedLaunch 参数。 然后可以使用 Set-AzVmUefi cmdlet 来设置 vTPM 和安全启动配置。 使用以下代码片段作为快速启动。 请记住用你自己的值替换此示例中的值。
$rgName = "myResourceGroup"
$location = "West US"
$vmName = "myTrustedVM"
$vmSize = Standard_B2s
$publisher = "MicrosoftWindowsServer"
$offer = "WindowsServer"
$sku = "2019-datacenter-gensecond"
$version = latest
$cred = Get-Credential `
   -Message "Enter a username and password for the virtual machine."

$vm = New-AzVMConfig -VMName $vmName -VMSize $vmSize

$vm = Set-AzVMOperatingSystem `
   -VM $vm -Windows `
   -ComputerName $vmName `
   -Credential $cred `
   -ProvisionVMAgent `
   -EnableAutoUpdate

$vm = Add-AzVMNetworkInterface -VM $vm `
   -Id $NIC.Id

$vm = Set-AzVMSourceImage -VM $vm `
   -PublisherName $publisher `
   -Offer $offer `
   -Skus $sku `
   -Version $version

$vm = Set-AzVMOSDisk -VM $vm `
   -StorageAccountType "StandardSSD_LRS" `
   -CreateOption "FromImage"

$vm = Set-AzVmSecurityProfile -VM $vm `
   -SecurityType "TrustedLaunch"

$vm = Set-AzVmUefi -VM $vm `
   -EnableVtpm $true `
   -EnableSecureBoot $true

New-AzVM -ResourceGroupName $rgName -Location $location -VM $vm
可以使用快速启动模板部署受信任启动 VM。
Linux
Windows
从 Azure Compute Gallery 映像部署受信任启动 VM
Azure 受信任启动 VM 支持使用 Azure Compute Gallery 创建和共享自定义映像。 可以根据映像的安全类型创建两种类型的映像:
受信任启动 VM 支持的映像
对于以下映像源,映像定义上的安全类型应设置为 TrustedLaunchsupported:
Gen2 操作系统 (OS) 磁盘 VHD
Gen2 托管映像
Gen2 Gallery 映像版本
映像源中不能包含任何 VM 来宾状态信息。
可以使用生成的映像版本创建 Azure Gen2 VM 或受信任启动 VM。
可以使用 Azure Compute Gallery - 直接共享库 和 Azure Compute Gallery - 社区库 共享这些图像。
登录到 Azure 门户 。
在搜索栏中搜索并选择“VM 映像版本”
在“VM 映像版本”页上,选择“创建”。
在“创建 VM 映像版本”页上的“基本信息”选项卡上:
选择 Azure 订阅。
选择现有资源组或创建新资源组。
选择 Azure 区域。
输入映像版本号。
对于“源”
如果选择“存储 Blob (VHD)”,请输入 OS 磁盘 VHD(不包含 VM 来宾状态)。 请确保使用 Gen2 VHD。
如果选择了“托管映像”
如果选择了“VM 映像版本”
对于“目标 Azure Compute Gallery”,选择或创建用于共享映像的库。
对于“操作系统状态”,选择“通用”或“专用”,具体取决于你的用例。 如果使用托管映像作为源,请始终选择“通用”。 如果使用存储 blob (VHD) 且想要选择“通用”,请按照步骤通用化 Linux VHD 或通用化 Windows VHD ,然后再继续操作。 如果你使用的是现有 VM 映像版本,请根据源 VM 映像定义中使用的内容选择“通用”
对于“目标 VM 映像定义”,选择“新建”。
在“创建 VM 映像定义”确定 。
在“复制”
在“加密”
选择“查看 + 创建” 。
成功验证配置后,选择“创建”以完成映像创建。
创建映像版本后,选择“创建 VM”。
在“创建虚拟机”
在“实例详细信息”下,输入一个名称作为 VM 名称,并选择一个支持受信任启动 的区域
对于“安全类型”
填写“管理员帐户”信息,然后填写“入站端口规则”。
在验证页上,查看 VM 的详细信息。
验证成功后,选择“创建”以完成 VM 创建。
确保运行最新版本的 Azure CLI。
使用 az login 登录到 Azure。
az login
使用 TrustedLaunchSupported 安全类型创建映像定义。
az sig image-definition create --resource-group MyResourceGroup --location eastus \
--gallery-name MyGallery --gallery-image-definition MyImageDef \
--publisher TrustedLaunchPublisher --offer TrustedLaunchOffer --sku TrustedLaunchSku \
--os-type Linux --os-state Generalized \
--hyper-v-generation V2 \
--features SecurityType=TrustedLaunchSupported
使用 OS 磁盘 VHD 创建映像版本。 确保在将 Linux VHD 上传到 Azure 存储帐户 blob 之前,已按照准备 Linux 以在 Azure 中进行映像处理 中的步骤对 Linux VHD 进行通用化操作。
az sig image-version create --resource-group MyResourceGroup \
--gallery-name MyGallery --gallery-image-definition MyImageDef \
--gallery-image-version 1.0.0 \
--os-vhd-storage-account /subscriptions/00000000-0000-0000-0000-00000000xxxx/resourceGroups/imageGroups/providers/Microsoft.Storage/storageAccounts/mystorageaccount \
--os-vhd-uri https://mystorageaccount.blob.core.windows.net/container/path_to_vhd_file
从上一映像版本创建受信任启动 VM。
adminUsername=linuxvm
az vm create --resource-group MyResourceGroup \
    --name myTrustedLaunchVM \
    --image "/subscriptions/00000000-0000-0000-0000-00000000xxxx/resourceGroups/MyResourceGroup/providers/Microsoft.Compute/galleries/MyGallery/images/MyImageDef" \
    --size Standard_D2s_v5 \
    --security-type TrustedLaunch \
    --enable-secure-boot true \
    --enable-vtpm true \
    --admin-username $adminUsername \
    --generate-ssh-keys
使用 TrustedLaunchSupported 安全类型创建映像定义。
$rgName = "MyResourceGroup"
$galleryName = "MyGallery"
$galleryImageDefinitionName = "MyImageDef"
$location = "eastus"
$publisherName = "TrustedlaunchPublisher"
$offerName = "TrustedlaunchOffer"
$skuName = "TrustedlaunchSku"
$description = "My gallery"
$SecurityType = @{Name='SecurityType';Value='TrustedLaunchSupported'}
$features = @($SecurityType)
New-AzGalleryImageDefinition -ResourceGroupName $rgName -GalleryName $galleryName -Name $galleryImageDefinitionName -Location $location -Publisher $publisherName -Offer $offerName -Sku $skuName -HyperVGeneration "V2" -OsState "Generalized" -OsType "Windows" -Description $description -Feature $features
若要创建映像版本,可以使用已在创建过程中通用化的现有 Gen2 Gallery 映像版本。
$rgName = "MyResourceGroup"
$galleryName = "MyGallery"
$galleryImageDefinitionName = "MyImageDef"
$location = "eastus"
$galleryImageVersionName = "1.0.0"
$sourceImageId = "/subscriptions/00000000-0000-0000-0000-000000000000/resourceGroups/myVMRG/providers/Microsoft.Compute/galleries/MyGallery/images/Gen2VMImageDef/versions/0.0.1"
New-AzGalleryImageVersion -ResourceGroupName $rgName -GalleryName $galleryName -GalleryImageDefinitionName $galleryImageDefinitionName -Name $galleryImageVersionName -Location $location -SourceImageId $sourceImageId
从上一映像版本创建受信任启动 VM。
$rgName = "MyResourceGroup"
$galleryName = "MyGallery"
$galleryImageDefinitionName = "MyImageDef"
$location = "eastus"
$vmName = "myVMfromImage"
$vmSize = "Standard_D2s_v5"
$imageDefinition = Get-AzGalleryImageDefinition `
   -GalleryName $galleryName `
   -ResourceGroupName $rgName `
   -Name $galleryImageDefinitionName
$cred = Get-Credential `
   -Message "Enter a username and password for the virtual machine"
# Network pieces
$subnetConfig = New-AzVirtualNetworkSubnetConfig `
   -Name mySubnet `
   -AddressPrefix 192.168.1.0/24
$vnet = New-AzVirtualNetwork `
   -ResourceGroupName $rgName `
   -Location $location `
   -Name MYvNET `
   -AddressPrefix 192.168.0.0/16 `
   -Subnet $subnetConfig
$pip = New-AzPublicIpAddress `
   -ResourceGroupName $rgName `
   -Location $location `
  -Name "mypublicdns$(Get-Random)" `
  -AllocationMethod Static `
  -IdleTimeoutInMinutes 4
$nsgRuleRDP = New-AzNetworkSecurityRuleConfig `
   -Name myNetworkSecurityGroupRuleRDP  `
   -Protocol Tcp `
  -Direction Inbound `
   -Priority 1000 `
   -SourceAddressPrefix * `
   -SourcePortRange * `
   -DestinationAddressPrefix * `
   -DestinationPortRange 3389 `
   -Access Deny
$nsg = New-AzNetworkSecurityGroup `
   -ResourceGroupName $rgName `
   -Location $location `
  -Name myNetworkSecurityGroup `
  -SecurityRules $nsgRuleRDP
$nic = New-AzNetworkInterface `
   -Name myNic `
   -ResourceGroupName $rgName `
   -Location $location `
  -SubnetId $vnet.Subnets[0].Id `
  -PublicIpAddressId $pip.Id `
  -NetworkSecurityGroupId $nsg.Id
$vm = New-AzVMConfig -vmName $vmName -vmSize $vmSize | `
      Set-AzVMOperatingSystem -Windows -ComputerName $vmName -Credential $cred | `
      Set-AzVMSourceImage -Id $imageDefinition.Id | `
      Add-AzVMNetworkInterface -Id $nic.Id
$vm = Set-AzVMSecurityProfile -SecurityType "TrustedLaunch" -VM $vm
$vm = Set-AzVmUefi -VM $vm `
   -EnableVtpm $true `
   -EnableSecureBoot $true
New-AzVM `
   -ResourceGroupName $rgName `
   -Location $location `
   -VM $vm
受信任启动 VM 映像
对于以下映像源,映像定义上的安全类型应设置为 TrustedLaunch:
受信任启动 VM 捕获
托管 OS 磁盘
托管 OS 磁盘快照
只能使用生成的映像版本来创建 Azure 受信任启动 VM。
登录 Azure 门户 。
若要从 VM 创建 Azure Compute Gallery 映像,请打开现有的受信任启动 VM 并选择“捕获”
在“创建映像”
创建新的目标 Azure Compute Gallery 或选择现有库。
将“操作系统状态”选择为“通用”或者“专用”。 若要创建通用映像,请确保在选择此选项之前对 VM 进行通用化操作以删除特定于计算机的信息 。 如果在受信任启动 Windows VM 上启用了基于 Bitlocker 的加密,则可能无法对同一 VM 进行通用化操作。
通过提供名称、发布者、产品/服务和 SKU 详细信息创建新的映像定义。 映像定义的“安全类型”
提供映像版本的版本号。
如果有必要,请修改复制选项。
在“创建映像”页底部,选择“查看 + 创建”
创建映像版本后,直接转到映像版本。 也可通过映像定义转到所需的映像版本。
在“VM 映像版本”
在“创建虚拟机”
在“实例详细信息”下,输入一个名称作为 VM 名称,并选择一个支持受信任启动 的区域
已根据所选映像版本填充映像和安全类型。 默认情况下启用“安全启动”和“vTPM”复选框。
填写“管理员帐户”信息,然后填写“入站端口规则”。
在页面底部,选择“查看 + 创建”
在验证页上,查看 VM 的详细信息。
验证成功后,选择“创建”以完成 VM 创建。
若要使用托管磁盘或托管磁盘快照作为映像版本的源(而不使用受信任启动 VM),请按照以下步骤操作。
登录到 Azure 门户 。
搜索“VM 映像版本”
提供订阅、资源组、区域和映像版本号。
选择“磁盘和/或快照”
从下拉列表中选择 OS 磁盘作为托管磁盘或托管磁盘快照。
选择目标 Azure Compute Gallery 以创建和共享映像。 如果没有库,新建一个。
将“操作系统状态”选择为“通用”或者“专用”。 若要创建通用映像,请确保对磁盘或快照进行通用化操作以删除特定于计算机的信息。
对于“目标 VM 映像定义”
如果需要,可以使用“复制”选项卡设置映像复制的副本数和目标区域。
还可视需要将“加密”
在“查看 + 创建”
在成功创建映像版本后,选择“+ 创建 VM”
执行前面提到的步骤 12 到 18,以使用该映像版本创建受信任启动 VM。
确保运行最新版本的 Azure CLI。
使用 az login 登录到 Azure。
az login
使用 TrustedLaunch 安全类型创建映像定义。
az sig image-definition create --resource-group MyResourceGroup --location eastus \
--gallery-name MyGallery --gallery-image-definition MyImageDef \
--publisher TrustedLaunchPublisher --offer TrustedLaunchOffer --sku TrustedLaunchSku \
--os-type Linux --os-state Generalized \
--hyper-v-generation V2 \
--features SecurityType=TrustedLaunch
若要创建映像版本,可以捕获现有的基于 Linux 的受信任启动 VM。 在创建映像版本之前,请通用化受信任启动 VM 。
az sig image-version create --resource-group MyResourceGroup \
--gallery-name MyGallery --gallery-image-definition MyImageDef \
--gallery-image-version 1.0.0 \
--managed-image /subscriptions/00000000-0000-0000-0000-00000000xxxx/resourceGroups/MyResourceGroup/providers/Microsoft.Compute/virtualMachines/myVM
如果需要使用托管磁盘或托管磁盘快照作为映像版本的映像源,请将上述命令中的 --managed-image 替换为 --os-snapshot,并提供磁盘或快照资源名称。
从上一映像版本创建受信任启动 VM。
adminUsername=linuxvm
az vm create --resource-group MyResourceGroup \
    --name myTrustedLaunchVM \
    --image "/subscriptions/00000000-0000-0000-0000-00000000xxxx/resourceGroups/MyResourceGroup/providers/Microsoft.Compute/galleries/MyGallery/images/MyImageDef" \
    --size Standard_D2s_v5 \
    --security-type TrustedLaunch \
    --enable-secure-boot true \
    --enable-vtpm true \
    --admin-username $adminUsername \
    --generate-ssh-keys
使用 TrustedLaunch 安全类型创建映像定义。
$rgName = "MyResourceGroup"
$galleryName = "MyGallery"
$galleryImageDefinitionName = "MyImageDef"
$location = "eastus"
$publisherName = "TrustedlaunchPublisher"
$offerName = "TrustedlaunchOffer"
$skuName = "TrustedlaunchSku"
$description = "My gallery"
$SecurityType = @{Name='SecurityType';Value='TrustedLaunch'}
$features = @($SecurityType)
New-AzGalleryImageDefinition -ResourceGroupName $rgName -GalleryName $galleryName -Name $galleryImageDefinitionName -Location $location -Publisher $publisherName -Offer $offerName -Sku $skuName -HyperVGeneration "V2" -OsState "Generalized" -OsType "Windows" -Description $description -Feature $features
若要创建映像版本,可以捕获现有的基于 Windows 的受信任启动 VM。 在创建映像版本之前,请通用化受信任启动 VM 。
$rgName = "MyResourceGroup"
$galleryName = "MyGallery"
$galleryImageDefinitionName = "MyImageDef"
$location = "eastus"
$galleryImageVersionName = "1.0.0"
$sourceImageId = "/subscriptions/00000000-0000-0000-0000-000000000000/resourceGroups/myVMRG/providers/Microsoft.Compute/virtualMachines/myVM"
New-AzGalleryImageVersion -ResourceGroupName $rgName -GalleryName $galleryName -GalleryImageDefinitionName $galleryImageDefinitionName -Name $galleryImageVersionName -Location $location -SourceImageId $sourceImageId
从上一映像版本创建受信任启动 VM。
$rgName = "MyResourceGroup"
$galleryName = "MyGallery"
$galleryImageDefinitionName = "MyImageDef"
$location = "eastus"
$vmName = "myVMfromImage"
$vmSize = "Standard_D2s_v5"
$imageDefinition = Get-AzGalleryImageDefinition `
   -GalleryName $galleryName `
   -ResourceGroupName $rgName `
   -Name $galleryImageDefinitionName
$cred = Get-Credential `
   -Message "Enter a username and password for the virtual machine"
# Network pieces
$subnetConfig = New-AzVirtualNetworkSubnetConfig `
   -Name mySubnet `
   -AddressPrefix 192.168.1.0/24
$vnet = New-AzVirtualNetwork `
   -ResourceGroupName $rgName `
   -Location $location `
   -Name MYvNET `
   -AddressPrefix 192.168.0.0/16 `
   -Subnet $subnetConfig
$pip = New-AzPublicIpAddress `
   -ResourceGroupName $rgName `
   -Location $location `
  -Name "mypublicdns$(Get-Random)" `
  -AllocationMethod Static `
  -IdleTimeoutInMinutes 4
$nsgRuleRDP = New-AzNetworkSecurityRuleConfig `
   -Name myNetworkSecurityGroupRuleRDP  `
   -Protocol Tcp `
  -Direction Inbound `
   -Priority 1000 `
   -SourceAddressPrefix * `
   -SourcePortRange * `
   -DestinationAddressPrefix * `
   -DestinationPortRange 3389 `
   -Access Deny
$nsg = New-AzNetworkSecurityGroup `
   -ResourceGroupName $rgName `
   -Location $location `
  -Name myNetworkSecurityGroup `
  -SecurityRules $nsgRuleRDP
$nic = New-AzNetworkInterface `
   -Name myNic `
   -ResourceGroupName $rgName `
   -Location $location `
  -SubnetId $vnet.Subnets[0].Id `
  -PublicIpAddressId $pip.Id `
  -NetworkSecurityGroupId $nsg.Id
$vm = New-AzVMConfig -vmName $vmName -vmSize $vmSize | `
      Set-AzVMOperatingSystem -Windows -ComputerName $vmName -Credential $cred | `
      Set-AzVMSourceImage -Id $imageDefinition.Id | `
      Add-AzVMNetworkInterface -Id $nic.Id
$vm = Set-AzVMSecurityProfile -SecurityType "TrustedLaunch" -VM $vm
$vm = Set-AzVmUefi -VM $vm `
   -EnableVtpm $true `
   -EnableSecureBoot $true
New-AzVM `
   -ResourceGroupName $rgName `
   -Location $location `
   -VM $vm
受信任启动内置策略
为了帮助用户采用受信任启动,可以使用 Azure 策略来帮助资源所有者采用受信任启动。 主要目标是帮助转换具有受信任启动功能的第 1 代和第 2 代 VM。
“虚拟机应启用受信任启动”适用的第 2 代 OS 和 VM 大小 以部署受信任启动 VM。
这两项策略共同构成了受信任启动策略计划。 该计划使你能够对多个相关的策略定义进行分组,以简化用于包括受信任启动配置的分配和管理资源。
要了解详细信息并开始部署,请参阅受信任启动内置策略 。
验证或更新设置
对于启用了受信任启动的已创建 VM,你可以在 Azure 门户中转到 VM 的“概述”
若要更改受信任启动配置,请在左侧菜单上的“设置”下选择“配置”
如果 VM 正在运行,你会收到一条消息,指出 VM 将重启。 选择“是”
相关内容
详细了解受信任启动 和启动完整性监视 VM。


