使用 Microsoft Graph 生成 Angular 单页应用
本教程指导你如何生成Angular Microsoft Graph检索用户的日历信息的单个页面应用。
提示
如果只想下载已完成的教程,可以下载或克隆GitHub存储库。
先决条件
在开始本教程之前,应该在开发 Node.js 安装一个。 如果没有安装Node.js,请访问上一链接,查看下载选项。
您还应该有一个在 Outlook.com 上拥有邮箱的个人 Microsoft 帐户,或者一个 Microsoft 工作或学校帐户。 如果你没有 Microsoft 帐户,则有几个选项可以获取免费帐户:
- 你可以 注册新的个人 Microsoft 帐户。
- 你可以注册开发人员计划Microsoft 365免费订阅Office 365订阅。
备注
本教程是使用 Node 版本 14.15.0 编写的。 本指南中的步骤可能与其他版本一起运行,但该版本尚未经过测试。
反馈
Please provide any feedback on this tutorial in the GitHub repository.
创建 Angular 单页应用
在此部分中,你将创建一个新的Angular项目。
打开命令行接口 (CLI) ,导航到你拥有创建文件权限的目录,然后运行以下命令来安装 Angular CLI 工具并创建新的 Angular 应用。
npm install -g @angular/cli
ng new graph-tutorial
THE Angular CLI will prompt for more information. 回答提示,如下所示。
? Would you like to add Angular routing? Yes
? Which stylesheet format would you like to use? CSS
命令完成后,在
graph-tutorialCLI 中更改为 目录并运行以下命令以启动本地 Web 服务器。ng serve --open默认浏览器将打开,https://localhost:4200/并包含默认Angular页面。 如果浏览器未打开,请打开 https://localhost:4200/ 它并浏览以验证新应用是否正常工作。
添加节点包
在继续之前,请安装一些你稍后将使用的其他程序包:
- ng-bootstrap,用于从 Angular。
- 设置 日期和时间格式的时间。
- windows-iana
- msal-angular,用于Azure Active Directory令牌进行身份验证和检索访问令牌。
- 用于调用 Microsoft Graph 的 microsoft-graph-client。
在 CLI 中运行以下命令。
ng add @ng-bootstrap/ng-bootstrap
npm install @azure/msal-browser@2.16.1 @azure/msal-angular@2.0.2
npm install date-fns@2.23.0 date-fns-tz@1.1.6 windows-iana@5.0.2
npm install @microsoft/microsoft-graph-client@3.0.0
npm install @microsoft/microsoft-graph-types --save-dev
设计应用
在此部分中,你将为应用创建用户界面。
打开 ./src/styles.css 并添加以下行。
@import "~bootstrap/dist/css/bootstrap.css";

/* Add padding for the nav bar */
body {
  padding-top: 4.5rem;
}

/* Style debug info in alerts */
.alert-pre {
  word-wrap: break-word;
  word-break: break-all;
  white-space: pre-wrap;
}

/* Add padding to user avatar link */
.avatar-link {
  padding-top: .25em;
  padding-bottom: .25em;
}
在名为 user.ts 的 ./src/app 文件夹中创建新文件并添加以下代码。
export class User {
  displayName!: string;
  email!: string;
  avatar!: string;
  timeZone!: string;
}
生成Angular顶部导航的导航组件。 在 CLI 中,运行以下命令。
ng generate component nav-bar命令完成后,打开 ./src/app/nav-bar/nav-bar.component.ts ,并将其内容替换为以下内容。
import { Component, OnInit } from '@angular/core';

import { User } from '../user';

@Component({
  selector: 'app-nav-bar',
  templateUrl: './nav-bar.component.html',
  styleUrls: ['./nav-bar.component.css']
})
export class NavBarComponent implements OnInit {

  // Should the collapsed nav show?
  showNav: boolean = false;
  // Is a user logged in?
  authenticated: boolean = false;
  // The user
  user?: User = undefined;

  constructor() { }

  ngOnInit() { }

  // Used by the Bootstrap navbar-toggler button to hide/show
  // the nav in a collapsed state
  toggleNavBar(): void {
    this.showNav = !this.showNav;
  }

  signIn(): void {
    // Temporary
    this.authenticated = true;
    this.user = {
      displayName: 'Adele Vance',
      email: 'AdeleV@contoso.com',
      avatar: '/assets/no-profile-photo.png',
      timeZone: ''
    };
  }

  signOut(): void {
    // Temporary
    this.authenticated = false;
    this.user = undefined;
  }
}
打开 "./src/app/nav-bar/nav-bar.component.html ",并将其内容替换为以下内容。
<nav class="navbar navbar-expand-md navbar-dark fixed-top bg-dark">
  <div class="container">
    <a routerLink="/" class="navbar-brand">Angular Graph Tutorial</a>
    <button class="navbar-toggler" type="button" (click)="toggleNavBar()" [attr.aria-expanded]="showNav"
    aria-controls="navbarCollapse" aria-expanded="false" aria-label="Toggle navigation">
      <span class="navbar-toggler-icon"></span>
    </button>
    <div class="collapse navbar-collapse" [class.show]="showNav" id="navbarCollapse">
      <ul class="navbar-nav mr-auto">
        <li class="nav-item">
          <a routerLink="/" class="nav-link" routerLinkActive="active">Home</a>
        </li>
        <li *ngIf="authenticated" class="nav-item">
          <a routerLink="/calendar" class="nav-link" routerLinkActive="active">Calendar</a>
        </li>
      </ul>
      <ul class="navbar-nav justify-content-end">
        <li class="nav-item">
          <a class="nav-link" href="https://docs.microsoft.com/graph/overview" target="_blank">Docs</a>
        </li>
        <li *ngIf="authenticated" ngbDropdown placement="bottom-right" class="nav-item">
          <a ngbDropdownToggle id="userMenu" class="nav-link avatar-link" role="button" aria-haspopup="true"
            aria-expanded="false">
            <img src="{{user != null ? user.avatar : ''}}" class="rounded-circle align-self-center mr-2" style="width: 32px;">
          </a>
          <div ngbDropdownMenu aria-labelledby="userMenu" class="dropdown-menu-right">
            <h5 class="dropdown-item-text mb-0">{{user != null ? user.displayName : ''}}</h5>
            <p class="dropdown-item-text text-muted mb-0">{{user != null ? user.email : ''}}</p>
            <div class="dropdown-divider"></div>
            <button class="dropdown-item" role="button" (click)="signOut()">Sign Out</button>
          </div>
        </li>
        <li *ngIf="!authenticated" class="nav-item">
          <button class="btn btn-link nav-link border-0" role="button" (click)="signIn()">Sign In</button>
        </li>
      </ul>
    </div>
  </div>
</nav>
为应用创建主页。 在 CLI 中运行以下命令。
ng generate component home命令完成后,打开 ./src/app/home/home.component.ts ,并将其内容替换为以下内容。
import { Component, OnInit } from '@angular/core';

import { User } from '../user';

@Component({
  selector: 'app-home',
  templateUrl: './home.component.html',
  styleUrls: ['./home.component.css']
})
export class HomeComponent implements OnInit {

  // Is a user logged in?
  authenticated: boolean = false;
  // The user
  user?: User = undefined;

  constructor() { }

  ngOnInit() { }

  signIn(): void {
    // Temporary
    this.authenticated = true;
    this.user = {
      displayName: 'Adele Vance',
      email: 'AdeleV@contoso.com',
      avatar: '',
      timeZone: ''
    };
  }
}
打开 "./src/app/home/home.component.html ",并将其内容替换为以下内容。
<div class="jumbotron">
  <h1>Angular Graph Tutorial</h1>
  <p class="lead">This sample app shows how to use the Microsoft Graph API from Angular</p>
  <div *ngIf="authenticated; then welcomeUser else signInPrompt"></div>
  <ng-template #welcomeUser>
    <h4>Welcome {{ user != null ? user.displayName : '' }}!</h4>
    <p>Use the navigation bar at the top of the page to get started.</p>
  </ng-template>
  <ng-template #signInPrompt>
    <button class="btn btn-primary btn-large" role="button" (click)="signIn()">Click here to sign in</button>
  </ng-template>
</div>
创建一个简单的
Alert类。 在 . /src/app 目录中创建一个名为 alert.ts 的新文件,并添加以下代码。export class Alert { type!: string; message!: string; debug!: string; }创建应用可用于向用户显示消息的警报服务。 在 CLI 中,运行以下命令。
ng generate service alerts打开 ./src/app/alerts.service.ts ,并将其内容替换为以下内容。
import { Injectable } from '@angular/core';
import { Alert } from './alert';

@Injectable({
  providedIn: 'root'
})

export class AlertsService {

  alerts: Alert[] = [];

  addError(message: string, debug?: string) {
    this.alerts.push({message: message, debug: debug ?? '', type: 'danger'});
  }

  addSuccess(message: string, debug?: string) {
    this.alerts.push({message: message, debug: debug ?? '', type: 'success'});
  }

  remove(alert: Alert) {
    this.alerts.splice(this.alerts.indexOf(alert), 1);
  }
}
生成警报组件以显示警报。 在 CLI 中,运行以下命令。
ng generate component alerts命令完成后,打开 ./src/app/alerts/alerts.component.ts ,并将其内容替换为以下内容。
import { Component, OnInit } from '@angular/core';
import { AlertsService } from '../alerts.service';
import { Alert } from '../alert';

@Component({
  selector: 'app-alerts',
  templateUrl: './alerts.component.html',
  styleUrls: ['./alerts.component.css']
})
export class AlertsComponent implements OnInit {

  constructor(public alertsService: AlertsService) { }

  ngOnInit() {
  }

  close(alert: Alert) {
    this.alertsService.remove(alert);
  }
}
打开 "./src/app/alerts/alerts.component.html "并将其内容替换为以下内容。
<div *ngFor="let alert of alertsService.alerts">
  <ngb-alert type="{{alert.type}}" (close)="close(alert)">
    {{alert.message}}
    <pre *ngIf="alert.debug" class="alert-pre border bg-light p-2 mt-2"><code>{{alert.debug}}</code></pre>
  </ngb-alert>
</div>
打开 "./src/app/app-routing.module.ts "
const routes: Routes = [];,将 行替换为以下代码。import { HomeComponent } from './home/home.component'; const routes: Routes = [ { path: '', component: HomeComponent }, ];打开 "./src/app/app.component.html ",并将其全部内容替换为以下内容。
<app-nav-bar></app-nav-bar>
<main role="main" class="container">
  <app-alerts></app-alerts>
  <router-outlet></router-outlet>
</main>
在 ./src/assets 目录中添加no-profile-photo.png选择的图像文件。 当用户在 Microsoft Graph 中没有照片时,此图像将用作用户Graph。
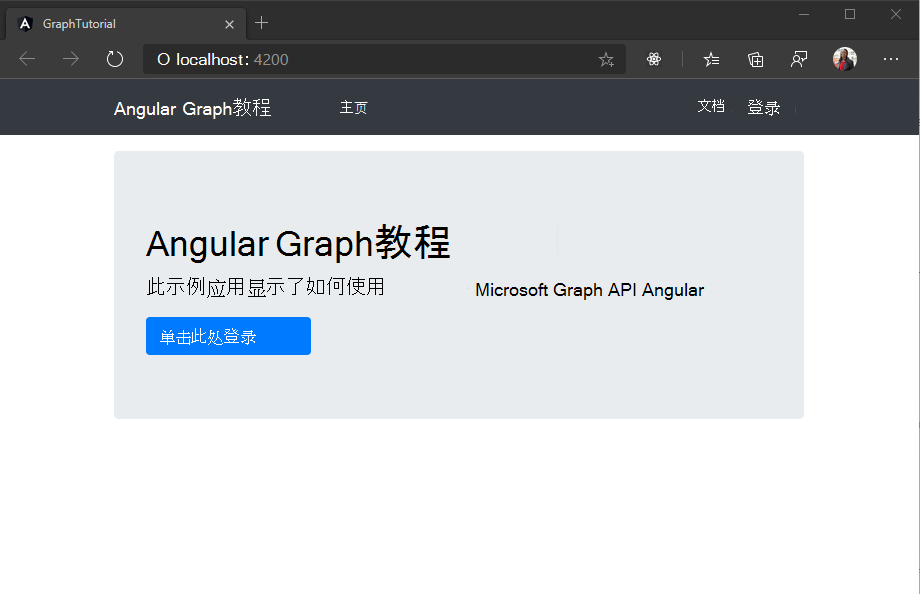
保存所有更改并刷新页面。 现在,应用看起来应该非常不同。

在门户中注册该应用
在此练习中,你将使用 Azure AD 管理中心创建新的 Azure Active Directory Web 应用程序注册。
打开浏览器,并转到 Azure Active Directory 管理中心。 使用 个人帐户(亦称为“Microsoft 帐户”)或 工作或学校帐户 登录。
选择左侧导航栏中的“Azure Active Directory”,再选择“管理”下的“应用注册”。

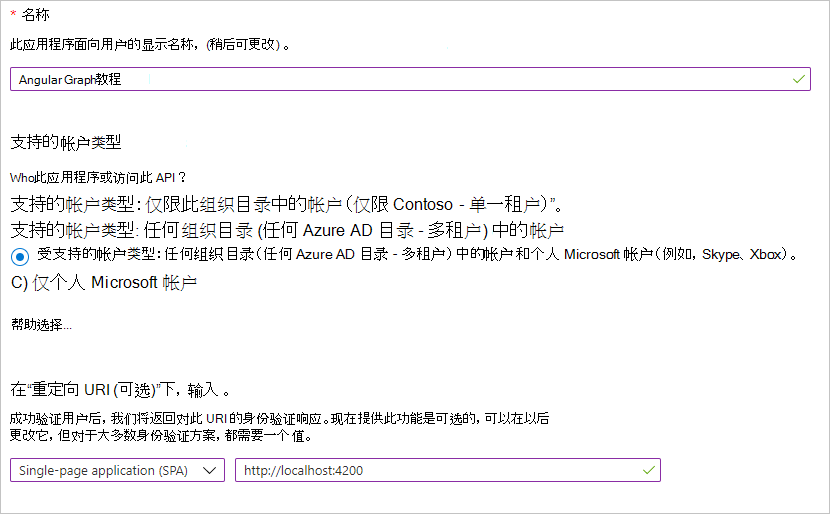
选择“新注册”。 在“注册应用”页上,按如下方式设置值。
- 将“名称”设置为“
Angular Graph Tutorial”。 - 将“受支持的帐户类型”设置为“任何组织目录中的帐户和个人 Microsoft 帐户”。
- 在“重定向 URI”下,将第一个下拉列表设置为“
Single-page application (SPA)”,并将值设置为“http://localhost:4200”。

- 将“名称”设置为“
选择“注册”。 在Angular Graph 教程"页上,复制"应用程序 (客户端) ID"的值并保存它,下一步中将需要该值。

添加 Azure AD 身份验证
在此练习中,你将扩展上一练习中的应用程序,以支持使用 Azure AD。 这是必需的,才能获取必要的 OAuth 访问令牌来调用 Microsoft Graph。 在此步骤中,你将 Microsoft 身份验证库Angular集成到应用程序中。
在 . /src 目录中新建一个名为 oauth.ts 的文件并添加以下代码。
export const OAuthSettings = {
  appId: 'YOUR_APP_ID_HERE',
  redirectUri: 'http://localhost:4200',
  scopes: [
    "user.read",
    "mailboxsettings.read",
    "calendars.readwrite"
  ]
};
将
YOUR_APP_ID_HERE替换为应用程序注册门户中的应用程序 ID。重要
如果你使用的是源代码管理(如 git),那么现在应该从源代码管理 中排除 oauth.ts 文件,以避免意外泄露应用 ID。
打开 ./src/app/app.module.ts ,将以下
import语句添加到文件顶部。import { FormsModule } from '@angular/forms'; import { IPublicClientApplication, PublicClientApplication, BrowserCacheLocation } from '@azure/msal-browser'; import { MsalModule, MsalService, MSAL_INSTANCE } from '@azure/msal-angular'; import { OAuthSettings } from '../oauth';在 语句下方添加以下
import函数。let msalInstance: IPublicClientApplication | undefined = undefined; export function MSALInstanceFactory(): IPublicClientApplication { msalInstance = msalInstance ?? new PublicClientApplication({ auth: { clientId: OAuthSettings.appId, redirectUri: OAuthSettings.redirectUri, postLogoutRedirectUri: OAuthSettings.redirectUri }, cache: { cacheLocation: BrowserCacheLocation.LocalStorage, } }); return msalInstance; }将
MsalModule和FormsModule添加到imports声明内的数组@NgModule。imports: [ BrowserModule, FormsModule, AppRoutingModule, NgbModule, MsalModule ],将 和
MSALInstanceFactoryMsalService添加到providers声明内的 数组@NgModule。providers: [ { provide: MSAL_INSTANCE, useFactory: MSALInstanceFactory }, MsalService ],
实施登录
在此部分中,你将创建身份验证服务并实施登录和注销。
在 CLI 中运行以下命令。
ng generate service auth通过为此创建服务,可以轻松地将该服务注入需要访问身份验证方法的任何组件。
命令完成后,打开 ./src/app/auth.service.ts ,并将其内容替换为以下代码。
import { Injectable } from '@angular/core';
import { MsalService } from '@azure/msal-angular';
import { InteractionType, PublicClientApplication } from '@azure/msal-browser';

import { AlertsService } from './alerts.service';
import { OAuthSettings } from '../oauth';
import { User } from './user';

@Injectable({
  providedIn: 'root'
})

export class AuthService {
  public authenticated: boolean;
  public user?: User;

  constructor(
    private msalService: MsalService,
    private alertsService: AlertsService) {

    this.authenticated = false;
    this.user = undefined;
  }

  // Prompt the user to sign in and
  // grant consent to the requested permission scopes
  async signIn(): Promise<void> {
    const result = await this.msalService
      .loginPopup(OAuthSettings)
      .toPromise()
      .catch((reason) => {
        this.alertsService.addError('Login failed',
          JSON.stringify(reason, null, 2));
      });

    if (result) {
      this.msalService.instance.setActiveAccount(result.account);
      this.authenticated = true;
      // Temporary placeholder
      this.user = new User();
      this.user.displayName = 'Adele Vance';
      this.user.email = 'AdeleV@contoso.com';
      this.user.avatar = '/assets/no-profile-photo.png';

      // Temporary to display token in an error box
      this.alertsService.addSuccess('Token acquired', result.accessToken);
    }
  }

  // Sign out
  async signOut(): Promise<void> {
    await this.msalService.logout().toPromise();
    this.user = undefined;
    this.authenticated = false;
  }
}
打开 ./src/app/nav-bar/nav-bar.component.ts ,并将其内容替换为以下内容。
import { Component, OnInit } from '@angular/core';

import { AuthService } from '../auth.service';
import { User } from '../user';

@Component({
  selector: 'app-nav-bar',
  templateUrl: './nav-bar.component.html',
  styleUrls: ['./nav-bar.component.css']
})
export class NavBarComponent implements OnInit {

  // Should the collapsed nav show?
  showNav: boolean = false;
  // Is a user logged in?
  get authenticated(): boolean {
    return this.authService.authenticated;
  }
  // The user
  get user(): User | undefined {
    return this.authService.user;
  }

  constructor(private authService: AuthService) { }

  ngOnInit() { }

  // Used by the Bootstrap navbar-toggler button to hide/show
  // the nav in a collapsed state
  toggleNavBar(): void {
    this.showNav = !this.showNav;
  }

  async signIn(): Promise<void> {
    await this.authService.signIn();
  }

  signOut(): void {
    this.authService.signOut();
  }
}
打开 ./src/app/home/home.component.ts ,并将其内容替换为以下内容。
保存更改并刷新浏览器。 单击 "单击此处登录"按钮 ,应重定向到 https://login.microsoftonline.com。 使用 Microsoft 帐户登录并同意请求的权限。 应用页面应刷新,显示令牌。
获取用户详细信息
现在,身份验证服务为用户的邮箱和电子邮件地址显示名称常量值。 现在你已拥有访问令牌,可以从 Microsoft Graph获取用户详细信息,以便这些值对应于当前用户。
打开 ./src/app/auth.service.ts ,将以下
import语句添加到文件顶部。import { Client } from '@microsoft/microsoft-graph-client'; import { AuthCodeMSALBrowserAuthenticationProvider } from '@microsoft/microsoft-graph-client/authProviders/authCodeMsalBrowser'; import * as MicrosoftGraph from '@microsoft/microsoft-graph-types';将属性添加到名为
AuthService的类graphClient。public graphClient?: Client;将新函数添加到称为
AuthService的getUser类。private async getUser(): Promise<User | undefined> { if (!this.authenticated) return undefined; const graphClient = Client.init({ // Initialize the Graph client with an auth // provider that requests the token from the // auth service authProvider: async(done) => { const token = await this.getAccessToken() .catch((reason) => { done(reason, null); }); if (token) { done(null, token); } else { done("Could not get an access token", null); } } }); // Get the user from Graph (GET /me) const graphUser: MicrosoftGraph.User = await graphClient .api('/me') .select('displayName,mail,mailboxSettings,userPrincipalName') .get(); const user = new User(); user.displayName = graphUser.displayName ?? ''; // Prefer the mail property, but fall back to userPrincipalName user.email = graphUser.mail ?? graphUser.userPrincipalName ?? ''; user.timeZone = graphUser.mailboxSettings?.timeZone ?? 'UTC'; // Use default avatar user.avatar = '/assets/no-profile-photo.png'; return user; }从 方法中查找并删除以下
signIn代码。// Temporary placeholder this.user = new User(); this.user.displayName = "Adele Vance"; this.user.email = "AdeleV@contoso.com"; this.user.avatar = '/assets/no-profile-photo.png'; // Temporary to display token in an error box this.alertsService.addSuccess('Token acquired', result);在它的位置,添加以下代码。
this.user = await this.getUser();此新代码使用 Microsoft Graph SDK
User获取用户的详细信息,然后使用 API 调用返回的值创建对象。constructor将 类的AuthService更改为检查用户是否已登录,如果已登录,则加载其详细信息。 将 现有的constructor替换为以下内容。constructor( private msalService: MsalService, private alertsService: AlertsService) { this.authenticated = this.msalService.instance .getAllAccounts().length > 0; this.getUser().then((user) => {this.user = user}); }
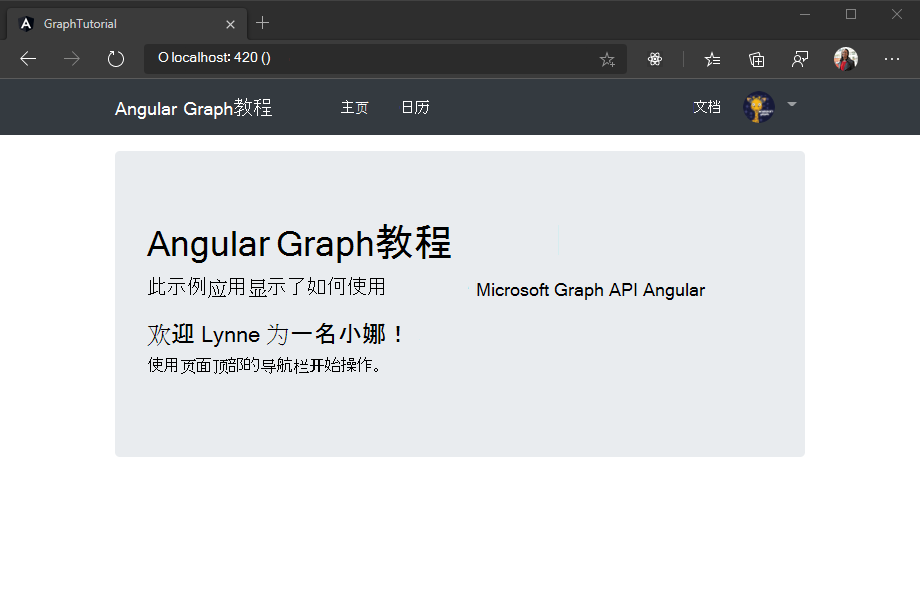
现在,如果保存更改并启动应用,登录后应最终返回主页,但 UI 应更改以指示你已登录。

单击右上角的用户头像以访问 "注销" 链接。 单击 "注销 "将重置会话,并返回到主页。

存储和刷新令牌
此时,应用程序具有访问令牌,该令牌在 Authorization API 调用标头中发送。 这是允许应用代表用户访问 Microsoft Graph令牌。
但是,此令牌期很短。 令牌在颁发后一小时过期。 由于应用使用的是 MSAL 库,因此不需要实现任何令牌存储或刷新逻辑。 缓存 MsalService 浏览器存储中的令牌。 方法 acquireTokenSilent 首先检查缓存的令牌,如果令牌未过期,则返回它。 如果已过期,它将进行无提示请求以获取新请求。
获取日历视图
在此练习中,你将 Microsoft Graph应用程序。 对于此应用程序,你将使用 microsoft-graph-client 库调用 Microsoft Graph。
从 Outlook 获取日历事件
添加新服务,以保留所有Graph呼叫。 在 CLI 中运行以下命令。
ng generate service graph与之前创建的身份验证服务一样,通过为此创建服务,你可以将该服务注入需要访问 Microsoft Graph。
命令完成后,打开 ./src/app/graph.service.ts ,并将其内容替换为以下内容。
import { Injectable } from '@angular/core';
import * as MicrosoftGraph from '@microsoft/microsoft-graph-types';

import { AuthService } from './auth.service';
import { AlertsService } from './alerts.service';

@Injectable({
  providedIn: 'root'
})

export class GraphService {

  constructor(
    private authService: AuthService,
    private alertsService: AlertsService) {}

  async getCalendarView(start: string, end: string, timeZone: string): Promise<MicrosoftGraph.Event[] | undefined> {
    if (!this.authService.graphClient) {
      this.alertsService.addError('Graph client is not initialized.');
      return undefined;
    }

    try {
      // GET /me/calendarview?startDateTime=''&endDateTime=''
      // &$select=subject,organizer,start,end
      // &$orderby=start/dateTime
      // &$top=50
      const result =  await this.authService.graphClient
        .api('/me/calendarview')
        .header('Prefer', `outlook.timezone="${timeZone}"`)
        .query({
          startDateTime: start,
          endDateTime: end
        })
        .select('subject,organizer,start,end')
        .orderby('start/dateTime')
        .top(50)
        .get();

      return result.value;
    } catch (error) {
      this.alertsService.addError('Could not get events', JSON.stringify(error, null, 2));
    }
    return undefined;
  }
}
考虑此代码将执行什么工作。
- 它在服务的Graph中初始化一个客户端。
- 它实现一
getCalendarView个函数,该函数Graph客户端:- 将调用的 URL 为
/me/calendarview。 - 方法
header包括 标头Prefer: outlook.timezone,这将导致返回事件的开始时间和结束时间在用户的首选时区。 - 方法
query添加 和startDateTimeendDateTime参数,定义日历视图的时间窗口。 - 方法
select将每个事件返回的字段限定为视图将实际使用的字段。 - 方法
orderby按开始时间对结果进行排序。
- 将调用的 URL 为
创建Angular组件以调用此新方法并显示调用的结果。 在 CLI 中运行以下命令。
ng generate component calendar命令完成后,将组件添加到
routes./src/app/app-routing.module.ts 中的数组。import { CalendarComponent } from './calendar/calendar.component'; const routes: Routes = [ { path: '', component: HomeComponent }, { path: 'calendar', component: CalendarComponent }, ];打开 ./src/app/calendar/calendar.component.ts ,并将其内容替换为以下内容。
import { Component, OnInit } from '@angular/core';
import { parseISO } from 'date-fns';
import { endOfWeek, startOfWeek } from 'date-fns/esm';
import { zonedTimeToUtc } from 'date-fns-tz';
import { findIana } from 'windows-iana';
import * as MicrosoftGraph from '@microsoft/microsoft-graph-types';

import { AuthService } from '../auth.service';
import { GraphService } from '../graph.service';
import { AlertsService } from '../alerts.service';

@Component({
  selector: 'app-calendar',
  templateUrl: './calendar.component.html',
  styleUrls: ['./calendar.component.css']
})
export class CalendarComponent implements OnInit {

  public events?: MicrosoftGraph.Event[];

  constructor(
    private authService: AuthService,
    private graphService: GraphService,
    private alertsService: AlertsService) { }

  async ngOnInit() {
    // Convert the user's timezone to IANA format
    const ianaName = findIana(this.authService.user?.timeZone ?? 'UTC');
    const timeZone = ianaName![0].valueOf() || this.authService.user?.timeZone || 'UTC';

    // Get midnight on the start of the current week in the user's timezone,
    // but in UTC. For example, for Pacific Standard Time, the time value would be
    // 07:00:00Z
    const now = new Date();
    const weekStart = zonedTimeToUtc(startOfWeek(now), timeZone);
    const weekEnd = zonedTimeToUtc(endOfWeek(now), timeZone);

    this.events = await this.graphService.getCalendarView(
      weekStart.toISOString(),
      weekEnd.toISOString(),
      this.authService.user?.timeZone ?? 'UTC');

      // Temporary to display raw results
      this.alertsService.addSuccess('Events from Graph', JSON.stringify(events, null, 2));
  }
}
现在,这只是在页面上以 JSON 呈现事件数组。 保存更改并重新启动该应用。 登录并单击导航 栏中 的"日历"链接。 如果一切正常,应在用户日历上看到事件被 JSON 卸载。
显示结果
现在,你可以更新 CalendarComponent 组件,以更用户友好的方式显示事件。
从 函数中删除添加警报的临时
ngOnInit代码。 更新的函数应如下所示。ngOnInit() { // Convert the user's timezone to IANA format const ianaName = findIana(this.authService.user?.timeZone ?? 'UTC'); const timeZone = ianaName![0].valueOf() || this.authService.user?.timeZone || 'UTC'; // Get midnight on the start of the current week in the user's timezone, // but in UTC. For example, for Pacific Standard Time, the time value would be // 07:00:00Z var startOfWeek = moment.tz(timeZone).startOf('week').utc(); var endOfWeek = moment(startOfWeek).add(7, 'day'); this.graphService.getCalendarView( startOfWeek.format(), endOfWeek.format(), this.authService.user?.timeZone ?? 'UTC') .then((events) => { this.events = events; }); }将函数添加到 类
CalendarComponent以将对象DateTimeTimeZone格式化为 ISO 字符串。formatDateTimeTimeZone(dateTime: MicrosoftGraph.DateTimeTimeZone | undefined | null): string { if (dateTime == undefined || dateTime == null) { return ''; } try { // Pass UTC for the time zone because the value // is already adjusted to the user's time zone return moment.tz(dateTime.dateTime, 'UTC').format(); } catch(error) { this.alertsService.addError('DateTimeTimeZone conversion error', JSON.stringify(error)); return ''; } }打开 "./src/app/calendar/calendar.component.html ",并将其内容替换为以下内容。
<h1>Calendar</h1>
<a class="btn btn-light btn-sm mb-3" routerLink="/newevent">New event</a>
<table class="table">
  <thead>
    <th scope="col">Organizer</th>
    <th scope="col">Subject</th>
    <th scope="col">Start</th>
    <th scope="col">End</th>
  </thead>
  <tbody>
    <tr *ngFor="let event of events">
      <td>{{event.organizer?.emailAddress?.name}}</td>
      <td>{{event.subject}}</td>
      <!-- Use 'UTC' in the pipe to date so Angular will not convert the
            already converted time to local time. See
            https://angular.io/api/common/DatePipe -->
      <td>{{formatDateTimeTimeZone(event.start) | date:'short' : 'UTC' }}</td>
      <td>{{formatDateTimeTimeZone(event.end) | date: 'short' : 'UTC' }}</td>
    </tr>
  </tbody>
</table>
这将循环访问事件集合,并针对每个事件添加一个表行。 保存更改并重新启动应用。 单击" 日历" 链接,应用现在应呈现一个事件表。

创建新事件
在此部分中,您将添加在用户日历上创建事件的能力。
打开 "./src/app/graph.service.ts ",将以下函数添加到
GraphService类。async addEventToCalendar(newEvent: MicrosoftGraph.Event): Promise<void> { try { // POST /me/events await this.graphClient .api('/me/events') .post(newEvent); } catch (error) { throw Error(JSON.stringify(error, null, 2)); } }
创建新的事件表单
创建一Angular组件以显示表单并调用此新函数。 在 CLI 中运行以下命令。
ng generate component new-event命令完成后,将组件添加到
routes./src/app/app-routing.module.ts 中的数组。import { NewEventComponent } from './new-event/new-event.component'; const routes: Routes = [ { path: '', component: HomeComponent }, { path: 'calendar', component: CalendarComponent }, { path: 'newevent', component: NewEventComponent }, ];在 . /src/app/new-event 目录中创建一个名为 new-event.ts 的新文件,并添加以下代码。
import * as MicrosoftGraph from '@microsoft/microsoft-graph-types';

// Model for the new event form
export class NewEvent {
  subject?: string;
  attendees?: string;
  start?: string;
  end?: string;
  body?: string;

  // Generate a MicrosoftGraph.Event from the model
  getGraphEvent(timeZone: string): MicrosoftGraph.Event {
    const graphEvent: MicrosoftGraph.Event = {
      subject: this.subject,
      start: {
        dateTime: this.start,
        timeZone: timeZone
      },
      end: {
        dateTime: this.end,
        timeZone: timeZone
      }
    };

    // If there are attendees, convert to array
    // and add them
    if (this.attendees && this.attendees.length > 0) {
      graphEvent.attendees = [];

      const emails = this.attendees.split(';');
      emails.forEach(email => {
        graphEvent.attendees?.push({
          type: 'required',
          emailAddress: {
            address: email
          }
        });
      });
    }

    // If there is a body, add it as plain text
    if (this.body && this.body.length > 0) {
      graphEvent.body = {
        contentType: 'text',
        content: this.body
      };
    }

    return graphEvent;
  }
}
此类将用作新事件表单的模型。
打开 ./src/app/new-event/new-event.component.ts ,并将其内容替换为以下代码。
import { Component, OnInit } from '@angular/core';

import { AuthService } from '../auth.service';
import { GraphService } from '../graph.service';
import { AlertsService } from '../alerts.service';
import { NewEvent } from './new-event';

@Component({
  selector: 'app-new-event',
  templateUrl: './new-event.component.html',
  styleUrls: ['./new-event.component.css']
})
export class NewEventComponent implements OnInit {

  model = new NewEvent();

  constructor(
    private authService: AuthService,
    private graphService: GraphService,
    private alertsService: AlertsService) { }

  ngOnInit(): void {
  }

  onSubmit(): void {
    const timeZone = this.authService.user?.timeZone ?? 'UTC';
    const graphEvent = this.model.getGraphEvent(timeZone);

    this.graphService.addEventToCalendar(graphEvent)
      .then(() => {
        this.alertsService.addSuccess('Event created.');
      }).catch(error => {
        this.alertsService.addError('Error creating event.', error.message);
      });
  }
}
打开 "./src/app/new-event/new-event.component.html "并将其内容替换为以下代码。
<h1>New event</h1>
<form (ngSubmit)="onSubmit()" #newEventForm="ngForm">
  <div class="form-group">
    <label for="subject">Subject</label>
    <input type="text" class="form-control" id="subject"
           required
           [(ngModel)]="model.subject" name="subject"
           #name="ngModel">
    <div [hidden]="name.valid || name.pristine"
          class="alert alert-danger">Subject is required</div>
  </div>
  <div class="form-group">
    <label for="attendees">Attendees</label>
    <input type="text" class="form-control" id="attendees"
           placeholder="Enter one or more email addresses (separated with a ;) to add attendees"
           [(ngModel)]="model.attendees" name="attendees"
           #name="ngModel">
  </div>
  <div class="form-row">
    <div class="col">
      <div class="form-group">
        <label for="start">Start</label>
        <input type="datetime-local" class="form-control" id="start"
               required
               [(ngModel)]="model.start" name="start"
               #name="ngModel">
        <div [hidden]="name.valid || name.pristine"
             class="alert alert-danger">Start is required</div>
      </div>
    </div>
    <div class="col">
      <div class="form-group">
        <label for="end">End</label>
        <input type="datetime-local" class="form-control" id="end"
               required
               [(ngModel)]="model.end" name="end"
               #name="ngModel">
        <div [hidden]="name.valid || name.pristine"
             class="alert alert-danger">End is required</div>
      </div>
    </div>
  </div>
  <div class="form-group">
    <label for="body">Body</label>
    <textarea class="form-control" id="body" rows="4"
              [(ngModel)]="model.body" name="body"
              #name="ngModel"></textarea>
  </div>
  <button type="submit" class="btn btn-primary mr-2"
          [disabled]="!newEventForm.form.valid">Create</button>
  <a class="btn btn-secondary" routerLink="/calendar">Cancel</a>
</form>
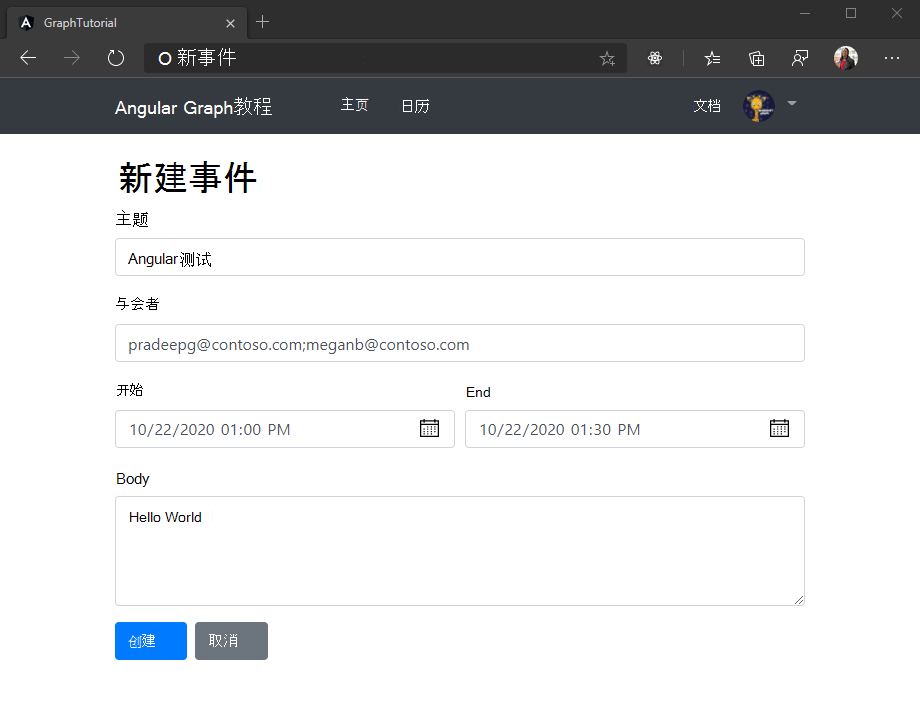
保存更改并刷新应用。 选择 日历页上 的"新建事件"按钮,然后使用该窗体在用户的日历上创建事件。

恭喜!
已完成 Microsoft Angular Graph教程。 现在,你已经拥有一个调用 Microsoft Graph,你可以试验和添加新功能。 请访问 Microsoft Graph概述,查看可以使用 Microsoft Graph 访问的所有数据。
反馈
Please provide any feedback on this tutorial in the GitHub repository.
你有关于此部分的问题? 如果有,请向我们提供反馈,以便我们对此部分作出改进。