使用 Microsoft Graph 生成 React 单页应用
本教程指导你如何生成一React单页应用,该应用使用 Microsoft Graph API 检索用户的日历信息。
提示
如果只想下载已完成的教程,可以下载或克隆GitHub存储库。
先决条件
在开始本教程之前,应该在 开发计算机上安装Node.js 和一 线。 如果没有设置或Node.js,请访问之前的链接,查看下载选项。
您还应该有一个在 Outlook.com 上拥有邮箱的个人 Microsoft 帐户,或者一个 Microsoft 工作或学校帐户。 如果你没有 Microsoft 帐户,则有几个选项可以获取免费帐户:
- 你可以 注册新的个人 Microsoft 帐户。
- 你可以注册开发人员计划Microsoft 365免费订阅Microsoft 365订阅。
备注
本教程使用 Node 版本 14.15.0 和一线 1.22.10 编写。 本指南中的步骤可能与其他版本一起运行,但该版本尚未经过测试。
反馈
Please provide any feedback on this tutorial in the GitHub repository.
创建 React 单页应用
在此部分中,你将创建一个新的React应用。
Open your command-line interface (CLI) , navigate to a directory where you have rights to create files, and run the following commands to create a new React app.
yarn create react-app graph-tutorial --template typescript命令完成后,在 CLI 中更改为 图形教程"**目录,并运行以下命令以启动本地 Web 服务器。
yarn start备注
如果尚未安装一个 "分 色",可以
npm start改为使用。
默认浏览器将打开, https://localhost:3000/ 并包含默认React页面。 如果浏览器未打开,请打开它并浏览 https://localhost:3000/ 以验证新应用是否正常工作。
添加节点包
在继续之前,请安装一些你稍后将使用的其他程序包:
- react-router-dom,用于声明性路由React应用。
- 用于样式 设置和常见组件的引导。
- 基于 Bootstrap React react-bootstrap。
- 用于设置日期和时间格式的日期 fns。
- 用于将时区Windows IANA 格式的windows-iana。
- msal-react,用于验证Azure Active Directory和检索访问令牌。
- 用于调用Microsoft Graph 的 microsoft-graph-client。
在 CLI 中运行以下命令。
yarn add react-router-dom@5.2.0 bootstrap@5.0.1 react-bootstrap@2.0.0-beta.4 windows-iana@5.0.2
yarn add date-fns@2.22.1 date-fns-tz@1.1.4 @azure/msal-react@1.0.1 @azure/msal-browser@2.16.1 @microsoft/microsoft-graph-client@3.0.0
yarn add -D @types/react-router-dom@5.1.8 @types/microsoft-graph
设计应用
首先为 应用创建 上下文。
在名为 AppContext.tsx 的 ./src 目录中创建新文件并添加以下
import语句。import React, { useContext, createContext, useState, MouseEventHandler, useEffect} from 'react'; import { AuthCodeMSALBrowserAuthenticationProvider } from '@microsoft/microsoft-graph-client/authProviders/authCodeMsalBrowser'; import { InteractionType, PublicClientApplication } from '@azure/msal-browser'; import { useMsal } from '@azure/msal-react';添加以下代码。
在 ./src/AppContext.tsx 的末尾添加以下函数。
function useProvideAppContext() {
  const [user, setUser] = useState<AppUser | undefined>(undefined);
  const [error, setError] = useState<AppError | undefined>(undefined);

  const displayError = (message: string, debug?: string) => {
    setError({message, debug});
  }

  const clearError = () => {
    setError(undefined);
  }

  const authProvider = undefined;

  const signIn = async () => {
    // TODO
  };

  const signOut = async () => {
    // TODO
  };

  return {
    user,
    error,
    signIn,
    signOut,
    displayError,
    clearError,
    authProvider
  };
}
你将在稍后部分中完成此上下文的实现。
为应用创建导航栏。 在目录中新建一个名为
./src的文件NavBar.tsx并添加以下代码。import React from 'react'; import { NavLink as RouterNavLink } from 'react-router-dom'; import { Button, Collapse, Container, Navbar, NavbarToggler, NavbarBrand, Nav, NavItem, NavLink, UncontrolledDropdown, DropdownToggle, DropdownMenu, DropdownItem } from 'reactstrap'; import '@fortawesome/fontawesome-free/css/all.css'; interface NavBarProps { isAuthenticated: boolean; authButtonMethod: any; user: any; } interface NavBarState { isOpen: boolean; } function UserAvatar(props: any) { // If a user avatar is available, return an img tag with the pic if (props.user.avatar) { return <img src={props.user.avatar} alt="user" className="rounded-circle align-self-center mr-2" style={{ width: '32px' }}></img>; } // No avatar available, return a default icon return <i className="far fa-user-circle fa-lg rounded-circle align-self-center mr-2" style={{ width: '32px' }}></i>; } function AuthNavItem(props: NavBarProps) { // If authenticated, return a dropdown with the user's info and a // sign out button if (props.isAuthenticated) { return ( <UncontrolledDropdown> <DropdownToggle nav caret> <UserAvatar user={props.user} /> </DropdownToggle> <DropdownMenu right> <h5 className="dropdown-item-text mb-0">{props.user.displayName}</h5> <p className="dropdown-item-text text-muted mb-0">{props.user.email}</p> <DropdownItem divider /> <DropdownItem onClick={props.authButtonMethod}>Sign Out</DropdownItem> </DropdownMenu> </UncontrolledDropdown> ); } // Not authenticated, return a sign in link return ( <NavItem> <Button onClick={props.authButtonMethod} className="btn-link nav-link border-0" color="link">Sign In</Button> </NavItem> ); } export default class NavBar extends React.Component<NavBarProps, NavBarState> { constructor(props: NavBarProps) { super(props); this.toggle = this.toggle.bind(this); this.state = { isOpen: false }; } toggle() { this.setState({ isOpen: !this.state.isOpen }); } render() { // Only show calendar nav item if logged in let calendarLink = null; if (this.props.isAuthenticated) { calendarLink = ( <NavItem> <RouterNavLink to="/calendar" className="nav-link" exact>Calendar</RouterNavLink> </NavItem> ); } return ( <div> <Navbar color="dark" dark expand="md" fixed="top"> <Container> <NavbarBrand href="/">React Graph Tutorial</NavbarBrand> <NavbarToggler onClick={this.toggle} /> <Collapse isOpen={this.state.isOpen} navbar> <Nav className="mr-auto" navbar> <NavItem> <RouterNavLink to="/" className="nav-link" exact>Home</RouterNavLink> </NavItem> {calendarLink} </Nav> <Nav className="justify-content-end" navbar> <NavItem> <NavLink href="https://developer.microsoft.com/graph/docs/concepts/overview" target="_blank"> <i className="fas fa-external-link-alt mr-1"></i> Docs </NavLink> </NavItem> <AuthNavItem isAuthenticated={this.props.isAuthenticated} authButtonMethod={this.props.authButtonMethod} user={this.props.user} /> </Nav> </Collapse> </Container> </Navbar> </div> ); } }为应用创建主页。 在目录中新建一个名为
./src的文件Welcome.tsx并添加以下代码。import React from 'react'; import { Button, Jumbotron } from 'reactstrap'; interface WelcomeProps { isAuthenticated: boolean; authButtonMethod: any; user: any; } interface WelcomeState { isOpen: boolean; } function WelcomeContent(props: WelcomeProps) { // If authenticated, greet the user if (props.isAuthenticated) { return ( <div> <h4>Welcome {props.user.displayName}!</h4> <p>Use the navigation bar at the top of the page to get started.</p> </div> ); } // Not authenticated, present a sign in button return <Button color="primary" onClick={props.authButtonMethod}>Click here to sign in</Button>; } export default class Welcome extends React.Component<WelcomeProps, WelcomeState> { render() { return ( <Jumbotron> <h1>React Graph Tutorial</h1> <p className="lead"> This sample app shows how to use the Microsoft Graph API to access Outlook and OneDrive data from React </p> <WelcomeContent isAuthenticated={this.props.isAuthenticated} user={this.props.user} authButtonMethod={this.props.authButtonMethod} /> </Jumbotron> ); } }创建错误消息显示,向用户显示消息。 在目录中新建一个名为
./src的文件ErrorMessage.tsx并添加以下代码。import React from 'react'; import { Alert } from 'reactstrap'; interface ErrorMessageProps { debug: string; message: string; } export default class ErrorMessage extends React.Component<ErrorMessageProps> { render() { let debug = null; if (this.props.debug) { debug = <pre className="alert-pre border bg-light p-2"><code>{this.props.debug}</code></pre>; } return ( <Alert color="danger"> <p className="mb-3">{this.props.message}</p> {debug} </Alert> ); } }打开
./src/index.css文件,并将其全部内容替换为以下内容。body { padding-top: 4.5rem; } .alert-pre { word-wrap: break-word; word-break: break-all; white-space: pre-wrap; }打开
./src/App.tsx并将其全部内容替换为以下内容。import { BrowserRouter as Router, Route } from 'react-router-dom'; import { Container } from 'react-bootstrap'; import { MsalProvider } from '@azure/msal-react' import { IPublicClientApplication } from '@azure/msal-browser'; import ProvideAppContext from './AppContext'; import ErrorMessage from './ErrorMessage'; import NavBar from './NavBar'; import Welcome from './Welcome'; import 'bootstrap/dist/css/bootstrap.css'; export default function App() { return( <ProvideAppContext> <Router> <NavBar /> <Container> <ErrorMessage /> <Route exact path="/" render={(props) => <Welcome {...props} /> } /> </Container> </Router> </ProvideAppContext> ); }在 ./public/images 目录中 添加no-profile-photo.png名称的图像文件。 当用户在 Microsoft Graph 中没有照片时,此图像将用作用户Graph。
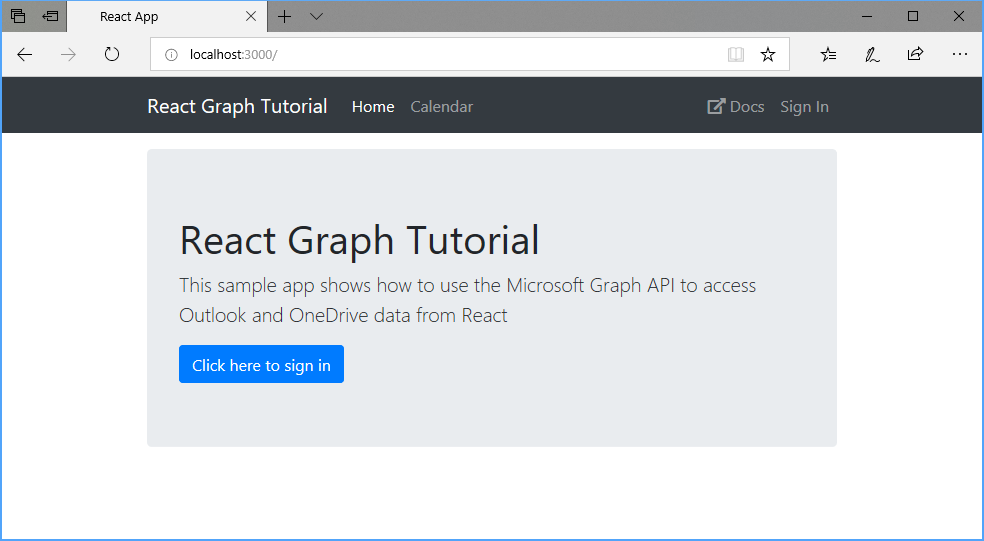
保存全部更改并重新启动该应用程序。 现在,应用看起来应该非常不同。
在门户中注册该应用
在此练习中,你将使用管理中心创建新的 Azure AD Azure Active Directory注册。
打开浏览器,并转到 Azure Active Directory 管理中心。 使用 个人帐户(亦称为“Microsoft 帐户”)或 工作或学校帐户 登录。
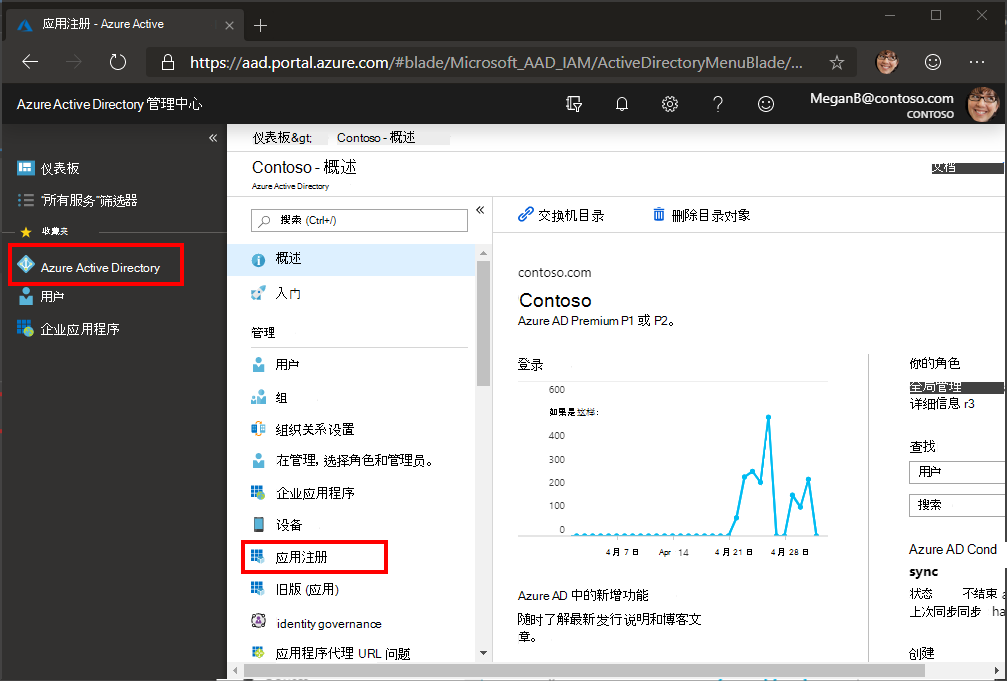
选择左侧导航栏中的“Azure Active Directory”,再选择“管理”下的“应用注册”。
备注
Azure AD B2C 用户只能看到旧版 (应用) 。 在这种情况下,请直接转到 https://aka.ms/appregistrations 。
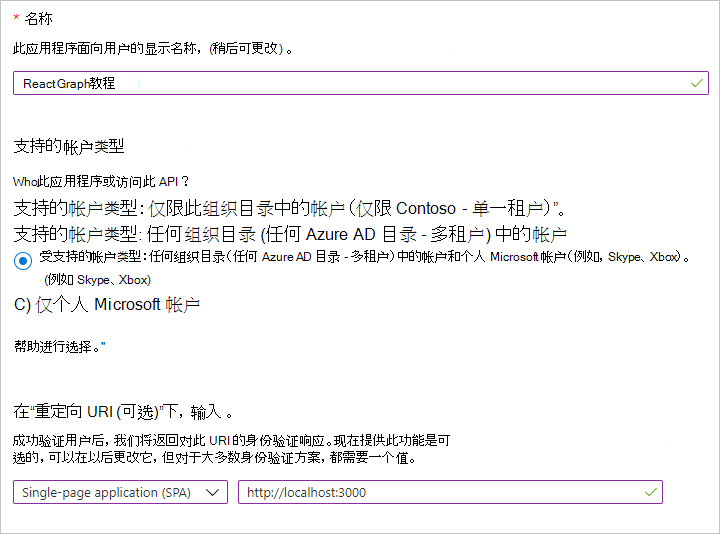
选择“新注册”。 在“注册应用”页上,按如下方式设置值。
- 将“名称”设置为“
React Graph Tutorial”。 - 将“受支持的帐户类型”设置为“任何组织目录中的帐户和个人 Microsoft 帐户”。
- 在“重定向 URI”下,将第一个下拉列表设置为“
Single-page application (SPA)”,并将值设置为“http://localhost:3000”。
- 将“名称”设置为“
选择 “注册”。 在React Graph 教程"页上,复制"应用程序 (客户端) ID"的值并 保存它,下一步中将需要该值。

添加 Azure AD 身份验证
在此练习中,你将从上一练习中扩展应用程序,以支持使用 Azure AD 进行身份验证。 若要获取必要的 OAuth 访问令牌来调用 Microsoft Graph。 在此步骤中,你将 Microsoft 身份验证库 库集成到应用程序中。
在名为 Config.ts 的 ./src 目录中创建新文件并添加以下代码。
export const config = {
  appId: 'YOUR_APP_ID_HERE',
  redirectUri: 'http://localhost:3000',
  scopes: [
    'user.read',
    'mailboxsettings.read',
    'calendars.readwrite'
  ]
};
将
YOUR_APP_ID_HERE替换为应用程序注册门户中的应用程序 ID。重要
如果你使用的是源代码管理(如 git),那么现在是从源代码管理中排除文件以避免意外泄露应用
Config.tsID 的一个好时间。
实施登录
在此部分中,你将实现身份验证提供程序、登录和注销。
打开 ./src/index.tsx, 在文件顶部
import添加以下语句。import { PublicClientApplication, EventType, EventMessage, AuthenticationResult } from '@azure/msal-browser'; import config from './Config';在 行前添加以下
ReactDOM.render代码。此代码创建 MSAL 库对象的实例,检查任何缓存的帐户,并注册回调以在成功登录后设置
PublicClientApplication活动帐户。更新
App调用中的ReactDOM.render元素,以在msalInstance名为 的属性中传递pca。打开 ./src/App.tsx, 并添加最后一个语句后的以下
import代码。将现有的
App函数替换为以下内容。export default function App({ pca }: AppProps) { return( <MsalProvider instance={ pca }> <ProvideAppContext> <Router> <div> <NavBar /> <Container> <ErrorMessage /> <Route exact path="/" render={(props) => <Welcome {...props} /> } /> </Container> </div> </Router> </ProvideAppContext> </MsalProvider> ); }这会将所有其他元素包装到 元素中,
MsalProvider从而提供身份验证状态和令牌获取。打开 ./src/AppContext.tsx, 在文件顶部
import添加以下语句。import config from './Config';在 函数顶部添加以下
useProvideAppContext行。const msal = useMsal();将
const authProvider = undefined;行替换为以下内容。将现有的
signIn函数替换为以下内容。const signIn = async () => { const result = await msal.instance.loginPopup({ scopes: config.scopes, prompt: 'select_account' }); // TEMPORARY: Show the access token displayError('Access token retrieved', result.accessToken); };保存更改并刷新浏览器。 单击登录按钮,你应该会看到加载 的弹出窗口
https://login.microsoftonline.com。 使用 Microsoft 帐户登录并同意请求的权限。 应用页面应刷新,显示令牌。
获取用户详细信息
在此部分中,你将修改 signIn 函数,以从 Microsoft Graph。
在名为 GraphService.ts 的 ./src 目录中创建新文件并添加以下代码。
这将实现 函数,该函数使用提供的 Graph 初始化 Microsoft 客户端并
getUserAuthProvider获取用户配置文件。打开 ./src/AppContext.tsx, 在文件顶部
import添加以下语句。import { getUser } from './GraphService';将现有的
signIn函数替换成以下代码。将现有的
signOut函数替换为以下内容。在 中添加以下
useEffect调用useProvideAppContext。保存更改并启动应用,登录后应最终返回主页,但 UI 应更改以指示你已登录。
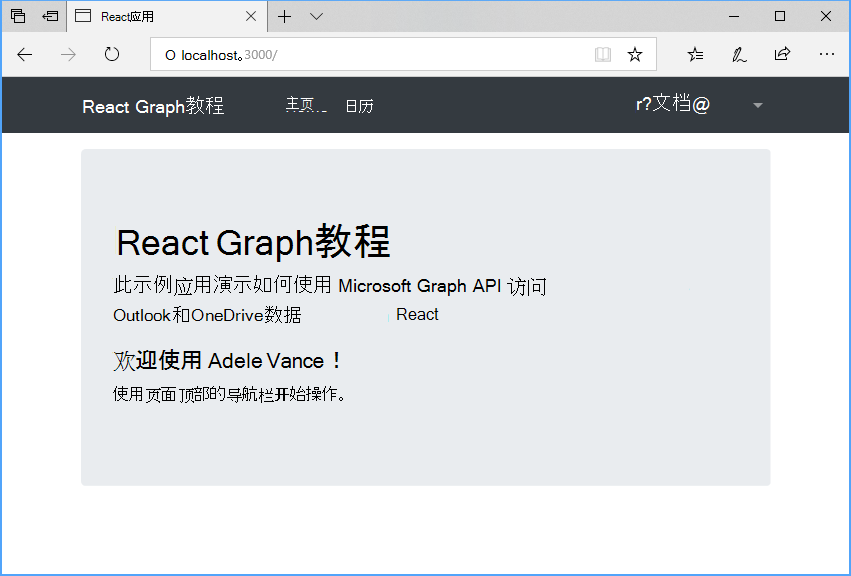
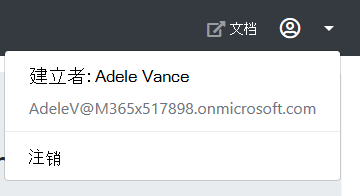
单击右上角的用户头像以访问 "注销" 链接。 单击 "注销 "将重置会话,并返回到主页。
存储和刷新令牌
此时,应用程序具有访问令牌,该令牌在 API 调用 Authorization 标头中发送。 这是允许应用代表用户访问 Microsoft Graph的令牌。
但是,此令牌期很短。 令牌在颁发后一小时过期。 此时刷新令牌将变得有效。 刷新令牌允许应用程序请求新的访问令牌,而无需用户再次登录。
由于应用使用的是 MSAL 库,因此不需要实现任何令牌存储或刷新逻辑。 缓存 PublicClientApplication 浏览器会话中的令牌。 acquireTokenSilent方法首先检查缓存的令牌,如果令牌未过期,则返回它。 如果已过期,它将使用缓存的刷新令牌获取新的刷新令牌。 您将在下面的模块中使用此方法更多。
获取日历视图
在此练习中,你将 microsoft Graph应用程序。 对于此应用程序,你将使用 microsoft-graph-client 库调用 Microsoft Graph。
从 Outlook 获取日历事件
打开 ./src/GraphService.ts 并添加以下函数。
export async function getUserWeekCalendar(accessToken: string, timeZone: string, startDate: Moment): Promise<Event[]> {
  const client = getAuthenticatedClient(accessToken);

  // Generate startDateTime and endDateTime query params
  // to display a 7-day window
  var startDateTime = startDate.format();
  var endDateTime = moment(startDate).add(7, 'day').format();

  // GET /me/calendarview?startDateTime=''&endDateTime=''
  // &$select=subject,organizer,start,end
  // &$orderby=start/dateTime
  // &$top=50
  var response: PageCollection = await client
    .api('/me/calendarview')
    .header('Prefer', `outlook.timezone="${timeZone}"`)
    .query({ startDateTime: startDateTime, endDateTime: endDateTime })
    .select('subject,organizer,start,end')
    .orderby('start/dateTime')
    .top(25)
    .get();

  if (response["@odata.nextLink"]) {
    // Presence of the nextLink property indicates more results are available
    // Use a page iterator to get all results
    var events: Event[] = [];

    // Must include the time zone header in page
    // requests too
    var options: GraphRequestOptions = {
      headers: { 'Prefer': `outlook.timezone="${timeZone}"` }
    };

    var pageIterator = new PageIterator(client, response, (event) => {
      events.push(event);
      return true;
    }, options);

    await pageIterator.iterate();

    return events;
  } else {

    return response.value;
  }
}
考虑此代码将执行什么工作。
- 将调用的 URL 为
/me/calendarview。 - 方法
header将 标头Prefer: outlook.timezone=""添加到请求中,导致响应中的时间在用户的首选时区。 - 方法
query添加 和startDateTimeendDateTime参数,定义日历视图的时间窗口。 - 方法
select将每个事件返回的字段限定为视图将实际使用的字段。 - 方法
orderby按创建结果的日期和时间对结果进行排序,最新项首先排序。 - 方法
top将单个页面中的结果限制为 25 个事件。 - 如果响应包含一
@odata.nextLink个值,PageIterator指示可用的结果更多,则使用对象在集合中分页获取所有结果。
- 将调用的 URL 为
创建React组件以显示调用的结果。 在名为 Calendar.tsx 的 ./src 目录中创建新文件并添加以下代码。
import { useEffect, useState } from 'react';
import { NavLink as RouterNavLink, RouteComponentProps } from 'react-router-dom';
import { Table } from 'react-bootstrap';
import { findIana } from "windows-iana";
import { Event } from 'microsoft-graph';
import { getUserWeekCalendar } from './GraphService';
import { useAppContext } from './AppContext';
import { AuthenticatedTemplate } from '@azure/msal-react';
import { add, format, getDay, parseISO } from 'date-fns';
import { endOfWeek, startOfWeek } from 'date-fns/esm';

export default function Calendar(props: RouteComponentProps) {
  const app = useAppContext();

  const [events, setEvents] = useState<Event[]>();

  useEffect(() => {
    const loadEvents = async() => {
      if (app.user && !events) {
        try {
          const ianaTimeZones = findIana(app.user?.timeZone!);
          const events = await getUserWeekCalendar(app.authProvider!, ianaTimeZones[0].valueOf());
          setEvents(events);
        } catch (err) {
          app.displayError!(err.message);
        }
      }
    };

    loadEvents();
  });

  return (
    <AuthenticatedTemplate>
      <pre><code>{JSON.stringify(events, null, 2)}</code></pre>
    </AuthenticatedTemplate>
  );
}
现在,这只是在页面上以 JSON 呈现事件数组。
将此新组件添加到应用。 打开
./src/App.tsx并添加以下import语句到文件顶部。import Calendar from './Calendar';将以下组件添加到现有 组件之后
<Route>。<Route exact path="/calendar" render={(props) => <Calendar {...props} /> } />保存更改并重新启动该应用。 登录并单击导航 栏中 的"日历"链接。 如果一切正常,应在用户日历上看到事件被 JSON 卸载。
显示结果
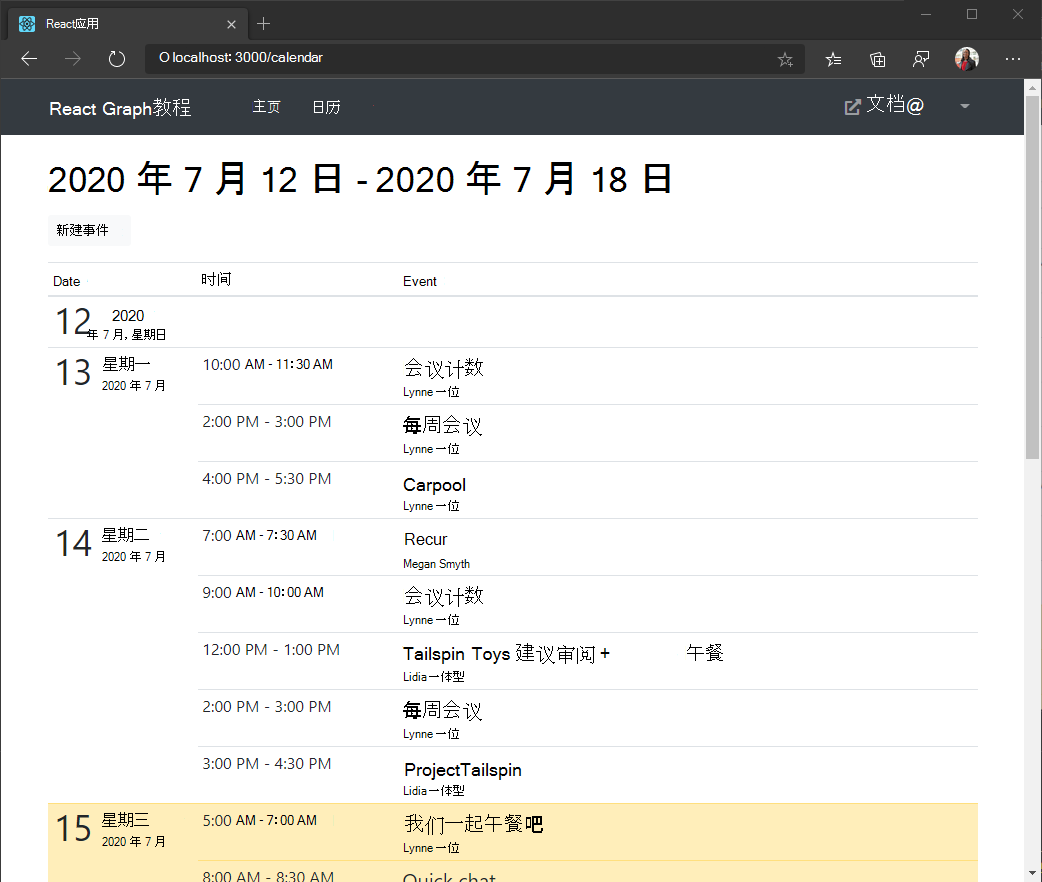
现在,你可以更新 Calendar 组件,以更用户友好的方式显示事件。
在目录中新建一个名为
./src的文件Calendar.css并添加以下代码。.calendar-view-date-cell { width: 150px; } .calendar-view-date { width: 40px; font-size: 36px; line-height: 36px; margin-right: 10px; } .calendar-view-month { font-size: 0.75em; } .calendar-view-timespan { width: 200px; } .calendar-view-subject { font-size: 1.25em; } .calendar-view-organizer { font-size: .75em; }创建一React组件,将一天中的事件呈现为表格行。 在目录中新建一个名为
./src的文件CalendarDayRow.tsx并添加以下代码。import React from 'react'; import moment, { Moment } from 'moment'; import { Event } from 'microsoft-graph'; interface CalendarDayRowProps { date: Moment | undefined; timeFormat: string; events: Event[]; } interface FormatMap { [key: string] : string; } // moment.js format strings are slightly // different than the ones returned by Graph const formatMap: FormatMap = { "h:mm tt": "h:mm A", "hh:mm tt": "hh:mm A" }; // Helper function to format Graph date/time in the user's // preferred format function formatDateTime(dateTime: string | undefined, format: string) { if (dateTime !== undefined) { return moment(dateTime).format(formatMap[format] || format); } } export default class CalendarDayRow extends React.Component<CalendarDayRowProps> { render() { var today = moment(); var rowClass = today.day() === this.props.date?.day() ? 'table-warning' : ''; var timeFormat = this.props.timeFormat; var dateCell = ( <td className='calendar-view-date-cell' rowSpan={this.props.events.length <= 0 ? 1 : this.props.events.length}> <div className='calendar-view-date float-left text-right'>{this.props.date?.format('DD')}</div> <div className='calendar-view-day'>{this.props.date?.format('dddd')}</div> <div className='calendar-view-month text-muted'>{this.props.date?.format('MMMM, YYYY')}</div> </td> ); if (this.props.events.length <= 0) { // Render an empty row for the day return ( <tr className={rowClass}> {dateCell} <td></td> <td></td> </tr> ); } return ( <React.Fragment> {this.props.events.map( function(event: Event, index: Number) { return ( <tr className={rowClass} key={event.id}> { index === 0 && dateCell } <td className="calendar-view-timespan"> <div>{formatDateTime(event.start?.dateTime, timeFormat)} - {formatDateTime(event.end?.dateTime, timeFormat)}</div> </td> <td> <div className="calendar-view-subject">{event.subject}</div> <div className="calendar-view-organizer">{event.organizer?.emailAddress?.name}</div> </td> </tr> ) } )} </React.Fragment> ) } }将以下语句
import添加到 Calendar.tsx 的顶部。import CalendarDayRow from './CalendarDayRow'; import './Calendar.css';将现有语句
return替换为以下代码。这会将事件拆分为其各自的天数,并呈现每天的表格部分。
保存更改并重新启动应用。 单击" 日历" 链接,应用现在应呈现一个事件表。
创建新事件
在此部分中,您将添加在用户日历上创建事件的能力。
向 GraphService 添加方法
打开 ./src/GraphService.ts 并添加以下函数以创建新事件。
export async function createEvent(accessToken: string, newEvent: Event): Promise<Event> {
  const client = getAuthenticatedClient(accessToken);

  // POST /me/events
  // JSON representation of the new event is sent in the
  // request body
  return await client
    .api('/me/events')
    .post(newEvent);
}
新建事件表单
在 . /src 目录中新建一个名为 NewEvent.tsx 的文件并添加以下代码。
import React from 'react';
import { NavLink as RouterNavLink, Redirect } from 'react-router-dom';
import { Button, Col, Form, FormGroup, Label, Input, Row } from 'reactstrap';
import { Attendee, Event } from 'microsoft-graph';
import { config } from './Config';
import withAuthProvider, { AuthComponentProps } from './AuthProvider';
import { createEvent } from './GraphService';

interface NewEventState {
  subject: string;
  attendees: string;
  start: string;
  end: string;
  body: string;
  disableCreate: boolean;
  redirect: boolean;
}

class NewEvent extends React.Component<AuthComponentProps, NewEventState> {

  constructor(props: any) {
    super(props);

    this.state = {
      subject: '',
      attendees: '',
      start: '',
      end: '',
      body: '',
      disableCreate: true,
      redirect: false
    }

    this.handleUpdate = this.handleUpdate.bind(this);
    this.isFormDisabled = this.isFormDisabled.bind(this);
    this.createEvent = this.createEvent.bind(this);
  }

  // Called whenever an input is changed
  handleUpdate(event: React.ChangeEvent<HTMLInputElement>) {
    // Set the state value that maps to the input
    var newState: any = {
      [event.target.name]: event.target.value
    };

    this.setState(newState);
  }

  // Determines if form is ready to submit
  // Requires a subject, start, and end
  isFormDisabled(): boolean {
    return this.state.subject.length === 0 ||
           this.state.start.length === 0 ||
           this.state.end.length === 0;
  }

  // Creates the event when user clicks Create
  async createEvent() {
    // Get the value of attendees and split into an array
    var attendeeEmails = this.state.attendees.split(';');
    var attendees: Attendee[] = [];

    // Create an Attendee object for each email address
    attendeeEmails.forEach((email) => {
      if (email.length > 0) {
        attendees.push({
          emailAddress: {
            address: email
          }
        });
      }
    });

    // Create the Event object
    var newEvent: Event = {
      subject: this.state.subject,
      // Only add if there are attendees
      attendees: attendees.length > 0 ? attendees : undefined,
      // Specify the user's time zone so
      // the start and end are set correctly
      start: {
        dateTime: this.state.start,
        timeZone: this.props.user.timeZone
      },
      end: {
        dateTime: this.state.end,
        timeZone: this.props.user.timeZone
      },
      // Only add if a body was given
      body: this.state.body.length > 0 ? {
        contentType: "text",
        content: this.state.body
      } : undefined
    }

    try {
      // Get the user's access token
      var accessToken = await this.props.getAccessToken(config.scopes);

      // Create the event
      await createEvent(accessToken, newEvent);

      // Redirect to the calendar view
      this.setState({ redirect: true });
    }
    catch (err) {
      this.props.setError('ERROR', JSON.stringify(err));
    }
  }

  render() {
    if (this.state.redirect) {
      return <Redirect to="/calendar" />
    }

    return (
      <Form>
        <FormGroup>
          <Label for="subject">Subject</Label>
          <Input type="text"
            name="subject"
            id="subject"
            value={this.state.subject}
            onChange={this.handleUpdate} />
        </FormGroup>
        <FormGroup>
          <Label for="attendees">Attendees</Label>
          <Input type="text"
            name="attendees"
            id="attendees"
            placeholder="Enter a list of email addresses, seperated by a semi-colon"
            value={this.state.attendees}
            onChange={this.handleUpdate} />
        </FormGroup>
        <Row form>
          <Col>
            <FormGroup>
              <Label for="start">Start</Label>
              <Input type="datetime-local"
                name="start"
                id="start"
                value={this.state.start}
                onChange={this.handleUpdate} />
            </FormGroup>
          </Col>
          <Col>
            <FormGroup>
              <Label for="end">End</Label>
              <Input type="datetime-local"
                name="end"
                id="end"
                value={this.state.end}
                onChange={this.handleUpdate} />
            </FormGroup>
          </Col>
        </Row>
        <FormGroup>
          <Label for="body">Body</Label>
          <Input type="textarea"
            name="body"
            id="body"
            value={this.state.body}
            onChange={this.handleUpdate} />
        </FormGroup>
        <Button color="primary"
          className="mr-2"
          disabled={this.isFormDisabled()}
          onClick={this.createEvent}>Create</Button>
        <RouterNavLink to="/calendar" className="btn btn-secondary" exact>Cancel</RouterNavLink>
      </Form>
    )
  }
}

export default withAuthProvider(NewEvent);
打开 ./src/App.tsx ,将以下
import语句添加到文件顶部。import NewEvent from './NewEvent';将新路由添加到新事件表单。 在其他元素之后添加以下
Route代码。<Route exact path="/newevent" render={(props) => <NewEvent {...props} /> } />完整的
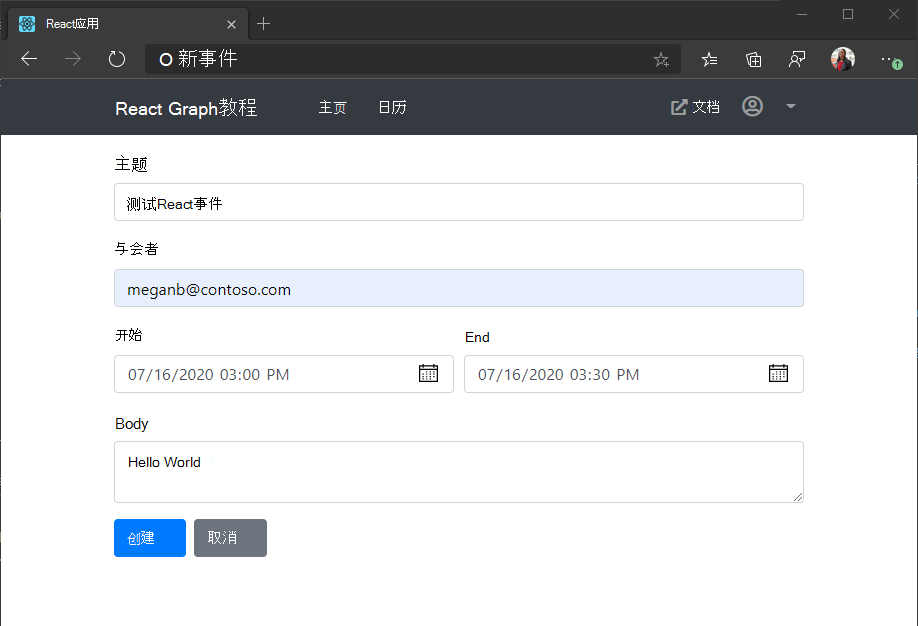
return语句现在应如下所示。刷新应用并浏览到日历视图。 单击" 新建事件" 按钮。 填写字段,然后单击"创建 "。
恭喜!
已完成 Microsoft React Graph教程。 现在,你已经拥有一个调用 Microsoft Graph,你可以试验和添加新功能。 请访问Microsoft Graph概述,查看可以使用 Microsoft Graph 访问的所有数据。
反馈
Please provide any feedback on this tutorial in the GitHub repository.
你有关于此部分的问题? 如果有,请向我们提供反馈,以便我们对此部分作出改进。