使用 Microsoft Graph 生成 Xamarin 应用
本教程指导你如何生成使用 Microsoft Graph API 检索用户的日历信息的 Xamarin 应用。
提示
如果只想下载已完成的教程,可以下载或克隆GitHub存储库。
先决条件
在开始本教程之前,应该先在Visual Studio开发人员模式Windows 10的计算机上安装此软件。 如果尚未安装Visual Studio,请访问上一链接,查看下载选项。
还应在安装 Xamarin 时安装 Xamarin Visual Studio安装。 有关 安装和配置 Xamarin 的说明,请参阅安装 Xamarin。
(可选)你还应具有对已安装Visual Studio for Mac Mac 的访问权限。 如果没有访问权限,仍可以完成本教程,但无法完成特定于 iOS 的部分。
您还应该有一个在 Outlook.com 上拥有邮箱的个人 Microsoft 帐户,或者一个 Microsoft 工作或学校帐户。 如果你没有 Microsoft 帐户,则有几个选项可以获取免费帐户:
- 你可以 注册新的个人 Microsoft 帐户。
- 你可以注册开发人员计划Microsoft 365免费订阅Microsoft 365订阅。
备注
本教程是使用 Visual Studio 2019 版本 16.10.3 和 Visual Studio for Mac 8.5.1 编写的。 两台计算机都安装了 Android SDK 平台 28。 本指南中的步骤可能与其他版本一起运行,但该版本尚未经过测试。
反馈
Please provide any feedback on this tutorial in the GitHub repository.
创建 Xamarin 应用
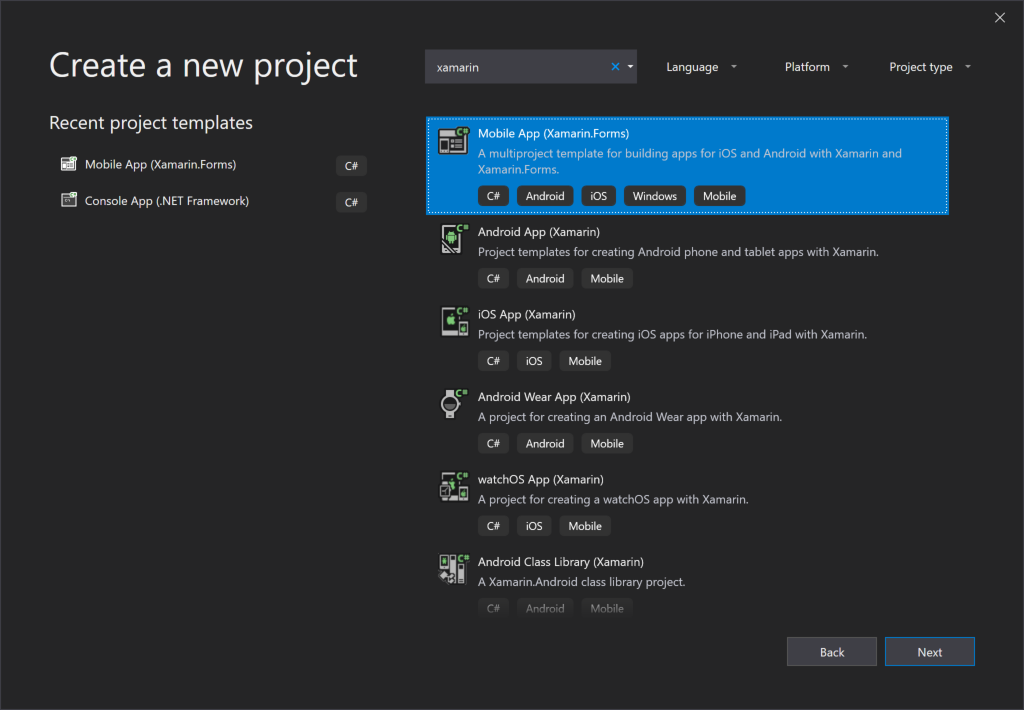
打开 Visual Studio ,选择“新建一个项目”。
在创建新 项目对话框中, 选择移动应用 (Xamarin.Forms),然后选择下一 步。
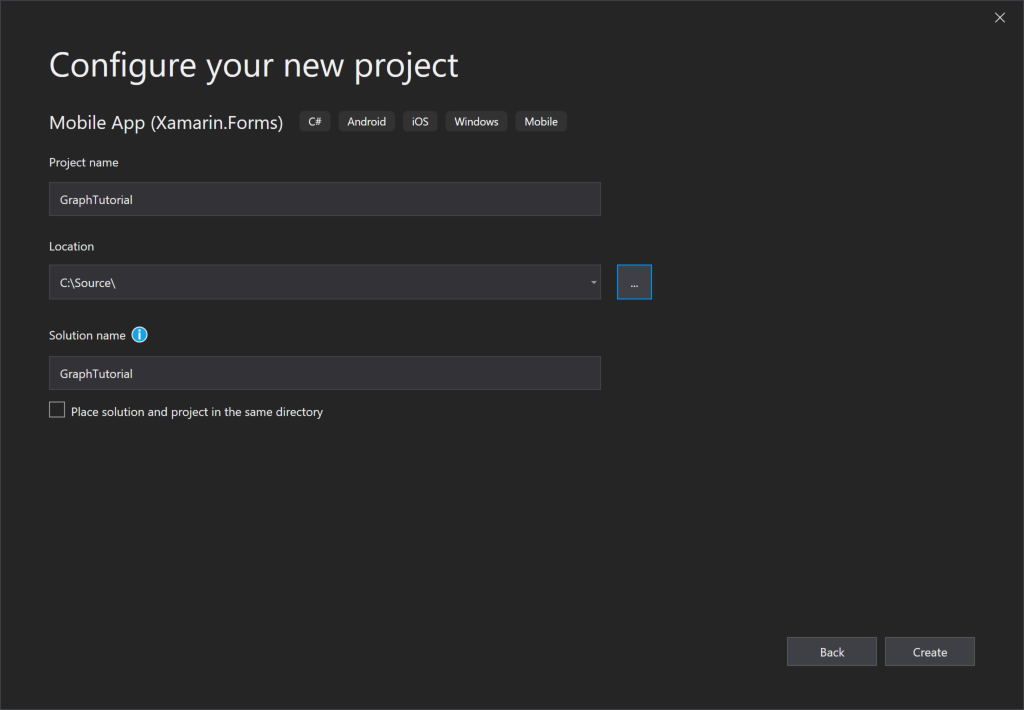
在"配置新项目" 对话框中,
GraphTutorial输入"Project 名称**"和**"解决方案名称",然后选择"创建 "。重要
请确保为这些实验室说明中指定的Visual Studio Project输入完全相同的名称。 Visual Studio 项目名称在代码中成为了命名空间的一部分。 在这些说明里的代码依赖于匹配在这些说明中指定的 Visual Studio 项目名称的命名空间。 如果你使用不同的项目名称,代码不会编译,除非你调整所有的命名空间来匹配你在创建项目时输入的 Visual Studio 项目名称。
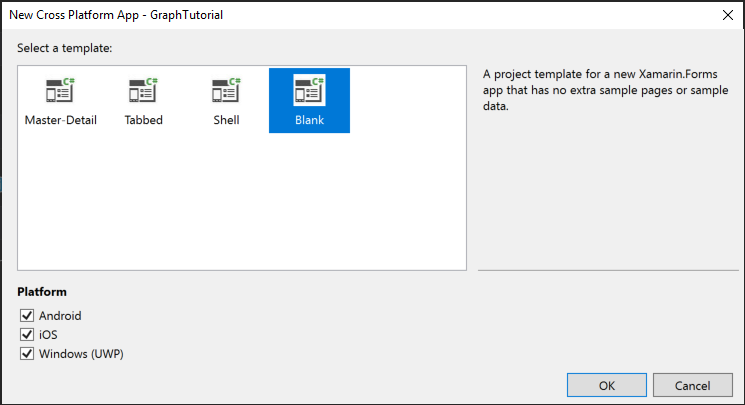
在" 新建跨平台应用 "对话框中,选择 "空白 "模板,然后选择想要在"平台"下构建 的平台。 选择 " 确定"以创建解决方案。
安装程序包
在继续之前,请安装一些NuGet程序包,你稍后会使用它。
- Microsoft.Identity.Client,用于Azure AD身份验证和令牌管理。
- Microsoft。Graph Microsoft Graph。
- 用于跨平台处理时区的 TimeZoneConverter 。
选择“工具 > NuGet 程序包管理器 > 程序包管理控制台”。
在“程序包管理器控制台”中,输入以下命令。
Install-Package Microsoft.Identity.Client -Version 4.35.1 -Project GraphTutorial
Install-Package Microsoft.Identity.Client -Version 4.35.1 -Project GraphTutorial.Android
Install-Package Microsoft.Identity.Client -Version 4.35.1 -Project GraphTutorial.iOS
Install-Package Microsoft.Graph -Version 4.1.0 -Project GraphTutorial
Install-Package TimeZoneConverter -Project GraphTutorial
设计应用
首先更新 类以 App 添加变量以跟踪身份验证状态和登录用户。
在 "解决方案资源管理器"中,展开 GraphTutorial 项目,然后展开 App.xaml 文件。 打开 App.xaml.cs 文件,将以下
using语句添加到文件顶部。using System.ComponentModel; using System.IO; using System.Reflection; using System.Threading.Tasks;将接口
INotifyPropertyChanged添加到类声明。public partial class App : Application, INotifyPropertyChanged将以下属性添加到 类
App。// Is a user signed in? private bool isSignedIn; public bool IsSignedIn { get { return isSignedIn; } set { isSignedIn = value; OnPropertyChanged("IsSignedIn"); OnPropertyChanged("IsSignedOut"); } } public bool IsSignedOut { get { return !isSignedIn; } } // The user's display name private string userName; public string UserName { get { return userName; } set { userName = value; OnPropertyChanged("UserName"); } } // The user's email address private string userEmail; public string UserEmail { get { return userEmail; } set { userEmail = value; OnPropertyChanged("UserEmail"); } } // The user's profile photo private ImageSource userPhoto; public ImageSource UserPhoto { get { return userPhoto; } set { userPhoto = value; OnPropertyChanged("UserPhoto"); } } // The user's time zone public static TimeZoneInfo UserTimeZone;将以下函数添加到 类
App。 目前SignIn,SignOut、GetUserInfo和 函数只是占位符。public async Task SignIn() { await GetUserInfo(); IsSignedIn = true; } public async Task SignOut() { UserPhoto = null; UserName = string.Empty; UserEmail = string.Empty; IsSignedIn = false; } private async Task GetUserInfo() { UserPhoto = ImageSource.FromStream(() => GetUserPhoto()); UserName = "Adele Vance"; UserEmail = "adelev@contoso.com"; } private Stream GetUserPhoto() { // Return the default photo return Assembly.GetExecutingAssembly().GetManifestResourceStream("GraphTutorial.no-profile-pic.png"); }函数
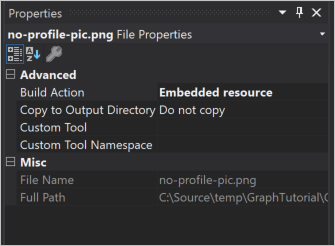
GetUserPhoto现在返回默认照片。 您可以提供您自己的文件,也可以从以下位置下载示例中GitHub。 如果使用自己的文件,请将其重命名为 no-profile-pic.png。将文件复制到 ./GraphTu一l/GraphTutorial 目录。
右键单击"解决方案资源管理器 "中的文件,然后选择 "属性 "。 在" 属性" 窗口中,将"生成 操作"的值 更改为 "嵌入资源"。
应用导航
在此部分中,将应用程序的主页更改为 FlyoutPage。 这将提供在应用中的视图之间切换的导航菜单。
打开 GraphTu一 l 项目中的 MainPage.xaml 文件,并将其内容替换为以下内容。
<!-- Copyright (c) Microsoft Corporation.
     Licensed under the MIT License. -->

<!-- <MainPageXamlSnippet> -->
<?xml version="1.0" encoding="utf-8" ?>
<MasterDetailPage xmlns="http://xamarin.com/schemas/2014/forms"
             xmlns:x="http://schemas.microsoft.com/winfx/2009/xaml"
             xmlns:local="clr-namespace:GraphTutorial"
             x:Class="GraphTutorial.MainPage">

    <MasterDetailPage.Master>
        <local:MenuPage/>
    </MasterDetailPage.Master>

    <MasterDetailPage.Detail>
        <NavigationPage>
            <x:Arguments>
                <local:WelcomePage/>
            </x:Arguments>
        </NavigationPage>
    </MasterDetailPage.Detail>

</MasterDetailPage>
<!-- </MainPageXamlSnippet> -->
实现菜单
右键单击 GraphTutorial 项目,然后选择 "添加",然后选择" 新建文件夹"。 将文件夹命名
Models。右键单击 "模型" 文件夹,然后选择 "添加",然后选择" 类..."。将类命名并选择
NavMenuItem"添加 "。打开 NavMenuItem.cs 文件,并将其内容替换为以下内容。
namespace GraphTutorial.Models
{
    public enum MenuItemType
    {
        Welcome,
        Calendar,
        NewEvent
    }

    public class NavMenuItem
    {
        public MenuItemType Id { get; set; }

        public string Title { get; set; }
    }
}
右键单击 GraphTutorial 项目,然后选择 "添加",然后选择" 新建项目..."。选择 "内容页面 ",并命名该页面
MenuPage。 选择“添加”。打开 MenuPage.xaml 文件,并将其内容替换为以下内容。
<!-- Copyright (c) Microsoft Corporation.
     Licensed under the MIT License. -->

<!-- <MenuPageXamlSnippet> -->
<?xml version="1.0" encoding="utf-8" ?>
<ContentPage xmlns="http://xamarin.com/schemas/2014/forms"
             xmlns:x="http://schemas.microsoft.com/winfx/2009/xaml"
             xmlns:ios="clr-namespace:Xamarin.Forms.PlatformConfiguration.iOSSpecific;assembly=Xamarin.Forms.Core"
             ios:Page.UseSafeArea="true"
             Title="Menu"
             x:Class="GraphTutorial.MenuPage">
    <ContentPage.Padding>
        <OnPlatform x:TypeArguments="Thickness">
            <On Platform="UWP" Value="10, 10, 10, 10" />
        </OnPlatform>
    </ContentPage.Padding>
    <ContentPage.Content>
        <StackLayout VerticalOptions="Start" HorizontalOptions="Center">
            <StackLayout x:Name="UserArea" />

            <!-- Signed out UI -->
            <StackLayout IsVisible="{Binding Path=IsSignedOut, Source={x:Static Application.Current}}">
                <Label Text="Sign in to get started"
                       HorizontalOptions="Center"
                       FontAttributes="Bold"
                       FontSize="Medium"
                       Margin="10,20,10,20" />
                <Button Text="Sign in"
                        Clicked="OnSignIn"
                        HorizontalOptions="Center" />
            </StackLayout>

            <!-- Signed in UI -->
            <StackLayout IsVisible="{Binding Path=IsSignedIn, Source={x:Static Application.Current}}">
                <Image Source="{Binding Path=UserPhoto, Source={x:Static Application.Current}}"
                       HorizontalOptions="Center"
                       Margin="0,20,0,10" />
                <Label Text="{Binding Path=UserName, Source={x:Static Application.Current}}"
                       HorizontalOptions="Center"
                       FontAttributes="Bold"
                       FontSize="Small" />
                <Label Text="{Binding Path=UserEmail, Source={x:Static Application.Current}}"
                       HorizontalOptions="Center"
                       FontAttributes="Italic" />
                <Button Text="Sign out"
                        Margin="0,20,0,20"
                        Clicked="OnSignOut"
                        HorizontalOptions="Center" />
                <ListView x:Name="ListViewMenu"
                          HasUnevenRows="True"
                          HorizontalOptions="Start">
                    <ListView.ItemTemplate>
                        <DataTemplate>
                            <ViewCell>
                                <Grid Padding="10">
                                    <Label Text="{Binding Title}" FontSize="20"/>
                                </Grid>
                            </ViewCell>
                        </DataTemplate>
                    </ListView.ItemTemplate>
                </ListView>
            </StackLayout>
        </StackLayout>
    </ContentPage.Content>
</ContentPage>
<!-- </MenuPageXamlSnippet> -->
在 "解决方案资源管理器"中展开 MenuPage.xaml 并打开 MenuPage.xaml.cs 文件。 将其内容替换为以下内容。
using System;
using System.Collections.Generic;
using System.Linq;
using System.Text;
using System.Threading.Tasks;

using Xamarin.Forms;
using Xamarin.Forms.Xaml;

using GraphTutorial.Models;

namespace GraphTutorial
{
    [XamlCompilation(XamlCompilationOptions.Compile)]
    public partial class MenuPage : ContentPage
    {
        MainPage RootPage => Application.Current.MainPage as MainPage;
        List<NavMenuItem> menuItems;

        public MenuPage()
        {
            InitializeComponent();

            // Add items to the menu
            menuItems = new List<NavMenuItem>
            {
                new NavMenuItem {Id = MenuItemType.Welcome, Title="Home" },
                new NavMenuItem {Id = MenuItemType.Calendar, Title="Calendar" },
                new NavMenuItem {Id = MenuItemType.NewEvent, Title="New event" }
            };
            ListViewMenu.ItemsSource = menuItems;

            // Initialize the selected item
            ListViewMenu.SelectedItem = menuItems[0];

            // Handle the ItemSelected event to navigate to the
            // selected page
            ListViewMenu.ItemSelected += async (sender, e) =>
            {
                if (e.SelectedItem == null)
                    return;

                var id = (int)((NavMenuItem)e.SelectedItem).Id;
                await RootPage.NavigateFromMenu(id);
            };
        }

        private async void OnSignOut(object sender, EventArgs e)
        {
            var signout = await DisplayAlert("Sign out?", "Do you want to sign out?", "Yes", "No");
            if (signout)
            {
                await (Application.Current as App).SignOut();
            }
        }

        private async void OnSignIn(object sender, EventArgs e)
        {
            try
            {
                await (Application.Current as App).SignIn();
            }
            catch (Exception ex)
            {
                await DisplayAlert("Authentication Error", ex.Message, "OK");
            }
        }
    }
}
备注
Visual Studio MenuPage.xaml.cs 中报告错误。 这些错误将在稍后的步骤中解决。
实现欢迎页面
右键单击 GraphTutorial 项目,然后选择 "添加",然后选择" 新建项目..."。选择 "内容页面 ",并命名该页面
WelcomePage。 选择“添加”。 打开 WelcomePage.xaml 文件,并将其内容替换为以下内容。<!-- Copyright (c) Microsoft Corporation. Licensed under the MIT License. --> <!-- <WelcomePageXamlSnippet> --> <?xml version="1.0" encoding="utf-8" ?> <ContentPage xmlns="http://xamarin.com/schemas/2014/forms" xmlns:x="http://schemas.microsoft.com/winfx/2009/xaml" Title="Home" x:Class="GraphTutorial.WelcomePage"> <ContentPage.Padding> <OnPlatform x:TypeArguments="Thickness"> <On Platform="UWP" Value="10, 10, 10, 10" /> </OnPlatform> </ContentPage.Padding> <ContentPage.Content> <StackLayout> <Label Text="Graph Xamarin Tutorial App" HorizontalOptions="Center" FontAttributes="Bold" FontSize="Large" Margin="10,20,10,20" /> <!-- Signed out UI --> <StackLayout IsVisible="{Binding Path=IsSignedOut, Source={x:Static Application.Current}}"> <Label Text="Please sign in to get started" HorizontalOptions="Center" FontSize="Medium" Margin="10,0,10,20"/> <Button Text="Sign in" HorizontalOptions="Center" Clicked="OnSignIn" /> </StackLayout> <!-- Signed in UI --> <StackLayout IsVisible="{Binding Path=IsSignedIn, Source={x:Static Application.Current}}"> <Label Text="{Binding Path=UserName, Source={x:Static Application.Current}, StringFormat='Welcome \{0\}!'}" HorizontalOptions="Center" FontSize="Medium"/> </StackLayout> </StackLayout> </ContentPage.Content> </ContentPage> <!-- </WelcomePageXamlSnippet> -->在 "解决方案资源管理器"中展开 WelcomePage.xaml 并打开 WelcomePage.xaml.cs 文件。 将以下函数添加到
WelcomePage类。private void OnSignIn(object sender, EventArgs e) { (App.Current.MainPage as MasterDetailPage).IsPresented = true; }
添加日历和新事件页面
现在,添加一个日历页和一个新的事件页面。 现在这些只是占位符。
右键单击 GraphTutorial 项目,然后选择 "添加",然后选择" 新建项目..."。选择 "内容页面 ",并命名该页面
CalendarPage。 选择“添加”。右键单击 GraphTutorial 项目,然后选择 "添加",然后选择" 新建项目..."。选择 "内容页面 ",并命名该页面
NewEventPage。 选择“添加”。
更新 MainPage 代码隐藏
现在,所有页面已就位,请更新 MainPage.xaml 的代码隐藏。
在 "解决方案资源管理器"中展开 MainPage.xaml,打开 MainPage.xaml.cs 文件,并将其全部内容替换为以下内容。
using System;
using System.Collections.Generic;
using System.IO;
using System.Linq;
using System.Reflection;
using System.Text;
using System.Threading.Tasks;
using Xamarin.Forms;
using GraphTutorial.Models;

namespace GraphTutorial
{
    public partial class MainPage : MasterDetailPage
    {
        Dictionary<int, NavigationPage> MenuPages = new Dictionary<int, NavigationPage>();

        public MainPage()
        {
            InitializeComponent();

            MasterBehavior = MasterBehavior.Popover;

            // Load the welcome page at start
            MenuPages.Add((int)MenuItemType.Welcome, (NavigationPage)Detail);
        }

        // Navigate to the selected page
        public async Task NavigateFromMenu(int id)
        {
            if (!MenuPages.ContainsKey(id))
            {
                switch (id)
                {
                    case (int)MenuItemType.Welcome:
                        MenuPages.Add(id, new NavigationPage(new WelcomePage()));
                        break;
                    case (int)MenuItemType.Calendar:
                        MenuPages.Add(id, new NavigationPage(new CalendarPage()));
                        break;
                    case (int)MenuItemType.NewEvent:
                        MenuPages.Add(id, new NavigationPage(new NewEventPage()));
                        break;
                }
            }

            var newPage = MenuPages[id];

            if (newPage != null && Detail != newPage)
            {
                Detail = newPage;

                if (Device.RuntimePlatform == Device.Android)
                    await Task.Delay(100);

                IsPresented = false;
            }
        }
    }
}
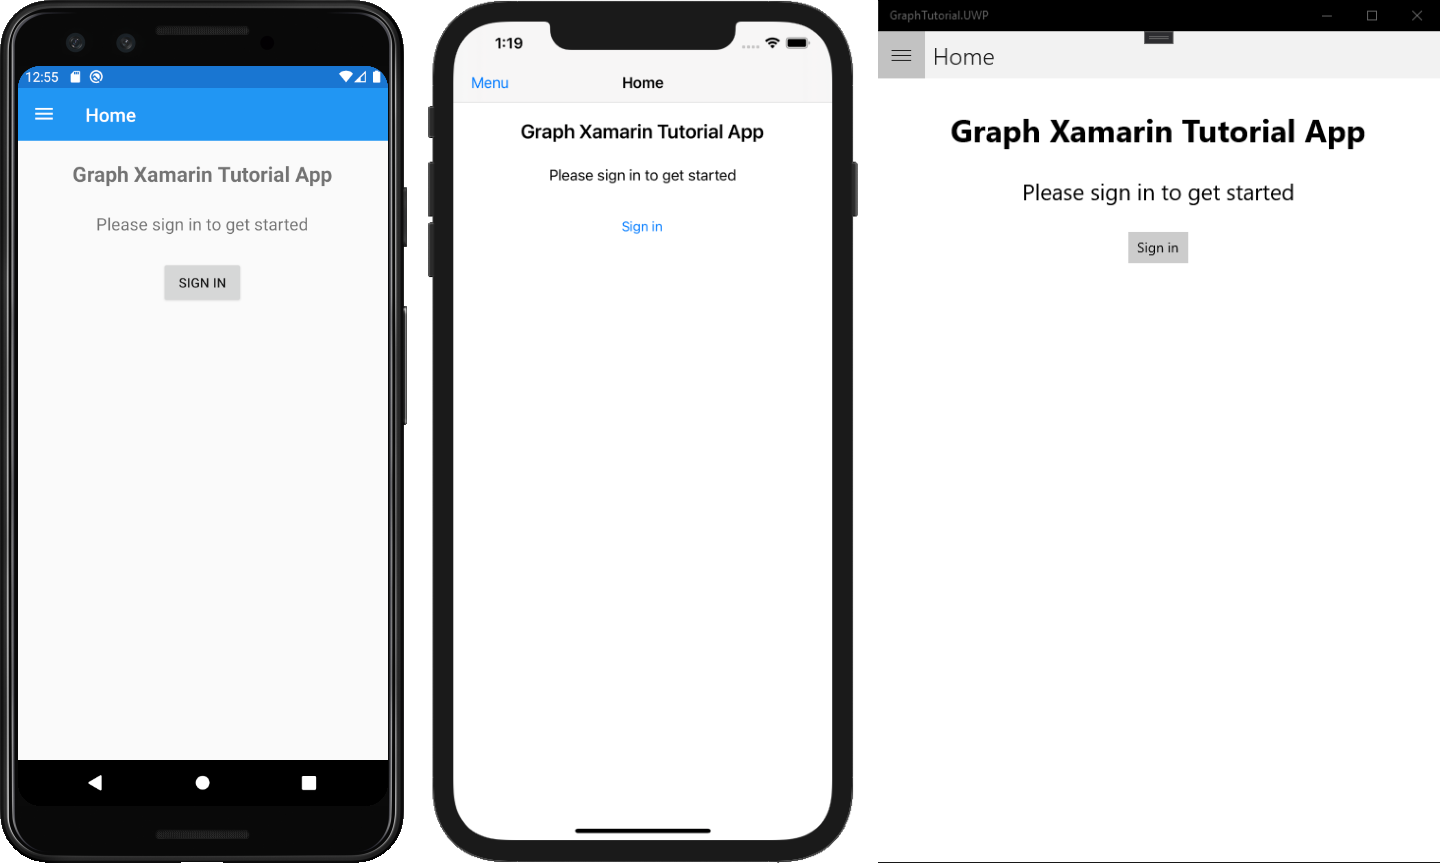
保存所有更改。 右键单击你想要在 Android、iOS 或 UWP (运行的项目,然后选择) 设置为"启动"Project。 按 F5 或选择"调试 ">"开始 调试Visual Studio"。
在门户中注册该应用
在此练习中,你将使用管理中心Azure Active Directory Azure AD 本机应用程序。
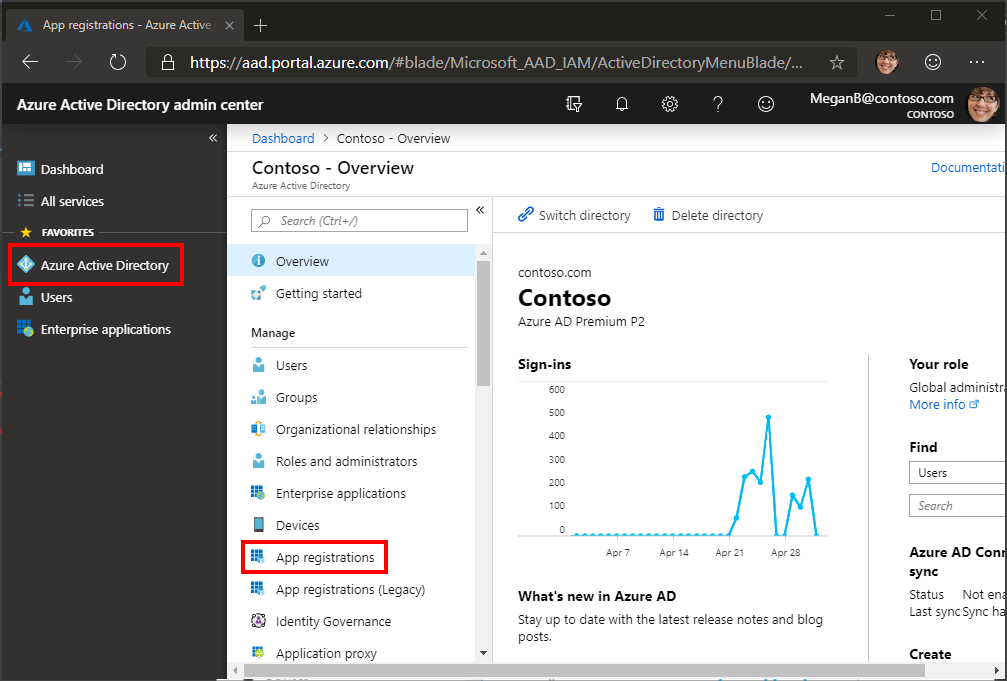
打开浏览器,并转到 Azure Active Directory 管理中心。然后,使用 个人帐户(亦称为“Microsoft 帐户”)或 工作或学校帐户 登录。
选择左侧导航栏中的“Azure Active Directory”,再选择“管理”下的“应用注册”。
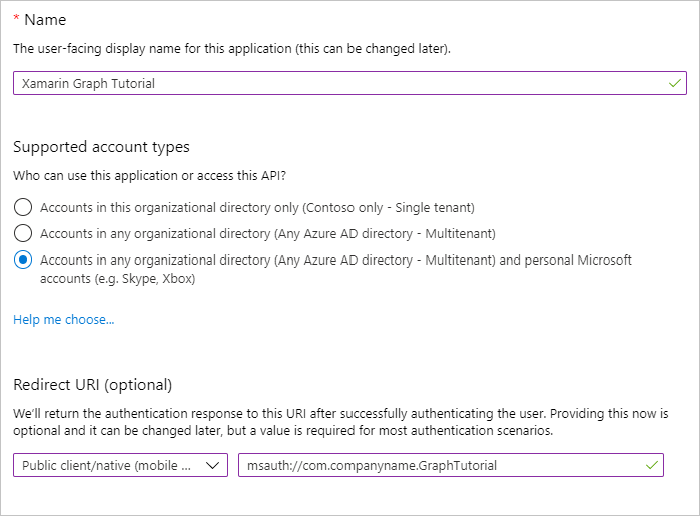
选择“新注册”。 在“注册应用”页上,按如下方式设置值。
- 将“名称”设置为“
Xamarin Graph Tutorial”。 - 将“受支持的帐户类型”设置为“任何组织目录中的帐户和个人 Microsoft 帐户”。
- Under Redirect URI (optional), change the dropdown to Public client (mobile & desktop ), and set the value to
msauth://com.companyname.GraphTutorial.
- 将“名称”设置为“
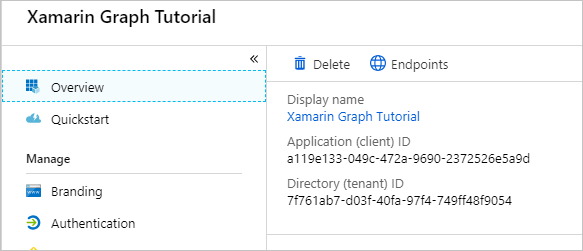
选择“注册”。 在 "Xamarin Graph 教程"页面上,复制 Application (client) ID 的值并保存它,你将在下一步中需要该值。
添加 Azure AD 身份验证
在此练习中,你将从上一练习中扩展应用程序,以支持使用 Azure AD 进行身份验证。 这是必需的,才能获取必要的 OAuth 访问令牌来调用 Microsoft Graph。 在此步骤中,你将将适用于 .NET 的 Microsoft 身份验证库 (MSAL) 集成到应用程序中。
在 "解决方案资源管理器"中,展开 GraphTutorial 项目并右键单击 "模型" 文件夹。 选择 "添加>类..."。 将类命名
OAuthSettings,然后选择"添加 "。打开 OAuthSettings.cs 文件,并将其内容替换为以下内容。
将
YOUR_APP_ID_HERE替换为应用注册中的应用程序 ID。重要
如果你使用的是源代码管理(如 git),那么现在是从源代码管理中排除文件以避免意外泄露应用
OAuthSettings.csID 的一个好时间。
实施登录
打开 GraphTu一l 项目中的 App.xaml.cs 文件,将以下语句
using添加到文件顶部。using GraphTutorial.Models; using Microsoft.Identity.Client; using Microsoft.Graph; using System.Diagnostics; using System.Linq; using System.Net.Http.Headers; using TimeZoneConverter;更改 应用程序类 声明行来解决应用程序 的名称 冲突。
public partial class App : Xamarin.Forms.Application, INotifyPropertyChanged将以下属性添加到
App类。// UIParent used by Android version of the app public static object AuthUIParent = null; // Keychain security group used by iOS version of the app public static string iOSKeychainSecurityGroup = null; // Microsoft Authentication client for native/mobile apps public static IPublicClientApplication PCA; // Microsoft Graph client public static GraphServiceClient GraphClient; // Microsoft Graph permissions used by app private readonly string[] Scopes = OAuthSettings.Scopes.Split(' ');接下来,在 类
PublicClientApplication的构造函数中创建新的App。public App() { InitializeComponent(); var builder = PublicClientApplicationBuilder .Create(OAuthSettings.ApplicationId) .WithRedirectUri(OAuthSettings.RedirectUri); if (!string.IsNullOrEmpty(iOSKeychainSecurityGroup)) { builder = builder.WithIosKeychainSecurityGroup(iOSKeychainSecurityGroup); } PCA = builder.Build(); MainPage = new MainPage(); }更新
SignIn函数以使用PublicClientApplication获取访问令牌。 在行上方添加以下await GetUserInfo();代码。// First, attempt silent sign in // If the user's information is already in the app's cache, // they won't have to sign in again. try { var accounts = await PCA.GetAccountsAsync(); var silentAuthResult = await PCA .AcquireTokenSilent(Scopes, accounts.FirstOrDefault()) .ExecuteAsync(); Debug.WriteLine("User already signed in."); Debug.WriteLine($"Successful silent authentication for: {silentAuthResult.Account.Username}"); Debug.WriteLine($"Access token: {silentAuthResult.AccessToken}"); } catch (MsalUiRequiredException msalEx) { // This exception is thrown when an interactive sign-in is required. Debug.WriteLine("Silent token request failed, user needs to sign-in: " + msalEx.Message); // Prompt the user to sign-in var interactiveRequest = PCA.AcquireTokenInteractive(Scopes); if (AuthUIParent != null) { interactiveRequest = interactiveRequest .WithParentActivityOrWindow(AuthUIParent); } var interactiveAuthResult = await interactiveRequest.ExecuteAsync(); Debug.WriteLine($"Successful interactive authentication for: {interactiveAuthResult.Account.Username}"); Debug.WriteLine($"Access token: {interactiveAuthResult.AccessToken}"); } catch (Exception ex) { Debug.WriteLine("Authentication failed. See exception messsage for more details: " + ex.Message); }此代码首先尝试以静默方式获取访问令牌。 例如,如果用户的信息已位于应用的缓存 (例如,如果用户之前在没有退出) 的情况下关闭了应用,这将成功,并且没有理由提示用户。 如果缓存中不存在用户的信息,函数
AcquireTokenSilent().ExecuteAsync()将引发MsalUiRequiredException。 在这种情况下,代码调用交互式函数获取令牌AcquireTokenInteractive。更新
SignOut函数以从缓存中删除用户信息。 将以下代码添加到 函数SignOut的开头。// Get all cached accounts for the app // (Should only be one) var accounts = await PCA.GetAccountsAsync(); while (accounts.Any()) { // Remove the account info from the cache await PCA.RemoveAsync(accounts.First()); accounts = await PCA.GetAccountsAsync(); }
更新 Android 项目以启用登录
在 Xamarin Android 项目中使用时,Microsoft 身份验证库有一些特定于 Android 的要求。
在 GraphTuoidl.Android 项目中,展开 "属性"文件夹,然后打开"AndroidManifest.xml"。 **** If you're using Visual Studio for Mac, Control click AndroidManifest.xml and choose Open With, then Source Code Editor. 将全部内容替换为以下内容。
<?xml version="1.0" encoding="utf-8"?>
<manifest xmlns:android="http://schemas.android.com/apk/res/android" android:versionCode="1" android:versionName="1.0" package="com.companyname.GraphTutorial">
    <uses-sdk android:minSdkVersion="21" android:targetSdkVersion="28" />
    <application android:label="GraphTutorial.Android">
        <activity android:name="microsoft.identity.client.BrowserTabActivity">
            <intent-filter>
                <action android:name="android.intent.action.VIEW" />
                <category android:name="android.intent.category.DEFAULT" />
                <category android:name="android.intent.category.BROWSABLE" />
                <data android:scheme="msauth" android:host="com.companyname.GraphTutorial" />
            </intent-filter>
        </activity>
    </application>
    <uses-permission android:name="android.permission.ACCESS_NETWORK_STATE" />
    <uses-permission android:name="android.permission.INTERNET" />
</manifest>
打开 MainActivity.cs, 将以下
using语句添加到文件顶部。using Android.Content; using Microsoft.Identity.Client;重写
OnActivityResult函数以将控件传递给 MSAL 库。 将以下内容添加到MainActivity类。protected override void OnActivityResult(int requestCode, Result resultCode, Intent data) { base.OnActivityResult(requestCode, resultCode, data); AuthenticationContinuationHelper .SetAuthenticationContinuationEventArgs(requestCode, resultCode, data); }在
OnCreate函数中,在 行后添加以下LoadApplication(new App());行。App.AuthUIParent = this;
更新 iOS 项目以启用登录
重要
由于 MSAL 需要使用 Entitlements.plist 文件,因此你必须Visual Studio Apple 开发人员帐户来启用预配。 如果你正在 iPhone 模拟器中运行本教程,则需要在 GraphTutorial.iOS 项目的设置 Build->iOS 捆绑签名的"自定义权利"字段中添加 Entitlements.plist。 有关详细信息,请参阅 Xamarin.iOS的设备预配。
在 Xamarin iOS 项目中使用时,Microsoft 身份验证库有一些特定于 iOS 的要求。
在"解决方案资源管理器"中,展开 GraphTu一一l.iOS 项目,然后打开 Entitlements.plist 文件。
找到密钥 链权利 ,然后选择启用 密钥链。
在 "钥匙链组"中,添加格式为 的条目
com.companyname.GraphTutorial。
更新 GraphTu一l.iOS 项目中的代码,以处理身份验证期间重定向。 打开 AppDelegate.cs 文件,在文件顶部
using添加以下语句。using Microsoft.Identity.Client;添加以下行以
FinishedLaunching在行之前LoadApplication(new App());运行。// Specify the Keychain access group App.iOSKeychainSecurityGroup = NSBundle.MainBundle.BundleIdentifier;重写
OpenUrl函数以将 URL 传递到 MSAL 库。 将以下内容添加到AppDelegate类。// Handling redirect URL // See: https://github.com/azuread/microsoft-authentication-library-for-dotnet/wiki/Xamarin-iOS-specifics public override bool OpenUrl(UIApplication app, NSUrl url, NSDictionary options) { AuthenticationContinuationHelper.SetAuthenticationContinuationEventArgs(url); return true; }
存储令牌
在 Xamarin 项目中使用 Microsoft 身份验证库时,它默认利用本机安全存储来缓存令牌。 有关详细信息 ,请参阅令牌 缓存序列化。
测试登录
此时,如果运行该应用程序并点击" 登录" 按钮,系统将提示你登录。 成功登录后,应该会看到访问令牌打印到调试程序的输出中。

获取用户详细信息
将新函数添加到 App 类以初始化
GraphServiceClient。private async Task InitializeGraphClientAsync() { var currentAccounts = await PCA.GetAccountsAsync(); try { if (currentAccounts.Count() > 0) { // Initialize Graph client GraphClient = new GraphServiceClient(new DelegateAuthenticationProvider( async (requestMessage) => { var result = await PCA.AcquireTokenSilent(Scopes, currentAccounts.FirstOrDefault()) .ExecuteAsync(); requestMessage.Headers.Authorization = new AuthenticationHeaderValue("Bearer", result.AccessToken); })); await GetUserInfo(); IsSignedIn = true; } else { IsSignedIn = false; } } catch (Exception ex) { Debug.WriteLine("Failed to initialized graph client."); Debug.WriteLine($"Accounts in the msal cache: {currentAccounts.Count()}."); Debug.WriteLine($"See exception message for details: {ex.Message}"); } }更新
SignInApp.xaml.cs 中的 函数以调用此函数,而不是GetUserInfo。 从 函数中删除SignIn以下内容。await GetUserInfo(); IsSignedIn = true;将以下内容添加到 函数
SignIn的末尾。await InitializeGraphClientAsync();更新
GetUserInfo函数,从 Microsoft Graph。 将现有的GetUserInfo函数替换为以下内容。private async Task GetUserInfo() { // Get the logged on user's profile (/me) var user = await GraphClient.Me.Request() .Select(u => new { u.DisplayName, u.Mail, u.MailboxSettings, u.UserPrincipalName }) .GetAsync(); UserPhoto = ImageSource.FromStream(() => GetUserPhoto()); UserName = user.DisplayName; UserEmail = string.IsNullOrEmpty(user.Mail) ? user.UserPrincipalName : user.Mail; try { UserTimeZone = TZConvert.GetTimeZoneInfo(user.MailboxSettings.TimeZone); } catch { // Default to local time zone UserTimeZone = TimeZoneInfo.Local; } }保存更改并运行该应用程序。 登录 UI 后,会使用用户的 显示名称 和电子邮件地址进行更新。
获取日历视图
在此练习中,你将将 Microsoft Graph合并到应用程序中。 对于此应用程序,你将使用适用于 .NET 的 Microsoft Graph客户端库调用 Microsoft Graph。
从 Outlook 获取日历事件
打开 GraphTu一 l 项目中的 CalendarPage.xaml, 并将其内容替换为以下内容。
<?xml version="1.0" encoding="utf-8" ?>
<ContentPage xmlns="http://xamarin.com/schemas/2014/forms"
             xmlns:x="http://schemas.microsoft.com/winfx/2009/xaml"
             Title="Calendar"
             x:Class="GraphTutorial.CalendarPage">
    <ContentPage.Content>
        <StackLayout>
            <Editor x:Name="JSONResponse"
                    IsSpellCheckEnabled="False"
                    HorizontalOptions="FillAndExpand"
                    VerticalOptions="FillAndExpand"/>
        </StackLayout>
    </ContentPage.Content>
</ContentPage>
打开 CalendarPage.xaml.cs, 在文件顶部
using添加以下语句。using Microsoft.Graph; using System.Collections.ObjectModel; using System.ComponentModel;将以下函数添加到 类,获取用户时区中本周
CalendarPage的开始。private static DateTime GetUtcStartOfWeekInTimeZone(DateTime today, TimeZoneInfo timeZone) { // Assumes Sunday as first day of week int diff = System.DayOfWeek.Sunday - today.DayOfWeek; // create date as unspecified kind var unspecifiedStart = DateTime.SpecifyKind(today.AddDays(diff), DateTimeKind.Unspecified); // convert to UTC return TimeZoneInfo.ConvertTimeToUtc(unspecifiedStart, timeZone); }将以下函数添加到
CalendarPage类,获取用户的事件并显示 JSON 响应。protected override async void OnAppearing() { base.OnAppearing(); // Get start and end of week in user's time zone var startOfWeek = GetUtcStartOfWeekInTimeZone(DateTime.Today, App.UserTimeZone); var endOfWeek = startOfWeek.AddDays(7); var queryOptions = new List<QueryOption> { new QueryOption("startDateTime", startOfWeek.ToString("o")), new QueryOption("endDateTime", endOfWeek.ToString("o")) }; var timeZoneString = Xamarin.Forms.Device.RuntimePlatform == Xamarin.Forms.Device.UWP ? App.UserTimeZone.StandardName : App.UserTimeZone.DisplayName; // Get the events var events = await App.GraphClient.Me.CalendarView.Request(queryOptions) .Header("Prefer", $"outlook.timezone=\"{timeZoneString}\"") .Select(e => new { e.Subject, e.Organizer, e.Start, e.End }) .OrderBy("start/DateTime") .Top(50) .GetAsync(); // Temporary JSONResponse.Text = App.GraphClient.HttpProvider.Serializer.SerializeObject(events.CurrentPage); }考虑代码正在
OnAppearing执行哪些工作。- 将调用的 URL 为
/v1.0/me/calendarview。startDateTime和endDateTime参数定义日历视图的起始和结束。Prefer: outlook.timezone标头将导致start在用户的时区中返回事件的 和end。Select函数将每个事件返回的字段限定为应用将实际使用的字段。OrderBy函数按开始日期和时间对结果进行排序。Top函数最多请求 50 个事件。
- 将调用的 URL 为
运行应用、登录,然后单击菜单中的 " 日历"导航项。 你应该在用户日历上看到事件的 JSON 转储。
显示结果
现在,可以将 JSON 转储替换为某些内容,以用户友好的方式显示结果。
首先创建绑定值转换器,将 Microsoft Graph 的dateTimeTimeZone值转换为用户期望的日期和时间格式。
右键单击 GraphTutorial 项目中的 "模型"文件夹,然后选择"添加",然后选择"类..."。 将类命名
GraphDateTimeTimeZoneConverter,然后选择"添加 "。将文件的全部内容替换为以下内容。
using Microsoft.Graph;
using System;
using System.Globalization;
using Xamarin.Forms;

namespace GraphTutorial.Models
{
    class GraphDateTimeTimeZoneConverter : IValueConverter
    {
        public object Convert(object value, Type targetType, object parameter, CultureInfo culture)
        {
            if (value is DateTimeTimeZone date)
            {
                var parsedDateAs = DateTimeOffset.Parse(date.DateTime);
                // Return the local date time string
                return $"{parsedDateAs.LocalDateTime.ToShortDateString()} {parsedDateAs.LocalDateTime.ToShortTimeString()}";
            }

            return string.Empty;
        }

        public object ConvertBack(object value, Type targetType, object parameter, CultureInfo culture)
        {
            throw new NotImplementedException();
        }
    }
}
将 CalendarPage.xaml 的全部 内容替换为以下内容。
<!-- Copyright (c) Microsoft Corporation.
     Licensed under the MIT License. -->

<!-- <CalendarPageXamlSnippet> -->
<?xml version="1.0" encoding="utf-8" ?>
<ContentPage xmlns="http://xamarin.com/schemas/2014/forms"
             xmlns:x="http://schemas.microsoft.com/winfx/2009/xaml"
             xmlns:local="clr-namespace:GraphTutorial.Models"
             Title="Calendar"
             x:Class="GraphTutorial.CalendarPage">
    <ContentPage.Resources>
        <local:GraphDateTimeTimeZoneConverter x:Key="DateConverter" />
    </ContentPage.Resources>
    <ContentPage.Content>
        <StackLayout>
            <ListView x:Name="CalendarList"
                      HasUnevenRows="true"
                      Margin="10,10,10,10">
                <ListView.ItemTemplate>
                    <DataTemplate>
                        <ViewCell>
                            <StackLayout Margin="10,10,10,10">
                                <Label Text="{Binding Path=Subject}"
                                       FontAttributes="Bold"
                                       FontSize="Medium" />
                                <Label Text="{Binding Path=Organizer.EmailAddress.Name}"
                                       FontSize="Small" />
                                <StackLayout Orientation="Horizontal">
                                    <Label Text="{Binding Path=Start, Converter={StaticResource DateConverter}}"
                                       FontSize="Micro" />
                                    <Label Text="to"
                                           FontSize="Micro" />
                                    <Label Text="{Binding Path=End, Converter={StaticResource DateConverter}}"
                                       FontSize="Micro" />
                                </StackLayout>
                            </StackLayout>
                        </ViewCell>
                    </DataTemplate>
                </ListView.ItemTemplate>
            </ListView>
        </StackLayout>
    </ContentPage.Content>
</ContentPage>
<!-- </CalendarPageXamlSnippet> -->
这会将 替换为
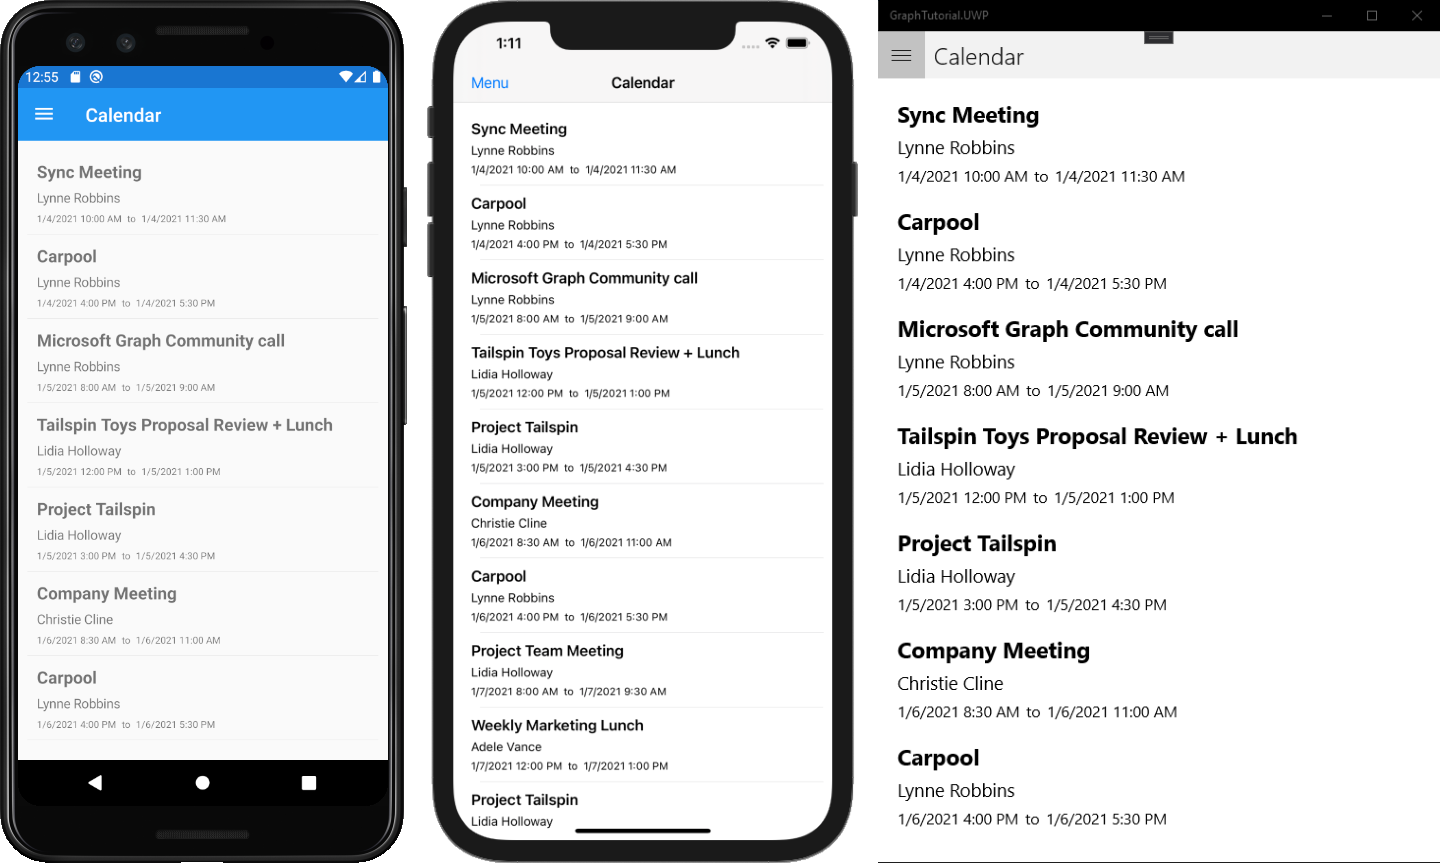
EditorListView。DataTemplate用于呈现每个项目的 使用 将GraphDateTimeTimeZoneConverter事件的Start和 属性转换为End字符串。打开 CalendarPage.xaml.cs 并从 函数中删除以下
OnAppearing行。// Temporary JSONResponse.Text = JsonConvert.SerializeObject(events.CurrentPage, Formatting.Indented);在它们的位置,添加以下代码。
// Add the events to the list view
CalendarList.ItemsSource = events.CurrentPage.ToList();
运行应用、登录,然后单击 "日历" 导航项。 你应该会看到格式化的 Start 和 End 值的事件列表。
创建新事件
在此部分中,您将添加在用户日历上创建事件的能力。
打开 NewEventPage.xaml, 并将其内容替换为以下内容。
<!-- Copyright (c) Microsoft Corporation.
     Licensed under the MIT License. -->

<!-- <NewEventPageXamlSnippet> -->
<?xml version="1.0" encoding="utf-8" ?>
<ContentPage xmlns="http://xamarin.com/schemas/2014/forms"
             xmlns:x="http://schemas.microsoft.com/winfx/2009/xaml"
             x:Class="GraphTutorial.NewEventPage">
    <ContentPage.Content>
        <AbsoluteLayout>
            <ScrollView
                AbsoluteLayout.LayoutBounds="0,0,1,1"
                AbsoluteLayout.LayoutFlags="All">
                <StackLayout Spacing="10" Margin="10">
                    <Label Text="Subject" />
                    <Entry Text="{Binding Subject}" />
                    <Label Text="Attendees" />
                    <Entry Text="{Binding Attendees}" Placeholder="Add multiple email addresses separated by a semicolon (';')" />
                    <Grid>
                        <Grid.ColumnDefinitions>
                            <ColumnDefinition Width="auto" />
                            <ColumnDefinition Width="auto" />
                        </Grid.ColumnDefinitions>
                        <Grid.RowDefinitions>
                            <RowDefinition Height="auto" />
                            <RowDefinition Height="auto" />
                            <RowDefinition Height="auto" />
                            <RowDefinition Height="auto" />
                        </Grid.RowDefinitions>
                        <Label Text="Start" />
                        <DatePicker Grid.Row="2" Date="{Binding StartDate, Mode=TwoWay}" />
                        <TimePicker Grid.Row="2" Grid.Column="2" Time="{Binding StartTime}" />
                        <Label Text="End" Grid.Row="3" />
                        <DatePicker Grid.Row="4" Date="{Binding EndDate, Mode=TwoWay}" />
                        <TimePicker Grid.Row="4" Grid.Column="2" Time="{Binding EndTime}" />
                    </Grid>
                    <Label Text="Body" />
                    <Editor HeightRequest="200" Text="{Binding Body}" />
                    <Button Text="Create" Clicked="CreateEvent" IsEnabled="{Binding IsValid}" />
                </StackLayout>
            </ScrollView>
            <StackLayout
                AbsoluteLayout.LayoutBounds="0,0,1,1"
                AbsoluteLayout.LayoutFlags="All"
                IsVisible="{Binding IsWorking}">
                <ActivityIndicator
                    HorizontalOptions="CenterAndExpand"
                    VerticalOptions="CenterAndExpand"
                    IsRunning="{Binding IsWorking}" />
            </StackLayout>
        </AbsoluteLayout>
    </ContentPage.Content>
</ContentPage>
<!-- </NewEventPageXamlSnippet> -->
打开 NewEventPage.xaml.cs, 将以下语句
using添加到文件顶部。using System.ComponentModel; using Microsoft.Graph;将 INotifyPropertyChange 接口添加到 NewEventPage 类。 将现有的类声明替换为以下内容。
[XamlCompilation(XamlCompilationOptions.Compile)]
public partial class NewEventPage : ContentPage, INotifyPropertyChanged
{
    public NewEventPage()
    {
        InitializeComponent();
        BindingContext = this;
    }
}
将以下属性添加到 NewEventPage 类。
// Value of the Subject text box
private string _subject = "";
public string Subject
{
    get { return _subject; }
    set
    {
        _subject = value;
        OnPropertyChanged();
        IsValid = true;
    }
}

// Value of the Attendees text box
private string _attendees = "";
public string Attendees
{
    get { return _attendees; }
    set
    {
        _attendees = value;
        OnPropertyChanged();
    }
}

// Value of the Start date picker
private DateTime _startDate = DateTime.Today;
public DateTime StartDate
{
    get { return _startDate; }
    set
    {
        _startDate = value;
        OnPropertyChanged();
        IsValid = true;
    }
}

// Value of the Start time picker
private TimeSpan _startTime = TimeSpan.Zero;
public TimeSpan StartTime
{
    get { return _startTime; }
    set
    {
        _startTime = value;
        OnPropertyChanged();
        IsValid = true;
    }
}

// Value of the End date picker
private DateTime _endDate = DateTime.Today;
public DateTime EndDate
{
    get { return _endDate; }
    set
    {
        _endDate = value;
        OnPropertyChanged();
        IsValid = true;
    }
}

// Value of the End time picker
private TimeSpan _endTime = TimeSpan.Zero;
public TimeSpan EndTime
{
    get { return _endTime; }
    set
    {
        _endTime = value;
        OnPropertyChanged();
        IsValid = true;
    }
}

// Value of the Body text box
private string _body = "";
public string Body
{
    get { return _body; }
    set
    {
        _body = value;
        OnPropertyChanged();
    }
}

// Combine the date from date picker with time from time picker
private DateTimeOffset CombineDateAndTime(DateTime date, TimeSpan time)
{
    // Use the year, month, and day from the supplied DateTimeOffset
    // to create a new DateTime at midnight
    var dt = new DateTime(date.Year, date.Month, date.Day);

    // Add the TimeSpan, and use the user's timezone offset
    return new DateTimeOffset(dt + time, App.UserTimeZone.BaseUtcOffset);
}

// Combined value of Start date and time pickers
public DateTimeOffset Start
{
    get
    {
        return CombineDateAndTime(StartDate, StartTime);
    }
}

// Combined value of End date and time pickers
public DateTimeOffset End
{
    get
    {
        return CombineDateAndTime(EndDate, EndTime);
    }
}

public bool IsValid
{
    get
    {
        // Subject is required, Start must be before
        // End
        return !string.IsNullOrWhiteSpace(Subject) &&
               DateTimeOffset.Compare(Start, End) < 0;
    }
    private set
    {
        // Only used to fire event, value
        // is always calculated
        OnPropertyChanged();
    }
}

private bool _isWorking = false;
public bool IsWorking
{
    get { return _isWorking; }
    set
    {
        _isWorking = value;
        OnPropertyChanged();
    }
}
添加以下代码以创建事件。
private async void CreateEvent(object sender, EventArgs e)
{
    IsWorking = true;

    var timeZoneString =
        Xamarin.Forms.Device.RuntimePlatform == Xamarin.Forms.Device.UWP ?
            App.UserTimeZone.StandardName : App.UserTimeZone.DisplayName;

    // Initialize a new Event object with the required fields
    var newEvent = new Event
    {
        Subject = Subject,
        Start = new DateTimeTimeZone
        {
            DateTime = Start.ToString("yyyy'-'MM'-'dd'T'HH':'mm':'ss"),
            TimeZone = timeZoneString
        },
        End = new DateTimeTimeZone
        {
            DateTime = End.ToString("yyyy'-'MM'-'dd'T'HH':'mm':'ss"),
            TimeZone = timeZoneString
        }
    };

    // If there's a body, add it
    if (!string.IsNullOrEmpty(Body))
    {
        newEvent.Body = new ItemBody
        {
            Content = Body,
            ContentType = BodyType.Text
        };
    }

    if (!string.IsNullOrEmpty(Attendees))
    {
        var attendeeList = new List<Attendee>();

        // Treat any unrecognized text as a list of email addresses
        var emails = Attendees.Split(new[] { ';', ',', ' ' },
            StringSplitOptions.RemoveEmptyEntries);

        foreach (var email in emails)
        {
            try
            {
                // Validate the email address
                var addr = new System.Net.Mail.MailAddress(email);
                if (addr.Address == email)
                {
                    attendeeList.Add(new Attendee
                    {
                        Type = AttendeeType.Required,
                        EmailAddress = new EmailAddress
                        {
                            Address = email
                        }
                    });
                }
            }
            catch { /* Invalid, skip */ }
        }

        if (attendeeList.Count > 0)
        {
            newEvent.Attendees = attendeeList;
        }
    }

    await App.GraphClient.Me.Events.Request().AddAsync(newEvent);

    await DisplayAlert("Success", "Event created.", "OK");

    IsWorking = false;
}
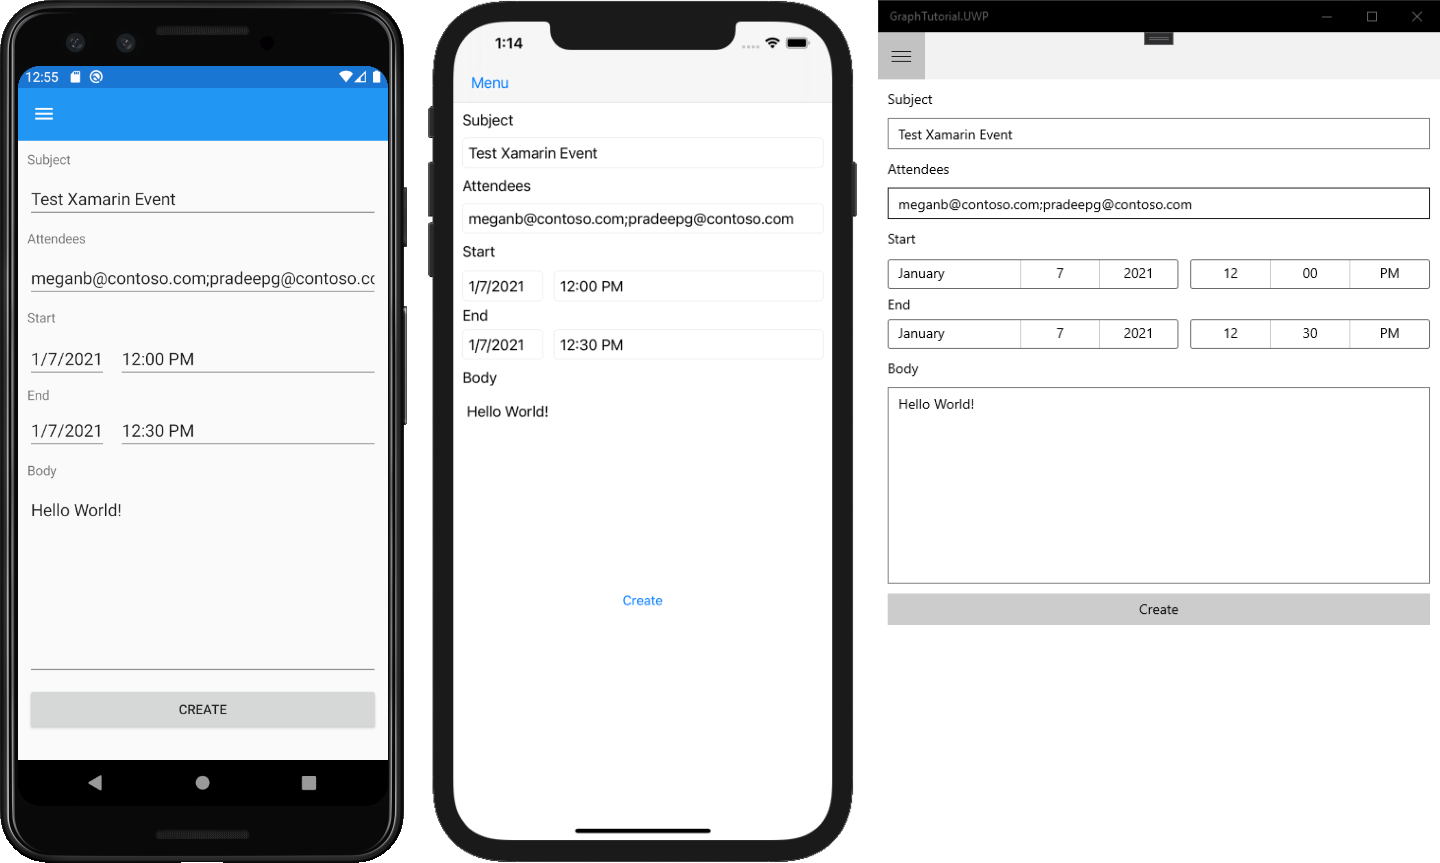
保存更改并运行该应用程序。 登录,选择"新建事件"菜单项,填写表单,然后选择"创建"将事件添加到用户日历。
恭喜!
你已完成 Xamarin Microsoft Graph教程。 现在,你已经拥有一个调用 Microsoft Graph,你可以试验和添加新功能。 请访问Microsoft Graph概述,查看可以使用 Microsoft Graph 访问的所有数据。
反馈
Please provide any feedback on this tutorial in the GitHub repository.
你有关于此部分的问题? 如果有,请向我们提供反馈,以便我们对此部分作出改进。