本教程将教你如何生成一个可用于在邮件撰写模式下将内容插入到邮件正文中的 Outlook 外接程序。
在本教程中,你将:
- 创建 Outlook 外接程序项目
- 定义撰写消息窗口中显示的按钮
- 实现从外部服务收集信息和提取数据的首次运行体验
- 实现可调用函数的无 UI 按钮
- 实现将内容插入到邮件正文中的任务窗格
提示
如果需要本教程的完整版本,请访问 GitHub 上的 Office 加载项示例存储库。
先决条件
Node.js (最新的活动 LTS 版本) 。 访问 Node.js 网站 ,下载并安装适合你的操作系统的正确版本。
最新版本的 Yeoman 和适用于 Office 加载项的 Yeoman 生成器。若要全局安装这些工具,请从命令提示符处运行以下命令。
npm install -g yo generator-office注意
即便先前已安装了 Yeoman 生成器,我们还是建议你通过 npm 将包更新为最新版本。
已连接到 Microsoft 365 订阅的 Office (包括 Office 网页版)。
注意
如果还没有 Office,可能有资格通过 Microsoft 365 开发人员计划获得 Microsoft 365 E5 开发人员订阅;有关详细信息,请参阅 常见问题解答。 或者,你可以 注册 1 个月的免费试用 版或 购买 Microsoft 365 计划。
Visual Studio Code (VS Code) 或你首选的代码编辑器。
Outlook 网页版、Windows (新 版或经典版) ,或 Mac 上的 Outlook。
GitHub 帐户。
安装
本教程中的加载项从 GitHub 帐户读取 Gist ,并将所选 Gist 添加到邮件正文。 完成以下步骤以创建两个新 gist,你可以使用它们来测试你要生成的外接程序。
-
在 Gist description... 字段中,输入 Hello World Markdown。
在 Filename including extension... 字段中,输入 test.md。
将以下 Markdown 添加到多行文本框。
# Hello World This is content converted from Markdown! Here's a JSON sample: ```json { "foo": "bar" } ```选择“创建公用 gist”按钮。
-
在 Gist description... 字段中,输入 Hello World Html。
在 Filename including extension... 字段中,输入 test.html。
将以下 Markdown 添加到多行文本框。
<html> <head> <style> h1 { font-family: Calibri; } </style> </head> <body> <h1>Hello World!</h1> <p>This is a test</p> </body> </html>选择“创建公用 gist”按钮。
创建 Outlook 外接程序项目
运行以下命令,使用 Yeoman 生成器创建加载项项目。 包含该项目的文件夹将添加到当前目录。
yo office注意
运行该
yo office命令时,可能会收到有关 Yeoman 和 Office 加载项 CLI 工具的数据收集策略的提示。 根据你的需要,使用提供的信息来响应提示。出现提示时,请提供以下信息以创建加载项项目。
创建项目的步骤因清单类型而略有不同。
注意
通过 Microsoft 365 统一清单,你可以将 Office 加载项与 Teams 应用合并到 Microsoft 365 应用中,作为开发和部署的单个单元。 若要了解详细信息,请参阅 具有统一清单的 Office 加载项。 有关结合了 Teams 应用和 Outlook 加载项的 Microsoft 365 应用示例,请参阅 折扣优惠。
我们期待你对统一清单提出反馈。 如有任何建议,请在 Office JavaScript 库的存储库中创建问题。
注意
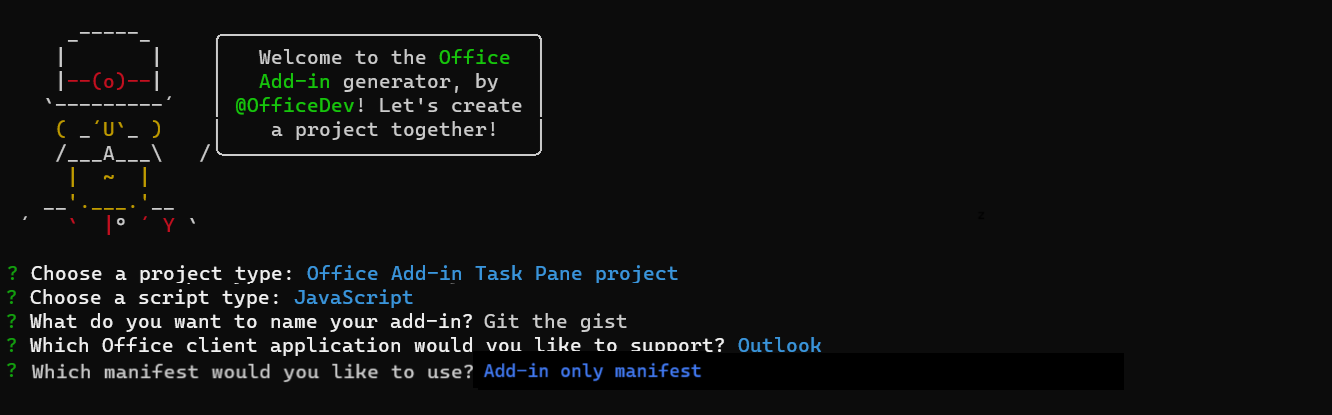
Mac 上的 Outlook 当前不支持 Microsoft 365 的统一清单。 如果使用的是 Mac 上的 Outlook,请选择“ 仅加载项清单 ”选项卡,然后改为按照这些说明进行操作。 有关详细信息,请参阅支持具有 Microsoft 365 统一清单的加载项。
选择项目类型 -
Office Add-in Task Pane project选择脚本类型 -
JavaScript要如何命名加载项? -
Git the gist要支持哪一个 Office 客户端应用程序? -
Outlook要使用哪个清单? -
unified manifest for Microsoft 365
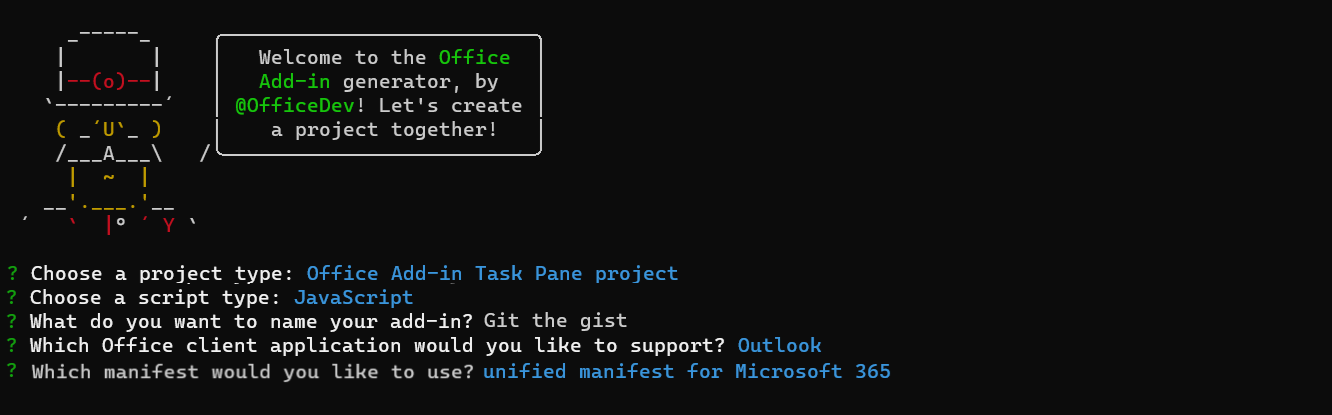
完成此向导后,生成器会创建项目,并安装支持的 Node 组件。
导航到项目的根目录。
cd "Git the gist"在 VS Code 或首选代码编辑器中打开项目。
提示
在 Windows 上,可通过命令行导航到项目的根目录,然后输入
code .在 VS Code 中打开该文件夹。 在 Mac 上,需要先将code命令添加到路径中,然后才可使用该命令在 VS Code 中打开项目文件夹。
更新清单
外接程序的清单控制外接程序在 Outlook 中的显示方式。 它定义外接程序在外接程序列表中的显示方式和功能区上显示的按钮,并设置外接程序使用的 HTML 和 JavaScript 文件的 URL。
指定基本信息
在清单文件中进行以下更新,以指定有关加载项的一些基本信息。
找到
"description"属性,将默认"short"值和"full"值替换为加载项的说明,然后保存文件。"description": { "short": "Gets gists.", "full": "Allows users to access their GitHub gists." },保存文件。
测试生成的外接程序
在继续之前,让我们测试生成器创建的基本外接程序,以确认项目已正确设置。
注意
Office 加载项应使用 HTTPS,而不是 HTTP,即使在开发过程中也是如此。 如果在运行以下命令之一后收到安装证书的提示,请接受安装 Yeoman 生成器提供的证书的提示。 你可能还必须以管理员身份运行命令提示符或终端才能进行更改。
如果这是你首次在计算机上开发 Office 加载项,系统可能会在命令行中提示你授予 Microsoft Edge WebView 环回豁免 (“允许 Microsoft Edge WebView 的 localhost 环回?”) 。 出现提示时,输入以
Y允许豁免。 请注意,需要管理员权限才能允许豁免。 一旦允许,则将来 (旁加载 Office 加载项时不应提示你获得豁免,除非你从计算机) 中删除了豁免。 若要了解详细信息,请在 加载 Office 加载项或使用 Fiddler 时查看“我们无法从本地主机打开此加载项”。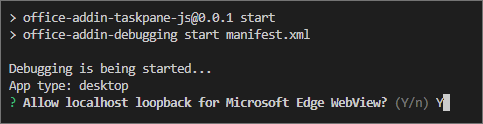
首次使用 Yeoman 生成器开发 Office 加载项时,默认浏览器会打开一个窗口,提示你登录到 Microsoft 365 帐户。 如果登录窗口未出现,并且遇到旁加载或登录超时错误,请运行
atk auth login m365。
在项目的根目录中运行以下命令。 运行此命令时,本地 Web 服务器将启动,并且加载加载项。
npm start注意
首次使用 Yeoman 生成器开发 Office 加载项时,默认浏览器会打开一个窗口,提示你登录到 Microsoft 365 帐户。 如果登录窗口未出现,并且遇到旁加载或登录超时错误,请先运行
atk auth login m365,然后再次运行npm start。如果加载项未自动旁加载,请按照 旁加载 Outlook 加载项 中的说明进行测试,在 Outlook 中手动旁加载加载加载项。
在 Outlook 中,打开现有邮件,然后选择“显示任务窗格”按钮。
当系统提示“Web 视图在加载时停止”对话框时,请选择“确定”。
注意
如果选择“取消”,则当加载项的此实例正在运行时,将不会再次显示该对话框。 但如果重新启动加载项,则会再次看到该对话框。
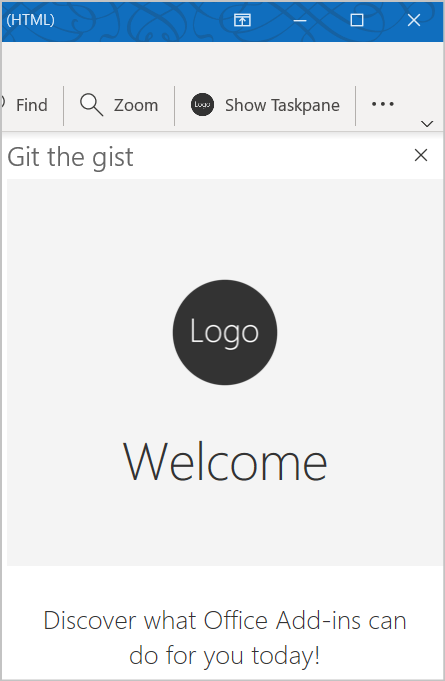
如果所有内容都已正确设置,任务窗格将打开并呈现加载项的欢迎页。
当您想要停止本地 Web 服务器并卸载加载项时,请按照适用的说明操作:
要停止服务器,请运行以下命令。 如果使用
npm start了 ,以下命令也应卸载加载项。npm stop如果手动旁加载了加载项,请参阅 删除旁加载的外接程序。
定义按钮
至此,已经验证基本外接程序可正常运行,你可以对其进行自定义以添加更多功能。 默认情况下,清单仅定义“读取邮件”窗口的按钮。 让我们更新清单以从“读取邮件”窗口中删除按钮,并为“撰写邮件”窗口定义两个新按钮:
显示 Gist 列表:打开任务窗格的按钮
插入默认 gist:用于调用函数的按钮
该过程取决于使用的清单。
请执行以下步骤:
打开 manifest.json 文件。
在数组中
"extensions.runtimes",有两个运行时对象。 对于第二个,使用"id"of"CommandsRuntime",将 更改"actions.id"为"insertDefaultGist"。 这是在后面的步骤中创建的函数的名称。 完成后,运行时对象应如下所示:{ "id": "CommandsRuntime", "type": "general", "code": { "page": "https://localhost:3000/commands.html" }, "actions": [ { "id": "insertDefaultGist", "type": "executeFunction" } ] }将数组中的
"extensions.ribbons.contexts"项目更改为"mailCompose". 这意味着按钮仅显示在新邮件或回复窗口中。"contexts": [ "mailCompose" ],"extensions.ribbons.tabs.groups"数组中有一个组对象。 对此对象进行以下更改。- 将属性更改
"id"为"msgComposeCmdGroup". - 将属性更改
"label"为“Git the gist”。
- 将属性更改
同一组对象具有一个
"controls"包含两个控制对象的数组。 我们需要对每个脚本的 JSON 进行更改。 在第一个步骤中,执行以下步骤。- 更改
"id"为"msgComposeShowGistListTaskPane". - 更改
"label"为“显示 gist 列表”。 - 更改
"supertip.title"为“显示 gist 列表”。 - 更改
"supertip.description"为“显示 gist 列表并允许将其内容插入当前邮件”。
- 更改
在第二个控件对象中,执行以下步骤。
- 更改
"id"为"msgComposeInsertDefaultGist". - 更改
"label"为“插入默认 Gist”。 - 更改
"supertip.title"为“插入默认 Gist”。 - 更改
"supertip.description"为“将标记为默认值的 gist 内容插入当前邮件中。” - 更改
"actionId"为"insertDefaultGist". 这与在先前步骤中设置的 相"action.id""CommandsRuntime"匹配。
完成后,
"ribbons"属性应如下所示:"ribbons": [ { "contexts": [ "mailCompose" ], "tabs": [ { "builtInTabId": "TabDefault", "groups": [ { "id": "msgComposeCmdGroup", "label": "Git the gist", "icons": [ { "size": 16, "file": "https://localhost:3000/assets/icon-16.png" }, { "size": 32, "file": "https://localhost:3000/assets/icon-32.png" }, { "size": 80, "file": "https://localhost:3000/assets/icon-80.png" } ], "controls": [ { "id": "msgComposeInsertGist", "type": "button", "label": "Display gist list", "icons": [ { "size": 16, "file": "https://localhost:3000/assets/icon-16.png" }, { "size": 32, "file": "https://localhost:3000/assets/icon-32.png" }, { "size": 80, "file": "https://localhost:3000/assets/icon-80.png" } ], "supertip": { "title": "Display gist list", "description": "Displays a list of your gists and allows you to insert their contents into the current message." }, "actionId": "TaskPaneRuntimeShow" }, { "id": "msgComposeInsertDefaultGist", "type": "button", "label": "Insert default gist", "icons": [ { "size": 16, "file": "https://localhost:3000/assets/icon-16.png" }, { "size": 32, "file": "https://localhost:3000/assets/icon-32.png" }, { "size": 80, "file": "https://localhost:3000/assets/icon-80.png" } ], "supertip": { "title": "Insert default gist", "description": "Inserts the content of the gist you mark as default into the current message." }, "actionId": "insertDefaultGist" } ] } ] } ] } ]- 更改
将更改保存到清单。
重新安装外接程序
必须重新安装外接程序,清单更改才能生效。
如果 Web 服务器正在运行,请运行以下命令。
npm stop运行以下命令以启动本地 Web 服务器并自动旁加载外接程序。
npm start
重新安装加载项后,可以通过检查命令“显示 gist 列表 ”和“在撰写消息窗口中 插入默认 gist ”来验证它是否已成功安装。 请注意,即使你选择了其中任何一项,系统也不会执行任何操作,因为你尚未完成生成此外接程序的操作。
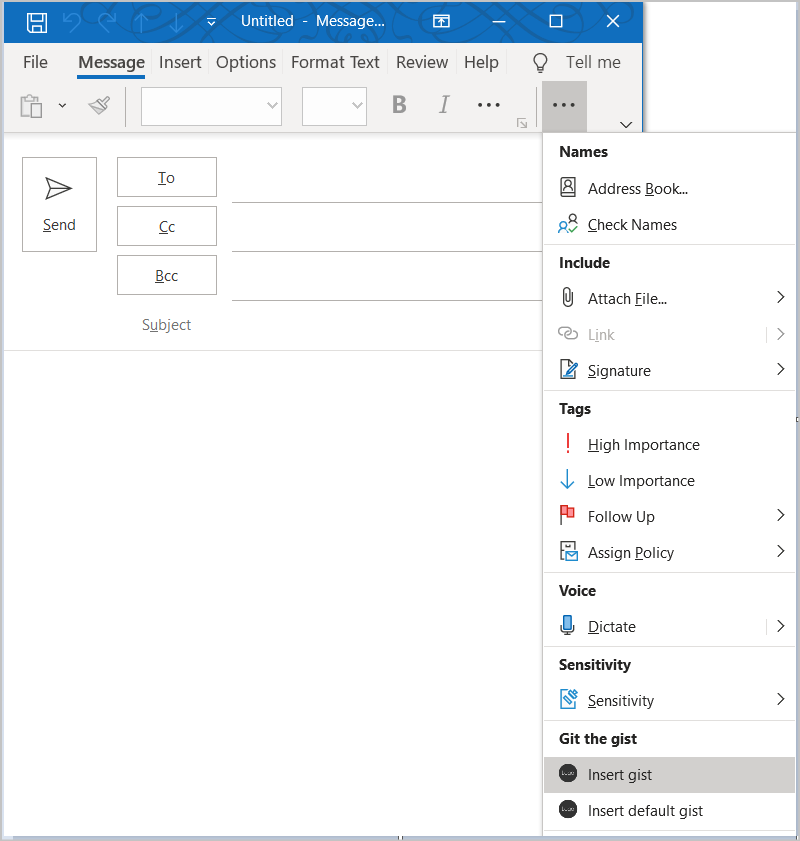
如果在经典 Outlook on Windows 或 Outlook on Mac 中运行此加载项,应该会在撰写邮件窗口的功能区上看到两个新按钮:“ 显示 Gist 列表” 和 “插入默认 Gist”。
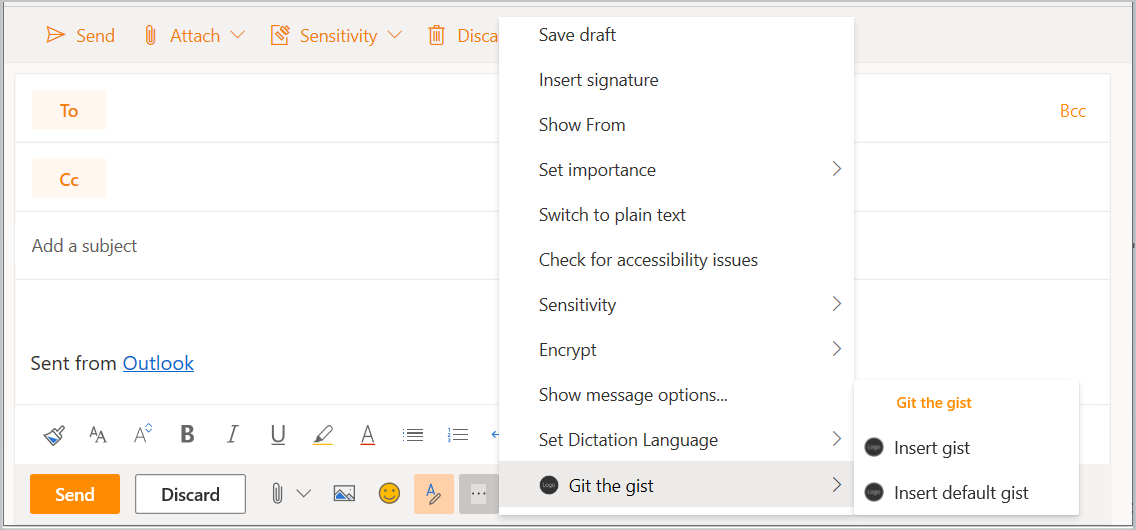
如果在 Outlook 网页版或新的 Outlook Windows 版中运行此加载项,请从撰写邮件窗口的功能区中选择“应用”,然后选择 Git the Gist 以查看“显示 Gist 列表”和“插入默认 Gist ”选项。
提示
有关如何在功能区上查找加载项的指南,请参阅在 Outlook 中使用加载项。
实现首次运行体验
此加载项需要能够从 GitHub 帐户读取 gist 并标识所选的默认 gist。 为了实现这些目标,该加载项会提示您提供 GitHub 用户名,并从现有 Gist 集合中选择默认 Gist。 完成本节中的步骤,实现首次运行体验,该体验显示对话框以收集此信息。
创建对话框的 UI
让我们首先为对话框创建 UI。
在 ./src 文件夹中,创建名为 settings 的新子文件夹。
在 ./src/settings 文件夹中,创建一个名为 dialog.html的文件。
在 dialog.html中,添加以下标记来定义一个基本表单,其中包含 GitHub 用户名的文本输入和将通过 JavaScript 填充的 gist 的空列表。
<!doctype html>
<html>

<head>
  <meta charset="UTF-8" />
  <meta http-equiv="X-UA-Compatible" content="IE=Edge" />
  <title>Settings</title>

  <!-- Office JavaScript API -->
  <script type="text/javascript" src="https://officeapis.public.onecdn.static.microsoft/1/office.js"></script>

  <!-- For more information on Fluent UI, visit https://developer.microsoft.com/fluentui. -->
  <link rel="stylesheet"
    href="https://res-1.cdn.office.net/files/fabric-cdn-prod_20230815.002/office-ui-fabric-core/11.1.0/css/fabric.min.css" />

  <!-- Template styles -->
  <link href="dialog.css" rel="stylesheet" type="text/css" />
</head>

<body class="ms-font-l">
  <main>
    <section class="ms-font-m ms-fontColor-neutralPrimary">
      <div class="not-configured-warning ms-MessageBar ms-MessageBar--warning">
        <div class="ms-MessageBar-content">
          <div class="ms-MessageBar-icon">
            <i class="ms-Icon ms-Icon--Info"></i>
          </div>
          <div class="ms-MessageBar-text">
            Oops! It looks like you haven't configured <strong>Git the gist</strong> yet.
            <br />
            Please configure your GitHub username and select a default gist, then try that action again!
          </div>
        </div>
      </div>
      <div class="ms-font-xxl">Settings</div>
      <div class="ms-Grid">
        <div class="ms-Grid-row">
          <div class="ms-TextField">
            <label class="ms-Label">GitHub Username</label>
            <input class="ms-TextField-field" id="github-user" type="text" value=""
              placeholder="Please enter your GitHub username" />
          </div>
        </div>
        <div class="error-display ms-Grid-row">
          <div class="ms-font-l ms-fontWeight-semibold">An error occurred:</div>
          <pre><code id="error-text"></code></pre>
        </div>
        <div class="gist-list-container ms-Grid-row">
          <div class="list-title ms-font-xl ms-fontWeight-regular">Choose Default Gist</div>
          <form>
            <div id="gist-list"></div>
          </form>
        </div>
      </div>
      <div class="ms-Dialog-actions">
        <div class="ms-Dialog-actionsRight">
          <button class="ms-Dialog-action ms-Button ms-Button--primary" id="settings-done" disabled>
            <span class="ms-Button-label">Done</span>
          </button>
        </div>
      </div>
    </section>
  </main>
  <script type="text/javascript" src="../helpers/gist-api.js"></script>
</body>

</html>
你可能已经注意到,HTML 文件引用了一个尚不存在的 JavaScript 文件 gist-api.js。 此文件将在“ 从 GitHub 提取数据 ”部分中创建。
保存所做的更改。
接下来,在 ./src/settings 文件夹中创建名为 dialog.css 的文件。
在 dialog.css 中,添加以下代码以指定 dialog.html使用的样式。
body {
  background-color: #ffffff;
}

section {
  margin: 10px 20px;
}

.not-configured-warning {
  display: none;
}

.error-display {
  display: none;
}

.gist-list-container {
  margin: 10px -8px;
  display: none;
}

.list-title {
  border-bottom: 1px solid #a6a6a6;
  padding-bottom: 5px;
}

ul {
  margin-top: 10px;
}

.ms-ListItem-secondaryText,
.ms-ListItem-tertiaryText {
  padding-left: 15px;
}
保存所做的更改。
开发对话框的功能
现在你已经定义了对话框 UI,可以编写使其实际执行某些操作的代码。
在 ./src/settings 文件夹中,创建一个名为 dialog.js的文件。
添加以下代码。
(function () {
  "use strict";

  // The onReady function must be run each time a new page is loaded.
  Office.onReady(function () {
    function initializeDialog() {
      if (window.location.search) {
        // Check if warning should be displayed.
        const warn = getParameterByName("warn");
        if (warn) {
          document.querySelector(".not-configured-warning").style.display = "block";
        } else {
          // See if the config values were passed.
          // If so, pre-populate the values.
          const user = getParameterByName("gitHubUserName");
          const gistId = getParameterByName("defaultGistId");

          document.getElementById("github-user").value = user;
          loadGists(user, function (success) {
            if (success) {
              document.querySelectorAll(".ms-ListItem").forEach(function (item) {
                item.classList.remove("is-selected");
                if (item.value === gistId) {
                  item.classList.add("is-selected");
                  item.checked = true;
                }
              });
              document.getElementById("settings-done").disabled = false;
            }
          });
        }
      }

      // When the GitHub username changes, try to load gists.
      document.getElementById("github-user").addEventListener("change", function () {
        document.getElementById("gist-list").textContent = "";
        const ghUser = document.getElementById("github-user").value;
        if (ghUser.length > 0) {
          loadGists(ghUser);
        }
      });

      // When the Done button is selected, send the values back to the caller as a serialized object.
      document.getElementById("settings-done").addEventListener("click", function () {
        const settings = {};

        settings.gitHubUserName = document.getElementById("github-user").value;

        const selectedGist = document.querySelector(".ms-ListItem.is-selected");
        if (selectedGist) {
          settings.defaultGistId = selectedGist.value;

          sendMessage(JSON.stringify(settings));
        }
      });
    }

    if (document.readyState === "loading") {
      document.addEventListener("DOMContentLoaded", initializeDialog);
    } else {
      initializeDialog();
    }
  });

  // Load gists using the GitHub API and build the list.
  function loadGists(user, callback) {
    getUserGists(user, function (gists, error) {
      if (error) {
        document.querySelector(".gist-list-container").style.display = "none";
        document.getElementById("error-text").textContent = JSON.stringify(error, null, 2);
        document.querySelector(".error-display").style.display = "block";
        if (callback) callback(false);
      } else {
        document.querySelector(".error-display").style.display = "none";
        buildGistList(document.getElementById("gist-list"), gists, onGistSelected);
        document.querySelector(".gist-list-container").style.display = "block";
        if (callback) callback(true);
      }
    });
  }

  function onGistSelected() {
    document.querySelectorAll(".ms-ListItem").forEach(function (item) {
      item.classList.remove("is-selected");
      item.checked = false;
    });
    const selectedItem = this.querySelector(".ms-ListItem");
    selectedItem.classList.add("is-selected");
    selectedItem.checked = true;
    document.querySelector(".not-configured-warning").style.display = "none";
    document.getElementById("settings-done").disabled = false;
  }

  function sendMessage(message) {
    Office.context.ui.messageParent(message);
  }

  function getParameterByName(name, url) {
    return new URL(url || window.location.href).searchParams.get(name);
  }
})();
保存所做的更改。
更新 webpack 配置设置
最后,打开在项目的根目录中找到的 webpack.config.js 文件,并完成以下步骤。
在
config对象内找到entry对象并为dialog添加新条目。dialog: "./src/settings/dialog.js",完成此操作后,新
entry对象将如下所示:entry: { polyfill: ["core-js/stable", "regenerator-runtime/runtime"], taskpane: ["./src/taskpane/taskpane.js", "./src/taskpane/taskpane.html"], commands: "./src/commands/commands.js", dialog: "./src/settings/dialog.js", },在
config对象中找到plugins数组。 在new CopyWebpackPlugin对象的patterns数组中,为 taskpane.css 和 dialog.css 添加新条目。{ from: "./src/taskpane/taskpane.css", to: "taskpane.css", }, { from: "./src/settings/dialog.css", to: "dialog.css", },完成此操作后,
new CopyWebpackPlugin对象将如下所示。 请注意,如果加载项仅使用插件清单,则会有一些细微的差异。new CopyWebpackPlugin({ patterns: [ { from: "./src/taskpane/taskpane.css", to: "taskpane.css", }, { from: "./src/settings/dialog.css", to: "dialog.css", }, { from: "assets/*", to: "assets/[name][ext][query]", }, { from: "manifest*.*", to: "[name]" + "[ext]", transform(content) { if (dev) { return content; } else { return content.toString().replace(new RegExp(urlDev, "g"), urlProd); } }, }, ]}),在
config对象内的同一plugins数组中,将此新对象添加到数组的末尾。new HtmlWebpackPlugin({ filename: "dialog.html", template: "./src/settings/dialog.html", chunks: ["polyfill", "dialog"] })完成此操作后,新
plugins数组如下所示。 请注意,如果加载项仅使用插件清单,则会有一些细微的差异。plugins: [ new HtmlWebpackPlugin({ filename: "taskpane.html", template: "./src/taskpane/taskpane.html", chunks: ["polyfill", "taskpane"], }), new CopyWebpackPlugin({ patterns: [ { from: "./src/taskpane/taskpane.css", to: "taskpane.css", }, { from: "./src/settings/dialog.css", to: "dialog.css", }, { from: "assets/*", to: "assets/[name][ext][query]", }, { from: "manifest*.*", to: "[name]." + buildType + "[ext]", transform(content) { if (dev) { return content; } else { return content.toString().replace(new RegExp(urlDev, "g"), urlProd); } }, }, ], }), new HtmlWebpackPlugin({ filename: "commands.html", template: "./src/commands/commands.html", chunks: ["polyfill", "commands"], }), new HtmlWebpackPlugin({ filename: "dialog.html", template: "./src/settings/dialog.html", chunks: ["polyfill", "dialog"] }) ],
从 GitHub 提取数据
你刚刚创建的 dialog.js 文件指定外接程序应在 change 事件触发时为 GitHub 用户名字段加载 gist。 若要从 GitHub 检索 Gist,需要使用 GitHub Gists API。
在 ./src 文件夹中,创建名为 helpers 的新子文件夹。
在 ./src/helpers 文件夹中,创建名为 gist-api.js的文件。
在 gist-api.js中,添加以下代码以从 GitHub 检索 gist 并生成 gist 列表。
function getUserGists(user, callback) {
  const requestUrl = "https://api.github.com/users/" + encodeURIComponent(user) + "/gists";

  fetchJson(requestUrl, callback);
}

function buildGistList(parent, gists, clickFunc) {
  gists.forEach(function (gist) {
    const listItem = document.createElement("div");
    parent.appendChild(listItem);

    const radioItem = document.createElement("input");
    radioItem.classList.add("ms-ListItem", "is-selectable");
    radioItem.type = "radio";
    radioItem.name = "gists";
    radioItem.tabIndex = 0;
    radioItem.value = gist.id;
    listItem.appendChild(radioItem);

    const descPrimary = document.createElement("span");
    descPrimary.classList.add("ms-ListItem-primaryText");
    descPrimary.textContent = gist.description;
    listItem.appendChild(descPrimary);

    const descSecondary = document.createElement("span");
    descSecondary.classList.add("ms-ListItem-secondaryText");
    descSecondary.textContent = " - " + buildFileList(gist.files);
    listItem.appendChild(descSecondary);

    const updated = new Date(gist.updated_at);

    const descTertiary = document.createElement("span");
    descTertiary.classList.add("ms-ListItem-tertiaryText");
    descTertiary.textContent = " - Last updated " + updated.toLocaleString();
    listItem.appendChild(descTertiary);

    listItem.addEventListener("click", clickFunc);
  });
}

function buildFileList(files) {
  let fileList = "";

  for (let file in files) {
    if (files.hasOwnProperty(file)) {
      if (fileList.length > 0) {
        fileList = fileList + ", ";
      }

      fileList = fileList + files[file].filename + " (" + files[file].language + ")";
    }
  }

  return fileList;
}
保存所做的更改。
运行以下命令以重建项目。
npm run build
实现无 UI 按钮
此加载项的 “插入默认 Gist ”按钮是一个无 UI 的按钮,可调用 JavaScript 函数,而不是像许多加载项按钮那样打开任务窗格。 选择“ 插入默认 Gist ”按钮时,相应的 JavaScript 函数会检查是否已配置该加载项。
如果已配置加载项,该函数将加载您选择为默认值的 gist 的内容,并将其插入到消息正文中。
如果尚未配置加载项,则设置对话框将提示您输入 GitHub 用户名。
更新函数文件 (HTML)
无 UI 按钮调用的函数必须都在对应的外形规格清单的 <FunctionFile> 元素指定的文件中进行定义。 此外接程序的清单指定 https://localhost:3000/commands.html 作为函数文件。
打开 ./src/commands/commands.html 并将全部内容替换为以下标记。
<!doctype html>
<html>

<head>
  <meta charset="UTF-8" />
  <meta http-equiv="X-UA-Compatible" content="IE=Edge" />

  <!-- Office JavaScript API -->
  <script type="text/javascript" src="https://officeapis.public.onecdn.static.microsoft/1/office.js"></script>

  <script type="text/javascript" src="../helpers/addin-config.js"></script>
  <script type="text/javascript" src="../helpers/gist-api.js"></script>
</head>

<body>
  <!-- NOTE: The body is empty on purpose. Since functions in commands.js are
       invoked via a button, there is no UI to render. -->
</body>

</html>
你可能已注意到,HTML 文件引用了尚不存在的 JavaScript 文件 addin-config.js。 将在本教程稍后的“创建文件以管理配置设置”部分中创建此文件。
保存所做的更改。
更新函数文件 (JavaScript)
打开文件 ./src/commands/commands.js 并使用以下代码替换全部内容。 请注意,如果 insertDefaultGist 函数确定尚未配置加载项,则会将参数
?warn=1添加到对话框 URL。 这样做会使设置对话框呈现在 ./src/settings/dialog.html中定义的消息栏,以告诉你为什么看到该对话框。let config; let btnEvent; // The onReady function must be run each time a new page is loaded. Office.onReady(); function showError(error) { Office.context.mailbox.item.notificationMessages.replaceAsync( "github-error", { type: "errorMessage", message: error, }, function (result) {} ); } let settingsDialog; function insertDefaultGist(event) { config = getConfig(); // Check if the add-in has been configured. if (config && config.defaultGistId) { // Get the default gist content and insert. try { getGist(config.defaultGistId, function (gist, error) { if (gist) { buildBodyContent(gist, function (content, error) { if (content) { Office.context.mailbox.item.body.setSelectedDataAsync( content, { coercionType: Office.CoercionType.Html }, function (result) { event.completed(); } ); } else { showError(error); event.completed(); } }); } else { showError(error); event.completed(); } }); } catch (err) { showError(err); event.completed(); } } else { // Save the event object so we can finish up later. btnEvent = event; // Not configured yet, display settings dialog with warn=1 to display warning. const url = new URL("dialog.html?warn=1", window.location.href).toString(); const dialogOptions = { width: 20, height: 40, displayInIframe: true }; Office.context.ui.displayDialogAsync(url, dialogOptions, function (result) { settingsDialog = result.value; settingsDialog.addEventHandler(Office.EventType.DialogMessageReceived, receiveMessage); settingsDialog.addEventHandler(Office.EventType.DialogEventReceived, dialogClosed); }); } } // Register the function. Office.actions.associate("insertDefaultGist", insertDefaultGist); function receiveMessage(message) { config = JSON.parse(message.message); setConfig(config, function (result) { settingsDialog.close(); settingsDialog = null; btnEvent.completed(); btnEvent = null; }); } function dialogClosed(message) { settingsDialog = null; btnEvent.completed(); btnEvent = null; }保存所做的更改。
创建文件以管理配置设置
在 ./src/helpers 文件夹中,创建名为 addin-config.js 的文件,并添加以下代码。 此代码使用 RoamingSettings 对象来获取和设置配置值。
function getConfig() {
  const config = {};

  config.gitHubUserName = Office.context.roamingSettings.get('gitHubUserName');
  config.defaultGistId = Office.context.roamingSettings.get('defaultGistId');

  return config;
}

function setConfig(config, callback) {
  Office.context.roamingSettings.set('gitHubUserName', config.gitHubUserName);
  Office.context.roamingSettings.set('defaultGistId', config.defaultGistId);

  Office.context.roamingSettings.saveAsync(callback);
}
保存所做的更改。
创建新函数来处理 gist
打开 ./src/helpers/gist-api.js 文件并添加以下函数。 请注意以下事项:
如果 Gist 包含 HTML,则加载项会将 HTML 原样插入到邮件正文中。
如果 Gist 包含 Markdown,则加载项使用 GitHub Markdown API 将 Markdown 转换为 HTML,然后将生成的 HTML 插入到消息正文中。
如果 gist 包含 HTML 或 Markdown 以外的任何内容,则外接程序会将其作为代码片段插入到邮件正文中。
function getGist(gistId, callback) {
  const requestUrl = "https://api.github.com/gists/" + encodeURIComponent(gistId);

  fetchJson(requestUrl, callback);
}

function fetchJson(url, callback) {
  fetch(url, { headers: { Accept: "application/vnd.github+json" } })
    .then(function (response) {
      if (!response.ok) {
        throw new Error("GitHub request failed: " + response.status + " " + response.statusText);
      }
      return response.json();
    })
    .then(function (data) {
      callback(data);
    })
    .catch(function (error) {
      callback(null, error);
    });
}

function buildBodyContent(gist, callback) {
  // Find the first non-truncated file in the gist and use it.
  for (let filename in gist.files) {
    if (gist.files.hasOwnProperty(filename)) {
      const file = gist.files[filename];
      if (!file.truncated) {
        switch (file.language) {
          case "HTML":
            // Insert as is.
            callback(file.content);
            break;
          case "Markdown":
            // Use GitHub's renderer so gist Markdown matches github.com.
            fetch("https://api.github.com/markdown", {
              method: "POST",
              headers: {
                Accept: "application/vnd.github+json",
                "Content-Type": "application/json",
              },
              body: JSON.stringify({ text: file.content, mode: "gfm" }),
            })
              .then(function (response) {
                if (!response.ok) {
                  throw new Error("GitHub Markdown request failed: " + response.status + " " + response.statusText);
                }
                return response.text();
              })
              .then(function (html) {
                callback(html);
              })
              .catch(function (error) {
                callback(null, error);
              });
            break;
          default:
            // Insert contents as a <code> block.
            const codeElement = document.createElement("code");
            codeElement.textContent = file.content;
            const preElement = document.createElement("pre");
            preElement.appendChild(codeElement);
            callback(preElement.outerHTML);
        }
        return;
      }
    }
  }
  callback(null, "No suitable file found in the gist");
}
保存所做的更改。
测试“插入默认 gist”按钮
如果本地 Web 服务器尚未运行,请从命令提示符运行
npm start。打开 Outlook 并撰写一封新邮件。
在“撰写邮件”窗口中,选择“插入默认 gist”。 将出现一个对话框,提示您设置 GitHub 用户名。
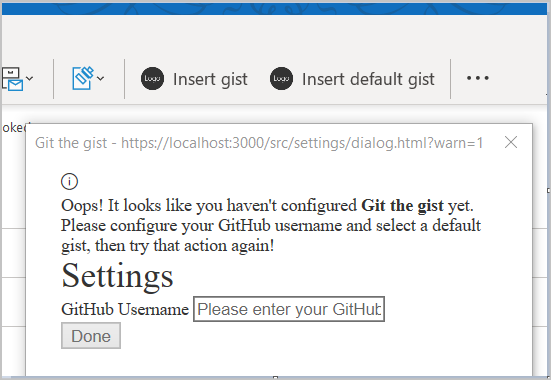
在设置对话框中,输入您的 GitHub 用户名,然后 按 Tab 键或单击对话框中的其他位置以调用 更改 事件。 此操作将加载公共 Gist 列表。 选择要作为默认值的 Gist,然后选择“ 完成”。
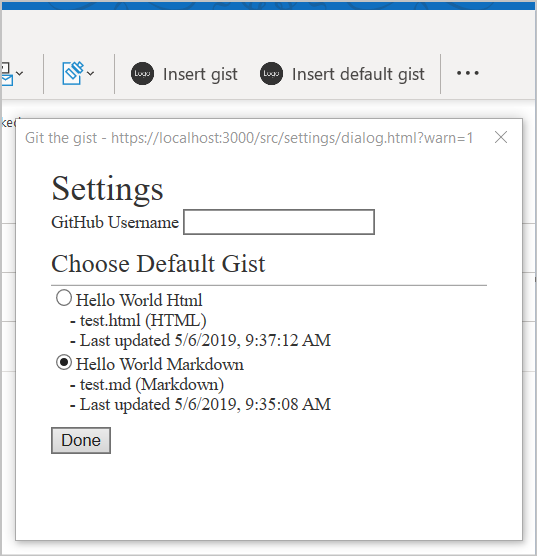
重新选择“插入默认 gist”按钮。 这一次,默认 gist 的内容插入到消息正文中。
注意
Windows 上的经典 Outlook:若要获取最新设置,可能需要关闭并重新打开撰写邮件窗口。
实现任务窗格
此加载项的 “显示 Gist 列表 ”按钮将打开一个任务窗格并显示你的 Gist。 然后,可以选择要插入邮件正文的 gist 之一。 如果尚未配置加载项,系统将提示你执行此操作。
为任务窗格创建 HTML
在创建的项目中,任务窗格 HTML 已在文件 ./src/taskpane/taskpane.html 中指定。 打开该文件并将全部内容替换为以下标记。
<!doctype html>
<html>

<head>
  <meta charset="UTF-8" />
  <meta http-equiv="X-UA-Compatible" content="IE=Edge" />
  <meta name="viewport" content="width=device-width, initial-scale=1" />
  <title>Contoso Task Pane Add-in</title>

  <!-- Office JavaScript API -->
  <script type="text/javascript" src="https://officeapis.public.onecdn.static.microsoft/1/office.js"></script>

  <!-- For more information on Fluent UI, visit https://developer.microsoft.com/fluentui. -->
  <link rel="stylesheet"
    href="https://res-1.cdn.office.net/files/fabric-cdn-prod_20230815.002/office-ui-fabric-core/11.1.0/css/fabric.min.css" />

  <!-- Template styles -->
  <link href="taskpane.css" rel="stylesheet" type="text/css" />
</head>

<body class="ms-font-l ms-landing-page">
  <main class="ms-landing-page__main">
    <section class="ms-landing-page__content ms-font-m ms-fontColor-neutralPrimary">
      <div id="not-configured" style="display: none">
        <div class="centered ms-font-xxl ms-u-textAlignCenter">Welcome!</div>
        <div class="ms-font-xl" id="settings-prompt">
          Please choose the <strong>Settings</strong> icon at the bottom of this window to configure this add-in.
        </div>
      </div>
      <div id="gist-list-container" style="display: none">
        <form>
          <div id="gist-list"></div>
        </form>
      </div>
      <div id="error-display" style="display: none"
        class="ms-u-borderBase ms-fontColor-error ms-font-m ms-bgColor-error ms-borderColor-error"></div>
    </section>
    <button class="ms-Button ms-Button--primary" id="insert-button" tabindex="0" disabled>
      <span class="ms-Button-label">Insert</span>
    </button>
  </main>
  <footer class="ms-landing-page__footer ms-bgColor-themePrimary">
    <div class="ms-landing-page__footer--left">
      <img src="../../assets/logo-filled.png" />
      <h1 class="ms-font-xl ms-fontWeight-semilight ms-fontColor-white">Git the gist</h1>
    </div>
    <div id="settings-icon" class="ms-landing-page__footer--right" aria-label="Settings" tabindex="0">
      <i class="ms-Icon enlarge ms-Icon--Settings ms-fontColor-white"></i>
    </div>
  </footer>
  <script type="text/javascript" src="../helpers/addin-config.js"></script>
  <script type="text/javascript" src="../helpers/gist-api.js"></script>
</body>

</html>
保存所做的更改。
为任务窗格创建 CSS
在创建的项目中,任务窗格 CSS 已在文件 ./src/taskpane/taskpane.css 中指定。 打开该文件并将全部内容替换为以下代码。
/* Copyright (c) Microsoft. All rights reserved. Licensed under the MIT license. See full license in root of repo. */
html,
body {
  width: 100%;
  height: 100%;
  margin: 0;
  padding: 0;
  overflow: auto;
}

body {
  position: relative;
  font-size: 16px;
  background-color: #ffffff;
}

main {
  height: 100%;
  overflow-y: auto;
}

footer {
  width: 100%;
  position: relative;
  bottom: 0;
  margin-top: 10px;
}

p,
h1,
h2,
h3,
h4,
h5,
h6 {
  margin: 0;
  padding: 0;
}

ul {
  padding: 0;
}

#settings-prompt {
  margin: 10px 0;
}

#error-display {
  padding: 10px;
}

#insert-button {
  margin: 0 10px;
}

.clearfix {
  display: block;
  clear: both;
  height: 0;
}

.pointerCursor {
  cursor: pointer;
}

.invisible {
  visibility: hidden;
}

.undisplayed {
  display: none;
}

.ms-Icon.enlarge {
  position: relative;
  font-size: 20px;
  top: 4px;
}

.ms-ListItem-secondaryText,
.ms-ListItem-tertiaryText {
  padding-left: 15px;
}

.ms-landing-page {
  display: -webkit-flex;
  display: flex;
  -webkit-flex-direction: column;
  flex-direction: column;
  -webkit-flex-wrap: nowrap;
  flex-wrap: nowrap;
  height: 100%;
}

.ms-landing-page__main {
  display: -webkit-flex;
  display: flex;
  -webkit-flex-direction: column;
  flex-direction: column;
  -webkit-flex-wrap: nowrap;
  flex-wrap: nowrap;
  -webkit-flex: 1 1 0;
  flex: 1 1 0;
  height: 100%;
}

.ms-landing-page__content {
  display: -webkit-flex;
  display: flex;
  -webkit-flex-direction: column;
  flex-direction: column;
  -webkit-flex-wrap: nowrap;
  flex-wrap: nowrap;
  height: 100%;
  -webkit-flex: 1 1 0;
  flex: 1 1 0;
  padding: 20px;
}

.ms-landing-page__content h2 {
  margin-bottom: 20px;
}

.ms-landing-page__footer {
  display: -webkit-inline-flex;
  display: inline-flex;
  -webkit-justify-content: center;
  justify-content: center;
  -webkit-align-items: center;
  align-items: center;
}

.ms-landing-page__footer--left {
  transition: background ease 0.1s, color ease 0.1s;
  display: -webkit-inline-flex;
  display: inline-flex;
  -webkit-justify-content: flex-start;
  justify-content: flex-start;
  -webkit-align-items: center;
  align-items: center;
  -webkit-flex: 1 0 0px;
  flex: 1 0 0px;
  padding: 20px;
}

.ms-landing-page__footer--left:active {
  cursor: default;
}

.ms-landing-page__footer--left--disabled {
  opacity: 0.6;
  pointer-events: none;
  cursor: not-allowed;
}

.ms-landing-page__footer--left--disabled:active,
.ms-landing-page__footer--left--disabled:hover {
  background: transparent;
}

.ms-landing-page__footer--left img {
  width: 40px;
  height: 40px;
}

.ms-landing-page__footer--left h1 {
  -webkit-flex: 1 0 0px;
  flex: 1 0 0px;
  margin-left: 15px;
  text-align: left;
  width: auto;
  max-width: auto;
  overflow: hidden;
  white-space: nowrap;
  text-overflow: ellipsis;
}

.ms-landing-page__footer--right {
  transition: background ease 0.1s, color ease 0.1s;
  padding: 29px 20px;
}

.ms-landing-page__footer--right:active,
.ms-landing-page__footer--right:hover {
  background: #005ca4;
  cursor: pointer;
}

.ms-landing-page__footer--right:active {
  background: #005ca4;
}

.ms-landing-page__footer--right--disabled {
  opacity: 0.6;
  pointer-events: none;
  cursor: not-allowed;
}

.ms-landing-page__footer--right--disabled:active,
.ms-landing-page__footer--right--disabled:hover {
  background: transparent;
}
保存所做的更改。
为任务窗格指定 JavaScript
在创建的项目中,任务窗格 JavaScript 已在文件 ./src/taskpane/taskpane.js 中指定。 打开该文件并将全部内容替换为以下代码。
(function () {
  "use strict";

  let config;
  let settingsDialog;

  Office.onReady(function () {
    function initializeTaskPane() {
      config = getConfig();

      // Check if add-in is configured.
      if (config && config.gitHubUserName) {
        // If configured, load the gist list.
        loadGists(config.gitHubUserName);
      } else {
        // Not configured yet.
        document.getElementById("not-configured").style.display = "";
      }

      // When insert button is selected, build the content and insert into the body.
      document.getElementById("insert-button").addEventListener("click", function () {
        const selectedGist = document.querySelector(".ms-ListItem.is-selected");
        const gistId = selectedGist && selectedGist.value;
        getGist(gistId, function (gist, error) {
          if (gist) {
            buildBodyContent(gist, function (content, error) {
              if (content) {
                Office.context.mailbox.item.body.setSelectedDataAsync(
                  content,
                  { coercionType: Office.CoercionType.Html },
                  function (result) {
                    if (result.status === Office.AsyncResultStatus.Failed) {
                      showError("Could not insert gist: " + result.error.message);
                    }
                  }
                );
              } else {
                showError("Could not create insertable content: " + error);
              }
            });
          } else {
            showError("Could not retrieve gist: " + error);
          }
        });
      });

      // When the settings icon is selected, open the settings dialog.
      document.getElementById("settings-icon").addEventListener("click", function () {
        // Display settings dialog.
        const url = new URL("dialog.html", window.location.href);
        if (config) {
          // If the add-in has already been configured, pass the existing values to the dialog.
          url.searchParams.set("gitHubUserName", config.gitHubUserName);
          url.searchParams.set("defaultGistId", config.defaultGistId);
        }

        const dialogOptions = { width: 20, height: 40, displayInIframe: true };

        Office.context.ui.displayDialogAsync(url.toString(), dialogOptions, function (result) {
          settingsDialog = result.value;
          settingsDialog.addEventHandler(Office.EventType.DialogMessageReceived, receiveMessage);
          settingsDialog.addEventHandler(Office.EventType.DialogEventReceived, dialogClosed);
        });
      });
    }

    if (document.readyState === "loading") {
      document.addEventListener("DOMContentLoaded", initializeTaskPane);
    } else {
      initializeTaskPane();
    }
  });

  function loadGists(user) {
    document.getElementById("error-display").style.display = "none";
    document.getElementById("not-configured").style.display = "none";
    document.getElementById("gist-list-container").style.display = "";

    getUserGists(user, function (gists, error) {
      if (error) {
      } else {
        const gistList = document.getElementById("gist-list");
        gistList.textContent = "";
        buildGistList(gistList, gists, onGistSelected);
      }
    });
  }

  function onGistSelected() {
    document.getElementById("insert-button").disabled = false;
    document.querySelectorAll(".ms-ListItem").forEach(function (item) {
      item.classList.remove("is-selected");
      item.checked = false;
    });
    const selectedItem = this.querySelector(".ms-ListItem");
    selectedItem.classList.add("is-selected");
    selectedItem.checked = true;
  }

  function showError(error) {
    document.getElementById("not-configured").style.display = "none";
    document.getElementById("gist-list-container").style.display = "none";
    const errorDisplay = document.getElementById("error-display");
    errorDisplay.textContent = error;
    errorDisplay.style.display = "";
  }

  function receiveMessage(message) {
    config = JSON.parse(message.message);
    setConfig(config, function (result) {
      settingsDialog.close();
      settingsDialog = null;
      loadGists(config.gitHubUserName);
    });
  }

  function dialogClosed(message) {
    settingsDialog = null;
  }
})();
保存所做的更改。
测试“显示 Gist 列表”按钮
如果本地 Web 服务器尚未运行,请从命令提示符运行
npm start。打开 Outlook 并撰写一封新邮件。
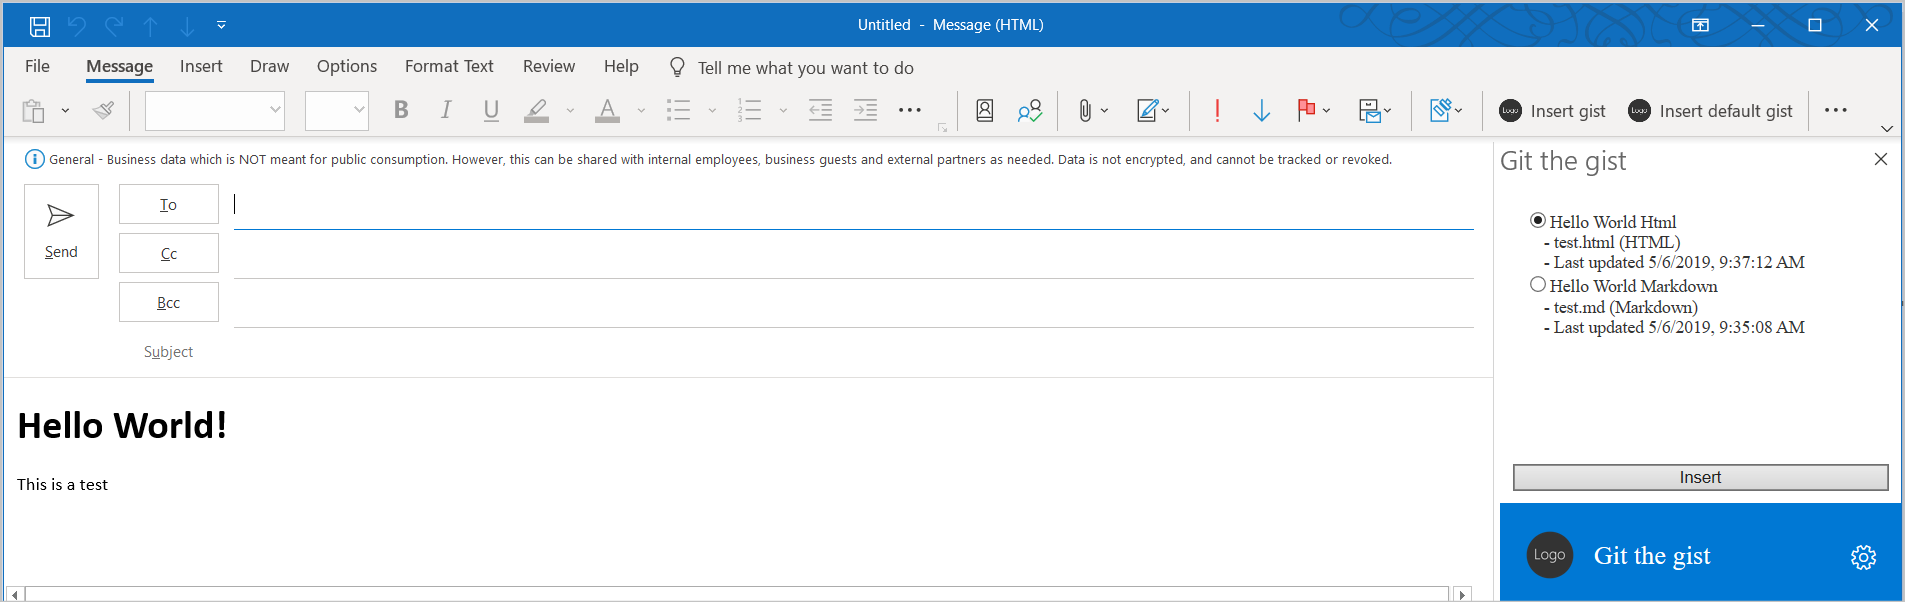
在撰写消息窗口中,选择 “显示 Gist 列表 ”按钮。 此时,将打开一个任务窗格。
在任务窗格中,选择 Hello World Html gist 并选择“插入”以将该 gist 插入到邮件正文中。
后续步骤
在本教程中,你创建了一个可以用于在邮件撰写模式下将内容插入到邮件正文中的 Outlook 外接程序。 若要了解有关开发 Outlook 加载项的详细信息,请继续阅读以下文章。
代码示例
- 已完成的 Outlook 加载项教程:完成本教程的结果。