服务主体是一种身份验证方法,可用于让 Microsoft Entra 应用程序访问 Power BI 服务内容和 API。
创建 Microsoft Entra 应用时,将创建服务主体对象。 借助服务主体对象(也称为服务主体),Microsoft Entra ID 可以对应用进行身份验证。 对应用进行身份验证后,该应用即可访问 Microsoft Entra 租户资源。
为了进行身份验证,服务主体将使用 Microsoft Entra 应用的应用程序 ID 以及下列项之一:
- 一个证书
- 应用程序机密
本文介绍如何使用应用程序 ID 和应用程序机密进行服务主体身份验证。
注意
建议使用证书而不是密钥来保护后端服务。
- 详细了解如何使用机密密钥或证书从 Microsoft Entra ID 获取访问令牌。
- 若要使用证书保护解决方案,请完成本文中的说明,然后按照使用服务主体和证书嵌入 Power BI 内容中所述的步骤进行操作。
方法
若要使用服务主体和应用程序 ID 进行嵌入式分析,请执行以下步骤。 后续部分详细介绍了这些步骤。
-
- 为 Microsoft Entra 应用创建机密。
- 获取应用的应用程序 ID 和应用程序机密。
注意
“第 1 步”中介绍了这些步骤。 有关创建 Microsoft Entra 应用的详细信息,请参阅创建 Microsoft Entra 应用。
创建 Microsoft Entra 安全组。
启用 Power BI 服务管理设置。
将服务主体添加到工作区中。
嵌入内容。
重要
在为服务主体创建 Microsoft Entra 应用程序后,无需在 Azure 门户中为该应用程序配置任何委派权限或应用程序权限。 为服务主体创建 Microsoft Entra 应用程序以访问 Power BI REST API 时,建议避免添加权限。 它们永远不会被使用,并且可能导致难以排查的错误。
步骤 1 - 创建 Microsoft Entra 应用
可以从 Azure 门户或使用 PowerShell 创建Microsoft Entra 应用:
若要从 Azure 门户创建Microsoft Entra 应用和机密,请按照 “注册应用”中的说明进行作。
注意
在离开此窗口后,客户端密码值将隐藏,你将无法再次查看或复制它。
步骤 2 - 创建 Microsoft Entra 安全组
服务主体无权访问你的任何 Power BI 内容和 API。 要授予服务主体访问权限,请在 Microsoft Entra ID 中创建安全组。 然后将创建的服务主体添加到该安全组。
注意
若要为整个组织启用服务主体访问权限,请跳过这一步。
可通过两种方式创建 Microsoft Entra 安全组:
手动创建安全组
若要手动创建 Azure 安全组,请按照“创建基本组”中的说明操作。 目前不要向组添加成员。
使用 PowerShell 创建安全组
以下示例脚本创建新的安全组。 它还将前面创建的服务主体添加到新安全组。
- 运行脚本之前,请将
<app-client-ID>替换为前面为新应用记录的客户端 ID。 - 运行脚本后,记下新安全组的对象 ID,可以在脚本输出中找到该 ID。
# Sign in as an admin.
Connect-MgGraph -Scopes "Application.ReadWrite.All"

# Get the service principal that you created earlier.
$servicePrincipal = Get-MgServicePrincipal -Filter "AppId eq '<app-client-ID>'"

# Create an Azure AD security group.
$group = New-MgGroup -DisplayName "securitygroup1" -SecurityEnabled -MailEnabled:$False -MailNickName "notSet"
Write-Host "Object ID of new security group: " $($group.Id)

# Add the service principal to the group.
New-MgGroupMember -GroupId $($group.Id) -DirectoryObjectId $($servicePrincipal.Id)
第 3 步 - 启用 Power BI 服务管理设置
为了让 Microsoft Entra 应用访问 Power BI 内容和 API,Power BI 管理员需要启用以下设置:
- 在应用中嵌入内容
- 允许服务主体使用 Power BI API
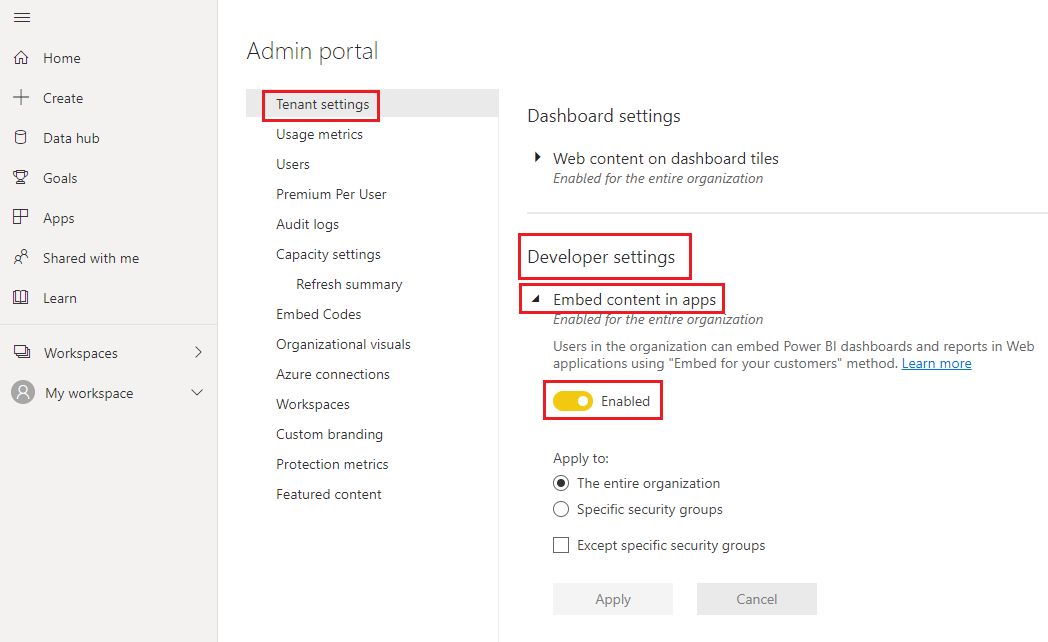
在 Power BI 管理员门户中,转到“租户设置”,然后向下滚动到“开发人员设置”。
为整个组织或在 Microsoft Entra ID 中创建的特定安全组启用“在应用中嵌入内容”。
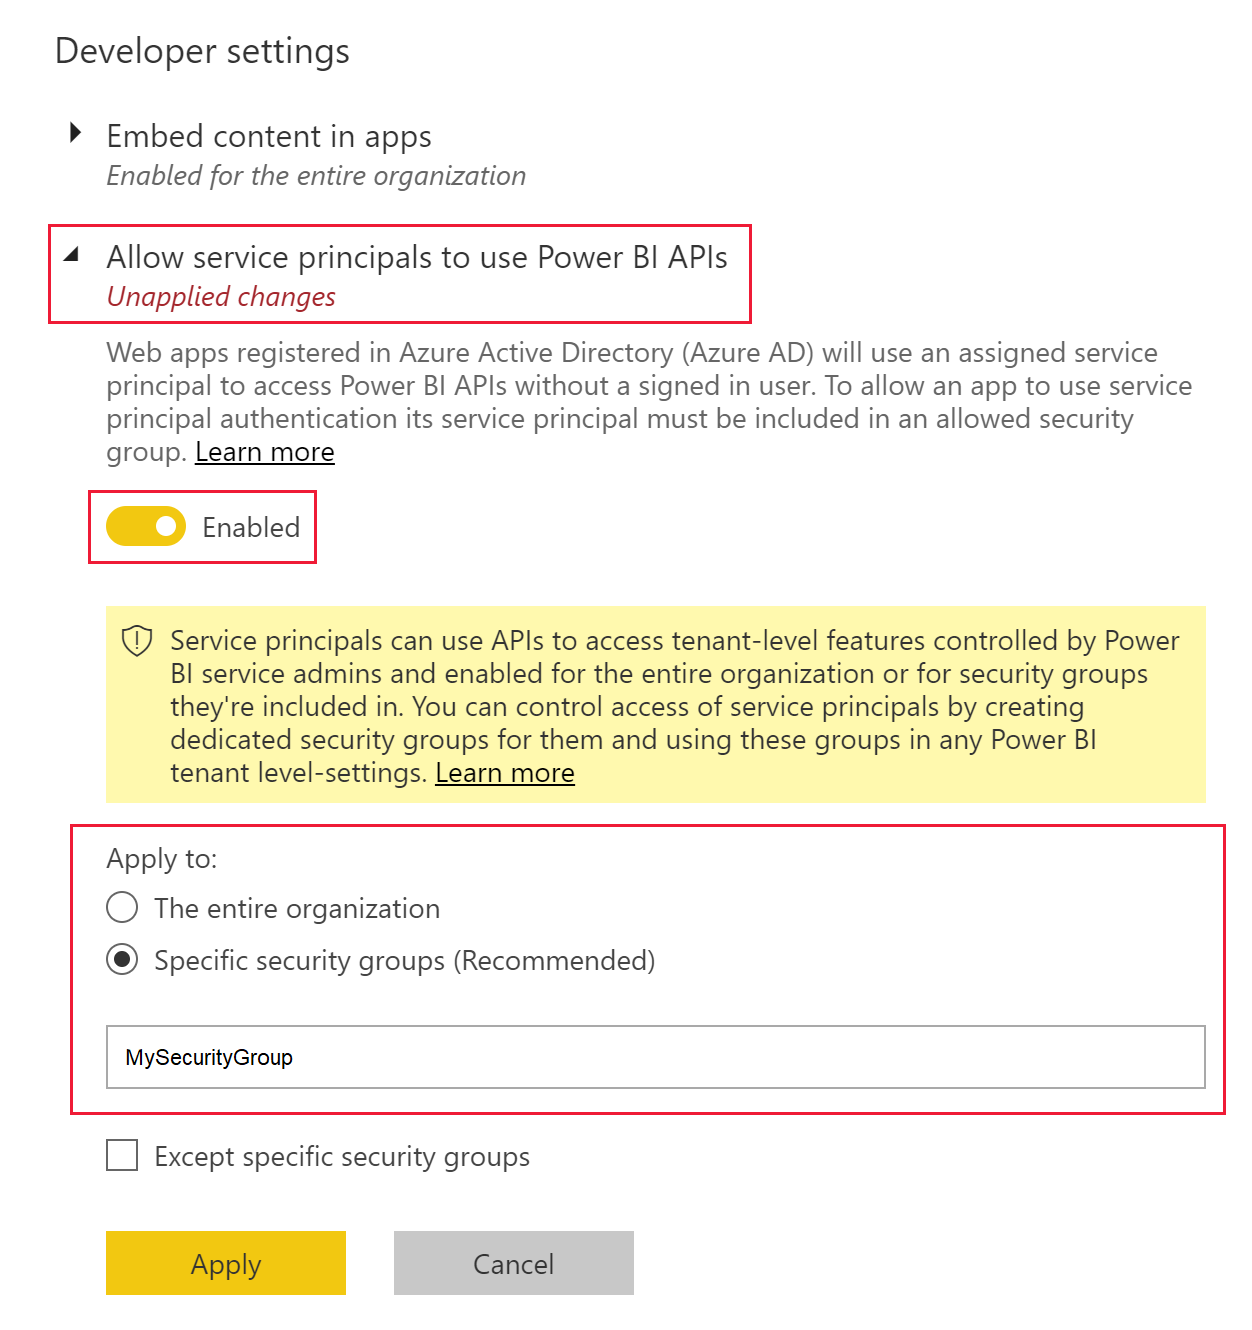
为整个组织或在 Microsoft Entra ID 中创建的特定安全组启用“允许服务主体使用 Power BI API”。
重要
服务主体有权访问为其启用的任何租户设置。 这包括特定安全组或整个组织,具体视管理设置而定。
若要限制服务主体只能访问特定租户设置,请只允许访问特定安全组。 也可以为服务主体创建专用安全组,并将它排除在相应租户设置之外。
第 4 步 - 将服务主体添加到工作区
Microsoft Entra 应用只有在有权以成员或管理员身份访问 Power BI 工作区时,才能访问 Power BI 报表、仪表板和语义模型。可以通过将应用的服务主体或其安全组添加到工作区来提供该访问权限。
可通过三种方法将服务主体或其安全组添加到工作区:
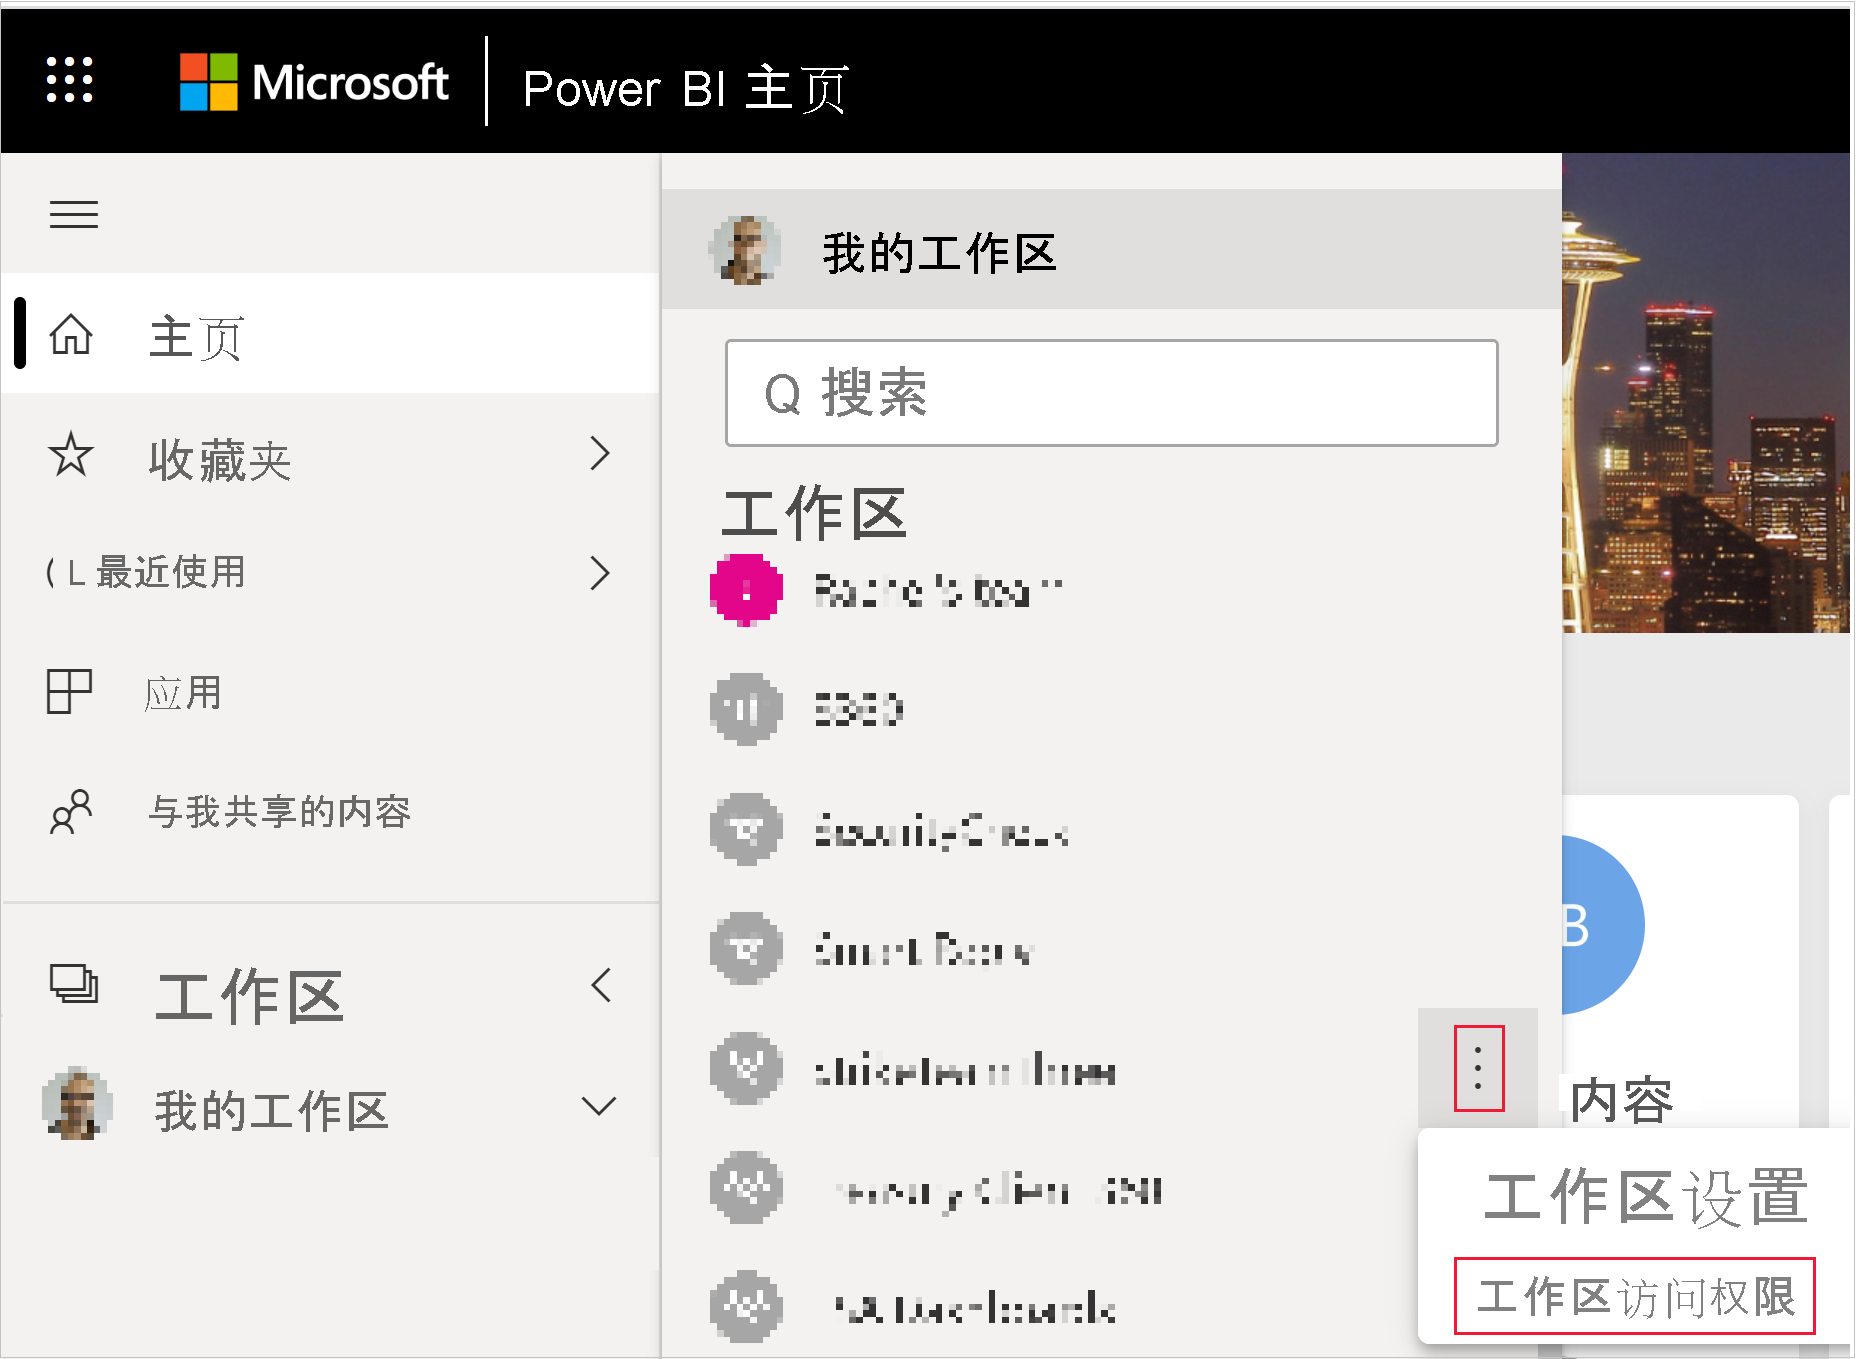
手动添加服务主体或安全组
在 Power BI 服务中,滚动到要为其启用访问权限的工作区。 在“更多”菜单中,选择“工作区访问权限”。
在“访问”窗格的“添加管理员、成员或参与者”下,添加以下项之一:
- 你的“服务主体”。 服务主体的名称是 Microsoft Entra 应用的显示名称,如 Microsoft Entra 应用的概述选项卡中所示。
- 包含服务主体的“安全组”。
在下拉菜单上选择“成员”或“管理员”。
选择 添加 。
使用 PowerShell 添加服务主体或安全组
以下部分提供了示例 PowerShell 脚本,用于将服务主体和安全组作为成员添加到 Power BI 工作区。
使用 PowerShell 将服务主体添加为工作区成员
以下脚本将服务主体添加为工作区成员。 运行脚本之前:
- 将
<service-principal-object-ID>替换为前面为新服务主体记录的对象 ID。 - 将
<workspace-name>替换为要授予服务主体访问权限的工作区的名称。
# Sign in to Power BI.
Login-PowerBI

# Set up the service principal ID.
$SPObjectID = "<service-principal-object-ID>"

# Get the workspace.
$pbiWorkspace = Get-PowerBIWorkspace -Filter "name eq '<workspace-name>'"

# Add the service principal to the workspace.
Add-PowerBIWorkspaceUser -Id $($pbiWorkspace.Id) -AccessRight Member -PrincipalType App -Identifier $($SPObjectID)
使用 PowerShell 将安全组添加为工作区成员
以下脚本将安全组添加为工作区成员。 运行脚本之前:
- 将
<security-group-object-ID>替换为前面为新安全组记录的对象 ID。 - 将
<workspace-name>替换为要授予安全组访问权限的工作区的名称。
# Sign in to Power BI.
Login-PowerBI

# Set up the security group object ID.
$SGObjectID = "<security-group-object-ID>"

# Get the workspace.
$pbiWorkspace = Get-PowerBIWorkspace -Filter "name eq '<workspace-name>'"

# Add the security group to the workspace.
Add-PowerBIWorkspaceUser -Id $($pbiWorkspace.Id) -AccessRight Member -PrincipalType Group -Identifier $($SGObjectID)
第 5 步 - 嵌入内容
嵌入内容后,便可以迁移到生产阶段。
注意
若要使用证书保护内容,请按照使用服务主体和证书嵌入 Power BI 内容中所述的步骤进行操作。
注意事项和限制
- 使用服务主体时,不支持“我的工作区”。
- 移动到生产环境时,需要容量。
- 无法使用服务主体登录 Power BI 门户。
- 在 Power BI 管理门户的开发人员设置中启用服务主体需要 Power BI 管理权限。
- 无法使用服务主体为组织应用程序嵌入内容。
- 不支持数据流管理。
- 并非所有只读 API 都受服务主体支持。 若要为只读管理员 API 启用服务主体支持,请在租户中启用Power BI 服务管理员设置。 有关详细信息,请参阅为只读管理 API 启用服务主体身份验证。
- 使用带有 Azure Analysis Services 数据源的服务主体时,服务主体本身必须具有 Azure Analysis Services 实例权限。 使用包含服务主体的安全组来实现此目的,这不起作用。