将 Raspberry Pi 设备连接到远程监视解决方案加速器 (Node.js)
本教程实施一个可将以下遥测数据发送到远程监视解决方案加速器的“冷却器”设备:
- 温度
- 压力
- 湿度
为简单起见,代码会生成冷却器的示例遥测值。 可以通过将真实的传感器连接到设备并发送真实的遥测数据,在本示例的基础上融会贯通。
示例设备还会:
- 将元数据发送到解决方案,以描述设备的功能。
- 针对通过解决方案中的“设备”页触发的操作做出响应。
- 针对通过解决方案中的“设备”页发送的配置更改做出响应。
要完成此教程,需要一个有效的 Azure 帐户。 如果没有帐户,只需花费几分钟就能创建一个免费试用帐户。 有关详细信息,请参阅 Azure 免费试用。
开始之前
在为设备编写任何代码之前,部署远程监视解决方案加速器,并向该解决方案添加一个真实的新设备。
部署远程监视解决方案加速器
本教程中创建的“冷却器”设备会将数据发送到远程监视解决方案加速器的实例中。 如果尚未在 Azure 帐户中预配远程监视解决方案加速器,请参阅部署远程监视解决方案加速器
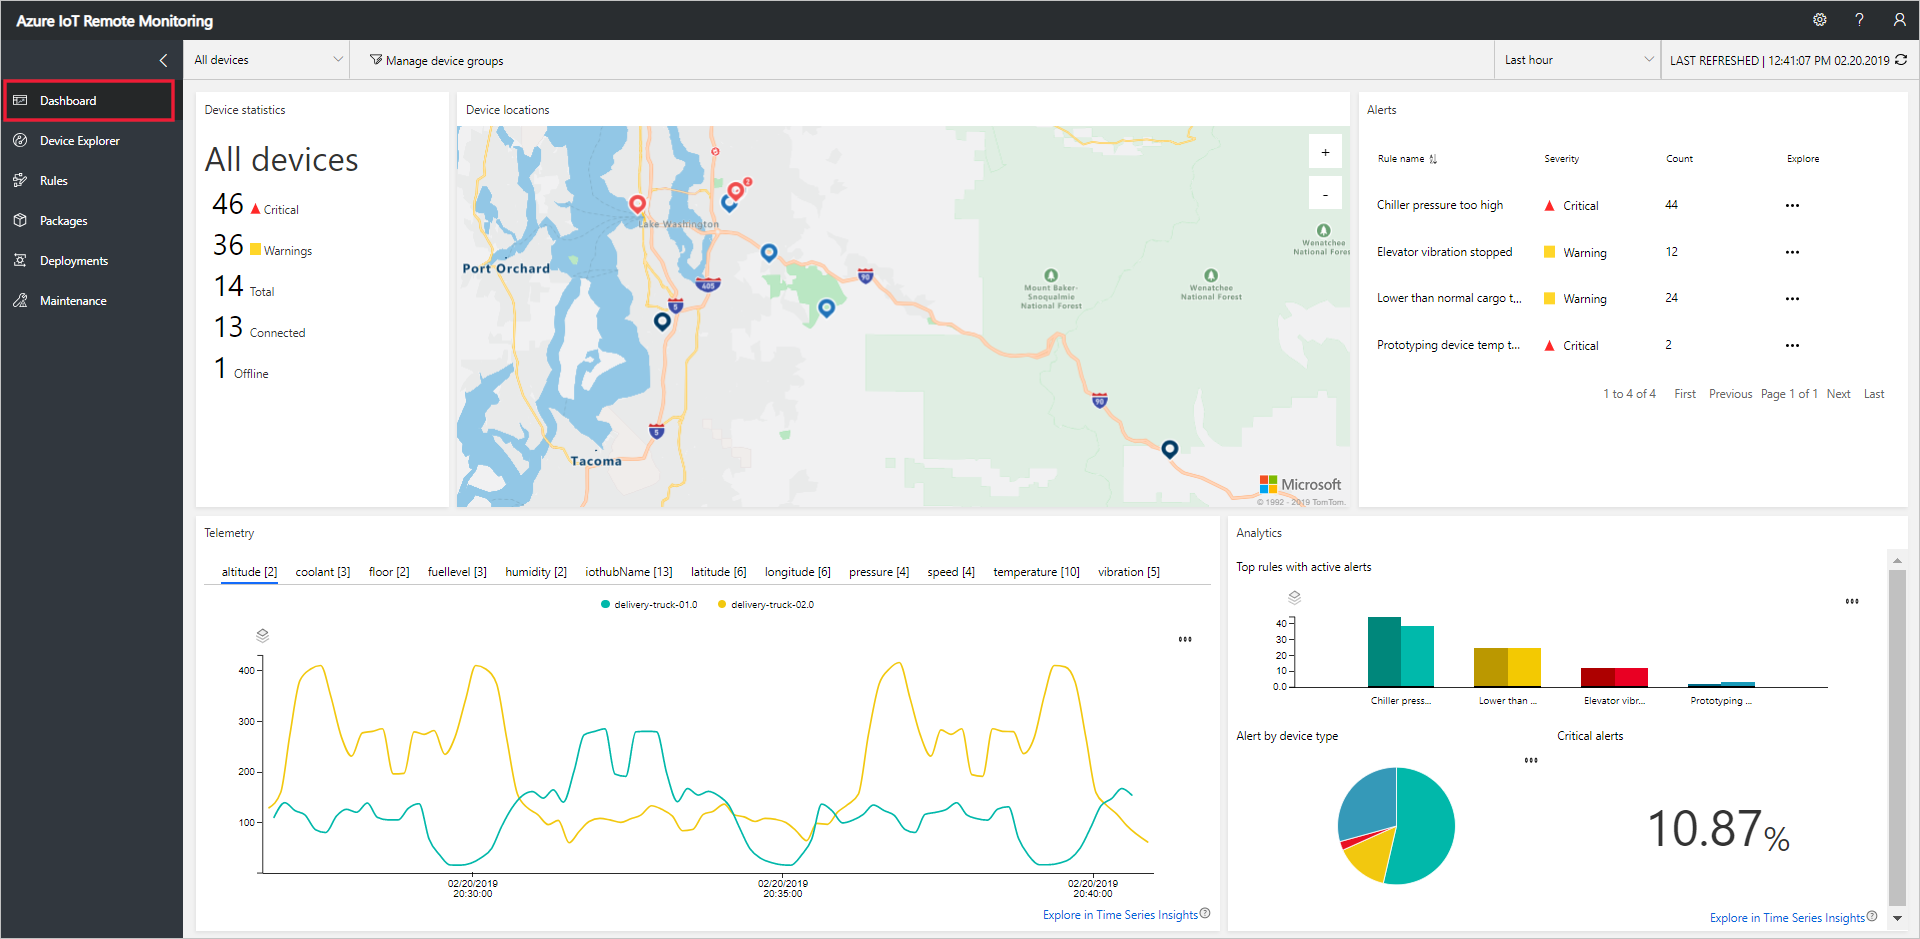
当远程监视解决方案的部署过程完成后,单击“启动”,以在浏览器中打开解决方案仪表板。
将设备添加到远程监视解决方案
对于连接到解决方案加速器的设备,该设备必须使用有效的凭据将自身标识到 IoT 中心。 将设备添加到解决方案时,有机会保存包含这些凭据的设备连接字符串。 在本教程中,稍后会在客户端应用程序中添加设备连接字符串。
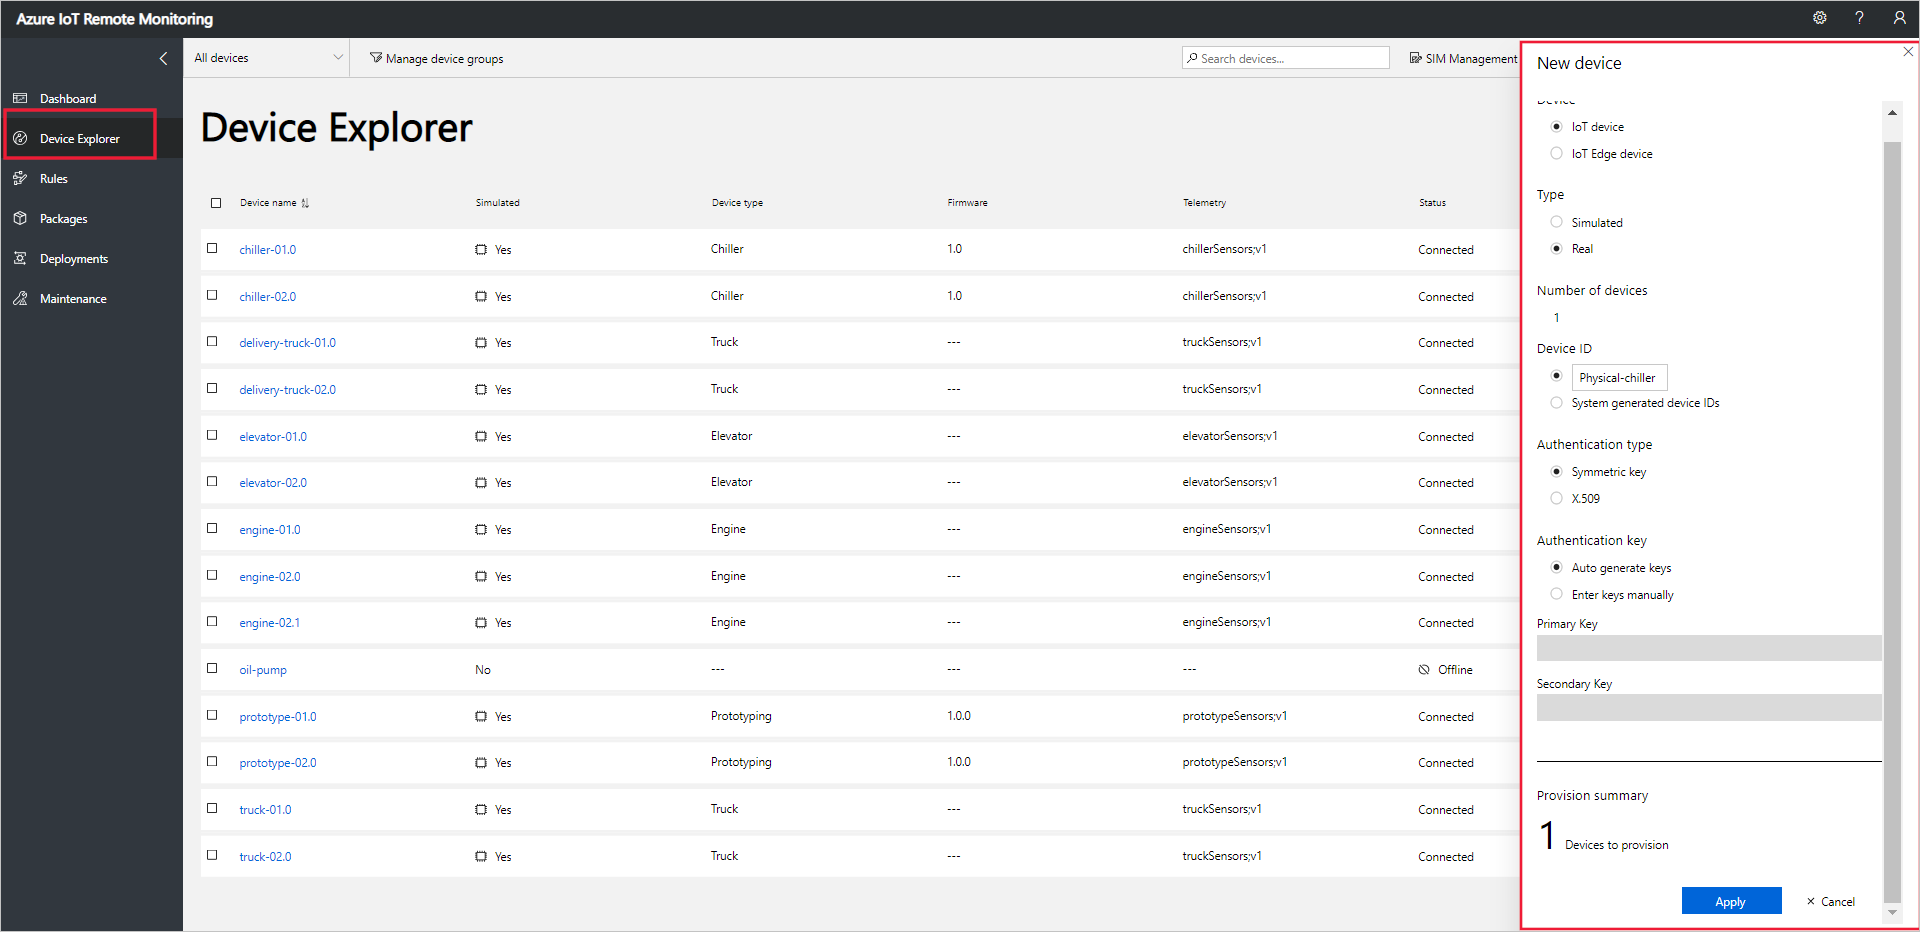
若要在远程监视解决方案中添加设备,请在解决方案中的“设备资源管理器”页上完成以下步骤:
选择“+ 新建设备”,然后选择“真实”作为设备类型 :
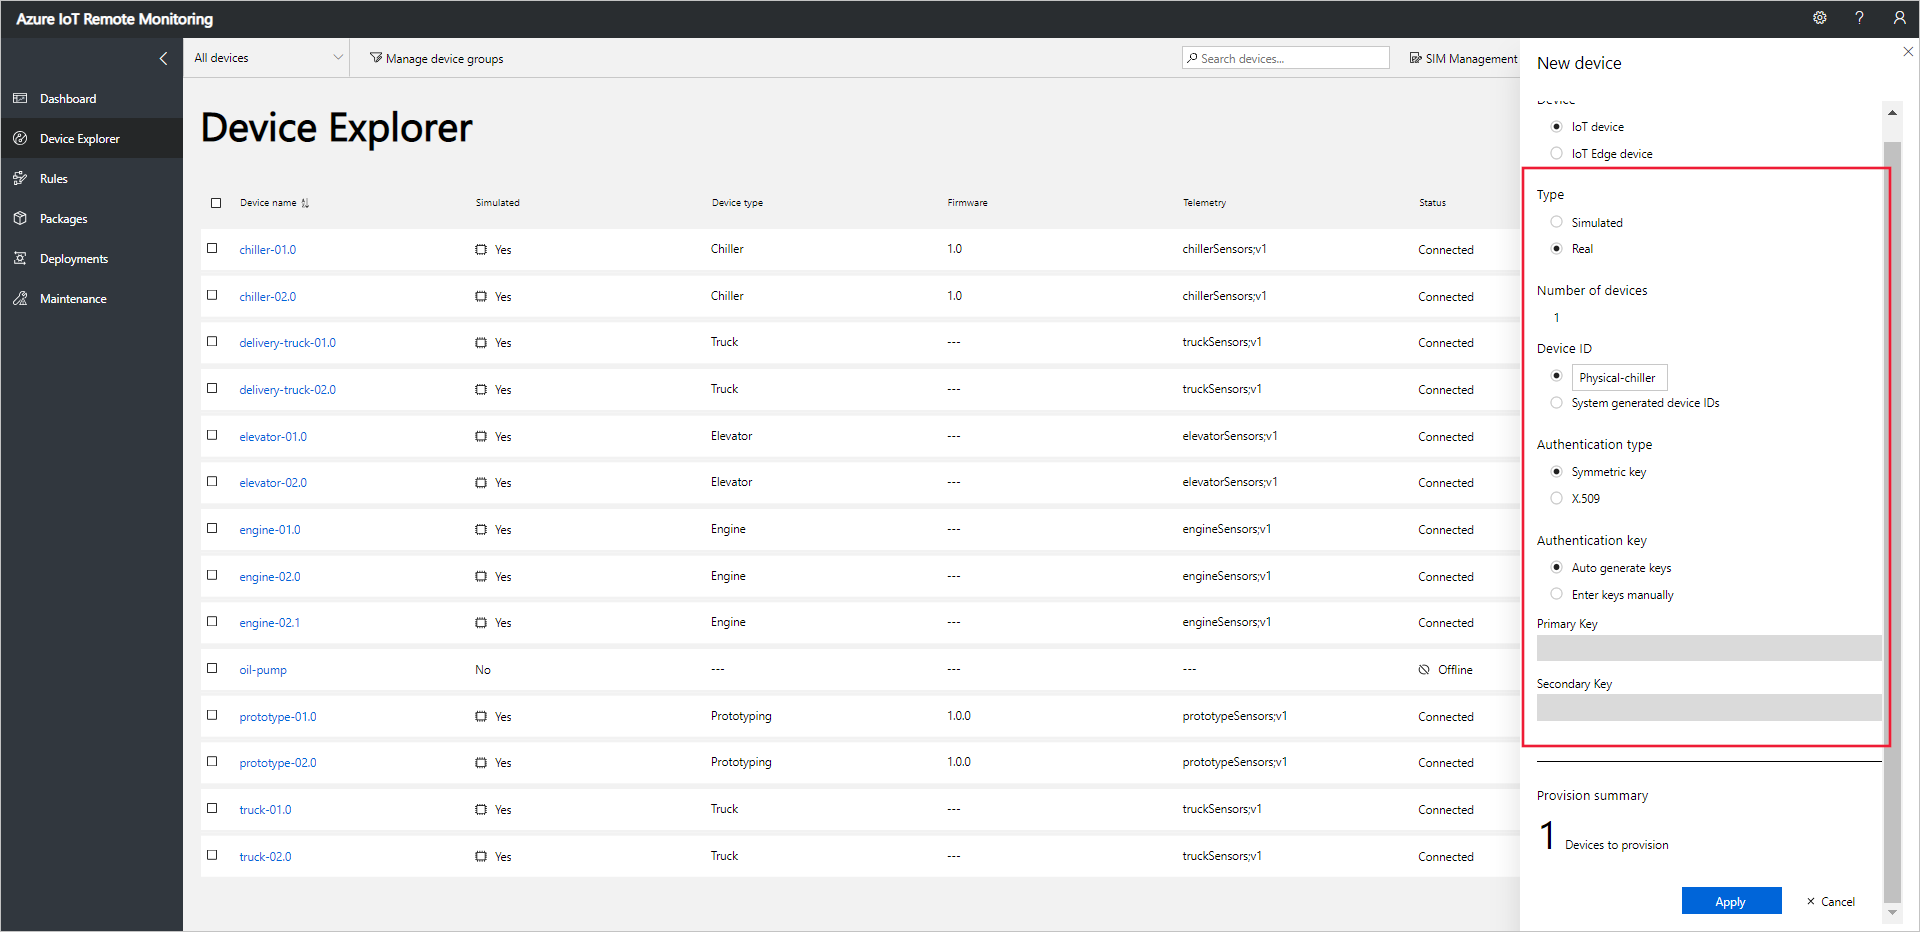
输入 Physical-chiller 作为设备 ID。 选择“对称密钥”和“自动生成密钥”选项:
选择“应用”。 然后记下设备 ID、主密钥和连接字符串主密钥值 :
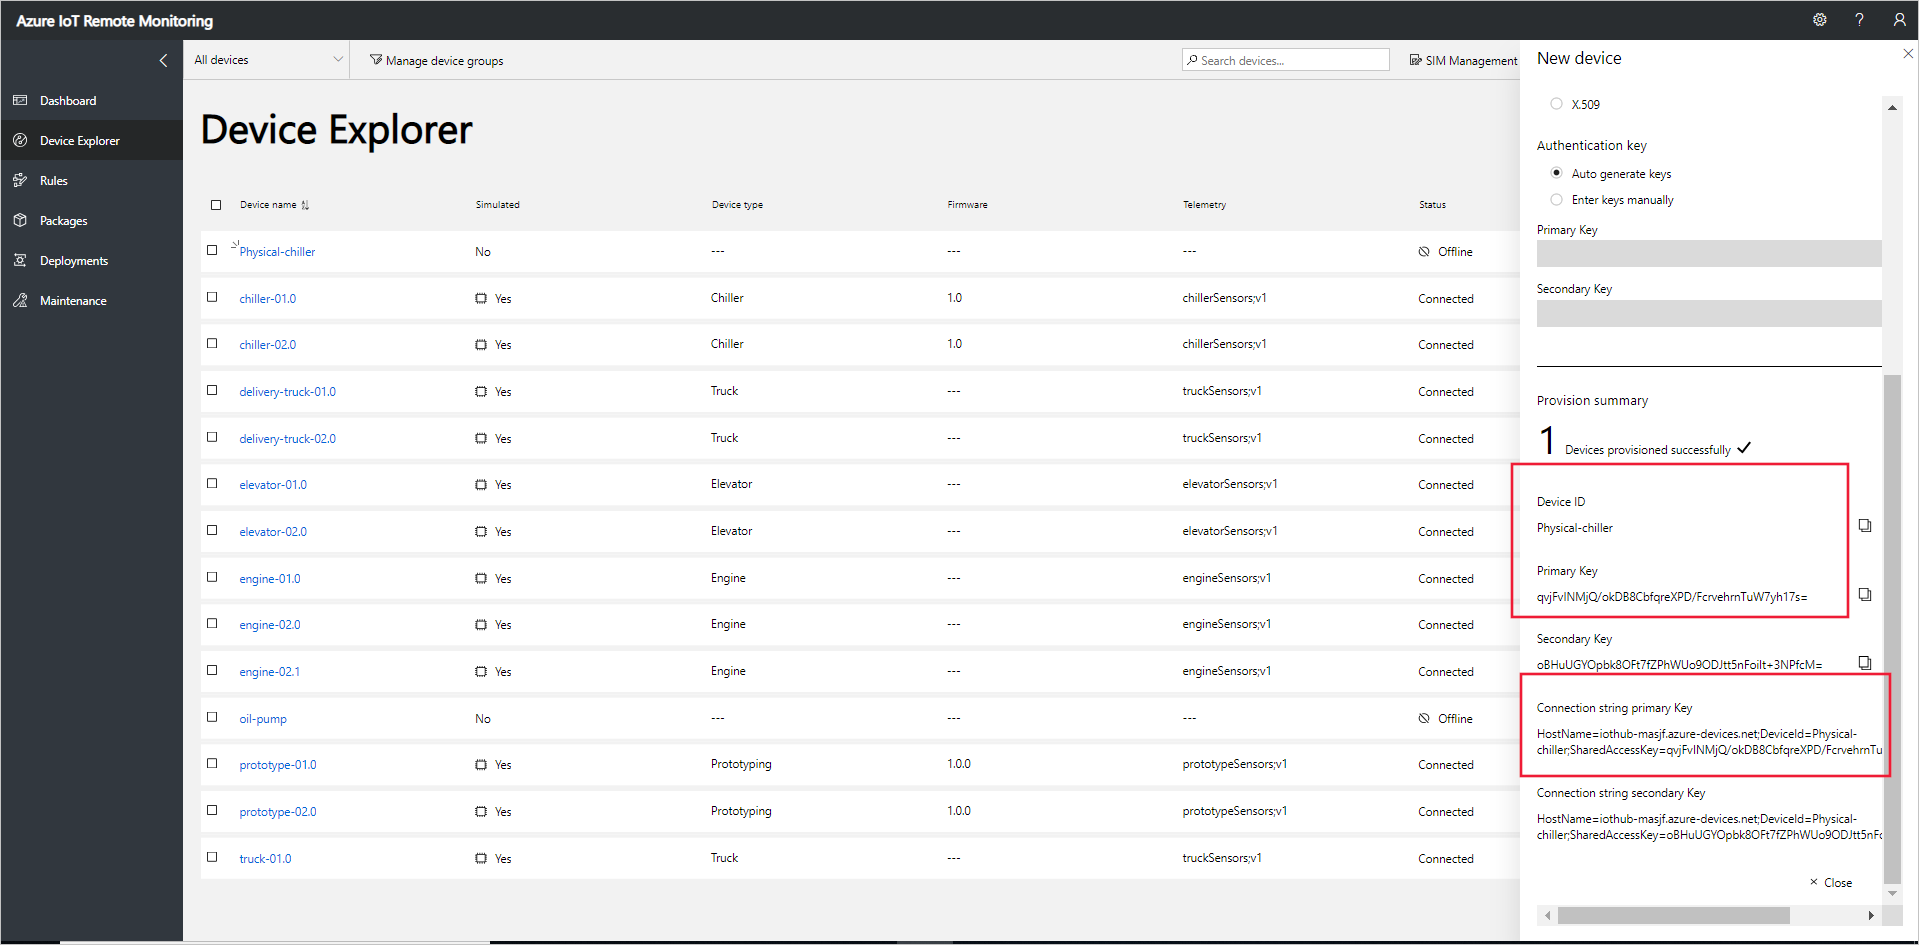
现在,你已向远程监视解决方案加速器添加了一个真实设备,并记下了其设备连接字符串。 在以下各部分中,你将实现使用设备连接字符串连接到解决方案的客户端应用程序。
客户端应用程序实现内置的冷却器设备模型。 解决方案加速器设备模型指定有关设备的以下信息:
- 设备报告给解决方案的属性。 例如,冷却器设备报告有关其固件和位置的信息。
- 由设备发送到解决方案的遥测数据类型。 例如,冷却器设备发送温度、湿度和压力值。
- 从解决方案可计划的在设备上运行的方法。 例如,冷却器设备必须实现 Reboot、FirmwareUpdate、EmergencyValveRelease 和 IncreasePressure 方法 。
本教程介绍如何将真实设备连接到远程监视解决方案加速器。 在本教程中,将使用 Node.js,它对于资源约束最少的环境是一个不错的选择。
如果更喜欢模拟某个设备,请参阅创建和测试新的模拟设备。
所需硬件
一个台式机,用于通过远程方式连接到 Raspberry Pi 上的命令行。
适用于 Raspberry Pi 3 的 Microsoft IoT 初学者套件或等效组件。 本教程使用套件中的以下项目:
- Raspberry Pi 3
- MicroSD 卡(带 NOOBS)
- USB 迷你电缆
- 以太网电缆
所需的桌面软件
需要在台式机上安装 SSH 客户端,才能远程访问 Raspberry Pi 上的命令行。
- Windows 不包括 SSH 客户端。 建议使用 PuTTY。
- 大多数 Linux 分发版和 Mac OS 包括命令行 SSH 实用工具。 有关详细信息,请参阅 SSH Using Linux or Mac OS(使用 Linux 或 Mac OS 的 SSH)。
所需的 Raspberry Pi 软件
如果尚未这样做,请在 Raspberry Pi 上安装 Node.js 4.0.0 或更高版本。 以下步骤演示如何在 Raspberry Pi 上安装 Node.js v6:
使用
ssh连接到 Raspberry Pi。 有关详细信息,请参阅 Raspberry Pi 网站上的 SSH(安全外壳)。使用以下命令更新 Raspberry Pi:
sudo apt-get update使用以下命令从 Raspberry Pi 中删除任何现有 Node.js 安装:
sudo apt-get remove nodered -y
sudo apt-get remove nodejs nodejs-legacy -y
sudo apt-get remove npm  -y
使用以下命令在 Raspberry Pi 上下载并安装 Node.js v6:
curl -sL https://deb.nodesource.com/setup_6.x | sudo bash -
sudo apt-get install nodejs npm
使用以下命令验证已成功安装 Node.js v6.11.4:
node --version
创建 Node.js 解决方案
使用与 Raspberry Pi 的 ssh 连接完成以下步骤:
在 Raspberry Pi 上的主文件夹中创建名为
remotemonitoring的文件夹。 在命令行中导航到此文件夹:cd ~ mkdir remotemonitoring cd remotemonitoring若要下载并安装完成示例应用所需的包,请运行以下命令:
npm install async azure-iot-device azure-iot-device-mqtt在
remotemonitoring文件夹中,创建名为 remote_monitoring.js 的文件。 在文本编辑器中打开此文件。 在 Raspberry Pi 上,可以使用nano或vi文本编辑器。在 remote_monitoring.js 文件中,添加以下
require语句:var Protocol = require('azure-iot-device-mqtt').Mqtt; var Client = require('azure-iot-device').Client; var Message = require('azure-iot-device').Message; var async = require('async');在
require语句之后添加以下变量声明。 将占位符值{device connection string}替换为针对远程监视解决方案中预配的设备记下的值:var connectionString = '{device connection string}';若要定义一些基本遥测数据,请添加以下变量:
var temperature = 50;
var temperatureUnit = 'F';
var humidity = 50;
var humidityUnit = '%';
var pressure = 55;
var pressureUnit = 'psig';
若要定义一些属性值,请添加以下变量:
var schema = "real-chiller;v1";
var deviceType = "RealChiller";
var deviceFirmware = "1.0.0";
var deviceFirmwareUpdateStatus = "";
var deviceLocation = "Building 44";
var deviceLatitude = 47.638928;
var deviceLongitude = -122.13476;
var deviceOnline = true;
添加以下变量以定义要发送到解决方案的报告属性。 这些属性包括在 Web UI 中显示的元数据:
var reportedProperties = {
  "SupportedMethods": "Reboot,FirmwareUpdate,EmergencyValveRelease,IncreasePressure",
  "Telemetry": {
    [schema]: ""
  },
  "Type": deviceType,
  "Firmware": deviceFirmware,
  "FirmwareUpdateStatus": deviceFirmwareUpdateStatus,
  "Location": deviceLocation,
  "Latitude": deviceLatitude,
  "Longitude": deviceLongitude,
  "Online": deviceOnline
}
若要输出操作结果,请添加以下帮助程序函数:
function printErrorFor(op) {
    return function printError(err) {
        if (err) console.log(op + ' error: ' + err.toString());
    };
}
添加以下帮助程序函数,用于随机化遥测值:
function generateRandomIncrement() {
    return ((Math.random() * 2) - 1);
}
添加以下泛型函数以处理解决方案中的直接方法调用。 该函数显示调用的直接方法的相关信息,但在此示例中不以任何方式修改设备。 解决方案使用直接方法对设备进行操作:
function onDirectMethod(request, response) {
  // Implement logic asynchronously here.
  console.log('Simulated ' + request.methodName);

  // Complete the response
  response.send(200, request.methodName + ' was called on the device', function (err) {
    if (err) console.error('Error sending method response :\n' + err.toString());
    else console.log('200 Response to method \'' + request.methodName + '\' sent successfully.');
  });
}
添加以下函数以处理解决方案中的 FirmwareUpdate 直接方法调用。 该函数验证直接方法负载中传入的参数,并以异步方式运行固件更新模拟:
function onFirmwareUpdate(request, response) {
  // Get the requested firmware version from the JSON request body
  var firmwareVersion = request.payload.Firmware;
  var firmwareUri = request.payload.FirmwareUri;

  // Ensure we got a firmware values
  if (!firmwareVersion || !firmwareUri) {
    response.send(400, 'Missing firmware value', function(err) {
      if (err) console.error('Error sending method response :\n' + err.toString());
      else console.log('400 Response to method \'' + request.methodName + '\' sent successfully.');
    });
  } else {
    // Respond the cloud app for the device method
    response.send(200, 'Firmware update started.', function(err) {
      if (err) console.error('Error sending method response :\n' + err.toString());
      else {
        console.log('200 Response to method \'' + request.methodName + '\' sent successfully.');

        // Run the simulated firmware update flow
        runFirmwareUpdateFlow(firmwareVersion, firmwareUri);
      }
    });
  }
}
添加以下函数以模拟长时间运行的固件更新流(将进度报告回解决方案):
// Simulated firmwareUpdate flow
function runFirmwareUpdateFlow(firmwareVersion, firmwareUri) {
  console.log('Simulating firmware update flow...');
  console.log('> Firmware version passed: ' + firmwareVersion);
  console.log('> Firmware URI passed: ' + firmwareUri);
  async.waterfall([
    function (callback) {
      console.log("Image downloading from " + firmwareUri);
      var patch = {
        FirmwareUpdateStatus: 'Downloading image..'
      };
      reportUpdateThroughTwin(patch, callback);
      sleep(10000, callback);
    },
    function (callback) {
      console.log("Downloaded, applying firmware " + firmwareVersion);
      deviceOnline = false;
      var patch = {
        FirmwareUpdateStatus: 'Applying firmware..',
        Online: false
      };
      reportUpdateThroughTwin(patch, callback);
      sleep(8000, callback);
    },
    function (callback) {
      console.log("Rebooting");
      var patch = {
        FirmwareUpdateStatus: 'Rebooting..'
      };
      reportUpdateThroughTwin(patch, callback);
      sleep(10000, callback);
    },
    function (callback) {
      console.log("Firmware updated to " + firmwareVersion);
      deviceOnline = true;
      var patch = {
        FirmwareUpdateStatus: 'Firmware updated',
        Online: true,
        Firmware: firmwareVersion
      };
      reportUpdateThroughTwin(patch, callback);
      callback(null);
    }
  ], function(err) {
    if (err) {
      console.error('Error in simulated firmware update flow: ' + err.message);
    } else {
      console.log("Completed simulated firmware update flow");
    }
  });

  // Helper function to update the twin reported properties.
  function reportUpdateThroughTwin(patch, callback) {
    console.log("Sending...");
    console.log(JSON.stringify(patch, null, 2));
    client.getTwin(function(err, twin) {
      if (!err) {
        twin.properties.reported.update(patch, function(err) {
          if (err) callback(err);
        });
      } else {
        if (err) callback(err);
      }
    });
  }

  function sleep(milliseconds, callback) {
    console.log("Simulate a delay (milleseconds): " + milliseconds);
    setTimeout(function () {
      callback(null);
    }, milliseconds);
  }
}
添加以下代码将遥测数据发送到解决方案。 客户端应用将属性添加到消息,以确定消息架构:
function sendTelemetry(data, schema) {
  if (deviceOnline) {
    var d = new Date();
    var payload = JSON.stringify(data);
    var message = new Message(payload);
    message.properties.add('iothub-creation-time-utc', d.toISOString());
    message.properties.add('iothub-message-schema', schema);

    console.log('Sending device message data:\n' + payload);
    client.sendEvent(message, printErrorFor('send event'));
  } else {
    console.log('Offline, not sending telemetry');
  }
}
添加以下代码,创建客户端实例:
var client = Client.fromConnectionString(connectionString, Protocol);添加以下代码来执行下述操作:
打开连接。
设置所需属性的处理程序。
发送报告的属性。
为直接方法注册处理程序。 此示例对固件更新直接方法使用单独的处理程序。
开始发送遥测。
client.open(function (err) {
if (err) {
  printErrorFor('open')(err);
} else {
  // Create device Twin
  client.getTwin(function (err, twin) {
    if (err) {
      console.error('Could not get device twin');
    } else {
      console.log('Device twin created');

      twin.on('properties.desired', function (delta) {
        // Handle desired properties set by solution
        console.log('Received new desired properties:');
        console.log(JSON.stringify(delta));
      });

      // Send reported properties
      twin.properties.reported.update(reportedProperties, function (err) {
        if (err) throw err;
        console.log('Twin state reported');
      });

      // Register handlers for all the method names we are interested in.
      // Consider separate handlers for each method.
      client.onDeviceMethod('Reboot', onDirectMethod);
      client.onDeviceMethod('FirmwareUpdate', onFirmwareUpdate);
      client.onDeviceMethod('EmergencyValveRelease', onDirectMethod);
      client.onDeviceMethod('IncreasePressure', onDirectMethod);
    }
  });

  // Start sending telemetry
  var sendDeviceTelemetry = setInterval(function () {
    temperature += generateRandomIncrement();
    pressure += generateRandomIncrement();
    humidity += generateRandomIncrement();
    var data = {
      'temperature': temperature,
      'temperature_unit': temperatureUnit,
      'humidity': humidity,
      'humidity_unit': humidityUnit,
      'pressure': pressure,
      'pressure_unit': pressureUnit
    };
    sendTelemetry(data, schema)
  }, 5000);

  client.on('error', function (err) {
    printErrorFor('client')(err);
    if (sendTemperatureInterval) clearInterval(sendTemperatureInterval);
    if (sendHumidityInterval) clearInterval(sendHumidityInterval);
    if (sendPressureInterval) clearInterval(sendPressureInterval);
    client.close(printErrorFor('client.close'));
  });
}
});
保存对 remote_monitoring.js 文件的更改。
若要启动示例应用程序,请在 Raspberry Pi 上的命令提示符下运行以下命令:
node remote_monitoring.js
查看设备遥测数据
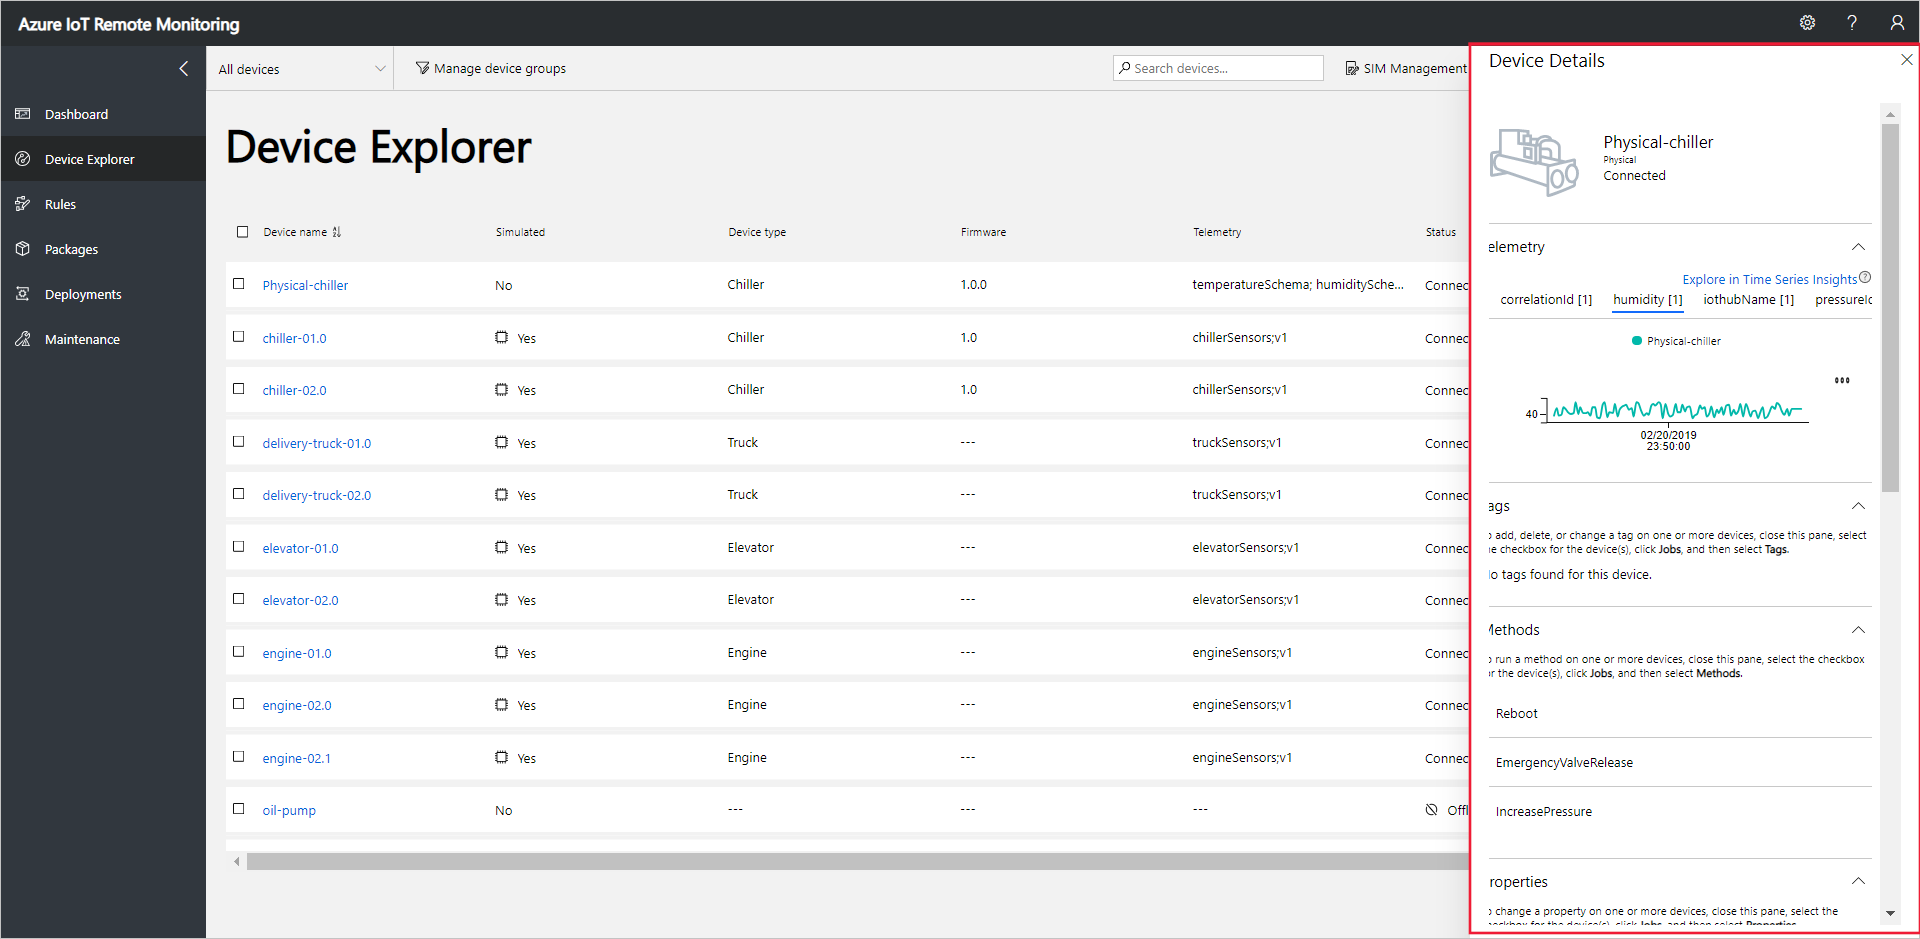
可以在解决方案中的“设备资源管理器”页上查看从设备发送的遥测数据。
在“设备资源管理器”页上的设备列表中选择已预配的设备。 一个面板将显示有关设备的信息,其中包括设备遥测绘图:
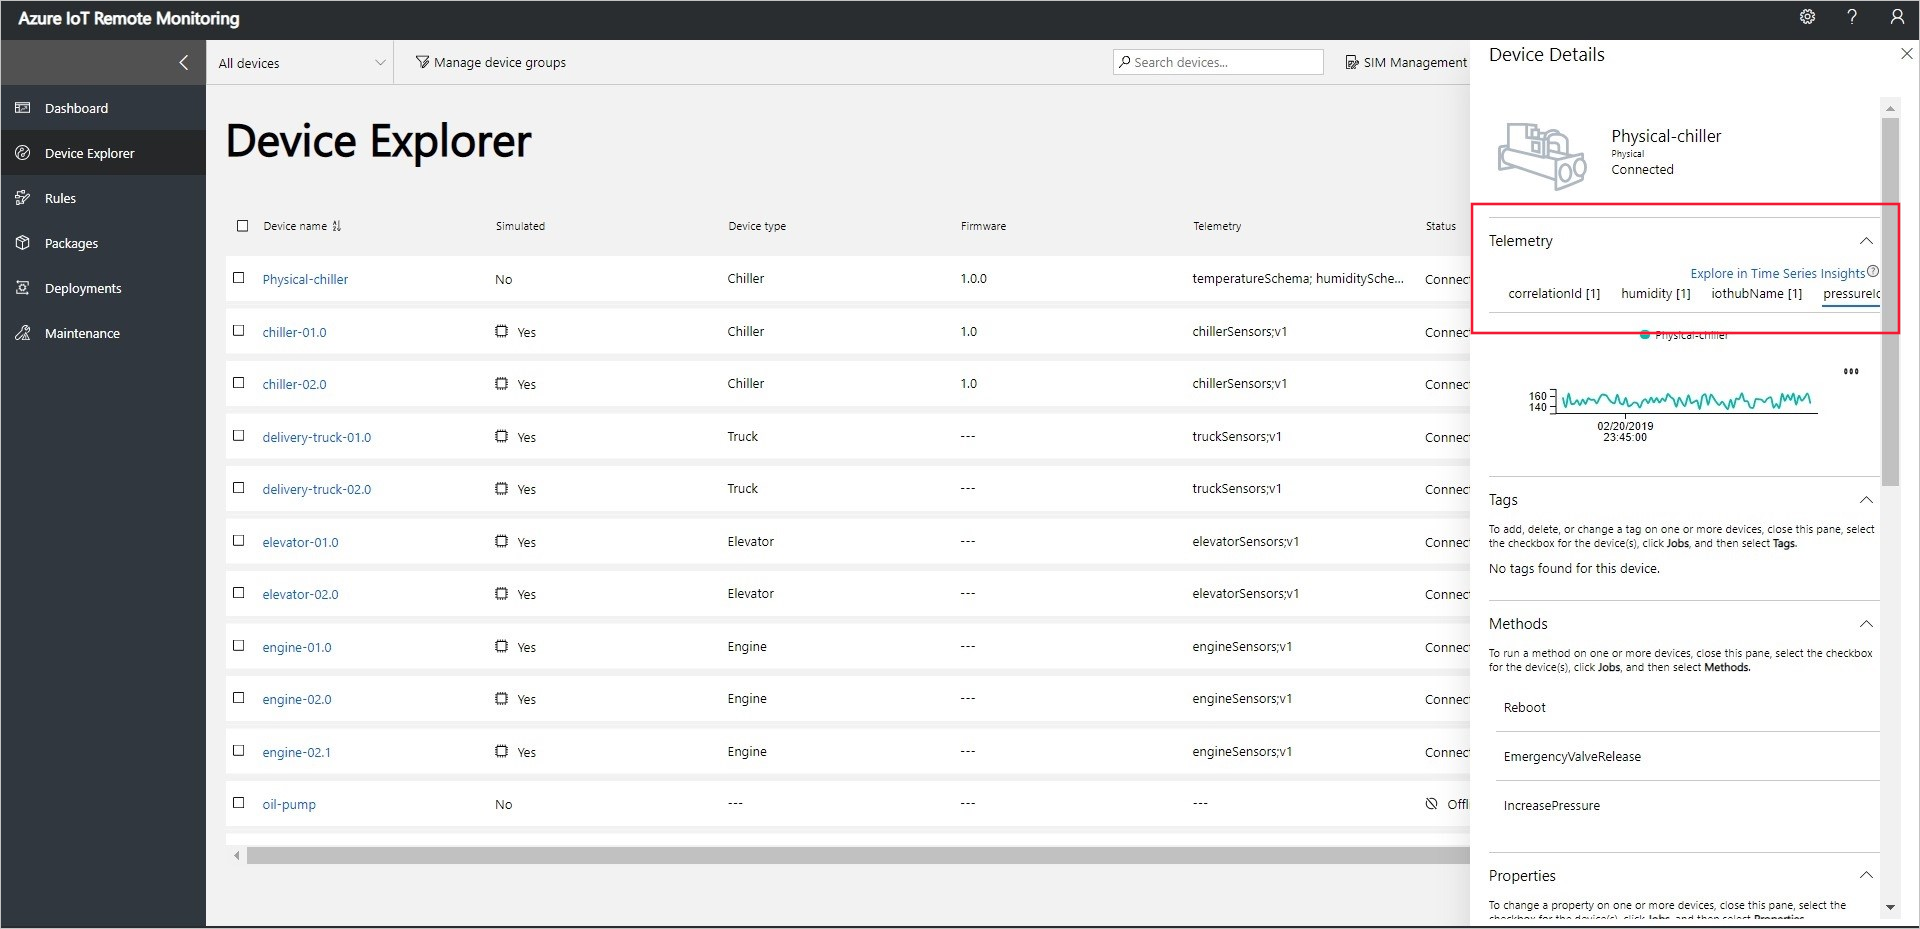
选择“压力”可更改遥测显示:
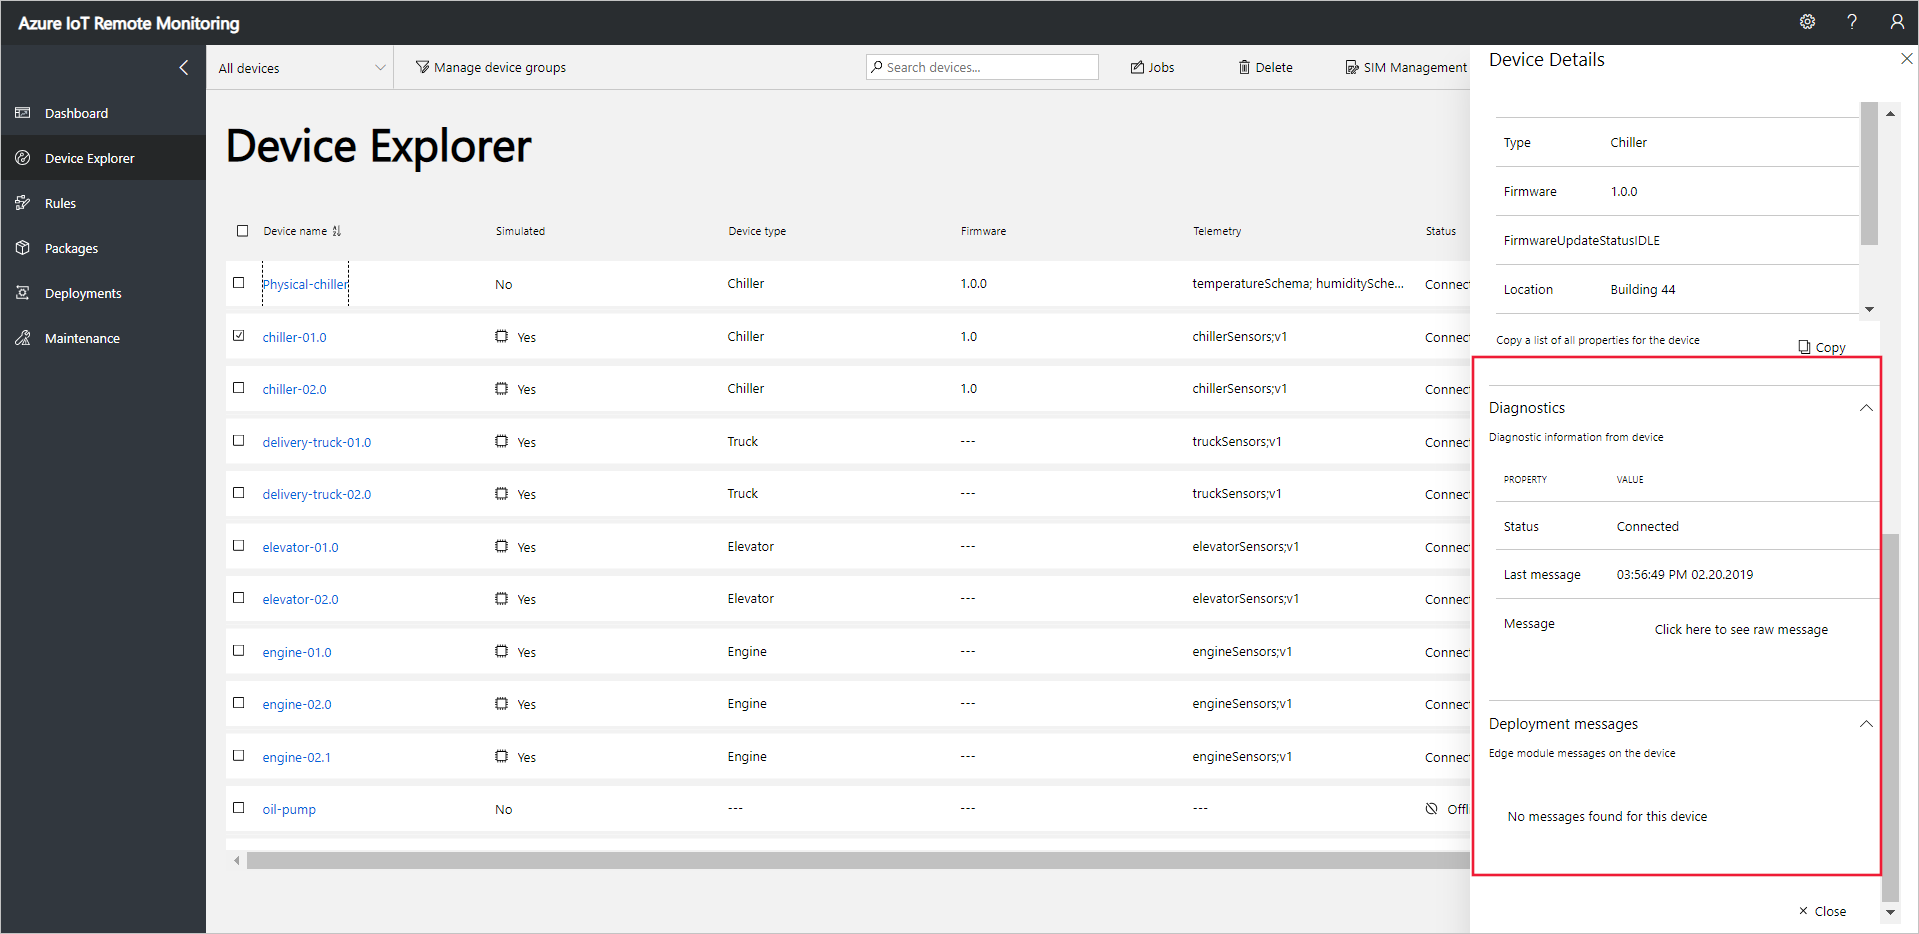
若要查看有关设备的诊断信息,请向下滚动到“诊断”:
对设备执行操作
若要对设备调用方法,请使用远程监视解决方案中的“设备资源管理器”页。 例如,在远程监视解决方案中,冷却器设备实现了 Reboot 方法。
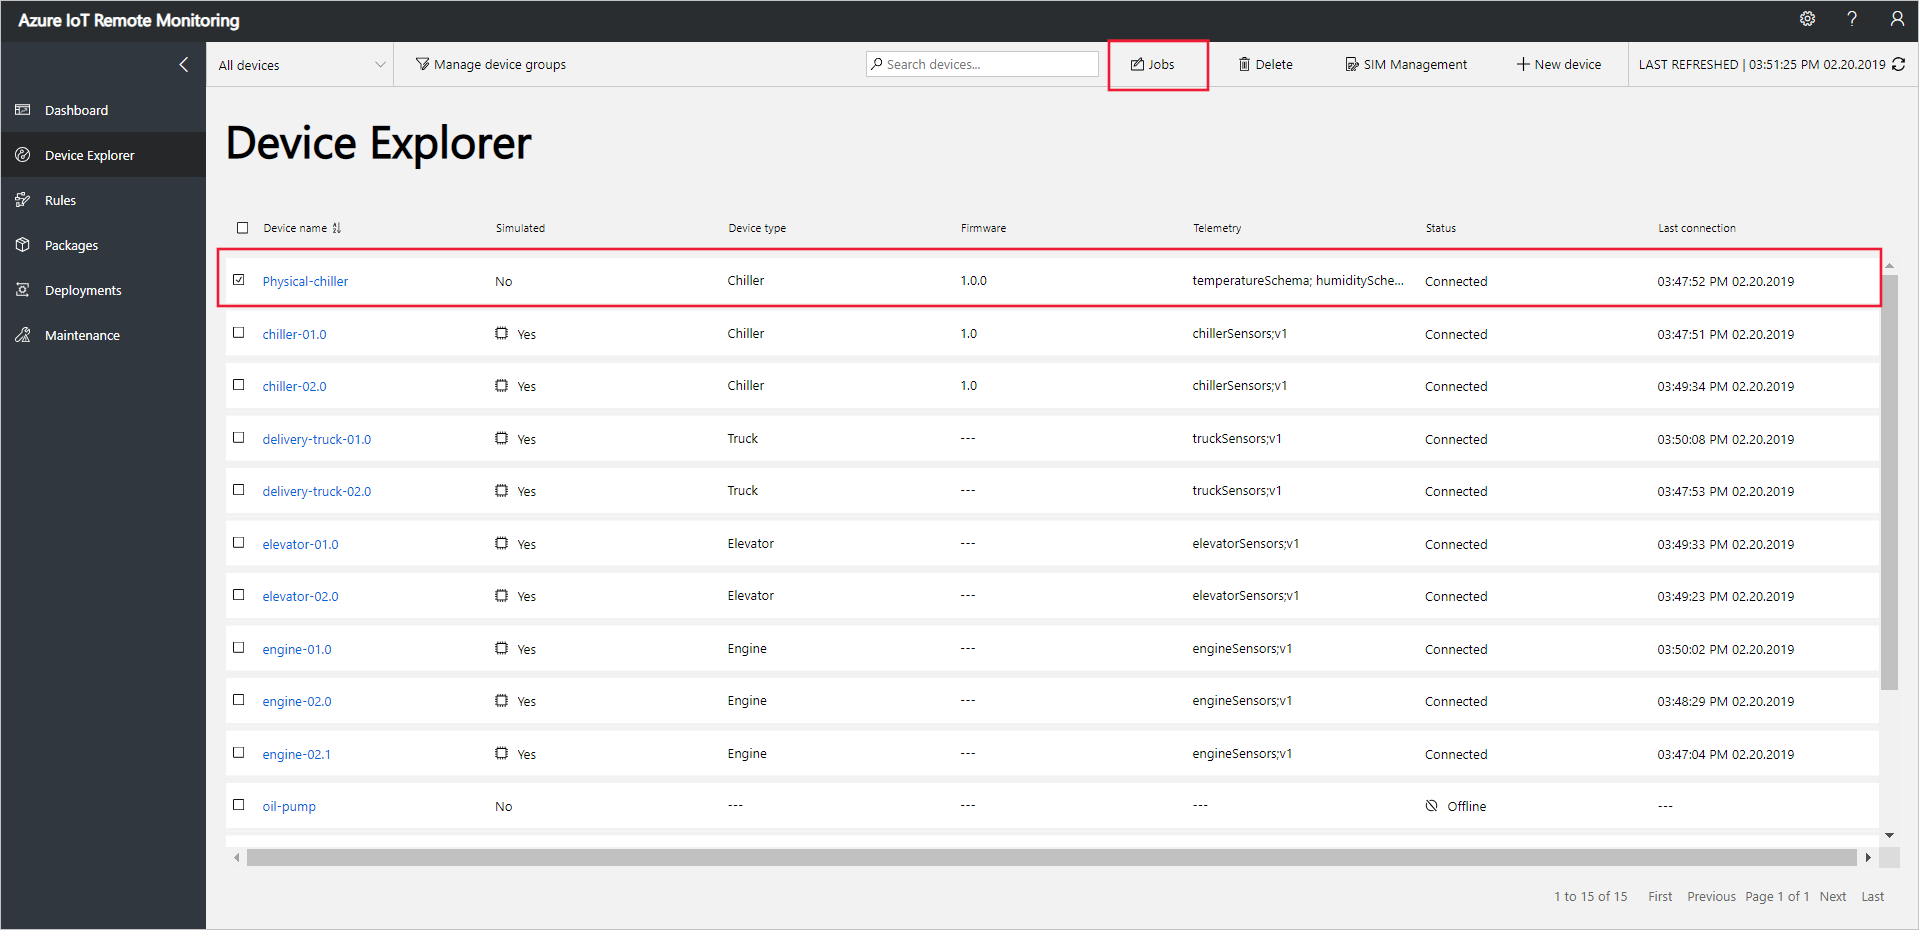
选择“设备”,导航到解决方案中的“设备资源管理器”页 。
在“设备资源管理器”页上的设备列表中选择已预配的设备:
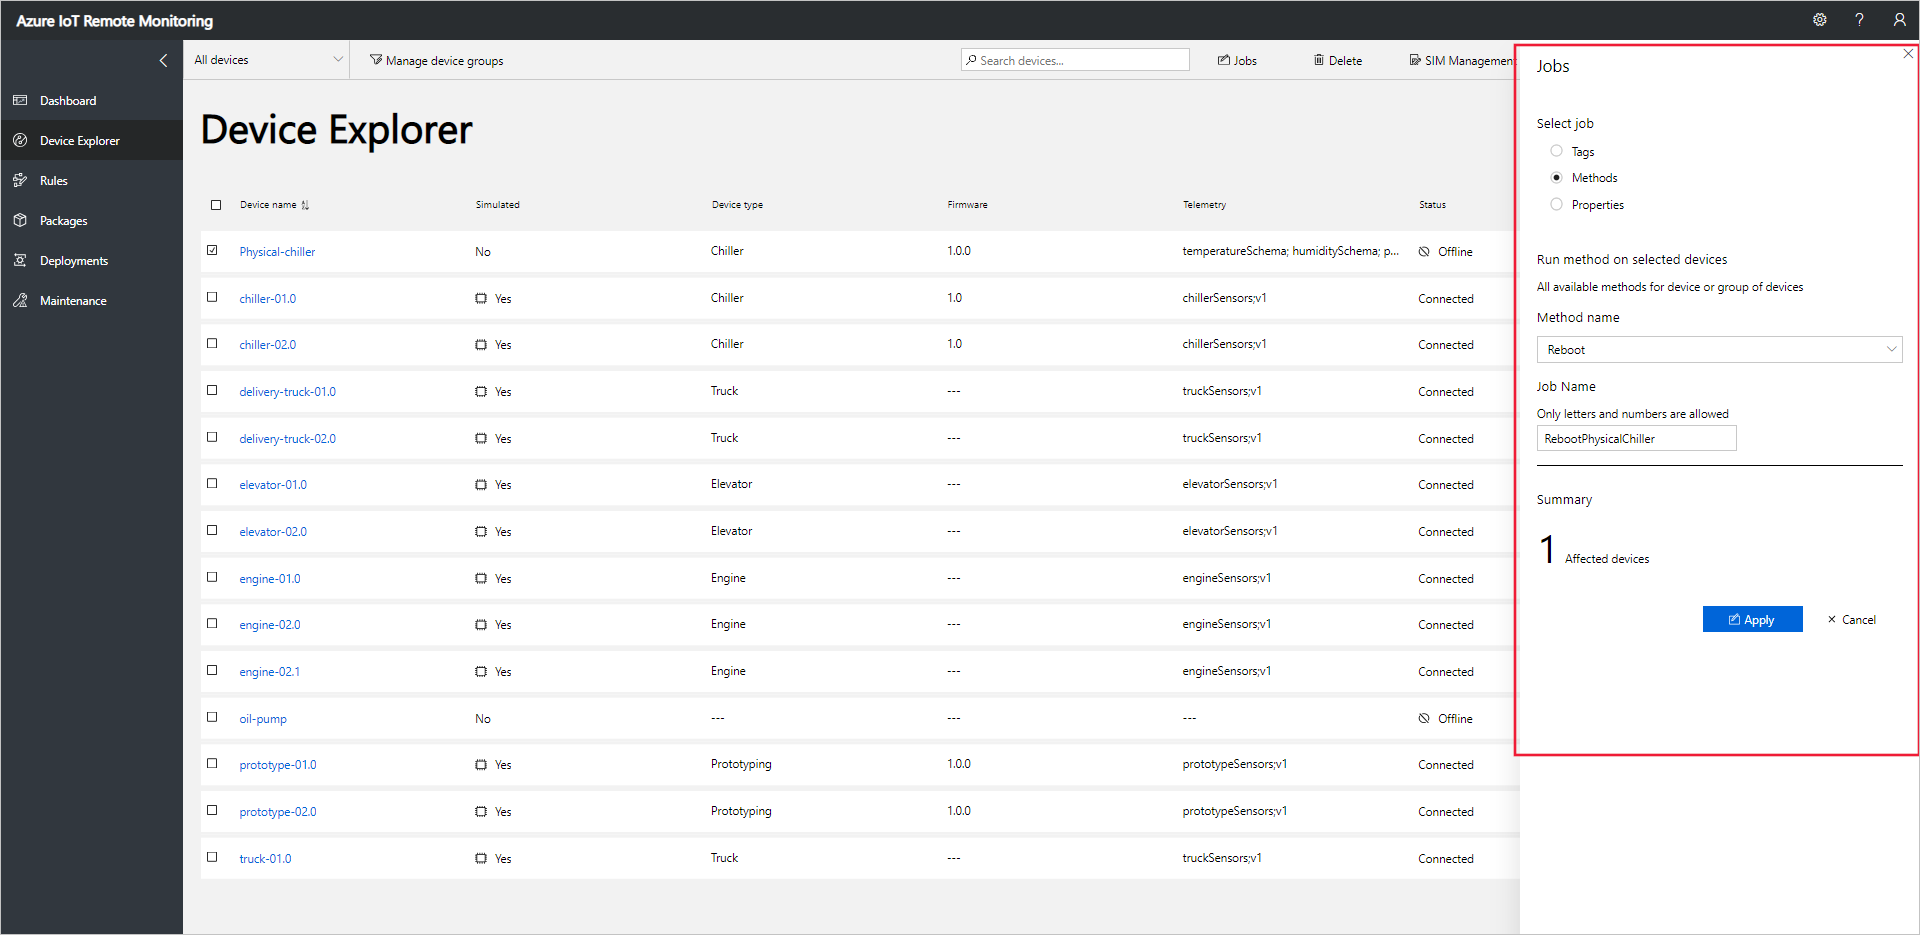
若要显示可对设备调用的方法列表,请选择“作业”,然后选择“方法” 。 若要计划在多个设备上运行的作业,可以在列表中选择多个设备。 “作业”面板会显示普遍适用于所有选定设备的方法类型。
选择“Reboot”,将作业名称设置为 RebootPhysicalChiller,然后选择“应用”:
模拟设备处理该方法时,一系列消息将显示在运行设备代码的控制台中。
注意
若要跟踪解决方案中作业的状态,请选择“查看作业状态”。
后续步骤
自定义远程监视解决方案加速器一文中介绍了自定义解决方案加速器的一些方法。