Note
此类 DataSet 和相关类是 2000 年代初的旧版 .NET Framework 技术,使应用程序能够在应用与数据库断开连接时处理内存中的数据。 这些技术对于使用户能够修改数据并将更改保留回数据库的应用特别有用。 尽管数据集是经过证实的成功技术,但新 .NET 应用程序的建议方法是使用 Entity Framework Core。 Entity Framework 提供了一种更自然的方式来将表格数据用作对象模型,并且具有更简单的编程接口。
创建作数据库中数据的应用程序时,通常会执行定义连接字符串、插入数据和运行存储过程等任务。 按照本文的指导,你可以在基于数据的窗体 (FOD) Windows 窗体应用程序中使用 Visual C# 或 Visual Basic 及 ADO.NET 与数据库进行交互。 所有 .NET 数据技术(包括数据集、LINQ(Language-Integrated 查询)到 SQL 和 Entity Framework,最终执行与本文所示步骤类似的步骤。
本文演示如何快速将数据从数据库中获取出来。 如果应用程序需要以非琐碎的方式修改数据并更新数据库,请考虑使用 Entity Framework 和数据绑定。 这样,用户界面控件就可以自动同步到基础数据中的更改。
若要访问本教程的完整代码,请参阅适用于 C# 和 Visual Basic 的 Visual Studio 文档 GitHub 存储库。
Important
为了简化代码,它不包括用于生产环境的异常处理。
Prerequisites
安装了“.NET 桌面开发”和“数据存储和处理”工作负载的 Visual Studio。 若要安装它们,请打开 Visual Studio 安装程序,然后选择要修改的 Visual Studio 版本旁边的 “修改 ”。
SQL Server Express LocalDB。 如果没有 SQL Server Express LocalDB,可以从 SQL Server 下载页安装它。
本文假定你熟悉 Visual Studio IDE 的基本功能。 它还假设你可以创建 Windows 窗体应用程序、向项目添加窗体、向窗体添加按钮和其他控件、设置控件属性和代码简单事件。 如果您对这些任务不熟悉,请在开始本演练之前,完成 在 Visual Studio 中使用 C# 创建 Windows 窗体应用的教程 或 在 Visual Studio 中使用 Visual Basic 创建 Windows 窗体应用的教程。
设置示例数据库
按照以下步骤创建示例数据库:
在 Visual Studio 中,打开 服务器资源管理器 窗口。
右键单击 “数据连接 ”,然后选择“ 创建新的 SQL Server 数据库”。
对于 服务器名称,请输入 (localdb)\mssqllocaldb。
对于 “新建数据库名称”,请输入 Sales,然后选择 “确定”。
Visual Studio 在服务器资源管理器的数据连接节点下创建一个空的Sales数据库。
右键单击 “销售 数据连接”,然后选择“ 新建查询”。
此时会打开查询编辑器窗口。
将 Sales Transact-SQL 脚本 复制到剪贴板。
将 T-SQL 脚本粘贴到查询编辑器窗口中,然后选择“ 执行”。
短时间后,查询将完成运行,并创建数据库对象。 数据库包含两个表:客户和订单。 这些表最初不包含任何数据,但在运行创建的应用程序时,可以添加数据。 该数据库还包含五个基本存储过程。
创建窗体并添加控件
使用 Windows 窗体应用(.NET Framework) 模板创建 C# 或 Visual Basic 项目并将其命名为 SimpleDataApp。
Visual Studio 创建项目和多个文件,包括名为 Form1 的空 Windows 窗体。
在 解决方案资源管理器中,向项目添加两个 Windows 窗体,使其总共有三个窗体,并为其提供以下名称:
Navigation
NewCustomer
FillOrCancel
对于每个窗体,请添加下图所示的文本框、按钮和其他控件。 对于每个控件,设置表描述的属性。
Note
组框和标签控件增加了清晰度,但不在代码中使用。
导航窗体
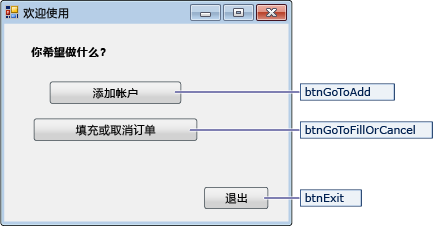
导航窗体的控件
控件文本 控件类型 控件属性 添加帐户 Button 名称 = btnGoToAdd 填写或取消订单 Button Name = btnGoToFillOrCancel Exit Button Name = btnExit NewCustomer 窗体
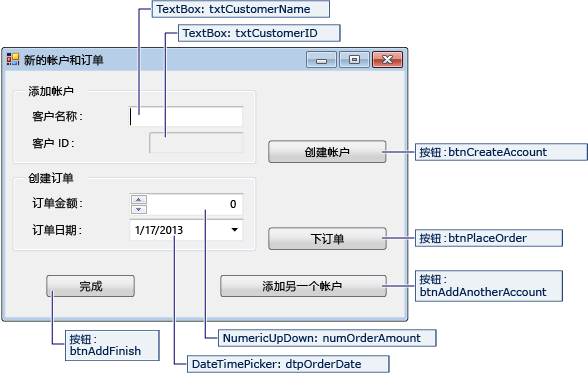
NewCustomer 窗体的控件
标签/控件文本 控件类型 控件属性 客户名称 TextBox Name = txtCustomerName 客户 ID TextBox Name = txtCustomerID
只读 = True创建帐户 Button Name = btnCreateAccount 订单金额 NumericUpdown Name = numOrderAmount
DecimalPlaces = 0
最大值 = 5000订单日期 DateTimePicker Name = dtpOrderDate
格式 = 短下单 Button Name = btnPlaceOrder Finish Button Name = btnAddFinish 添加另一个帐户 Button Name = btnAddAnotherAccount FillOrCancel 窗体

FillOrCancel 窗体的控件
标签/控件文本 控件类型 控件属性 订单 ID TextBox Name = txtOrderID 查找订单 Button Name = btnFindByOrderID 如果填写订单... DateTimePicker Name = dtpFillDate
格式 = 短(None) DataGridView Name = dgvCustomerOrders
只读 = True
RowHeadersVisible = False取消订单 Button Name = btnCancelOrder 填充顺序 Button 名称 = btnFillOrder Finish Button Name = btnFinishUpdates
存储连接字符串
当应用程序尝试打开与数据库的连接时,应用程序必须有权访问连接字符串。 为了避免需要在每个窗体上手动输入字符串,请将字符串存储在项目中 App.config 文件中。 然后,创建一个方法,该方法在从应用程序中的任何窗体调用时返回字符串。
若要查找连接字符串,请执行以下命令:
在服务器资源管理器中,右键单击 “销售 数据连接”,然后选择“ 属性”。
找到 连接字符串 属性并将其字符串值复制到剪贴板。
若要在项目中存储连接字符串,请执行以下作:
在 解决方案资源管理器中,根据项目类型执行以下步骤之一:
对于 C# 项目,展开项目下的 “属性” 节点,然后打开 Settings.settings 文件。
对于 Visual Basic 项目,选择“ 显示所有文件”,展开“ 我的项目 ”节点,然后打开 Settings.settings 文件。
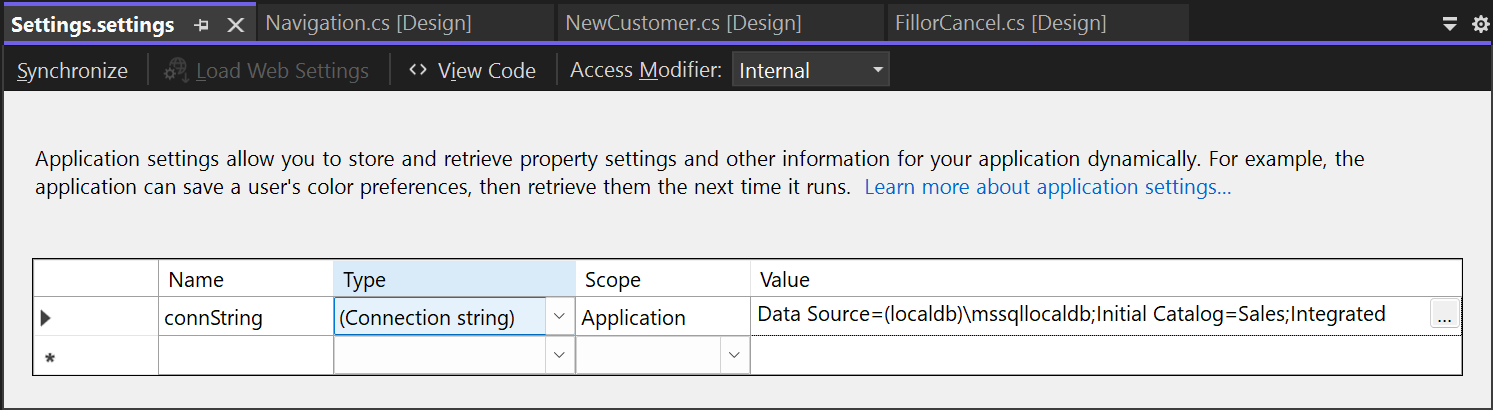
在 “名称” 列中,输入 connString。
在类型列表中,选择“连接字符串”。
在 范围 列表中,选择 应用程序。
在 值 列中,输入连接字符串(没有任何外部引号),然后保存所做的更改。

Caution
在实际应用程序中,应安全地存储连接字符串,如 连接字符串和配置文件中所述。 为了获得最佳安全性,请使用不依赖于在连接字符串中存储密码的身份验证方法。 例如,本地 SQL Server 数据库的 Windows 身份验证。 有关详细信息,请参阅 “保存和编辑连接字符串”。
编写表单的代码
本部分简要概述了每个表格的作用。 它还提供了相关代码,选择窗体上的按钮时就会定义基础逻辑。
导航窗体
运行应用程序时将打开导航窗体,其中包含以下按钮:
添加帐户:打开 NewCustomer 窗体。
填写或取消订单:打开 FillOrCancel 表单。
退出:关闭应用程序。
将导航窗体设为启动窗体
对于 C# 项目:
在 解决方案资源管理器中,打开 Program.cs。
将
Application.Run行更改为:Application.Run(new Navigation());
对于 Visual Basic 项目:
在 解决方案资源管理器中,右键单击项目并选择 “属性”。
在项目设计器中,选择“应用程序”选项卡,然后在“启动对象”列表中选择“导航”。
为导航窗体创建自动生成的事件处理程序
若要创建空事件处理程序方法,请双击导航窗体上的三个按钮中的每一个。 双击按钮会在设计器代码文件中添加自动生成的代码,这使按钮选择能够引发事件。
如果决定直接将代码复制并粘贴到代码文件中,而不是在设计器中使用双击作,请确保将事件处理程序设置为正确的方法:
在窗体代码文件的 “属性 ”窗口中,使用闪电工具栏按钮切换到 “事件 ”选项卡。
搜索 Click 属性并验证其值是否为正确的事件处理程序方法。
为导航窗体逻辑添加代码
在 Navigation 窗体的代码页中,完成三个按钮选择事件处理程序的方法主体,如下面的代码所示。
/// <summary>
/// Opens the NewCustomer form as a dialog box,
/// which returns focus to the calling form when it is closed.
/// </summary>
private void btnGoToAdd_Click(object sender, EventArgs e)
{
    Form frm = new NewCustomer();
    frm.Show();
}

/// <summary>
/// Opens the FillorCancel form as a dialog box.
/// </summary>
private void btnGoToFillOrCancel_Click(object sender, EventArgs e)
{
    Form frm = new FillOrCancel();
    frm.ShowDialog();
}

/// <summary>
/// Closes the application (not just the Navigation form).
/// </summary>
private void btnExit_Click(object sender, EventArgs e)
{
    this.Close();
}
NewCustomer 窗体
输入客户名称并选择“ 创建帐户 ”按钮时,NewCustomer 表单将创建一个客户帐户,SQL Server 将返回一个 IDENTITY 值作为新的客户 ID。 然后,可以通过指定金额和订单日期并选择 “下 单”按钮来为新帐户下订单。
为 NewCustomer 窗体创建自动生成的事件处理程序
双击四个按钮,为 NewCustomer 窗体上的每个按钮创建一个空的 Click 事件处理程序。 双击这些按钮还会在设计器代码文件中添加自动生成的代码,使按钮选择能够引发事件。
为 NewCustomer 表单逻辑添加代码
若要完成 NewCustomer 表单逻辑,请执行以下步骤:
将
System.Data.SqlClient命名空间引入范围,以便无需完全限定其成员的名称。
向类添加一些变量和帮助程序方法。
// Storage for IDENTITY values returned from database.
private int parsedCustomerID;
private int orderID;

/// <summary>
/// Verifies that the customer name text box is not empty.
/// </summary>
private bool IsCustomerNameValid()
{
    if (txtCustomerName.Text == "")
    {
        MessageBox.Show("Please enter a name.");
        return false;
    }
    else
    {
        return true;
    }
}

/// <summary>
/// Verifies that a customer ID and order amount have been provided.
/// </summary>
private bool IsOrderDataValid()
{
    // Verify that CustomerID is present.
    if (txtCustomerID.Text == "")
    {
        MessageBox.Show("Please create customer account before placing order.");
        return false;
    }
    // Verify that Amount isn't 0.
    else if ((numOrderAmount.Value < 1))
    {
        MessageBox.Show("Please specify an order amount.");
        return false;
    }
    else
    {
        // Order can be submitted.
        return true;
    }
}

/// <summary>
/// Clears the form data.
/// </summary>
private void ClearForm()
{
    txtCustomerName.Clear();
    txtCustomerID.Clear();
    dtpOrderDate.Value = DateTime.Now;
    numOrderAmount.Value = 0;
    this.parsedCustomerID = 0;
}
完善四个按钮选择事件处理程序的方法体。
/// <summary>
/// Creates a new customer by calling the Sales.uspNewCustomer stored procedure.
/// </summary>
private void btnCreateAccount_Click(object sender, EventArgs e)
{
    if (IsCustomerNameValid())
    {
        // Create the connection.
        using (SqlConnection connection = new SqlConnection(Properties.Settings.Default.connString))
        {
            // Create a SqlCommand, and identify it as a stored procedure.
            using (SqlCommand sqlCommand = new SqlCommand("Sales.uspNewCustomer", connection))
            {
                sqlCommand.CommandType = CommandType.StoredProcedure;

                // Add input parameter for the stored procedure and specify what to use as its value.
                sqlCommand.Parameters.Add(new SqlParameter("@CustomerName", SqlDbType.NVarChar, 40));
                sqlCommand.Parameters["@CustomerName"].Value = txtCustomerName.Text;

                // Add the output parameter.
                sqlCommand.Parameters.Add(new SqlParameter("@CustomerID", SqlDbType.Int));
                sqlCommand.Parameters["@CustomerID"].Direction = ParameterDirection.Output;

                try
                {
                    connection.Open();

                    // Run the stored procedure.
                    sqlCommand.ExecuteNonQuery();

                    // Customer ID is an IDENTITY value from the database.
                    this.parsedCustomerID = (int)sqlCommand.Parameters["@CustomerID"].Value;

                    // Put the Customer ID value into the read-only text box.
                    this.txtCustomerID.Text = Convert.ToString(parsedCustomerID);
                }
                catch
                {
                    MessageBox.Show("Customer ID was not returned. Account could not be created.");
                }
                finally
                {
                    connection.Close();
                }
            }
        }
    }
}

/// <summary>
/// Calls the Sales.uspPlaceNewOrder stored procedure to place an order.
/// </summary>
private void btnPlaceOrder_Click(object sender, EventArgs e)
{
    // Ensure the required input is present.
    if (IsOrderDataValid())
    {
        // Create the connection.
        using (SqlConnection connection = new SqlConnection(Properties.Settings.Default.connString))
        {
            // Create SqlCommand and identify it as a stored procedure.
            using (SqlCommand sqlCommand = new SqlCommand("Sales.uspPlaceNewOrder", connection))
            {
                sqlCommand.CommandType = CommandType.StoredProcedure;

                // Add the @CustomerID input parameter, which was obtained from uspNewCustomer.
                sqlCommand.Parameters.Add(new SqlParameter("@CustomerID", SqlDbType.Int));
                sqlCommand.Parameters["@CustomerID"].Value = this.parsedCustomerID;

                // Add the @OrderDate input parameter.
                sqlCommand.Parameters.Add(new SqlParameter("@OrderDate", SqlDbType.DateTime, 8));
                sqlCommand.Parameters["@OrderDate"].Value = dtpOrderDate.Value;

                // Add the @Amount order amount input parameter.
                sqlCommand.Parameters.Add(new SqlParameter("@Amount", SqlDbType.Int));
                sqlCommand.Parameters["@Amount"].Value = numOrderAmount.Value;

                // Add the @Status order status input parameter.
                // For a new order, the status is always O (open).
                sqlCommand.Parameters.Add(new SqlParameter("@Status", SqlDbType.Char, 1));
                sqlCommand.Parameters["@Status"].Value = "O";

                // Add the return value for the stored procedure, which is  the order ID.
                sqlCommand.Parameters.Add(new SqlParameter("@RC", SqlDbType.Int));
                sqlCommand.Parameters["@RC"].Direction = ParameterDirection.ReturnValue;

                try
                {
                    //Open connection.
                    connection.Open();

                    // Run the stored procedure.
                    sqlCommand.ExecuteNonQuery();

                    // Display the order number.
                    this.orderID = (int)sqlCommand.Parameters["@RC"].Value;
                    MessageBox.Show("Order number " + this.orderID + " has been submitted.");
                }
                catch
                {
                    MessageBox.Show("Order could not be placed.");
                }
                finally
                {
                    connection.Close();
                }
            }
        }
    }
}

/// <summary>
/// Clears the form data so another new account can be created.
/// </summary>
private void btnAddAnotherAccount_Click(object sender, EventArgs e)
{
    this.ClearForm();
}

/// <summary>
/// Closes the form/dialog box.
/// </summary>
private void btnAddFinish_Click(object sender, EventArgs e)
{
    this.Close();
}
FillOrCancel 窗体
FillOrCancel 窗体运行查询,以便在输入订单 ID 时返回订单,然后选择 “查找订单 ”按钮。 返回的行显示在只读数据网格中。 如果选择“ 取消订单 ”按钮,则可以将订单标记为已取消(X),或者如果选择 “填充顺序 ”按钮,则可以将订单标记为已填充(F)。 如果再次选择 “查找订单 ”按钮,将显示更新后的行。
为 FillOrCancel 表单创建自动生成的事件处理程序
通过双击按钮,为 FillOrCancel 窗体上的四个按钮创建空的 Click 事件处理程序。 双击这些按钮还会在设计器代码文件中添加自动生成的代码,使按钮选择能够引发事件。
添加适用于 FillOrCancel 窗体逻辑的代码
若要完成 FillOrCancel 表单逻辑,请执行以下步骤。
将以下两个命名空间引入范围,以便无需完全限定其成员的名称。
向类添加变量和帮助程序方法。
// Storage for the order ID value.
private int parsedOrderID;

/// <summary>
/// Verifies that an order ID is present and contains valid characters.
/// </summary>
private bool IsOrderIDValid()
{
    // Check for input in the Order ID text box.
    if (txtOrderID.Text == "")
    {
        MessageBox.Show("Please specify the Order ID.");
        return false;
    }

    // Check for characters other than integers.
    else if (Regex.IsMatch(txtOrderID.Text, @"^\D*$"))
    {
        // Show message and clear input.
        MessageBox.Show("Customer ID must contain only numbers.");
        txtOrderID.Clear();
        return false;
    }
    else
    {
        // Convert the text in the text box to an integer to send to the database.
        parsedOrderID = Int32.Parse(txtOrderID.Text);
        return true;
    }
}
完善四个按钮选择事件处理程序的方法体。
/// <summary>
/// Executes a t-SQL SELECT statement to obtain order data for a specified
/// order ID, then displays it in the DataGridView on the form.
/// </summary>
private void btnFindByOrderID_Click(object sender, EventArgs e)
{
    if (IsOrderIDValid())
    {
        using (SqlConnection connection = new SqlConnection(Properties.Settings.Default.connString))
        {
            // Define a t-SQL query string that has a parameter for orderID.
            const string sql = "SELECT * FROM Sales.Orders WHERE orderID = @orderID";

            // Create a SqlCommand object.
            using (SqlCommand sqlCommand = new SqlCommand(sql, connection))
            {
                // Define the @orderID parameter and set its value.
                sqlCommand.Parameters.Add(new SqlParameter("@orderID", SqlDbType.Int));
                sqlCommand.Parameters["@orderID"].Value = parsedOrderID;

                try
                {
                    connection.Open();

                    // Run the query by calling ExecuteReader().
                    using (SqlDataReader dataReader = sqlCommand.ExecuteReader())
                    {
                        // Create a data table to hold the retrieved data.
                        DataTable dataTable = new DataTable();

                        // Load the data from SqlDataReader into the data table.
                        dataTable.Load(dataReader);

                        // Display the data from the data table in the data grid view.
                        this.dgvCustomerOrders.DataSource = dataTable;

                        // Close the SqlDataReader.
                        dataReader.Close();
                    }
                }
                catch
                {
                    MessageBox.Show("The requested order could not be loaded into the form.");
                }
                finally
                {
                    // Close the connection.
                    connection.Close();
                }
            }
        }
    }
}

/// <summary>
/// Cancels an order by calling the Sales.uspCancelOrder
/// stored procedure on the database.
/// </summary>
private void btnCancelOrder_Click(object sender, EventArgs e)
{
    if (IsOrderIDValid())
    {
        // Create the connection.
        using (SqlConnection connection = new SqlConnection(Properties.Settings.Default.connString))
        {
            // Create the SqlCommand object and identify it as a stored procedure.
            using (SqlCommand sqlCommand = new SqlCommand("Sales.uspCancelOrder", connection))
            {
                sqlCommand.CommandType = CommandType.StoredProcedure;

                // Add the order ID input parameter for the stored procedure.
                sqlCommand.Parameters.Add(new SqlParameter("@orderID", SqlDbType.Int));
                sqlCommand.Parameters["@orderID"].Value = parsedOrderID;

                try
                {
                    // Open the connection.
                    connection.Open();

                    // Run the command to execute the stored procedure.
                    sqlCommand.ExecuteNonQuery();
                }
                catch
                {
                    MessageBox.Show("The cancel operation was not completed.");
                }
                finally
                {
                    // Close connection.
                    connection.Close();
                }
            }
        }
    }
}

/// <summary>
/// Fills an order by calling the Sales.uspFillOrder stored
/// procedure on the database.
/// </summary>
private void btnFillOrder_Click(object sender, EventArgs e)
{
    if (IsOrderIDValid())
    {
        // Create the connection.
        using (SqlConnection connection = new SqlConnection(Properties.Settings.Default.connString))
        {
            // Create command and identify it as a stored procedure.
            using (SqlCommand sqlCommand = new SqlCommand("Sales.uspFillOrder", connection))
            {
                sqlCommand.CommandType = CommandType.StoredProcedure;

                // Add the order ID input parameter for the stored procedure.
                sqlCommand.Parameters.Add(new SqlParameter("@orderID", SqlDbType.Int));
                sqlCommand.Parameters["@orderID"].Value = parsedOrderID;

                // Add the filled date input parameter for the stored procedure.
                sqlCommand.Parameters.Add(new SqlParameter("@FilledDate", SqlDbType.DateTime, 8));
                sqlCommand.Parameters["@FilledDate"].Value = dtpFillDate.Value;

                try
                {
                    connection.Open();

                    // Execute the stored procedure.
                    sqlCommand.ExecuteNonQuery();
                }
                catch
                {
                    MessageBox.Show("The fill operation was not completed.");
                }
                finally
                {
                    // Close the connection.
                    connection.Close();
                }
            }
        }
    }
}

/// <summary>
/// Closes the form.
/// </summary>
private void btnFinishUpdates_Click(object sender, EventArgs e)
{
    this.Close();
}
测试应用程序
运行应用程序并尝试创建几个客户和订单,以验证一切是否按预期工作。
若要验证数据库是否随更改一起更新:
在服务器资源管理器中打开 “表” 节点。
右键单击 “客户 ”和 “订单” 节点,然后选择“ 显示表数据”。
相关内容
- 用于 .NET 的 Visual Studio 数据工具