在本教程的上一阶段中,我们使用 PyTorch 创建了机器学习模型。 但是,该模型是一个 .pth 文件。 若要将其与 Windows ML 应用集成,需要将模型转换为 ONNX 格式。
导出模型
要导出模型,你将使用 torch.onnx.export() 函数。 此函数执行模型,并记录用于计算输出的运算符的跟踪。
- 将 main 函数上方的以下代码复制到 Visual Studio 中的
DataClassifier.py文件中。
#Function to Convert to ONNX
def convert():

    # set the model to inference mode
    model.eval()

    # Let's create a dummy input tensor
    dummy_input = torch.randn(1, 3, 32, 32, requires_grad=True)

    # Export the model
    torch.onnx.export(model,         # model being run
         dummy_input,       # model input (or a tuple for multiple inputs)
         "Network.onnx",       # where to save the model
         export_params=True,  # store the trained parameter weights inside the model file
         opset_version=11,    # the ONNX version to export the model to
         do_constant_folding=True,  # whether to execute constant folding for optimization
         input_names = ['input'],   # the model's input names
         output_names = ['output'], # the model's output names
         dynamic_axes={'input' : {0 : 'batch_size'},    # variable length axes
                                'output' : {0 : 'batch_size'}})
    print(" ")
    print('Model has been converted to ONNX')
在导出模型之前必须调用 model.eval() 或 model.train(False),因为这会将模型设置为“推理模式”。 这是必需的,因为 dropout 或 batchnorm 等运算符在推理和训练模式下的行为有所不同。
- 要运行到 ONNX 的转换,请将对转换函数的调用添加到 main 函数。 无需再次训练模型,因此我们将注释掉一些不再需要运行的函数。 main 函数将如下所示。
if __name__ == "__main__":
    num_epochs = 10
    train(num_epochs)
    print('Finished Training\n')
    test()
    test_species()
    convert()
- 选择工具栏上的
Start Debugging按钮或按F5再次运行项目。 无需再次训练模型,只需从项目文件夹中加载现有模型即可。
导航到项目位置并找到 .pth 模型旁边的 ONNX 模型。
注释
想要了解更多吗? 查看有关导出模型的 PyTorch 教程。
导出模型。
使用 Neutron 打开
Network.onnx模型文件。选择数据节点,打开模型属性。
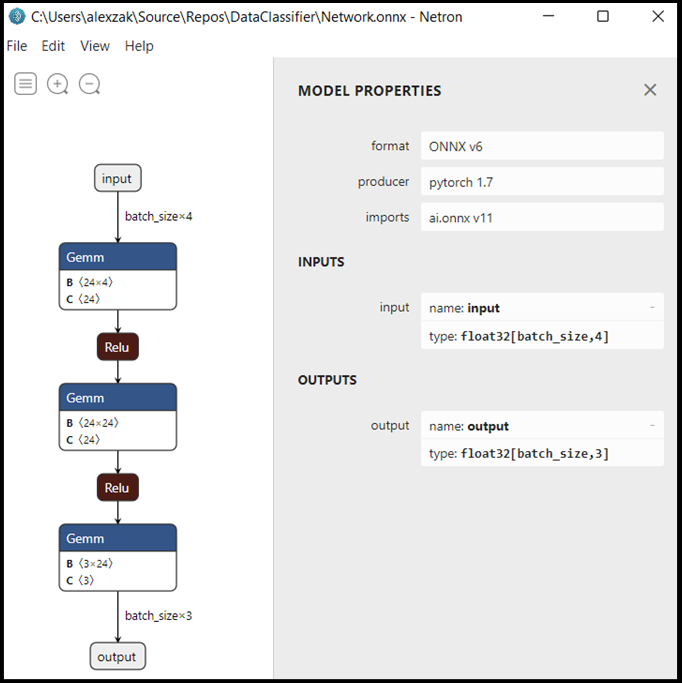
如你所见,该模型需要一个 32 位张量(多维数组)浮点对象作为输入,并返回一个 Tensor 浮点作为输出。 输出数组将包括每个标签的概率。 构建模型的方式,标签由 3 个数字表示,每个数字与特定类型的虹膜花相关联。
| 标签 1 | 标签 2 | 标签 3 |
|---|---|---|
| 0 | 1 | 2 |
| Iris-setosa | Iris-versicolor | Iris-virginica |
你将需要提取这些值来显示 Windows ML 应用的正确预测。
后续步骤
模型已准备就绪,可供部署。 接下来,主要事件是构建一个 Windows 应用程序并在 Windows 设备上在本地运行它。