了解如何使用框架和页面在你的应用中实现基本对等导航。
几乎每个应用都需要在页面之间导航。 即使是具有单个内容页面的简单应用也通常具有需要导航的设置页面。 在本文中,我们将演练将 XAML Page 添加到应用的基础知识,以及如何使用 Frame 在页面之间导航。
- 适用于:Windows 应用 SDK/WinUI3
- 重要 API:Microsoft.UI.Xaml.Controls.Frame 类、Microsoft.UI.Xaml.Controls.Page 类、Microsoft.UI.Xaml.Navigation 命名空间
注意
有关 UWP 应用中的导航,请参阅 应用导航(UWP)
1.创建空白应用
若要在 Visual Studio 中创建空白应用,请执行以下操作:
- 若要设置开发计算机,请参阅 “开始开发 Windows 应用”。
- 在Microsoft Visual Studio 开始窗口中,选择“创建新项目”,或者在 Visual Studio 菜单上选择“文件>新建>项目”。
- 在 “创建新项目 ”对话框的下拉列表筛选器中,分别选择 C# 或 C++、 Windows 和 WinUI。
- 选择“打包的空白应用(桌面版 WinUI 3)”项目模板,然后单击“下一步”。 该模板创建一个具有基于 WinUI 3 的用户界面的桌面应用。
- 在 “项目名称 ”框中,输入
BasicNavigation并单击“ 创建”。 - 若要运行程序,请从菜单中选择“调试>开始调试”,或按 F5。 在开发计算机上生成并运行解决方案,确认应用运行时不会出错。 将显示一个空白页。
- 要停止调试并返回到 Visual Studio,退出该应用,或从菜单中单击“停止调试”。
- 从
MainWindow.xamlMainWindow模板和代码隐藏文件中删除模板中包含的任何示例代码。
2. 使用框架在页面之间导航
当应用有多个页面时,可以使用 Frame 在它们之间导航。 该Frame类支持各种导航方法,例如 Navigate、GoBack 和 GoForward,以及 BackStack、ForwardStack 和 BackStackDepth 等属性。
在 Visual Studio 中创建新的Windows 应用 SDK项目时,项目模板将创建类MainWindow(类型为 Microsoft.UI.Xaml.Window)。 但是,它不会创建 框架 或 页面 ,也不提供任何导航代码。
若要启用页面之间的导航,请添加一个 Frame 作为根元素的 MainWindow. 可以在代码隐藏文件中的 Application.OnLaunched 方法重写中 App.xaml 执行此操作。
App打开代码隐藏文件,更新OnLaunched替代并处理 NavigationFailed 事件,如下所示。
// App.xaml.cs

protected override void OnLaunched(Microsoft.UI.Xaml.LaunchActivatedEventArgs args)
{
    m_window = new MainWindow();

    // Create a Frame to act as the navigation context and navigate to the first page
    Frame rootFrame = new Frame();
    rootFrame.NavigationFailed += OnNavigationFailed;
    // Navigate to the first page, configuring the new page
    // by passing required information as a navigation parameter
    rootFrame.Navigate(typeof(MainPage), args.Arguments);

    // Place the frame in the current Window
    m_window.Content = rootFrame;
    // Ensure the MainWindow is active
    m_window.Activate();
}

void OnNavigationFailed(object sender, NavigationFailedEventArgs e)
{
    throw new Exception("Failed to load Page " + e.SourcePageType.FullName);
}
// App.xaml.h

// Add after OnLaunched declaration.
void OnNavigationFailed(IInspectable const&, Microsoft::UI::Xaml::Navigation::NavigationFailedEventArgs const&);

///////////////
// App.xaml.cpp

void App::OnLaunched(LaunchActivatedEventArgs const& e)
{
    window = make<MainWindow>();
    Frame rootFrame = Frame();
    rootFrame.NavigationFailed({ this, &App::OnNavigationFailed });
    rootFrame.Navigate(xaml_typename<BasicNavigation::MainPage>(), box_value(e.Arguments()));
    window.Content(rootFrame);
    window.Activate();
}

void App::OnNavigationFailed(IInspectable const&, NavigationFailedEventArgs const& e)
{
    throw hresult_error(E_FAIL, hstring(L"Failed to load Page ") + e.SourcePageType().Name);
}
注意
对于具有更复杂的导航的应用,通常使用 NavigationView 作为 MainWindow 的根目录,并将导航 Frame 视图作为内容放置。 有关详细信息,请参阅 导航视图。
Navigate 方法用于显示此Frame内容。 此处, MainPage.xaml 将 Navigate 传递给该方法,因此该方法将加载 MainPage 到该方法中 Frame。
如果导航到应用的初始窗口失败, NavigationFailed 将发生事件,并且此代码会在事件处理程序中引发异常。
3. 添加基本页面
空白应用模板不会为你创建多个应用页面。 在页面之间导航之前,需要向应用添加一些页面。
若要向应用添加新项,请执行以下操作:
- 在解决方案资源管理器中,右键单击
BasicNavigation项目节点以打开上下文菜单。 - 从上下文菜单中选择“添加新>项”。
- 在“添加新项”对话框中,选择左窗格中的 WinUI 节点,然后在中间窗格中选择“空白页”(WinUI 3)。
- 在 “名称 ”框中,输入
MainPage并按 “添加 ”按钮。 - 重复步骤 1-4 以添加第二页,但在 “名称 ”框中输入
Page2。
现在,这些文件应作为项目的一部分 BasicNavigation 列出。
| C#(编程语言) | C++ |
|---|---|
|
|
重要
对于C++项目,必须在引用另一页的每个页面的头文件中添加一个 #include 指令。 对于此处显示的页间导航示例,MainPage.xaml.h 文件包含 #include "Page2.xaml.h",其次,Page2.xaml.h 文件又包含 #include "MainPage.xaml.h"。
C++页面模板还包括一个示例 Button 和单击处理程序代码,需要从页面的 XAML 和代码隐藏文件中删除这些代码。
向页面添加内容
在 MainPage.xaml中,将现有页面内容替换为以下内容:
<Grid>
    <TextBlock x:Name="pageTitle" Text="Main Page"
               Margin="16" Style="{StaticResource TitleTextBlockStyle}"/>
    <HyperlinkButton Content="Click to go to page 2"
                     Click="HyperlinkButton_Click"
                     HorizontalAlignment="Center"/>
</Grid>
此 XAML 添加:
- 一个
pageTitle属性设置为根Main Page的子元素。 - 一个 HyperlinkButton 元素,用于作为根 网格的子元素导航到下一页。
在MainPage代码隐藏文件中,添加以下代码来处理Click添加到的 HyperlinkButton 事件,以便导航到 Page2.xaml。
// MainPage.xaml.cs

private void HyperlinkButton_Click(object sender, RoutedEventArgs e)
{
    Frame.Navigate(typeof(Page2));
}
// pch.h
// Add this include in pch.h to support winrt::xaml_typename

#include <winrt/Windows.UI.Xaml.Interop.h>

////////////////////
// MainPage.xaml.h

void HyperlinkButton_Click(winrt::Windows::Foundation::IInspectable const& sender, winrt::Microsoft::UI::Xaml::RoutedEventArgs const& e);

////////////////////
// MainPage.xaml.cpp

void winrt::BasicNavigation::implementation::MainPage::HyperlinkButton_Click(winrt::Windows::Foundation::IInspectable const& sender, winrt::Microsoft::UI::Xaml::RoutedEventArgs const& e)
{
    Frame().Navigate(winrt::xaml_typename<BasicNavigation::Page2>());
}
MainPage 是 Page 类的子类。 该 Page 类具有只读 Frame 属性,该属性获取 Frame 包含的 Page。 调用中的ClickHyperlinkButtonMainPageFrame.Navigate(typeof(Page2))事件处理程序时,Frame将显示其Page2.xaml内容。
每当将页面加载到框架中时,该页将作为 PageStackEntry添加到 Frame 的 BackStack 或 ForwardStack,从而允许历史记录和向后导航。
现在,在 Page2.xaml. 将现有页面内容替换为以下内容:
<Grid>
    <TextBlock x:Name="pageTitle" Text="Page 2"
               Margin="16" Style="{StaticResource TitleTextBlockStyle}"/>
    <HyperlinkButton Content="Click to go to main page"
                     Click="HyperlinkButton_Click"
                     HorizontalAlignment="Center"/>
</Grid>
在Page2代码隐藏文件中,添加以下代码来处理 Click HyperlinkButton。
// Page2.xaml.cs

private void HyperlinkButton_Click(object sender, RoutedEventArgs e)
{
    Frame.Navigate(typeof(MainPage));
}
// Page2.xaml.h

void HyperlinkButton_Click(winrt::Windows::Foundation::IInspectable const& sender, winrt::Microsoft::UI::Xaml::RoutedEventArgs const& e);

/////////////////
// Page2.xaml.cpp

void winrt::BasicNavigation::implementation::Page2::HyperlinkButton_Click(winrt::Windows::Foundation::IInspectable const& sender, winrt::Microsoft::UI::Xaml::RoutedEventArgs const& e)
{
    Frame().Navigate(winrt::xaml_typename<BasicNavigation::MainPage>());
}
生成并运行应用。 单击显示“单击以转到第 2 页”的链接。 顶部显示“第 2 页”的第二页应加载并显示在框架中。 现在,单击第 2 页上的链接,返回到主页。
4. 在页面之间传递信息
你的应用现在在两个页面之间导航,但它实际上并没有执行任何有趣的操作。 通常,当应用有多个页面时,页面需要共享信息。 现在,你将将一些信息从第一页传递到第二页。
在中 MainPage.xaml,将前面添加的 HyperlinkButton StackPanel 替换为以下 StackPanel。 这会添加 TextBlock 标签和用于输入文本字符串的 TextBox。name
<StackPanel VerticalAlignment="Center">
    <TextBlock HorizontalAlignment="Center" Text="Enter your name"/>
    <TextBox HorizontalAlignment="Center" Width="200" x:Name="name"/>
    <HyperlinkButton Content="Click to go to page 2"
                              Click="HyperlinkButton_Click"
                              HorizontalAlignment="Center"/>
</StackPanel>
现在,你将使用该方法的第 Navigate 二个重载,并将文本框中的文本作为第二个参数传递。 下面是此 Navigate 重载的签名:
public bool Navigate(System.Type sourcePageType, object parameter);
bool Navigate(TypeName const& sourcePageType, IInspectable const& parameter);
在HyperlinkButton_Click代码隐藏文件的事件处理程序MainPage中,向引用Navigate文本框属性Text的方法添加第二个参数name。
// MainPage.xaml.cs

private void HyperlinkButton_Click(object sender, RoutedEventArgs e)
{
    Frame.Navigate(typeof(Page2), name.Text);
}
// MainPage.xaml.cpp

void winrt::BasicNavigation::implementation::MainPage::HyperlinkButton_Click(winrt::Windows::Foundation::IInspectable const& sender, winrt::Microsoft::UI::Xaml::RoutedEventArgs const& e)
{
    Frame().Navigate(xaml_typename<BasicNavigation::Page2>(), winrt::box_value(name().Text()));
}
在中 Page2.xaml,将前面添加的 HyperlinkButton 替换为以下内容 StackPanel。 这将添加一个 TextBlock ,用于显示从中 MainPage传递的文本字符串。
<StackPanel VerticalAlignment="Center">
    <TextBlock HorizontalAlignment="Center" x:Name="greeting"/>
    <HyperlinkButton Content="Click to go to page 1"
                     Click="HyperlinkButton_Click"
                     HorizontalAlignment="Center"/>
</StackPanel>
在 Page2 代码隐藏文件中,添加以下代码以替代 OnNavigatedTo 方法:
// Page2.xaml.cs

protected override void OnNavigatedTo(NavigationEventArgs e)
{
    if (e.Parameter is string && !string.IsNullOrWhiteSpace((string)e.Parameter))
    {
        greeting.Text = $"Hello, {e.Parameter.ToString()}";
    }
    else
    {
        greeting.Text = "Hello!";
    }
    base.OnNavigatedTo(e);
}
// Page2.xaml.h

void Page2::OnNavigatedTo(Microsoft::UI::Xaml::Navigation::NavigationEventArgs const& e)
{
	auto propertyValue{ e.Parameter().as<Windows::Foundation::IPropertyValue>() };
	if (propertyValue.Type() == Windows::Foundation::PropertyType::String)
	{
		auto name{ winrt::unbox_value<winrt::hstring>(e.Parameter()) };
		if (!name.empty())
		{
			greeting().Text(L"Hello, " + name);
			__super::OnNavigatedTo(e);
			return;
		}
	}
	greeting().Text(L"Hello!");
	__super::OnNavigatedTo(e);
}
运行应用,在文本框中键入名称,然后单击显示 Click to go to page 2的链接。
当Click调用HyperlinkButton中的事件MainPageFrame.Navigate(typeof(Page2), name.Text)时,属性name.Text将Page2传递给该属性,并且事件数据中的值用于页面上显示的消息。
5. 缓存页面
默认情况下不缓存页面内容和状态,因此如果你要缓存信息,必须在应用的每个页面中启用它。
在我们的基本对等示例中,单击Click to go to page 1链接时,Page2打开的(和任何其他字段)TextBox设置为MainPage其默认状态。 解决此问题的一种方法是使用 NavigationCacheMode 属性指定将页面添加到框架的页面缓存。
默认情况下,每次导航时,都会使用其默认值创建新页面实例。 在MainPage.xaml中,设置为NavigationCacheModeEnabled(在开始Page标记中)缓存页面,并保留页面的所有内容和状态值,直到超出帧的页面缓存。 如果忽略 CacheSize 限制,将 NavigationCacheMode 设置为 Required,这将为框架指定导航历史记录中可缓存的页数。 但是,请记住,根据设备的内存限制,缓存大小限制可能非常重要。
<Page
    x:Class="BasicNavigation.MainPage"
    ...
    mc:Ignorable="d"
    NavigationCacheMode="Enabled">
现在,单击回到主页时,在文本框中输入的名称仍然存在。
6. 自定义页面切换动画
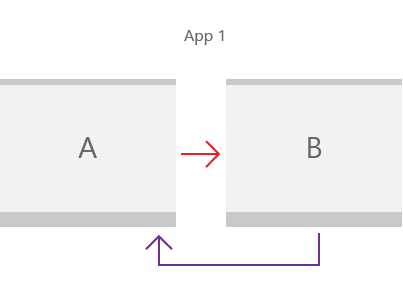
默认情况下,当导航发生时,每个页面都会在框架中进行动画处理。 默认动画是“入口”动画,导致页面从窗口底部向上滑动。 但是,可以选择适合应用导航的不同动画选项。 例如,可以使用“钻取”动画来给人一种感觉,即用户更深入你的应用,或水平幻灯片动画,以给人一种感觉,即两个页面是对等。 有关详细信息,请参阅 页面切换。
这些动画由 NavigationTransitionInfo 的子类表示。 若要指定要用于页面切换的动画,你将使用方法的第 Navigate 三个重载,并将子类作为第三个 NavigationTransitionInfo 参数 (infoOverride) 传递。 下面是此 Navigate 重载的签名:
public bool Navigate(System.Type sourcePageType,
                     object parameter,
                     NavigationTransitionInfo infoOverride);
bool Navigate(TypeName const& sourcePageType,
              IInspectable const& parameter,
              NavigationTransitionInfo const& infoOverride);
在 HyperlinkButton_Click 代码隐藏文件的事件处理程序 MainPage 中,向方法添加第三个参数 Navigate ,该方法将 infoOverride 参数 设置为 SlideNavigationTransitionInfo ,其 Effect 属性设置为 FromRight。
// MainPage.xaml.cs

private void HyperlinkButton_Click(object sender, RoutedEventArgs e)
{
    Frame.Navigate(typeof(Page2),
                   name.Text,
                   new SlideNavigationTransitionInfo()
                       { Effect = SlideNavigationTransitionEffect.FromRight});
}
// pch.h

#include <winrt/Microsoft.UI.Xaml.Media.Animation.h>

////////////////////
// MainPage.xaml.cpp

using namespace winrt::Microsoft::UI::Xaml::Media::Animation;

// ...

void winrt::BasicNavigation::implementation::MainPage::HyperlinkButton_Click(winrt::Windows::Foundation::IInspectable const& sender, winrt::Microsoft::UI::Xaml::RoutedEventArgs const& e)
{
    // Create the slide transition and set the transition effect to FromRight.
    SlideNavigationTransitionInfo slideEffect = SlideNavigationTransitionInfo();
    slideEffect.Effect(SlideNavigationTransitionEffect(SlideNavigationTransitionEffect::FromRight));
    Frame().Navigate(winrt::xaml_typename<BasicNavigation::Page2>(),
        		     winrt::box_value(name().Text()),
                     slideEffect);
}
在 HyperlinkButton_Click 代码隐藏文件的事件处理程序 Page2 中,将 infoOverride 参数设置为 SlideNavigationTransitionInfo ,其 Effect 属性设置为 FromLeft。
// Page2.xaml.cs

private void HyperlinkButton_Click(object sender, RoutedEventArgs e)
{
    Frame.Navigate(typeof(MainPage),
                   null,
                   new SlideNavigationTransitionInfo()
                       { Effect = SlideNavigationTransitionEffect.FromLeft});
}
// Page2.xaml.cpp

using namespace winrt::Microsoft::UI::Xaml::Media::Animation;

// ...

void winrt::BasicNavigation::implementation::MainPage::HyperlinkButton_Click(winrt::Windows::Foundation::IInspectable const& sender, winrt::Microsoft::UI::Xaml::RoutedEventArgs const& e)
{
    // Create the slide transition and set the transition effect to FromLeft.
    SlideNavigationTransitionInfo slideEffect = SlideNavigationTransitionInfo();
    slideEffect.Effect(SlideNavigationTransitionEffect(SlideNavigationTransitionEffect::FromLeft));
    Frame().Navigate(winrt::xaml_typename<BasicNavigation::MainPage>(),
        		     nullptr,
                     slideEffect);
}
现在,在页面之间导航时,页面向左和向右滑动,这为这种过渡提供了更自然的感觉,并强化了页面之间的连接。
