本教程的这一部分将新页面添加到应用,该视图显示以前创建的所有笔记。
多个笔记和导航
当前,笔记视图显示单个笔记。 若要显示所有已保存的笔记,请创建新的视图和模型: AllNotes。
- 在 解决方案资源管理器 窗格中,右键单击 Views 文件夹,然后选择 Add>New Item...
- 在“ 添加新项 ”对话框中,选择窗口左侧模板列表中的 WinUI 。 接下来,选择 空白页(WinUI) 模板。 为文件 AllNotesPage.xaml 命名,然后按 “添加”。
- 在 解决方案资源管理器 窗格中,右键单击 Models 文件夹,然后选择 Add>Class...
- 为类 AllNotes.cs 命名,然后按 Add。
小窍门
可以从 GitHub 存储库下载或查看本教程的代码。 若要查看此步骤中的代码,请参阅此提交:所有备注视图和模型。
编码 AllNotes 模型
新的数据模型表示了展示多个笔记所需的数据。 在这里,你将从应用的本地存储中获取所有注释,并创建一个Note对象集合,你将在AllNotesPage中展示这些对象。
在 解决方案资源管理器 窗格中,打开 Models\AllNotes.cs 文件。
将文件中的代码 AllNotes.cs 替换为以下代码:
using System;
using System.Collections.Generic;
using System.Collections.ObjectModel;
using System.Threading.Tasks;
using Windows.Storage;

namespace WinUINotes.Models
{
    public class AllNotes
    {
        public ObservableCollection<Note> Notes { get; set; } =
                                    new ObservableCollection<Note>();

        public AllNotes()
        {
            LoadNotes();
        }

        public async void LoadNotes()
        {
            Notes.Clear();
            // Get the folder where the notes are stored.
            StorageFolder storageFolder =
                          ApplicationData.Current.LocalFolder;
            await GetFilesInFolderAsync(storageFolder);
        }

        private async Task GetFilesInFolderAsync(StorageFolder folder)
        {
            // Each StorageItem can be either a folder or a file.
            IReadOnlyList<IStorageItem> storageItems =
                                        await folder.GetItemsAsync();
            foreach (IStorageItem item in storageItems)
            {
                if (item.IsOfType(StorageItemTypes.Folder))
                {
                    // Recursively get items from subfolders.
                    await GetFilesInFolderAsync((StorageFolder)item);
                }
                else if (item.IsOfType(StorageItemTypes.File))
                {
                    StorageFile file = (StorageFile)item ;
                    Note note = new Note()
                    {
                        Filename = file.Name,
                        Text = await FileIO.ReadTextAsync(file),
                        Date = file.DateCreated.DateTime
                    };
                    Notes.Add(note);
                }
            }
        }
    }
}
前面的代码声明了一组名为 Note 的 Notes 项,并使用 LoadNotes 方法从应用的本地存储中加载笔记。
注释
LoadNotes 方法使用 async void 而不是 async Task,因为它是从构造函数调用的,而构造函数不能是 async。 这种即发即弃模式在这里是可以接受的,因为该方法是一个类似事件的初始化例程。
该 Notes 集合使用 ObservableCollection,该集合是一个适用于数据绑定的专用集合。 当列出多个项(如 ItemsView)的控件绑定到一个 ObservableCollection控件时,这两个控件协同工作,以自动使项列表与集合保持同步。 如果将项添加到集合中,控件将自动更新为新项。 如果将项添加到列表中,则更新集合。
![]() 在文档中了解详细信息:
在文档中了解详细信息:
现在,AllNotes 模型已准备好为视图提供数据,因此需要在 AllNotesPage 中创建模型的实例,以便视图可以access模型。
在 解决方案资源管理器 窗格中,打开 Views\AllNotesPage.xaml.cs 文件。
在类中
AllNotesPage,添加此代码以创建AllNotes名为 notesModel 的模型:注释
你需要在文件顶部添加
using WinUINotes.Models;以引用AllNotes类。public sealed partial class AllNotesPage : Page { // ↓ Add this. ↓ private AllNotes notesModel = new AllNotes(); // ↑ Add this. ↑ public AllNotesPage() { this.InitializeComponent(); } }
设计 AllNotes 页
接下来,需要设计视图以支持 AllNotes 模型。
在 解决方案资源管理器 窗格中,打开 Views\AllNotesPage.xaml 文件。
将
<Grid> ... </Grid>元素替换为以下标记:<Grid> <Grid.RowDefinitions> <RowDefinition Height="Auto"/> <RowDefinition Height="*"/> </Grid.RowDefinitions> <CommandBar DefaultLabelPosition="Right"> <AppBarButton Icon="Add" Label="New note"/> <CommandBar.Content> <TextBlock Text="Quick notes" Margin="16,8" Style="{ThemeResource SubtitleTextBlockStyle}"/> </CommandBar.Content> </CommandBar> <ItemsView ItemsSource="{x:Bind notesModel.Notes}" Grid.Row="1" Padding="16" > <ItemsView.Layout> <UniformGridLayout MinItemWidth="200" MinColumnSpacing="12" MinRowSpacing="12" ItemsJustification="Start"/> </ItemsView.Layout> </ItemsView> </Grid>
前述 XAML 介绍一些新概念:
-
CommandBar 控件包含 AppBarButton。 此按钮具有
Label和Icon,并受包含它的CommandBar的影响。 例如,这CommandBar会将按钮的标签位置设置为Right。 命令栏通常显示在应用顶部,以及页面标题。 -
ItemsView 控件显示项的集合,在本例中,绑定到模型
Notes的属性。 项目的展示方式由项目视图通过ItemsView.Layout属性设置。 在这里,你将使用 UniformGridLayout。
现在创建了AllNotesPage之后,需要最后一次更新MainWindow.xaml,以便加载AllNotesPage而不是单个NotePage。
在 解决方案资源管理器 窗格中,打开 MainWindow.xaml 文件。
请更新
rootFrame元素,使SourcePageType指向views.AllNotesPage,如下所示:<Frame x:Name="rootFrame" Grid.Row="1" SourcePageType="views:AllNotesPage"/>
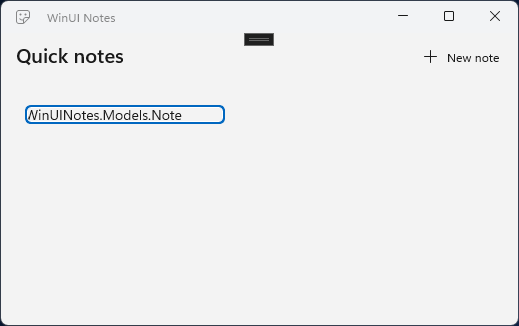
如果现在运行应用,你将看到之前创建的注释已加载到控件中 ItemsView 。 但是,它只是显示为对象的字符串表示形式。
ItemsView不知道应如何显示此项。 您将在下一部分中更正此问题。
添加数据模板
需要指定 DataTemplate 来告知 ItemsView 数据项的显示方式。 将 DataTemplate 分配给 ItemsView 的 ItemTemplate 属性。 对于集合中的每个项,ItemsView.ItemTemplate 将生成声明的 XAML。
在 解决方案资源管理器 窗格中,双击 AllNotesPage.xaml 条目,在 XAML 编辑器中打开它。
请在
local映射下方的行中添加这个新的命名空间映射。xmlns:models="using:WinUINotes.Models"在开头
<Page.Resources>标签后添加<Page...>元素。 这将在的Page属性中获取ResourceDictionary,以便你可以向其中添加XAML资源。<Page x:Class="WinUINotes.Views.AllNotesPage" ... > <!-- ↓ Add this. ↓ --> <Page.Resources> </Page.Resources>在
<Page.Resources>元素内,添加DataTemplate来描述如何显示Note项目。<Page.Resources> <!-- ↓ Add this. ↓ --> <DataTemplate x:Key="NoteItemTemplate" x:DataType="models:Note"> <ItemContainer> <Grid Background="LightGray"> <Grid.RowDefinitions> <RowDefinition Height="120"/> <RowDefinition Height="Auto"/> </Grid.RowDefinitions> <TextBlock Text="{x:Bind Text}" Margin="12,8" TextWrapping="Wrap" TextTrimming="WordEllipsis"/> <Border Grid.Row="1" Padding="8,6,0,6" Background="Gray"> <TextBlock Text="{x:Bind Date}" Foreground="White"/> </Border> </Grid> </ItemContainer> </DataTemplate> <!-- ↑ Add this. ↑ --> </Page.Resources>在 XAML
ItemsView中,将Padding="16"更改为Margin="24",并将ItemTemplate属性赋予您刚创建的数据模板。<ItemsView ItemsSource="{x:Bind notesModel.Notes}" Grid.Row="1" Margin="24" <!-- ↓ Add this. ↓ --> ItemTemplate="{StaticResource NoteItemTemplate}">生成并运行应用。
当在 DataTemplate 中使用 x:Bind 标记扩展时,必须在 DataTemplate 上指定 x:DataType。 在这种情况下,这是一个 Note(因此,需要为 Models 添加 XAML 命名空间引用)。 模板对于笔记使用两个 TextBlock 控件,这些控件绑定到笔记的 Text 和 Date 属性。
Grid 元素用于布局并提供背景色。
Border 元素用于日期的背景。 (XAML Border 元素可以提供大纲和背景。
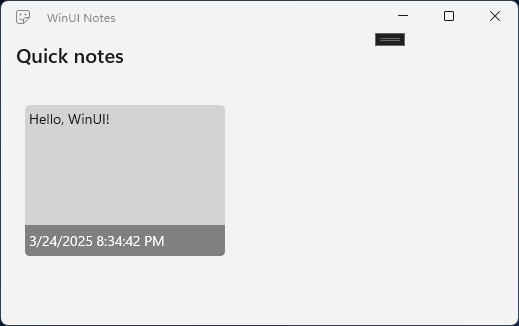
运行应用时,数据模板将应用于 Note 项,如果Windows个性化设置>颜色设置使用浅色模式,则如下所示:
但是,如果你的Windows个性化>颜色设置使用深色模式,它如下所示:
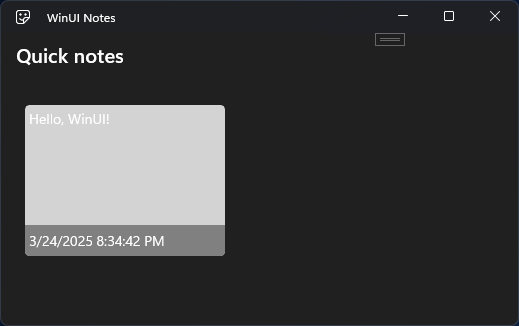
这不是应用的预期外观。 之所以发生,是因为笔记的数据模板中有硬编码的颜色值。 默认情况下,WinUI 3 个元素适应用户的深色或浅色首选项。 定义自己的元素(如数据模板)时,需要小心谨慎地做同样的事情。
在 XAML ResourceDictionary中定义资源时,必须分配一个 x:Key 值来标识资源。 然后,可以使用x:Key在 XAML 中利用{StaticResource}标记扩展或{ThemeResource}标记扩展来检索资源。
- 无论颜色主题如何,
{StaticResource}都是相同的,因此它通常用于Font或Style设置等用途。 -
{ThemeResource}根据所选颜色主题而变化,因此它用于Foreground、Background和其他与颜色相关的属性。
WinUI 包括多种内置资源,可以帮助应用程序遵循 Fluent Design System 的风格指南,同时确保符合无障碍功能指南。 你将使用内置主题资源替换数据模板中的硬编码颜色,并应用其他一些资源来匹配 Fluent Design 指南。
在之前添加的数据模板中,更新此处指示的节以使用内置资源:
<DataTemplate x:Key="NoteItemTemplate"
              x:DataType="models:Note">

<!-- ↓ Update this. ↓ -->
    <ItemContainer CornerRadius="{StaticResource OverlayCornerRadius}">
        <Grid Background="{ThemeResource CardBackgroundFillColorDefaultBrush}"
              BorderThickness="1"
              BorderBrush="{ThemeResource CardStrokeColorDefaultBrush}"
              CornerRadius="{StaticResource OverlayCornerRadius}">
<!-- ↑ Update this. ↑ -->

            <Grid.RowDefinitions>
                <RowDefinition Height="120"/>
                <RowDefinition Height="Auto"/>
            </Grid.RowDefinitions>
            <TextBlock Text="{x:Bind Text}" Margin="12,8"
                       TextWrapping="Wrap"
                       TextTrimming="WordEllipsis"/>

<!-- ↓ Update this. ↓ -->
            <Border Grid.Row="1" Padding="8,6,0,6"
                    Background="{ThemeResource SubtleFillColorSecondaryBrush}">
                <TextBlock Text="{x:Bind Date}"
                    Style="{StaticResource CaptionTextBlockStyle}"
                    Foreground="{ThemeResource TextFillColorSecondaryBrush}"/>
<!-- ↑ Update this. ↑ -->

            </Border>
        </Grid>
    </ItemContainer>
</DataTemplate>
现在,当你使用浅色设置运行应用时,它将如下所示:
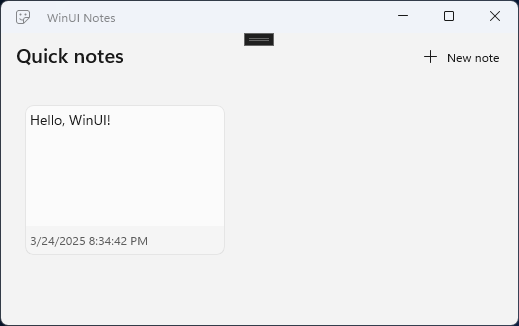
当你使用深色设置运行应用时,它将如下所示:
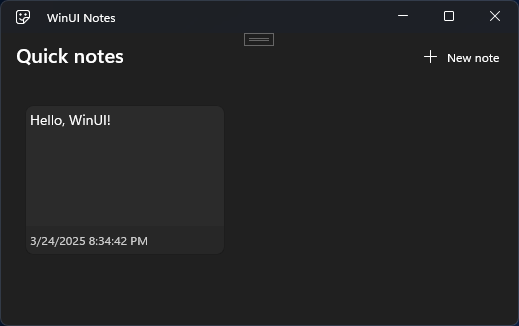
![]() 在文档中了解详细信息:
在文档中了解详细信息:
小窍门
该 WinUI 3 Gallery 应用是了解不同 WinUI 控件和设计指南的好方法。 若要查看数据模板中使用的主题资源,打开 WinUI 3 Gallery 应用到颜色指南。 在此处,可以看到资源的外观,并直接从应用复制所需的值。

该 WinUI 3 Gallery 应用包含 WinUI 控件和功能的交互式示例。 从 Microsoft Store 或浏览 GitHub 上的源代码获取应用。
