手部跟踪系统使用用户的手掌和手指作为输入。 每根手指、整个手掌和手势的位置和旋转数据均可用。 从 Unreal 4.26 开始,手部跟踪基于 Unreal HeadMountedDisplay 插件,并在所有 XR 平台和设备上使用公共 API。 Windows Mixed Reality 和 OpenXR 系统的功能相同。
手势
使用手势,你可以跟踪和使用用户的手和手指作为输入,可在蓝图和 C++ 中访问这些数据。 Unreal API 以坐标系统的形式发送数据,时钟周期与 Unreal Engine 同步。
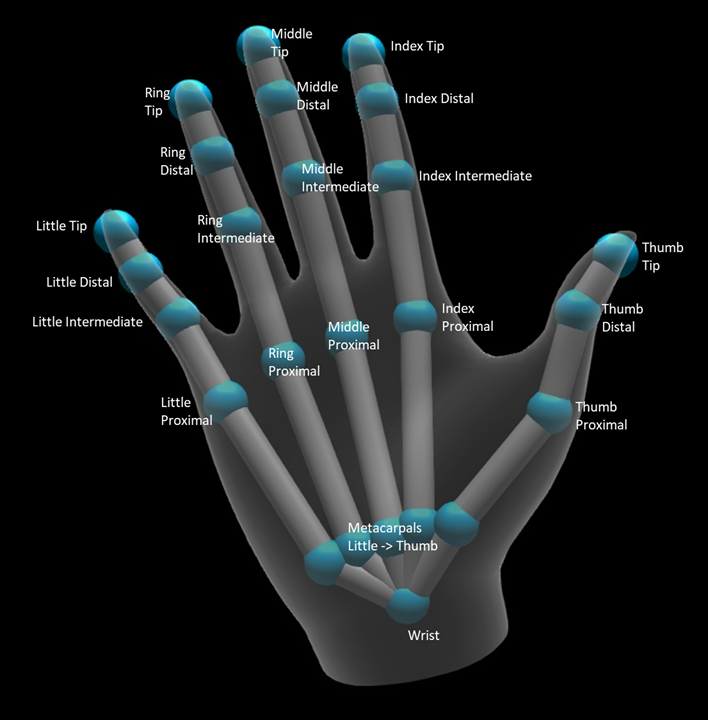
该层次结构由 EHandKeypoint 枚举描述:
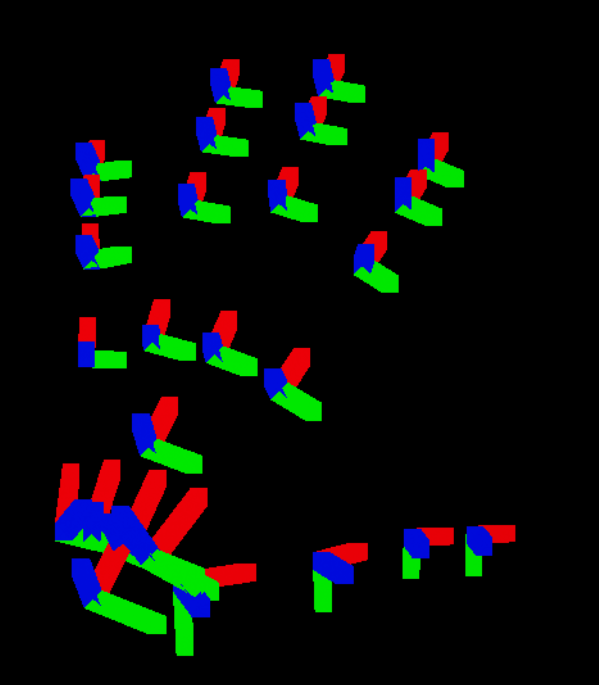
你可以使用“获取运动控制器数据”函数从用户手中获得所有这些数据。 该函数返回一个 XRMotionControllerData 结构。 下面是蓝图脚本示例,它分析 XRMotionControllerData 结构以获取手关节位置,并在每个关节位置绘制调试坐标系统。
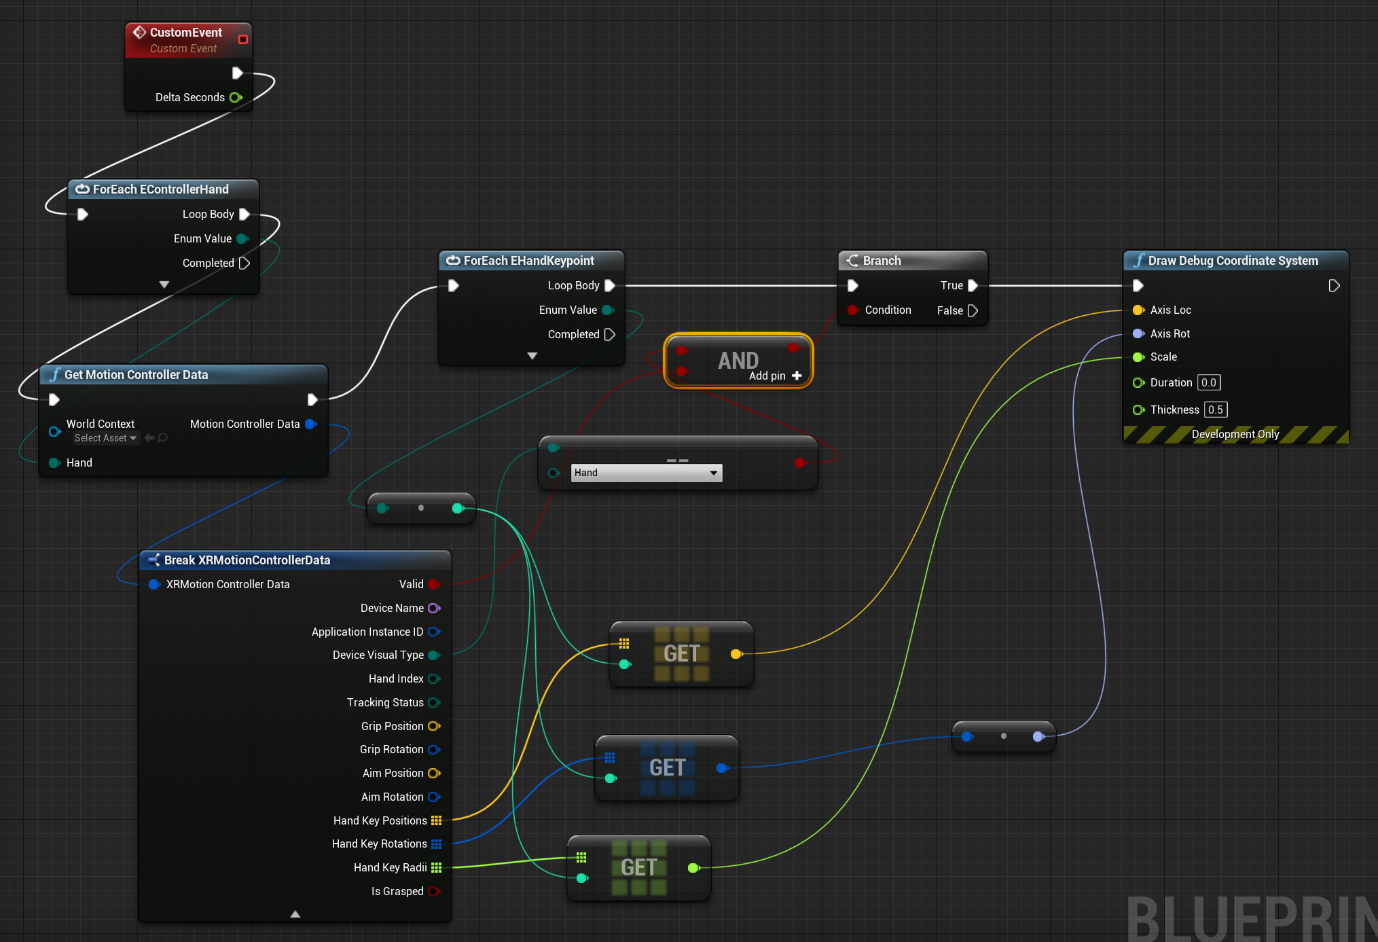
务必要检查该结构是否有效以及它是否为手。 否则,在访问位置、旋转和半径数组时,可能会获得未定义的行为。
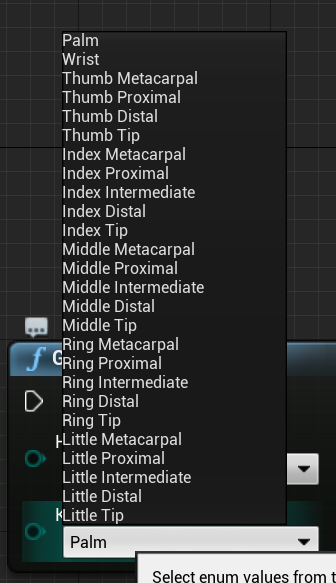
EWMRHandKeypoint 枚举描述了手的骨骼层次结构。 可以在蓝图中找到每个关键点:
完整的 C++ 枚举如下所示:
enum class EWMRHandKeypoint : uint8
{
	Palm,
	Wrist,
	ThumbMetacarpal,
	ThumbProximal,
	ThumbDistal,
	ThumbTip,
	IndexMetacarpal,
	IndexProximal,
	IndexIntermediate,
	IndexDistal,
	IndexTip,
	MiddleMetacarpal,
	MiddleProximal,
	MiddleIntermediate,
	MiddleDistal,
	MiddleTip,
	RingMetacarpal,
	RingProximal,
	RingIntermediate,
	RingDistal,
	RingTip,
	LittleMetacarpal,
	LittleProximal,
	LittleIntermediate,
	LittleDistal,
	LittleTip
};
可以在 Windows.Perception.People.HandJointKind 中查找每个枚举用例的数值。
支持手部跟踪
可以通过从“手部跟踪”>“Windows Mixed Reality”添加“支持手部跟踪”在蓝图中使用手部跟踪:
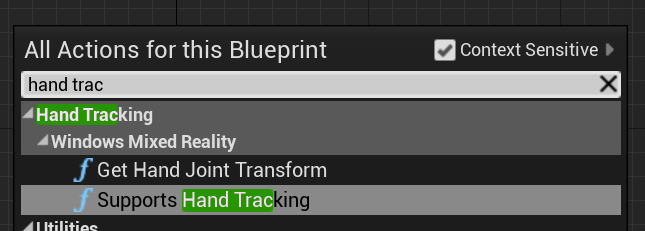
如果设备支持手部跟踪,此函数返回 true;如果手部跟踪不可用,则返回 false。

C++:
包括 WindowsMixedRealityHandTrackingFunctionLibrary.h。
static bool UWindowsMixedRealityHandTrackingFunctionLibrary::SupportsHandTracking()
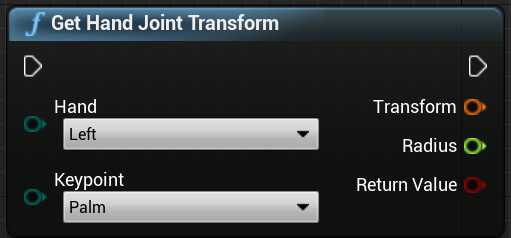
获取手部跟踪
可以使用 GetHandJointTransform 从手中返回空间数据。 数据将每帧更新一次,但如果在帧内,则会缓存返回值。 出于性能方面的考虑,不建议在此函数中使用繁重逻辑。
C++:
static bool UWindowsMixedRealityHandTrackingFunctionLibrary::GetHandJointTransform(EControllerHand Hand, EWMRHandKeypoint Keypoint, FTransform& OutTransform, float& OutRadius)
下面是 GetHandJointTransform 函数参数的细目:
- Hand - 以是用户的左手或右手。
- Keypoint -手骨骼。
- Transform -骨基底的坐标和方向。 你可以请求下一个骨基底,以获取骨末端的转换数据。 特殊骨尖端提供末端。
- **半径 - 骨基底半径。
- **返回值 - 如果此帧跟踪骨骼,返回 true;如果未跟踪骨骼,则返回 false。
手部实时链接动画
手势使用实时链接插件显示给动画。
如果 Windows Mixed Reality 和实时链接插件已启用:
- 选择“窗口”>“实时链接”,打开“实时链接编辑器”窗口。
- 选择“源”并启用“Windows Mixed Reality 手部跟踪源”

启用源并打开动画资产后,展开“预览场景”选项卡中的“动画”部分可看到其他选项。
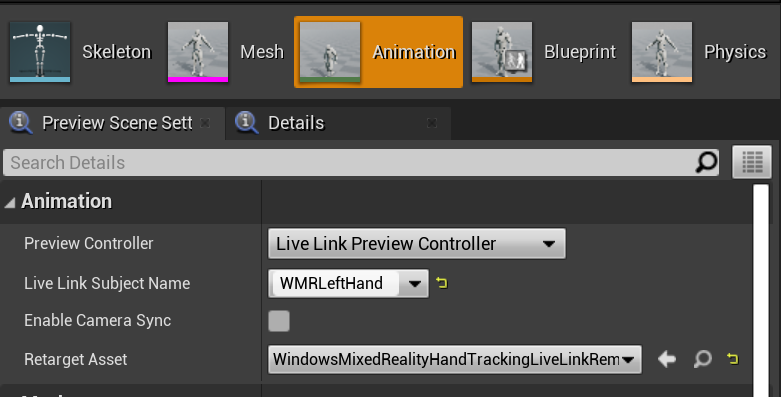
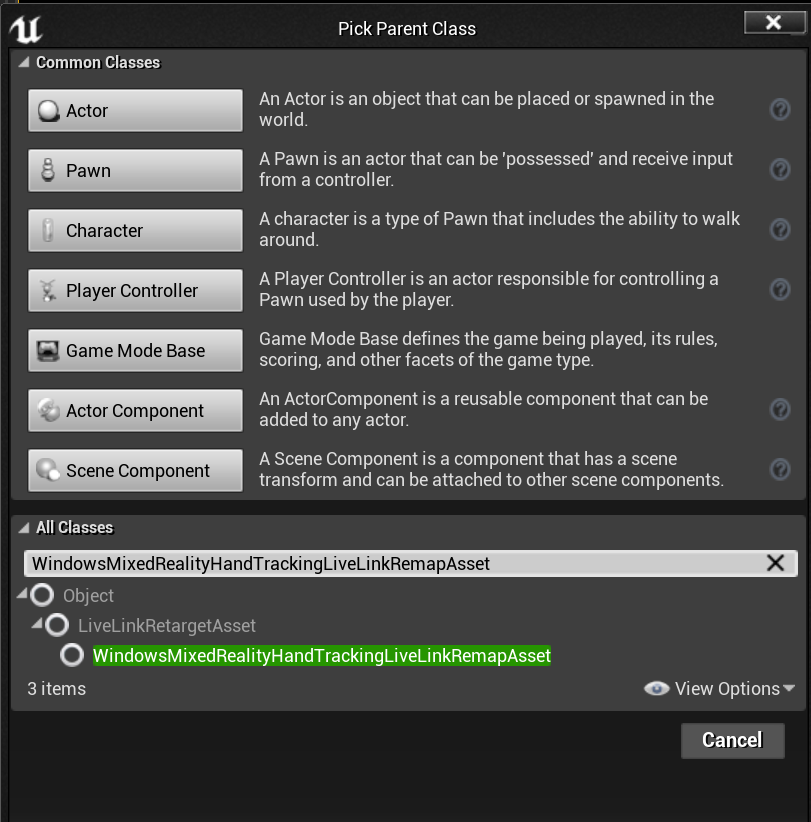
手动画层次结构与 EWMRHandKeypoint 中相同。 动画可以使用 WindowsMixedRealityHandTrackingLiveLinkRemapAsset 重定向:
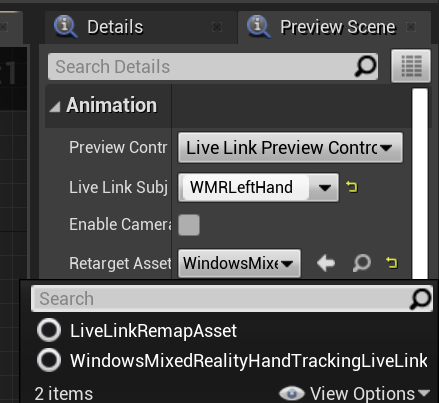
还可以在编辑器中将它作为子类:
手部网格
必须使用 Microsoft OpenXR 插件,可从 Unreal Marketplace 或 GitHub 获得。
手部网格作为跟踪几何
重要
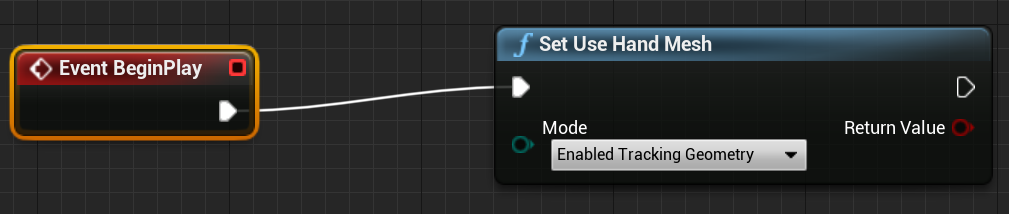
若要在 OpenXR 中将手部网格作为跟踪几何获取,需要调用已启用跟踪几何的“设置使用手部网格”。
若要启用该模式,应调用已启用跟踪几何的“设置使用手部网格”:
注意
不可能同时启用这两种模式。 如果启用一个,则会自动禁用另一个。
访问手部网格数据
在可以访问手部网格数据之前,你需要:
- 选择“ARSessionConfig”资产,展开“AR 设置”->“世界映射”设置,然后选中“根据跟踪几何生成网格数据”。
下面是默认的网格参数:
- 使用网格数据进行遮挡
- 为网格数据生成碰撞
- 为网格数据生成导航网格
- 在线框中呈现网格数据 - 显示生成网格的调试参数
这些参数值用作空间映射网格和手部网格默认值。 你可以在任何网格的蓝图或代码中随时对其进行更改。
C++ API 参考
使用 EEARObjectClassification 查找所有可跟踪对象中的手部网格值。
enum class EARObjectClassification : uint8
{
    // Other types
	HandMesh,
};
当系统检测到任何可跟踪对象(包括手部网格)时,将调用以下委托。
class FARSupportInterface
{
    public:
    // Other params
	DECLARE_AR_SI_DELEGATE_FUNCS(OnTrackableAdded)
	DECLARE_AR_SI_DELEGATE_FUNCS(OnTrackableUpdated)
	DECLARE_AR_SI_DELEGATE_FUNCS(OnTrackableRemoved)
};
请确保委托处理程序遵循下面的函数签名:
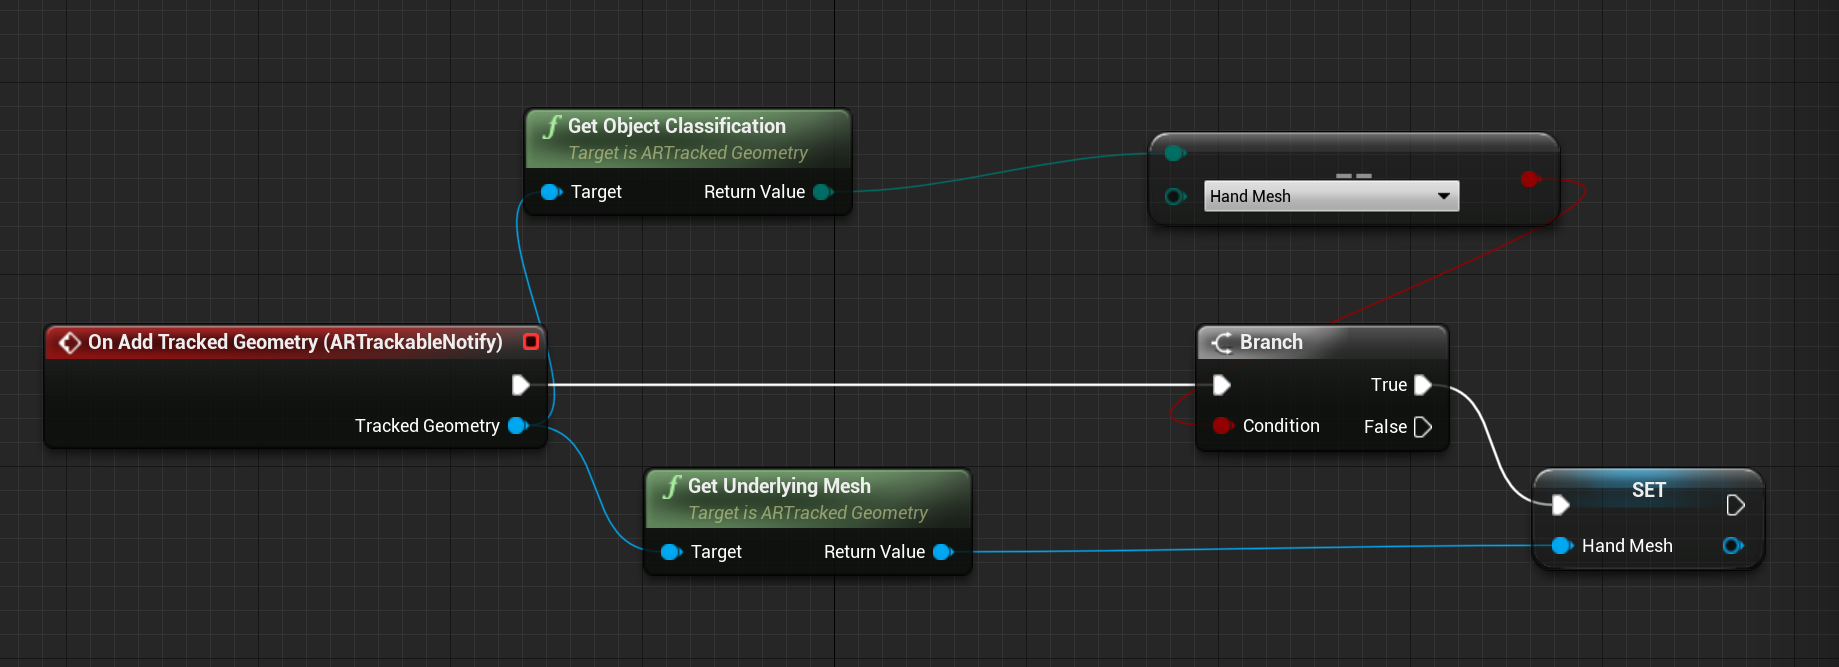
void UARHandMeshComponent::OnTrackableAdded(UARTrackedGeometry* Added)
可以通过 UARTrackedGeometry::GetUnderlyingMesh 访问网格数据:
UMRMeshComponent* UARTrackedGeometry::GetUnderlyingMesh()
蓝图 API 参考
若要在蓝图中使用手部网格:
- 将“ARTrackableNotify”组件添加到蓝图角色
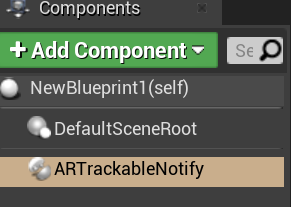
- 请转到“详细信息”面板,展开“事件”部分。
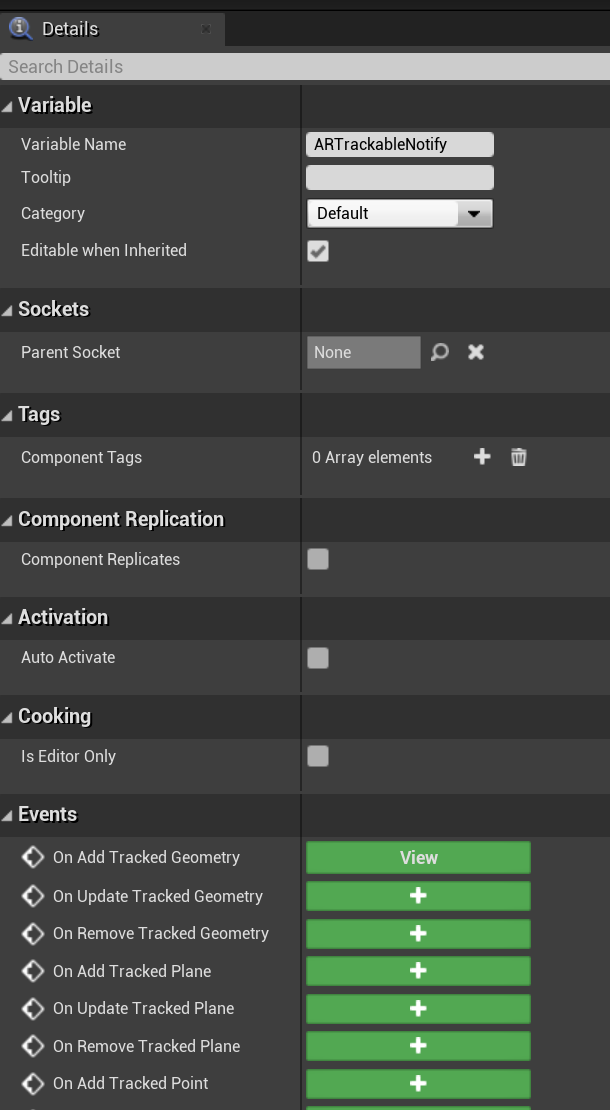
- 在添加/更新/删除跟踪几何时,使用以下事件图像中的节点进行覆盖:
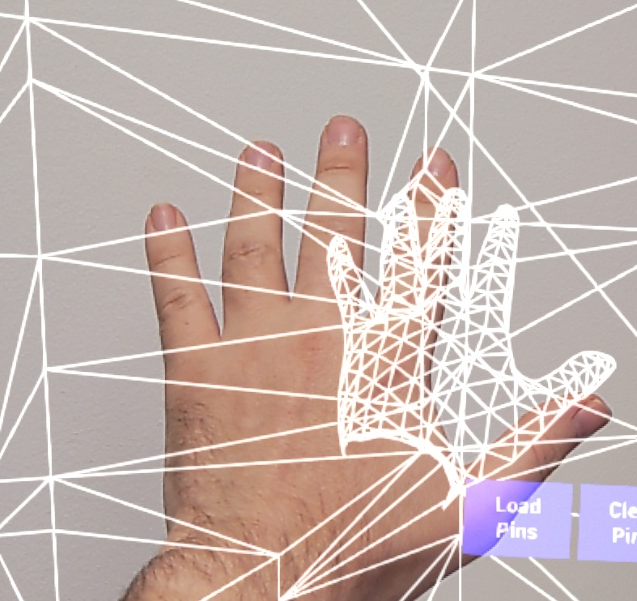
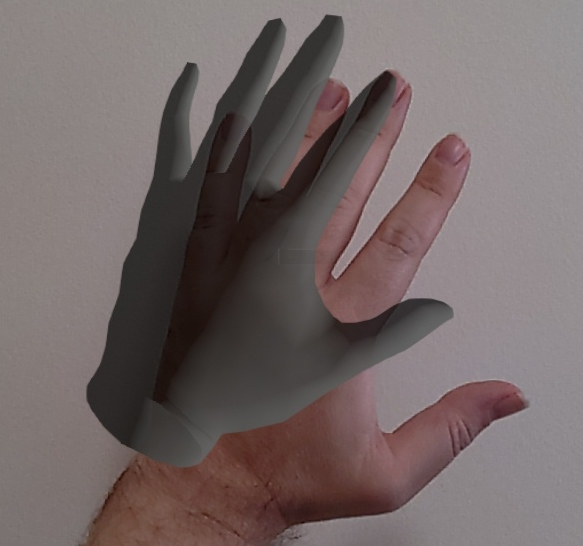
OpenXR 中的手部网格可视化效果
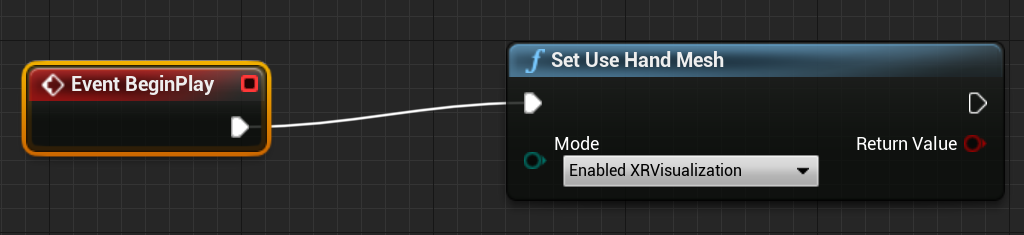
可视化手部网格的建议方法是将 Epic 的 XRVisualization 插件与 Microsoft OpenXR plugin 插件结合使用。
然后,在蓝图编辑器中,应使用 Microsoft OpenXR 插件中的“设置使用手部网格”函数,并将“已启用 XRVisualization”作为参数:
若要管理呈现过程,应使用 XRVisualization 中的“呈现运动控制器”:
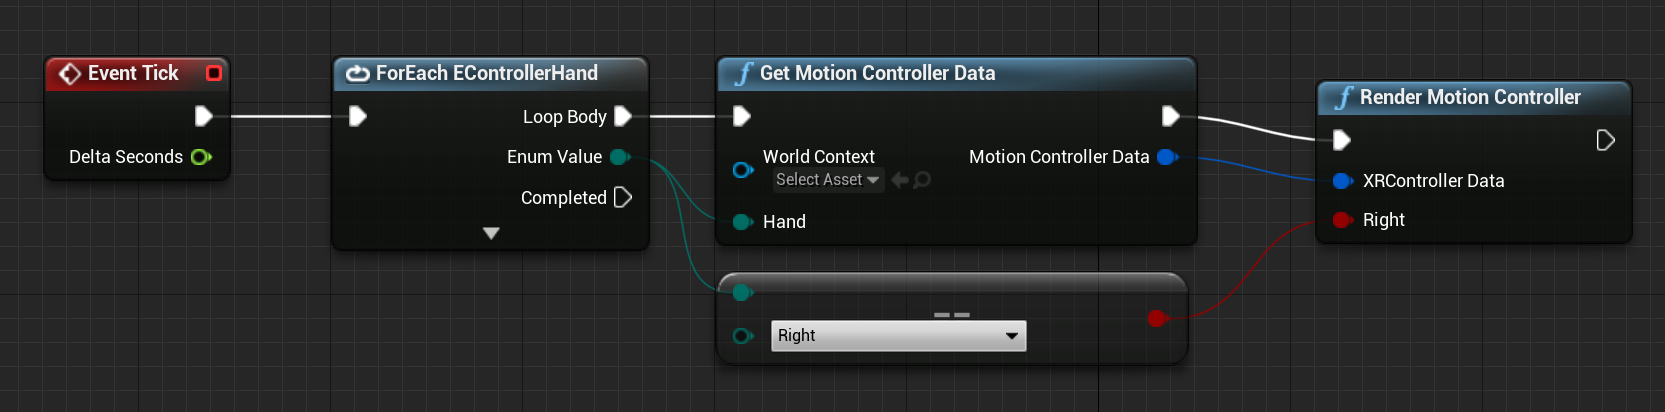
结果:
如果需要更复杂的内容(例如使用自定义着色器绘制手部网格),需要将网格作为跟踪几何。
手部射线
获取手势适用于近距交互,例如抓取对象或按按钮。 但是,有时你需要使用距离用户较远的全息影像。 这可以通过手部射线实现,可在 C++ 和蓝图中用作指向设备。 你可以将射线从手绘制到某个远点,在 Unreal 光线跟踪的一些帮助下,选择其他情况下无法触及的全息影像。
重要
由于所有函数结果都会随每个帧更改,因此它们都是可调用的。 有关纯函数、非纯函数或可调用函数的信息,请参阅函数的蓝图用户 guid。
若要获取手部射线数据,应使用上一部分中的“获取运动控制器数据”函数。 返回的结构包含两个参数,你可以用来创建一个手部射线 - 目标位置和目标旋转。 这些参数形成由肘部定向的射线。 应使用这些参数,并找到所指向的全息影像。
以下示例用于确定手部射线是否命中小组件并设置自定义命中结果:
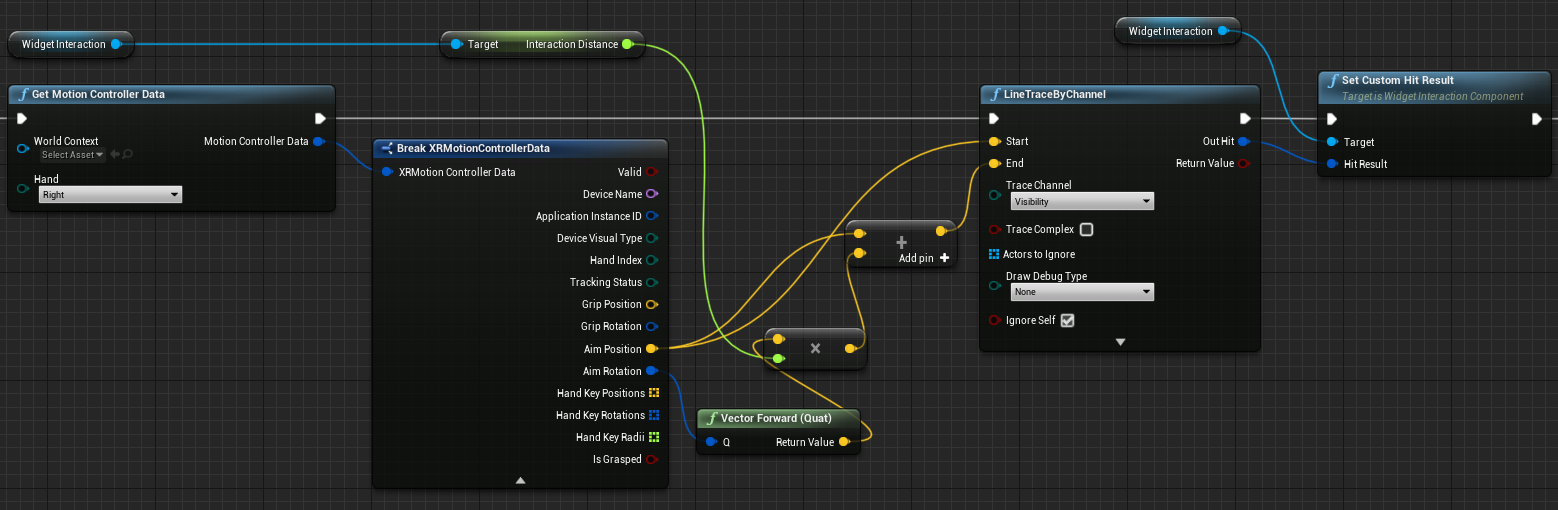
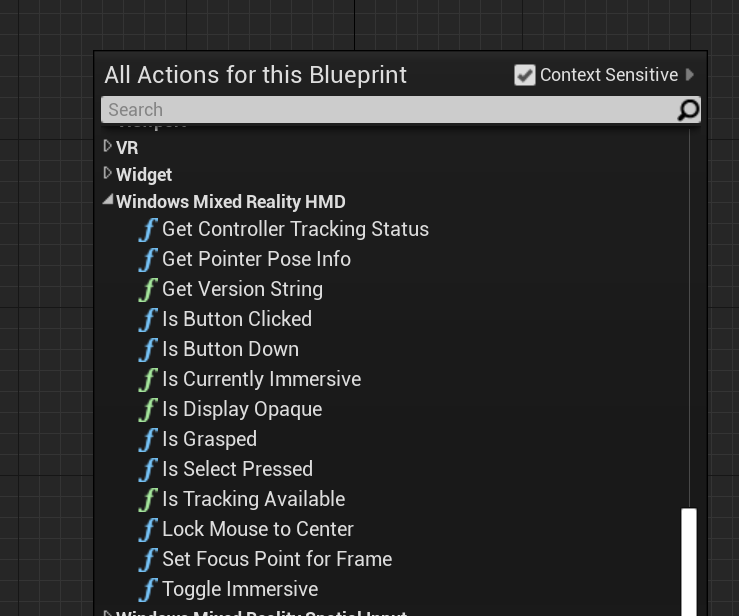
若要在蓝图中使用手部射线,请在 Windows Mixed Reality HMD 下搜索任何操作:
若要在 C++ 中访问它们,请将 WindowsMixedRealityFunctionLibrary.h 包含在调用代码文件的顶部。
Enum
还可以访问 EHMDInputControllerButtons 下的输入案例,它们可在蓝图中使用:
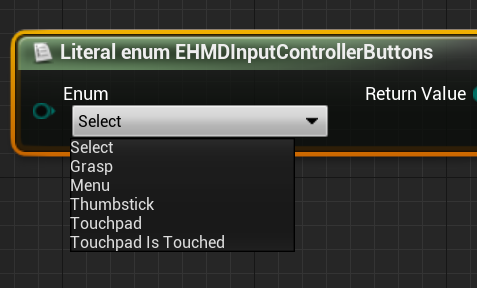
为了在 C++ 中访问,请使用 EHMDInputControllerButtons 枚举类:
enum class EHMDInputControllerButtons : uint8
{
	Select,
	Grasp,
//......
};
下面是两个适用枚举事例的细目:
- Select - 用户触发的“选择”事件。
- 在 HoloLens 2 中,通过隔空敲击、凝视和提交触发,或者在启用了语音输入的情况下发出“选择”口令触发。
- Grasp - 用户触发的“抓取”事件。
- 在 HoloLens 2 中,通过在全息影像上握拳触发。
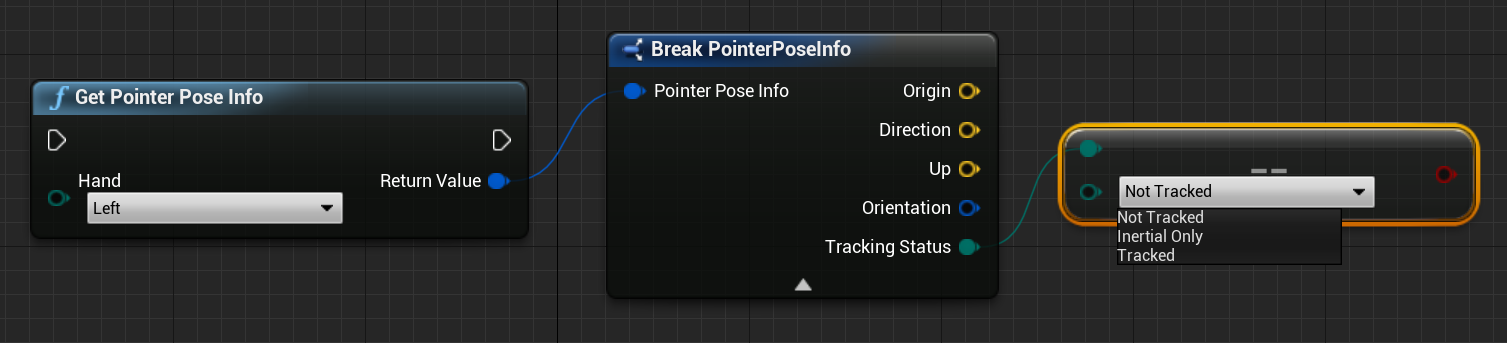
可以通过如下所示的 EHMDTrackingStatus 枚举,在 C++ 中访问手部网格的跟踪状态:
enum class EHMDTrackingStatus : uint8
{
	NotTracked,
	//......
	Tracked
};
下面是两个适用枚举事例的细目:
- NotTracked - 手不可见
- Tracked - 可全面跟踪手
结构
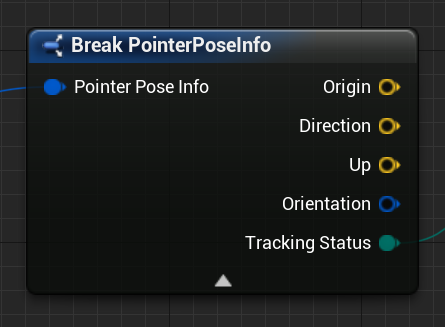
PointerPoseInfo 结构可提供有关以下手部数据的信息:
- Origin - 手的原点
- Direction - 手的方向
- Up - 手的向上矢量
- Orientation - 方向四元数
- Tracking Status - 当前跟踪状态
可以通过蓝图访问 PointerPoseInfo 结构,如下所示:
或者使用 C++:
struct FPointerPoseInfo
{
	FVector Origin;
	FVector Direction;
	FVector Up;
	FQuat Orientation;
	EHMDTrackingStatus TrackingStatus;
};
函数
可以在每个帧上调用下面列出的所有函数,从而允许持续监视。
- 获取指针姿势信息返回有关当前帧中手部射线方向的完整信息。
蓝图:
C++:
static FPointerPoseInfo UWindowsMixedRealityFunctionLibrary::GetPointerPoseInfo(EControllerHand hand);
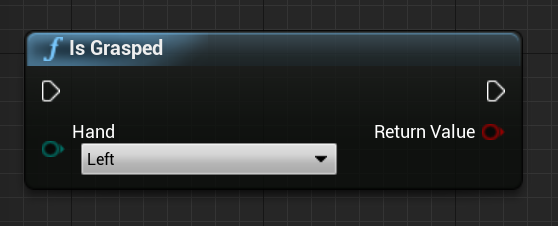
- 如果当前帧中手为抓取状态,则“Is Grasped”返回 true。
蓝图:
C++:
static bool UWindowsMixedRealityFunctionLibrary::IsGrasped(EControllerHand hand);
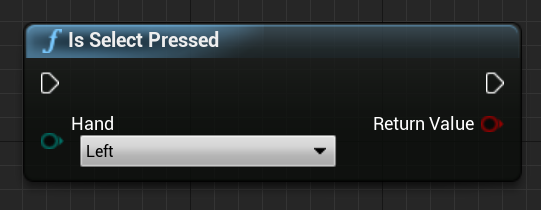
- 如果当前帧中用户触发了选择,则“Is Select Pressed”返回 true。
蓝图:
C++:
static bool UWindowsMixedRealityFunctionLibrary::IsSelectPressed(EControllerHand hand);
- 如果当前帧中触发了事件或按钮,则“Is Button Clicked”返回 true。
蓝图:
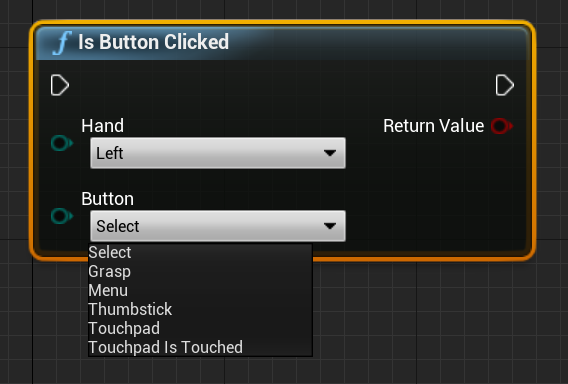
C++:
static bool UWindowsMixedRealityFunctionLibrary::IsButtonClicked(EControllerHand hand, EHMDInputControllerButtons button);
- “获取跟踪器跟踪状态”返回当前帧中的跟踪状态。
蓝图:

C++:
static EHMDTrackingStatus UWindowsMixedRealityFunctionLibrary::GetControllerTrackingStatus(EControllerHand hand);
笔势
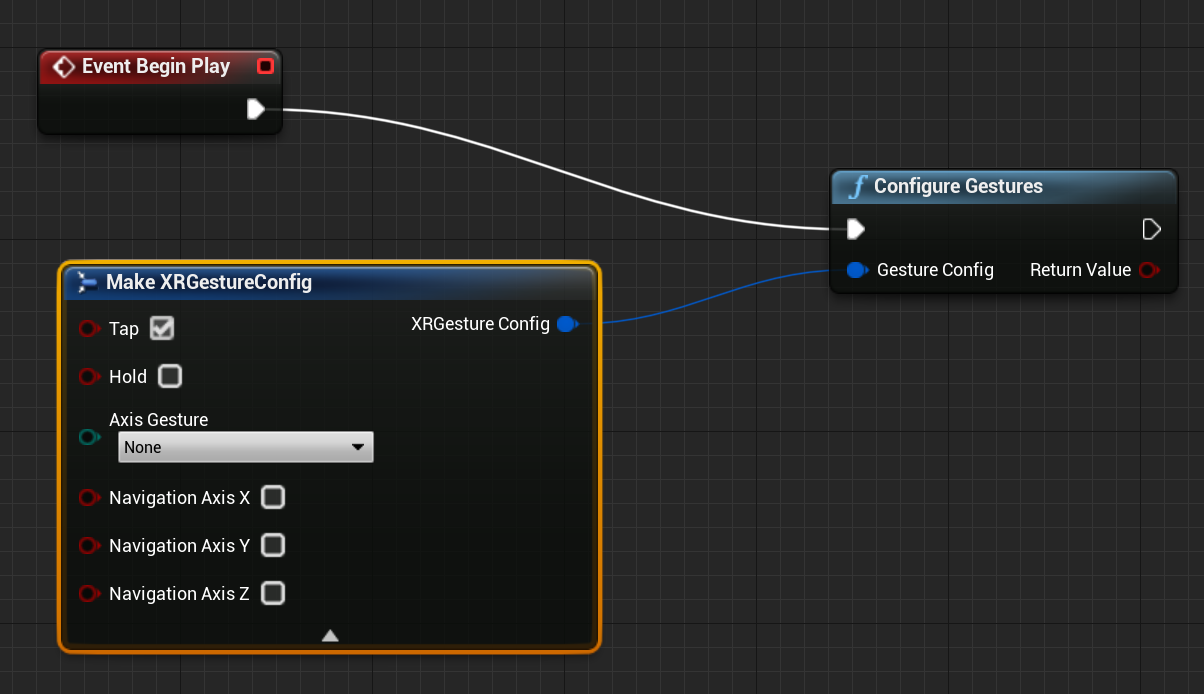
HoloLens 2 跟踪空间手势,这意味着你可以捕获这些手势作为输入。 手势跟踪基于订阅模型。 应使用“配置手势”函数来告知设备要跟踪的手势。有关手势的更多详细信息,请参阅 HoloLens 2 基本用法文档。
Windows Mixed Reality
然后,应添加代码来订阅以下事件:
OpenXR
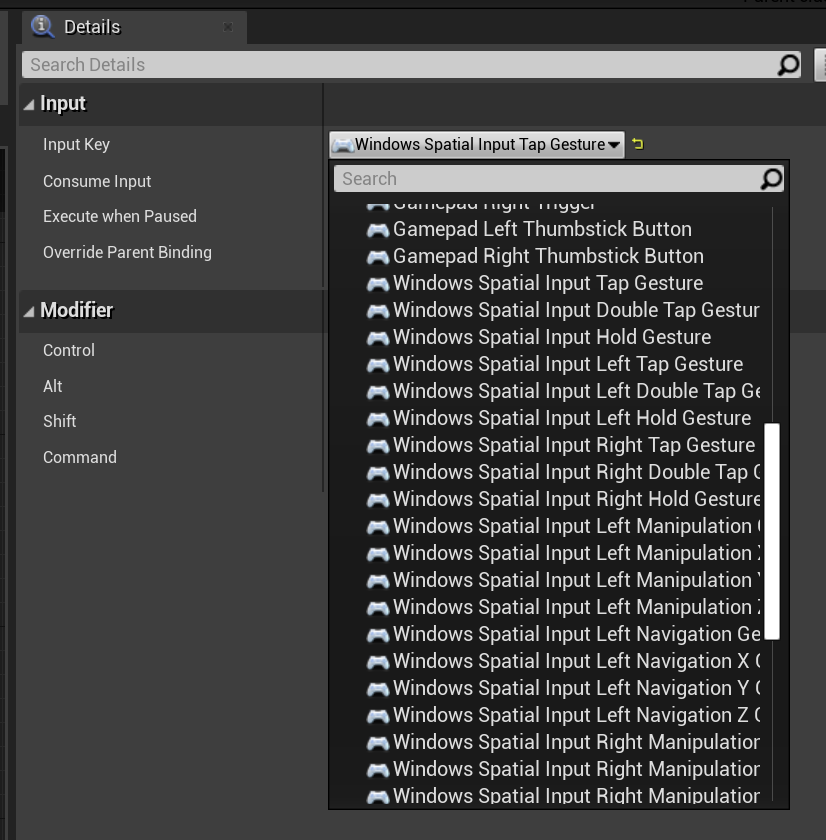
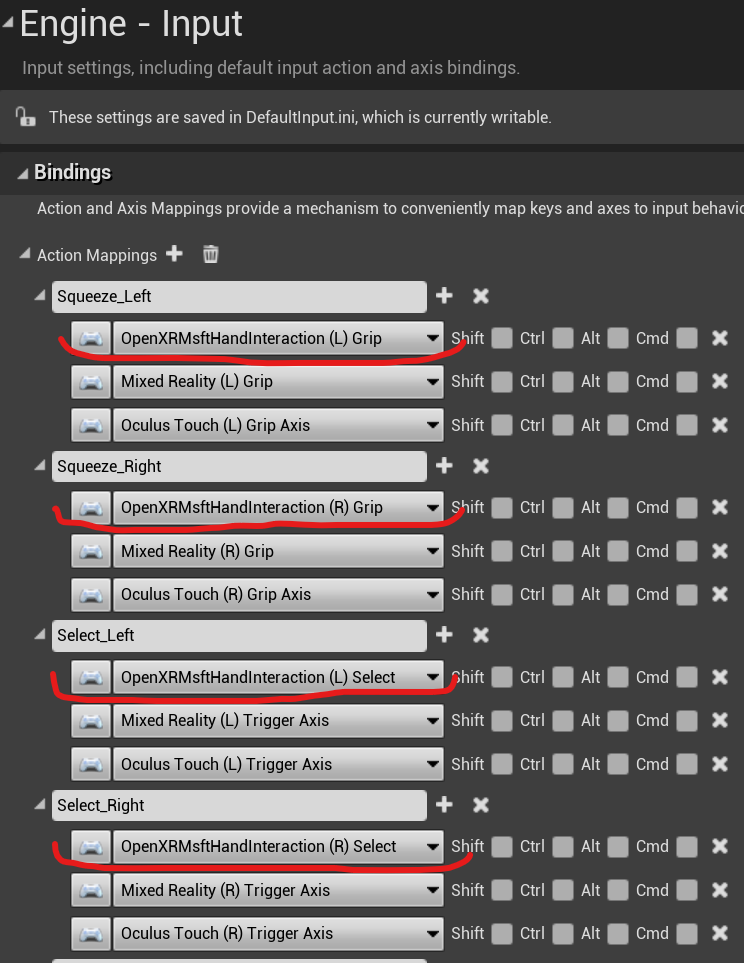
在 OpenXR 中,手势事件通过输入管道进行跟踪。 使用手势交互,设备可以自动识别“点击并按住”手势,但不能识别其他手势。 它们命名为 OpenXRMsftHandInteraction 选择和抓握映射。 无需启用订阅,应在 Project Settings/Engine/Input 中声明事件,如下所示:
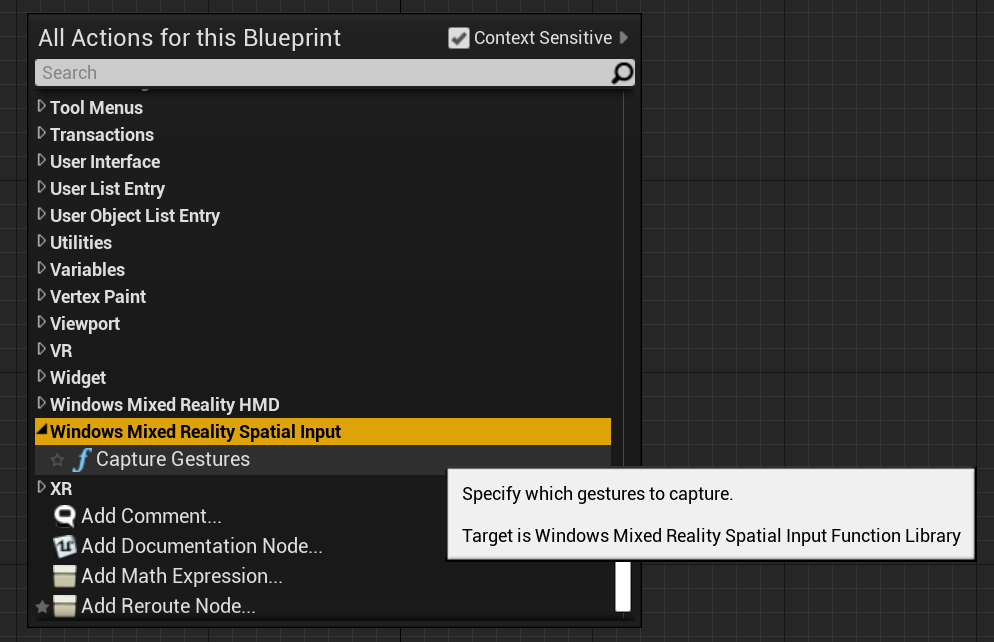
可以在“Windows Mixed Reality 空间输入”下找到蓝图函数,并通过在调用代码文件中添加 WindowsMixedRealitySpatialInputFunctionLibrary.h 找到 C++ 函数。
Enum
蓝图:
C++:
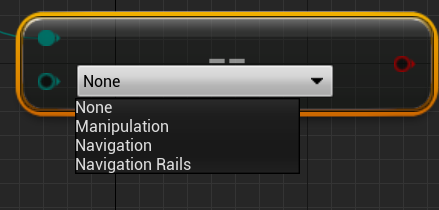
enum class ESpatialInputAxisGestureType : uint8
{
	None = 0,
	Manipulation = 1,
	Navigation = 2,
	NavigationRails = 3
};
函数
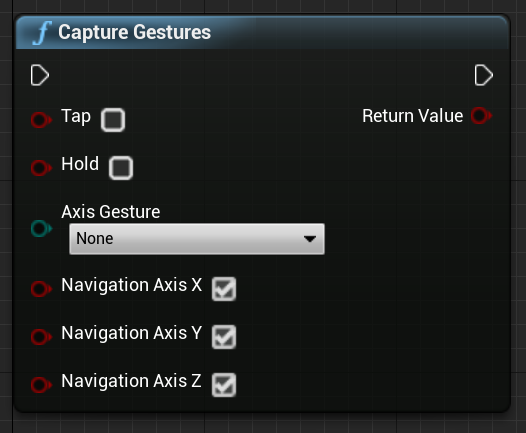
可以使用 CaptureGestures 函数启用和禁用手势捕获。 当启用的手势触发输入事件时,如果手势捕获成功,该函数将返回 true;如果出错,则返回 false。
蓝图:
C++:
static bool UWindowsMixedRealitySpatialInputFunctionLibrary::CaptureGestures(
	bool Tap = false,
	bool Hold = false,
	ESpatialInputAxisGestureType AxisGesture = ESpatialInputAxisGestureType::None,
	bool NavigationAxisX = true,
	bool NavigationAxisY = true,
	bool NavigationAxisZ = true);
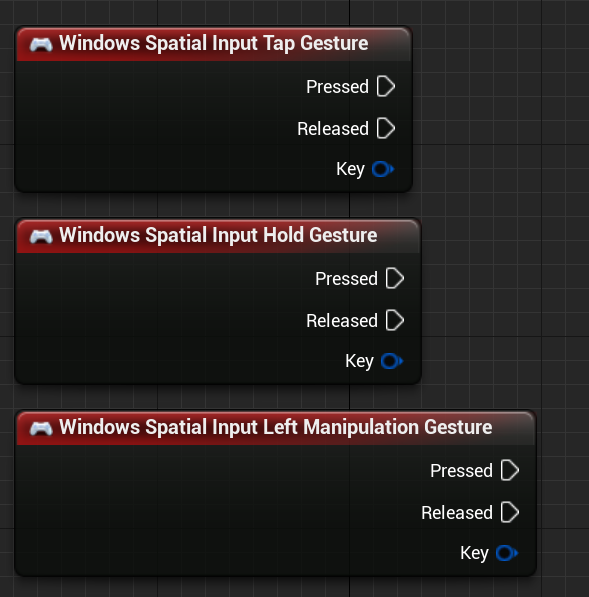
下面是可以在蓝图和 C++ 中找到的关键事件:
const FKey FSpatialInputKeys::TapGesture(TapGestureName);
const FKey FSpatialInputKeys::DoubleTapGesture(DoubleTapGestureName);
const FKey FSpatialInputKeys::HoldGesture(HoldGestureName);

const FKey FSpatialInputKeys::LeftTapGesture(LeftTapGestureName);
const FKey FSpatialInputKeys::LeftDoubleTapGesture(LeftDoubleTapGestureName);
const FKey FSpatialInputKeys::LeftHoldGesture(LeftHoldGestureName);

const FKey FSpatialInputKeys::RightTapGesture(RightTapGestureName);
const FKey FSpatialInputKeys::RightDoubleTapGesture(RightDoubleTapGestureName);
const FKey FSpatialInputKeys::RightHoldGesture(RightHoldGestureName);

const FKey FSpatialInputKeys::LeftManipulationGesture(LeftManipulationGestureName);
const FKey FSpatialInputKeys::LeftManipulationXGesture(LeftManipulationXGestureName);
const FKey FSpatialInputKeys::LeftManipulationYGesture(LeftManipulationYGestureName);
const FKey FSpatialInputKeys::LeftManipulationZGesture(LeftManipulationZGestureName);

const FKey FSpatialInputKeys::LeftNavigationGesture(LeftNavigationGestureName);
const FKey FSpatialInputKeys::LeftNavigationXGesture(LeftNavigationXGestureName);
const FKey FSpatialInputKeys::LeftNavigationYGesture(LeftNavigationYGestureName);
const FKey FSpatialInputKeys::LeftNavigationZGesture(LeftNavigationZGestureName);


const FKey FSpatialInputKeys::RightManipulationGesture(RightManipulationGestureName);
const FKey FSpatialInputKeys::RightManipulationXGesture(RightManipulationXGestureName);
const FKey FSpatialInputKeys::RightManipulationYGesture(RightManipulationYGestureName);
const FKey FSpatialInputKeys::RightManipulationZGesture(RightManipulationZGestureName);

const FKey FSpatialInputKeys::RightNavigationGesture(RightNavigationGestureName);
const FKey FSpatialInputKeys::RightNavigationXGesture(RightNavigationXGestureName);
const FKey FSpatialInputKeys::RightNavigationYGesture(RightNavigationYGestureName);
const FKey FSpatialInputKeys::RightNavigationZGesture(RightNavigationZGestureName);
下一个开发检查点
如果你遵循我们规划的 Unreal 开发历程,则你处于探索 MRTK 核心基础知识的过程之中。 从这里,你可以继续了解下一部分基础知识:
或跳转到混合现实平台功能和 API:
你可以随时返回到 Unreal 开发检查点。