快速入門:在應用程式中新增 1:1 視訊通話
使用通訊服務的通話 SDK,在應用程式中新增 1 對 1 視訊通話,以開始使用 Azure 通訊服務。 您將了解如何使用適用於 JavaScript 的 Azure 通訊服務通話 SDK,開始並接聽視訊通話。
範例程式碼
如果您想要直接跳到結尾,您可以在 GitHub \(英文\) 上下載此快速入門作為範例。
注意
您可以使用 Azure 通訊服務 UI 程式庫 \(英文\),來存取外撥給 Azure 通訊服務使用者的通話。 此 UI 程式庫讓開發人員只需使用幾行程式碼,就能將已啟用 VoIP 的通話用戶端新增至其應用程式中。
必要條件
取得具備有效訂用帳戶的 Azure 帳戶。 免費建立帳戶。
您必須具有 Node.js 18。 您可以使用 msi 安裝程式進行安裝。
建立作用中的通訊服務資源。 建立通訊服務資源。 您必須記錄您的連接字串,以供此快速入門使用。
建立使用者存取權杖來將通話用戶端具現化。 了解如何建立和管理使用者存取權杖。 您也可以使用 Azure CLI,並搭配您的連接字串執行命令,以建立使用者和存取權杖。
az communication identity token issue --scope voip --connection-string "yourConnectionString"如需詳細資訊,請參閱使用 Azure CLI 建立和管理存取權杖。
設定
建立新的 Node.js 應用程式
開啟您的終端機或命令視窗,為您的應用程式建立新的目錄,並瀏覽至該目錄。
mkdir calling-quickstart && cd calling-quickstart
執行 npm init -y 以使用預設設定建立 package.json 檔案。
npm init -y
Install the package
使用 npm install 命令,以安裝適用於 JavaScript 的 Azure 通訊服務通話 SDK。
npm install @azure/communication-common --save
npm install @azure/communication-calling --save
設定應用程式架構
此快速入門會使用 Webpack 來組合應用程式資產。 執行下列命令以安裝 webpack、webpack-cli 和 webpack-dev-server npm 套件,並將其列為 package.json 中的開發相依性:
npm install copy-webpack-plugin@^11.0.0 webpack@^5.88.2 webpack-cli@^5.1.4 webpack-dev-server@^4.15.1 --save-dev
程式碼如下:
在專案的根目錄中建立 index.html 檔案。 我們會使用此檔案來設定基本配置,讓使用者能夠進行 1:1 視訊通話。
<!-- index.html -->
<!DOCTYPE html>
<html>
    <head>
        <title>Azure Communication Services - Calling Web SDK</title>
        <link rel="stylesheet" type="text/css" href="styles.css"/>
    </head>
    <body>
        <h4>Azure Communication Services - Calling Web SDK</h4>
        <input id="user-access-token"
            type="text"
            placeholder="User access token"
            style="margin-bottom:1em; width: 500px;"/>
        <button id="initialize-call-agent" type="button">Initialize Call Agent</button>
        <br>
        <br>
        <input id="callee-acs-user-id"
            type="text"
            placeholder="Enter callee's Azure Communication Services user identity in format: '8:acs:resourceId_userId'"
            style="margin-bottom:1em; width: 500px; display: block;"/>
        <button id="start-call-button" type="button" disabled="true">Start Call</button>
        <button id="hangup-call-button" type="button" disabled="true">Hang up Call</button>
        <button id="accept-call-button" type="button" disabled="true">Accept Call</button>
        <button id="start-video-button" type="button" disabled="true">Start Video</button>
        <button id="stop-video-button" type="button" disabled="true">Stop Video</button>
        <br>
        <br>
        <div id="connectedLabel" style="color: #13bb13;" hidden>Call is connected!</div>
        <br>
        <div id="remoteVideosGallery" style="width: 40%;" hidden>Remote participants' video streams:</div>
        <br>
        <div id="localVideoContainer" style="width: 30%;" hidden>Local video stream:</div>
        <!-- points to the bundle generated from client.js -->
        <script src="./main.js"></script>
    </body>
</html>
下列類別和介面會處理 Azure 通訊服務通話 SDK 的一些主要功能:
| 名稱 | 描述 |
|---|---|
CallClient |
通話 SDK 的主要進入點。 |
AzureCommunicationTokenCredential |
實作 CommunicationTokenCredential 介面,可用來將 callAgent 具現化。 |
CallAgent |
用來開始和管理通話。 |
DeviceManager |
用來管理媒體裝置。 |
Call |
用來代表通話。 |
LocalVideoStream |
用來在本機系統上建立相機裝置的本機視訊串流。 |
RemoteParticipant |
用來代表通話中的遠端參與者 |
RemoteVideoStream |
用來表示來自遠端參與者的遠端視訊串流。 |
在 index.js 專案的根目錄中建立檔案,以包含此快速入門的應用程式邏輯。 將下列程式碼新增至 index.js:
// Make sure to install the necessary dependencies
const { CallClient, VideoStreamRenderer, LocalVideoStream } = require('@azure/communication-calling');
const { AzureCommunicationTokenCredential } = require('@azure/communication-common');
const { AzureLogger, setLogLevel } = require("@azure/logger");
// Set the log level and output
setLogLevel('verbose');
AzureLogger.log = (...args) => {
    console.log(...args);
};

// Calling web sdk objects
let callAgent;
let deviceManager;
let call;
let incomingCall;
let localVideoStream;
let localVideoStreamRenderer;

// UI widgets
let userAccessToken = document.getElementById('user-access-token');
let calleeAcsUserId = document.getElementById('callee-acs-user-id');
let initializeCallAgentButton = document.getElementById('initialize-call-agent');
let startCallButton = document.getElementById('start-call-button');
let hangUpCallButton = document.getElementById('hangup-call-button');
let acceptCallButton = document.getElementById('accept-call-button');
let startVideoButton = document.getElementById('start-video-button');
let stopVideoButton = document.getElementById('stop-video-button');
let connectedLabel = document.getElementById('connectedLabel');
let remoteVideosGallery = document.getElementById('remoteVideosGallery');
let localVideoContainer = document.getElementById('localVideoContainer');

/**
 * Using the CallClient, initialize a CallAgent instance with a CommunicationUserCredential which will enable us to make outgoing calls and receive incoming calls.
 * You can then use the CallClient.getDeviceManager() API instance to get the DeviceManager.
 */
initializeCallAgentButton.onclick = async () => {
    try {
        const callClient = new CallClient();
        tokenCredential = new AzureCommunicationTokenCredential(userAccessToken.value.trim());
        callAgent = await callClient.createCallAgent(tokenCredential)
        // Set up a camera device to use.
        deviceManager = await callClient.getDeviceManager();
        await deviceManager.askDevicePermission({ video: true });
        await deviceManager.askDevicePermission({ audio: true });
        // Listen for an incoming call to accept.
        callAgent.on('incomingCall', async (args) => {
            try {
                incomingCall = args.incomingCall;
                acceptCallButton.disabled = false;
                startCallButton.disabled = true;
            } catch (error) {
                console.error(error);
            }
        });

        startCallButton.disabled = false;
        initializeCallAgentButton.disabled = true;
    } catch(error) {
        console.error(error);
    }
}

/**
 * Place a 1:1 outgoing video call to a user
 * Add an event listener to initiate a call when the `startCallButton` is clicked:
 * First you have to enumerate local cameras using the deviceManager `getCameraList` API.
 * In this quickstart we're using the first camera in the collection. Once the desired camera is selected, a
 * LocalVideoStream instance will be constructed and passed within `videoOptions` as an item within the
 * localVideoStream array to the call method. Once your call connects it will automatically start sending a video stream to the other participant.
 */
startCallButton.onclick = async () => {
    try {
        const localVideoStream = await createLocalVideoStream();
        const videoOptions = localVideoStream ? { localVideoStreams: [localVideoStream] } : undefined;
        call = callAgent.startCall([{ communicationUserId: calleeAcsUserId.value.trim() }], { videoOptions });
        // Subscribe to the call's properties and events.
        subscribeToCall(call);
    } catch (error) {
        console.error(error);
    }
}

/**
 * Accepting an incoming call with video
 * Add an event listener to accept a call when the `acceptCallButton` is clicked:
 * After subscribing to the `CallAgent.on('incomingCall')` event, you can accept the incoming call.
 * You can pass the local video stream which you want to use to accept the call with.
 */
acceptCallButton.onclick = async () => {
    try {
        const localVideoStream = await createLocalVideoStream();
        const videoOptions = localVideoStream ? { localVideoStreams: [localVideoStream] } : undefined;
        call = await incomingCall.accept({ videoOptions });
        // Subscribe to the call's properties and events.
        subscribeToCall(call);
    } catch (error) {
        console.error(error);
    }
}

/**
 * Subscribe to a call obj.
 * Listen for property changes and collection updates.
 */
subscribeToCall = (call) => {
    try {
        // Inspect the initial call.id value.
        console.log(`Call Id: ${call.id}`);
        //Subscribe to call's 'idChanged' event for value changes.
        call.on('idChanged', () => {
            console.log(`Call Id changed: ${call.id}`);
        });

        // Inspect the initial call.state value.
        console.log(`Call state: ${call.state}`);
        // Subscribe to call's 'stateChanged' event for value changes.
        call.on('stateChanged', async () => {
            console.log(`Call state changed: ${call.state}`);
            if(call.state === 'Connected') {
                connectedLabel.hidden = false;
                acceptCallButton.disabled = true;
                startCallButton.disabled = true;
                hangUpCallButton.disabled = false;
                startVideoButton.disabled = false;
                stopVideoButton.disabled = false;
                remoteVideosGallery.hidden = false;
            } else if (call.state === 'Disconnected') {
                connectedLabel.hidden = true;
                startCallButton.disabled = false;
                hangUpCallButton.disabled = true;
                startVideoButton.disabled = true;
                stopVideoButton.disabled = true;
                console.log(`Call ended, call end reason={code=${call.callEndReason.code}, subCode=${call.callEndReason.subCode}}`);
            }
        });

        call.on('isLocalVideoStartedChanged', () => {
            console.log(`isLocalVideoStarted changed: ${call.isLocalVideoStarted}`);
        });
        console.log(`isLocalVideoStarted: ${call.isLocalVideoStarted}`);
        call.localVideoStreams.forEach(async (lvs) => {
            localVideoStream = lvs;
            await displayLocalVideoStream();
        });
        call.on('localVideoStreamsUpdated', e => {
            e.added.forEach(async (lvs) => {
                localVideoStream = lvs;
                await displayLocalVideoStream();
            });
            e.removed.forEach(lvs => {
               removeLocalVideoStream();
            });
        });

        // Inspect the call's current remote participants and subscribe to them.
        call.remoteParticipants.forEach(remoteParticipant => {
            subscribeToRemoteParticipant(remoteParticipant);
        });
        // Subscribe to the call's 'remoteParticipantsUpdated' event to be
        // notified when new participants are added to the call or removed from the call.
        call.on('remoteParticipantsUpdated', e => {
            // Subscribe to new remote participants that are added to the call.
            e.added.forEach(remoteParticipant => {
                subscribeToRemoteParticipant(remoteParticipant)
            });
            // Unsubscribe from participants that are removed from the call
            e.removed.forEach(remoteParticipant => {
                console.log('Remote participant removed from the call.');
            });
        });
    } catch (error) {
        console.error(error);
    }
}

/**
 * Subscribe to a remote participant obj.
 * Listen for property changes and collection udpates.
 */
subscribeToRemoteParticipant = (remoteParticipant) => {
    try {
        // Inspect the initial remoteParticipant.state value.
        console.log(`Remote participant state: ${remoteParticipant.state}`);
        // Subscribe to remoteParticipant's 'stateChanged' event for value changes.
        remoteParticipant.on('stateChanged', () => {
            console.log(`Remote participant state changed: ${remoteParticipant.state}`);
        });

        // Inspect the remoteParticipants's current videoStreams and subscribe to them.
        remoteParticipant.videoStreams.forEach(remoteVideoStream => {
            subscribeToRemoteVideoStream(remoteVideoStream)
        });
        // Subscribe to the remoteParticipant's 'videoStreamsUpdated' event to be
        // notified when the remoteParticiapant adds new videoStreams and removes video streams.
        remoteParticipant.on('videoStreamsUpdated', e => {
            // Subscribe to new remote participant's video streams that were added.
            e.added.forEach(remoteVideoStream => {
                subscribeToRemoteVideoStream(remoteVideoStream)
            });
            // Unsubscribe from remote participant's video streams that were removed.
            e.removed.forEach(remoteVideoStream => {
                console.log('Remote participant video stream was removed.');
            })
        });
    } catch (error) {
        console.error(error);
    }
}

/**
 * Subscribe to a remote participant's remote video stream obj.
 * You have to subscribe to the 'isAvailableChanged' event to render the remoteVideoStream. If the 'isAvailable' property
 * changes to 'true', a remote participant is sending a stream. Whenever availability of a remote stream changes
 * you can choose to destroy the whole 'Renderer', a specific 'RendererView' or keep them, but this will result in displaying blank video frame.
 */
subscribeToRemoteVideoStream = async (remoteVideoStream) => {
    let renderer = new VideoStreamRenderer(remoteVideoStream);
    let view;
    let remoteVideoContainer = document.createElement('div');
    remoteVideoContainer.className = 'remote-video-container';

    let loadingSpinner = document.createElement('div');
    loadingSpinner.className = 'loading-spinner';
    remoteVideoStream.on('isReceivingChanged', () => {
        try {
            if (remoteVideoStream.isAvailable) {
                const isReceiving = remoteVideoStream.isReceiving;
                const isLoadingSpinnerActive = remoteVideoContainer.contains(loadingSpinner);
                if (!isReceiving && !isLoadingSpinnerActive) {
                    remoteVideoContainer.appendChild(loadingSpinner);
                } else if (isReceiving && isLoadingSpinnerActive) {
                    remoteVideoContainer.removeChild(loadingSpinner);
                }
            }
        } catch (e) {
            console.error(e);
        }
    });

    const createView = async () => {
        // Create a renderer view for the remote video stream.
        view = await renderer.createView();
        // Attach the renderer view to the UI.
        remoteVideoContainer.appendChild(view.target);
        remoteVideosGallery.appendChild(remoteVideoContainer);
    }

    // Remote participant has switched video on/off
    remoteVideoStream.on('isAvailableChanged', async () => {
        try {
            if (remoteVideoStream.isAvailable) {
                await createView();
            } else {
                view.dispose();
                remoteVideosGallery.removeChild(remoteVideoContainer);
            }
        } catch (e) {
            console.error(e);
        }
    });

    // Remote participant has video on initially.
    if (remoteVideoStream.isAvailable) {
        try {
            await createView();
        } catch (e) {
            console.error(e);
        }
    }
}

/**
 * Start your local video stream.
 * This will send your local video stream to remote participants so they can view it.
 */
startVideoButton.onclick = async () => {
    try {
        const localVideoStream = await createLocalVideoStream();
        await call.startVideo(localVideoStream);
    } catch (error) {
        console.error(error);
    }
}

/**
 * Stop your local video stream.
 * This will stop your local video stream from being sent to remote participants.
 */
stopVideoButton.onclick = async () => {
    try {
        await call.stopVideo(localVideoStream);
    } catch (error) {
        console.error(error);
    }
}

/**
 * To render a LocalVideoStream, you need to create a new instance of VideoStreamRenderer, and then
 * create a new VideoStreamRendererView instance using the asynchronous createView() method.
 * You may then attach view.target to any UI element.
 */
createLocalVideoStream = async () => {
    const camera = (await deviceManager.getCameras())[0];
    if (camera) {
        return new LocalVideoStream(camera);
    } else {
        console.error(`No camera device found on the system`);
    }
}

/**
 * Display your local video stream preview in your UI
 */
displayLocalVideoStream = async () => {
    try {
        localVideoStreamRenderer = new VideoStreamRenderer(localVideoStream);
        const view = await localVideoStreamRenderer.createView();
        localVideoContainer.hidden = false;
        localVideoContainer.appendChild(view.target);
    } catch (error) {
        console.error(error);
    }
}

/**
 * Remove your local video stream preview from your UI
 */
removeLocalVideoStream = async() => {
    try {
        localVideoStreamRenderer.dispose();
        localVideoContainer.hidden = true;
    } catch (error) {
        console.error(error);
    }
}

/**
 * End current call
 */
hangUpCallButton.addEventListener("click", async () => {
    // end the current call
    await call.hangUp();
});
在 styles.css 專案的根目錄中建立檔案,以包含此快速入門的應用程式樣式。 將下列程式碼新增至 styles.css:
/**
 * CSS for styling the loading spinner over the remote video stream
 */
.remote-video-container {
    position: relative;
}
.loading-spinner {
    border: 12px solid #f3f3f3;
    border-radius: 50%;
    border-top: 12px solid #ca5010;
    width: 100px;
    height: 100px;
    -webkit-animation: spin 2s linear infinite; /* Safari */
    animation: spin 2s linear infinite;
    position: absolute;
    margin: auto;
    top: 0;
    bottom: 0;
    left: 0;
    right: 0;
    transform: translate(-50%, -50%);
}
@keyframes spin {
    0% { transform: rotate(0deg); }
    100% { transform: rotate(360deg); }
}
/* Safari */
@-webkit-keyframes spin {
    0% { -webkit-transform: rotate(0deg); }
    100% { -webkit-transform: rotate(360deg); }
}
新增 Webpack 本機伺服器程式碼
在 webpack.config.js 專案的根目錄中建立檔案,以包含此快速入門的本機伺服器邏輯。 將下列程式碼新增至 webpack.config.js:
const path = require('path');
const CopyPlugin = require("copy-webpack-plugin");

module.exports = {
    mode: 'development',
    entry: './index.js',
    output: {
        filename: 'main.js',
        path: path.resolve(__dirname, 'dist'),
    },
    devServer: {
        static: {
            directory: path.join(__dirname, './')
        },
    },
    plugins: [
        new CopyPlugin({
            patterns: [
                './index.html'
            ]
        }),
    ]
};
執行程式碼
使用 webpack-dev-server 來建置並執行您的應用程式。 執行下列命令,在本機 Web 伺服器上組合應用程式主機:
npx webpack serve --config webpack.config.js
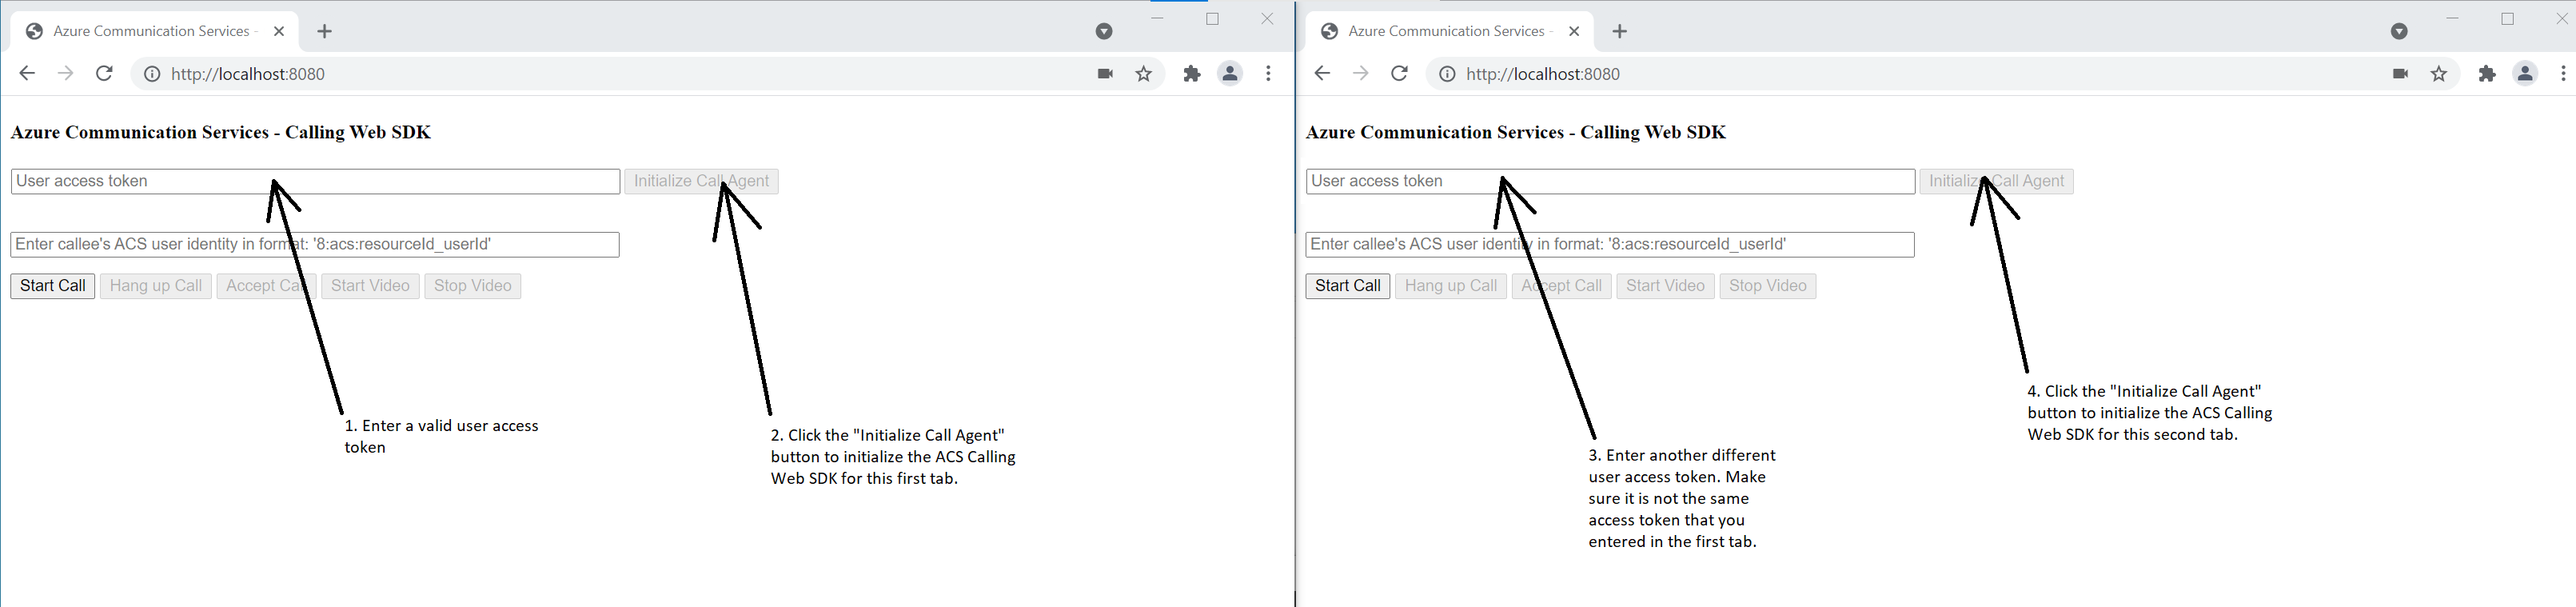
開啟瀏覽器,並在兩個索引標籤上瀏覽到 http://localhost:8080/.You 應該會看到下列畫面:

在第一個索引標籤上,輸入有效的使用者存取權杖,並在另一個索引標籤上,輸入另一個不同的有效使用者存取權杖。
如果您還沒有可使用的權杖,請參閱使用者存取權杖文件。
在這兩個索引標籤上,按一下 [初始化通話代理程式] 按鈕。 您應該會看見下列畫面:
在第一個索引標籤上,輸入第二個索引標籤的 Azure 通訊服務使用者身分識別,然後按一下 [開始通話] 按鈕。 第一個索引標籤會開始外撥給第二個索引標籤的通話,而第二個索引標籤的 [接受通話] 按鈕會變成已啟用: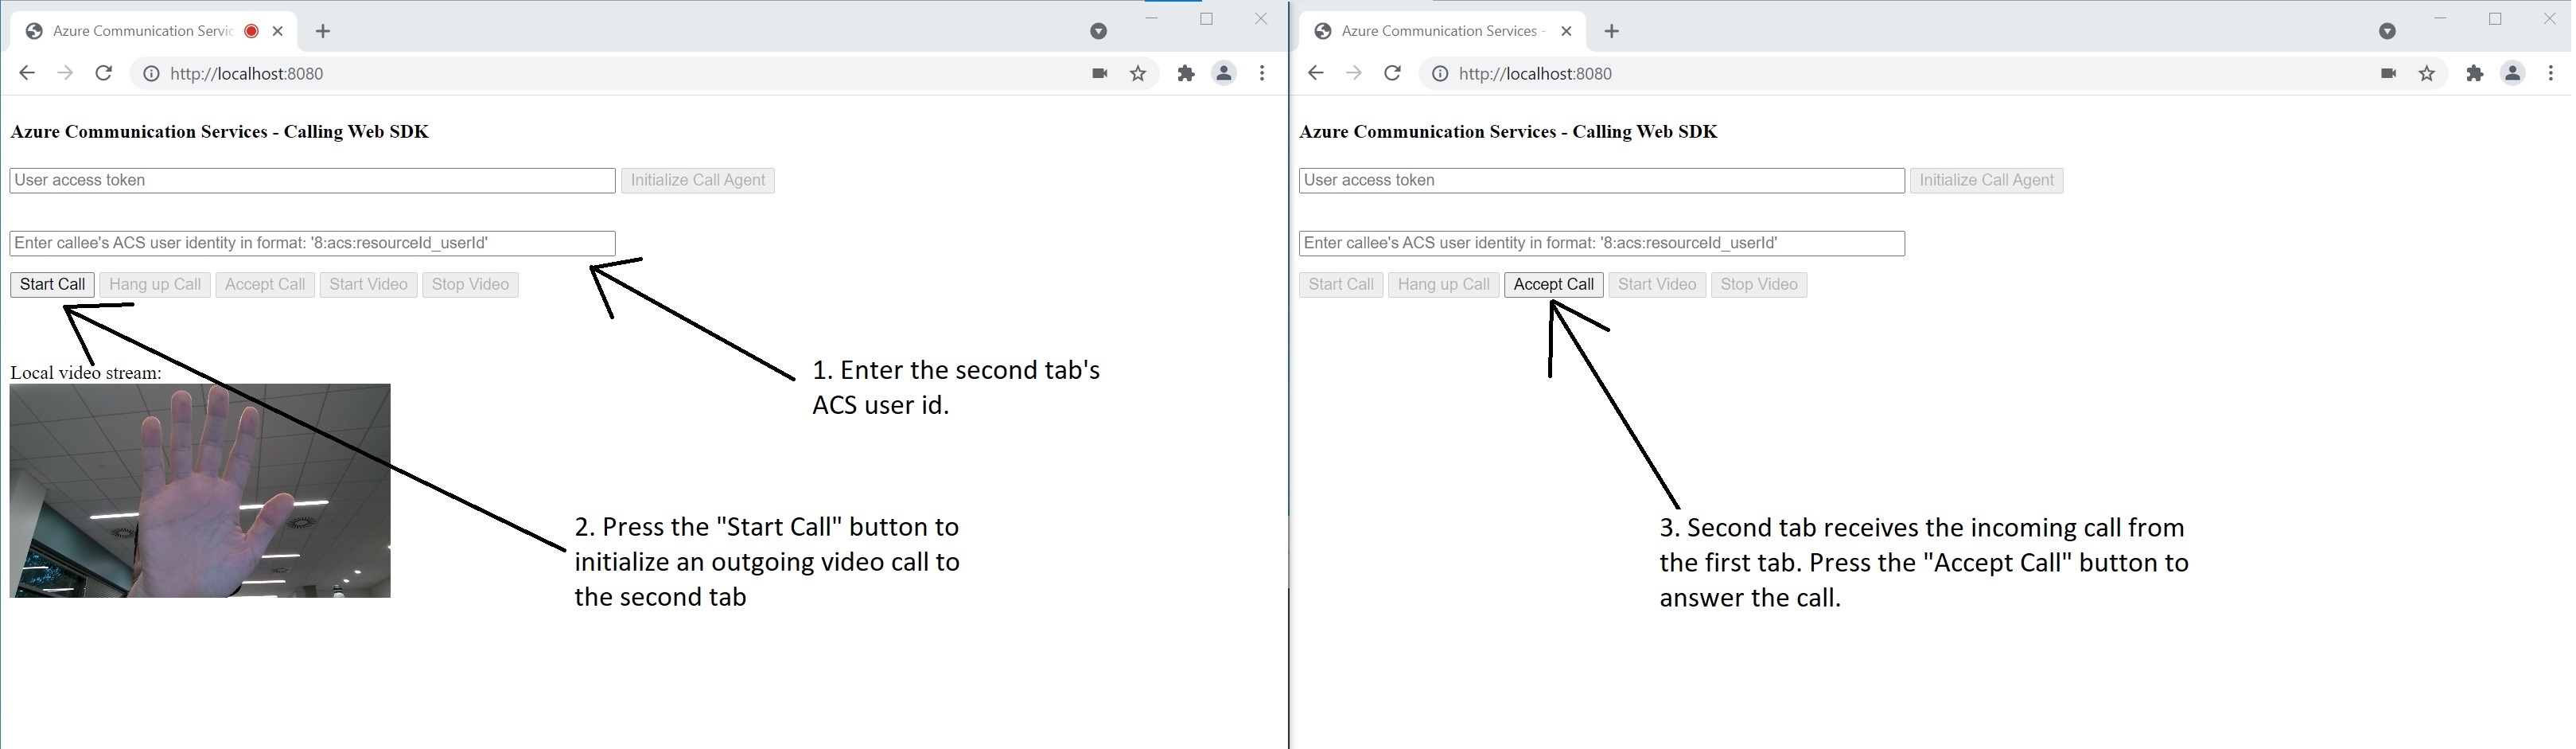
從第二個索引標籤中,按一下 [接受通話] 按鈕,通話即會開始並連線。 您應該會看見下列畫面: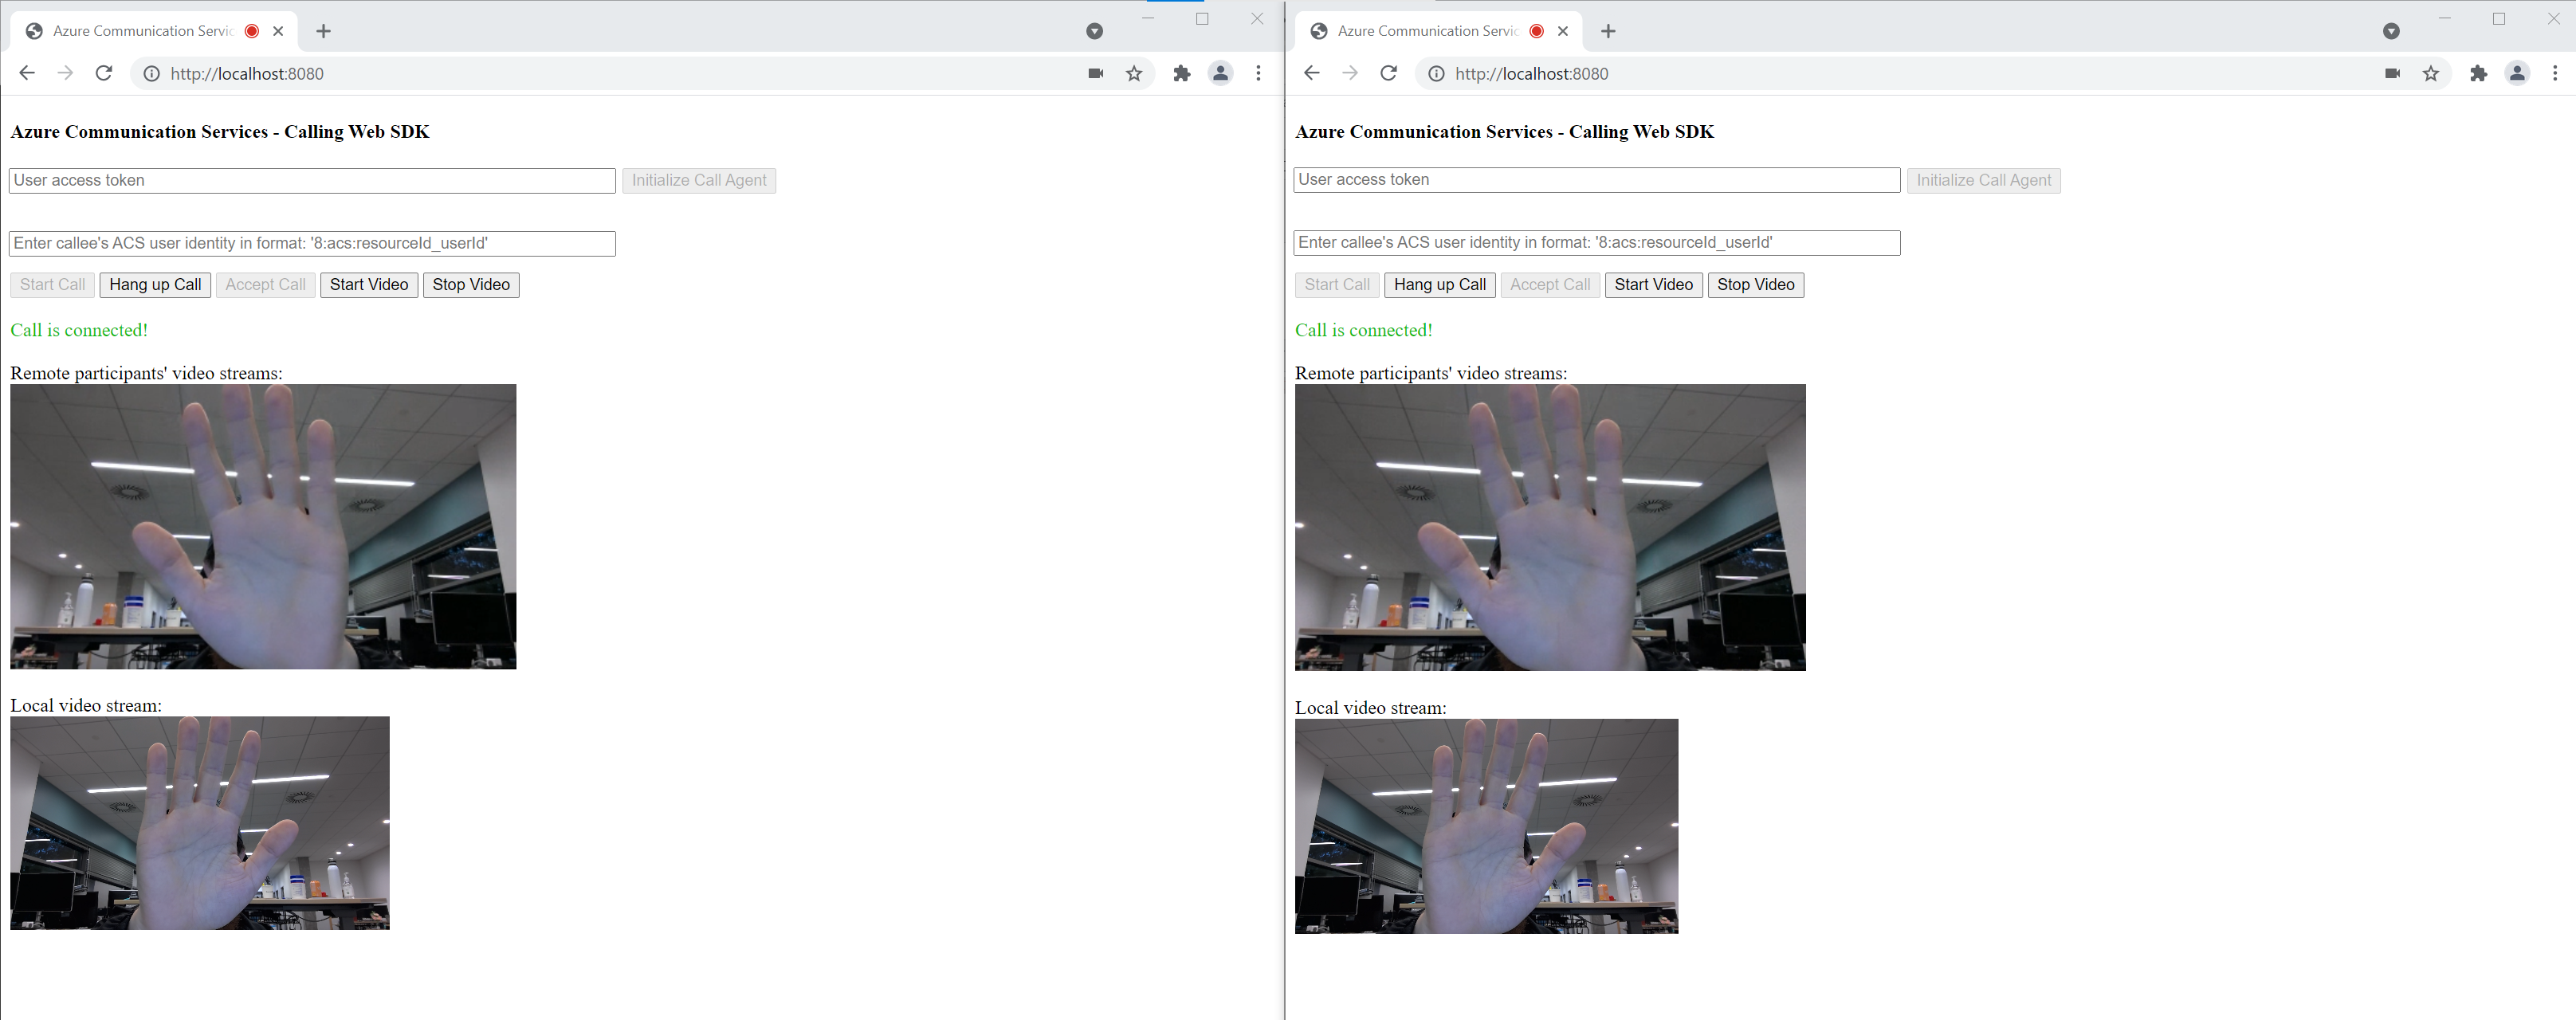
這兩個索引標籤現在已成功處於 1 對 1 視訊通話中。 這兩個索引標籤可以聽到彼此的音訊,並看見彼此的視訊串流。
使用通訊服務的通話用戶端程式庫來將視訊通話新增至您的應用程式,以開始使用 Azure 通訊服務。 了解如何包含 1:1 視訊通話,以及如何建立或加入群組通話。 此外,您可以使用適用於 Android 的 Azure 通訊服務通話 SDK 來開始、接聽及加入視訊通話。
如果您要開始使用範例程式碼,您可以下載範例應用程式。
必要條件
具有有效訂用帳戶的 Azure 帳戶。 免費建立帳戶。
Android Studio,用於建立 Android 應用程式。
已部署通訊服務資源。 建立通訊服務資源。 您必須針對此快速入門記錄您的連接字串。
針對您的 Azure 通訊服務的使用者存取權杖。 您也可以使用 Azure CLI,並搭配您的連接字串執行命令,以建立使用者和存取權杖。
az communication identity token issue --scope voip --connection-string "yourConnectionString"如需詳細資訊,請參閱使用 Azure CLI 建立和管理存取權杖。
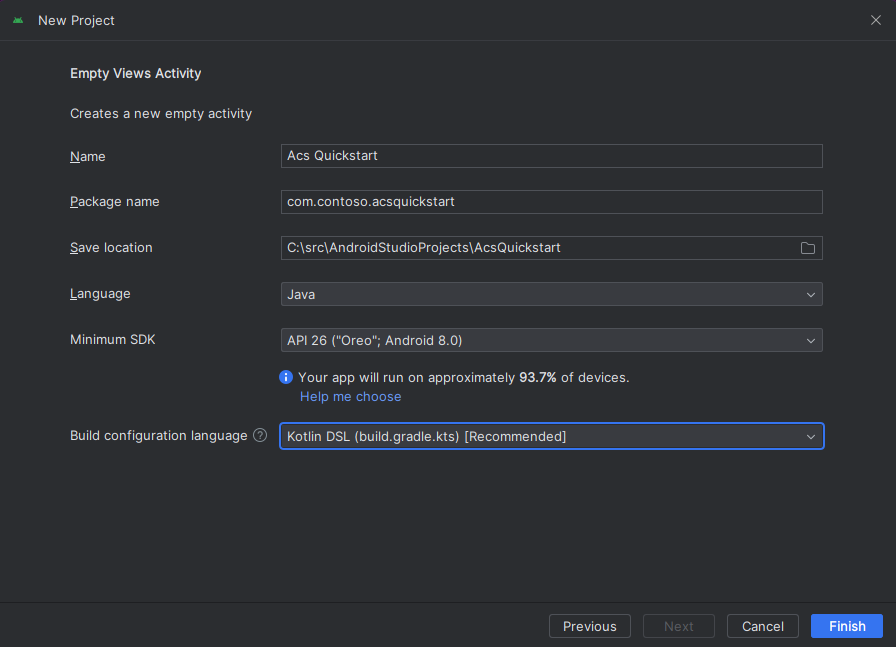
建立具有空白活動的 Android 應用程式
從 Android Studio 中,選取 [啟動新的 Android Studio 專案]。
![顯示在 Android Studio 中選取 [啟動新的 Android Studio 專案] 按鈕的螢幕快照。](media/android/studio-new-project.png)
在 [手機和平板電腦] 底下,選取 [空白活動] 專案範本。
![顯示 [項目範本畫面] 中選取 [空白活動] 選項的螢幕快照。](media/android/studio-blank-activity.png)
針對 [最低 SDK],選取 [API 26: Android 8.0 (Oreo)] 或更新版本。 請參閱 SDK 支援版本。
Install the package
找出您的專案層級 build.gradle,並將 mavenCentral() 新增至 buildscript 和 allprojects 底下的存放庫清單
buildscript {
    repositories {
    ...
        mavenCentral()
    ...
    }
}
allprojects {
    repositories {
    ...
        mavenCentral()
    ...
    }
}
接著,在模組層級 build.gradle 中,將下列幾行新增至 dependencies 和 android 區段中:
android {
    ...
    packagingOptions {
        pickFirst  'META-INF/*'
    }
    compileOptions {
        sourceCompatibility JavaVersion.VERSION_1_8
        targetCompatibility JavaVersion.VERSION_1_8
    }
}

dependencies {
    ...
    implementation 'com.azure.android:azure-communication-calling:2.0.0'
    ...
}
將權限新增至應用程式資訊清單
若要要求進行通話所需的權限,您必須先在應用程式資訊清單 (app/src/main/AndroidManifest.xml) 中宣告權限。 使用下列程式碼取代檔案內容:
<?xml version="1.0" encoding="utf-8"?>
<manifest xmlns:android="http://schemas.android.com/apk/res/android"
    package="com.contoso.acsquickstart">

    <uses-permission android:name="android.permission.INTERNET" />
    <uses-permission android:name="android.permission.ACCESS_NETWORK_STATE" />
    <uses-permission android:name="android.permission.ACCESS_WIFI_STATE" />
    <uses-permission android:name="android.permission.RECORD_AUDIO" />
    <uses-permission android:name="android.permission.CAMERA" />

    <application
        android:allowBackup="true"
        android:icon="@mipmap/ic_launcher"
        android:label="@string/app_name"
        android:roundIcon="@mipmap/ic_launcher_round"
        android:supportsRtl="true"
        android:theme="@style/AppTheme">
        <!--Our Calling SDK depends on the Apache HTTP SDK.
When targeting Android SDK 28+, this library needs to be explicitly referenced.
See https://developer.android.com/about/versions/pie/android-9.0-changes-28#apache-p-->
        <uses-library android:name="org.apache.http.legacy" android:required="false"/>
        <activity android:name=".MainActivity">
            <intent-filter>
                <action android:name="android.intent.action.MAIN" />

                <category android:name="android.intent.category.LAUNCHER" />
            </intent-filter>
        </activity>
    </application>

</manifest>
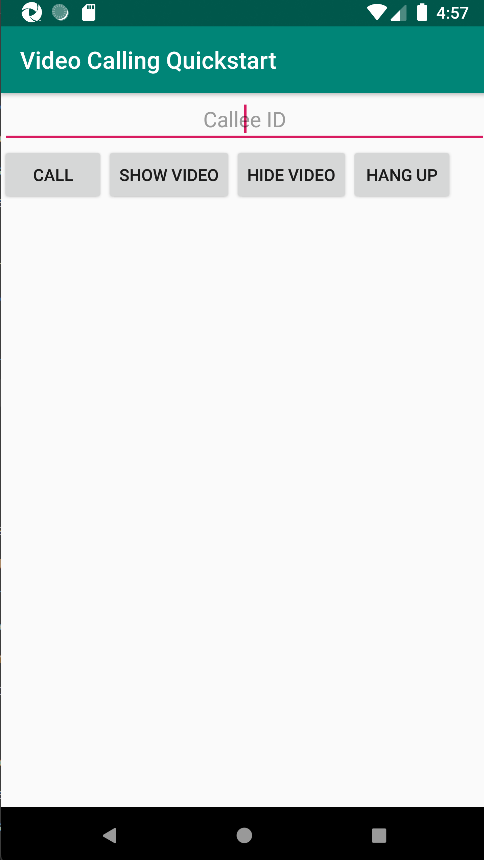
設定應用程式的配置
您需要受話者識別碼或群組通話識別碼的文字輸入、進行通話的按鈕,以及掛斷通話的額外按鈕。
同時,還需要兩個按鈕來開啟和關閉本機視訊。 您必須為本機和遠端視訊串流放置兩個容器。 您可以透過設計工具或藉由編輯配置 XML 來新增這些按鈕。
移至 app/src/main/res/layout/activity_main.xml,然後使用下列程式碼取代檔案內容:
<?xml version="1.0" encoding="utf-8"?>
<androidx.constraintlayout.widget.ConstraintLayout xmlns:android="http://schemas.android.com/apk/res/android"
    xmlns:app="http://schemas.android.com/apk/res-auto"
    xmlns:tools="http://schemas.android.com/tools"
    android:layout_width="match_parent"
    android:layout_height="match_parent"
    tools:context=".MainActivity">
    <LinearLayout
        android:layout_width="match_parent"
        android:layout_height="wrap_content"
        android:orientation="vertical">

        <EditText
            android:id="@+id/call_id"
            android:layout_width="match_parent"
            android:layout_height="wrap_content"
            android:ems="10"
            android:gravity="center"
            android:hint="Callee ID"
            android:inputType="textPersonName"
            app:layout_constraintBottom_toTopOf="@+id/call_button"
            app:layout_constraintEnd_toEndOf="parent"
            app:layout_constraintStart_toStartOf="parent"
            app:layout_constraintTop_toTopOf="parent"
            app:layout_constraintVertical_bias="0.064" />
        <LinearLayout
            android:layout_width="match_parent"
            android:layout_height="wrap_content">
            <Button
                android:id="@+id/call_button"
                android:layout_width="wrap_content"
                android:layout_height="wrap_content"
                android:layout_marginBottom="16dp"
                android:gravity="center"
                android:text="Call"
                app:layout_constraintBottom_toBottomOf="parent"
                app:layout_constraintEnd_toEndOf="parent"
                app:layout_constraintStart_toStartOf="parent" />
            <Button
                android:id="@+id/show_preview"
                android:layout_width="wrap_content"
                android:layout_height="wrap_content"
                android:layout_marginBottom="16dp"
                android:gravity="center"
                android:text="Show Video"
                app:layout_constraintBottom_toBottomOf="parent"
                app:layout_constraintEnd_toEndOf="parent"
                app:layout_constraintStart_toStartOf="parent" />
            <Button
                android:id="@+id/hide_preview"
                android:layout_width="wrap_content"
                android:layout_height="wrap_content"
                android:layout_marginBottom="16dp"
                android:gravity="center"
                android:text="Hide Video"
                app:layout_constraintBottom_toBottomOf="parent"
                app:layout_constraintEnd_toEndOf="parent"
                app:layout_constraintStart_toStartOf="parent" />
            <Button
                android:id="@+id/hang_up"
                android:layout_width="wrap_content"
                android:layout_height="wrap_content"
                android:layout_marginBottom="16dp"
                android:gravity="center"
                android:text="Hang Up"
                app:layout_constraintBottom_toBottomOf="parent"
                app:layout_constraintEnd_toEndOf="parent"
                app:layout_constraintStart_toStartOf="parent" />
        </LinearLayout>
        <ScrollView
            android:layout_width="match_parent"
            android:layout_height="wrap_content">
            <GridLayout
                android:id="@+id/remotevideocontainer"
                android:layout_width="match_parent"
                android:layout_height="wrap_content"
                android:columnCount="2"
                android:rowCount="2"
                android:padding="10dp"></GridLayout>
        </ScrollView>
    </LinearLayout>
    <FrameLayout
        android:layout_width="match_parent"
        android:layout_height="match_parent">
        <LinearLayout
            android:id="@+id/localvideocontainer"
            android:layout_width="180dp"
            android:layout_height="300dp"
            android:layout_gravity="right|bottom"
            android:orientation="vertical"
            android:padding="10dp">
            <Button
                android:id="@+id/switch_source"
                android:layout_width="match_parent"
                android:layout_height="wrap_content"
                android:gravity="center"
                android:text="Switch Source"
                android:visibility="invisible" />
        </LinearLayout>

    </FrameLayout>
</androidx.constraintlayout.widget.ConstraintLayout>
建立主要活動 Scaffolding 和繫結
建立配置之後,即可新增繫結,以及活動的基本 Scaffolding。 活動會處理要求執行階段權限、建立通話代理程式,並在按下按鈕時進行通話。
系統會覆寫 onCreate 方法來叫用 getAllPermissions 和 createAgent,並新增通話按鈕的繫結。 此事件只會在建立活動時發生一次。 如需 onCreate 的詳細資訊,請參閱了解活動生命週期指南。
移至 MainActivity.java 檔案,然後使用下列程式碼取代內容:
package com.example.videocallingquickstart;

import androidx.appcompat.app.AppCompatActivity;
import androidx.core.app.ActivityCompat;

import android.Manifest;
import android.content.pm.PackageManager;
import android.media.AudioManager;
import android.os.Bundle;
import android.util.DisplayMetrics;
import android.util.Log;
import android.view.View;
import android.widget.Button;
import android.widget.EditText;
import android.widget.GridLayout;
import android.widget.Toast;
import android.widget.LinearLayout;
import android.content.Context;
import com.azure.android.communication.calling.CallState;
import com.azure.android.communication.calling.CallingCommunicationException;
import com.azure.android.communication.calling.ParticipantsUpdatedListener;
import com.azure.android.communication.calling.PropertyChangedEvent;
import com.azure.android.communication.calling.PropertyChangedListener;
import com.azure.android.communication.calling.StartCallOptions;
import com.azure.android.communication.calling.VideoDeviceInfo;
import com.azure.android.communication.common.CommunicationIdentifier;
import com.azure.android.communication.common.CommunicationTokenCredential;
import com.azure.android.communication.calling.CallAgent;
import com.azure.android.communication.calling.CallClient;
import com.azure.android.communication.calling.DeviceManager;
import com.azure.android.communication.calling.VideoOptions;
import com.azure.android.communication.calling.LocalVideoStream;
import com.azure.android.communication.calling.VideoStreamRenderer;
import com.azure.android.communication.calling.VideoStreamRendererView;
import com.azure.android.communication.calling.CreateViewOptions;
import com.azure.android.communication.calling.ScalingMode;
import com.azure.android.communication.calling.IncomingCall;
import com.azure.android.communication.calling.Call;
import com.azure.android.communication.calling.AcceptCallOptions;
import com.azure.android.communication.calling.ParticipantsUpdatedEvent;
import com.azure.android.communication.calling.RemoteParticipant;
import com.azure.android.communication.calling.RemoteVideoStream;
import com.azure.android.communication.calling.RemoteVideoStreamsEvent;
import com.azure.android.communication.calling.RendererListener;
import com.azure.android.communication.common.CommunicationUserIdentifier;
import com.azure.android.communication.common.MicrosoftTeamsUserIdentifier;
import com.azure.android.communication.common.PhoneNumberIdentifier;
import com.azure.android.communication.common.UnknownIdentifier;

import java.util.ArrayList;
import java.util.HashSet;
import java.util.List;
import java.util.HashMap;
import java.util.Map;
import java.util.concurrent.ExecutionException;
import java.util.concurrent.Executors;

import java.util.ArrayList;
import java.util.HashSet;
import java.util.List;
import java.util.HashMap;
import java.util.Map;
import java.util.concurrent.ExecutionException;
import java.util.concurrent.Executors;

public class MainActivity extends AppCompatActivity {

    private CallAgent callAgent;
    private VideoDeviceInfo currentCamera;
    private LocalVideoStream currentVideoStream;
    private DeviceManager deviceManager;
    private IncomingCall incomingCall;
    private Call call;
    VideoStreamRenderer previewRenderer;
    VideoStreamRendererView preview;
    final Map<Integer, StreamData> streamData = new HashMap<>();
    private boolean renderRemoteVideo = true;
    private ParticipantsUpdatedListener remoteParticipantUpdatedListener;
    private PropertyChangedListener onStateChangedListener;

    final HashSet<String> joinedParticipants = new HashSet<>();

    Button switchSourceButton;

    @Override
    protected void onCreate(Bundle savedInstanceState) {
        super.onCreate(savedInstanceState);
        setContentView(R.layout.activity_main);

        getAllPermissions();
        createAgent();

        handleIncomingCall();

        Button callButton = findViewById(R.id.call_button);
        callButton.setOnClickListener(l -> startCall());
        Button hangupButton = findViewById(R.id.hang_up);
        hangupButton.setOnClickListener(l -> hangUp());
        Button startVideo = findViewById(R.id.show_preview);
        startVideo.setOnClickListener(l -> turnOnLocalVideo());
        Button stopVideo = findViewById(R.id.hide_preview);
        stopVideo.setOnClickListener(l -> turnOffLocalVideo());

        switchSourceButton = findViewById(R.id.switch_source);
        switchSourceButton.setOnClickListener(l -> switchSource());

        setVolumeControlStream(AudioManager.STREAM_VOICE_CALL);
    }

	/**
     * Request each required permission if the app doesn't already have it.
     */
    private void getAllPermissions() {
        // See section on requesting permissions
    }

    /**
      * Create the call agent for placing calls
      */
    private void createAgent() {
        // See section on creating the call agent
    }

	/**
     * Handle incoming calls
     */
    private void handleIncomingCall() {
        // See section on answering incoming call
    }

	/**
     * Place a call to the callee id provided in `callee_id` text input.
     */
    private void startCall() {
        // See section on starting the call
    }

    /**
     * End calls
     */
    private void hangUp() {
        // See section on ending the call
    }

	/**
     * Mid-call operations
     */
    public void turnOnLocalVideo() {
        // See section
    }

    public void turnOffLocalVideo() {
        // See section
    }

	/**
     * Change the active camera for the next available
     */
	public void switchSource() {
		// See section
    }
}
要求執行階段時的權限
針對 Android 6.0 和更新版本 (API 層級 23),以及 targetSdkVersion 23 或更新版本,權限會在執行階段授與,而不是在安裝應用程式時授與。 為了提供支援,可實作 getAllPermissions,針對每個必要的權限呼叫 ActivityCompat.checkSelfPermission 和 ActivityCompat.requestPermissions。
/**
 * Request each required permission if the app doesn't already have it.
 */
private void getAllPermissions() {
    String[] requiredPermissions = new String[]{Manifest.permission.RECORD_AUDIO, Manifest.permission.CAMERA, Manifest.permission.WRITE_EXTERNAL_STORAGE, Manifest.permission.READ_PHONE_STATE};
    ArrayList<String> permissionsToAskFor = new ArrayList<>();
    for (String permission : requiredPermissions) {
        if (ActivityCompat.checkSelfPermission(this, permission) != PackageManager.PERMISSION_GRANTED) {
            permissionsToAskFor.add(permission);
        }
    }
    if (!permissionsToAskFor.isEmpty()) {
        ActivityCompat.requestPermissions(this, permissionsToAskFor.toArray(new String[0]), 1);
    }
}
注意
當您設計應用程式時,請考量何時應要求這些權限。 您應該視需要要求權限,而不是提前要求。 如需詳細資訊,請參閱 Android 權限指南 \(機器翻譯\)。
物件模型
下列類別和介面會處理 Azure 通訊服務通話 SDK 的一些重大功能:
| 名稱 | 描述 |
|---|---|
CallClient |
通話 SDK 的主要進入點。 |
CallAgent |
用來開始和管理通話。 |
CommunicationTokenCredential |
用來作為權杖認證以將 CallAgent 具現化。 |
CommunicationIdentifier |
用來作為可能屬於通話一部分的不同類型參與者。 |
從使用者存取權杖建立代理程式
您需要使用者權杖,才能建立已驗證的通話代理程式。 一般來說,此權杖會從具有應用程式特定驗證的服務產生。 如需使用者存取權杖的詳細資訊,請參閱使用者存取權杖。
在快速入門中,將 <User_Access_Token> 取代為針對您的 Azure 通訊服務資源產生的使用者存取權杖。
/**
 * Create the call agent for placing calls
 */
private void createAgent() {
    Context context = this.getApplicationContext();
    String userToken = "<USER_ACCESS_TOKEN>";
    try {
        CommunicationTokenCredential credential = new CommunicationTokenCredential(userToken);
        CallClient callClient = new CallClient();
        deviceManager = callClient.getDeviceManager(context).get();
        callAgent = callClient.createCallAgent(getApplicationContext(), credential).get();
    } catch (Exception ex) {
        Toast.makeText(context, "Failed to create call agent.", Toast.LENGTH_SHORT).show();
    }
}
使用通話代理程式開始視訊通話
您可以使用通話代理程式來進行通話。 您只需提供受話者識別碼和通話選項的清單。
若要進行視訊通話,您必須使用 deviceManagergetCameras API 來列舉本機相機。 選取所需的相機之後,使用它來建構 LocalVideoStream 執行個體。 然後,將其當作 localVideoStream 陣列中的項目傳遞至 videoOptions,並傳入通話方法。 當通話連線之後,便會自動開始從選取的相機中將視訊串流傳送給另一位參與者。
private void startCall() {
    Context context = this.getApplicationContext();
    EditText callIdView = findViewById(R.id.call_id);
    String callId = callIdView.getText().toString();
    ArrayList<CommunicationIdentifier> participants = new ArrayList<CommunicationIdentifier>();
    List<VideoDeviceInfo> cameras = deviceManager.getCameras();


    StartCallOptions options = new StartCallOptions();
    if(!cameras.isEmpty()) {
        currentCamera = getNextAvailableCamera(null);
        currentVideoStream = new LocalVideoStream(currentCamera, context);
        LocalVideoStream[] videoStreams = new LocalVideoStream[1];
        videoStreams[0] = currentVideoStream;
        VideoOptions videoOptions = new VideoOptions(videoStreams);
        options.setVideoOptions(videoOptions);
        showPreview(currentVideoStream);
    }
    participants.add(new CommunicationUserIdentifier(callId));

    call = callAgent.startCall(
            context,
            participants,
            options);

    //Subscribe to events on updates of call state and remote participants
    remoteParticipantUpdatedListener = this::handleRemoteParticipantsUpdate;
    onStateChangedListener = this::handleCallOnStateChanged;
    call.addOnRemoteParticipantsUpdatedListener(remoteParticipantUpdatedListener);
    call.addOnStateChangedListener(onStateChangedListener);
}
在此快速入門中,您依賴 getNextAvailableCamera 函式來挑選通話所使用的相機。 此函式採用相機列舉作為輸入,並逐一查看清單,以取得下一個可用的相機。 如果引數是 null,則函式會挑選清單中的第一個裝置。 如果您在選取 [開始通話] 時沒有可用的相機,即會改為開始音訊通話。 但是,如果遠端參與者透過視訊來接聽,您仍然可以看到遠端視訊串流。
private VideoDeviceInfo getNextAvailableCamera(VideoDeviceInfo camera) {
    List<VideoDeviceInfo> cameras = deviceManager.getCameras();
    int currentIndex = 0;
    if (camera == null) {
        return cameras.isEmpty() ? null : cameras.get(0);
    }

    for (int i = 0; i < cameras.size(); i++) {
        if (camera.getId().equals(cameras.get(i).getId())) {
            currentIndex = i;
            break;
        }
    }
    int newIndex = (currentIndex + 1) % cameras.size();
    return cameras.get(newIndex);
}
當您建構 LocalVideoStream 執行個體之後,就可以建立轉譯器,在 UI 上顯示它。
private void showPreview(LocalVideoStream stream) {
        previewRenderer = new VideoStreamRenderer(stream, this);
        LinearLayout layout = findViewById(R.id.localvideocontainer);
        preview = previewRenderer.createView(new CreateViewOptions(ScalingMode.FIT));
        preview.setTag(0);
        runOnUiThread(() -> {
            layout.addView(preview);
            switchSourceButton.setVisibility(View.VISIBLE);
        });
    }
若要允許使用者切換本機視訊來源,請使用 switchSource。 此方法會挑選下一個可用的相機,並將其定義為本機串流。
public void switchSource() {
    if (currentVideoStream != null) {
        try {
            currentCamera = getNextAvailableCamera(currentCamera);
            currentVideoStream.switchSource(currentCamera).get();
        } catch (InterruptedException e) {
            e.printStackTrace();
        } catch (ExecutionException e) {
            e.printStackTrace();
        }
    }
}
接聽來電
您可以在 callAgent 上訂閱 addOnIncomingCallListener,以取得來電。
private void handleIncomingCall() {
    callAgent.addOnIncomingCallListener((incomingCall) -> {
        this.incomingCall = incomingCall;
        Executors.newCachedThreadPool().submit(this::answerIncomingCall);
    });
}
若要在視訊相機開啟的情況下接受通話,請使用 deviceManagergetCameras API 來列舉本機相機。 挑選相機,並建構 LocalVideoStream 執行個體。 先將其傳遞到 acceptCallOptions,然後在 call 物件上呼叫 accept 方法。
private void answerIncomingCall() {
    Context context = this.getApplicationContext();
    if (incomingCall == null){
        return;
    }
    AcceptCallOptions acceptCallOptions = new AcceptCallOptions();
    List<VideoDeviceInfo> cameras = deviceManager.getCameras();
    if(!cameras.isEmpty()) {
        currentCamera = getNextAvailableCamera(null);
        currentVideoStream = new LocalVideoStream(currentCamera, context);
        LocalVideoStream[] videoStreams = new LocalVideoStream[1];
        videoStreams[0] = currentVideoStream;
        VideoOptions videoOptions = new VideoOptions(videoStreams);
        acceptCallOptions.setVideoOptions(videoOptions);
        showPreview(currentVideoStream);
    }
    try {
        call = incomingCall.accept(context, acceptCallOptions).get();
    } catch (InterruptedException e) {
        e.printStackTrace();
    } catch (ExecutionException e) {
        e.printStackTrace();
    }

    //Subscribe to events on updates of call state and remote participants
    remoteParticipantUpdatedListener = this::handleRemoteParticipantsUpdate;
    onStateChangedListener = this::handleCallOnStateChanged;
    call.addOnRemoteParticipantsUpdatedListener(remoteParticipantUpdatedListener);
    call.addOnStateChangedListener(onStateChangedListener);
}
遠端參與者和遠端視訊串流
當您開始通話或接聽來電時,您必須訂閱 addOnRemoteParticipantsUpdatedListener 事件來處理遠端參與者。
remoteParticipantUpdatedListener = this::handleRemoteParticipantsUpdate;
call.addOnRemoteParticipantsUpdatedListener(remoteParticipantUpdatedListener);
使用在相同類別內定義的事件接聽程式時,請將接聽程式繫結至變數。 將變數傳遞為引數,以新增和移除接聽程式方法。
如果您嘗試以引數形式直接傳入接聽程式,則您會失去對該接聽程式的參考。 Java 會建立這些接聽程式的新執行個體,而不是參考先前建立的接聽程式。 您無法移除先前的執行個體,因為您沒有對這些執行個體的參考。
遠端視訊串流更新
針對 1:1 通話,您必須處理新增的參與者。 當您移除遠端參與者時,通話即會結束。 針對新增的參與者,您可以訂閱 addOnVideoStreamsUpdatedListener 來處理視訊串流更新。
public void handleRemoteParticipantsUpdate(ParticipantsUpdatedEvent args) {
    handleAddedParticipants(args.getAddedParticipants());
}

private void handleAddedParticipants(List<RemoteParticipant> participants) {
    for (RemoteParticipant remoteParticipant : participants) {
        if(!joinedParticipants.contains(getId(remoteParticipant))) {
            joinedParticipants.add(getId(remoteParticipant));

            if (renderRemoteVideo) {
                for (RemoteVideoStream stream : remoteParticipant.getVideoStreams()) {
                    StreamData data = new StreamData(stream, null, null);
                    streamData.put(stream.getId(), data);
                    startRenderingVideo(data);
                }
            }
            remoteParticipant.addOnVideoStreamsUpdatedListener(videoStreamsEventArgs -> videoStreamsUpdated(videoStreamsEventArgs));
        }
    }
}

private void videoStreamsUpdated(RemoteVideoStreamsEvent videoStreamsEventArgs) {
    for(RemoteVideoStream stream : videoStreamsEventArgs.getAddedRemoteVideoStreams()) {
        StreamData data = new StreamData(stream, null, null);
        streamData.put(stream.getId(), data);
        if (renderRemoteVideo) {
            startRenderingVideo(data);
        }
    }

    for(RemoteVideoStream stream : videoStreamsEventArgs.getRemovedRemoteVideoStreams()) {
        stopRenderingVideo(stream);
    }
}


public String getId(final RemoteParticipant remoteParticipant) {
    final CommunicationIdentifier identifier = remoteParticipant.getIdentifier();
    if (identifier instanceof PhoneNumberIdentifier) {
        return ((PhoneNumberIdentifier) identifier).getPhoneNumber();
    } else if (identifier instanceof MicrosoftTeamsUserIdentifier) {
        return ((MicrosoftTeamsUserIdentifier) identifier).getUserId();
    } else if (identifier instanceof CommunicationUserIdentifier) {
        return ((CommunicationUserIdentifier) identifier).getId();
    } else {
        return ((UnknownIdentifier) identifier).getId();
    }
}
轉譯遠端視訊
建立遠端視訊串流的轉譯器,並將其附加至檢視,以開始轉譯遠端檢視。 處置檢視以停止轉譯。
void startRenderingVideo(StreamData data){
    if (data.renderer != null) {
        return;
    }
    GridLayout layout = ((GridLayout)findViewById(R.id.remotevideocontainer));
    data.renderer = new VideoStreamRenderer(data.stream, this);
    data.renderer.addRendererListener(new RendererListener() {
        @Override
        public void onFirstFrameRendered() {
            String text = data.renderer.getSize().toString();
            Log.i("MainActivity", "Video rendering at: " + text);
        }

        @Override
        public void onRendererFailedToStart() {
            String text = "Video failed to render";
            Log.i("MainActivity", text);
        }
    });
    data.rendererView = data.renderer.createView(new CreateViewOptions(ScalingMode.FIT));
    data.rendererView.setTag(data.stream.getId());
    runOnUiThread(() -> {
        GridLayout.LayoutParams params = new GridLayout.LayoutParams(layout.getLayoutParams());
        DisplayMetrics displayMetrics = new DisplayMetrics();
        getWindowManager().getDefaultDisplay().getMetrics(displayMetrics);
        params.height = (int)(displayMetrics.heightPixels / 2.5);
        params.width = displayMetrics.widthPixels / 2;
        layout.addView(data.rendererView, params);
    });
}

void stopRenderingVideo(RemoteVideoStream stream) {
    StreamData data = streamData.get(stream.getId());
    if (data == null || data.renderer == null) {
        return;
    }
    runOnUiThread(() -> {
        GridLayout layout = findViewById(R.id.remotevideocontainer);
        for(int i = 0; i < layout.getChildCount(); ++ i) {
            View childView =  layout.getChildAt(i);
            if ((int)childView.getTag() == data.stream.getId()) {
                layout.removeViewAt(i);
            }
        }
    });
    data.rendererView = null;
    // Dispose renderer
    data.renderer.dispose();
    data.renderer = null;
}

static class StreamData {
    RemoteVideoStream stream;
    VideoStreamRenderer renderer;
    VideoStreamRendererView rendererView;
    StreamData(RemoteVideoStream stream, VideoStreamRenderer renderer, VideoStreamRendererView rendererView) {
        this.stream = stream;
        this.renderer = renderer;
        this.rendererView = rendererView;
    }
}
通話狀態更新
通話狀態可能會從已連線變更為已中斷連線。 當通話連線之後,您就能處理遠端參與者,並在通話中斷連線時,處置 previewRenderer 來停止本機視訊。
private void handleCallOnStateChanged(PropertyChangedEvent args) {
        if (call.getState() == CallState.CONNECTED) {
            runOnUiThread(() -> Toast.makeText(this, "Call is CONNECTED", Toast.LENGTH_SHORT).show());
            handleCallState();
        }
        if (call.getState() == CallState.DISCONNECTED) {
            runOnUiThread(() -> Toast.makeText(this, "Call is DISCONNECTED", Toast.LENGTH_SHORT).show());
            if (previewRenderer != null) {
                previewRenderer.dispose();
            }
            switchSourceButton.setVisibility(View.INVISIBLE);
        }
    }
結束通話
在通話執行個體上呼叫 hangUp() 函式,以結束通話。 處置 previewRenderer 以停止本機視訊。
private void hangUp() {
    try {
        call.hangUp().get();
        switchSourceButton.setVisibility(View.INVISIBLE);
    } catch (ExecutionException | InterruptedException e) {
        e.printStackTrace();
    }
    if (previewRenderer != null) {
        previewRenderer.dispose();
    }
}
隱藏和顯示本機視訊
通話開始之後,您就能使用 turnOffLocalVideo() 來停止本機視訊轉譯和串流,此方法會移除包裝本機轉譯器的檢視,並處置目前的串流。 若要繼續串流並再次轉譯本機預覽,請使用 turnOnLocalVideo(),此方法會顯示視訊預覽並開始串流。
public void turnOnLocalVideo() {
    List<VideoDeviceInfo> cameras = deviceManager.getCameras();
    if(!cameras.isEmpty()) {
        try {
            currentVideoStream = new LocalVideoStream(currentCamera, this);
            showPreview(currentVideoStream);
            call.startVideo(this, currentVideoStream).get();
            switchSourceButton.setVisibility(View.VISIBLE);
        } catch (CallingCommunicationException acsException) {
            acsException.printStackTrace();
        } catch (ExecutionException | InterruptedException e) {
            e.printStackTrace();
        }
    }
}

public void turnOffLocalVideo() {
    try {
        LinearLayout container = findViewById(R.id.localvideocontainer);
        for (int i = 0; i < container.getChildCount(); ++i) {
            Object tag = container.getChildAt(i).getTag();
            if (tag != null && (int)tag == 0) {
                container.removeViewAt(i);
            }
        }
        switchSourceButton.setVisibility(View.INVISIBLE);
        previewRenderer.dispose();
        previewRenderer = null;
        call.stopVideo(this, currentVideoStream).get();
    } catch (CallingCommunicationException acsException) {
        acsException.printStackTrace();
    } catch (ExecutionException | InterruptedException e) {
        e.printStackTrace();
    }
}
執行程式碼
您現在可以使用 Android Studio 工具列上的 [執行應用程式] 按鈕來啟動應用程式。
| 完成的應用程式 | 1:1 通話 |
|---|---|
|
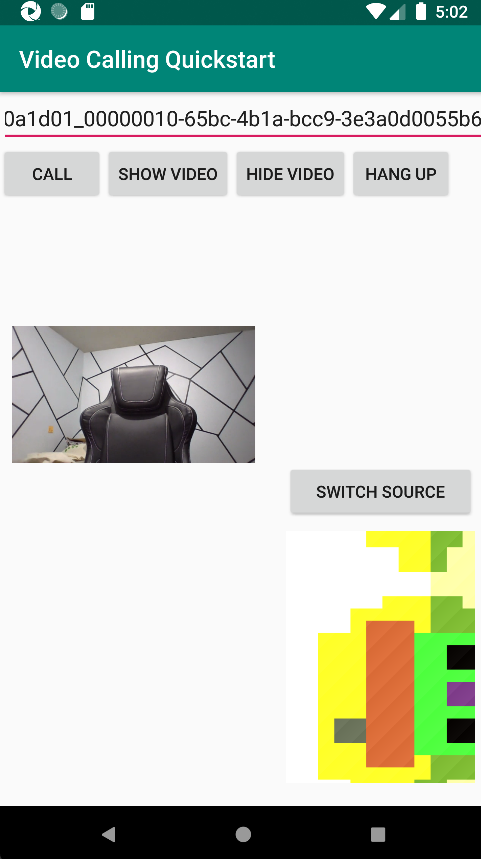
|
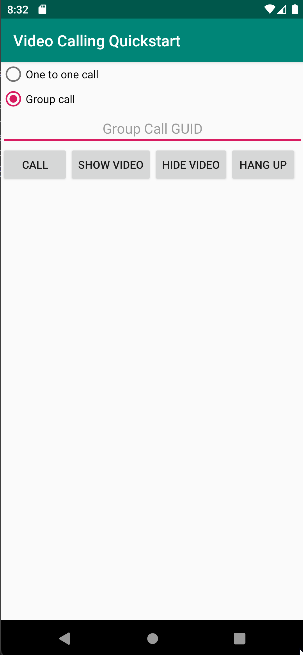
新增群組通話功能
現在您可以更新應用程式,讓使用者能夠在 1:1 通話或群組通話之間進行選擇。
更新配置
使用選項按鈕來選取 SDK 要建立 1:1 通話,還是要加入群組通話。 此選項按鈕位於頂端,因此,app/src/main/res/layout/activity_main.xml 的第一個區段結尾如下所示。
<?xml version="1.0" encoding="utf-8"?>
<androidx.constraintlayout.widget.ConstraintLayout xmlns:android="http://schemas.android.com/apk/res/android"
    xmlns:app="http://schemas.android.com/apk/res-auto"
    xmlns:tools="http://schemas.android.com/tools"
    android:layout_width="match_parent"
    android:layout_height="match_parent"
    tools:context=".MainActivity">
    <LinearLayout
        android:layout_width="match_parent"
        android:layout_height="wrap_content"
        android:orientation="vertical">

        <RadioGroup
            android:layout_width="match_parent"
            android:layout_height="wrap_content">

            <RadioButton
                android:id="@+id/one_to_one_call"
                android:layout_width="match_parent"
                android:layout_height="wrap_content"
                android:text="One to one call" />

            <RadioButton
                android:id="@+id/group_call"
                android:layout_width="match_parent"
                android:layout_height="wrap_content"
                android:text="Group call" />

        </RadioGroup>

        <EditText
            android:id="@+id/call_id"
            android:layout_width="match_parent"
            android:layout_height="wrap_content"
            android:ems="10"
            android:gravity="center"
            android:hint="Callee ID"
            android:inputType="textPersonName"
            app:layout_constraintBottom_toTopOf="@+id/call_button"
            app:layout_constraintEnd_toEndOf="parent"
            app:layout_constraintStart_toStartOf="parent"
            app:layout_constraintTop_toTopOf="parent"
            app:layout_constraintVertical_bias="0.064" />
.
.
.
</androidx.constraintlayout.widget.ConstraintLayout>
更新 MainActivity.Java
您現在可以更新元素和邏輯,來決定何時要建立 1:1 通話,以及何時要加入群組通話。 第一個部分的程式碼需要更新,才能新增相依性、項目及其他設定。
相依性:
import android.widget.RadioButton;
import com.azure.android.communication.calling.GroupCallLocator;
import com.azure.android.communication.calling.JoinCallOptions;
import java.util.UUID;
全域元素:
RadioButton oneToOneCall, groupCall;
更新 onCreate():
@Override
protected void onCreate(Bundle savedInstanceState) {
    super.onCreate(savedInstanceState);
    setContentView(R.layout.activity_main);

    getAllPermissions();
    createAgent();

    handleIncomingCall();

    Button callButton = findViewById(R.id.call_button);
    callButton.setOnClickListener(l -> startCall());
    Button hangupButton = findViewById(R.id.hang_up);
    hangupButton.setOnClickListener(l -> hangUp());
    Button startVideo = findViewById(R.id.show_preview);
    startVideo.setOnClickListener(l -> turnOnLocalVideo());
    Button stopVideo = findViewById(R.id.hide_preview);
    stopVideo.setOnClickListener(l -> turnOffLocalVideo());

    switchSourceButton = findViewById(R.id.switch_source);
    switchSourceButton.setOnClickListener(l -> switchSource());

    setVolumeControlStream(AudioManager.STREAM_VOICE_CALL);

    oneToOneCall = findViewById(R.id.one_to_one_call);
    oneToOneCall.setOnClickListener(this::onCallTypeSelected);
    oneToOneCall.setChecked(true);
    groupCall = findViewById(R.id.group_call);
    groupCall.setOnClickListener(this::onCallTypeSelected);

}
更新 startCall():
private void startCall() {
        Context context = this.getApplicationContext();
        EditText callIdView = findViewById(R.id.call_id);
        String callId = callIdView.getText().toString();
        ArrayList<CommunicationIdentifier> participants = new ArrayList<CommunicationIdentifier>();
        List<VideoDeviceInfo> cameras = deviceManager.getCameras();


        if(oneToOneCall.isChecked()){
        StartCallOptions options = new StartCallOptions();
        if(!cameras.isEmpty()) {
            currentCamera = getNextAvailableCamera(null);
            currentVideoStream = new LocalVideoStream(currentCamera, context);
            LocalVideoStream[] videoStreams = new LocalVideoStream[1];
            videoStreams[0] = currentVideoStream;
            VideoOptions videoOptions = new VideoOptions(videoStreams);
            options.setVideoOptions(videoOptions);
            showPreview(currentVideoStream);
        }
        participants.add(new CommunicationUserIdentifier(callId));

        call = callAgent.startCall(
                context,
                participants,
                options);
        }
        else{

            JoinCallOptions options = new JoinCallOptions();
            if(!cameras.isEmpty()) {
                currentCamera = getNextAvailableCamera(null);
                currentVideoStream = new LocalVideoStream(currentCamera, context);
                LocalVideoStream[] videoStreams = new LocalVideoStream[1];
                videoStreams[0] = currentVideoStream;
                VideoOptions videoOptions = new VideoOptions(videoStreams);
                options.setVideoOptions(videoOptions);
                showPreview(currentVideoStream);
            }
            GroupCallLocator groupCallLocator = new GroupCallLocator(UUID.fromString(callId));

            call = callAgent.join(
                    context,
                    groupCallLocator,
                    options);
        }


        remoteParticipantUpdatedListener = this::handleRemoteParticipantsUpdate;
        onStateChangedListener = this::handleCallOnStateChanged;
        call.addOnRemoteParticipantsUpdatedListener(remoteParticipantUpdatedListener);
        call.addOnStateChangedListener(onStateChangedListener);
    }
新增 onCallTypeSelected():
public void onCallTypeSelected(View view) {
    boolean checked = ((RadioButton) view).isChecked();
    EditText callIdView = findViewById(R.id.call_id);

    switch(view.getId()) {
        case R.id.one_to_one_call:
            if (checked){
                callIdView.setHint("Callee id");
            }
            break;
        case R.id.group_call:
            if (checked){
                callIdView.setHint("Group Call GUID");
            }
            break;
    }
}
執行升級的應用程式
此時,您可以使用 Android Studio 工具列上的 [執行應用程式] 按鈕來啟動應用程式。
| 畫面更新 | 群組通話 |
|---|---|
|
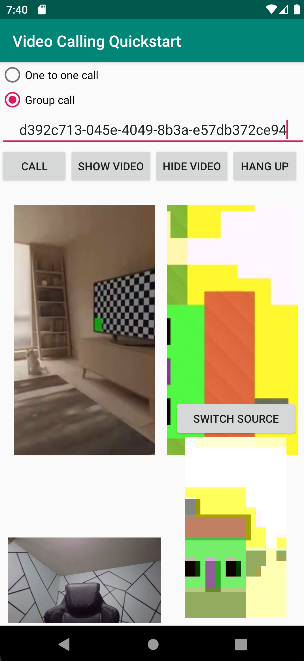
|
使用通訊服務的通話 SDK,在您的應用程式中新增一對一視訊通話,以開始使用 Azure 通訊服務。 您將了解如何使用適用於 iOS 的 Azure 通訊服務通話 SDK,開始並接聽視訊通話。
範例程式碼
如果您想要直接跳到結尾,您可以在 GitHub \(英文\) 上下載此快速入門作為範例。
必要條件
取得具備有效訂用帳戶的 Azure 帳戶。 免費建立帳戶。
執行 Xcode 的 Mac,以及安裝在您 Keychain 中的有效開發人員憑證。
建立作用中的通訊服務資源。 建立通訊服務資源。 您必須針對此快速入門記錄您的連接字串。
針對您的 Azure 通訊服務的使用者存取權杖。 您也可以使用 Azure CLI,並搭配您的連接字串執行命令,以建立使用者和存取權杖。
az communication identity token issue --scope voip --connection-string "yourConnectionString"如需詳細資訊,請參閱使用 Azure CLI 建立和管理存取權杖。
設定
建立 XCode 專案
在 Xcode 中,建立新的 iOS 專案,並選取 [單一檢視應用程式] 範本。 此教學課程使用 SwiftUI 架構 \(英文\),因此,您應將 [語言] 設定為 [Swift],並將 [使用者介面] 設定為 [SwiftUI]。 進行本快速入門期間,您不會建立測試。 您可以視需要取消核取 [包含測試]。
![顯示 Xcode 內 [新增專案] 視窗的螢幕快照。](media/ios/xcode-new-ios-project.png)
安裝 CocoaPods
使用此指南,在 Mac 上安裝 CocoaPods \(英文\)。
使用 CocoaPods 安裝套件和相依性
若要為應用程式建立
Podfile,請開啟終端,然後瀏覽至專案資料夾並執行 pod init。將下列程式碼新增至
Podfile並儲存。 請參閱 SDK 支援版本。
platform :ios, '13.0'
use_frameworks!

target 'VideoCallingQuickstart' do
  pod 'AzureCommunicationCalling', '~> 1.0.0'
end
執行 pod install。
使用 Xcode 開啟
.xcworkspace。
直接使用 XCFramework
如果您不是使用 CocoaPods 作為相依性管理員,您可以直接從我們的發行版本頁面 \(英文\) 中下載 AzureCommunicationCalling.xcframework。
請務必知道 AzureCommunicationCalling 相依於 AzureCommunicationCommon,因此,您也必須在專案中安裝它。
注意
儘管 AzureCommunicationCommon 是純 Swift 套件,但是您無法使用 Swift Package Manager 來安裝它,以搭配 AzureCommunicationCalling 使用,因為後者是 Objective-C 架構,而 Swift Package Manager 在設計上故意不支援 Swift ObjC 介面標頭,這表示,如果使用 Swift Package Manager 安裝,就無法與 AzureCommunicationCalling 一起運作。 您必須透過另一個相依性管理員進行安裝,或者從 AzureCommunicationCommon 來源產生 xcframework,並匯入到您的專案。
要求存取麥克風和相機的權限
若要存取裝置的麥克風和相機,您必須以 NSMicrophoneUsageDescription 和 NSCameraUsageDescription 更新應用程式的資訊屬性清單。 您可以將相關聯的值設定為字串,其中包含系統用來向使用者要求存取權的對話。
以滑鼠右鍵按一下專案樹狀結構的 Info.plist 項目,然後選取 [開啟為] > [原始程式碼]。 將以下幾行新增至最上層 <dict> 區段中,然後儲存檔案。
<key>NSMicrophoneUsageDescription</key>
<string>Need microphone access for VOIP calling.</string>
<key>NSCameraUsageDescription</key>
<string>Need camera access for video calling</string>
設定應用程式架構
開啟專案的 ContentView.swift 檔案,並將匯入宣告新增至檔案頂端,以匯入 AzureCommunicationCalling 程式庫和 AVFoundation。 AVFoundation 可用於從程式碼擷取音訊權限。
import AzureCommunicationCalling
import AVFoundation
物件模型
下列類別和介面會處理適用於 iOS 的 Azure 通訊服務通話 SDK 的一些主要功能。
| 名稱 | 描述 |
|---|---|
CallClient |
CallClient 是通話 SDK 的主要進入點。 |
CallAgent |
CallAgent 可用來開始和管理通話。 |
CommunicationTokenCredential |
CommunicationTokenCredential 可用來作為權杖認證以將 CallAgent 具現化。 |
CommunicationIdentifier |
CommunicationIdentifier 可用來代表使用者的身分識別,其可以是下列其中一個選項:CommunicationUserIdentifier、PhoneNumberIdentifier 或 CallingApplication。 |
建立通話代理程式
使用一些簡單的 UI 控制項來取代 ContentView struct 的實作,讓使用者可以起始和結束通話。 在此快速入門中,我們會將商務邏輯附加至這些控制項。
struct ContentView: View {
    @State var callee: String = ""
    @State var callClient: CallClient?
    @State var callAgent: CallAgent?
    @State var call: Call?
    @State var deviceManager: DeviceManager?
    @State var localVideoStream:[LocalVideoStream]?
    @State var incomingCall: IncomingCall?
    @State var sendingVideo:Bool = false
    @State var errorMessage:String = "Unknown"

    @State var remoteVideoStreamData:[Int32:RemoteVideoStreamData] = [:]
    @State var previewRenderer:VideoStreamRenderer? = nil
    @State var previewView:RendererView? = nil
    @State var remoteRenderer:VideoStreamRenderer? = nil
    @State var remoteViews:[RendererView] = []
    @State var remoteParticipant: RemoteParticipant?
    @State var remoteVideoSize:String = "Unknown"
    @State var isIncomingCall:Bool = false

    @State var callObserver:CallObserver?
    @State var remoteParticipantObserver:RemoteParticipantObserver?

    var body: some View {
        NavigationView {
            ZStack{
                Form {
                    Section {
                        TextField("Who would you like to call?", text: $callee)
                        Button(action: startCall) {
                            Text("Start Call")
                        }.disabled(callAgent == nil)
                        Button(action: endCall) {
                            Text("End Call")
                        }.disabled(call == nil)
                        Button(action: toggleLocalVideo) {
                            HStack {
                                Text(sendingVideo ? "Turn Off Video" : "Turn On Video")
                            }
                        }
                    }
                }
                // Show incoming call banner
                if (isIncomingCall) {
                    HStack() {
                        VStack {
                            Text("Incoming call")
                                .padding(10)
                                .frame(maxWidth: .infinity, alignment: .topLeading)
                        }
                        Button(action: answerIncomingCall) {
                            HStack {
                                Text("Answer")
                            }
                            .frame(width:80)
                            .padding(.vertical, 10)
                            .background(Color(.green))
                        }
                        Button(action: declineIncomingCall) {
                            HStack {
                                Text("Decline")
                            }
                            .frame(width:80)
                            .padding(.vertical, 10)
                            .background(Color(.red))
                        }
                    }
                    .frame(maxWidth: .infinity, alignment: .topLeading)
                    .padding(10)
                    .background(Color.gray)
                }
                ZStack{
                    VStack{
                        ForEach(remoteViews, id:\.self) { renderer in
                            ZStack{
                                VStack{
                                    RemoteVideoView(view: renderer)
                                        .frame(width: .infinity, height: .infinity)
                                        .background(Color(.lightGray))
                                }
                            }
                            Button(action: endCall) {
                                Text("End Call")
                            }.disabled(call == nil)
                            Button(action: toggleLocalVideo) {
                                HStack {
                                    Text(sendingVideo ? "Turn Off Video" : "Turn On Video")
                                }
                            }
                        }

                    }.frame(maxWidth: .infinity, maxHeight: .infinity, alignment: .topLeading)
                    VStack{
                        if(sendingVideo)
                        {
                            VStack{
                                PreviewVideoStream(view: previewView!)
                                    .frame(width: 135, height: 240)
                                    .background(Color(.lightGray))
                            }
                        }
                    }.frame(maxWidth:.infinity, maxHeight:.infinity,alignment: .bottomTrailing)
                }
            }
     .navigationBarTitle("Video Calling Quickstart")
        }.onAppear{
            // Authenticate the client

            // Initialize the CallAgent and access Device Manager

            // Ask for permissions
        }
    }
}

//Functions and Observers

struct PreviewVideoStream: UIViewRepresentable {
    let view:RendererView
    func makeUIView(context: Context) -> UIView {
        return view
    }
    func updateUIView(_ uiView: UIView, context: Context) {}
}

struct RemoteVideoView: UIViewRepresentable {
    let view:RendererView
    func makeUIView(context: Context) -> UIView {
        return view
    }
    func updateUIView(_ uiView: UIView, context: Context) {}
}

struct ContentView_Previews: PreviewProvider {
    static var previews: some View {
        ContentView()
    }
}
驗證用戶端
為了將 CallAgent 執行個體初始化,您需要使用者存取權杖,才能撥打和接聽通話。 如果您沒有可使用的權杖,請參閱使用者存取權杖文件。
當您具有權杖後,將下列程式碼新增至 ContentView.swift 中的 onAppear 回呼。 您必須將 <USER ACCESS TOKEN> 取代為資源的有效使用者存取權杖:
var userCredential: CommunicationTokenCredential?
do {
    userCredential = try CommunicationTokenCredential(token: "<USER ACCESS TOKEN>")
} catch {
    print("ERROR: It was not possible to create user credential.")
    return
}
將 CallAgent 初始化並存取裝置管理員
若要從 CallClient 建立 CallAgent 執行個體,請使用 callClient.createCallAgent 方法,在將其初始化之後非同步傳回 CallAgent 物件。 DeviceManager 讓您能夠列舉可於通話中用來傳輸音訊/視訊串流的本機裝置。 這也可讓您向使用者要求權限以存取麥克風/相機。
self.callClient = CallClient()
self.callClient?.createCallAgent(userCredential: userCredential!) { (agent, error) in
    if error != nil {
        print("ERROR: It was not possible to create a call agent.")
        return
    }

    else {
        self.callAgent = agent
        print("Call agent successfully created.")
        self.callAgent!.delegate = incomingCallHandler
        self.callClient?.getDeviceManager { (deviceManager, error) in
            if (error == nil) {
                print("Got device manager instance")
                self.deviceManager = deviceManager
            } else {
                print("Failed to get device manager instance")
            }
        }
    }
}
要求權限
我們需要將下列程式碼新增至 onAppear 回呼,以要求音訊和視訊的權限。
AVAudioSession.sharedInstance().requestRecordPermission { (granted) in
    if granted {
        AVCaptureDevice.requestAccess(for: .video) { (videoGranted) in
            /* NO OPERATION */
        }
    }
}
設定音訊工作階段
您可以使用 AVAudioSession 物件來設定應用程式的音訊工作階段。 以下是為應用程式啟用藍牙音訊裝置的範例:
func configureAudioSession() -> Error? {
    // Retrieve the audio session.
    let audioSession: AVAudioSession = AVAudioSession.sharedInstance()
    // set options to allow bluetooth device
    let options: AVAudioSession.CategoryOptions = .allowBluetooth
    var configError: Error?
    do {
        // Set the audio session category.
        try audioSession.setCategory(.playAndRecord, options: options)
        print("configureAudioSession successfully")
    } catch {
        print("configureAudioSession failed")
        configError = error
    }
    return configError
}
顯示本機視訊
開始通話之前,您可以管理與視訊相關的設定。 在此快速入門中,我們將介紹在通話之前或期間切換本機視訊的實作。
首先,需要使用 deviceManager 來存取本機相機。 選取所需的相機之後,即可建構 LocalVideoStream 並建立 VideoStreamRenderer,然後將其附加至 previewView。 在通話期間,可以使用 startVideo 或 stopVideo,開始或停止將 LocalVideoStream 傳送至遠端參與者。 此函式也適用於處理來電。
func toggleLocalVideo() {
    // toggling video before call starts
    if (call == nil)
    {
        if(!sendingVideo)
        {
            self.callClient = CallClient()
            self.callClient?.getDeviceManager { (deviceManager, error) in
                if (error == nil) {
                    print("Got device manager instance")
                    self.deviceManager = deviceManager
                } else {
                    print("Failed to get device manager instance")
                }
            }
            guard let deviceManager = deviceManager else {
                return
            }
            let camera = deviceManager.cameras.first
            let scalingMode = ScalingMode.fit
            if (self.localVideoStream == nil) {
                self.localVideoStream = [LocalVideoStream]()
            }
            localVideoStream!.append(LocalVideoStream(camera: camera!))
            previewRenderer = try! VideoStreamRenderer(localVideoStream: localVideoStream!.first!)
            previewView = try! previewRenderer!.createView(withOptions: CreateViewOptions(scalingMode:scalingMode))
            self.sendingVideo = true
        }
        else{
            self.sendingVideo = false
            self.previewView = nil
            self.previewRenderer!.dispose()
            self.previewRenderer = nil
        }
    }
    // toggle local video during the call
    else{
        if (sendingVideo) {
            call!.stopVideo(stream: localVideoStream!.first!) { (error) in
                if (error != nil) {
                    print("cannot stop video")
                }
                else {
                    self.sendingVideo = false
                    self.previewView = nil
                    self.previewRenderer!.dispose()
                    self.previewRenderer = nil
                }
            }
        }
        else {
            guard let deviceManager = deviceManager else {
                return
            }
            let camera = deviceManager.cameras.first
            let scalingMode = ScalingMode.fit
            if (self.localVideoStream == nil) {
                self.localVideoStream = [LocalVideoStream]()
            }
            localVideoStream!.append(LocalVideoStream(camera: camera!))
            previewRenderer = try! VideoStreamRenderer(localVideoStream: localVideoStream!.first!)
            previewView = try! previewRenderer!.createView(withOptions: CreateViewOptions(scalingMode:scalingMode))
            call!.startVideo(stream:(localVideoStream?.first)!) { (error) in
                if (error != nil) {
                    print("cannot start video")
                }
                else {
                    self.sendingVideo = true
                }
            }
        }
    }
}
撥出電話
startCall 方法會設定為點選 [開始通話] 按鈕時要執行的動作。 在此快速入門中,撥出的通話預設為僅限音訊。 若要透過視訊開始通話,則需要使用 LocalVideoStream 設定 VideoOptions,並使用 startCallOptions 傳遞它,以設定通話的初始選項。
func startCall() {
        let startCallOptions = StartCallOptions()
        if(sendingVideo)
        {
            if (self.localVideoStream == nil) {
                self.localVideoStream = [LocalVideoStream]()
            }
            let videoOptions = VideoOptions(localVideoStreams: localVideoStream!)
            startCallOptions.videoOptions = videoOptions
        }
        let callees:[CommunicationIdentifier] = [CommunicationUserIdentifier(self.callee)]
        self.callAgent?.startCall(participants: callees, options: startCallOptions) { (call, error) in
            setCallAndObserver(call: call, error: error)
        }
    }
CallObserver 和 RemoteParticipantObserver 可用來管理通話中的事件和遠端參與者。 我們將在 setCallAndObserver 函式中設定觀察者。
func setCallAndObserver(call: Call!, error: Error?) {
    if error == nil {
        self.call = call
        self.callObserver = CallObserver(self)
        self.call!.delegate = self.callObserver
        self.remoteParticipantObserver = RemoteParticipantObserver(self)
    } else {
        print("Failed to get call object")
    }
}
接聽來電
若要接聽來電,請實作 IncomingCallHandler 顯示來電橫幅,以便接聽或拒絕通話。 將下列實作放置於 IncomingCallHandler.swift 中。
final class IncomingCallHandler: NSObject, CallAgentDelegate, IncomingCallDelegate {
    public var contentView: ContentView?
    private var incomingCall: IncomingCall?

    private static var instance: IncomingCallHandler?
    static func getOrCreateInstance() -> IncomingCallHandler {
        if let c = instance {
            return c
        }
        instance = IncomingCallHandler()
        return instance!
    }

    private override init() {}

    public func callAgent(_ callAgent: CallAgent, didRecieveIncomingCall incomingCall: IncomingCall) {
        self.incomingCall = incomingCall
        self.incomingCall?.delegate = self
        contentView?.showIncomingCallBanner(self.incomingCall!)
    }

    public func callAgent(_ callAgent: CallAgent, didUpdateCalls args: CallsUpdatedEventArgs) {
        if let removedCall = args.removedCalls.first {
            contentView?.callRemoved(removedCall)
            self.incomingCall = nil
        }
    }
}
我們需要將下列程式碼新增至 ContentView.swift 中的 onAppear 回呼,以建立 IncomingCallHandler 的執行個體:
let incomingCallHandler = IncomingCallHandler.getOrCreateInstance()
incomingCallHandler.contentView = self
成功建立 CallAgent 後,將委派設定為 CallAgent:
self.callAgent!.delegate = incomingCallHandler
一旦有來電,IncomingCallHandler 就會呼叫 showIncomingCallBanner 函式,以顯示 answer 和 decline 按鈕。
func showIncomingCallBanner(_ incomingCall: IncomingCall?) {
    isIncomingCall = true
    self.incomingCall = incomingCall
}
附加至 answer 和 decline 的動作會以下列程式碼來實作。 為了透過視訊接聽通話,需要開啟本機視訊,並使用 localVideoStream 設定 AcceptCallOptions 選項。
func answerIncomingCall() {
    isIncomingCall = false
    let options = AcceptCallOptions()
    if (self.incomingCall != nil) {
        guard let deviceManager = deviceManager else {
            return
        }
        if (self.localVideoStream == nil) {
            self.localVideoStream = [LocalVideoStream]()
        }
        if(sendingVideo)
        {
            let camera = deviceManager.cameras.first
            localVideoStream!.append(LocalVideoStream(camera: camera!))
            let videoOptions = VideoOptions(localVideoStreams: localVideoStream!)
            options.videoOptions = videoOptions
        }
        self.incomingCall!.accept(options: options) { (call, error) in
            setCallAndObserver(call: call, error: error)
        }
    }
}

func declineIncomingCall() {
    self.incomingCall!.reject { (error) in }
    isIncomingCall = false
}
遠端參與者視訊串流
我們可以建立 RemoteVideoStreamData 類別,以處理轉譯遠端參與者的視訊串流。
public class RemoteVideoStreamData : NSObject, RendererDelegate {
    public func videoStreamRenderer(didFailToStart renderer: VideoStreamRenderer) {
        owner.errorMessage = "Renderer failed to start"
    }

    private var owner:ContentView
    let stream:RemoteVideoStream
    var renderer:VideoStreamRenderer? {
        didSet {
            if renderer != nil {
                renderer!.delegate = self
            }
        }
    }

    var views:[RendererView] = []
    init(view:ContentView, stream:RemoteVideoStream) {
        owner = view
        self.stream = stream
    }

    public func videoStreamRenderer(didRenderFirstFrame renderer: VideoStreamRenderer) {
        let size:StreamSize = renderer.size
        owner.remoteVideoSize = String(size.width) + " X " + String(size.height)
    }
}
訂閱事件
我們可以實作 CallObserver 類別以訂閱事件集合,當值在通話期間變更時收到通知。
public class CallObserver: NSObject, CallDelegate, IncomingCallDelegate {
    private var owner: ContentView
    init(_ view:ContentView) {
            owner = view
    }

    public func call(_ call: Call, didChangeState args: PropertyChangedEventArgs) {
        if(call.state == CallState.connected) {
            initialCallParticipant()
        }
    }

    // render remote video streams when remote participant changes
    public func call(_ call: Call, didUpdateRemoteParticipant args: ParticipantsUpdatedEventArgs) {
        for participant in args.addedParticipants {
            participant.delegate = owner.remoteParticipantObserver
            for stream in participant.videoStreams {
                if !owner.remoteVideoStreamData.isEmpty {
                    return
                }
                let data:RemoteVideoStreamData = RemoteVideoStreamData(view: owner, stream: stream)
                let scalingMode = ScalingMode.fit
                data.renderer = try! VideoStreamRenderer(remoteVideoStream: stream)
                let view:RendererView = try! data.renderer!.createView(withOptions: CreateViewOptions(scalingMode:scalingMode))
                data.views.append(view)
                self.owner.remoteViews.append(view)
                owner.remoteVideoStreamData[stream.id] = data
            }
            owner.remoteParticipant = participant
        }
    }

    // Handle remote video streams when the call is connected
    public func initialCallParticipant() {
        for participant in owner.call!.remoteParticipants {
            participant.delegate = owner.remoteParticipantObserver
            for stream in participant.videoStreams {
                renderRemoteStream(stream)
            }
            owner.remoteParticipant = participant
        }
    }

    //create render for RemoteVideoStream and attach it to view
    public func renderRemoteStream(_ stream: RemoteVideoStream!) {
        if !owner.remoteVideoStreamData.isEmpty {
            return
        }
        let data:RemoteVideoStreamData = RemoteVideoStreamData(view: owner, stream: stream)
        let scalingMode = ScalingMode.fit
        data.renderer = try! VideoStreamRenderer(remoteVideoStream: stream)
        let view:RendererView = try! data.renderer!.createView(withOptions: CreateViewOptions(scalingMode:scalingMode))
        self.owner.remoteViews.append(view)
        owner.remoteVideoStreamData[stream.id] = data
    }
}
遠端參與者管理
在通話執行個體上,所有遠端參與者均會以 RemoteParticipant 類型表示,且可透過 remoteParticipants 集合取得。
我們可以實作 RemoteParticipantObserver 類別,以訂閱遠端參與者遠端視訊串流的相關更新。
public class RemoteParticipantObserver : NSObject, RemoteParticipantDelegate {
    private var owner:ContentView
    init(_ view:ContentView) {
        owner = view
    }

    public func renderRemoteStream(_ stream: RemoteVideoStream!) {
        let data:RemoteVideoStreamData = RemoteVideoStreamData(view: owner, stream: stream)
        let scalingMode = ScalingMode.fit
        data.renderer = try! VideoStreamRenderer(remoteVideoStream: stream)
        let view:RendererView = try! data.renderer!.createView(withOptions: CreateViewOptions(scalingMode:scalingMode))
        self.owner.remoteViews.append(view)
        owner.remoteVideoStreamData[stream.id] = data
    }

    // render RemoteVideoStream when remote participant turns on the video, dispose the renderer when remote video is off
    public func remoteParticipant(_ remoteParticipant: RemoteParticipant, didUpdateVideoStreams args: RemoteVideoStreamsEventArgs) {
        for stream in args.addedRemoteVideoStreams {
            renderRemoteStream(stream)
        }
        for stream in args.removedRemoteVideoStreams {
            for data in owner.remoteVideoStreamData.values {
                data.renderer?.dispose()
            }
            owner.remoteViews.removeAll()
        }
    }
}
執行程式碼
您可以選取 [產品] > [執行] 或使用 (⌘-R) 鍵盤快速鍵,在 iOS 模擬器上建置並執行應用程式。
在此快速入門中,您將了解如何使用適用於 Windows 的 Azure 通訊服務通話 SDK,開始進行 1:1 視訊通話。
UWP 範例程式碼
必要條件
若要完成本教學課程,您需要下列必要條件:
具有有效訂用帳戶的 Azure 帳戶。 免費建立帳戶。
安裝包含通用 Windows 平台開發工作負載的 Visual Studio 2022。
已部署通訊服務資源。 建立通訊服務資源。 您必須針對此快速入門記錄您的連接字串。
針對您的 Azure 通訊服務的使用者存取權杖。 您也可以使用 Azure CLI,並搭配您的連接字串執行命令,以建立使用者和存取權杖。
az communication identity token issue --scope voip --connection-string "yourConnectionString"如需詳細資訊,請參閱使用 Azure CLI 建立和管理存取權杖。
設定
建立專案
在 Visual Studio 中,使用 [空白應用程式 (通用 Windows)] 範本建立新專案,以設定單頁通用 Windows 平台 (UWP) 應用程式。
![顯示 Visual Studio 內 [新增 UWP 專案] 視窗的螢幕快照。](media/windows/create-a-new-project.png)
Install the package
以滑鼠右鍵按一下您的專案,然後移至 Manage Nuget Packages,以安裝 Azure.Communication.Calling.WindowsClient1.2.0-beta.1 或更高版本。 請確定已選取 [包含發行前版本]。
要求存取
移至 [Package.appxmanifest],然後按一下 [Capabilities]。
檢查 Internet (Client & Server),以取得存取網際網路的輸入和輸出權限。
檢查 Microphone,以存取麥克風的音訊摘要。
檢查 WebCam,以存取裝置的相機。
以滑鼠右鍵按一下並選擇 [檢視程式碼],藉以將下列程式碼新增至您的 Package.appxmanifest。
<Extensions>
<Extension Category="windows.activatableClass.inProcessServer">
<InProcessServer>
<Path>RtmMvrUap.dll</Path>
<ActivatableClass ActivatableClassId="VideoN.VideoSchemeHandler" ThreadingModel="both" />
</InProcessServer>
</Extension>
</Extensions>
設定應用程式架構
我們必須設定基本配置來附加邏輯。 為了撥打外撥電話,我們需要 TextBox 來提供被通話者的使用者識別碼。 我們也需要 [Start Call] 按鈕和 [Hang Up] 按鈕。
同時還需要預覽本機視訊,並轉譯另一位參與者的遠端視訊。 因此,我們需要兩個元素來顯示視訊串流。
開啟專案的 MainPage.xaml,並使用下列實作取代內容。
<Page
    x:Class="CallingQuickstart.MainPage"
    xmlns="http://schemas.microsoft.com/winfx/2006/xaml/presentation"
    xmlns:x="http://schemas.microsoft.com/winfx/2006/xaml"
    xmlns:local="using:CallingQuickstart"
    xmlns:d="http://schemas.microsoft.com/expression/blend/2008"
    xmlns:mc="http://schemas.openxmlformats.org/markup-compatibility/2006"
    mc:Ignorable="d"
    Background="{ThemeResource ApplicationPageBackgroundThemeBrush}">

    <Grid x:Name="MainGrid" HorizontalAlignment="Stretch">
        <Grid.RowDefinitions>
            <RowDefinition Height="*"/>
            <RowDefinition Height="Auto"/>
            <RowDefinition Height="200*"/>
            <RowDefinition Height="60*"/>
            <RowDefinition Height="Auto"/>
        </Grid.RowDefinitions>

        <Grid Grid.Row="0" x:Name="AppTitleBar" Background="LightSeaGreen">
            <!-- Width of the padding columns is set in LayoutMetricsChanged handler. -->
            <!-- Using padding columns instead of Margin ensures that the background paints the area under the caption control buttons (for transparent buttons). -->
            <TextBlock x:Name="QuickstartTitle" Text="Calling Quickstart sample title bar" Style="{StaticResource CaptionTextBlockStyle}" Padding="4,4,0,0"/>
        </Grid>

        <TextBox Grid.Row="1" x:Name="CalleeTextBox" PlaceholderText="Who would you like to call?" TextWrapping="Wrap" VerticalAlignment="Center" />

        <Grid Grid.Row="2" Background="LightGray">
            <Grid.RowDefinitions>
                <RowDefinition/>
            </Grid.RowDefinitions>
            <Grid.ColumnDefinitions>
                <ColumnDefinition Width="*"/>
                <ColumnDefinition Width="*"/>
            </Grid.ColumnDefinitions>
            <MediaPlayerElement x:Name="LocalVideo" HorizontalAlignment="Center" Stretch="UniformToFill" Grid.Column="0" VerticalAlignment="Center" AutoPlay="True" />
            <MediaPlayerElement x:Name="RemoteVideo" HorizontalAlignment="Center" Stretch="UniformToFill" Grid.Column="1" VerticalAlignment="Center" AutoPlay="True" />
        </Grid>
        <StackPanel Grid.Row="3" Orientation="Vertical" Grid.RowSpan="2">
            <StackPanel Orientation="Horizontal" Margin="10">
                <TextBlock VerticalAlignment="Center">Cameras:</TextBlock>
                <ComboBox x:Name="CameraList" HorizontalAlignment="Left" Grid.Column="0" DisplayMemberPath="Name" SelectionChanged="CameraList_SelectionChanged" Margin="10"/>
            </StackPanel>
            <StackPanel Orientation="Horizontal">
                <Button x:Name="CallButton" Content="Start/Join call" Click="CallButton_Click" VerticalAlignment="Center" Margin="10,0,0,0" Height="40" Width="123"/>
                <Button x:Name="HangupButton" Content="Hang up" Click="HangupButton_Click" VerticalAlignment="Center" Margin="10,0,0,0" Height="40" Width="123"/>
                <CheckBox x:Name="MuteLocal" Content="Mute" Margin="10,0,0,0" Click="MuteLocal_Click" Width="74"/>
                <CheckBox x:Name="BackgroundBlur" Content="Background blur" Width="142" Margin="10,0,0,0" Click="BackgroundBlur_Click"/>
            </StackPanel>
        </StackPanel>
        <TextBox Grid.Row="4" x:Name="Stats" Text="" TextWrapping="Wrap" VerticalAlignment="Center" Height="30" Margin="0,2,0,0" BorderThickness="2" IsReadOnly="True" Foreground="LightSlateGray" />
    </Grid>
</Page>
開啟 App.xaml.cs (以滑鼠右鍵按一下並選擇 [檢視程式碼]),並將這一行新增至頂端:
using CallingQuickstart;
開啟 MainPage.xaml.cs (按一下滑鼠右鍵並選擇 [檢視程式碼]),然後使用下列實作取代內容:
using Azure.Communication.Calling.WindowsClient;
using System;
using System.Collections.Generic;
using System.Linq;
using System.Threading.Tasks;
using Windows.ApplicationModel;
using Windows.ApplicationModel.Core;
using Windows.Media.Core;
using Windows.Networking.PushNotifications;
using Windows.UI;
using Windows.UI.ViewManagement;
using Windows.UI.Xaml;
using Windows.UI.Xaml.Controls;
using Windows.UI.Xaml.Media;
using Windows.UI.Xaml.Navigation;

namespace CallingQuickstart
{
    public sealed partial class MainPage : Page
    {
        private const string authToken = "<Azure Communication Services auth token>";

        private CallClient callClient;
        private CallTokenRefreshOptions callTokenRefreshOptions;
        private CallAgent callAgent;
        private CommunicationCall call = null;

        private LocalOutgoingAudioStream micStream;
        private LocalOutgoingVideoStream cameraStream;

        #region Page initialization
        public MainPage()
        {
            this.InitializeComponent();

            // Hide default title bar.
            var coreTitleBar = CoreApplication.GetCurrentView().TitleBar;
            coreTitleBar.ExtendViewIntoTitleBar = true;

            QuickstartTitle.Text = $"{Package.Current.DisplayName} - Ready";
            Window.Current.SetTitleBar(AppTitleBar);

            CallButton.IsEnabled = true;
            HangupButton.IsEnabled = !CallButton.IsEnabled;
            MuteLocal.IsChecked = MuteLocal.IsEnabled = !CallButton.IsEnabled;

            ApplicationView.PreferredLaunchViewSize = new Windows.Foundation.Size(800, 600);
            ApplicationView.PreferredLaunchWindowingMode = ApplicationViewWindowingMode.PreferredLaunchViewSize;
        }

        protected override async void OnNavigatedTo(NavigationEventArgs e)
        {
            await InitCallAgentAndDeviceManagerAsync();

            base.OnNavigatedTo(e);
        }
#endregion

        private async Task InitCallAgentAndDeviceManagerAsync()
        {
            // Initialize call agent and Device Manager
        }

        private async void Agent_OnIncomingCallAsync(object sender, IncomingCall incomingCall)
        {
            // Accept an incoming call
        }

        private async void CallButton_Click(object sender, RoutedEventArgs e)
        {
            // Start a call with video
        }

        private async void HangupButton_Click(object sender, RoutedEventArgs e)
        {
            // End the current call
        }

        private async void Call_OnStateChangedAsync(object sender, PropertyChangedEventArgs args)
        {
            var call = sender as CommunicationCall;

            if (call != null)
            {
                var state = call.State;

                await Dispatcher.RunAsync(Windows.UI.Core.CoreDispatcherPriority.Normal, () =>
                {
                    QuickstartTitle.Text = $"{Package.Current.DisplayName} - {state.ToString()}";
                    Window.Current.SetTitleBar(AppTitleBar);

                    HangupButton.IsEnabled = state == CallState.Connected || state == CallState.Ringing;
                    CallButton.IsEnabled = !HangupButton.IsEnabled;
                    MuteLocal.IsEnabled = !CallButton.IsEnabled;
                });

                switch (state)
                {
                    case CallState.Connected:
                        {
                            break;
                        }
                    case CallState.Disconnected:
                        {
                            break;
                        }
                    default: break;
                }
            }
        }

        private async void CameraList_SelectionChanged(object sender, SelectionChangedEventArgs e)
        {
            // Handle camera selection
        }
    }
}
物件模型
下列類別和介面會處理 Azure 通訊服務通話 SDK 的一些重大功能:
| 名稱 | 描述 |
|---|---|
CallClient |
CallClient 是通話用戶端程式庫的主要進入點。 |
CallAgent |
CallAgent 可用來開始和加入通話。 |
CommunicationCall |
CommunicationCall 可用來管理已撥打或已加入的通話。 |
CallTokenCredential |
CallTokenCredential 可用來作為權杖認證以將 CallAgent 具現化。 |
CommunicationUserIdentifier |
CommunicationUserIdentifier 可用來代表使用者的身分識別,其可以是下列其中一個選項:CommunicationUserIdentifier、PhoneNumberIdentifier 或 CallingApplication。 |
驗證用戶端
若要將 CallAgent 初始化,您需要使用者存取權杖。 一般來說,此權杖會從具有應用程式特定驗證的服務產生。 如需使用者存取權杖的詳細資訊,請參閱使用者存取權杖指南。
在快速入門中,將 <AUTHENTICATION_TOKEN> 取代為針對您的 Azure 通訊服務資源所產生的使用者存取權杖。
當您具有權杖之後,請使用它來將 CallAgent 執行個體初始化,讓我們能夠撥打和接收通話。 為了存取裝置上的相機,我們也需要取得裝置管理員執行個體。
將下列程式碼新增至 InitCallAgentAndDeviceManagerAsync 函式。
this.callClient = new CallClient(new CallClientOptions() {
    Diagnostics = new CallDiagnosticsOptions() {
        AppName = "CallingQuickstart",
        AppVersion="1.0",
        Tags = new[] { "Calling", "ACS", "Windows" }
        }
    });

// Set up local video stream using the first camera enumerated
var deviceManager = await this.callClient.GetDeviceManagerAsync();
var camera = deviceManager?.Cameras?.FirstOrDefault();
var mic = deviceManager?.Microphones?.FirstOrDefault();
micStream = new LocalOutgoingAudioStream();

CameraList.ItemsSource = deviceManager.Cameras.ToList();

if (camera != null)
{
    CameraList.SelectedIndex = 0;
}

callTokenRefreshOptions = new CallTokenRefreshOptions(false);
callTokenRefreshOptions.TokenRefreshRequested += OnTokenRefreshRequestedAsync;

var tokenCredential = new CallTokenCredential(authToken, callTokenRefreshOptions);

var callAgentOptions = new CallAgentOptions()
{
    DisplayName = "Contoso",
    //https://github.com/lukes/ISO-3166-Countries-with-Regional-Codes/blob/master/all/all.csv
    EmergencyCallOptions = new EmergencyCallOptions() { CountryCode = "840" }
};


try
{
    this.callAgent = await this.callClient.CreateCallAgentAsync(tokenCredential, callAgentOptions);
    //await this.callAgent.RegisterForPushNotificationAsync(await this.RegisterWNS());
    this.callAgent.CallsUpdated += OnCallsUpdatedAsync;
    this.callAgent.IncomingCallReceived += OnIncomingCallAsync;

}
catch(Exception ex)
{
    if (ex.HResult == -2147024809)
    {
        // E_INVALIDARG
        // Handle possible invalid token
    }
}
開始視訊通話
將實作新增至 CallButton_Click,以開始視訊通話。 我們需要使用裝置管理員執行個體來列舉相機,並建構 LocalOutgoingVideoStream。 我們需要使用 LocalVideoStream 設定 VideoOptions,並使用 startCallOptions 傳遞它,以設定通話的初始選項。 透過將 LocalOutgoingVideoStream 附加至 MediaElement,我們就能看到本機視訊的預覽。
var callString = CalleeTextBox.Text.Trim();

if (!string.IsNullOrEmpty(callString))
{
    if (callString.StartsWith("8:")) // 1:1 Azure Communication Services call
    {
        call = await StartAcsCallAsync(callString);
    }
    else if (callString.StartsWith("+")) // 1:1 phone call
    {
        call = await StartPhoneCallAsync(callString, "+12133947338");
    }
    else if (Guid.TryParse(callString, out Guid groupId))// Join group call by group guid
    {
        call = await JoinGroupCallByIdAsync(groupId);
    }
    else if (Uri.TryCreate(callString, UriKind.Absolute, out Uri teamsMeetinglink)) //Teams meeting link
    {
        call = await JoinTeamsMeetingByLinkAsync(teamsMeetinglink);
    }
}

if (call != null)
{
    call.RemoteParticipantsUpdated += OnRemoteParticipantsUpdatedAsync;
    call.StateChanged += OnStateChangedAsync;
}
新增方法來開始或加入不同類型的通話 (1 對 1 Azure 通訊服務通話、1:1 通話、Azure 通訊服務群組通話、Teams 會議加入等)。
private async Task<CommunicationCall> StartAcsCallAsync(string acsCallee)
{
    var options = await GetStartCallOptionsAsynnc();
    var call = await this.callAgent.StartCallAsync( new [] { new UserCallIdentifier(acsCallee) }, options);
    return call;
}

private async Task<CommunicationCall> StartPhoneCallAsync(string acsCallee, string alternateCallerId)
{
    var options = await GetStartCallOptionsAsynnc();
    options.AlternateCallerId = new PhoneNumberCallIdentifier(alternateCallerId);

    var call = await this.callAgent.StartCallAsync( new [] { new PhoneNumberCallIdentifier(acsCallee) }, options);
    return call;
}

private async Task<CommunicationCall> JoinGroupCallByIdAsync(Guid groupId)
{
    var joinCallOptions = await GetJoinCallOptionsAsync();

    var groupCallLocator = new GroupCallLocator(groupId);
    var call = await this.callAgent.JoinAsync(groupCallLocator, joinCallOptions);
    return call;
}

private async Task<CommunicationCall> JoinTeamsMeetingByLinkAsync(Uri teamsCallLink)
{
    var joinCallOptions = await GetJoinCallOptionsAsync();

    var teamsMeetingLinkLocator = new TeamsMeetingLinkLocator(teamsCallLink.AbsoluteUri);
    var call = await callAgent.JoinAsync(teamsMeetingLinkLocator, joinCallOptions);
    return call;
}

private async Task<StartCallOptions> GetStartCallOptionsAsynnc()
{
    return new StartCallOptions() {
        OutgoingAudioOptions = new OutgoingAudioOptions() { IsOutgoingAudioMuted = true, OutgoingAudioStream = micStream  },
        OutgoingVideoOptions = new OutgoingVideoOptions() { OutgoingVideoStreams = new OutgoingVideoStream[] { cameraStream } }
    };
}

private async Task<JoinCallOptions> GetJoinCallOptionsAsync()
{
    return new JoinCallOptions() {
        OutgoingAudioOptions = new OutgoingAudioOptions() { IsOutgoingAudioMuted = true },
        OutgoingVideoOptions = new OutgoingVideoOptions() { OutgoingVideoStreams = new OutgoingVideoStream[] { cameraStream } }
    };
}
根據 CameraList_SelectionChanged 方法上選取的相機,新增程式碼來建立 LocalVideoStream。
var selectedCamerea = CameraList.SelectedItem as VideoDeviceDetails;
cameraStream = new LocalOutgoingVideoStream(selectedCamerea);

 var localUri = await cameraStream.StartPreviewAsync();
await Dispatcher.RunAsync(Windows.UI.Core.CoreDispatcherPriority.Normal, () =>
{
    LocalVideo.Source = MediaSource.CreateFromUri(localUri);
});

if (call != null)
{
    await call?.StartVideoAsync(cameraStream);
}
接聽來電
將實作新增至 OnIncomingCallAsync,以透過視訊接聽來電,將 LocalVideoStream 傳遞至 acceptCallOptions。
var incomingCall = args.IncomingCall;

var acceptCallOptions = new AcceptCallOptions() {
    IncomingVideoOptions = new IncomingVideoOptions()
    {
        IncomingVideoStreamKind = VideoStreamKind.RemoteIncoming
    }
};

_ = await incomingCall.AcceptAsync(acceptCallOptions);
遠端參與者和遠端視訊串流
在通話執行個體上,所有遠端參與者均可透過 RemoteParticipants 集合取得。 當通話連線之後,我們就能存取通話的遠端參與者,並處理遠端視訊串流。
private async void Call_OnVideoStreamsUpdatedAsync(object sender, RemoteVideoStreamsEventArgs args)
{
    foreach (var remoteVideoStream in args.AddedRemoteVideoStreams)
    {
        await Dispatcher.RunAsync(Windows.UI.Core.CoreDispatcherPriority.Normal, async () =>
        {
            RemoteVideo.Source = await remoteVideoStream.Start();
        });
    }

    foreach (var remoteVideoStream in args.RemovedRemoteVideoStreams)
    {
        remoteVideoStream.Stop();
    }
}

private async void Agent_OnCallsUpdatedAsync(object sender, CallsUpdatedEventArgs args)
{
    var removedParticipants = new List<RemoteParticipant>();
    var addedParticipants = new List<RemoteParticipant>();

    foreach(var call in args.RemovedCalls)
    {
        removedParticipants.AddRange(call.RemoteParticipants.ToList<RemoteParticipant>());
    }

    foreach (var call in args.AddedCalls)
    {
        addedParticipants.AddRange(call.RemoteParticipants.ToList<RemoteParticipant>());
    }

    await OnParticipantChangedAsync(removedParticipants, addedParticipants);
}

private async Task OnParticipantChangedAsync(IEnumerable<RemoteParticipant> removedParticipants, IEnumerable<RemoteParticipant> addedParticipants)
{
    foreach (var participant in removedParticipants)
    {
        foreach(var incomingVideoStream in  participant.IncomingVideoStreams)
        {
            var remoteVideoStream = incomingVideoStream as RemoteIncomingVideoStream;
            if (remoteVideoStream != null)
            {
                await remoteVideoStream.StopPreviewAsync();
            }
        }
        participant.VideoStreamStateChanged -= OnVideoStreamStateChanged;
    }

    foreach (var participant in addedParticipants)
    {
        participant.VideoStreamStateChanged += OnVideoStreamStateChanged;
    }
}

private void OnVideoStreamStateChanged(object sender, VideoStreamStateChangedEventArgs e)
{
    CallVideoStream callVideoStream = e.CallVideoStream;

    switch (callVideoStream.StreamDirection)
    {
        case StreamDirection.Outgoing:
            OnOutgoingVideoStreamStateChanged(callVideoStream as OutgoingVideoStream);
            break;
        case StreamDirection.Incoming:
            OnIncomingVideoStreamStateChanged(callVideoStream as IncomingVideoStream);
            break;
    }
}

private async void OnIncomingVideoStreamStateChanged(IncomingVideoStream incomingVideoStream)
{
    switch (incomingVideoStream.State)
    {
        case VideoStreamState.Available:
        {
            switch (incomingVideoStream.Kind)
            {
                case VideoStreamKind.RemoteIncoming:
                    var remoteVideoStream = incomingVideoStream as RemoteIncomingVideoStream;
                    var uri = await remoteVideoStream.StartPreviewAsync();

                    await Dispatcher.RunAsync(Windows.UI.Core.CoreDispatcherPriority.Normal, () =>
                    {
                        RemoteVideo.Source = MediaSource.CreateFromUri(uri);
                    });
                    break;

                case VideoStreamKind.RawIncoming:
                    break;
            }
            break;
        }
        case VideoStreamState.Started:
            break;
        case VideoStreamState.Stopping:
            break;
        case VideoStreamState.Stopped:
            if (incomingVideoStream.Kind == VideoStreamKind.RemoteIncoming)
            {
                var remoteVideoStream = incomingVideoStream as RemoteIncomingVideoStream;
                await remoteVideoStream.StopPreviewAsync();
            }
            break;
        case VideoStreamState.NotAvailable:
            break;
    }

}
轉譯遠端視訊
針對每個遠端視訊串流,將其附加至 MediaElement。
private async Task AddVideoStreamsAsync(IReadOnlyList<RemoteVideoStream> remoteVideoStreams)
{
    foreach (var remoteVideoStream in remoteVideoStreams)
    {
        var remoteUri = await remoteVideoStream.Start();

        await Dispatcher.RunAsync(Windows.UI.Core.CoreDispatcherPriority.Normal, () =>
        {
            RemoteVideo.Source = remoteUri;
            RemoteVideo.Play();
        });
    }
}
通話狀態更新
當通話中斷連線之後,我們需要清除視訊轉譯器,並在遠端參與者一開始加入通話時處理這種情況。
private async void Call_OnStateChanged(object sender, PropertyChangedEventArgs args)
{
    switch (((Call)sender).State)
    {
        case CallState.Disconnected:
            await Dispatcher.RunAsync(Windows.UI.Core.CoreDispatcherPriority.Normal, () =>
            {
                LocalVideo.Source = null;
                RemoteVideo.Source = null;
            });
            break;

        case CallState.Connected:
            foreach (var remoteParticipant in call.RemoteParticipants)
            {
                String remoteParticipantMRI = remoteParticipant.Identifier.ToString();
                remoteParticipantDictionary.TryAdd(remoteParticipantMRI, remoteParticipant);
                await AddVideoStreams(remoteParticipant.VideoStreams);
                remoteParticipant.OnVideoStreamsUpdated += Call_OnVideoStreamsUpdated;
            }
            break;

        default:
            break;
    }
}
結束通話
按一下 [Hang Up] 按鈕時,結束目前的通話。 將實作新增至 HangupButton_Click,以使用我們建立的 callAgent 結束通話,然後終止參與者更新和通話狀態事件處理常式。
var call = this.callAgent?.Calls?.FirstOrDefault();
if (call != null)
{
    try
    {
        await call.HangUpAsync(new HangUpOptions() { ForEveryone = true });
    }
    catch(Exception ex)
    {
    }
}
執行程式碼
在 Visual Studio 中,您可以建置並執行程式碼。 針對解決方案平台,我們支援 ARM64、x64 和 x86。
您可以在文字欄位中提供使用者識別碼並按一下 [Start Call] 按鈕,以進行外撥視訊通話。
注意:呼叫 8:echo123 會停止視訊串流,因為回應聊天機器人不支持視訊串流。
如需使用者識別碼 (身分識別) 的詳細資訊,請參閱使用者存取權杖指南。
WinUI 3 範例程式碼
必要條件
若要完成本教學課程,您需要下列必要條件:
具有有效訂用帳戶的 Azure 帳戶。 免費建立帳戶。
如何建立 WinUI 3 應用程式的基礎知識。 建立您的第一個 WinUI 3 (Windows App SDK) 專案是一個很好的入門資源。
已部署通訊服務資源。 建立通訊服務資源。 您必須針對此快速入門記錄您的連接字串。
針對您的 Azure 通訊服務的使用者存取權杖。 您也可以使用 Azure CLI,並搭配您的連接字串執行命令,以建立使用者和存取權杖。
az communication identity token issue --scope voip --connection-string "yourConnectionString"如需詳細資訊,請參閱使用 Azure CLI 建立和管理存取權杖。
設定
建立專案
在 Visual Studio 中,使用 [已封裝的空白應用程式 (WinUI 3 in Desktop)] 範本建立新專案,以設定單頁 WinUI 3 應用程式。
![顯示 Visual Studio 內 [新增 WinUI 專案] 視窗的螢幕快照。](media/windows/create-a-new-winui-project.png)
Install the package
以滑鼠右鍵按一下您的專案,然後移至 Manage Nuget Packages,以安裝 Azure.Communication.Calling.WindowsClient1.0.0 或更高版本。 請確定已選取 [包含發行前版本]。
要求存取
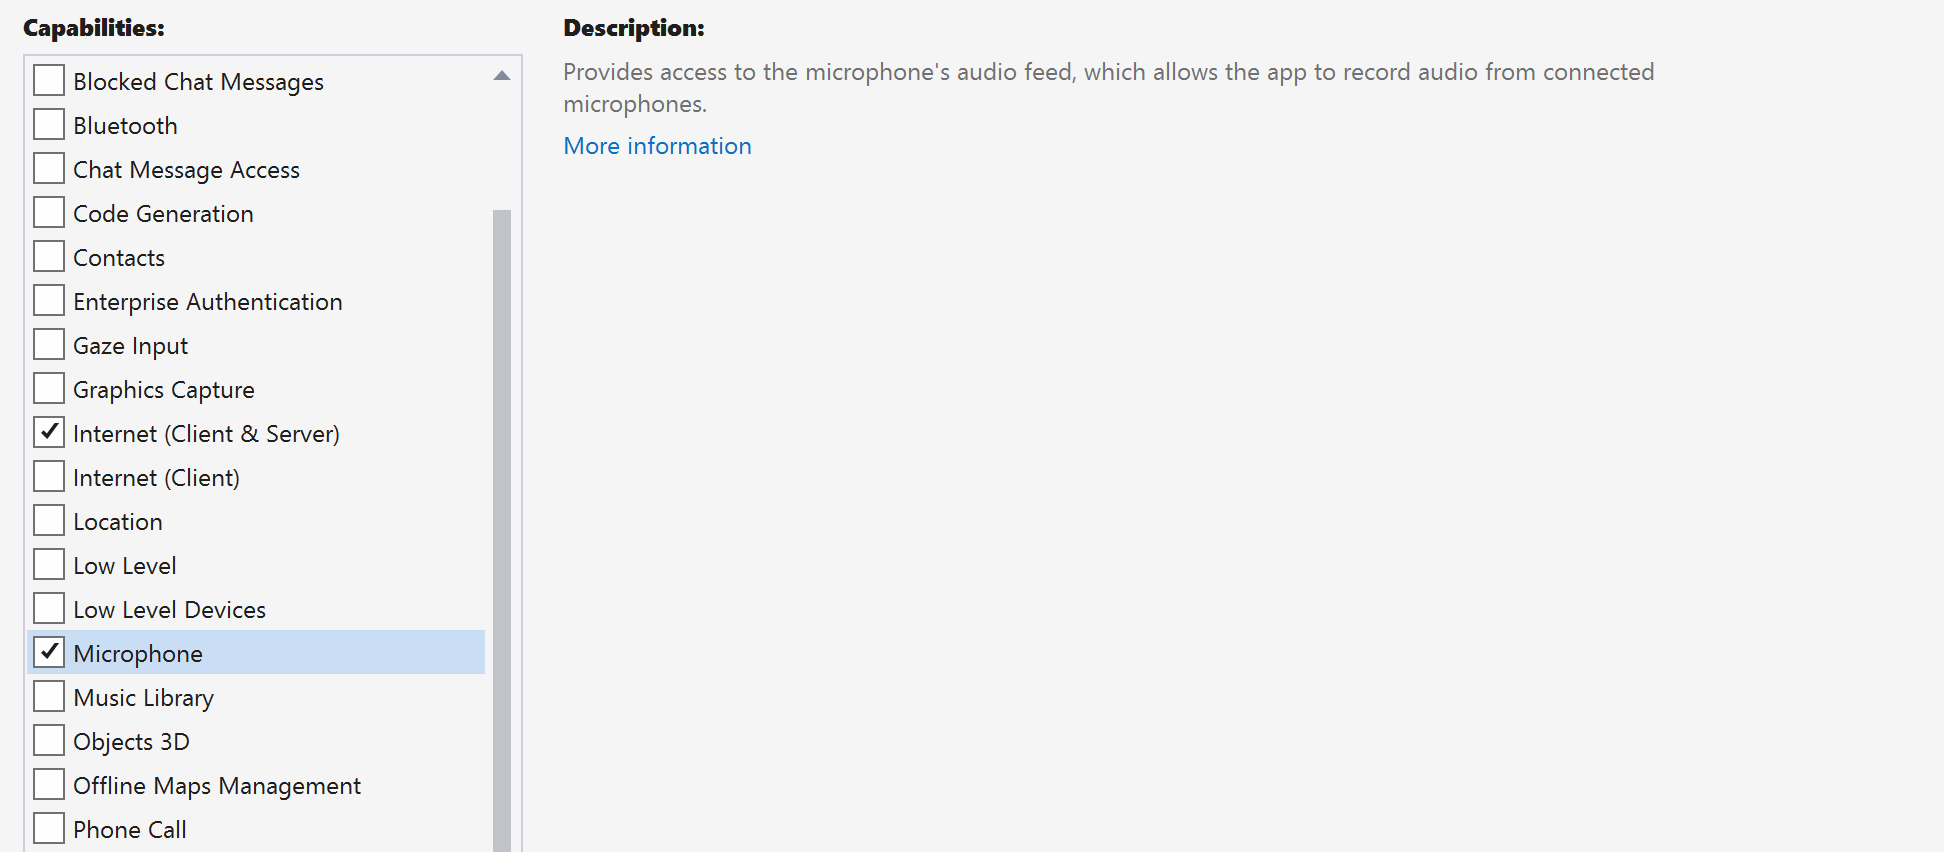
將下列程式碼新增至 app.manifest:
<file name="RtmMvrMf.dll">
    <activatableClass name="VideoN.VideoSchemeHandler" threadingModel="both" xmlns="urn:schemas-microsoft-com:winrt.v1" />
</file>
設定應用程式架構
我們必須設定基本配置來附加邏輯。 為了撥打外撥電話,我們需要 TextBox 來提供被通話者的使用者識別碼。 我們也需要 [Start Call] 按鈕和 [Hang Up] 按鈕。
同時還需要預覽本機視訊,並轉譯另一位參與者的遠端視訊。 因此,我們需要兩個元素來顯示視訊串流。
開啟專案的 MainWindow.xaml,並使用下列實作取代內容。
<Page
    x:Class="CallingQuickstart.MainPage"
    xmlns="http://schemas.microsoft.com/winfx/2006/xaml/presentation"
    xmlns:x="http://schemas.microsoft.com/winfx/2006/xaml"
    xmlns:local="using:CallingQuickstart"
    xmlns:d="http://schemas.microsoft.com/expression/blend/2008"
    xmlns:mc="http://schemas.openxmlformats.org/markup-compatibility/2006"
    mc:Ignorable="d">

    <Grid x:Name="MainGrid">
        <Grid.RowDefinitions>
            <RowDefinition Height="32"/>
            <RowDefinition Height="Auto"/>
            <RowDefinition Height="200*"/>
            <RowDefinition Height="60*"/>
            <RowDefinition Height="Auto"/>
        </Grid.RowDefinitions>

        <Grid Grid.Row="0" x:Name="AppTitleBar" Background="LightSeaGreen">
            <!-- Width of the padding columns is set in LayoutMetricsChanged handler. -->
            <!-- Using padding columns instead of Margin ensures that the background paints the area under the caption control buttons (for transparent buttons). -->
            <TextBlock x:Name="QuickstartTitle" Text="Calling Quickstart sample title bar" Style="{StaticResource CaptionTextBlockStyle}" Padding="4,4,0,0"/>
        </Grid>

        <TextBox Grid.Row="1" x:Name="CalleeTextBox" PlaceholderText="Who would you like to call?" TextWrapping="Wrap" VerticalAlignment="Center" />

        <Grid Grid.Row="2" Background="LightGray">
            <Grid.RowDefinitions>
                <RowDefinition/>
            </Grid.RowDefinitions>
            <Grid.ColumnDefinitions>
                <ColumnDefinition Width="*"/>
                <ColumnDefinition Width="*"/>
            </Grid.ColumnDefinitions>
            <MediaPlayerElement x:Name="LocalVideo" HorizontalAlignment="Center" Stretch="UniformToFill" Grid.Column="0" VerticalAlignment="Center" AutoPlay="True" />
            <MediaPlayerElement x:Name="RemoteVideo" HorizontalAlignment="Center" Stretch="UniformToFill" Grid.Column="1" VerticalAlignment="Center" AutoPlay="True" />
        </Grid>
        <StackPanel Grid.Row="3" Orientation="Vertical" Grid.RowSpan="2">
            <StackPanel Orientation="Horizontal" Margin="10">
                <TextBlock VerticalAlignment="Center">Cameras:</TextBlock>
                <ComboBox x:Name="CameraList" HorizontalAlignment="Left" Grid.Column="0" DisplayMemberPath="Name" SelectionChanged="CameraList_SelectionChanged" Margin="10"/>
            </StackPanel>
            <StackPanel Orientation="Horizontal">
                <Button x:Name="CallButton" Content="Start/Join call" Click="CallButton_Click" VerticalAlignment="Center" Margin="10,0,0,0" Height="40" Width="123"/>
                <Button x:Name="HangupButton" Content="Hang up" Click="HangupButton_Click" VerticalAlignment="Center" Margin="10,0,0,0" Height="40" Width="123"/>
                <CheckBox x:Name="MuteLocal" Content="Mute" Margin="10,0,0,0" Click="MuteLocal_Click" Width="74"/>
                <CheckBox x:Name="BackgroundBlur" Content="Background blur" Width="142" Margin="10,0,0,0" Click="BackgroundBlur_Click"/>
            </StackPanel>
        </StackPanel>
        <TextBox Grid.Row="4" x:Name="Stats" Text="" TextWrapping="Wrap" VerticalAlignment="Center" Height="30" Margin="0,2,0,0" BorderThickness="2" IsReadOnly="True" Foreground="LightSlateGray" />
    </Grid>
</Page>
開啟 App.xaml.cs (以滑鼠右鍵按一下並選擇 [檢視程式碼]),並將這一行新增至頂端:
using CallingQuickstart;
開啟 MainWindow.xaml.cs (按一下滑鼠右鍵並選擇 [檢視程式碼]),然後使用下列實作取代內容:
using Azure.Communication.Calling.WindowsClient;
using Azure.WinRT.Communication;
using Microsoft.UI.Xaml;
using System;
using System.Collections.Generic;
using System.Linq;
using System.Threading.Tasks;
using Windows.Media.Core;

namespace CallingQuickstart
{
    public sealed partial class MainWindow : Window
    {
        CallAgent callAgent;
        Call call;
        DeviceManager deviceManager;
        Dictionary<string, RemoteParticipant> remoteParticipantDictionary = new Dictionary<string, RemoteParticipant>();

        public MainWindow()
        {
            this.InitializeComponent();
            Task.Run(() => this.InitCallAgentAndDeviceManagerAsync()).Wait();
        }

        private async Task InitCallAgentAndDeviceManagerAsync()
        {
            // Initialize call agent and Device Manager
        }

        private async void Agent_OnIncomingCallAsync(object sender, IncomingCall incomingCall)
        {
            // Accept an incoming call
        }

        private async void CallButton_Click(object sender, RoutedEventArgs e)
        {
            // Start a call with video
        }

        private async void HangupButton_Click(object sender, RoutedEventArgs e)
        {
            // End the current call
        }

        private async void Call_OnStateChangedAsync(object sender, PropertyChangedEventArgs args)
        {
            var state = (sender as Call)?.State;
            this.DispatcherQueue.TryEnqueue(() => {
                State.Text = state.ToString();
            });
        }
    }
}
物件模型
下列類別和介面會處理 Azure 通訊服務通話 SDK 的一些重大功能:
| 名稱 | 描述 |
|---|---|
CallClient |
CallClient 是通話用戶端程式庫的主要進入點。 |
CallAgent |
CallAgent 可用來開始和加入通話。 |
CommunicationCall |
CommunicationCall 可用來管理已撥打或已加入的通話。 |
CallTokenCredential |
CallTokenCredential 可用來作為權杖認證以將 CallAgent 具現化。 |
CommunicationUserIdentifier |
CommunicationUserIdentifier 可用來代表使用者的身分識別,其可以是下列其中一個選項:CommunicationUserIdentifier、PhoneNumberIdentifier 或 CallingApplication。 |
驗證用戶端
若要將 CallAgent 初始化,您需要使用者存取權杖。 一般來說,此權杖會從具有應用程式特定驗證的服務產生。 如需使用者存取權杖的詳細資訊,請參閱使用者存取權杖指南。
在快速入門中,將 <AUTHENTICATION_TOKEN> 取代為針對您的 Azure 通訊服務資源所產生的使用者存取權杖。
當您具有權杖之後,請使用它來將 CallAgent 執行個體初始化,讓我們能夠撥打和接收通話。 為了存取裝置上的相機,我們也需要取得裝置管理員執行個體。
將下列程式碼新增至 InitCallAgentAndDeviceManagerAsync 函式。
var callClient = new CallClient();
this.deviceManager = await callClient.GetDeviceManagerAsync();

var tokenCredential = new CallTokenCredential("<AUTHENTICATION_TOKEN>");
var callAgentOptions = new CallAgentOptions()
{
    DisplayName = "<DISPLAY_NAME>"
};

this.callAgent = await callClient.CreateCallAgentAsync(tokenCredential, callAgentOptions);
this.callAgent.OnCallsUpdated += Agent_OnCallsUpdatedAsync;
this.callAgent.OnIncomingCall += Agent_OnIncomingCallAsync;
開始視訊通話
將實作新增至 CallButton_Click,以開始視訊通話。 我們需要使用裝置管理員執行個體來列舉相機,並建構 LocalVideoStream。 我們需要使用 LocalVideoStream 設定 VideoOptions,並使用 startCallOptions 傳遞它,以設定通話的初始選項。 透過將 LocalVideoStream 附加至 MediaPlayerElement,我們就能看到本機視訊的預覽。
var startCallOptions = new StartCallOptions();

if (this.deviceManager.Cameras?.Count > 0)
{
    var videoDeviceInfo = this.deviceManager.Cameras?.FirstOrDefault();
    if (videoDeviceInfo != null)
    {
        var selectedCamerea = CameraList.SelectedItem as VideoDeviceDetails;
        cameraStream = new LocalOutgoingVideoStream(selectedCamerea);

        var localUri = await cameraStream.StartPreviewAsync();
        await Dispatcher.RunAsync(Windows.UI.Core.CoreDispatcherPriority.Normal, () =>
        {
            LocalVideo.Source = MediaSource.CreateFromUri(localUri);
        });

        startCallOptions.VideoOptions = new OutgoingVideoOptions(new[] { cameraStream });
    }
}

var callees = new ICommunicationIdentifier[1]
{
    new CommunicationUserIdentifier(CalleeTextBox.Text.Trim())
};

this.call = await this.callAgent.StartCallAsync(callees, startCallOptions);
this.call.OnRemoteParticipantsUpdated += Call_OnRemoteParticipantsUpdatedAsync;
this.call.OnStateChanged += Call_OnStateChangedAsync;
接聽來電
將實作新增至 Agent_OnIncomingCallAsync,以透過視訊接聽來電,將 LocalVideoStream 傳遞至 acceptCallOptions。
var acceptCallOptions = new AcceptCallOptions();

if (this.deviceManager.Cameras?.Count > 0)
{
    var videoDeviceInfo = this.deviceManager.Cameras?.FirstOrDefault();
    if (videoDeviceInfo != null)
    {
        var selectedCamerea = CameraList.SelectedItem as VideoDeviceDetails;
        cameraStream = new LocalOutgoingVideoStream(selectedCamerea);

        var localUri = await cameraStream.StartPreviewAsync();
        await Dispatcher.RunAsync(Windows.UI.Core.CoreDispatcherPriority.Normal, () =>
        {
            LocalVideo.Source = MediaSource.CreateFromUri(localUri);
        });

        acceptCallOptions.VideoOptions = new OutgoingVideoOptions(new[] { localVideoStream });
    }
}

call = await incomingCall.AcceptAsync(acceptCallOptions);
遠端參與者和遠端視訊串流
在通話執行個體上,所有遠端參與者均可透過 RemoteParticipants 集合取得。 當通話連線之後,我們就能存取通話的遠端參與者,並處理遠端視訊串流。
private async void Call_OnVideoStreamsUpdatedAsync(object sender, RemoteVideoStreamsEventArgs args)
{
    foreach (var remoteVideoStream in args.AddedRemoteVideoStreams)
    {
        this.DispatcherQueue.TryEnqueue(async () => {
            RemoteVideo.Source = MediaSource.CreateFromUri(await remoteVideoStream.Start());
            RemoteVideo.MediaPlayer.Play();
        });
    }

    foreach (var remoteVideoStream in args.RemovedRemoteVideoStreams)
    {
        remoteVideoStream.Stop();
    }
}

private async void Agent_OnCallsUpdatedAsync(object sender, CallsUpdatedEventArgs args)
{
    foreach (var call in args.AddedCalls)
    {
        foreach (var remoteParticipant in call.RemoteParticipants)
        {
            var remoteParticipantMRI = remoteParticipant.Identifier.ToString();
            this.remoteParticipantDictionary.TryAdd(remoteParticipantMRI, remoteParticipant);
            await AddVideoStreamsAsync(remoteParticipant.VideoStreams);
            remoteParticipant.OnVideoStreamsUpdated += Call_OnVideoStreamsUpdatedAsync;
        }
    }
}

private async void Call_OnRemoteParticipantsUpdatedAsync(object sender, ParticipantsUpdatedEventArgs args)
{
    foreach (var remoteParticipant in args.AddedParticipants)
    {
        String remoteParticipantMRI = remoteParticipant.Identifier.ToString();
        this.remoteParticipantDictionary.TryAdd(remoteParticipantMRI, remoteParticipant);
        await AddVideoStreamsAsync(remoteParticipant.VideoStreams);
        remoteParticipant.OnVideoStreamsUpdated += Call_OnVideoStreamsUpdatedAsync;
    }

    foreach (var remoteParticipant in args.RemovedParticipants)
    {
        String remoteParticipantMRI = remoteParticipant.Identifier.ToString();
        this.remoteParticipantDictionary.Remove(remoteParticipantMRI);
    }
}
轉譯遠端視訊
針對每個遠端視訊串流,將其附加至 MediaPlayerElement。
private async Task AddVideoStreamsAsync(IReadOnlyList<RemoteVideoStream> remoteVideoStreams)
{
    foreach (var remoteVideoStream in remoteVideoStreams)
    {
        var remoteUri = await remoteVideoStream.Start();

        this.DispatcherQueue.TryEnqueue(() => {
            RemoteVideo.Source = MediaSource.CreateFromUri(remoteUri);
            RemoteVideo.MediaPlayer.Play();
        });
    }
}
通話狀態更新
當通話中斷連線之後,我們需要清除視訊轉譯器,並在遠端參與者一開始加入通話時處理這種情況。
private async void Call_OnStateChanged(object sender, PropertyChangedEventArgs args)
{
    switch (((Call)sender).State)
    {
        case CallState.Disconnected:
            this.DispatcherQueue.TryEnqueue(() => { =>
            {
                LocalVideo.Source = null;
                RemoteVideo.Source = null;
            });
            break;

        case CallState.Connected:
            foreach (var remoteParticipant in call.RemoteParticipants)
            {
                String remoteParticipantMRI = remoteParticipant.Identifier.ToString();
                remoteParticipantDictionary.TryAdd(remoteParticipantMRI, remoteParticipant);
                await AddVideoStreams(remoteParticipant.VideoStreams);
                remoteParticipant.OnVideoStreamsUpdated += Call_OnVideoStreamsUpdated;
            }
            break;

        default:
            break;
    }
}
結束通話
按一下 [Hang Up] 按鈕時,結束目前的通話。 將實作新增至 HangupButton_Click,以使用我們建立的 callAgent 結束通話,然後終止參與者更新和通話狀態事件處理常式。
this.call.OnRemoteParticipantsUpdated -= Call_OnRemoteParticipantsUpdatedAsync;
this.call.OnStateChanged -= Call_OnStateChangedAsync;
await this.call.HangUpAsync(new HangUpOptions());
執行程式碼
在 Visual Studio 中,您可以建置並執行程式碼。 針對解決方案平台,我們支援 ARM64、x64 和 x86。
您可以在文字欄位中提供使用者識別碼並按一下 [Start Call] 按鈕,以進行外撥視訊通話。
注意:呼叫 8:echo123 會停止視訊串流,因為回應聊天機器人不支持視訊串流。
如需使用者識別碼 (身分識別) 的詳細資訊,請參閱使用者存取權杖指南。
在此快速入門中,您將了解如何使用適用於 Unity 的 Azure 通訊服務通話 SDK,開始進行通話。 如需在 Unity 平台上接收並轉譯視訊畫面,請參閱原始媒體存取快速入門。
您可以從 GitHub 下載應用程式範例。
必要條件
若要完成本教學課程,您需要下列必要條件:
具有有效訂用帳戶的 Azure 帳戶。 免費建立帳戶。
安裝包含通用 Windows 平台開發工作負載的 Unity Hub 和 Unity 編輯器 \(英文\)。
已部署通訊服務資源。 建立通訊服務資源。 您必須針對此快速入門記錄您的連接字串。
針對您的 Azure 通訊服務的使用者存取權杖。 您也可以使用 Azure CLI,並搭配您的連接字串執行命令,以建立使用者和存取權杖。
az communication identity token issue --scope voip --connection-string "yourConnectionString"如需詳細資訊,請參閱使用 Azure CLI 建立和管理存取權杖。
設定
建立專案
在 Unity Hub 中,使用 2D 核心範本來建立新專案,以設定 Unity 專案。
![顯示 Visual Studio 內 [新增 UWP 專案] 視窗的螢幕快照。](media/unity/create-a-new-project.png)
Install the package
有兩種方式可安裝適用於 Unity 的 Azure 通訊通話 SDK。
從公用 npm 摘要下載 SDK \(英文\),並將其匯入到 Unity 編輯器的套件管理員,其位於 Windows 索引標籤底下。
從 Microsoft 下載混合實境功能工具,並透過混合實境工具管理員進行安裝。
設定應用程式架構
我們必須設定基本配置來附加邏輯。 為了撥打外撥電話,我們需要 TextBox 來提供被通話者的使用者識別碼。 我們也需要 Start/Join call 按鈕和 Hang up 按鈕。
在專案中建立名為 Main 的新場景。
開啟 Main.unity 檔案,然後使用下列實作取代內容:
Main.Unity 程式碼
Main.unity
%YAML 1.1
%TAG !u! tag:unity3d.com,2011:
--- !u!29 &1
OcclusionCullingSettings:
  m_ObjectHideFlags: 0
  serializedVersion: 2
  m_OcclusionBakeSettings:
    smallestOccluder: 5
    smallestHole: 0.25
    backfaceThreshold: 100
  m_SceneGUID: 00000000000000000000000000000000
  m_OcclusionCullingData: {fileID: 0}
--- !u!104 &2
RenderSettings:
  m_ObjectHideFlags: 0
  serializedVersion: 9
  m_Fog: 0
  m_FogColor: {r: 0.5, g: 0.5, b: 0.5, a: 1}
  m_FogMode: 3
  m_FogDensity: 0.01
  m_LinearFogStart: 0
  m_LinearFogEnd: 300
  m_AmbientSkyColor: {r: 0.212, g: 0.227, b: 0.259, a: 1}
  m_AmbientEquatorColor: {r: 0.114, g: 0.125, b: 0.133, a: 1}
  m_AmbientGroundColor: {r: 0.047, g: 0.043, b: 0.035, a: 1}
  m_AmbientIntensity: 1
  m_AmbientMode: 3
  m_SubtractiveShadowColor: {r: 0.42, g: 0.478, b: 0.627, a: 1}
  m_SkyboxMaterial: {fileID: 0}
  m_HaloStrength: 0.5
  m_FlareStrength: 1
  m_FlareFadeSpeed: 3
  m_HaloTexture: {fileID: 0}
  m_SpotCookie: {fileID: 10001, guid: 0000000000000000e000000000000000, type: 0}
  m_DefaultReflectionMode: 0
  m_DefaultReflectionResolution: 128
  m_ReflectionBounces: 1
  m_ReflectionIntensity: 1
  m_CustomReflection: {fileID: 0}
  m_Sun: {fileID: 0}
  m_IndirectSpecularColor: {r: 0, g: 0, b: 0, a: 1}
  m_UseRadianceAmbientProbe: 0
--- !u!157 &3
LightmapSettings:
  m_ObjectHideFlags: 0
  serializedVersion: 12
  m_GIWorkflowMode: 1
  m_GISettings:
    serializedVersion: 2
    m_BounceScale: 1
    m_IndirectOutputScale: 1
    m_AlbedoBoost: 1
    m_EnvironmentLightingMode: 0
    m_EnableBakedLightmaps: 0
    m_EnableRealtimeLightmaps: 0
  m_LightmapEditorSettings:
    serializedVersion: 12
    m_Resolution: 2
    m_BakeResolution: 40
    m_AtlasSize: 1024
    m_AO: 0
    m_AOMaxDistance: 1
    m_CompAOExponent: 1
    m_CompAOExponentDirect: 0
    m_ExtractAmbientOcclusion: 0
    m_Padding: 2
    m_LightmapParameters: {fileID: 0}
    m_LightmapsBakeMode: 1
    m_TextureCompression: 1
    m_FinalGather: 0
    m_FinalGatherFiltering: 1
    m_FinalGatherRayCount: 256
    m_ReflectionCompression: 2
    m_MixedBakeMode: 2
    m_BakeBackend: 0
    m_PVRSampling: 1
    m_PVRDirectSampleCount: 32
    m_PVRSampleCount: 500
    m_PVRBounces: 2
    m_PVREnvironmentSampleCount: 500
    m_PVREnvironmentReferencePointCount: 2048
    m_PVRFilteringMode: 2
    m_PVRDenoiserTypeDirect: 0
    m_PVRDenoiserTypeIndirect: 0
    m_PVRDenoiserTypeAO: 0
    m_PVRFilterTypeDirect: 0
    m_PVRFilterTypeIndirect: 0
    m_PVRFilterTypeAO: 0
    m_PVREnvironmentMIS: 0
    m_PVRCulling: 1
    m_PVRFilteringGaussRadiusDirect: 1
    m_PVRFilteringGaussRadiusIndirect: 5
    m_PVRFilteringGaussRadiusAO: 2
    m_PVRFilteringAtrousPositionSigmaDirect: 0.5
    m_PVRFilteringAtrousPositionSigmaIndirect: 2
    m_PVRFilteringAtrousPositionSigmaAO: 1
    m_ExportTrainingData: 0
    m_TrainingDataDestination: TrainingData
    m_LightProbeSampleCountMultiplier: 4
  m_LightingDataAsset: {fileID: 0}
  m_LightingSettings: {fileID: 0}
--- !u!196 &4
NavMeshSettings:
  serializedVersion: 2
  m_ObjectHideFlags: 0
  m_BuildSettings:
    serializedVersion: 2
    agentTypeID: 0
    agentRadius: 0.5
    agentHeight: 2
    agentSlope: 45
    agentClimb: 0.4
    ledgeDropHeight: 0
    maxJumpAcrossDistance: 0
    minRegionArea: 2
    manualCellSize: 0
    cellSize: 0.16666667
    manualTileSize: 0
    tileSize: 256
    accuratePlacement: 0
    maxJobWorkers: 0
    preserveTilesOutsideBounds: 0
    debug:
      m_Flags: 0
  m_NavMeshData: {fileID: 0}
--- !u!1 &247756367
GameObject:
  m_ObjectHideFlags: 0
  m_CorrespondingSourceObject: {fileID: 0}
  m_PrefabInstance: {fileID: 0}
  m_PrefabAsset: {fileID: 0}
  serializedVersion: 6
  m_Component:
  - component: {fileID: 247756370}
  - component: {fileID: 247756369}
  - component: {fileID: 247756368}
  m_Layer: 0
  m_Name: EventSystem
  m_TagString: Untagged
  m_Icon: {fileID: 0}
  m_NavMeshLayer: 0
  m_StaticEditorFlags: 0
  m_IsActive: 1
--- !u!114 &247756368
MonoBehaviour:
  m_ObjectHideFlags: 0
  m_CorrespondingSourceObject: {fileID: 0}
  m_PrefabInstance: {fileID: 0}
  m_PrefabAsset: {fileID: 0}
  m_GameObject: {fileID: 247756367}
  m_Enabled: 1
  m_EditorHideFlags: 0
  m_Script: {fileID: 11500000, guid: 4f231c4fb786f3946a6b90b886c48677, type: 3}
  m_Name:
  m_EditorClassIdentifier:
  m_SendPointerHoverToParent: 1
  m_HorizontalAxis: Horizontal
  m_VerticalAxis: Vertical
  m_SubmitButton: Submit
  m_CancelButton: Cancel
  m_InputActionsPerSecond: 10
  m_RepeatDelay: 0.5
  m_ForceModuleActive: 0
--- !u!114 &247756369
MonoBehaviour:
  m_ObjectHideFlags: 0
  m_CorrespondingSourceObject: {fileID: 0}
  m_PrefabInstance: {fileID: 0}
  m_PrefabAsset: {fileID: 0}
  m_GameObject: {fileID: 247756367}
  m_Enabled: 1
  m_EditorHideFlags: 0
  m_Script: {fileID: 11500000, guid: 76c392e42b5098c458856cdf6ecaaaa1, type: 3}
  m_Name:
  m_EditorClassIdentifier:
  m_FirstSelected: {fileID: 0}
  m_sendNavigationEvents: 1
  m_DragThreshold: 10
--- !u!4 &247756370
Transform:
  m_ObjectHideFlags: 0
  m_CorrespondingSourceObject: {fileID: 0}
  m_PrefabInstance: {fileID: 0}
  m_PrefabAsset: {fileID: 0}
  m_GameObject: {fileID: 247756367}
  m_LocalRotation: {x: 0, y: 0, z: 0, w: 1}
  m_LocalPosition: {x: 0, y: 0, z: 0}
  m_LocalScale: {x: 1, y: 1, z: 1}
  m_ConstrainProportionsScale: 0
  m_Children: []
  m_Father: {fileID: 0}
  m_RootOrder: 2
  m_LocalEulerAnglesHint: {x: 0, y: 0, z: 0}
--- !u!1 &293984669
GameObject:
  m_ObjectHideFlags: 0
  m_CorrespondingSourceObject: {fileID: 0}
  m_PrefabInstance: {fileID: 0}
  m_PrefabAsset: {fileID: 0}
  serializedVersion: 6
  m_Component:
  - component: {fileID: 293984671}
  - component: {fileID: 293984670}
  m_Layer: 0
  m_Name: AppManager
  m_TagString: Untagged
  m_Icon: {fileID: 0}
  m_NavMeshLayer: 0
  m_StaticEditorFlags: 0
  m_IsActive: 1
--- !u!114 &293984670
MonoBehaviour:
  m_ObjectHideFlags: 0
  m_CorrespondingSourceObject: {fileID: 0}
  m_PrefabInstance: {fileID: 0}
  m_PrefabAsset: {fileID: 0}
  m_GameObject: {fileID: 293984669}
  m_Enabled: 1
  m_EditorHideFlags: 0
  m_Script: {fileID: 11500000, guid: 7c7d18b32fdb6b14e857ebb6d9627958, type: 3}
  m_Name:
  m_EditorClassIdentifier:
  callStatus: {fileID: 1529611528}
  videoPlayer: {fileID: 0}
--- !u!4 &293984671
Transform:
  m_ObjectHideFlags: 0
  m_CorrespondingSourceObject: {fileID: 0}
  m_PrefabInstance: {fileID: 0}
  m_PrefabAsset: {fileID: 0}
  m_GameObject: {fileID: 293984669}
  m_LocalRotation: {x: 0, y: 0, z: 0, w: 1}
  m_LocalPosition: {x: 0, y: 0, z: 0}
  m_LocalScale: {x: 1, y: 1, z: 1}
  m_ConstrainProportionsScale: 0
  m_Children: []
  m_Father: {fileID: 0}
  m_RootOrder: 1
  m_LocalEulerAnglesHint: {x: 0, y: 0, z: 0}
--- !u!1 &438770860
GameObject:
  m_ObjectHideFlags: 0
  m_CorrespondingSourceObject: {fileID: 0}
  m_PrefabInstance: {fileID: 0}
  m_PrefabAsset: {fileID: 0}
  serializedVersion: 6
  m_Component:
  - component: {fileID: 438770861}
  - component: {fileID: 438770863}
  - component: {fileID: 438770862}
  m_Layer: 5
  m_Name: Text (TMP)
  m_TagString: Untagged
  m_Icon: {fileID: 0}
  m_NavMeshLayer: 0
  m_StaticEditorFlags: 0
  m_IsActive: 1
--- !u!224 &438770861
RectTransform:
  m_ObjectHideFlags: 0
  m_CorrespondingSourceObject: {fileID: 0}
  m_PrefabInstance: {fileID: 0}
  m_PrefabAsset: {fileID: 0}
  m_GameObject: {fileID: 438770860}
  m_LocalRotation: {x: 0, y: 0, z: 0, w: 1}
  m_LocalPosition: {x: 0, y: 0, z: 0}
  m_LocalScale: {x: 1, y: 1, z: 1}
  m_ConstrainProportionsScale: 0
  m_Children: []
  m_Father: {fileID: 1732033234}
  m_RootOrder: 0
  m_LocalEulerAnglesHint: {x: 0, y: 0, z: 0}
  m_AnchorMin: {x: 0, y: 0}
  m_AnchorMax: {x: 1, y: 1}
  m_AnchoredPosition: {x: 0, y: 0}
  m_SizeDelta: {x: 0, y: 0}
  m_Pivot: {x: 0.5, y: 0.5}
--- !u!114 &438770862
MonoBehaviour:
  m_ObjectHideFlags: 0
  m_CorrespondingSourceObject: {fileID: 0}
  m_PrefabInstance: {fileID: 0}
  m_PrefabAsset: {fileID: 0}
  m_GameObject: {fileID: 438770860}
  m_Enabled: 1
  m_EditorHideFlags: 0
  m_Script: {fileID: 11500000, guid: f4688fdb7df04437aeb418b961361dc5, type: 3}
  m_Name:
  m_EditorClassIdentifier:
  m_Material: {fileID: 0}
  m_Color: {r: 1, g: 1, b: 1, a: 1}
  m_RaycastTarget: 1
  m_RaycastPadding: {x: 0, y: 0, z: 0, w: 0}
  m_Maskable: 1
  m_OnCullStateChanged:
    m_PersistentCalls:
      m_Calls: []
  m_text: Start Call
  m_isRightToLeft: 0
  m_fontAsset: {fileID: 11400000, guid: 8f586378b4e144a9851e7b34d9b748ee, type: 2}
  m_sharedMaterial: {fileID: 2180264, guid: 8f586378b4e144a9851e7b34d9b748ee, type: 2}
  m_fontSharedMaterials: []
  m_fontMaterial: {fileID: 0}
  m_fontMaterials: []
  m_fontColor32:
    serializedVersion: 2
    rgba: 4281479730
  m_fontColor: {r: 0.19607843, g: 0.19607843, b: 0.19607843, a: 1}
  m_enableVertexGradient: 0
  m_colorMode: 3
  m_fontColorGradient:
    topLeft: {r: 1, g: 1, b: 1, a: 1}
    topRight: {r: 1, g: 1, b: 1, a: 1}
    bottomLeft: {r: 1, g: 1, b: 1, a: 1}
    bottomRight: {r: 1, g: 1, b: 1, a: 1}
  m_fontColorGradientPreset: {fileID: 0}
  m_spriteAsset: {fileID: 0}
  m_tintAllSprites: 0
  m_StyleSheet: {fileID: 0}
  m_TextStyleHashCode: -1183493901
  m_overrideHtmlColors: 0
  m_faceColor:
    serializedVersion: 2
    rgba: 4294967295
  m_fontSize: 24
  m_fontSizeBase: 24
  m_fontWeight: 400
  m_enableAutoSizing: 0
  m_fontSizeMin: 18
  m_fontSizeMax: 72
  m_fontStyle: 0
  m_HorizontalAlignment: 2
  m_VerticalAlignment: 512
  m_textAlignment: 65535
  m_characterSpacing: 0
  m_wordSpacing: 0
  m_lineSpacing: 0
  m_lineSpacingMax: 0
  m_paragraphSpacing: 0
  m_charWidthMaxAdj: 0
  m_enableWordWrapping: 1
  m_wordWrappingRatios: 0.4
  m_overflowMode: 0
  m_linkedTextComponent: {fileID: 0}
  parentLinkedComponent: {fileID: 0}
  m_enableKerning: 1
  m_enableExtraPadding: 0
  checkPaddingRequired: 0
  m_isRichText: 1
  m_parseCtrlCharacters: 1
  m_isOrthographic: 1
  m_isCullingEnabled: 0
  m_horizontalMapping: 0
  m_verticalMapping: 0
  m_uvLineOffset: 0
  m_geometrySortingOrder: 0
  m_IsTextObjectScaleStatic: 0
  m_VertexBufferAutoSizeReduction: 0
  m_useMaxVisibleDescender: 1
  m_pageToDisplay: 1
  m_margin: {x: 0, y: 0, z: 0, w: 0}
  m_isUsingLegacyAnimationComponent: 0
  m_isVolumetricText: 0
  m_hasFontAssetChanged: 0
  m_baseMaterial: {fileID: 0}
  m_maskOffset: {x: 0, y: 0, z: 0, w: 0}
--- !u!222 &438770863
CanvasRenderer:
  m_ObjectHideFlags: 0
  m_CorrespondingSourceObject: {fileID: 0}
  m_PrefabInstance: {fileID: 0}
  m_PrefabAsset: {fileID: 0}
  m_GameObject: {fileID: 438770860}
  m_CullTransparentMesh: 1
--- !u!1 &519420028
GameObject:
  m_ObjectHideFlags: 0
  m_CorrespondingSourceObject: {fileID: 0}
  m_PrefabInstance: {fileID: 0}
  m_PrefabAsset: {fileID: 0}
  serializedVersion: 6
  m_Component:
  - component: {fileID: 519420032}
  - component: {fileID: 519420031}
  - component: {fileID: 519420029}
  m_Layer: 0
  m_Name: Main Camera
  m_TagString: MainCamera
  m_Icon: {fileID: 0}
  m_NavMeshLayer: 0
  m_StaticEditorFlags: 0
  m_IsActive: 1
--- !u!81 &519420029
AudioListener:
  m_ObjectHideFlags: 0
  m_CorrespondingSourceObject: {fileID: 0}
  m_PrefabInstance: {fileID: 0}
  m_PrefabAsset: {fileID: 0}
  m_GameObject: {fileID: 519420028}
  m_Enabled: 1
--- !u!20 &519420031
Camera:
  m_ObjectHideFlags: 0
  m_CorrespondingSourceObject: {fileID: 0}
  m_PrefabInstance: {fileID: 0}
  m_PrefabAsset: {fileID: 0}
  m_GameObject: {fileID: 519420028}
  m_Enabled: 1
  serializedVersion: 2
  m_ClearFlags: 2
  m_BackGroundColor: {r: 0.19215687, g: 0.3019608, b: 0.4745098, a: 0}
  m_projectionMatrixMode: 1
  m_GateFitMode: 2
  m_FOVAxisMode: 0
  m_SensorSize: {x: 36, y: 24}
  m_LensShift: {x: 0, y: 0}
  m_FocalLength: 50
  m_NormalizedViewPortRect:
    serializedVersion: 2
    x: 0
    y: 0
    width: 1
    height: 1
  near clip plane: 0.3
  far clip plane: 1000
  field of view: 60
  orthographic: 1
  orthographic size: 5
  m_Depth: -1
  m_CullingMask:
    serializedVersion: 2
    m_Bits: 4294967295
  m_RenderingPath: -1
  m_TargetTexture: {fileID: 0}
  m_TargetDisplay: 0
  m_TargetEye: 0
  m_HDR: 1
  m_AllowMSAA: 0
  m_AllowDynamicResolution: 0
  m_ForceIntoRT: 0
  m_OcclusionCulling: 0
  m_StereoConvergence: 10
  m_StereoSeparation: 0.022
--- !u!4 &519420032
Transform:
  m_ObjectHideFlags: 0
  m_CorrespondingSourceObject: {fileID: 0}
  m_PrefabInstance: {fileID: 0}
  m_PrefabAsset: {fileID: 0}
  m_GameObject: {fileID: 519420028}
  m_LocalRotation: {x: 0, y: 0, z: 0, w: 1}
  m_LocalPosition: {x: 0, y: 0, z: -10}
  m_LocalScale: {x: 1, y: 1, z: 1}
  m_ConstrainProportionsScale: 0
  m_Children: []
  m_Father: {fileID: 0}
  m_RootOrder: 0
  m_LocalEulerAnglesHint: {x: 0, y: 0, z: 0}
--- !u!1 &857336305
GameObject:
  m_ObjectHideFlags: 0
  m_CorrespondingSourceObject: {fileID: 0}
  m_PrefabInstance: {fileID: 0}
  m_PrefabAsset: {fileID: 0}
  serializedVersion: 6
  m_Component:
  - component: {fileID: 857336306}
  - component: {fileID: 857336309}
  - component: {fileID: 857336308}
  - component: {fileID: 857336307}
  m_Layer: 5
  m_Name: Placeholder
  m_TagString: Untagged
  m_Icon: {fileID: 0}
  m_NavMeshLayer: 0
  m_StaticEditorFlags: 0
  m_IsActive: 1
--- !u!224 &857336306
RectTransform:
  m_ObjectHideFlags: 0
  m_CorrespondingSourceObject: {fileID: 0}
  m_PrefabInstance: {fileID: 0}
  m_PrefabAsset: {fileID: 0}
  m_GameObject: {fileID: 857336305}
  m_LocalRotation: {x: 0, y: 0, z: 0, w: 1}
  m_LocalPosition: {x: 0, y: 0, z: 0}
  m_LocalScale: {x: 1, y: 1, z: 1}
  m_ConstrainProportionsScale: 0
  m_Children: []
  m_Father: {fileID: 1787936407}
  m_RootOrder: 0
  m_LocalEulerAnglesHint: {x: 0, y: 0, z: 0}
  m_AnchorMin: {x: 0, y: 0}
  m_AnchorMax: {x: 1, y: 1}
  m_AnchoredPosition: {x: 0, y: 0}
  m_SizeDelta: {x: 0, y: 0}
  m_Pivot: {x: 0.5, y: 0.5}
--- !u!114 &857336307
MonoBehaviour:
  m_ObjectHideFlags: 0
  m_CorrespondingSourceObject: {fileID: 0}
  m_PrefabInstance: {fileID: 0}
  m_PrefabAsset: {fileID: 0}
  m_GameObject: {fileID: 857336305}
  m_Enabled: 1
  m_EditorHideFlags: 0
  m_Script: {fileID: 11500000, guid: 306cc8c2b49d7114eaa3623786fc2126, type: 3}
  m_Name:
  m_EditorClassIdentifier:
  m_IgnoreLayout: 1
  m_MinWidth: -1
  m_MinHeight: -1
  m_PreferredWidth: -1
  m_PreferredHeight: -1
  m_FlexibleWidth: -1
  m_FlexibleHeight: -1
  m_LayoutPriority: 1
--- !u!114 &857336308
MonoBehaviour:
  m_ObjectHideFlags: 0
  m_CorrespondingSourceObject: {fileID: 0}
  m_PrefabInstance: {fileID: 0}
  m_PrefabAsset: {fileID: 0}
  m_GameObject: {fileID: 857336305}
  m_Enabled: 1
  m_EditorHideFlags: 0
  m_Script: {fileID: 11500000, guid: f4688fdb7df04437aeb418b961361dc5, type: 3}
  m_Name:
  m_EditorClassIdentifier:
  m_Material: {fileID: 0}
  m_Color: {r: 1, g: 1, b: 1, a: 1}
  m_RaycastTarget: 1
  m_RaycastPadding: {x: 0, y: 0, z: 0, w: 0}
  m_Maskable: 1
  m_OnCullStateChanged:
    m_PersistentCalls:
      m_Calls: []
  m_text: Who Would you like to call?
  m_isRightToLeft: 0
  m_fontAsset: {fileID: 11400000, guid: 8f586378b4e144a9851e7b34d9b748ee, type: 2}
  m_sharedMaterial: {fileID: 2180264, guid: 8f586378b4e144a9851e7b34d9b748ee, type: 2}
  m_fontSharedMaterials: []
  m_fontMaterial: {fileID: 0}
  m_fontMaterials: []
  m_fontColor32:
    serializedVersion: 2
    rgba: 2150773298
  m_fontColor: {r: 0.19607843, g: 0.19607843, b: 0.19607843, a: 0.5}
  m_enableVertexGradient: 0
  m_colorMode: 3
  m_fontColorGradient:
    topLeft: {r: 1, g: 1, b: 1, a: 1}
    topRight: {r: 1, g: 1, b: 1, a: 1}
    bottomLeft: {r: 1, g: 1, b: 1, a: 1}
    bottomRight: {r: 1, g: 1, b: 1, a: 1}
  m_fontColorGradientPreset: {fileID: 0}
  m_spriteAsset: {fileID: 0}
  m_tintAllSprites: 0
  m_StyleSheet: {fileID: 0}
  m_TextStyleHashCode: -1183493901
  m_overrideHtmlColors: 0
  m_faceColor:
    serializedVersion: 2
    rgba: 4294967295
  m_fontSize: 14
  m_fontSizeBase: 14
  m_fontWeight: 400
  m_enableAutoSizing: 0
  m_fontSizeMin: 18
  m_fontSizeMax: 72
  m_fontStyle: 2
  m_HorizontalAlignment: 1
  m_VerticalAlignment: 256
  m_textAlignment: 65535
  m_characterSpacing: 0
  m_wordSpacing: 0
  m_lineSpacing: 0
  m_lineSpacingMax: 0
  m_paragraphSpacing: 0
  m_charWidthMaxAdj: 0
  m_enableWordWrapping: 0
  m_wordWrappingRatios: 0.4
  m_overflowMode: 0
  m_linkedTextComponent: {fileID: 0}
  parentLinkedComponent: {fileID: 0}
  m_enableKerning: 1
  m_enableExtraPadding: 1
  checkPaddingRequired: 0
  m_isRichText: 1
  m_parseCtrlCharacters: 1
  m_isOrthographic: 1
  m_isCullingEnabled: 0
  m_horizontalMapping: 0
  m_verticalMapping: 0
  m_uvLineOffset: 0
  m_geometrySortingOrder: 0
  m_IsTextObjectScaleStatic: 0
  m_VertexBufferAutoSizeReduction: 0
  m_useMaxVisibleDescender: 1
  m_pageToDisplay: 1
  m_margin: {x: 0, y: 0, z: 0, w: 0}
  m_isUsingLegacyAnimationComponent: 0
  m_isVolumetricText: 0
  m_hasFontAssetChanged: 0
  m_baseMaterial: {fileID: 0}
  m_maskOffset: {x: 0, y: 0, z: 0, w: 0}
--- !u!222 &857336309
CanvasRenderer:
  m_ObjectHideFlags: 0
  m_CorrespondingSourceObject: {fileID: 0}
  m_PrefabInstance: {fileID: 0}
  m_PrefabAsset: {fileID: 0}
  m_GameObject: {fileID: 857336305}
  m_CullTransparentMesh: 1
--- !u!1 &963546686
GameObject:
  m_ObjectHideFlags: 0
  m_CorrespondingSourceObject: {fileID: 0}
  m_PrefabInstance: {fileID: 0}
  m_PrefabAsset: {fileID: 0}
  serializedVersion: 6
  m_Component:
  - component: {fileID: 963546687}
  - component: {fileID: 963546690}
  - component: {fileID: 963546689}
  - component: {fileID: 963546688}
  m_Layer: 5
  m_Name: InputField (TMP)
  m_TagString: Untagged
  m_Icon: {fileID: 0}
  m_NavMeshLayer: 0
  m_StaticEditorFlags: 0
  m_IsActive: 1
--- !u!224 &963546687
RectTransform:
  m_ObjectHideFlags: 0
  m_CorrespondingSourceObject: {fileID: 0}
  m_PrefabInstance: {fileID: 0}
  m_PrefabAsset: {fileID: 0}
  m_GameObject: {fileID: 963546686}
  m_LocalRotation: {x: 0, y: 0, z: 0, w: 1}
  m_LocalPosition: {x: 0, y: 0, z: 0}
  m_LocalScale: {x: 1, y: 1, z: 1}
  m_ConstrainProportionsScale: 0
  m_Children:
  - {fileID: 1787936407}
  m_Father: {fileID: 1843906927}
  m_RootOrder: 0
  m_LocalEulerAnglesHint: {x: 0, y: 0, z: 0}
  m_AnchorMin: {x: 0.5, y: 0.5}
  m_AnchorMax: {x: 0.5, y: 0.5}
  m_AnchoredPosition: {x: 0.00002861, y: 327}
  m_SizeDelta: {x: 1337.7578, y: 71.4853}
  m_Pivot: {x: 0.5, y: 0.5}
--- !u!114 &963546688
MonoBehaviour:
  m_ObjectHideFlags: 0
  m_CorrespondingSourceObject: {fileID: 0}
  m_PrefabInstance: {fileID: 0}
  m_PrefabAsset: {fileID: 0}
  m_GameObject: {fileID: 963546686}
  m_Enabled: 1
  m_EditorHideFlags: 0
  m_Script: {fileID: 11500000, guid: 2da0c512f12947e489f739169773d7ca, type: 3}
  m_Name:
  m_EditorClassIdentifier:
  m_Navigation:
    m_Mode: 3
    m_WrapAround: 0
    m_SelectOnUp: {fileID: 0}
    m_SelectOnDown: {fileID: 0}
    m_SelectOnLeft: {fileID: 0}
    m_SelectOnRight: {fileID: 0}
  m_Transition: 1
  m_Colors:
    m_NormalColor: {r: 1, g: 1, b: 1, a: 1}
    m_HighlightedColor: {r: 0.9607843, g: 0.9607843, b: 0.9607843, a: 1}
    m_PressedColor: {r: 0.78431374, g: 0.78431374, b: 0.78431374, a: 1}
    m_SelectedColor: {r: 0.9607843, g: 0.9607843, b: 0.9607843, a: 1}
    m_DisabledColor: {r: 0.78431374, g: 0.78431374, b: 0.78431374, a: 0.5019608}
    m_ColorMultiplier: 1
    m_FadeDuration: 0.1
  m_SpriteState:
    m_HighlightedSprite: {fileID: 0}
    m_PressedSprite: {fileID: 0}
    m_SelectedSprite: {fileID: 0}
    m_DisabledSprite: {fileID: 0}
  m_AnimationTriggers:
    m_NormalTrigger: Normal
    m_HighlightedTrigger: Highlighted
    m_PressedTrigger: Pressed
    m_SelectedTrigger: Selected
    m_DisabledTrigger: Disabled
  m_Interactable: 1
  m_TargetGraphic: {fileID: 963546689}
  m_TextViewport: {fileID: 1787936407}
  m_TextComponent: {fileID: 1676708954}
  m_Placeholder: {fileID: 857336308}
  m_VerticalScrollbar: {fileID: 0}
  m_VerticalScrollbarEventHandler: {fileID: 0}
  m_LayoutGroup: {fileID: 0}
  m_ScrollSensitivity: 1
  m_ContentType: 0
  m_InputType: 0
  m_AsteriskChar: 42
  m_KeyboardType: 0
  m_LineType: 0
  m_HideMobileInput: 0
  m_HideSoftKeyboard: 0
  m_CharacterValidation: 0
  m_RegexValue:
  m_GlobalPointSize: 14
  m_CharacterLimit: 0
  m_OnEndEdit:
    m_PersistentCalls:
      m_Calls: []
  m_OnSubmit:
    m_PersistentCalls:
      m_Calls: []
  m_OnSelect:
    m_PersistentCalls:
      m_Calls: []
  m_OnDeselect:
    m_PersistentCalls:
      m_Calls: []
  m_OnTextSelection:
    m_PersistentCalls:
      m_Calls: []
  m_OnEndTextSelection:
    m_PersistentCalls:
      m_Calls: []
  m_OnValueChanged:
    m_PersistentCalls:
      m_Calls:
      - m_Target: {fileID: 293984670}
        m_TargetAssemblyTypeName: CallClientHost, Assembly-CSharp
        m_MethodName: set_CalleeIdentity
        m_Mode: 0
        m_Arguments:
          m_ObjectArgument: {fileID: 0}
          m_ObjectArgumentAssemblyTypeName: UnityEngine.Object, UnityEngine
          m_IntArgument: 0
          m_FloatArgument: 0
          m_StringArgument:
          m_BoolArgument: 0
        m_CallState: 2
  m_OnTouchScreenKeyboardStatusChanged:
    m_PersistentCalls:
      m_Calls: []
  m_CaretColor: {r: 0.19607843, g: 0.19607843, b: 0.19607843, a: 1}
  m_CustomCaretColor: 0
  m_SelectionColor: {r: 0.65882355, g: 0.80784315, b: 1, a: 0.7529412}
  m_Text:
  m_CaretBlinkRate: 0.85
  m_CaretWidth: 1
  m_ReadOnly: 0
  m_RichText: 1
  m_GlobalFontAsset: {fileID: 11400000, guid: 8f586378b4e144a9851e7b34d9b748ee, type: 2}
  m_OnFocusSelectAll: 1
  m_ResetOnDeActivation: 1
  m_RestoreOriginalTextOnEscape: 1
  m_isRichTextEditingAllowed: 0
  m_LineLimit: 0
  m_InputValidator: {fileID: 0}
--- !u!114 &963546689
MonoBehaviour:
  m_ObjectHideFlags: 0
  m_CorrespondingSourceObject: {fileID: 0}
  m_PrefabInstance: {fileID: 0}
  m_PrefabAsset: {fileID: 0}
  m_GameObject: {fileID: 963546686}
  m_Enabled: 1
  m_EditorHideFlags: 0
  m_Script: {fileID: 11500000, guid: fe87c0e1cc204ed48ad3b37840f39efc, type: 3}
  m_Name:
  m_EditorClassIdentifier:
  m_Material: {fileID: 0}
  m_Color: {r: 1, g: 1, b: 1, a: 1}
  m_RaycastTarget: 1
  m_RaycastPadding: {x: 0, y: 0, z: 0, w: 0}
  m_Maskable: 1
  m_OnCullStateChanged:
    m_PersistentCalls:
      m_Calls: []
  m_Sprite: {fileID: 10911, guid: 0000000000000000f000000000000000, type: 0}
  m_Type: 1
  m_PreserveAspect: 0
  m_FillCenter: 1
  m_FillMethod: 4
  m_FillAmount: 1
  m_FillClockwise: 1
  m_FillOrigin: 0
  m_UseSpriteMesh: 0
  m_PixelsPerUnitMultiplier: 1
--- !u!222 &963546690
CanvasRenderer:
  m_ObjectHideFlags: 0
  m_CorrespondingSourceObject: {fileID: 0}
  m_PrefabInstance: {fileID: 0}
  m_PrefabAsset: {fileID: 0}
  m_GameObject: {fileID: 963546686}
  m_CullTransparentMesh: 1
--- !u!1 &1184525248
GameObject:
  m_ObjectHideFlags: 0
  m_CorrespondingSourceObject: {fileID: 0}
  m_PrefabInstance: {fileID: 0}
  m_PrefabAsset: {fileID: 0}
  serializedVersion: 6
  m_Component:
  - component: {fileID: 1184525249}
  - component: {fileID: 1184525251}
  - component: {fileID: 1184525250}
  m_Layer: 5
  m_Name: Status Header
  m_TagString: Untagged
  m_Icon: {fileID: 0}
  m_NavMeshLayer: 0
  m_StaticEditorFlags: 0
  m_IsActive: 1
--- !u!224 &1184525249
RectTransform:
  m_ObjectHideFlags: 0
  m_CorrespondingSourceObject: {fileID: 0}
  m_PrefabInstance: {fileID: 0}
  m_PrefabAsset: {fileID: 0}
  m_GameObject: {fileID: 1184525248}
  m_LocalRotation: {x: 0, y: 0, z: 0, w: 1}
  m_LocalPosition: {x: 0, y: 0, z: 0}
  m_LocalScale: {x: 1, y: 1, z: 1}
  m_ConstrainProportionsScale: 0
  m_Children: []
  m_Father: {fileID: 1843906927}
  m_RootOrder: 3
  m_LocalEulerAnglesHint: {x: 0, y: 0, z: 0}
  m_AnchorMin: {x: 0.5, y: 0.5}
  m_AnchorMax: {x: 0.5, y: 0.5}
  m_AnchoredPosition: {x: -23, y: -303}
  m_SizeDelta: {x: 159.05, y: 33.5037}
  m_Pivot: {x: 0.5, y: 0.5}
--- !u!114 &1184525250
MonoBehaviour:
  m_ObjectHideFlags: 0
  m_CorrespondingSourceObject: {fileID: 0}
  m_PrefabInstance: {fileID: 0}
  m_PrefabAsset: {fileID: 0}
  m_GameObject: {fileID: 1184525248}
  m_Enabled: 1
  m_EditorHideFlags: 0
  m_Script: {fileID: 11500000, guid: f4688fdb7df04437aeb418b961361dc5, type: 3}
  m_Name:
  m_EditorClassIdentifier:
  m_Material: {fileID: 0}
  m_Color: {r: 1, g: 1, b: 1, a: 1}
  m_RaycastTarget: 1
  m_RaycastPadding: {x: 0, y: 0, z: 0, w: 0}
  m_Maskable: 1
  m_OnCullStateChanged:
    m_PersistentCalls:
      m_Calls: []
  m_text: Status
  m_isRightToLeft: 0
  m_fontAsset: {fileID: 11400000, guid: 8f586378b4e144a9851e7b34d9b748ee, type: 2}
  m_sharedMaterial: {fileID: 2180264, guid: 8f586378b4e144a9851e7b34d9b748ee, type: 2}
  m_fontSharedMaterials: []
  m_fontMaterial: {fileID: 0}
  m_fontMaterials: []
  m_fontColor32:
    serializedVersion: 2
    rgba: 4294967295
  m_fontColor: {r: 1, g: 1, b: 1, a: 1}
  m_enableVertexGradient: 0
  m_colorMode: 3
  m_fontColorGradient:
    topLeft: {r: 1, g: 1, b: 1, a: 1}
    topRight: {r: 1, g: 1, b: 1, a: 1}
    bottomLeft: {r: 1, g: 1, b: 1, a: 1}
    bottomRight: {r: 1, g: 1, b: 1, a: 1}
  m_fontColorGradientPreset: {fileID: 0}
  m_spriteAsset: {fileID: 0}
  m_tintAllSprites: 0
  m_StyleSheet: {fileID: 0}
  m_TextStyleHashCode: -1183493901
  m_overrideHtmlColors: 0
  m_faceColor:
    serializedVersion: 2
    rgba: 4294967295
  m_fontSize: 24
  m_fontSizeBase: 24
  m_fontWeight: 400
  m_enableAutoSizing: 0
  m_fontSizeMin: 18
  m_fontSizeMax: 72
  m_fontStyle: 0
  m_HorizontalAlignment: 1
  m_VerticalAlignment: 256
  m_textAlignment: 65535
  m_characterSpacing: 0
  m_wordSpacing: 0
  m_lineSpacing: 0
  m_lineSpacingMax: 0
  m_paragraphSpacing: 0
  m_charWidthMaxAdj: 0
  m_enableWordWrapping: 1
  m_wordWrappingRatios: 0.4
  m_overflowMode: 0
  m_linkedTextComponent: {fileID: 0}
  parentLinkedComponent: {fileID: 0}
  m_enableKerning: 1
  m_enableExtraPadding: 0
  checkPaddingRequired: 0
  m_isRichText: 1
  m_parseCtrlCharacters: 1
  m_isOrthographic: 1
  m_isCullingEnabled: 0
  m_horizontalMapping: 0
  m_verticalMapping: 0
  m_uvLineOffset: 0
  m_geometrySortingOrder: 0
  m_IsTextObjectScaleStatic: 0
  m_VertexBufferAutoSizeReduction: 0
  m_useMaxVisibleDescender: 1
  m_pageToDisplay: 1
  m_margin: {x: 0, y: 2.5243988, z: 10.097656, w: -2.5243645}
  m_isUsingLegacyAnimationComponent: 0
  m_isVolumetricText: 0
  m_hasFontAssetChanged: 0
  m_baseMaterial: {fileID: 0}
  m_maskOffset: {x: 0, y: 0, z: 0, w: 0}
--- !u!222 &1184525251
CanvasRenderer:
  m_ObjectHideFlags: 0
  m_CorrespondingSourceObject: {fileID: 0}
  m_PrefabInstance: {fileID: 0}
  m_PrefabAsset: {fileID: 0}
  m_GameObject: {fileID: 1184525248}
  m_CullTransparentMesh: 1
--- !u!1 &1332239153
GameObject:
  m_ObjectHideFlags: 0
  m_CorrespondingSourceObject: {fileID: 0}
  m_PrefabInstance: {fileID: 0}
  m_PrefabAsset: {fileID: 0}
  serializedVersion: 6
  m_Component:
  - component: {fileID: 1332239154}
  - component: {fileID: 1332239157}
  - component: {fileID: 1332239156}
  - component: {fileID: 1332239155}
  m_Layer: 5
  m_Name: Hang Up Button
  m_TagString: Untagged
  m_Icon: {fileID: 0}
  m_NavMeshLayer: 0
  m_StaticEditorFlags: 0
  m_IsActive: 1
--- !u!224 &1332239154
RectTransform:
  m_ObjectHideFlags: 0
  m_CorrespondingSourceObject: {fileID: 0}
  m_PrefabInstance: {fileID: 0}
  m_PrefabAsset: {fileID: 0}
  m_GameObject: {fileID: 1332239153}
  m_LocalRotation: {x: 0, y: 0, z: 0, w: 1}
  m_LocalPosition: {x: 0, y: 0, z: 0}
  m_LocalScale: {x: 1, y: 1, z: 1}
  m_ConstrainProportionsScale: 0
  m_Children:
  - {fileID: 1917486034}
  m_Father: {fileID: 1843906927}
  m_RootOrder: 2
  m_LocalEulerAnglesHint: {x: 0, y: 0, z: 0}
  m_AnchorMin: {x: 0.5, y: 0.5}
  m_AnchorMax: {x: 0.5, y: 0.5}
  m_AnchoredPosition: {x: -277, y: -329}
  m_SizeDelta: {x: 212.1357, y: 53.698}
  m_Pivot: {x: 0.5, y: 0.5}
--- !u!114 &1332239155
MonoBehaviour:
  m_ObjectHideFlags: 0
  m_CorrespondingSourceObject: {fileID: 0}
  m_PrefabInstance: {fileID: 0}
  m_PrefabAsset: {fileID: 0}
  m_GameObject: {fileID: 1332239153}
  m_Enabled: 1
  m_EditorHideFlags: 0
  m_Script: {fileID: 11500000, guid: 4e29b1a8efbd4b44bb3f3716e73f07ff, type: 3}
  m_Name:
  m_EditorClassIdentifier:
  m_Navigation:
    m_Mode: 3
    m_WrapAround: 0
    m_SelectOnUp: {fileID: 0}
    m_SelectOnDown: {fileID: 0}
    m_SelectOnLeft: {fileID: 0}
    m_SelectOnRight: {fileID: 0}
  m_Transition: 1
  m_Colors:
    m_NormalColor: {r: 1, g: 1, b: 1, a: 1}
    m_HighlightedColor: {r: 0.9607843, g: 0.9607843, b: 0.9607843, a: 1}
    m_PressedColor: {r: 0.78431374, g: 0.78431374, b: 0.78431374, a: 1}
    m_SelectedColor: {r: 0.9607843, g: 0.9607843, b: 0.9607843, a: 1}
    m_DisabledColor: {r: 0.78431374, g: 0.78431374, b: 0.78431374, a: 0.5019608}
    m_ColorMultiplier: 1
    m_FadeDuration: 0.1
  m_SpriteState:
    m_HighlightedSprite: {fileID: 0}
    m_PressedSprite: {fileID: 0}
    m_SelectedSprite: {fileID: 0}
    m_DisabledSprite: {fileID: 0}
  m_AnimationTriggers:
    m_NormalTrigger: Normal
    m_HighlightedTrigger: Highlighted
    m_PressedTrigger: Pressed
    m_SelectedTrigger: Selected
    m_DisabledTrigger: Disabled
  m_Interactable: 1
  m_TargetGraphic: {fileID: 1332239156}
  m_OnClick:
    m_PersistentCalls:
      m_Calls:
      - m_Target: {fileID: 293984670}
        m_TargetAssemblyTypeName: AppManager, Assembly-CSharp
        m_MethodName: HangupButton_Click
        m_Mode: 1
        m_Arguments:
          m_ObjectArgument: {fileID: 0}
          m_ObjectArgumentAssemblyTypeName: UnityEngine.Object, UnityEngine
          m_IntArgument: 0
          m_FloatArgument: 0
          m_StringArgument:
          m_BoolArgument: 0
        m_CallState: 2
--- !u!114 &1332239156
MonoBehaviour:
  m_ObjectHideFlags: 0
  m_CorrespondingSourceObject: {fileID: 0}
  m_PrefabInstance: {fileID: 0}
  m_PrefabAsset: {fileID: 0}
  m_GameObject: {fileID: 1332239153}
  m_Enabled: 1
  m_EditorHideFlags: 0
  m_Script: {fileID: 11500000, guid: fe87c0e1cc204ed48ad3b37840f39efc, type: 3}
  m_Name:
  m_EditorClassIdentifier:
  m_Material: {fileID: 0}
  m_Color: {r: 1, g: 1, b: 1, a: 1}
  m_RaycastTarget: 1
  m_RaycastPadding: {x: 0, y: 0, z: 0, w: 0}
  m_Maskable: 1
  m_OnCullStateChanged:
    m_PersistentCalls:
      m_Calls: []
  m_Sprite: {fileID: 10905, guid: 0000000000000000f000000000000000, type: 0}
  m_Type: 1
  m_PreserveAspect: 0
  m_FillCenter: 1
  m_FillMethod: 4
  m_FillAmount: 1
  m_FillClockwise: 1
  m_FillOrigin: 0
  m_UseSpriteMesh: 0
  m_PixelsPerUnitMultiplier: 1
--- !u!222 &1332239157
CanvasRenderer:
  m_ObjectHideFlags: 0
  m_CorrespondingSourceObject: {fileID: 0}
  m_PrefabInstance: {fileID: 0}
  m_PrefabAsset: {fileID: 0}
  m_GameObject: {fileID: 1332239153}
  m_CullTransparentMesh: 1
--- !u!1 &1529611526
GameObject:
  m_ObjectHideFlags: 0
  m_CorrespondingSourceObject: {fileID: 0}
  m_PrefabInstance: {fileID: 0}
  m_PrefabAsset: {fileID: 0}
  serializedVersion: 6
  m_Component:
  - component: {fileID: 1529611527}
  - component: {fileID: 1529611529}
  - component: {fileID: 1529611528}
  m_Layer: 5
  m_Name: Status
  m_TagString: Untagged
  m_Icon: {fileID: 0}
  m_NavMeshLayer: 0
  m_StaticEditorFlags: 0
  m_IsActive: 1
--- !u!224 &1529611527
RectTransform:
  m_ObjectHideFlags: 0
  m_CorrespondingSourceObject: {fileID: 0}
  m_PrefabInstance: {fileID: 0}
  m_PrefabAsset: {fileID: 0}
  m_GameObject: {fileID: 1529611526}
  m_LocalRotation: {x: 0, y: 0, z: 0, w: 1}
  m_LocalPosition: {x: 0, y: 0, z: 0}
  m_LocalScale: {x: 1, y: 1, z: 1}
  m_ConstrainProportionsScale: 0
  m_Children: []
  m_Father: {fileID: 1843906927}
  m_RootOrder: 4
  m_LocalEulerAnglesHint: {x: 0, y: 0, z: 0}
  m_AnchorMin: {x: 0.5, y: 0.5}
  m_AnchorMax: {x: 0.5, y: 0.5}
  m_AnchoredPosition: {x: -2.525, y: -344.75}
  m_SizeDelta: {x: 200, y: 50}
  m_Pivot: {x: 0.5, y: 0.5}
--- !u!114 &1529611528
MonoBehaviour:
  m_ObjectHideFlags: 0
  m_CorrespondingSourceObject: {fileID: 0}
  m_PrefabInstance: {fileID: 0}
  m_PrefabAsset: {fileID: 0}
  m_GameObject: {fileID: 1529611526}
  m_Enabled: 1
  m_EditorHideFlags: 0
  m_Script: {fileID: 11500000, guid: f4688fdb7df04437aeb418b961361dc5, type: 3}
  m_Name:
  m_EditorClassIdentifier:
  m_Material: {fileID: 0}
  m_Color: {r: 1, g: 1, b: 1, a: 1}
  m_RaycastTarget: 1
  m_RaycastPadding: {x: 0, y: 0, z: 0, w: 0}
  m_Maskable: 1
  m_OnCullStateChanged:
    m_PersistentCalls:
      m_Calls: []
  m_text: Disconnected
  m_isRightToLeft: 0
  m_fontAsset: {fileID: 11400000, guid: 8f586378b4e144a9851e7b34d9b748ee, type: 2}
  m_sharedMaterial: {fileID: 2180264, guid: 8f586378b4e144a9851e7b34d9b748ee, type: 2}
  m_fontSharedMaterials: []
  m_fontMaterial: {fileID: 0}
  m_fontMaterials: []
  m_fontColor32:
    serializedVersion: 2
    rgba: 4294967295
  m_fontColor: {r: 1, g: 1, b: 1, a: 1}
  m_enableVertexGradient: 0
  m_colorMode: 3
  m_fontColorGradient:
    topLeft: {r: 1, g: 1, b: 1, a: 1}
    topRight: {r: 1, g: 1, b: 1, a: 1}
    bottomLeft: {r: 1, g: 1, b: 1, a: 1}
    bottomRight: {r: 1, g: 1, b: 1, a: 1}
  m_fontColorGradientPreset: {fileID: 0}
  m_spriteAsset: {fileID: 0}
  m_tintAllSprites: 0
  m_StyleSheet: {fileID: 0}
  m_TextStyleHashCode: -1183493901
  m_overrideHtmlColors: 0
  m_faceColor:
    serializedVersion: 2
    rgba: 4294967295
  m_fontSize: 30
  m_fontSizeBase: 30
  m_fontWeight: 400
  m_enableAutoSizing: 0
  m_fontSizeMin: 18
  m_fontSizeMax: 72
  m_fontStyle: 0
  m_HorizontalAlignment: 1
  m_VerticalAlignment: 256
  m_textAlignment: 65535
  m_characterSpacing: 0
  m_wordSpacing: 0
  m_lineSpacing: 0
  m_lineSpacingMax: 0
  m_paragraphSpacing: 0
  m_charWidthMaxAdj: 0
  m_enableWordWrapping: 1
  m_wordWrappingRatios: 0.4
  m_overflowMode: 0
  m_linkedTextComponent: {fileID: 0}
  parentLinkedComponent: {fileID: 0}
  m_enableKerning: 1
  m_enableExtraPadding: 0
  checkPaddingRequired: 0
  m_isRichText: 1
  m_parseCtrlCharacters: 1
  m_isOrthographic: 1
  m_isCullingEnabled: 0
  m_horizontalMapping: 0
  m_verticalMapping: 0
  m_uvLineOffset: 0
  m_geometrySortingOrder: 0
  m_IsTextObjectScaleStatic: 0
  m_VertexBufferAutoSizeReduction: 0
  m_useMaxVisibleDescender: 1
  m_pageToDisplay: 1
  m_margin: {x: 0, y: 0, z: -25.861023, w: 0}
  m_isUsingLegacyAnimationComponent: 0
  m_isVolumetricText: 0
  m_hasFontAssetChanged: 0
  m_baseMaterial: {fileID: 0}
  m_maskOffset: {x: 0, y: 0, z: 0, w: 0}
--- !u!222 &1529611529
CanvasRenderer:
  m_ObjectHideFlags: 0
  m_CorrespondingSourceObject: {fileID: 0}
  m_PrefabInstance: {fileID: 0}
  m_PrefabAsset: {fileID: 0}
  m_GameObject: {fileID: 1529611526}
  m_CullTransparentMesh: 1
--- !u!1 &1676708952
GameObject:
  m_ObjectHideFlags: 0
  m_CorrespondingSourceObject: {fileID: 0}
  m_PrefabInstance: {fileID: 0}
  m_PrefabAsset: {fileID: 0}
  serializedVersion: 6
  m_Component:
  - component: {fileID: 1676708953}
  - component: {fileID: 1676708955}
  - component: {fileID: 1676708954}
  m_Layer: 5
  m_Name: Text
  m_TagString: Untagged
  m_Icon: {fileID: 0}
  m_NavMeshLayer: 0
  m_StaticEditorFlags: 0
  m_IsActive: 1
--- !u!224 &1676708953
RectTransform:
  m_ObjectHideFlags: 0
  m_CorrespondingSourceObject: {fileID: 0}
  m_PrefabInstance: {fileID: 0}
  m_PrefabAsset: {fileID: 0}
  m_GameObject: {fileID: 1676708952}
  m_LocalRotation: {x: 0, y: 0, z: 0, w: 1}
  m_LocalPosition: {x: 0, y: 0, z: 0}
  m_LocalScale: {x: 1, y: 1, z: 1}
  m_ConstrainProportionsScale: 0
  m_Children: []
  m_Father: {fileID: 1787936407}
  m_RootOrder: 1
  m_LocalEulerAnglesHint: {x: 0, y: 0, z: 0}
  m_AnchorMin: {x: 0, y: 0}
  m_AnchorMax: {x: 1, y: 1}
  m_AnchoredPosition: {x: 0, y: 0}
  m_SizeDelta: {x: 0, y: 0}
  m_Pivot: {x: 0.5, y: 0.5}
--- !u!114 &1676708954
MonoBehaviour:
  m_ObjectHideFlags: 0
  m_CorrespondingSourceObject: {fileID: 0}
  m_PrefabInstance: {fileID: 0}
  m_PrefabAsset: {fileID: 0}
  m_GameObject: {fileID: 1676708952}
  m_Enabled: 1
  m_EditorHideFlags: 0
  m_Script: {fileID: 11500000, guid: f4688fdb7df04437aeb418b961361dc5, type: 3}
  m_Name:
  m_EditorClassIdentifier:
  m_Material: {fileID: 0}
  m_Color: {r: 1, g: 1, b: 1, a: 1}
  m_RaycastTarget: 1
  m_RaycastPadding: {x: 0, y: 0, z: 0, w: 0}
  m_Maskable: 1
  m_OnCullStateChanged:
    m_PersistentCalls:
      m_Calls: []
  m_text: "\u200B"
  m_isRightToLeft: 0
  m_fontAsset: {fileID: 11400000, guid: 8f586378b4e144a9851e7b34d9b748ee, type: 2}
  m_sharedMaterial: {fileID: 2180264, guid: 8f586378b4e144a9851e7b34d9b748ee, type: 2}
  m_fontSharedMaterials: []
  m_fontMaterial: {fileID: 0}
  m_fontMaterials: []
  m_fontColor32:
    serializedVersion: 2
    rgba: 4281479730
  m_fontColor: {r: 0.19607843, g: 0.19607843, b: 0.19607843, a: 1}
  m_enableVertexGradient: 0
  m_colorMode: 3
  m_fontColorGradient:
    topLeft: {r: 1, g: 1, b: 1, a: 1}
    topRight: {r: 1, g: 1, b: 1, a: 1}
    bottomLeft: {r: 1, g: 1, b: 1, a: 1}
    bottomRight: {r: 1, g: 1, b: 1, a: 1}
  m_fontColorGradientPreset: {fileID: 0}
  m_spriteAsset: {fileID: 0}
  m_tintAllSprites: 0
  m_StyleSheet: {fileID: 0}
  m_TextStyleHashCode: -1183493901
  m_overrideHtmlColors: 0
  m_faceColor:
    serializedVersion: 2
    rgba: 4294967295
  m_fontSize: 14
  m_fontSizeBase: 14
  m_fontWeight: 400
  m_enableAutoSizing: 0
  m_fontSizeMin: 18
  m_fontSizeMax: 72
  m_fontStyle: 0
  m_HorizontalAlignment: 1
  m_VerticalAlignment: 256
  m_textAlignment: 65535
  m_characterSpacing: 0
  m_wordSpacing: 0
  m_lineSpacing: 0
  m_lineSpacingMax: 0
  m_paragraphSpacing: 0
  m_charWidthMaxAdj: 0
  m_enableWordWrapping: 0
  m_wordWrappingRatios: 0.4
  m_overflowMode: 0
  m_linkedTextComponent: {fileID: 0}
  parentLinkedComponent: {fileID: 0}
  m_enableKerning: 1
  m_enableExtraPadding: 1
  checkPaddingRequired: 0
  m_isRichText: 1
  m_parseCtrlCharacters: 1
  m_isOrthographic: 1
  m_isCullingEnabled: 0
  m_horizontalMapping: 0
  m_verticalMapping: 0
  m_uvLineOffset: 0
  m_geometrySortingOrder: 0
  m_IsTextObjectScaleStatic: 0
  m_VertexBufferAutoSizeReduction: 0
  m_useMaxVisibleDescender: 1
  m_pageToDisplay: 1
  m_margin: {x: 0, y: 0, z: 0, w: 0}
  m_isUsingLegacyAnimationComponent: 0
  m_isVolumetricText: 0
  m_hasFontAssetChanged: 0
  m_baseMaterial: {fileID: 0}
  m_maskOffset: {x: 0, y: 0, z: 0, w: 0}
--- !u!222 &1676708955
CanvasRenderer:
  m_ObjectHideFlags: 0
  m_CorrespondingSourceObject: {fileID: 0}
  m_PrefabInstance: {fileID: 0}
  m_PrefabAsset: {fileID: 0}
  m_GameObject: {fileID: 1676708952}
  m_CullTransparentMesh: 1
--- !u!1 &1732033233
GameObject:
  m_ObjectHideFlags: 0
  m_CorrespondingSourceObject: {fileID: 0}
  m_PrefabInstance: {fileID: 0}
  m_PrefabAsset: {fileID: 0}
  serializedVersion: 6
  m_Component:
  - component: {fileID: 1732033234}
  - component: {fileID: 1732033237}
  - component: {fileID: 1732033236}
  - component: {fileID: 1732033235}
  m_Layer: 5
  m_Name: Start Call Button
  m_TagString: Untagged
  m_Icon: {fileID: 0}
  m_NavMeshLayer: 0
  m_StaticEditorFlags: 0
  m_IsActive: 1
--- !u!224 &1732033234
RectTransform:
  m_ObjectHideFlags: 0
  m_CorrespondingSourceObject: {fileID: 0}
  m_PrefabInstance: {fileID: 0}
  m_PrefabAsset: {fileID: 0}
  m_GameObject: {fileID: 1732033233}
  m_LocalRotation: {x: 0, y: 0, z: 0, w: 1}
  m_LocalPosition: {x: 0, y: 0, z: 0}
  m_LocalScale: {x: 1, y: 1, z: 1}
  m_ConstrainProportionsScale: 0
  m_Children:
  - {fileID: 438770861}
  m_Father: {fileID: 1843906927}
  m_RootOrder: 1
  m_LocalEulerAnglesHint: {x: 0, y: 0, z: 0}
  m_AnchorMin: {x: 0.5, y: 0.5}
  m_AnchorMax: {x: 0.5, y: 0.5}
  m_AnchoredPosition: {x: -525.52, y: -329}
  m_SizeDelta: {x: 212.1357, y: 53.698}
  m_Pivot: {x: 0.5, y: 0.5}
--- !u!114 &1732033235
MonoBehaviour:
  m_ObjectHideFlags: 0
  m_CorrespondingSourceObject: {fileID: 0}
  m_PrefabInstance: {fileID: 0}
  m_PrefabAsset: {fileID: 0}
  m_GameObject: {fileID: 1732033233}
  m_Enabled: 1
  m_EditorHideFlags: 0
  m_Script: {fileID: 11500000, guid: 4e29b1a8efbd4b44bb3f3716e73f07ff, type: 3}
  m_Name:
  m_EditorClassIdentifier:
  m_Navigation:
    m_Mode: 3
    m_WrapAround: 0
    m_SelectOnUp: {fileID: 0}
    m_SelectOnDown: {fileID: 0}
    m_SelectOnLeft: {fileID: 0}
    m_SelectOnRight: {fileID: 0}
  m_Transition: 1
  m_Colors:
    m_NormalColor: {r: 1, g: 1, b: 1, a: 1}
    m_HighlightedColor: {r: 0.9607843, g: 0.9607843, b: 0.9607843, a: 1}
    m_PressedColor: {r: 0.78431374, g: 0.78431374, b: 0.78431374, a: 1}
    m_SelectedColor: {r: 0.9607843, g: 0.9607843, b: 0.9607843, a: 1}
    m_DisabledColor: {r: 0.78431374, g: 0.78431374, b: 0.78431374, a: 0.5019608}
    m_ColorMultiplier: 1
    m_FadeDuration: 0.1
  m_SpriteState:
    m_HighlightedSprite: {fileID: 0}
    m_PressedSprite: {fileID: 0}
    m_SelectedSprite: {fileID: 0}
    m_DisabledSprite: {fileID: 0}
  m_AnimationTriggers:
    m_NormalTrigger: Normal
    m_HighlightedTrigger: Highlighted
    m_PressedTrigger: Pressed
    m_SelectedTrigger: Selected
    m_DisabledTrigger: Disabled
  m_Interactable: 1
  m_TargetGraphic: {fileID: 1732033236}
  m_OnClick:
    m_PersistentCalls:
      m_Calls:
      - m_Target: {fileID: 293984670}
        m_TargetAssemblyTypeName: CallClientHost, Assembly-CSharp
        m_MethodName: CallButton_Click
        m_Mode: 1
        m_Arguments:
          m_ObjectArgument: {fileID: 0}
          m_ObjectArgumentAssemblyTypeName: UnityEngine.Object, UnityEngine
          m_IntArgument: 0
          m_FloatArgument: 0
          m_StringArgument:
          m_BoolArgument: 0
        m_CallState: 2
--- !u!114 &1732033236
MonoBehaviour:
  m_ObjectHideFlags: 0
  m_CorrespondingSourceObject: {fileID: 0}
  m_PrefabInstance: {fileID: 0}
  m_PrefabAsset: {fileID: 0}
  m_GameObject: {fileID: 1732033233}
  m_Enabled: 1
  m_EditorHideFlags: 0
  m_Script: {fileID: 11500000, guid: fe87c0e1cc204ed48ad3b37840f39efc, type: 3}
  m_Name:
  m_EditorClassIdentifier:
  m_Material: {fileID: 0}
  m_Color: {r: 1, g: 1, b: 1, a: 1}
  m_RaycastTarget: 1
  m_RaycastPadding: {x: 0, y: 0, z: 0, w: 0}
  m_Maskable: 1
  m_OnCullStateChanged:
    m_PersistentCalls:
      m_Calls: []
  m_Sprite: {fileID: 10905, guid: 0000000000000000f000000000000000, type: 0}
  m_Type: 1
  m_PreserveAspect: 0
  m_FillCenter: 1
  m_FillMethod: 4
  m_FillAmount: 1
  m_FillClockwise: 1
  m_FillOrigin: 0
  m_UseSpriteMesh: 0
  m_PixelsPerUnitMultiplier: 1
--- !u!222 &1732033237
CanvasRenderer:
  m_ObjectHideFlags: 0
  m_CorrespondingSourceObject: {fileID: 0}
  m_PrefabInstance: {fileID: 0}
  m_PrefabAsset: {fileID: 0}
  m_GameObject: {fileID: 1732033233}
  m_CullTransparentMesh: 1
--- !u!1 &1787936406
GameObject:
  m_ObjectHideFlags: 0
  m_CorrespondingSourceObject: {fileID: 0}
  m_PrefabInstance: {fileID: 0}
  m_PrefabAsset: {fileID: 0}
  serializedVersion: 6
  m_Component:
  - component: {fileID: 1787936407}
  - component: {fileID: 1787936408}
  m_Layer: 5
  m_Name: Text Area
  m_TagString: Untagged
  m_Icon: {fileID: 0}
  m_NavMeshLayer: 0
  m_StaticEditorFlags: 0
  m_IsActive: 1
--- !u!224 &1787936407
RectTransform:
  m_ObjectHideFlags: 0
  m_CorrespondingSourceObject: {fileID: 0}
  m_PrefabInstance: {fileID: 0}
  m_PrefabAsset: {fileID: 0}
  m_GameObject: {fileID: 1787936406}
  m_LocalRotation: {x: 0, y: 0, z: 0, w: 1}
  m_LocalPosition: {x: 0, y: 0, z: 0}
  m_LocalScale: {x: 1, y: 1, z: 1}
  m_ConstrainProportionsScale: 0
  m_Children:
  - {fileID: 857336306}
  - {fileID: 1676708953}
  m_Father: {fileID: 963546687}
  m_RootOrder: 0
  m_LocalEulerAnglesHint: {x: 0, y: 0, z: 0}
  m_AnchorMin: {x: 0, y: 0}
  m_AnchorMax: {x: 1, y: 1}
  m_AnchoredPosition: {x: 0, y: -0.4999962}
  m_SizeDelta: {x: -20, y: -13}
  m_Pivot: {x: 0.5, y: 0.5}
--- !u!114 &1787936408
MonoBehaviour:
  m_ObjectHideFlags: 0
  m_CorrespondingSourceObject: {fileID: 0}
  m_PrefabInstance: {fileID: 0}
  m_PrefabAsset: {fileID: 0}
  m_GameObject: {fileID: 1787936406}
  m_Enabled: 1
  m_EditorHideFlags: 0
  m_Script: {fileID: 11500000, guid: 3312d7739989d2b4e91e6319e9a96d76, type: 3}
  m_Name:
  m_EditorClassIdentifier:
  m_Padding: {x: -8, y: -5, z: -8, w: -5}
  m_Softness: {x: 0, y: 0}
--- !u!1 &1843906923
GameObject:
  m_ObjectHideFlags: 0
  m_CorrespondingSourceObject: {fileID: 0}
  m_PrefabInstance: {fileID: 0}
  m_PrefabAsset: {fileID: 0}
  serializedVersion: 6
  m_Component:
  - component: {fileID: 1843906927}
  - component: {fileID: 1843906926}
  - component: {fileID: 1843906925}
  - component: {fileID: 1843906924}
  m_Layer: 5
  m_Name: Canvas
  m_TagString: Untagged
  m_Icon: {fileID: 0}
  m_NavMeshLayer: 0
  m_StaticEditorFlags: 0
  m_IsActive: 1
--- !u!114 &1843906924
MonoBehaviour:
  m_ObjectHideFlags: 0
  m_CorrespondingSourceObject: {fileID: 0}
  m_PrefabInstance: {fileID: 0}
  m_PrefabAsset: {fileID: 0}
  m_GameObject: {fileID: 1843906923}
  m_Enabled: 1
  m_EditorHideFlags: 0
  m_Script: {fileID: 11500000, guid: dc42784cf147c0c48a680349fa168899, type: 3}
  m_Name:
  m_EditorClassIdentifier:
  m_IgnoreReversedGraphics: 1
  m_BlockingObjects: 0
  m_BlockingMask:
    serializedVersion: 2
    m_Bits: 4294967295
--- !u!114 &1843906925
MonoBehaviour:
  m_ObjectHideFlags: 0
  m_CorrespondingSourceObject: {fileID: 0}
  m_PrefabInstance: {fileID: 0}
  m_PrefabAsset: {fileID: 0}
  m_GameObject: {fileID: 1843906923}
  m_Enabled: 1
  m_EditorHideFlags: 0
  m_Script: {fileID: 11500000, guid: 0cd44c1031e13a943bb63640046fad76, type: 3}
  m_Name:
  m_EditorClassIdentifier:
  m_UiScaleMode: 0
  m_ReferencePixelsPerUnit: 100
  m_ScaleFactor: 1
  m_ReferenceResolution: {x: 800, y: 600}
  m_ScreenMatchMode: 0
  m_MatchWidthOrHeight: 0
  m_PhysicalUnit: 3
  m_FallbackScreenDPI: 96
  m_DefaultSpriteDPI: 96
  m_DynamicPixelsPerUnit: 1
  m_PresetInfoIsWorld: 0
--- !u!223 &1843906926
Canvas:
  m_ObjectHideFlags: 0
  m_CorrespondingSourceObject: {fileID: 0}
  m_PrefabInstance: {fileID: 0}
  m_PrefabAsset: {fileID: 0}
  m_GameObject: {fileID: 1843906923}
  m_Enabled: 1
  serializedVersion: 3
  m_RenderMode: 0
  m_Camera: {fileID: 0}
  m_PlaneDistance: 100
  m_PixelPerfect: 0
  m_ReceivesEvents: 1
  m_OverrideSorting: 0
  m_OverridePixelPerfect: 0
  m_SortingBucketNormalizedSize: 0
  m_AdditionalShaderChannelsFlag: 25
  m_SortingLayerID: 0
  m_SortingOrder: 0
  m_TargetDisplay: 0
--- !u!224 &1843906927
RectTransform:
  m_ObjectHideFlags: 0
  m_CorrespondingSourceObject: {fileID: 0}
  m_PrefabInstance: {fileID: 0}
  m_PrefabAsset: {fileID: 0}
  m_GameObject: {fileID: 1843906923}
  m_LocalRotation: {x: 0, y: 0, z: 0, w: 1}
  m_LocalPosition: {x: 0, y: 0, z: 0}
  m_LocalScale: {x: 0, y: 0, z: 0}
  m_ConstrainProportionsScale: 0
  m_Children:
  - {fileID: 963546687}
  - {fileID: 1732033234}
  - {fileID: 1332239154}
  - {fileID: 1184525249}
  - {fileID: 1529611527}
  m_Father: {fileID: 0}
  m_RootOrder: 3
  m_LocalEulerAnglesHint: {x: 0, y: 0, z: 0}
  m_AnchorMin: {x: 0, y: 0}
  m_AnchorMax: {x: 0, y: 0}
  m_AnchoredPosition: {x: 0, y: 0}
  m_SizeDelta: {x: 0, y: 0}
  m_Pivot: {x: 0, y: 0}
--- !u!1 &1917486033
GameObject:
  m_ObjectHideFlags: 0
  m_CorrespondingSourceObject: {fileID: 0}
  m_PrefabInstance: {fileID: 0}
  m_PrefabAsset: {fileID: 0}
  serializedVersion: 6
  m_Component:
  - component: {fileID: 1917486034}
  - component: {fileID: 1917486036}
  - component: {fileID: 1917486035}
  m_Layer: 5
  m_Name: Text (TMP)
  m_TagString: Untagged
  m_Icon: {fileID: 0}
  m_NavMeshLayer: 0
  m_StaticEditorFlags: 0
  m_IsActive: 1
--- !u!224 &1917486034
RectTransform:
  m_ObjectHideFlags: 0
  m_CorrespondingSourceObject: {fileID: 0}
  m_PrefabInstance: {fileID: 0}
  m_PrefabAsset: {fileID: 0}
  m_GameObject: {fileID: 1917486033}
  m_LocalRotation: {x: 0, y: 0, z: 0, w: 1}
  m_LocalPosition: {x: 0, y: 0, z: 0}
  m_LocalScale: {x: 1, y: 1, z: 1}
  m_ConstrainProportionsScale: 0
  m_Children: []
  m_Father: {fileID: 1332239154}
  m_RootOrder: 0
  m_LocalEulerAnglesHint: {x: 0, y: 0, z: 0}
  m_AnchorMin: {x: 0, y: 0}
  m_AnchorMax: {x: 1, y: 1}
  m_AnchoredPosition: {x: 0, y: 0}
  m_SizeDelta: {x: 0, y: 0}
  m_Pivot: {x: 0.5, y: 0.5}
--- !u!114 &1917486035
MonoBehaviour:
  m_ObjectHideFlags: 0
  m_CorrespondingSourceObject: {fileID: 0}
  m_PrefabInstance: {fileID: 0}
  m_PrefabAsset: {fileID: 0}
  m_GameObject: {fileID: 1917486033}
  m_Enabled: 1
  m_EditorHideFlags: 0
  m_Script: {fileID: 11500000, guid: f4688fdb7df04437aeb418b961361dc5, type: 3}
  m_Name:
  m_EditorClassIdentifier:
  m_Material: {fileID: 0}
  m_Color: {r: 1, g: 1, b: 1, a: 1}
  m_RaycastTarget: 1
  m_RaycastPadding: {x: 0, y: 0, z: 0, w: 0}
  m_Maskable: 1
  m_OnCullStateChanged:
    m_PersistentCalls:
      m_Calls: []
  m_text: Hang Up
  m_isRightToLeft: 0
  m_fontAsset: {fileID: 11400000, guid: 8f586378b4e144a9851e7b34d9b748ee, type: 2}
  m_sharedMaterial: {fileID: 2180264, guid: 8f586378b4e144a9851e7b34d9b748ee, type: 2}
  m_fontSharedMaterials: []
  m_fontMaterial: {fileID: 0}
  m_fontMaterials: []
  m_fontColor32:
    serializedVersion: 2
    rgba: 4281479730
  m_fontColor: {r: 0.19607843, g: 0.19607843, b: 0.19607843, a: 1}
  m_enableVertexGradient: 0
  m_colorMode: 3
  m_fontColorGradient:
    topLeft: {r: 1, g: 1, b: 1, a: 1}
    topRight: {r: 1, g: 1, b: 1, a: 1}
    bottomLeft: {r: 1, g: 1, b: 1, a: 1}
    bottomRight: {r: 1, g: 1, b: 1, a: 1}
  m_fontColorGradientPreset: {fileID: 0}
  m_spriteAsset: {fileID: 0}
  m_tintAllSprites: 0
  m_StyleSheet: {fileID: 0}
  m_TextStyleHashCode: -1183493901
  m_overrideHtmlColors: 0
  m_faceColor:
    serializedVersion: 2
    rgba: 4294967295
  m_fontSize: 24
  m_fontSizeBase: 24
  m_fontWeight: 400
  m_enableAutoSizing: 0
  m_fontSizeMin: 18
  m_fontSizeMax: 72
  m_fontStyle: 0
  m_HorizontalAlignment: 2
  m_VerticalAlignment: 512
  m_textAlignment: 65535
  m_characterSpacing: 0
  m_wordSpacing: 0
  m_lineSpacing: 0
  m_lineSpacingMax: 0
  m_paragraphSpacing: 0
  m_charWidthMaxAdj: 0
  m_enableWordWrapping: 1
  m_wordWrappingRatios: 0.4
  m_overflowMode: 0
  m_linkedTextComponent: {fileID: 0}
  parentLinkedComponent: {fileID: 0}
  m_enableKerning: 1
  m_enableExtraPadding: 0
  checkPaddingRequired: 0
  m_isRichText: 1
  m_parseCtrlCharacters: 1
  m_isOrthographic: 1
  m_isCullingEnabled: 0
  m_horizontalMapping: 0
  m_verticalMapping: 0
  m_uvLineOffset: 0
  m_geometrySortingOrder: 0
  m_IsTextObjectScaleStatic: 0
  m_VertexBufferAutoSizeReduction: 0
  m_useMaxVisibleDescender: 1
  m_pageToDisplay: 1
  m_margin: {x: 0, y: 0, z: 0, w: 0}
  m_isUsingLegacyAnimationComponent: 0
  m_isVolumetricText: 0
  m_hasFontAssetChanged: 0
  m_baseMaterial: {fileID: 0}
  m_maskOffset: {x: 0, y: 0, z: 0, w: 0}
--- !u!222 &1917486036
CanvasRenderer:
  m_ObjectHideFlags: 0
  m_CorrespondingSourceObject: {fileID: 0}
  m_PrefabInstance: {fileID: 0}
  m_PrefabAsset: {fileID: 0}
  m_GameObject: {fileID: 1917486033}
  m_CullTransparentMesh: 1
建立名為 AppManager.cs 的指令碼,並將其連結至 Unity 編輯器中的 AppManager 物件。 使用下列實作取代內容:
using Azure.Communication.Calling.UnityClient;
using System.Runtime.InteropServices.ComTypes;
using System;
using UnityEngine;
using System.Linq;
using UnityEngine.UI;
using TMPro;

/// <summary>
/// A singleton which hosts an Azure Communication calling client. This calling client
/// is then shared across the application.
/// </summary>

public class AppManager : MonoBehaviour
{
    private CallClient callClient;
    private CallAgent callAgent;
    private DeviceManager deviceManager;
    private CommunicationCall call;
    private LocalOutgoingAudioStream micStream;
    private LocalVideoStream cameraStream;

    public string CalleeIdentity { get; set; }

    public TMP_Text callStatus;

    public static AppManager Instance;

    private void Awake()
    {
        // start of new code
        if (Instance != null)
        {
            Destroy(gameObject);
            return;
        }
        // end of new code

        callClient = new CallClient();

        Instance = this;
        DontDestroyOnLoad(gameObject);

        InitCallAgentAndDeviceManagerAsync();
    }

    public async void CallButton_Click()
    {
        // Start a call
    }

    public async void HangupButton_Click()
    {
        // Hang up a call
    }

#region API event handlers
    private async void OnIncomingCallAsync(object sender, IncomingCallReceivedEventArgs args)
    {
        // Handle incoming call event
    }

    private async void OnStateChangedAsync(object sender, Azure.Communication.Calling.UnityClient.PropertyChangedEventArgs args)
    {
        // Handle connected and disconnected state change of a call
    }

    private async void OnRemoteParticipantsUpdatedAsync(object sender, ParticipantsUpdatedEventArgs args)
    {
        // Handle remote participant arrival or departure events and subscribe to individual participant's VideoStreamStateChanged event
    }

    private void OnVideoStreamStateChanged(object sender, VideoStreamStateChangedEventArgs e)
    {
        // Handle incoming or outgoing video stream change events
    }

    private async void OnIncomingVideoStreamStateChangedAsync(IncomingVideoStream incomingVideoStream)
    {
        // Handle incoming IncomingVideoStreamStateChanged event and process individual VideoStreamState
    }
#endregion

    //Used For Updating the UI
    private void Update()
    {
        if (call != null)
        {
            switch (call.State)
            {
                case CallState.Connected:
                    if (callStatus.text != "Connected")
                        callStatus.text = "Connected";
                    break;
                case CallState.Disconnected:
                    if (callStatus.text != "Disconnected")
                        callStatus.text = "Disconnected";
                    break;
            }
        }
    }
}
在名為 AppManager 的 GameObject 中,將新建立的指令碼拖曳到其指令碼元件中。 將 [狀態] 文字物件拖曳到 [通話狀態] 文字欄位中,以啟用通話狀態的 UI 更新。 此 SDK 會透過 URI 提供視訊,但目前,Unity 的視訊播放機可能不支援 URI 播放。
物件模型
下方列出類別和介面的表格會處理 Azure 通訊服務通話 SDK 的一些主要功能:
| 名稱 | 描述 |
|---|---|
CallClient |
CallClient 是通話 SDK 的主要進入點。 |
CallAgent |
CallAgent 可用來開始和管理通話。 |
Call |
CommunicationCall 可用來管理進行中的通話。 |
CallTokenCredential |
CallTokenCredential 可用來作為權杖認證以將 CallAgent 具現化。 |
CallIdentifier |
CallIdentifier 可用來代表使用者的身分識別,其可以是下列其中一個選項:UserCallIdentifier、PhoneNumberCallIdentifier 等。 |
驗證用戶端
透過使用者存取權杖來將 CallAgent 執行個體初始化,此存取權杖可讓我們撥打和接聽通話,並選擇性地取得 DeviceManager 執行個體來查詢用戶端裝置設定。
在程式碼中,將 <AUTHENTICATION_TOKEN> 取代為使用者存取權杖。 如果您還沒有可用的權杖,請參閱使用者存取權杖文件。
新增 InitCallAgentAndDeviceManagerAsync 函式,以啟動 SDK。 您可以自訂此協助程式,以符合應用程式的需求。
private async void InitCallAgentAndDeviceManagerAsync()
{

    deviceManager = await callClient.GetDeviceManager();

    var tokenCredential = new CallTokenCredential(<AUTHENTICATION_TOKEN>);

    var callAgentOptions = new CallAgentOptions()
    {
        DisplayName = $"{Environment.MachineName}/{Environment.UserName}",
    };

    callAgent = await callClient.CreateCallAgent(tokenCredential, callAgentOptions);
    callAgent.IncomingCallReceived += OnIncomingCallAsync;
}
開始視訊通話
取得 StartCallOptions 物件之後,即可使用 CallAgent 來起始 Azure 通訊服務通話:
public async void CallButton_Click()
{
    var startCallOptions = new StartCallOptions();
    startCallOptions = new StartCallOptions()
    {
        OutgoingVideoOptions = new OutgoingVideoOptions() { Streams = new OutgoingVideoStream[] { cameraStream } }
    };

    var callee = new UserCallIdentifier(CalleeIdentity);

    call = await callAgent.StartCallAsync(new CallIdentifier[] { callee }, startCallOptions);
    // Set up handler for remote participant updated events, such as VideoStreamStateChanged event
    call.RemoteParticipantsUpdated += OnRemoteParticipantsUpdatedAsync;
    // Set up handler for call StateChanged event
    call.StateChanged += OnStateChangedAsync;
}
處理遠端參與者和遠端傳入的視訊
傳入的視訊會與特定遠端參與者相關聯,因此,RemoteParticipantsUpdated 是重要的事件,可讓您保持通知並取得對持續變更之參與者的參考。
private void OnRemoteParticipantsUpdatedAsync(object sender, ParticipantsUpdatedEventArgs args)
{
    foreach (var participant in args.RemovedParticipants)
    {
        foreach (var incomingVideoStream in participant.IncomingVideoStreams)
        {
            var remoteVideoStream = incomingVideoStream as RemoteVideoStream;
            if (remoteVideoStream != null)
            {
                remoteVideoStream.Stop();
            }
        }
        // Tear down the event handler on the departing participant
        participant.VideoStreamStateChanged -= OnVideoStreamStateChanged;
    }

    foreach (var participant in args.AddedParticipants)
    {
        // Set up handler for VideoStreamStateChanged of the participant who just joined the call
        participant.VideoStreamStateChanged += OnVideoStreamStateChanged;
    }
}
在通話執行個體上,所有遠端參與者均可透過 RemoteParticipants 集合取得。 當通話連線之後,就能存取通話的遠端參與者,並處理遠端視訊串流。
private void OnVideoStreamStateChanged(object sender, VideoStreamStateChangedEventArgs e)
{
    CallVideoStream callVideoStream = e.Stream;

    switch (callVideoStream.Direction)
    {
        case StreamDirection.Outgoing:
            //OnOutgoingVideoStreamStateChanged(callVideoStream as OutgoingVideoStream);
            break;
        case StreamDirection.Incoming:
            OnIncomingVideoStreamStateChangedAsync(callVideoStream as IncomingVideoStream);
            break;
    }
}
視訊串流將透過內部狀態序列來傳輸。 VideoStreamState.Available 是將視訊串流繫結至 UI 元素 (例如 MediaPlayerElement) 以轉譯視訊串流的慣用狀態,而 VideoStreamState.Stopped 通常是應該完成清除工作 (例如,停止視訊預覽) 的狀態。
private async void OnIncomingVideoStreamStateChangedAsync(IncomingVideoStream incomingVideoStream)
{
    switch (incomingVideoStream.State)
    {
        case VideoStreamState.Available:
            switch (incomingVideoStream.Kind)
            {
                case VideoStreamKind.RemoteIncoming:
                    var remoteVideoStream = incomingVideoStream as RemoteVideoStream;
                    var uri = await remoteVideoStream.StartAsync();
                    break;

                case VideoStreamKind.RawIncoming:
                    break;
            }
            break;

        case VideoStreamState.Started:
            break;

        case VideoStreamState.Stopping:
        case VideoStreamState.Stopped:
            if (incomingVideoStream.Kind == VideoStreamKind.RemoteIncoming)
            {
                var remoteVideoStream = incomingVideoStream as RemoteVideoStream;
                remoteVideoStream.Stop();
            }
            break;

        case VideoStreamState.NotAvailable:
            break;
    }
}
結束通話
按兩下 [Hang up] 按鈕時,結束目前的通話。 將實作新增至 HangupButton_Click 以結束通話,並停止預覽和視訊串流。
public async void HangupButton_Click()
{
    if (call != null)
    {
        try
        {
            await call.HangUpAsync(new HangUpOptions() { ForEveryone = false });
        }
        catch (Exception ex)
        {
        }
    }
}
接聽來電
IncomingCallReceived 事件接收設定於 SDK 啟動程序協助程式 InitCallAgentAndDeviceManagerAsync 中。
callAgent.IncomingCallReceived += OnIncomingCallAsync;
應用程式有機會設定應如何接受來電,例如,視訊和音訊串流類型。
private async void OnIncomingCallAsync(object sender, IncomingCallReceivedEventArgs args)
{
    var incomingCall = args.IncomingCall;

    var acceptCallOptions = new AcceptCallOptions()
    {
        IncomingVideoOptions = new IncomingVideoOptions()
        {
            StreamKind = VideoStreamKind.RemoteIncoming
        }
    };

    call = await incomingCall.AcceptAsync(acceptCallOptions);
    // Set up handler for remote participant updated events, such as VideoStreamStateChanged event
    call.RemoteParticipantsUpdated += OnRemoteParticipantsUpdatedAsync;
    // Set up handler for incoming call StateChanged event
    call.StateChanged += OnStateChangedAsync;
}
監視和回應通話狀態變更事件
當進行中的通話從一種狀態異動為另一種狀態時,就會引發 Call 物件上的 StateChanged 事件。 應用程式有機會反映 UI 上的狀態變更,或插入商務邏輯。
private async void OnStateChangedAsync(object sender, Azure.Communication.Calling.UnityClient.PropertyChangedEventArgs args)
{
    var call = sender as CommunicationCall;

    if (call != null)
    {
        var state = call.State;

        switch (state)
        {
            case CallState.Connected:
                {
                    await call.StartAudioAsync(micStream);
                    break;
                }
            case CallState.Disconnected:
                {
                    call.RemoteParticipantsUpdated -= OnRemoteParticipantsUpdatedAsync;
                    call.StateChanged -= OnStateChangedAsync;

                    call.Dispose();

                    break;
                }
            default: break;
        }
    }
}
執行程式碼
您可以在 Unity 編輯器或使用 Unity 的裝置上建置並執行程式碼。
您可以在文字欄位中提供使用者識別碼並按一下 [Start Call/Join] 按鈕,以進行外撥通話。 呼叫 8:echo123,會將您連線到回應聊天機器人,此功能非常適合入門,以及驗證您的音訊裝置運作正常。
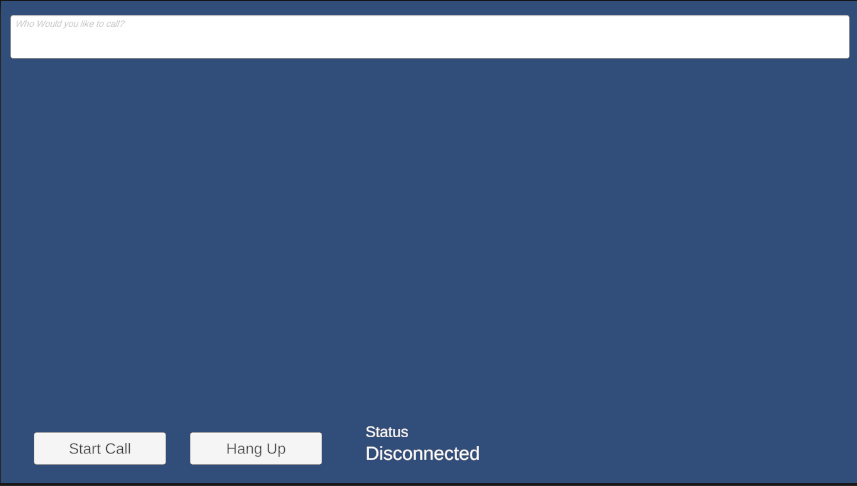
清除資源
如果您想要清除並移除通訊服務訂用帳戶,您可以刪除資源或資源群組。 刪除資源群組也會刪除與其相關聯的任何其他資源。 深入了解如何清除資源。
下一步
如需詳細資訊,請參閱下列文章:
- 查看我們的通話 Hero 範例
- 開始使用 UI 程式庫
- 了解通話 SDK 功能
- 深入了解通話的運作方式