以 .NET 開始使用 Azure 佇列儲存體
概觀
Azure 佇列儲存體可提供應用程式元件之間的雲端傳訊。 設計可調整規模的應用程式時,應用程式元件通常是去耦合的,以便您可以個別調整元件規模。 佇列儲存體可針對應用程式元件,提供非同步傳訊,無論應用程式元件是在雲端、桌面、內部部署伺服器或行動裝置上執行。 佇列儲存體也支援管理非同步工作並建置處理工作流程。
關於本教學課程
本教學課程說明如何使用 Azure 佇列儲存體撰寫一些常見案例的 .NET 程式碼。 本文說明的案例包括建立和刪除佇列,以及新增、讀取和刪除佇列訊息。
預估完成時間: 45 分鐘
必要條件
什麼是佇列儲存體?
Azure 佇列儲存體是一項儲存大量訊息的服務,全球任何地方都可利用 HTTP 或 HTTPS 並透過驗證的呼叫來存取這些訊息。 單一佇列訊息的大小上限為 64 KB,而一個佇列可以包含數百萬個訊息,以儲存體帳戶的總容量為限。 佇列儲存體通常用來建立要以非同步方式處理的待處理項目。
佇列服務概念
Azure 佇列服務包含下列元件:
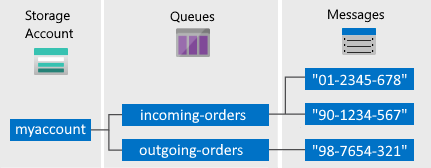
儲存體帳戶: 一律透過儲存體帳戶來存取 Azure 儲存體。 如需儲存體帳戶的詳細資訊,請參閱儲存體帳戶概觀。
佇列: 佇列包含一組訊息。 所有訊息都必須放在佇列中。 請注意,佇列名稱必須是小寫。 如需為佇列命名的詳細資訊,請參閱 為佇列和中繼資料命名。
訊息: 大小上限為 64 KB 的訊息 (任何格式)。 訊息可保留在佇列中的時間上限為 7 天。 如需版本 2017-07-29 或更新版本,最大存留時間可以是任何正數,或是表示訊息未過期的 -1。 如果省略此參數,則預設存留時間為 7 天。
URL 格式:您可以使用以下 URL 格式來定址佇列:http://
<storage account>.queue.core.windows.net/<queue>下列 URL 可定址圖中的佇列:
http://myaccount.queue.core.windows.net/incoming-orders
建立 Azure 儲存體帳戶
建立您第一個 Azure 儲存體帳戶最簡單的方法,就是使用 Azure 入口網站。 若要深入了解,請參閱 建立儲存體帳戶。
您也可以使用 Azure PowerShell、Azure CLI,或 Azure Storage Resource Provider for .NET 來建立 Azure 儲存體帳戶。
如果您不想此時在 Azure 中建立儲存體帳戶,也可以使用 Azure 儲存體模擬器在本機環境中執行並測試您的程式碼。 如需詳細資訊,請參閱使用 Azure 模擬器進行本機 Azure 儲存體開發。
設定開發環境
接下來,在 Visual Studio 中設定您的開發環境,以便您開始嘗試本指南中的程式碼範例。
建立 Windows 主控台應用程式專案
在 Visual Studio 中,建立新的 Windows 主控台應用程式。 下列步驟說明如何在 Visual Studio 2019 中建立主控台應用程式。 這些步驟類似其他 Visual Studio 版本中的步驟。
- 選取 [檔案]>[新增]>[專案]
- 選取 [平台] > [Windows]
- 選取 主控台應用程式 (.NET Framework)
- 選取 [下一步]
- 在 [專案名稱] 欄位中,輸入應用程式的名稱
- 選取 [建立]
本教學課程中的所有程式碼範例均可新增至您主控台應用程式的 Program.cs 檔案中的 Main() 方法。
您可以在任何類型的 .NET 應用程式 (包括 Azure 雲端服務或 Web 應用程式和桌面與行動應用程式) 中使用 Azure 儲存體用戶端程式庫。 在本指南中,為求簡化,我們會使用主控台應用程式。
使用 NuGet 來安裝必要的封裝
您必須參考專案中的下列四個套件,才能完成本教學課程:
- 適用於 .NET 的 Azure.Core 程式庫:此套件提供新式 .NET Azure SDK 用戶端程式庫的共用基本概念、抽象概念和協助程式。
- 適用於 .NET 的 Azure.Storage.Common 用戶端程式庫:此套件提供其他 Azure 儲存體用戶端程式庫所共用的基礎結構。
- 適用於 .NET 的 Azure.Storage.Queues 用戶端程式庫:此套件可以與 Azure 佇列儲存體搭配運作,以儲存可由用戶端所存取的訊息。
- 適用於 .NET 的 System.Configuration.ConfigurationManager 程式庫:此套件提供對用戶端應用程式的組態檔存取權。
您可以使用 NuGet 來取得這些套件。 請遵循下列步驟:
- 在 [方案總管] 中以滑鼠右鍵按一下專案,然後選擇 [管理 NuGet 套件]。
- 選取 [瀏覽]
- 在線上搜尋
Azure.Storage.Queues,然後選取 [安裝] 以安裝 Azure 儲存體用戶端程式庫及其相依項目。 也會安裝 Azure.Storage.Common 和 Azure.Core 程式庫,這些是佇列程式庫的相依項目。 - 在線上搜尋
System.Configuration.ConfigurationManager,然後選取 [安裝] 來安裝 Configuration Manager。
決定您的目標環境
有兩個環境選項可供您執行本指南中的範例︰
- 您可以對雲端中的 Azure 儲存體帳戶執行您的程式碼。
- 您可以對 Azurite 儲存體模擬器執行您的程式碼。 Azurite 是模擬雲端中 Azure 儲存體帳戶的本機環境。 Azurite 是一個免費選項,在開發您的應用程式時可用於測試和偵錯您的程式碼。 模擬器會使用已知的帳戶和金鑰。 如需詳細資訊,請參閱使用 Azurite 模擬器進行本機 Azure 儲存體開發和測試。
注意
您可以選擇以儲存體模擬器為目標,以避免產生與 Azure 儲存體相關聯的任何費用。 不過,如果您選擇以雲端中的 Azure 儲存體帳戶為目標,則執行本教學課程的費用可以忽略不計。
取得您的儲存體連接字串
適用於 .NET 的 Azure 儲存體用戶端程式庫可支援使用儲存體連接字串,來設定存取儲存服務時所需的端點與認證。 如需詳細資訊,請參閱管理儲存體帳戶存取金鑰。
從 Azure 入口網站複製您的認證
範例程式碼需要授與對您儲存體帳戶的存取權。 若要進行授權,您必須以連接字串的形式為應用程式提供您的儲存體帳戶認證。 若要檢視您的儲存體帳戶認證:
瀏覽至 Azure 入口網站。
找出您的儲存體帳戶。
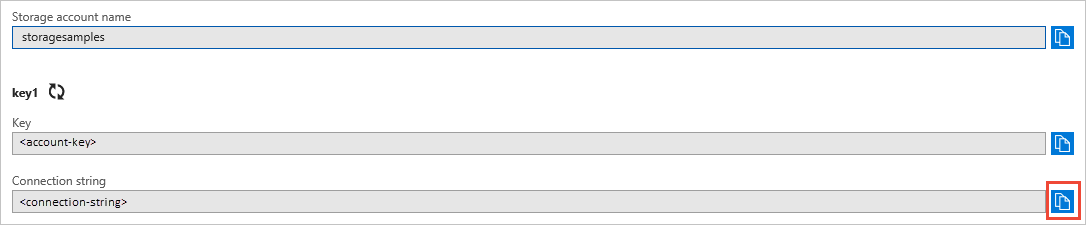
在儲存體帳戶概觀的 [設定] 區段中,選取 [存取金鑰]。 您的帳戶存取金鑰隨即出現,此外也會顯示每個金鑰的完整連接字串。
尋找 [金鑰1] 下方的 [連接字串] 值,然後按一下 [複製] 按鈕來複製連接字串。 在下一個步驟中,您會將連接字串值新增至環境變數。
如需有關連接字串的詳細資訊,請參閱設定 Azure 儲存體的連接字串。
注意
儲存體帳戶金鑰很類似儲存體帳戶的根密碼。 請務必小心保護您的儲存體帳戶金鑰。 請避免轉發給其他使用者、進行硬式編碼,或將它儲存在其他人可以存取的純文字檔案。 如果您認為金鑰可能遭到破解,請使用 Azure 入口網站重新產生金鑰。
在組態檔中維護儲存體連接字串是最佳方式。 若要設定連接字串,請從 Visual Studio 中的 [方案總管] 開啟 app.config 檔案。 如這裡所示,新增 <appSettings> 元素的內容。 將 connection-string 取代為您從入口網站中儲存體帳戶複製的值:
<configuration>
    <startup>
        <supportedRuntime version="v4.0" sku=".NETFramework,Version=v4.7.2" />
    </startup>
    <appSettings>
        <add key="StorageConnectionString" value="connection-string" />
    </appSettings>
</configuration>
例如,組態設定會如下顯示:
<add key="StorageConnectionString" value="DefaultEndpointsProtocol=https;AccountName=storagesample;AccountKey=GMuzNHjlB3S9itqZJHHCnRkrokLkcSyW7yK9BRbGp0ENePunLPwBgpxV1Z/pVo9zpem/2xSHXkMqTHHLcx8XRA==EndpointSuffix=core.windows.net" />
若要以 Azurite 儲存體模擬器為目標,您可以使用對應到已知帳戶名稱和金鑰的捷徑。 在此情況下,您的連接字串設定會是︰
<add key="StorageConnectionString" value="UseDevelopmentStorage=true" />
新增 using 指示詞
將下列 using 指示詞新增至 Program.cs 檔案的開頭處:
using System; // Namespace for Console output
using System.Configuration; // Namespace for ConfigurationManager
using System.Threading.Tasks; // Namespace for Task
using Azure.Identity;
using Azure.Storage.Queues; // Namespace for Queue storage types
using Azure.Storage.Queues.Models; // Namespace for PeekedMessage
建立佇列儲存體用戶端
QueueClient 類別可讓您擷取佇列儲存體中儲存的佇列。 以下是建立服務用戶端的其中一種方式:
//-------------------------------------------------
// Create the queue service client
//-------------------------------------------------
public void CreateQueueClient(string queueName)
{
    // Get the connection string from app settings
    string connectionString = ConfigurationManager.AppSettings["StorageConnectionString"];

    // Instantiate a QueueClient which will be used to create and manipulate the queue
    QueueClient queueClient = new QueueClient(connectionString, queueName);
}
秘訣
您使用 QueueClient 類別傳送的訊息,必須採用可以包含在以 UTF-8 編碼的 XML 要求中的格式。 您可以選擇性地將 MessageEncoding 選項設定為 Base64 來處理不符合規範的訊息。
您現在可以開始撰寫程式碼,以讀取佇列儲存體的資料並將資料寫入其中。
建立佇列
此範例顯示如何建立佇列:
//-------------------------------------------------
// Create a message queue
//-------------------------------------------------
public bool CreateQueue(string queueName)
{
    try
    {
        // Get the connection string from app settings
        string connectionString = ConfigurationManager.AppSettings["StorageConnectionString"];

        // Instantiate a QueueClient which will be used to create and manipulate the queue
        QueueClient queueClient = new QueueClient(connectionString, queueName);

        // Create the queue
        queueClient.CreateIfNotExists();

        if (queueClient.Exists())
        {
            Console.WriteLine($"Queue created: '{queueClient.Name}'");
            return true;
        }
        else
        {
            Console.WriteLine($"Make sure the Azurite storage emulator running and try again.");
            return false;
        }
    }
    catch (Exception ex)
    {
        Console.WriteLine($"Exception: {ex.Message}\n\n");
        Console.WriteLine($"Make sure the Azurite storage emulator running and try again.");
        return false;
    }
}
將訊息插入佇列
若要將訊息插入現有佇列中,請呼叫 SendMessage 方法。 訊息可為字串 (UTF-8 格式) 或位元組陣列。 下列程式碼會建立佇列 (如果不存在) 並插入訊息:
//-------------------------------------------------
// Insert a message into a queue
//-------------------------------------------------
public void InsertMessage(string queueName, string message)
{
    // Get the connection string from app settings
    string connectionString = ConfigurationManager.AppSettings["StorageConnectionString"];

    // Instantiate a QueueClient which will be used to create and manipulate the queue
    QueueClient queueClient = new QueueClient(connectionString, queueName);

    // Create the queue if it doesn't already exist
    queueClient.CreateIfNotExists();

    if (queueClient.Exists())
    {
        // Send a message to the queue
        queueClient.SendMessage(message);
    }

    Console.WriteLine($"Inserted: {message}");
}
查看下一個訊息
透過呼叫 PeekMessages 方法,您可以在佇列中查看訊息,而不需要將其從佇列中移除。 如果您未傳遞 maxMessages 參數的值,則預設值是查看一則訊息。
//-------------------------------------------------
// Peek at a message in the queue
//-------------------------------------------------
public void PeekMessage(string queueName)
{
    // Get the connection string from app settings
    string connectionString = ConfigurationManager.AppSettings["StorageConnectionString"];

    // Instantiate a QueueClient which will be used to manipulate the queue
    QueueClient queueClient = new QueueClient(connectionString, queueName);

    if (queueClient.Exists())
    {
        // Peek at the next message
        PeekedMessage[] peekedMessage = queueClient.PeekMessages();

        // Display the message
        Console.WriteLine($"Peeked message: '{peekedMessage[0].Body}'");
    }
}
變更佇列訊息的內容
佇列中的訊息內容可就地變更。 若訊息代表工作任務,則可使用此特徵來更新工作任務的狀態。 下列程式碼會使用新內容更新佇列訊息,並將可見度逾時設定延長 60 秒。 這可儲存與訊息相關的工作狀態,並提供用戶端多一分鐘的時間繼續處理訊息。 您可以使用此技巧來追蹤佇列訊息上的多步驟工作流程,如果因為硬體或軟體故障而導致某個處理步驟失敗也無需從頭開始。 通常,您也會保留重試計數,如果訊息重試超過 n 次,您會將它刪除。 這麼做可防止每次處理時便觸發應用程式錯誤的訊息。
//-------------------------------------------------
// Update an existing message in the queue
//-------------------------------------------------
public void UpdateMessage(string queueName)
{
    // Get the connection string from app settings
    string connectionString = ConfigurationManager.AppSettings["StorageConnectionString"];

    // Instantiate a QueueClient which will be used to manipulate the queue
    QueueClient queueClient = new QueueClient(connectionString, queueName);

    if (queueClient.Exists())
    {
        // Get the message from the queue
        QueueMessage[] message = queueClient.ReceiveMessages();

        // Update the message contents
        queueClient.UpdateMessage(message[0].MessageId,
                message[0].PopReceipt,
                "Updated contents",
                TimeSpan.FromSeconds(60.0)  // Make it invisible for another 60 seconds
            );
    }
}
將下一個訊息清除佇列
您可以使用兩個步驟從佇列中將訊息清除佇列。 呼叫 ReceiveMessages 時,您會取得佇列中的下一個訊息。 從 ReceiveMessages 傳回的訊息,對於從此佇列讀取訊息的任何其他程式碼而言,將會是不可見的。 依預設,此訊息會隱藏 30 秒。 若要完成移除佇列訊息,您也必須呼叫 DeleteMessage。 這個刪除訊息的兩步驟流程可確保當程式碼因硬體或軟體故障而無法處理訊息時,程式碼的其他執行個體可取得相同訊息並再試一次。 您的程式碼會在處理完訊息之後立即呼叫 DeleteMessage。
//-------------------------------------------------
// Process and remove a message from the queue
//-------------------------------------------------
public void DequeueMessage(string queueName)
{
    // Get the connection string from app settings
    string connectionString = ConfigurationManager.AppSettings["StorageConnectionString"];

    // Instantiate a QueueClient which will be used to manipulate the queue
    QueueClient queueClient = new QueueClient(connectionString, queueName);

    if (queueClient.Exists())
    {
        // Get the next message
        QueueMessage[] retrievedMessage = queueClient.ReceiveMessages();

        // Process (i.e. print) the message in less than 30 seconds
        Console.WriteLine($"Dequeued message: '{retrievedMessage[0].Body}'");

        // Delete the message
        queueClient.DeleteMessage(retrievedMessage[0].MessageId, retrievedMessage[0].PopReceipt);
    }
}
搭配通用佇列儲存體 API 使用 Async-Await 模式
這個範例示範如何搭配通用佇列儲存體 API 使用 Async-Await 模式。 此範例會呼叫每個指定方法的非同步版本,就像每個方法的 Async 尾碼所指示的一樣。 使用非同步方法時,Async-Await 模式會暫停本機執行,直到呼叫完成為止。 這種行為可讓目前的執行緒執行其他工作,有助於避免發生效能瓶頸並提升應用程式的整體回應。 如需如何在 .NET 中使用 Async-Await 模式的詳細資訊,請參閱 Async 和 Await (C# 和 Visual Basic)
//-------------------------------------------------
// Perform queue operations asynchronously
//-------------------------------------------------
public async Task QueueAsync(string queueName)
{
    // Get the connection string from app settings
    string connectionString = ConfigurationManager.AppSettings["StorageConnectionString"];

    // Instantiate a QueueClient which will be used to manipulate the queue
    QueueClient queueClient = new QueueClient(connectionString, queueName);

    // Create the queue if it doesn't already exist
    await queueClient.CreateIfNotExistsAsync();

    if (await queueClient.ExistsAsync())
    {
        Console.WriteLine($"Queue '{queueClient.Name}' created");
    }
    else
    {
        Console.WriteLine($"Queue '{queueClient.Name}' exists");
    }

    // Async enqueue the message
    await queueClient.SendMessageAsync("Hello, World");
    Console.WriteLine($"Message added");

    // Async receive the message
    QueueMessage[] retrievedMessage = await queueClient.ReceiveMessagesAsync();
    Console.WriteLine($"Retrieved message with content '{retrievedMessage[0].Body}'");

    // Async delete the message
    await queueClient.DeleteMessageAsync(retrievedMessage[0].MessageId, retrievedMessage[0].PopReceipt);
    Console.WriteLine($"Deleted message: '{retrievedMessage[0].Body}'");

    // Async delete the queue
    await queueClient.DeleteAsync();
    Console.WriteLine($"Deleted queue: '{queueClient.Name}'");
}
使用其他選項來清除佇列訊息
自訂從佇列中擷取訊息的方法有兩種。 首先,您可以取得一批訊息 (最多 32 個)。 其次,您可以設定較長或較短的可見度逾時,讓您的程式碼有較長或較短的時間可以完全處理每個訊息。
下列程式碼範例將使用 ReceiveMessages 方法,在一次呼叫中取得 20 個訊息。 接著其會使用 foreach 迴圈處理每個訊息。 它也會將可見度逾時設定為每個訊息五分鐘。 請注意,系統會針對所有訊息同時開始計時 5 分鐘,所以從呼叫 ReceiveMessages 開始的 5 分鐘後,任何尚未刪除的訊息都會重新出現。
//-----------------------------------------------------
// Process and remove multiple messages from the queue
//-----------------------------------------------------
public void DequeueMessages(string queueName)
{
    // Get the connection string from app settings
    string connectionString = ConfigurationManager.AppSettings["StorageConnectionString"];

    // Instantiate a QueueClient which will be used to manipulate the queue
    QueueClient queueClient = new QueueClient(connectionString, queueName);

    if (queueClient.Exists())
    {
        // Receive and process 20 messages
        QueueMessage[] receivedMessages = queueClient.ReceiveMessages(20, TimeSpan.FromMinutes(5));

        foreach (QueueMessage message in receivedMessages)
        {
            // Process (i.e. print) the messages in less than 5 minutes
            Console.WriteLine($"De-queued message: '{message.Body}'");

            // Delete the message
            queueClient.DeleteMessage(message.MessageId, message.PopReceipt);
        }
    }
}
取得佇列長度
您可以取得佇列中的估計訊息數目。
GetProperties 方法會傳回佇列屬性,包括訊息計數。
ApproximateMessagesCount 屬性包含佇列中大約的訊息數目。 此數目不會低於佇列中實際的訊息數目,而會更高。
//-----------------------------------------------------
// Get the approximate number of messages in the queue
//-----------------------------------------------------
public void GetQueueLength(string queueName)
{
    // Get the connection string from app settings
    string connectionString = ConfigurationManager.AppSettings["StorageConnectionString"];

    // Instantiate a QueueClient which will be used to manipulate the queue
    QueueClient queueClient = new QueueClient(connectionString, queueName);

    if (queueClient.Exists())
    {
        QueueProperties properties = queueClient.GetProperties();

        // Retrieve the cached approximate message count.
        int cachedMessagesCount = properties.ApproximateMessagesCount;

        // Display number of messages.
        Console.WriteLine($"Number of messages in queue: {cachedMessagesCount}");
    }
}
刪除佇列
若要刪除佇列和其所含的所有訊息,請在佇列物件上呼叫 Delete 方法。
//-------------------------------------------------
// Delete the queue
//-------------------------------------------------
public void DeleteQueue(string queueName)
{
    // Get the connection string from app settings
    string connectionString = ConfigurationManager.AppSettings["StorageConnectionString"];

    // Instantiate a QueueClient which will be used to manipulate the queue
    QueueClient queueClient = new QueueClient(connectionString, queueName);

    if (queueClient.Exists())
    {
        // Delete the queue
        queueClient.Delete();
    }

    Console.WriteLine($"Queue deleted: '{queueClient.Name}'");
}
下一步
了解佇列儲存體的基礎概念之後,請參考下列連結以了解有關更複雜的儲存工作。
- 如需可用 API 的完整詳細資訊,請檢視佇列儲存體參考文件:
- 如需了解 Azure 中的其他資料儲存選項,請檢視更多功能指南。
- 以 .NET 開始使用 Azure 表格儲存體以儲存結構化資料。
- 以 .NET 開始使用 Azure Blob 儲存體以儲存非結構化資料。
- 使用 .NET (C#) 連接到 SQL Database 以儲存關聯式資料。
- 了解如何使用 Azure WebJobs SDK,來簡化您撰寫以使用 Azure 儲存體的程式碼。
如需使用已淘汰 .NET 11.x 版 SDK 的相關程式碼範例,請參閱 使用 .NET 11.x 版的程式碼範例。